以上就是给各位分享不推荐使用ConnectivityManagergetNetworkInfo(int),其中也会对不推荐使用超声雾化吸入的药物是进行解释,同时本文还将给你拓展(4)Switching
以上就是给各位分享不推荐使用 ConnectivityManager getNetworkInfo(int),其中也会对不推荐使用超声雾化吸入的药物是进行解释,同时本文还将给你拓展(4) Switching Performance – Connecting Linux Network Namespaces、AbstractMultiTenantConnectionProvider 在 LocalContainerEntityManagerFactoryBean 中配置、AFNetworking 全解析之RechabilityManager、android ConnectivityManager类的分析等相关知识,如果能碰巧解决你现在面临的问题,别忘了关注本站,现在开始吧!
本文目录一览:- 不推荐使用 ConnectivityManager getNetworkInfo(int)(不推荐使用超声雾化吸入的药物是)
- (4) Switching Performance – Connecting Linux Network Namespaces
- AbstractMultiTenantConnectionProvider 在 LocalContainerEntityManagerFactoryBean 中配置
- AFNetworking 全解析之RechabilityManager
- android ConnectivityManager类的分析
(不推荐使用超声雾化吸入的药物是)")
不推荐使用 ConnectivityManager getNetworkInfo(int)(不推荐使用超声雾化吸入的药物是)
使用 compileSdkVersion 23 ,但试图支持早至 9。
getNetworkInfo(int)在
23
中已弃用。建议使用getAllNetworks()andgetNetworkInfo(Network)代替。但是,这两者都需要至少
API 21。
是否有我们可以在支持包中使用的类来帮助解决这个问题?
答案1
小编典典您可以使用:
获取活动网络信息();
ConnectivityManager cm = (ConnectivityManager) context.getSystemService(Context.CONNECTIVITY_SERVICE);NetworkInfo activeNetwork = cm.getActiveNetworkInfo();if (activeNetwork != null) { // connected to the internet if (activeNetwork.getType() == ConnectivityManager.TYPE_WIFI) { // connected to wifi } else if (activeNetwork.getType() == ConnectivityManager.TYPE_MOBILE) { // connected to mobile data }} else { // not connected to the internet}或者在开关盒中
ConnectivityManager cm = (ConnectivityManager) context.getSystemService(Context.CONNECTIVITY_SERVICE);NetworkInfo activeNetwork = cm.getActiveNetworkInfo();if (activeNetwork != null) { // connected to the internet switch (activeNetwork.getType()) { case ConnectivityManager.TYPE_WIFI: // connected to wifi break; case ConnectivityManager.TYPE_MOBILE: // connected to mobile data break; default: break; }} else { // not connected to the internet} Switching Performance – Connecting Linux Network Namespaces")
(4) Switching Performance – Connecting Linux Network Namespaces
http://www.opencloudblog.com/?p=96
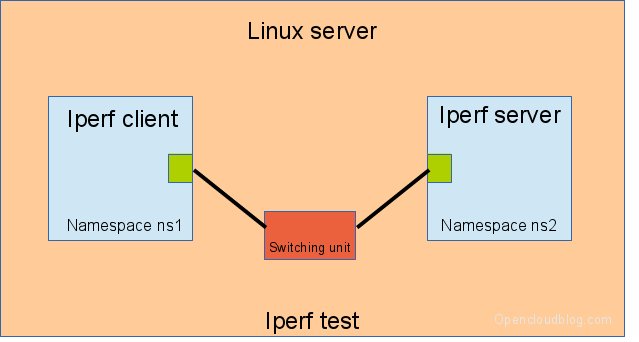
In a previous article I have shown several solutions to interconnect Linux network namespaces (http://www.opencloudblog.com). Four different solutions can be used – but which is the best solution with respect to performance and resource usage? This is quite interesting when you are running Openstack Networking Neutron together with the Openvswitch. The systems used to run these tests have Ubuntu 13.04 installed with kernel 3.8.0.30 and Openvswitch 1.9. The MTU of the IP interfaces is kept at the default value of 1500.
A test script has been used to collect performance numbers. The test script creates 2 namespaces, connects these namespaces using different Linux network technologies and measures the throughput and CPU usage using the software iperf. The iperf server process is started in one namespace, the client iperf process is started in the other namespace.
IMPORTANT REMARK: The results are confusing – a deeper analysis shows, that the configuration of the virtual network devices has a major impact on the performance. The settings TSO and GSO play a very important role when using network devices. I’ll show an analyses in an upcoming article.
Perf test setup
Single CPU (i5-2550 [3.3 GHz]) Kernel 3.13
The test system has the Desktop CPU i5-2500 CPU @ 3.30GHz providing 4 CPU cores and 32 GByte DDR3-10600 RAM providing around 160 GBit/s RAM throughput.
The test system is running Ubuntu 14.04 with kernel 3.13.0.24 and Openvswitch 2.0.1
The results are shown in the table below. iperf has been running with one, two and four threads. At the end the limiting factor is CPU usage. The column „efficiency“ is defined as network throughput in GBit/s per Gigahertz available on CPUs.
| Switch and Connection type | no of iperf threads |
throughput [GBit/s] tso gso lro gro on |
Efficiency [GBit/s per CPUGHZ] |
throughput [GBit/s] tso gso lro gro off |
|---|---|---|---|---|
| one veth pair | 1 | 37.8 | 6.3 | 3.7 |
| one veth pair | 2 | 65.0 | 5.4 | 7.9 |
| one veth pair | 4 | 54.6 | 4.4 | 11.0 |
| one veth pair | 8 | 40.7 | 3.2 | 11.4 |
| one veth pair | 16 | 37.4 | 2.9 | 11.7 |
| linuxbridge with two veth pairs | 1 | 33.3 | 5.5 | 2.7 |
| linuxbridge with two veth pairs | 2 | 54.3 | 4.4 | 5.6 |
| linuxbridge with two veth pairs | 4 | 43.9 | 3.4 | 6.9 |
| linuxbridge with two veth pairs | 8 | 32.1 | 2.5 | 7.9 |
| linuxbridge with two veth pairs | 16 | 34.0 | 2.6 | 7.9 |
| openvswitch with two veth pairs | 1 | 35.0 | 5.9 | 3.2 |
| openvswitch with two veth pairs | 2 | 51.5 | 4.2 | 6.7 |
| openvswitch with two veth pairs | 4 | 47.3 | 3.8 | 8.7 |
| openvswitch with two veth pairs | 8 | 36.0 | 2.8 | 7.5 |
| openvswitch with two veth pairs | 16 | 36.5 | 2.8 | 9.4 |
| openvswitch with two internal ovs ports | 1 | 37.0 | 6.2 | 3.3 |
| openvswitch with two internal ovs ports | 2 | 65.6 | 5.5 | 6.4 |
| openvswitch with two internal ovs ports | 4 | 74.3 | 5.7 | 6.3 |
| openvswitch with two interval ovs ports | 8 | 74.3 | 5.7 | 10.9 |
| openvswitch with two internal ovs ports | 16 | 73.4 | 5.6 | 12.6 |
The numbers show an drastic effect, if TSO … are switches off. TSO perfformes the segmentation at the NIC level. In this software NIC only environment no segmentation is done by the NIC, the large packets (average 40 kBytes) are sent to the other side as one packet. The guiding factor is the packet packet rate.
Single CPU (i5-2550 [3.3 GHz]) Kernel 3.8
The test system is running Ubuntu 13.04 with kernel 3.8.0.30 and Openvswitch 1.9 .
The results are shown in the table below. iperf has been running with one, two and four threads. At the end the limiting factor is CPU usage. The column „efficiency“ is defined as network throughput in GBit/s per Gigahertz available on CPUs.
| Switch and Connection type | no of iperf threads |
throughput [GBit/s] |
Efficiency [GBit/s per CPUGHZ] |
|---|---|---|---|
| one veth pair | 1 | 7.4 | 1.21 |
| one veth pair | 2 | 13.5 | 1.15 |
| one veth pair | 4 | 14.2 | 1.14 |
| one veth pair | 8 | 15.3 | 1.17 |
| one veth pair | 16 | 14.0 | 1.06 |
| linuxbridge with two veth pairs | 1 | 3.9 | 0.62 |
| linuxbridge with two veth pairs | 2 | 8.5 | 0.70 |
| linuxbridge with two veth pairs | 4 | 8.8 | 0.69 |
| linuxbridge with two veth pairs | 8 | 9.5 | 0.72 |
| linuxbridge with two veth pairs | 16 | 9.1 | 0.69 |
| openvswitch with two veth pairs | 1 | 4.5 | 0.80 |
| openvswitch with two veth pairs | 2 | 9.7 | 0.82 |
| openvswitch with two veth pairs | 4 | 10.7 | 0.85 |
| openvswitch with two veth pairs | 8 | 11.3 | 0.86 |
| openvswitch with two veth pairs | 16 | 10.7 | 0.81 |
| openvswitch with two internal ovs ports | 1 | 41.9 | 6.91 |
| openvswitch with two internal ovs ports | 2 | 69.1 | 5.63 |
| openvswitch with two internal ovs ports | 4 | 75.5 | 5.74 |
| openvswitch with two interval ovs ports | 8 | 67.0 | 5.08 |
| openvswitch with two internal ovs ports | 16 | 74.3 | 5.63 |
The results show a huge differences. The openvswitch using two internal openvswitch ports has the best throughput and the best efficiency.
The short summary is:
- Use Openvswitch and Openvswitch internal ports – in the case of one iperf thread you get 6.9 GBit/s throughput per CPU Ghz. But this solution does not provide any iptables rules on the link.
- If you like the old linuxbridge and veth pairs you get only 0.7 GBit/s per CPU Ghz throughput. With this solution it’s possible to filter the traffic on the network namespace links.
The table shows some interesting effects, e.g.:
- The test with the ovs and two ovs ports shows a drop in performance between 4 and 16 threads. The CPU analysis shows, that in the case of 8 threads, the CPU time used by softirqs doubled in comparison to the case of 4 threads. The softirq time used by 16 threads is the same as for 4 threads.
Openstack
If you are running Openstack Neutron, you should use the Openvswitch. Avoid linuxbridges. When connecting the Neutron networking Router/LBaas/DHCP namespaces DO NOT enable ovs_use_veth.

AbstractMultiTenantConnectionProvider 在 LocalContainerEntityManagerFactoryBean 中配置
@Credo 你好,想跟你请教个问题:
我也在做多租户系统开发,想问你一下,你有 AbstractMultiTenantConnectionProvider 在 LocalContainerEntityManagerFactoryBean 中配置的例子么?多谢

AFNetworking 全解析之RechabilityManager
一个关于AFNetworking的系列
AFNetworking框架是一个使用非常广泛的框架,现在几乎已经占据了iOS开发中网络层的主导地位,成为行业标准。究其原因,其代码本身的质量非常高,设计非常优秀,使用也非常方便。
我们平时在网上看到的大多是如何来使用AFNetworking的文章,少有剖析实现原理。虽然我们没有必要再造一个轮子,但是理解轮子如何制造有助于提高我们自身的能力,也可以避免在使用过程中踩坑。
这个系列的文章是鄙人学习AF框架过程中所作的笔记,分享出来以供大家观摩批评,如有理解不到位的地方,欢迎大家批评指正。
AFNetworkReachabilityManager的作用
AFNetworkReachabilityManager是af库中用于临测网络状态,网络状态变化的工具。使用这个工具可以得到当前系统是否可接入网络,使用什么方式接入网络(Wifi or WWAN?),以及在网络发生变化时得到相应的通知。
定义的几种网络状态
manager对象的networkReachabilityStatus 属性标记当前的网络状态,有以下几种选项
AFNetworkReachabilityStatusUnknown 未知的网络状态
AFNetworkReachabilityStatusNotReachable 当前处于一个无网的状态,或者被禁用的网络状态
AFNetworkReachabilityStatusReachableViaWWAN 当前网络使用移动
AFNetworkReachabilityStatusReachableViaWiFi 当前使用wifi连接网络
使用AF查看当前网络状态
可以使用提供的单例,也可以自己创建一个新的实例来检查网络
[[AFNetworkReachabilityManager sharedManager] startMonitoring];
[[AFNetworkReachabilityManager sharedManager] setReachabilityStatusChangeBlock:^(AFNetworkReachabilityStatus status) {
    NSString *statusstr = AFStringFromNetworkReachabilityStatus(status);
    NSLog(@"network : %@", statusstr);
}];
注意,如果启动时就去获取,这时获得的状态可能会为Unknown
[[AFNetworkReachabilityManager sharedManager] startMonitoring];
NSString *statusstr = AFStringFromNetworkReachabilityStatus(status);
// statusstr = @"unknown...";
RechabilityManager类中所涉及的知识点
这里列举中间所用到的不常见的知识点,诸如单例、静态函数等不在此列
SCNetworkReachabilityRef
SCNetworkReachabilityRef 是SystemConfiguration framework中的一个类,专门用于检测和关注网络状态,使用C语言风格进行编程。
主要的函数有以下几个:SCNetworkRechabilityRef SCNetworkReachabilityCreateWithAddress(CFAllocatorRef allocator, const struct sockaddr *address) 创建该对象的引用,第一个参数可以使用NULL或者kCFAllocatorDefault,第二个参数为目标地址,如果传入0.0.0.0则用于查询本机网络状态。
在我们的AFReachabilityManager中,+manager方法使用了这个函数来创建一个默认的,用于0.0.0.0的连接器。
struct sockaddr_in address;
bzero(&address, sizeof(address));
address.sin_len = sizeof(address);
address.sin_family = AF_INET;
[self managerForAddress:&address];
Boolean SCNetworkReachabilityGetFlags(SCNetworkReachabilityRef target, SCNetworkReachabilityFlags *flags) 用于获取网络的连接状态值,如果获取成功,返回TRUE。
Boolean SCNetworkReachabilityScheduleWithRunLoop    (
                    SCNetworkReachabilityRef    target,
                    CFRunLoopRef            runLoop,
                    CFStringRef            runLoopMode
                    )

Boolean SCNetworkReachabilityUnscheduleFromRunLoop    (
                    SCNetworkReachabilityRef    target,
                    CFRunLoopRef            runLoop,
                    CFStringRef            runLoopMode
                    )
Boolean SCNetworkReachabilitySetCallback        (
                    SCNetworkReachabilityRef            target,
                    SCNetworkReachabilityCallBack    __nullable    callout,
                    SCNetworkReachabilityContext    * __nullable    context
                    )
这三个函数用于将screachability对象加入到runloop中,在网络状态发生变化时触发回调获得相应的通知。
要使用这三个方法,首先必须先配置好回调函数
static void AFNetworkReachabilityCallback(SCNetworkReachabilityRef __unused target, SCNetworkReachabilityFlags flags, void *info) {
    AFPostReachabilityStatusChange(flags, (__bridge AFNetworkReachabilityStatusBlock)info);
}
然后使用 SCNetworkReachabilitySetCallback(self.networkReachability, AFNetworkReachabilityCallback, &context); 函数将callback添加到screachability中。
注意这里还有一个context参数 SCNetworkReachabilityContext context = {0, (__bridge void *)callback, AFNetworkReachabilityRetainCallback, AFNetworkReachabilityReleaseCallback, NULL};
callback是一个已定义好的block对象,而retainCallback和releaseCallback则决定了之后如何对这个callback对象进行引用。
这个callback将在随后的回调触发中,被传入到AFNetworkReachabilityCallback函数中被使用。
KeyValueAffecting
KVO机制我们在平时的开发中也经常会有使用,不过比较深入和偏门一些的知识点则不是那么的常见了,在AFReachabilityManager中使用到了一个方法
+(NSSet )keyPathsForValuesAffectingValueForKey:(NSString )key,这个方法决定了哪些key值会影响到其他的key值的observing。
比如
+(NSSet *)keyPathsForValuesAffectingValueForKey:(NSString *)key {
    if ([key isEqualToString:@"reachable"] || [key isEqualToString:@"reachableViaWWAN"] || [key isEqualToString:@"reachableViaWiFi"]) {
        return [NSSet setWithObject:@"networkReachabilityStatus"];
    }

    return [super keyPathsForValuesAffectingValueForKey:key];
}
这个方法指明,如果networkReachabilityStatus属性被改变,那么reachable、reachableViaWWAN、reachableViaWiFi这几个属性的观察者也会收到通知。
UML结构图

调用流程图
这个流程图标识了AFReachability使用SCNetworkReachability并产生回调的过程

AFReachability的缺点
通过上面的流程图,大家可以看到,AFReachability对象创建以后并不会立即去取status,而是在startMonitor方法以后,才会去取得SC中的status,
即使如此,源代码中也是使用异步的方法去取的SCReachability的status,所以我们在使用startMonitor方法之后,并不能稳定的取得当前的网络状态,而是必需在回调中才能得到。
dispatch_async(dispatch_get_global_queue(DISPATCH_QUEUE_PRIORITY_BACKGROUND, 0),^{
        SCNetworkReachabilityFlags flags;
        if (SCNetworkReachabilityGetFlags(self.networkReachability, &flags)) {
            AFPostReachabilityStatusChange(flags, callback);
        }
    });

android ConnectivityManager类的分析
ConnectivityManage
主要功能是对网络连接的信息判断
上次服务代码 frameworks/base/services/core/java/com/android/server/ConnectivityService
我们今天的关于不推荐使用 ConnectivityManager getNetworkInfo(int)和不推荐使用超声雾化吸入的药物是的分享已经告一段落,感谢您的关注,如果您想了解更多关于(4) Switching Performance – Connecting Linux Network Namespaces、AbstractMultiTenantConnectionProvider 在 LocalContainerEntityManagerFactoryBean 中配置、AFNetworking 全解析之RechabilityManager、android ConnectivityManager类的分析的相关信息,请在本站查询。
本文标签:


![[转帖]Ubuntu 安装 Wine方法(ubuntu如何安装wine)](https://www.gvkun.com/zb_users/cache/thumbs/4c83df0e2303284d68480d1b1378581d-180-120-1.jpg)

