本文将分享AngularCLI简介的详细内容,并且还将对angular/cli进行详尽解释,此外,我们还将为大家带来关于1.利用AngularCLI创建Angular脚手架工程、Ag-grid和Ang
本文将分享Angular CLI简介的详细内容,并且还将对angular/cli进行详尽解释,此外,我们还将为大家带来关于1.利用Angular CLI创建Angular脚手架工程、Ag-grid和Angular2使用angular-cli、Angular 2 + 折腾记 :(1)初识Angular-cli[官方脚手架]及脱坑要点、Angular 2 – 具有依赖性的angular-cli管道测试的相关知识,希望对你有所帮助。
本文目录一览:- Angular CLI简介(angular/cli)
- 1.利用Angular CLI创建Angular脚手架工程
- Ag-grid和Angular2使用angular-cli
- Angular 2 + 折腾记 :(1)初识Angular-cli[官方脚手架]及脱坑要点
- Angular 2 – 具有依赖性的angular-cli管道测试
")
Angular CLI简介(angular/cli)
一、简介
Angular CLI用于简单,快速构建Angular2项目,只要掌握几行命令就能扣减前端架构。依赖于NodeJs和npm。
Git 源代码地址:https://github.com/angular/angular-cli
AngularCLI主要特性
1 Angular CLI 可以快速搭建框架,创建module,service,class,directive等;
2 具有webpack的功能,代码分割(code splitting),按需加载;
3 代码打包压缩;
4 模块测试,端到端测试;
5 热部署,有改动立即重新编译,不用刷新浏览器;而且速度很快
6 有开发环境,测试环境,生产环境的配置,不用自己操心;
7 sass,less的预编译Angular CLI都会自动识别后缀来编译;
8 typescript的配置,Angular CLI在创建应用时都可以自己配置;
9 在创建好的工程也可以做一些个性化的配置,webpack的具体配置还不支持,未来可能会增加;
10 Angular CLI创建的工程结构是最佳实践,生产可用;
安装 Angular CLI
windows: npm install -g angular-cli
macOS: sudo npm install -g angular-cli
注:安装的时间可能会比较长。
安装成功后,使用 ng help 命令,验证安装是否成功
二、使用 Angular CLI创建Angular项目
1.创建项目:
ng new project_name(项目名称)
注:安装时如果很慢,设置cnpm ,使用命令:
ng set --global packageManager=cnpm
注2:Installing packages ...加载模块依赖过程,可能也会相对慢一会儿。
2.启动项目
cd project_name
ng serve --open //编译运行名称
使用--open(或-o)参数可以自动打开浏览器并访问http://localhost:4200/。
运行成功,地址栏输入:http://localhost:4200/
运行结果页面如下:
尝试的修改一下app.component.ts中的文字,看看热部署是否马上生效?yes!it does!
3.ng 命令创建模块、类等
ng g module about
创建module,component,service,class
更多:
Ionic2 相关文档整理
Visual Studio Code v1.18发布
EF Linq字符串模糊查询整理

1.利用Angular CLI创建Angular脚手架工程
1.安装NPM
1.1.安装NodeJS
1.2.因为国内网络被墙,所以非常有必要安装cnpm(淘宝NPM,可以自行搜索)
2.安装Angular CLI
2.1.安装:
cnpm install -g @angular/cli
或者
npm install -g @angular/cli(未安装淘宝npm的情况下)
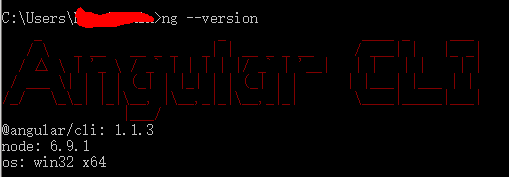
2.2.确认安装成功:
ng --version
正确安装的话,应该如下图所示:
2.3.将npm替换为cnpm作为Angular的包管理工具,加快项目创建速度,依然是为了规避网络被墙的问题,命令如下:
ng set --global packageManager=cnpm
3.创建你的第一个工程
3.1.当一切就绪以后,就可以创建第一个Angular工程了,命令如下:
ng new my-app
4.使用WebStorm&IDEA打开&运行项目
4.1.选中生成的目录,直接打开即可
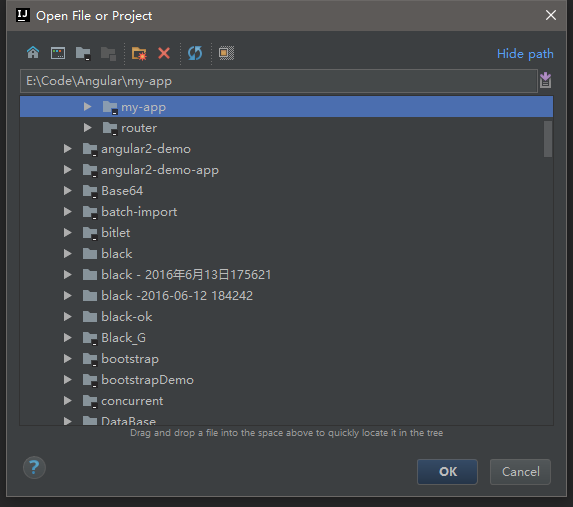
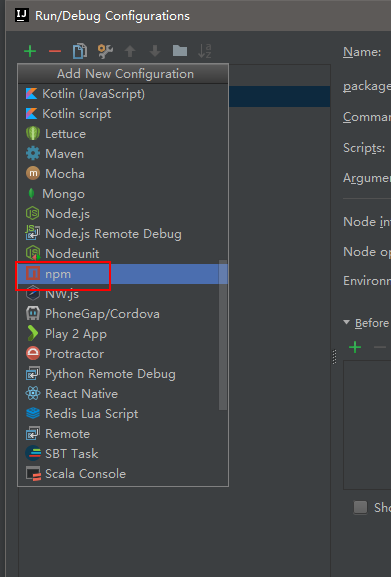
4.2.使用IDE运行项目
对于IDEA而言,可以根据如下截图操作

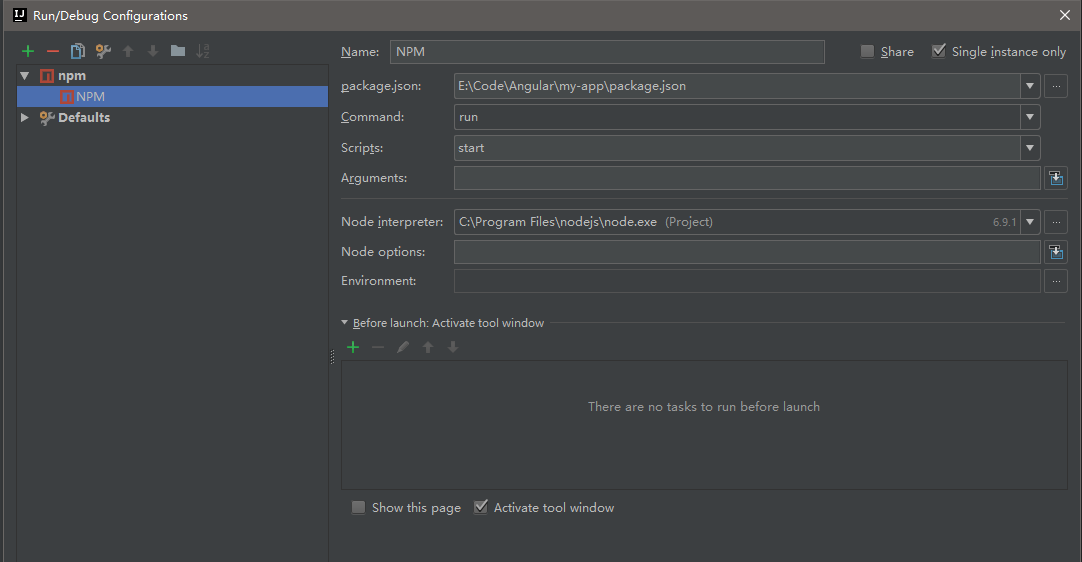
4.3.启动项目,等待100%后,在浏览器中打开:http://127.0.0.1:4200确认是否一切OK

5.创建第一个组件
ng g component navbar

Ag-grid和Angular2使用angular-cli
下面我将介绍我的运行方式,但我没有使用ag-grid-ng2.我不知道在angular-cli.json中引用ag-grid-ng2的位置.
我想逐步使用这样的东西:
我正在使用:
>节点:6.9.2
> NPM:4.0.5
>打字稿:2.1.4
> Angular CLI:1.0.0-beta.22-1
> Ag-Grid:7.0.2
我使用以下命令启动项目,并没有更改任何内容,除了下面将要描述的内容:
ng new MyProject
cd MyProject
npm install --save ag-grid
npm install --save ag-grid-ng2
然后我编辑了文件’angular-cli.json’:
"styles": [
  "../node_modules/ag-grid/dist/styles/ag-grid.css","../node_modules/ag-grid/dist/styles/theme-blue.css","styles.css"
],"scripts": [
  "../node_modules/ag-grid/dist/ag-grid.js"
],
文件:app.component.html
<h1>
  {{title}}
</h1>

<div  id="grid-test">
</div>
文件:app.component.ts
import { Component,OnInit } from '@angular/core';

import { Grid,GridOptions } from "ag-grid/main";

@Component({
  selector: 'app-root',templateUrl: './app.component.html',styleUrls: ['./app.component.css']
})
export class AppComponent implements OnInit {

  title = 'app works!';
  gridOptions: GridOptions;

  constructor() {
  }

  ngOnInit() {

    this.gridOptions = <GridOptions>{};
    this.gridOptions.columnDefs = [];
    this.gridOptions.columnDefs.push({ headerName: 'name',field: 'name' });

    var el = document.querySelector('#grid-test');
    new Grid(<HTMLdivelement>el,this.gridOptions);

    let data: any[] = [];
    data.push({name: 'Name 1'});
    data.push({name: 'Name 2'});
    data.push({name: 'Name 3'});
    this.gridOptions.api.setRowData(data);
  }

}
谢谢.
解决方法
> Ag Grid – Building with Angular CLI
> Ag Grid Angular Example
![Angular 2 + 折腾记 :(1)初识Angular-cli[官方脚手架]及脱坑要点](http://www.gvkun.com/zb_users/upload/2025/02/2ec33061-cc5b-4b76-b195-e004574f42951739669829051.jpg "Angular 2 + 折腾记 :(1)初识Angular-cli[官方脚手架]及脱坑要点")
Angular 2 + 折腾记 :(1)初识Angular-cli[官方脚手架]及脱坑要点
前言
这个系列的进度有些跳跃性,我尽量直白点解释,但是我不是官方文档,直入主题!!!!
什么是Angular-cli
简言之:就是NG团队自行维护的一个`脚手架`[内置单元测试及webpack2打包工具等] -- 这货前身是ember-cli;
官网:https://cli.angular.io/
Github: https://github.com/angular/angular-cli
npm: https://www.npmjs.com/package/angular-cli
我最早是从beta18开始用的,截止beta28.3 – 这个分支已经废弃,已经迁移,之前npm install angular-cli不推荐;
目前最新的是v1.0.0-rc.2;从旧版本到rc期间坑了太多次,每次升级各种酸爽;
rc2开始基本变化不大,可以直接拿来用了。。
安装之前
- window下:
- 安装
lts版本的nodejs[6.10.0] , Angular-cli中的node-sass不支持7.x,装不上的 - 装了visual studio 2015+及python2+ [node-sass及部分模块需要调用这两个依赖进行编译]
- 或者采用国内的cnpm安装,记得带版本号,有时候不带版本会安装
0.0.1版本,cnpm好像会把编译好node-sass装上,不用本地再次编译 – 亲测多次可用 - 或者安装
windows-build-tools:windows下的依赖库,再执行官方安装命令
- 安装
Linux下:
- nodejs控制推荐用
nvm来管理 :https://github.com/creationix/nvm - 先下载
nvm的脚本,用curl或者wget都行,前者有些不预装,后者基本都有
wget -qO- https://raw.githubusercontent.com/creationix/nvm/v0.33.1/install.sh | bashcurl -o- https://raw.githubusercontent.com/creationix/nvm/v0.33.1/install.sh | bash
- 记得重新读取bash的配置文件,因为脚本没法实时生效,用linux的
source命令一下子就搞定了
source ~/.bashrc: 意思就是重新加载当前用户的bash配置文件
nvm的命令不多,仔细看看文档哈,我们这里只需要稳定版本(lts)
nvm install --lts: 之后node怎么用就怎么用哈
- 其次,linux下推荐用
yarn替代npm,使用起来体验好很多,速度也快很多
# 下载公钥

curl -sS https://dl.yarnpkg.com/debian/pubkey.gpg | sudo apt-key add -


# 把源写进去源请求列表

echo "deb https://dl.yarnpkg.com/debian/ stable main" | sudo tee /etc/apt/sources.list.d/yarn.list


# 我用的是deepin !!!! 支持一下国产,挺好用哈~~~~

sudo apt-get update && sudo apt-get install yarn
- nodejs控制推荐用
开发工具这些就不扯了,我选择VSCODE
安装
npm install -g @angular/cli – 无压力过墙的孩子推荐
或者
cnpm install -g @angular/cli@v1.0.0-rc.2 – 国内淘宝源(cnpm的安装自行搜索)
或者
yarn add global @angular/cli – 看网络了。。。
初始化项目
angular-cli可以初始化ng2或者ng4的项目,我这里说2+;
脚手架的命令很多,我这里只列出最常用的;
- 新建东东
| 范围 | 命令 | 作用 |
|---|---|---|
| new | ng new new_project | 初始化新项目 |
| Component | ng g component my-new-component | 新建一个组件 |
| Directive | ng g directive my-new-directive | 新建一个指令 |
| Pipe | ng g pipe my-new-pipe | 新建一个管道 |
| Service | ng g service my-new-service | 新建一个服务 |
| Class | ng g class my-new-class | 新建一个类 |
| Interface | ng g interface my-new-interface | 新建一个接口 |
| Enum | ng g enum my-new-enum | 新建一个枚举 |
| Module | ng g module my-module | 新建一个模块 |
- 测试及检测
| 范围 | 命令 | 作用 |
|---|---|---|
| e2e | ng e2e | 跑自动化测试-自己写测试测试用例 |
| test | ng test | 跑单元测试 – 自己写 |
| lint | ng lint | 调用tslint跑整个项目,可以收获一堆警告和错误,–force –fix –format可以帮助格式和修复部分问题 |
- 启动
ng serve: 启动脚手架服务,默认端口4200;自定义什么看帮助额
- 打包
ng build: 开发模式打包,调用的环境文件是/src/environments/environments.ts;
ng build --prod: 以前调用aot打包还需要带上--aot,从beta31开始,--prod模式下自动调用aot打包,
调用的环境文件是/src/environments/environments.prod.ts
- 弹出配置文件(还原真实的配置文件)
我们看到的ng开头的命令都是二重封装的。。。有时候我们想要改源文件或者看到原始配置是怎么样的这货就用到了
ng eject : 这个东西的配置很多,可以弹出各种各样的源配置和文件
生成的目录树小解释
总结
- 这个脚手架支持sass和less,手动改下
.angular-cli.json就可以了。或者执行命令改下支持,,一个道理的 - 当然可以配置接口反向代理,但是我感觉不实用,推荐还是把不同接口的url写在不同的environment里面,用
Nginx做反向代理!ng serve --proxy-config proxy.conf.json;这个老版本是支持的,现在不知道支不支持
{
  "/": {
    "target": "http://localhost:3000","secure": false
  }
}

Angular 2 – 具有依赖性的angular-cli管道测试
管道代码是:
import { Pipe,PipeTransform } from "@angular/core";
import { DatePipe,JsonPipe } from "@angular/common";

@Pipe({name: 'dataTableFormat'})
export class DataTablePipe implements PipeTransform {

  // values with type 'json' are parsed to json. As a result,string values may be displayed with quotes ("<string>").
  // To avoid that,we remove these quotes with this regex
  private quotesExp: RegExp = /^\"|\"$/gi;

  constructor(private datePipe: DatePipe,private jsonPipe: JsonPipe) {
  }

  transform(value: string,type: string): string {
    switch (type) {
        case "date":
            return this.datePipe.transform(value,'short');
        case "json":
            return this.jsonPipe.transform(value).replace(this.quotesExp,"");
        default:
            return value;
    }
  }
}
和规范代码是:
import {Testbed} from "@angular/core/testing";
import {DataTablePipe} from "./data-table.pipe";
import {DatePipe,JsonPipe} from "@angular/common";

describe('DataTableFormat',() => {

    beforeEach(() => {
        Testbed.configureTestingModule({
            declarations: [ DataTablePipe ],providers: [
                DatePipe,JsonPipe
            ]
        });
    });

    it('sanity',() => {
        expect(true).toBeTruthy();
    });

    it('should transform ',() => {
        let fixture = Testbed.createComponent(DataTablePipe);
        let comp = fixture.componentInstance;
        let testDate:Date = new Date();
        let datePipe = fixture.debugElement.injector.get(DatePipe);

        expect(comp.transform(testDate.toString(),'date')).toBe(datePipe.transform(testDate));

    });
});
完整性测试通过,但真正的测试失败并出现错误:
Error: Cannot create the component DataTablePipe as it was not imported into the testing module!
    at Testbed.createComponent (webpack:///Users/sninio/dev/csp-ui-ng/~/@angular/core/bundles/core-testing.umd.js:1144:0 <- src/main/js/test.ts:6022:23)
    at Function.Testbed.createComponent (webpack:///Users/sninio/dev/csp-ui-ng/~/@angular/core/bundles/core-testing.umd.js:972:0 <- src/main/js/test.ts:5850:33)
    at Object.<anonymous> (webpack:///Users/sninio/dev/csp-ui-ng/src/main/js/app/pages/+platform/events/data-table/data-table.pipe.spec.ts:23:30 <- src/main/js/test.ts:14770:41)
    at ZoneDelegate.invoke (webpack:///Users/sninio/dev/csp-ui-ng/~/zone.js/dist/zone.js:203:0 <- src/main/js/test.ts:26741:28)
    at ProxyZonespec.onInvoke (webpack:///Users/sninio/dev/csp-ui-ng/~/zone.js/dist/proxy.js:72:0 <- src/main/js/test.ts:18285:39)
    at ZoneDelegate.invoke (webpack:///Users/sninio/dev/csp-ui-ng/~/zone.js/dist/zone.js:202:0 <- src/main/js/test.ts:26740:34)
    at Zone.run (webpack:///Users/sninio/dev/csp-ui-ng/~/zone.js/dist/zone.js:96:0 <- src/main/js/test.ts:26634:43)
    at Object.<anonymous> (webpack:///Users/sninio/dev/csp-ui-ng/~/zone.js/dist/jasmine-patch.js:91:27 <- src/main/js/test.ts:18021:50)
我确定这是我错过的一些配置,但由于某种原因,DataTablePipe没有导入测试模块……
有任何想法吗?
解决方法
import { inject } from '@angular/core/testing';

it('should transform ',inject([DatePipe,JsonPipe],(datePipe,jsonPipe) => {
  let pipe = new DataTablePipe(datePipe,jsonPipe);
  let testDate: Date = new Date();

  expect(pipe.transform(testDate.toString(),'date'))
      .toBe(datePipe.transform(testDate,'short'));
}));
关于Angular CLI简介和angular/cli的问题我们已经讲解完毕,感谢您的阅读,如果还想了解更多关于1.利用Angular CLI创建Angular脚手架工程、Ag-grid和Angular2使用angular-cli、Angular 2 + 折腾记 :(1)初识Angular-cli[官方脚手架]及脱坑要点、Angular 2 – 具有依赖性的angular-cli管道测试等相关内容,可以在本站寻找。
本文标签:


![[转帖]Ubuntu 安装 Wine方法(ubuntu如何安装wine)](https://www.gvkun.com/zb_users/cache/thumbs/4c83df0e2303284d68480d1b1378581d-180-120-1.jpg)

