在这篇文章中,我们将为您详细介绍AndroidStudio生成函数注释的实现方法的内容,并且讨论关于androidstudio怎么生成构造方法的相关问题。此外,我们还会涉及一些关于AndroidStu
在这篇文章中,我们将为您详细介绍Android Studio生成函数注释的实现方法的内容,并且讨论关于android studio怎么生成构造方法的相关问题。此外,我们还会涉及一些关于Android Studio javadoc 生成注释文档、Android Studio kotlin生成编辑类注释代码、Android Studio Update 1.0的Android注释错误、android studio xml文件实现添加注释的知识,以帮助您更全面地了解这个主题。
本文目录一览:- Android Studio生成函数注释的实现方法(android studio怎么生成构造方法)
- Android Studio javadoc 生成注释文档
- Android Studio kotlin生成编辑类注释代码
- Android Studio Update 1.0的Android注释错误
- android studio xml文件实现添加注释
")
Android Studio生成函数注释的实现方法(android studio怎么生成构造方法)
Android Studio生成函数注释的实现方法
1、函数名上输入
---> /**,然后回车,即自动生成基本注释(参数,返回等)

2、使用快捷键生成
---> 鼠标停留在函数体内,按下设置的快捷键即可生成基本注释
快捷键设置方法:在"Fix doc comment"上右键进行快捷键设置。

如有疑问请留言或者到本站社区交流讨论,感谢阅读,希望能帮助到大家,谢谢大家对本站的支持!

Android Studio javadoc 生成注释文档
相信大家刚开始写代码的时候就被前辈告知了要养成写注释的好习惯,今天我们来了解一下如何利用我们平时写的注释生成文档,一起来看看吧!
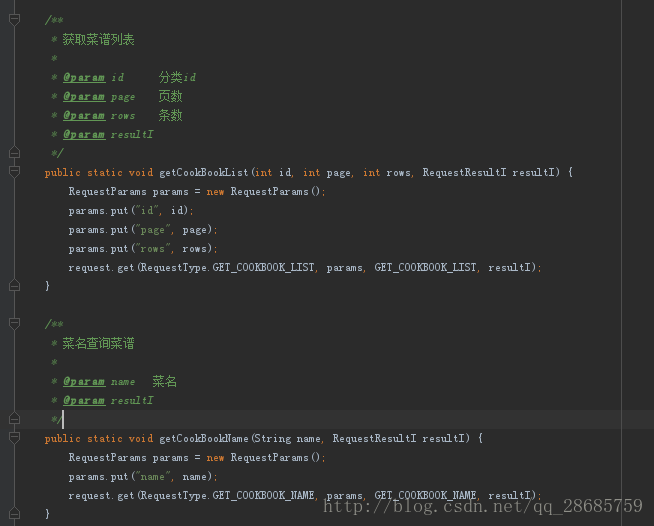
其实注释格式一般如下两种:
/*
*普通多行
*注释
*/
// 单行注释
而我们需要生成文档就必须是下面这种格式:
/**
*javadoc
*要求格式
*/
其实就是多了一个*号而已。
既然了解了注释的格式,那么我们就利用上面的注释来使用android studio生成javadoc:
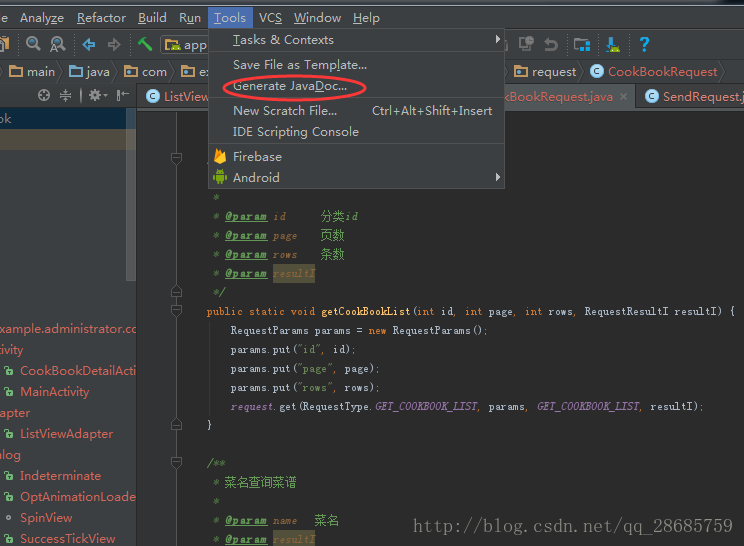
单击进入配置页面:
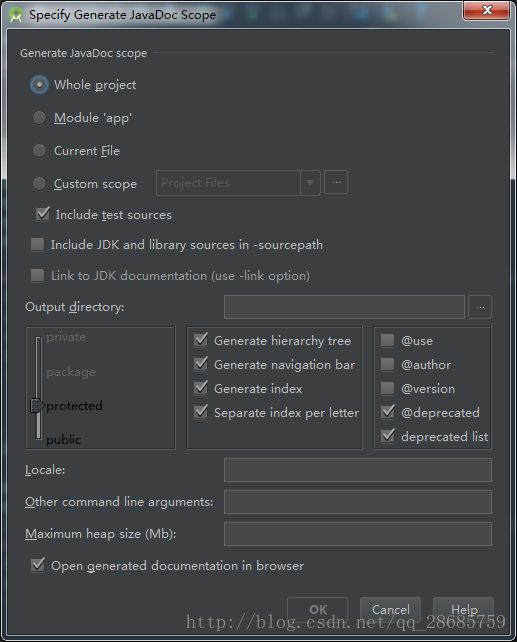
这里我主要讲以下几个地方:
首先在上面指定你需要生成文档的文件夹或文件;
然后是output directorys中指定输出文档的路径;
最后如果你注释中是中文就需要在Othere command line arguments中填写 -encoding utf-8 -charset utf-8 否则生成会失败并提示你“编码GBK的不可映射字符”,好了基本上流程就走完了,直接点击ok即可。
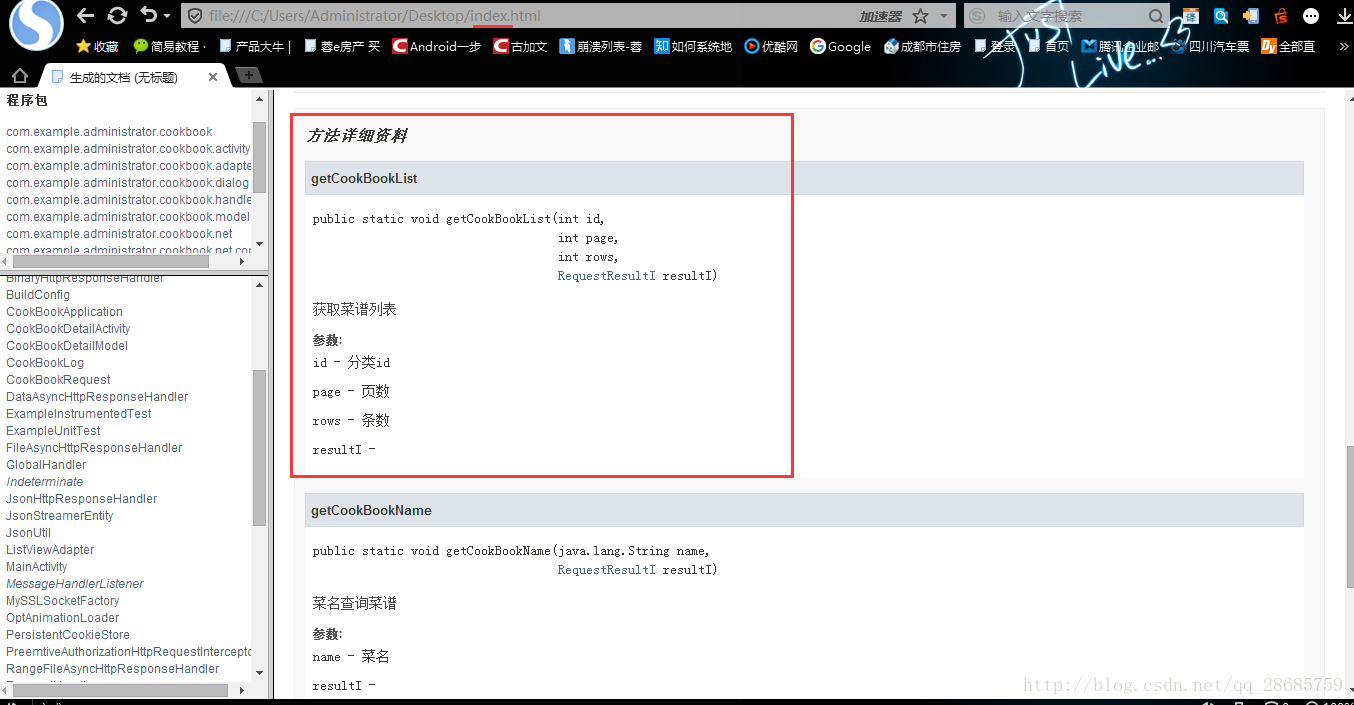
当你看到和我一样的界面那么你就成功了,我这里是生成了所有类的文档,如果没有自动打开网页,大家可以在我们指定的文档输出文件夹中找到index.html打开即可,好了本文就到此为止,希望对大家有用!

Android Studio kotlin生成编辑类注释代码
更新了AS 3.1.2之后,发现新建Kotlin类,类注释依然木有,没办法只有自己动手了。
方法很简单,编辑File Header就可以啦。

只需要编辑自己想要的模板就可以啦。
/**
* @Author ${USER}
* @Date ${DATE}-${TIME}
* @Email chrisSpringSmell@gmail.com
*/
支持的动态命令不多,只有一些简单的命令。
新建类效果:

补充知识:Android Studio javadoc 生成注释文档
相信大家刚开始写代码的时候就被前辈告知了要养成写注释的好习惯,今天我们来了解一下如何利用我们平时写的注释生成文档,一起来看看吧!

其实注释格式一般如下两种:
/*
*普通多行
*注释
*/
// 单行注释
而我们需要生成文档就必须是下面这种格式:
/**
*javadoc
*要求格式
*/
其实就是多了一个*号而已。
既然了解了注释的格式,那么我们就利用上面的注释来使用android studio生成javadoc:

单击进入配置页面:

这里我主要讲以下几个地方:
首先在上面指定你需要生成文档的文件夹或文件;
然后是output directorys中指定输出文档的路径;
最后如果你注释中是中文就需要在Othere command line arguments中填写 -encoding utf-8 -charset utf-8 否则生成会失败并提示你“编码GBK的不可映射字符”,好了基本上流程就走完了,直接点击ok即可。

当你看到和我一样的界面那么你就成功了,我这里是生成了所有类的文档,如果没有自动打开网页,大家可以在我们指定的文档输出文件夹中找到index.html打开即可,好了本文就到此为止,希望对大家有用,多多支持!
以上这篇Android Studio kotlin生成编辑类注释代码就是小编分享给大家的全部内容了,希望能给大家一个参考,也希望大家多多支持。
- Android kotlin使用注解实现防按钮连点功能的示例
- Android kotlin+协程+Room数据库的简单使用
- Android结合kotlin使用coroutine的方法实例
- 在Android中如何使用DataBinding详解(Kotlin)
- Android Studio / IDEA kotlin 显示 var 真实类型操作
- Android使用Kotlin实现多节点进度条
- Android studio 生成带Kotlin文档的实现方式
- Android Studio Kotlin代码和java代码相互转化实例
- 使用Android studio查看Kotlin的字节码教程
- Android studio kotlin代码格式化操作
- Android Studio使用Kotlin时,修改代码后运行不生效的解决方法
- Android中AndroidStudio&Kotlin安装到运行过程及常见问题汇总
- Kotlin + Flow 实现Android 应用初始化任务启动库

Android Studio Update 1.0的Android注释错误
当我构建项目时,它给了我这个错误:
Error:(40,0) Could not find property 'processResources' on com.android.build.gradle.internal.api.ApplicationVariantImpl_Decorated@54335f5.
这是我的项目的build.gradle文件:
// Top-level build file where you can add configuration options common to all sub-projects/modules.

buildscript {
    repositories {
        jcenter()
    }
    dependencies {
        classpath 'com.android.tools.build:gradle:1.0.0'


        // the latest version of the android-apt plugin https://bitbucket.org/hvisser/android-apt
        // https://stackoverflow.com/a/25939518
        classpath 'com.neenbedankt.gradle.plugins:android-apt:1.4'

        // NOTE: Do not place your application dependencies here; they belong
        // in the individual module build.gradle files
    }
}


allprojects {
    repositories {
        jcenter()
    }
}
这是我的应用程序的build.gradle文件:
apply plugin: 'com.android.application'
apply plugin: 'com.neenbedankt.android-apt'
// duhet per te shtuar librarine e android annotations ne ccompile time http://joostfunkekupper.com/useful-android-libraries/
// https://github.com/excilys/androidannotations/wiki/IntelliJIDEA
android {
    compileSdkVersion 21
    buildToolsversion '21.1.1'
    defaultConfig {
        applicationId "<my package>"
        minSdkVersion 14
        targetSdkVersion 21
        versionCode 1
        versionName "1.0"
    }
    buildTypes {
        release {
            minifyEnabled false
            proguardFiles getDefaultProguardFile('proguard-android.txt'),'proguard-rules.pro'
        }
    }
    productFlavors {
    }
}
// https://github.com/excilys/androidannotations/wiki/FAQ
// https://github.com/DayS/androidannotations/wiki/Building-Project-Gradle
//https://bitbucket.org/hvisser/android-apt
apt {// https://stackoverflow.com/a/26284580
    arguments {
        androidManifestFile variant.processResources.manifestFile
        // This should of course be your own package name
        resourcePackageName '<my package>'

    }
}

dependencies {
    compile filetree(dir: 'libs',include: ['*.jar'])
    compile 'com.actionbarsherlock:actionbarsherlock:4.4.0@aar'
    compile project(':FreeFlow')
    compile 'com.nostra13.universalimageloader:universal-image-loader:1.9.3'
    compile 'com.squareup.retrofit:retrofit:1.7.0'
    compile project(':library')
    compile project(':facebook')
    compile project(':viewPagerIndicatorLibrary')
    compile 'com.google.code.gson:gson:2.3'
    compile 'com.android.support:support-v4:21.0.0'
    compile 'com.neenbedankt.gradle.plugins:android-apt:1.4'
    apt 'org.androidannotations:androidannotations:3.2'
    compile 'org.androidannotations:androidannotations-api:3.2'
    compile 'com.squareup:otto:1.3.5'
    compile 'com.paymill.android:android-sdk:1.2.0'
}
40号错误发生在第二次build.gradle:
androidManifestFile variant.processResources.manifestFile
有没有人遇到这个问题,因为我找不到任何解决方案的这个问题
谢谢
解决方法
请参见 this wiki page获取build.gradle的示例.
注意这一行:
androidManifestFile variant.outputs[0].processResources.manifestFile

android studio xml文件实现添加注释
即只能在组件布局代码后,或者在组件的前面添加注释。
#注释格式:
Android的XML文件注释一般采用 <!--注释内容 -->的方式进行
在XML中,形如 <Button /> 的表示方式,其中“/>”的含义表示这个XML中没有内文,他是一个最小组成单元,也就是说他的中间不能包含其他任何< >的代码,所以在<Button />中间注释会出现错误
例如:
<?xml version="1.0" encoding="utf-8"?>
<!-- 在这里注释是没有问题的 -->
<TextView android:id="@+id/right_view1"
 android:background="@drawable/yellow" android:layout_width="fill_parent"
 android:layout_height="wrap_content" android:text="第二组第一项" />
<!-- 在这里注释也是没有问题的 -->
<TextView android:id="@+id/right_view2"
 android:background="@drawable/blue"
 android:layout_width="fill_parent"
 android:layout_height="wrap_content"
 android:layout_below="@id/right_view1" android:text="第二组第二项" />
补充知识:AndroidStudio XML文件之shape标签使用详解
前言:
shape标签可以很方便的得到一些矩形、圆、椭圆、圆环,可以实现圆角、渐变,shape编写出来的资源,可以作为View的背景,减少View使用图片作为背景图的概率,从而减少apk体积,相对比图片要更节省内存,shape标签编写出来的资源一般放到drawable文件目录下。
shape标签如何使用:
shpae标签的载体是一个xml文件,一个xml里同时只能存在一个shape标签,在shape标签里声明一些属性和嵌套标签组合起来,可以得到一个视图资源,利用该资源可以填充View的属性
示例:
<!-- 圆环-流线型渐变 -->
<shape xmlns:android="http://schemas.android.com/apk/res/android"
 android:shape="ring"
 android:innerRadius="20dp"
 android:thickness="6dp"
 android:useLevel="false">
 <size
 android:width="60dp"
 android:height="60dp" />

 <!--扫描渐变shape不能设置角度 #00ff0000 #80ff0000 ffff0000 -->
 <gradient
 android:centerColor="@color/colorCyan"
 android:endColor="@color/colorGreen"
 android:startColor="@color/colorCyanine"
 android:type="sweep" />
</shape>

shape标签里面的属性:
android:shape="XXX"
方型:rectangle,这也是默认的形状
圆型:oval
线形:line
环形:ring,上面示例就为环形
如果android:shape="ring",以下属性定义才会生效:
android:innerRadius : 环内部(中间的孔)的半径,以dp表示
android:innerRadiusRatio : 环内部的半径,浮点型。以环宽度的比率表示。此值被 android:innerRadius覆盖。默认值为 9。
android:thickness : 环的厚度,以dp表示。
android:thicknessRatio : 环的厚度,浮点型。表示为环宽度的比率。此值被 android:innerRadius 覆盖。默认值为 3。
android:useLevel : 布尔值。如果这用作 LevelListDrawable,则此值为“true”。这通常应为“false”,否则形状不会显示。
shape标签里可以嵌套的标签:
solid标签的属性: 用于填充形状的内部颜色
android:color"XX"
corners标签的属性:为形状产生圆角。仅当形状为矩形时适用
android:radius : 所有角都进行圆角处理半径,如果有单独设置某个角,单独设置的优先级最高
android:topLeftRadius : 左上圆角
android:topRightRadius : 右上圆角
android:bottomLeftRadius : 左下圆角
android:bottomRightRadius : 右下圆角
padding标签的属性:内边距
android:left : 左内边距
android:top : 上内边距
android:right :右内边距
android:bottom :下内边距
size标签的属性:形状的大小,可以通过这里来设置形状大小
android:height="XX"
android:width="XX"
stroke标签的属性: 描边,可以是实线也可以是虚线
android:width :线宽
android:color :颜色
android:dashWidth :虚线的间距。仅在设置了 android:dashGap 时有效
android:dashGap : 虚线的厚度大小。仅在设置了 android:dashWidth 时有效
gradient标签的属性:形状渐变颜色
android:angle : 整型。渐变的角度(度)。0 为从左到右,90 为从上到上。必须是 45 的倍数。默认值为 0。
android:centerX : 浮点型。渐变颜色的位置 (0 - 1.0)。
android:centerY : 浮点型。渐变颜色的位置 (0 - 1.0)。
android:centerColor :颜色。起始颜色与结束颜色之间的可选颜色
android:endColor : 颜色。结束颜色
android:gradientRadius : 浮点型。渐变的半径。仅在 android:type="radial" 时适用。
android:startColor : 颜色。起始颜色
android:type :要应用的渐变图案的类型
linear :线性渐变。这是默认值
radial : 径向渐变。起始颜色为中心颜色。
sweep : 流线型渐变
动态创建GradientDrawable并使用:
用shape标签定义的xml,最终都会转化为GradientDrawable对象,所以创建GradientDrawable对象和定义shape文件是一样的
//创建GradientDrawable
GradientDrawable gd = new GradientDrawable();
//对应形状
gd.setShape(GradientDrawable.RING);
//对应内部填充颜色
gd.setColor(Color.parseColor("#FFFF0000"));
//对应圆角
gd.setCornerRadius(5);
//对应xml的stroke
gd.setStroke(3, Color.parseColor("#FFFF0000"));
//给某个view使用
view.setBackgroundDrawable(gd);//如果要设置渐变颜色,方法一
int colors[] = { 0xff255779 , 0xff3e7492, 0xffa6c0cd };//分别为开始颜色,中间夜色,结束颜色
GradientDrawable gradientDrawable = new GradientDrawable(GradientDrawable.Orientation.TOP_BOTTOM, colors);
//设置中间渐变颜色的位置
gradientDrawable.setGradientCenter(1,2);
//渐变type
gradientDrawable.setGradientType(GradientDrawable.SWEEP_GRADIENT);
//动态改变GradientDrawable的属性
GradientDrawable drawable =(GradientDrawable)view.getBackground();
drawable.setColor(fillColor); // 设置填充色
drawable.setStroke(strokeWidth, strokeColor); // 设置边框宽度和颜色
drawable.setColors(colors); // 设置渐变颜色数组
把资源文件转换成Java对象:
GradientDrawable d = (GradientDrawable) context.getResources().getDrawable(R.drawable.loading_shape);
d.setColors(PublicLibraryStyle.colorThemes);
bindId(R.id.iv_loading).setBackground(d);
以上这篇android studio xml文件实现添加注释就是小编分享给大家的全部内容了,希望能给大家一个参考,也希望大家多多支持。
- 玩转Android之Drawable的使用
- Android自定义控件样式实例详解
- android 使用Xml文件定义Shape方式
关于Android Studio生成函数注释的实现方法和android studio怎么生成构造方法的问题我们已经讲解完毕,感谢您的阅读,如果还想了解更多关于Android Studio javadoc 生成注释文档、Android Studio kotlin生成编辑类注释代码、Android Studio Update 1.0的Android注释错误、android studio xml文件实现添加注释等相关内容,可以在本站寻找。
本文标签:


![[转帖]Ubuntu 安装 Wine方法(ubuntu如何安装wine)](https://www.gvkun.com/zb_users/cache/thumbs/4c83df0e2303284d68480d1b1378581d-180-120-1.jpg)

