本文的目的是介绍Android实现QQ登录功能的详细情况,特别关注android实现qq登录界面的相关信息。我们将通过专业的研究、有关数据的分析等多种方式,为您呈现一个全面的了解Android实现QQ
本文的目的是介绍Android实现QQ登录功能的详细情况,特别关注android实现qq登录界面的相关信息。我们将通过专业的研究、有关数据的分析等多种方式,为您呈现一个全面的了解Android实现QQ登录功能的机会,同时也不会遗漏关于Android QQ登录界面绘制代码、Android SQLite数据库连接实现登录功能、Android Studio实现QQ的注册登录和好友列表跳转、Android Studio实现登录功能案例讲解的知识。
本文目录一览:- Android实现QQ登录功能(android实现qq登录界面)
- Android QQ登录界面绘制代码
- Android SQLite数据库连接实现登录功能
- Android Studio实现QQ的注册登录和好友列表跳转
- Android Studio实现登录功能案例讲解
")
Android实现QQ登录功能(android实现qq登录界面)
QQ登录是一个非常简单的一个第三方应用,现在,我们就来实现一个QQ登录
首先下载两个jar包 这里上传不了jar包,所以可以到我的github中下载工程中libs中的两个jar包
网址:https://github.com/chengzexiang/qqlogin
打代码前,先把这些东西写上:
private static final String TAG = "MainActivity";
private static final String APP_ID = "1105602574";//官方获取的APPID
private Tencent mTencent;
private BaseUiListener miuiListener;
private UserInfo mUserInfo;
在AndroidManifest.xml中加入权限
<uses-permission android:name="android.permission.INTERNET" />
<uses-permission android:name="android.permission.ACCESS_NETWORK_STATE" />
 <!-- 注册SDKActivity -->
  <activity
   android:name="com.tencent.tauth.AuthActivity"
   android:launchMode="singleTask"
   android:noHistory="true" >
   <intent-filter>
    <action android:name="android.intent.action.VIEW" />
    <category android:name="android.intent.category.DEFAULT" />
    <category android:name="android.intent.category.broWSABLE" />
    <data android:scheme="tencent1105602574" /> <!-- 开放平台获取的APPID -->
   </intent-filter>
  </activity>
  <activity android:name="com.tencent.connect.common.AssistActivity"
   android:theme="@android:style/Theme.Translucent.NoTitleBar"
   android:screenorientation="portrait"/>
Xml布局中的
<?xml version="1.0" encoding="utf-8"?>
<LinearLayout
 xmlns:android="http://schemas.android.com/apk/res/android"
 xmlns:app="http://schemas.android.com/apk/res-auto"
 android:orientation="vertical"
 xmlns:tools="http://schemas.android.com/tools" android:layout_width="match_parent"
 android:layout_height="match_parent" tools:context="com.bwei.czx.czx0914qq.MainActivity">

 <Button
  android:layout_width="wrap_content"
  android:layout_height="wrap_content"
  android:text="登录"
  android:id="@+id/login"/>
 <TextView
  android:layout_width="match_parent"
  android:layout_height="wrap_content"
  android:id="@+id/name"/>
 <ImageView
  android:layout_width="100dp"
  android:layout_height="80dp"
  android:id="@+id/img"/>

</LinearLayout>
下面开始MainActivity中的代码
package com.bwei.czx.czx0914qq;

import android.content.Intent;
import android.os.Bundle;
import android.support.v7.app.AppCompatActivity;
import android.util.Log;
import android.view.View;
import android.widget.Button;
import android.widget.ImageView;
import android.widget.TextView;
import android.widget.Toast;

import com.nostra13.universalimageloader.core.ImageLoader;
import com.nostra13.universalimageloader.core.ImageLoaderConfiguration;
import com.tencent.connect.UserInfo;
import com.tencent.connect.auth.QQToken;
import com.tencent.connect.common.Constants;
import com.tencent.tauth.iuiListener;
import com.tencent.tauth.Tencent;
import com.tencent.tauth.UiError;

import org.json.JSONException;
import org.json.JSONObject;

public class MainActivity extends AppCompatActivity {
 private static final String TAG = "MainActivity";
 private static final String APP_ID = "1105602574";//官方获取的APPID
 private Tencent mTencent;
 private BaseUiListener miuiListener;
 private UserInfo mUserInfo;
 private Button login;
 private TextView name;
 private ImageView img;

 @Override
 protected void onCreate(Bundle savedInstanceState) {
  super.onCreate(savedInstanceState);
  setContentView(R.layout.activity_main);
  //传入参数APPID和全局Context上下文
  mTencent = Tencent.createInstance(APP_ID,MainActivity.this.getApplicationContext());

  initView();
  login.setonClickListener(new View.OnClickListener() {
   @Override
   public void onClick(View v) {
    miuiListener = new BaseUiListener();
    //all表示获取所有权限
    mTencent.login(MainActivity.this,"all",miuiListener);
    mUserInfo = new UserInfo(MainActivity.this,mTencent.getQQToken()); //获取用户信息
    mUserInfo.getUserInfo(miuiListener);
   }
  });
 }

 private void initView() {
  login = (Button) findViewById(R.id.login);
  name = (TextView) findViewById(R.id.name);
  img = (ImageView) findViewById(R.id.img);
 }
 /**
  * 自定义监听器实现iuiListener接口后,需要实现的3个方法
  * onComplete完成 onError错误 onCancel取消
  */
 private class BaseUiListener implements iuiListener {

  @Override
  public void onComplete(Object response) {
   Toast.makeText(MainActivity.this,"授权成功",Toast.LENGTH_SHORT).show();
   Log.e(TAG,"response:" + response);
   JSONObject obj = (JSONObject) response;
   try {
    String openID = obj.getString("openid");
    String accesstoken = obj.getString("access_token");
    String expires = obj.getString("expires_in");
    mTencent.setopenId(openID);
    mTencent.setAccesstoken(accesstoken,expires);
    QQToken qqToken = mTencent.getQQToken();
    mUserInfo = new UserInfo(getApplicationContext(),qqToken);
    mUserInfo.getUserInfo(new iuiListener() {
     @Override
     public void onComplete(Object response) {
      Log.e(TAG,"登录成功"+response.toString());
      if(response == null){
       return;
      }
      try {
       JSONObject jo = (JSONObject) response;
        Toast.makeText(MainActivity.this,"登录成功",Toast.LENGTH_LONG).show();
       String nickName = jo.getString("nickname");
       String figureurl_1= jo.getString("figureurl_1");
       name.setText(nickName);
       ImageLoaderConfiguration configuration = new ImageLoaderConfiguration.Builder(MainActivity.this).build();
       ImageLoader.getInstance().init(configuration);
       ImageLoader.getInstance().displayImage(figureurl_1,img);
      } catch (Exception e) {
       // Todo: handle exception
      }
     }

     @Override
     public void onError(UiError uiError) {
      Log.e(TAG,"登录失败"+uiError.toString());
     }

     @Override
     public void onCancel() {
      Log.e(TAG,"登录取消");

     }
    });
   } catch (JSONException e) {
    e.printstacktrace();
   }
  }

  @Override
  public void onError(UiError uiError) {
   Toast.makeText(MainActivity.this,"授权失败",Toast.LENGTH_SHORT).show();

  }

  @Override
  public void onCancel() {
   Toast.makeText(MainActivity.this,"授权取消",Toast.LENGTH_SHORT).show();

  }

 }
 @Override
 protected void onActivityResult(int requestCode,int resultCode,Intent data) {
  if(requestCode == Constants.REQUEST_LOGIN){
   Tencent.onActivityResultData(requestCode,resultCode,data,miuiListener);
  }
  super.onActivityResult(requestCode,data);
 }
}
下面为显示效果

qq登录完成!
以上就是本文的全部内容,希望对大家的学习有所帮助,也希望大家多多支持编程小技巧。

Android QQ登录界面绘制代码
先看看效果图:

首先过程中碰到的几个问题:
1、对 EditText 进行自定义背景
2、运行时自动 EditText 自动获得焦点
3、在获得焦点时即清空 hint ,而不是输入后清空
4、清空按钮的出现时机(在得到焦点并且有输入内容时)
--- 这些问题都有一一解决 ---
以下是代码:
布局 fragment_main(问题2)
<!-- android:focusable="true"
   android:focusableInTouchMode="true"
   把EditText默认的行为截断了! -->
<RelativeLayout xmlns:android="http://schemas.android.com/apk/res/android"
  xmlns:tools="http://schemas.android.com/tools"
  android:layout_width="match_parent"
  android:layout_height="match_parent"
  android:background="#ECEDF1"
  android:focusable="true"
  android:focusableInTouchMode="true"
  tools:context="com.dragon.android.qqlogin.MainActivity$PlaceholderFragment" >

  <ImageView
    android:id="@+id/imageView1"
    android:layout_width="70dp"
    android:layout_height="70dp"
    android:layout_centerHorizontal="true"
    android:layout_marginBottom="5dp"
    android:layout_marginTop="40dp"
    android:src="@drawable/a" />

  <EditText
    android:id="@+id/editText1"
    android:layout_width="match_parent"
    android:layout_height="wrap_content"
    android:layout_below="@id/imageView1"
    android:ems="10"
    android:background="@drawable/bg_edittext"
    android:inputType="textPersonName"
    android:gravity="center"
    android:textColor="#6A6A6C"
    android:hint="@string/inaccount"
    android:textColorHint="#ECEDDD">
  </EditText>

  <EditText
    android:id="@+id/editText2"
    android:layout_width="match_parent"
    android:layout_height="wrap_content"
    android:layout_below="@id/editText1"
    android:ems="10"
    android:background="@drawable/bg_edittext"
    android:inputType="textPassword"
    android:gravity="center"
    android:textColor="#6A6A6C"
    android:hint="@string/inpwd"
    android:textColorHint="#ECEDDD" >
  </EditText>

  <Button
    android:id="@+id/button1"
    android:layout_width="match_parent"
    android:layout_height="40dp"
    android:layout_below="@id/editText2"
    android:layout_marginLeft="20dp"
    android:layout_marginRight="20dp"
    android:layout_marginTop="10dp"
    android:background="@drawable/bg_button"
    android:text="@string/button"
    android:gravity="center"
    android:textColor="#F9FAFB" />

  <LinearLayout
    android:layout_width="match_parent"
    android:layout_height="wrap_content"
    android:layout_alignParentBottom="true"
    android:padding="10dp" >

    <TextView
      android:id="@+id/textView2"
      android:layout_width="wrap_content"
      android:layout_height="wrap_content"
      android:gravity="center"
      android:text="@string/faillogin"
      android:textColor="#0EB1EF" />

    <TextView
      android:id="@+id/textView3"
      android:layout_width="match_parent"
      android:layout_height="wrap_content"
      android:gravity="right"
      android:text="@string/regist"
      android:textColor="#0EB1EF" />
  </LinearLayout>

  <Button
    android:id="@+id/button2"
    android:layout_width="16dp"
    android:layout_height="16dp"
    android:layout_alignTop="@id/editText1"
    android:layout_marginTop="15dp"
    android:layout_alignParentRight="true"
    android:layout_marginRight="10dp"
    android:background="@drawable/clear"
    android:visibility="invisible" />

  <Button
    android:id="@+id/button3"
    android:layout_width="16dp"
    android:layout_height="16dp"
    android:layout_alignTop="@id/editText2"
    android:layout_marginTop="15dp"
    android:layout_alignLeft="@+id/button2"
    android:background="@drawable/clear"
    android:visibility="invisible" />

</RelativeLayout>
Button 和 EditText 的背景(问题1)
1.bg_button
<?xml version="1.0" encoding="utf-8"?>
<shape xmlns:android="http://schemas.android.com/apk/res/android" >

  <stroke android:width="1px" android:color="#00ACED" />

  <solid android:color="#00ACED" />

  <corners android:radius="10dp" />

</shape>
2.bg_edittext
<?xml version="1.0" encoding="utf-8"?>
<shape xmlns:android="http://schemas.android.com/apk/res/android" >

  <stroke android:width="1px" android:color="#ECEDF1" />

  <solid android:color="#F9FAFB" />

  <corners android:radius="10dp" />

  <padding
    android:top="10dp"
    android:bottom="10dp"/>

</shape>
3.strings
<?xml version="1.0" encoding="utf-8"?>
<resources>

  <string name="app_name">qqloginnew</string>
  <string name="action_settings">Settings</string>
  <string name="button">登录</string>
  <string name="faillogin">无法登录?</string>
  <string name="regist">新用户注册</string>
  <string name="inaccount">QQ号/手机号/邮箱</string>
  <string name="inpwd">密码</string>
  <string name="sucess">登录成功</string>

</resources>
MainActivity (问题3、4.....)
package com.dragon.android.qqloginnew;

import android.app.Activity;
import android.os.Bundle;
import android.text.Editable;
import android.text.TextWatcher;
import android.view.View;
import android.view.View.OnClickListener;
import android.view.View.OnFocuschangelistener;
import android.widget.Button;
import android.widget.EditText;

public class MainActivity extends Activity {
  private EditText editText1;
  private EditText editText2;
  // private Button button;
  private Button clearButton1;
  private Button clearButton2;

  // 得到strings中的属性
  // private String string2 = getResources().getString(R.string.inaccount);

  @Override
  protected void onCreate(Bundle savedInstanceState) {
    super.onCreate(savedInstanceState);
    setContentView(R.layout.fragment_main);

    editText1 = (EditText) findViewById(R.id.editText1);
    editText2 = (EditText) findViewById(R.id.editText2);

    // button = (Button) findViewById(R.id.button1);
    clearButton1 = (Button) findViewById(R.id.button2);
    clearButton2 = (Button) findViewById(R.id.button3);

    // 对EditText进行焦点变更监听
    editText1.setonFocuschangelistener(new EditTextListener(clearButton1));
    editText2.setonFocuschangelistener(new EditTextListener(clearButton2));

    // 对清空按钮进行点击监听
    clearButton1.setonClickListener(new ClearButtonListener());
    clearButton2.setonClickListener(new ClearButtonListener());

    // 对EditText进行编辑监听
    editText1.addTextChangedListener(new MyEditTextWatcher(editText1));
    editText2.addTextChangedListener(new MyEditTextWatcher(editText2));
  }

  /**
   * 对EditText的内容进行实时监控
   *
   * @author Auser
   *
   */
  class MyEditTextWatcher implements TextWatcher {
    private CharSequence temp;
    private EditText editText;

    public MyEditTextWatcher(EditText editText) {
      this.editText = editText;
    }

    @Override
    // int start开始的位置,int count被改变的旧内容数,int after改变后的内容数量
    public void beforeTextChanged(CharSequence s,int start,int count,int after) {
      // 这里的s表示改变之前的内容,通常start和count组合,可以在s中读取本次改变字段中被改变的内容。而after表示改变后新的内容的数量。
    }

    @Override
    // int start开始的位置,int before改变前的内容数量,int count新增量
    public void onTextChanged(CharSequence s,int before,int count) {
      // 这里的s表示改变之后的内容,通常start和count组合,可以在s中读取本次改变字段中新的内容。而before表示被改变的内容的数量。
      temp = s;
    }

    @Override
    // 表示最终内容
    public void afterTextChanged(Editable s) {
      if (temp.length() > 0) {
        // 设置清空按钮为可见
        if (editText == editText1) {
          clearButton1.setVisibility(View.VISIBLE);
        } else if (editText == editText2) {
          clearButton2.setVisibility(View.VISIBLE);
        }
      } else {
        // 设置清空按钮不可见
        if (editText == editText1) {
          clearButton1.setVisibility(View.INVISIBLE);
        } else if (editText == editText2) {
          clearButton2.setVisibility(View.INVISIBLE);
        }
      }
    }
  }

  /**
   * 清空按钮点击事件
   *
   * @author
   *
   */
  class ClearButtonListener implements OnClickListener {

    @Override
    public void onClick(View view) {
      if (view == clearButton1) {
        editText1.setText("");
      } else if (view == clearButton2) {
        editText2.setText("");
      }
    }
  }

  /**
   * 焦点变更事件
   *
   * @author Auser
   *
   */
  class EditTextListener implements OnFocuschangelistener {
    private Button clear;

    public EditTextListener(Button clear) {
      this.clear = clear;
    }

    @Override
    public void onFocusChange(View v,boolean hasFocus) {
      EditText textView = (EditText) v;
      String hint;
      if (hasFocus) {
        // 当获取焦点时如果内容不为空则清空按钮可见
        if (!textView.getText().toString().equals("")) {
          clear.setVisibility(View.VISIBLE);
        }
        // if (textView == editText2) {
        // // 设置输入格式为不可见的密码格式
        // textView.setInputType(InputType.TYPE_CLASS_TEXT
        // | InputType.TYPE_TEXT_VARIATION_PASSWORD);
        // }
        hint = textView.getHint().toString();
        // 给TextView添加额外的数据
        textView.setTag(hint);
        textView.setHint("");
      } else {
        // 当失去焦点时清空按钮不可见
        clear.setVisibility(View.INVISIBLE);
        // if (textView == editText2) {
        // // 设置输入格式为可见的密码格式
        // textView.setInputType(InputType.TYPE_CLASS_TEXT
        // | InputType.TYPE_TEXT_VARIATION_VISIBLE_PASSWORD);
        // }
        // 取出之前添加的额外数据
        hint = textView.getTag().toString();
        textView.setHint(hint);
      }
    }
  }
}
以上就是本文的全部内容,希望对大家的学习有所帮助,也希望大家多多支持编程小技巧。

Android SQLite数据库连接实现登录功能
本文实例为大家分享了Android SQLite数据库连接实现登录功能的具体代码,供大家参考,具体内容如下
布局文件
border.xml
<?xml version="1.0" encoding="utf-8"?>
<shape xmlns:android="http://schemas.android.com/apk/res/android" >

<!--  布局的背景颜色-->
<!--  <solid android:color="#FFFFFF" />-->

<!--  边框线的粗细和颜色-->
  <stroke
      android:width="0.01dp"
      android:color="#000" />

  <padding
      android:bottom="5dp"
      android:left="5dp"
      android:right="5dp"
      android:top="5dp" />

<!--  圆角-->
  <corners android:radius="5dp" />

</shape>
<?xml version="1.0" encoding="utf-8"?>
<android.support.constraint.ConstraintLayout
    xmlns:android="http://schemas.android.com/apk/res/android"
    xmlns:app="http://schemas.android.com/apk/res-auto"
    xmlns:tools="http://schemas.android.com/tools"
    android:layout_width="match_parent"
    android:layout_height="match_parent"
    tools:context=".MainActivity">
<LinearLayout

        android:padding="5dp"
        android:background="@drawable/border"
        android:orientation="vertical"
        android:layout_gravity="center_horizontal"
        android:layout_width="360dp"
        android:layout_height="112dp">


      <LinearLayout

          android:orientation="horizontal"
          android:layout_gravity="center_horizontal"
          android:layout_width="match_parent"
          android:layout_height="50dp">


        <ImageView
            android:layout_marginRight="15dp"
            android:layout_gravity="center_vertical"
            android:layout_width="30dp"
            android:layout_height="30dp" app:srcCompat="@drawable/usn" android:id="@+id/usn"/>

        <!-- android:background="@null" 去掉下划线        -->
        <EditText
            android:singleLine="true"
            android:background="@null"
            android:layout_width="match_parent"
            android:layout_height="match_parent"
            android:inputType="text"
            android:hint="用户名"
            android:ems="10"
            android:id="@+id/username"/>
      </LinearLayout>

      <!-- 水平线-->
      <View
          android:layout_height="0.5dip"
          android:background="#686868"
          android:layout_width="match_parent"/>
      <LinearLayout

          android:orientation="horizontal"
          android:layout_gravity="center_horizontal"
          android:layout_width="match_parent"
          android:layout_height="50dp">


        <ImageView
            android:layout_marginRight="15dp"
            android:layout_gravity="center_vertical"
            android:layout_width="30dp"
            android:layout_height="30dp" app:srcCompat="@drawable/pwd" android:id="@+id/密码"/>
        <EditText
            android:singleLine="true"
            android:background="@null"
            android:layout_width="match_parent"
            android:layout_height="match_parent"
            android:inputType="textPassword"
            android:hint="密码"
            android:ems="10"
            android:id="@+id/password"/>
      </LinearLayout>

    </LinearLayout>

    <Button
        android:layout_gravity="center_horizontal"
        android:background="#EF8D89"
        android:layout_marginTop="20dp"
        android:text="登  录"
        android:onClick="userLogin"
        android:layout_width="360dp"
        android:layout_height="wrap_content" android:id="@+id/login"/>

</android.support.constraint.ConstraintLayout>
MainActivity类
public class MainActivity extends AppCompatActivity implements View.OnClickListener{
  //访问数据库的类
  SQLiteDatabase db;

  //定义常量,作为消息的key
  public final static String MESSAGE_KEY="com.android2";

 @Override
  protected void onCreate(Bundle savedInstanceState) {

    super.onCreate(savedInstanceState);

    /**
     * (参数)1、context MainActivity
     * 2、name 数据库名
     * 3、
     * 4、版本号
     */
    final DatabaseHelper databaseHelper = new DatabaseHelper(this,"emis.db",null,2);

    //获得读取数据库权限
    db = databaseHelper.getReadableDatabase();
    setContentView(R.layout.activity_main);
  }
  /*响应*/
  private void userLogin() {
    EditText et1 = findViewById(R.id.username);
    String username = et1.getText().toString();
    EditText et2 = findViewById(R.id.password);
    String password = et2.getText().toString();

    //游标类Cursor 负责生成读写数据库的对象
    Cursor cursor = db.rawQuery("SELECT * FROM users WHERE username=? AND password=?",new String[]{username,password});

    //数据库中有此数据,登录成功
    if(cursor.getCount()>0){
      Intent intent = new Intent(this,ReceiveActivity.class);
      intent.putExtra(MESSAGE_KEY,username);
      startActivity(intent);
    }
    else{
      Toast.makeText(MainActivity.this,"用户名或密码错误!",Toast.LENGTH_SHORT).show();
    }


  }
}
ReceiveActivity类及布局
<?xml version="1.0" encoding="utf-8"?>
<LinearLayout
    xmlns:android="http://schemas.android.com/apk/res/android"
    xmlns:tools="http://schemas.android.com/tools"
    xmlns:app="http://schemas.android.com/apk/res-auto"
    android:layout_width="match_parent"
    android:layout_height="match_parent"
    tools:context=".ReceiveActivity"

>

  <TextView
      android:textSize="24dp"
      android:layout_gravity="center_vertical"
      android:id="@+id/output"
      android:layout_width="match_parent"
      android:layout_height="match_parent"
      />
</LinearLayout>
package com.android02;

import android.content.Intent;
import android.support.v7.app.AppCompatActivity;
import android.os.Bundle;
import android.widget.TextView;

public class ReceiveActivity extends AppCompatActivity {

  @Override
  protected void onCreate(Bundle savedInstanceState) {
    super.onCreate(savedInstanceState);
    setContentView(R.layout.activity_receive);

    //获取intent引用
    Intent intent = getIntent();

    //以MESSAGE_KEY获取获取编辑框文字
    String message = intent.getStringExtra(MainActivity.MESSAGE_KEY);

    //以id获取TextView
    TextView textView = findViewById(R.id.output);

    //显示message
    textView.setText("欢迎!"+message);


  }
}
测试:

以上就是本文的全部内容,希望对大家的学习有所帮助,也希望大家多多支持。
- Android实现点击图片上传SQLite数据库
- Android 通过SQLite数据库实现数据存储管理
- Android SQLite数据库加密的操作方法
- Android Studio连接SQLite数据库的登录注册实现
- Android中SQLite数据库知识点总结
- Android SQLite数据库进行查询优化的方法
- Android SharePreferences与数据库SQLite存储实现方法介绍

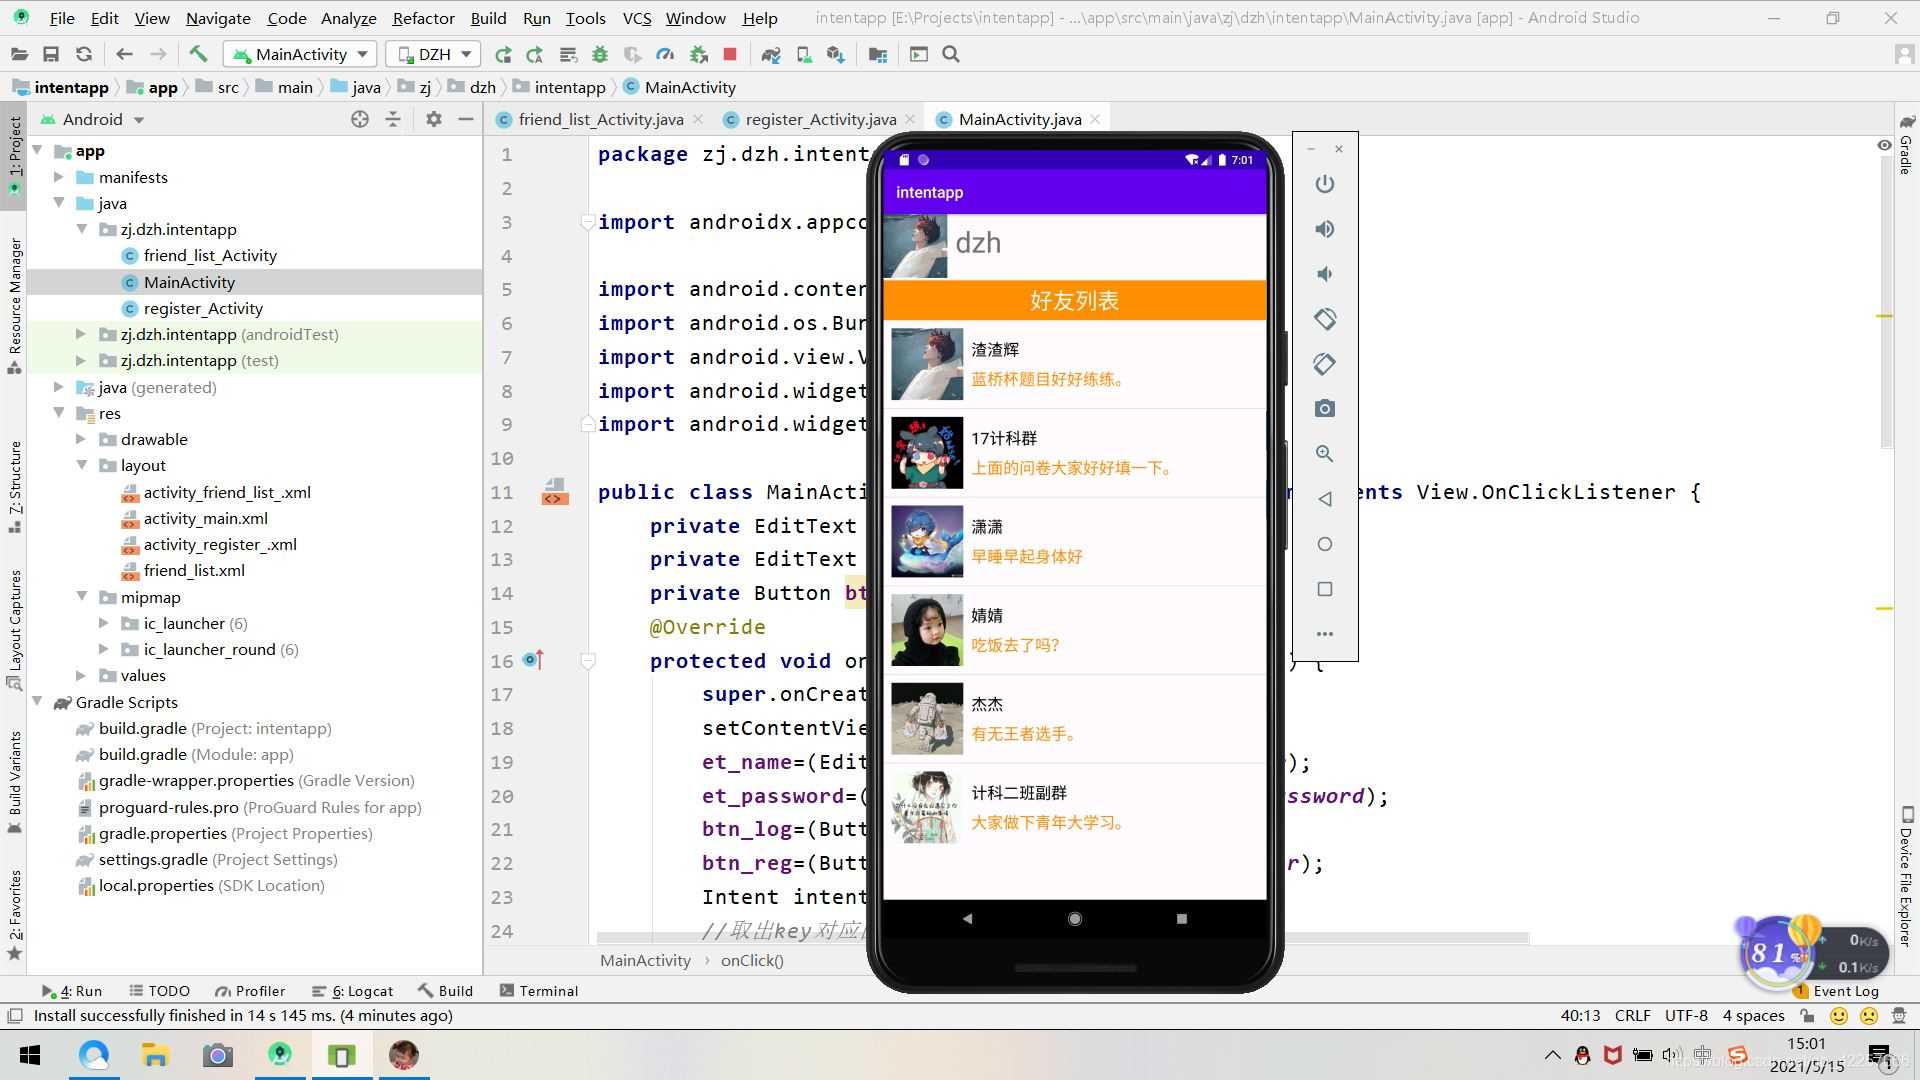
Android Studio实现QQ的注册登录和好友列表跳转
一、项目概述
本次项目主要包含了注册、登录和好友列表三个界面以及之间相互跳转。其中好友列表界面设计的很详细,有好友头像和消息内容。用户先点击注册按钮进入注册界面,输入完账号和密码后,点击注册,跳转到登录界面,这时候账号和密码也被传了过来,点击登录按钮进入好友列表界面,这时候用户名也被传递过来。
二、开发环境
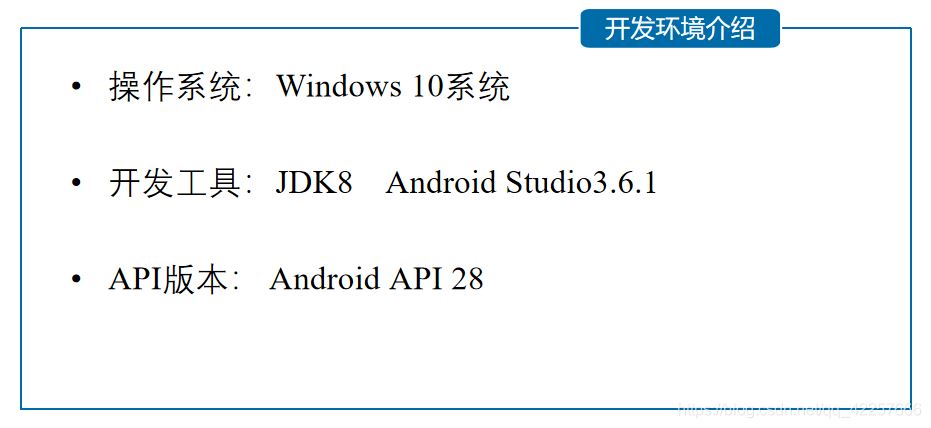
三、详细设计
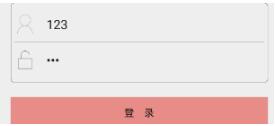
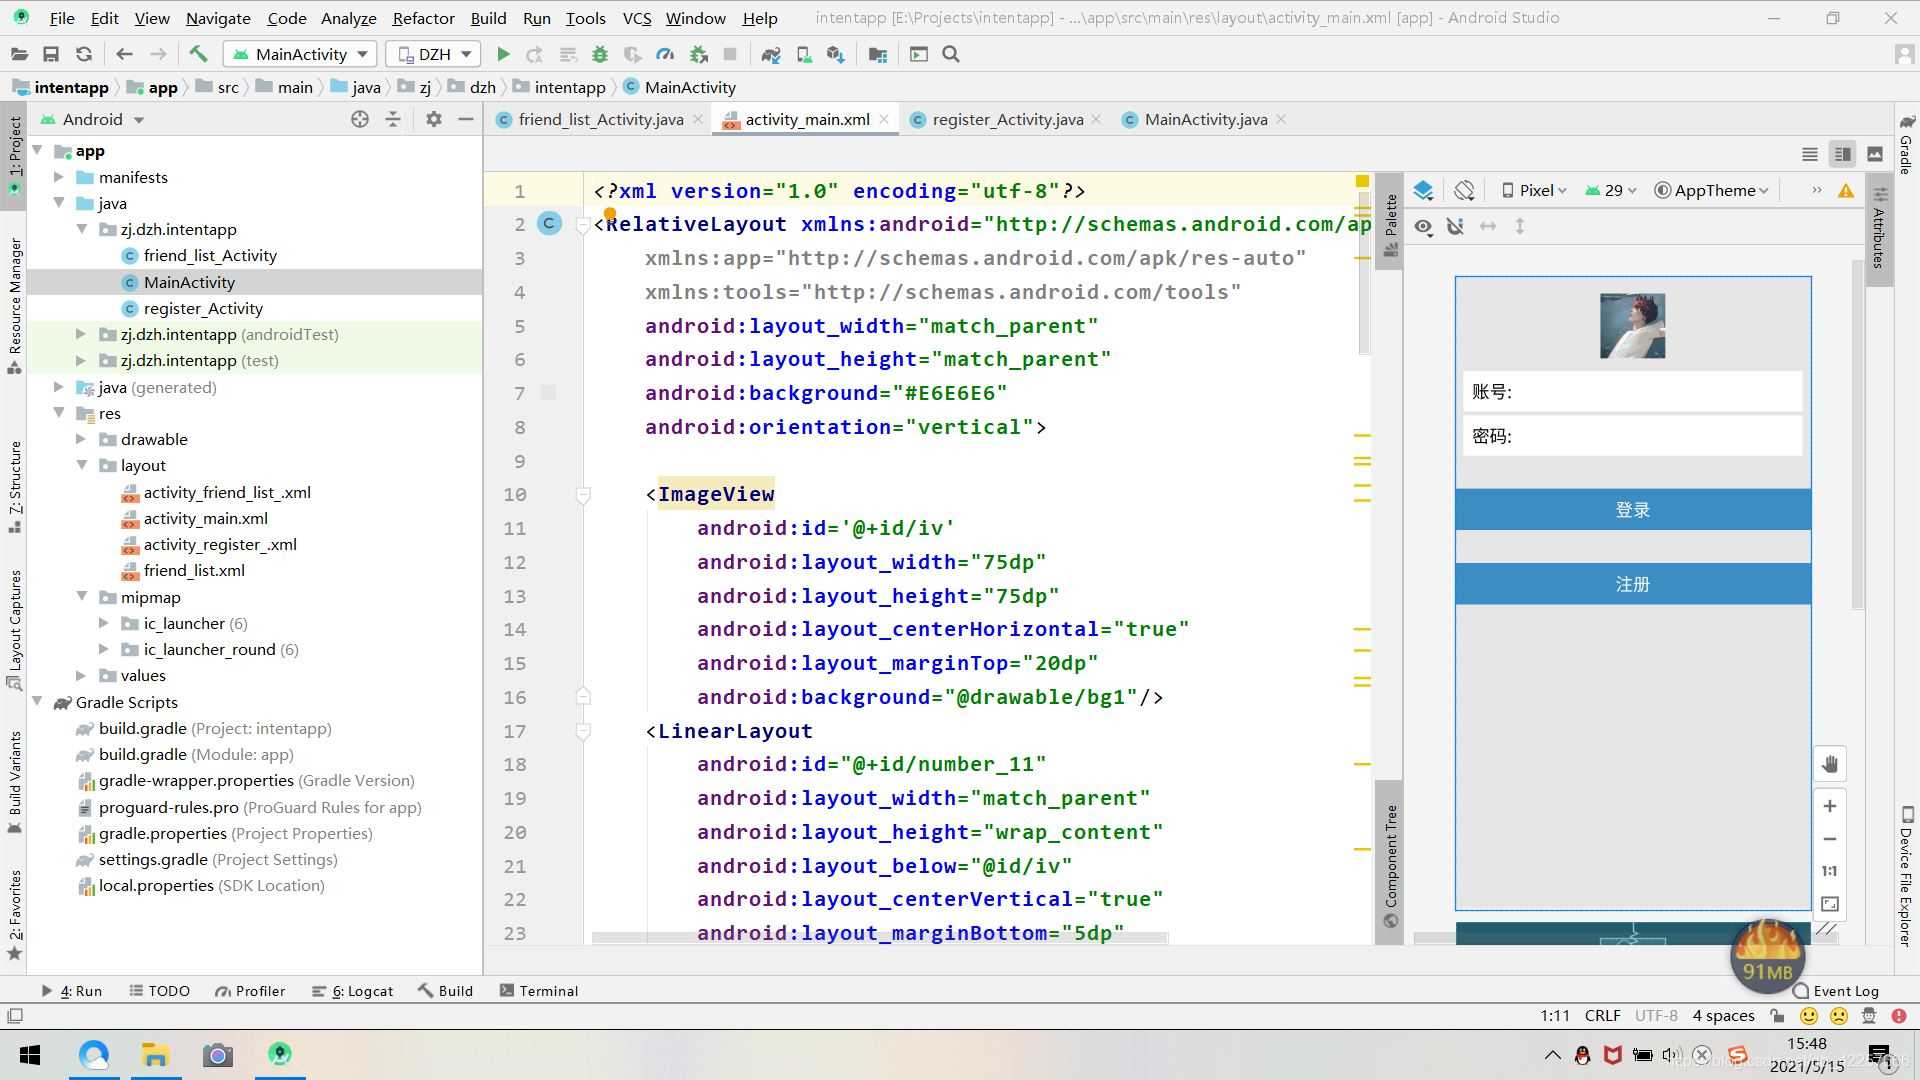
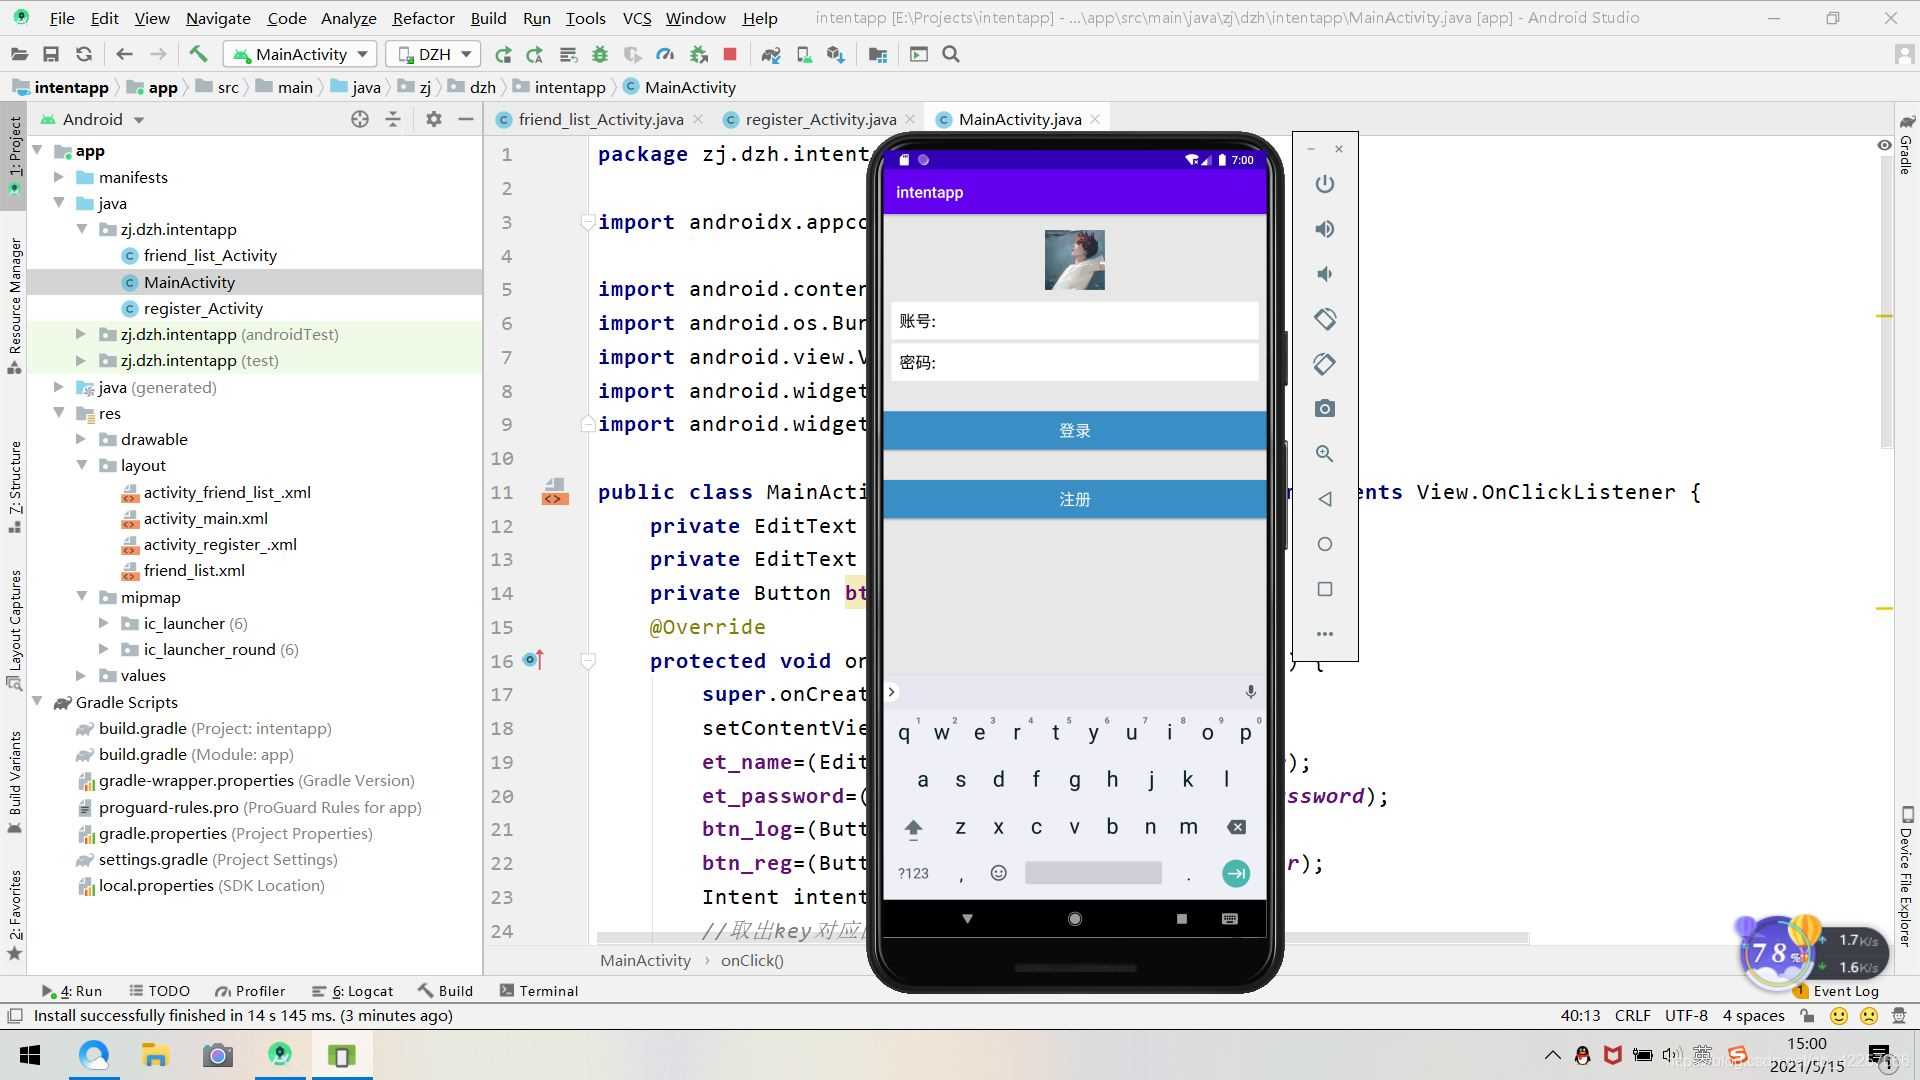
1、登录界面的搭建
整体布局是相对布局RelativeLayout,上来ImageView是头像框,下面一个LinearLayout,显示的账号TextView和EditText;紧接着还是一个LinearLayout,里面是密码的TextView和EditText。最下面是两个Button,一个是登录,一个是注册,与父布局同宽。
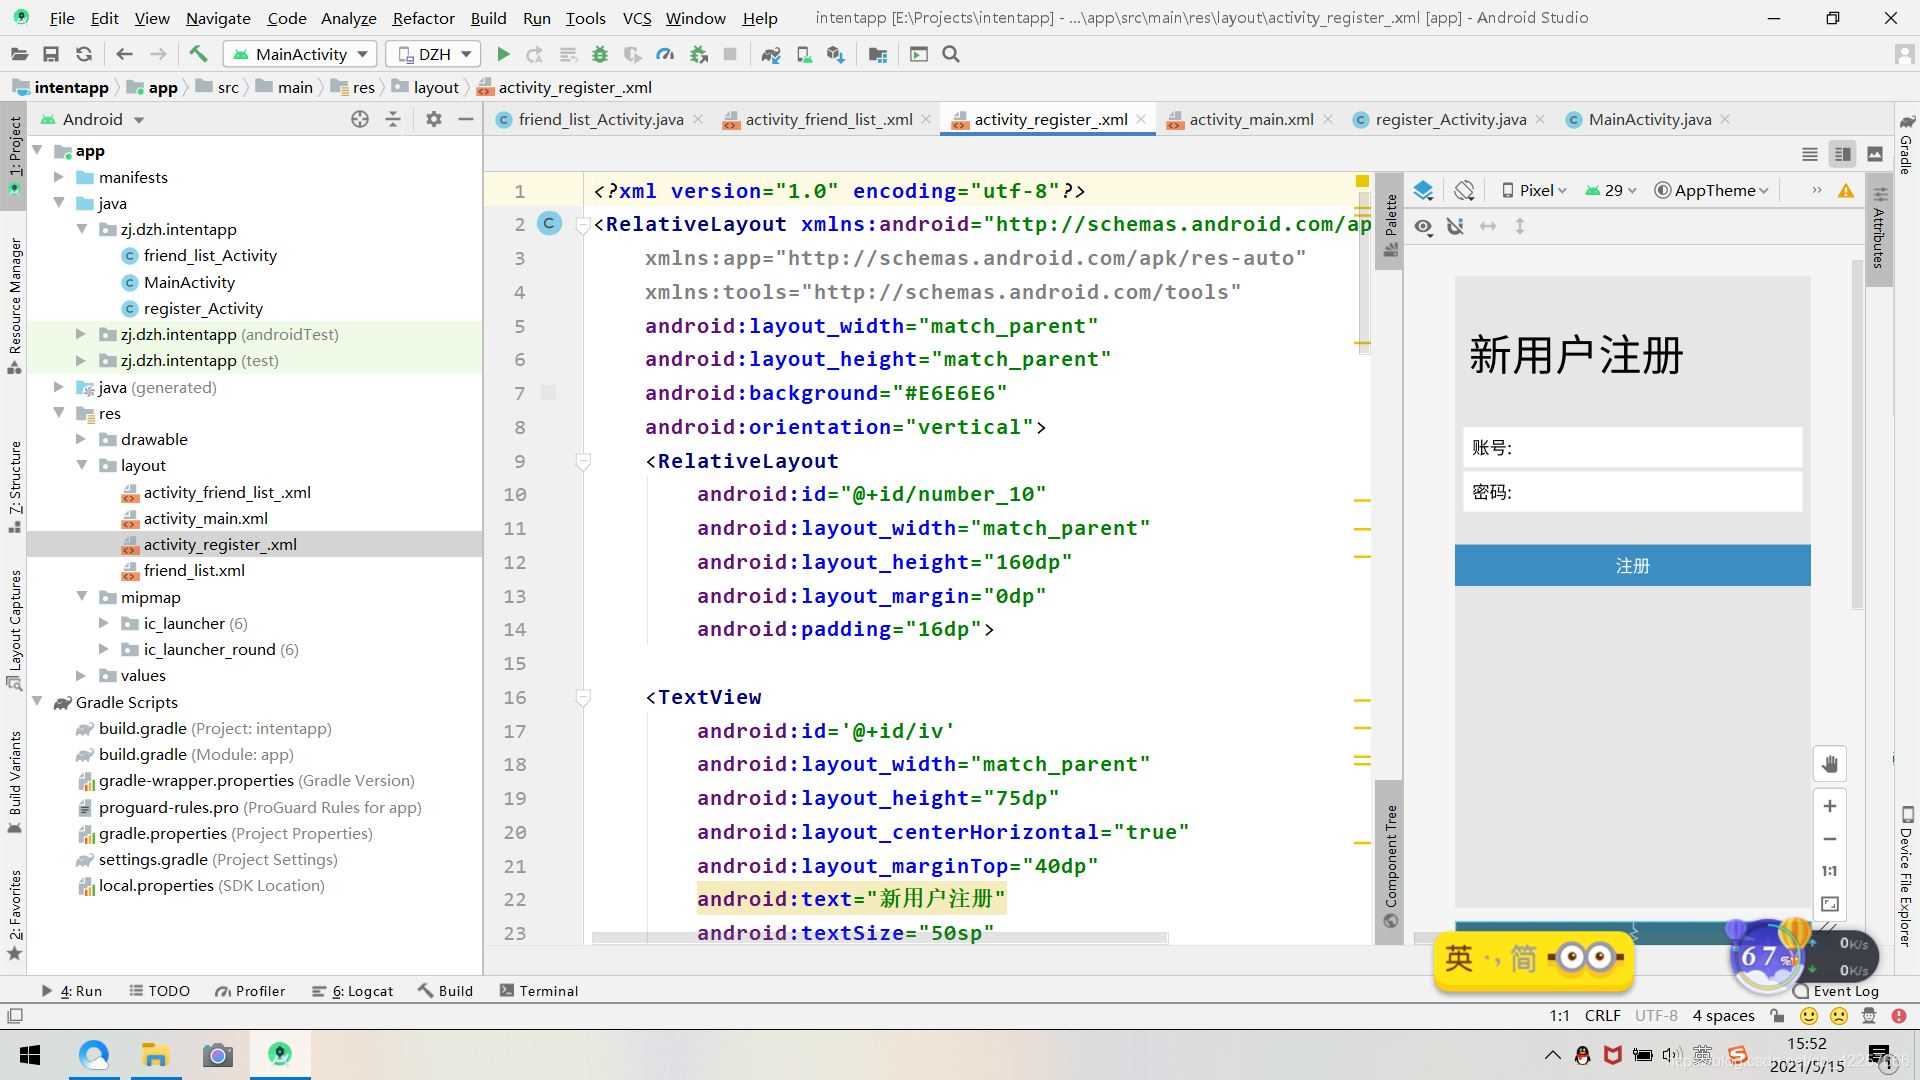
2、注册界面的搭建
最外层是RelativeLayout,顶部是一个“新用户注册”的TextView,下面一个LinearLayout,显示的账号TextView和输入框EditText;紧接着还是一个LinearLayout,里面是密码的TextView和输入框EditText,最下面是注册的Button,onClick=“click”。
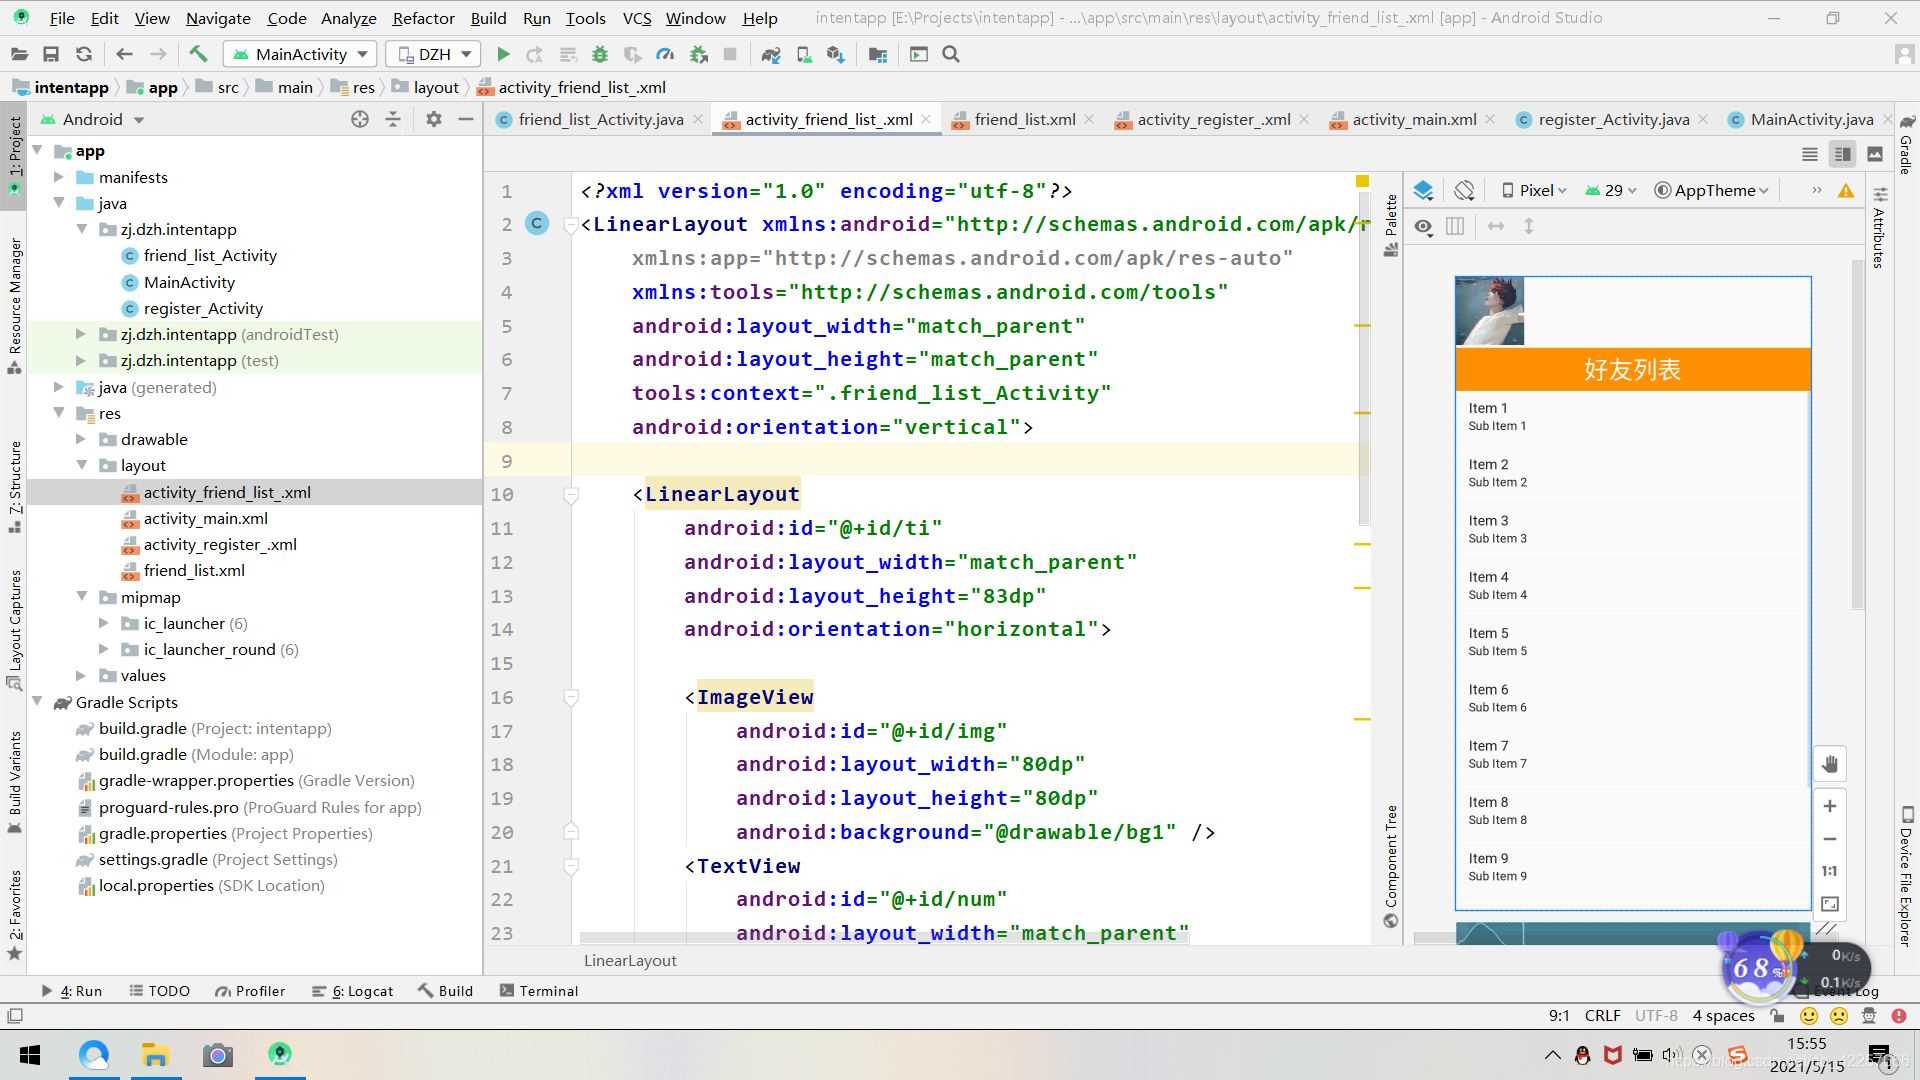
3、好友列表界面的搭建
最外层是LinearLayout布局,排列方式为vertical垂直。首先最上面是一个LinearLayout,里面放了一个ImageView头像,和一个TextView文本框,用来接收用户登录时的账号,并且显示在这里。在下面是一个TextView,显示“好友列表”,紧接着是一个ListView列表,显示好友信息。
4、跳转功能实现
登录按钮绑定的监听器,设置意图进行跳转,点击从当前的主界面跳转到好友列表界面。
btn_log.setOnClickListener(new View.OnClickListener() {//匿名内部类方式实现按钮点击事件
            @Override
            public void onClick(View v) {//传递数据
                Intent intent=new Intent(MainActivity.this,friend_list_Activity.class);//创建Intent对象,启动Activity02
                //将数据存入Intent对象
                intent.putExtra("name",et_name.getText().toString().trim());
                startActivity(intent);
            }
        });
        btn_reg.setOnClickListener(this);
注册按钮绑定的监听器,创建意图Intent,实现点击跳转到注册界面。
public void onClick(View view){
        switch(view.getId()){
            case R.id.btn_register:
            Intent intent=new Intent(this,register_Activity.class);
            startActivityForResult(intent,1);//返回请求结果,请求码为1
        }
    }
注册界面的注册按钮,用click方法实现,创建意图Intent,并传值过去。
public void click(View view) {
        Toast.makeText(this, "注册成功!", Toast.LENGTH_SHORT).show();
        Intent intent = new Intent();
        intent.putExtra("name", reg_name.getText().toString().trim());
        intent.putExtra("password", reg_password.getText().toString().trim());
        setResult(1, intent);
        finish();
    }
四、项目效果
1、主界面默认显示为登录界面。
2、点击注册按钮进入注册界面。
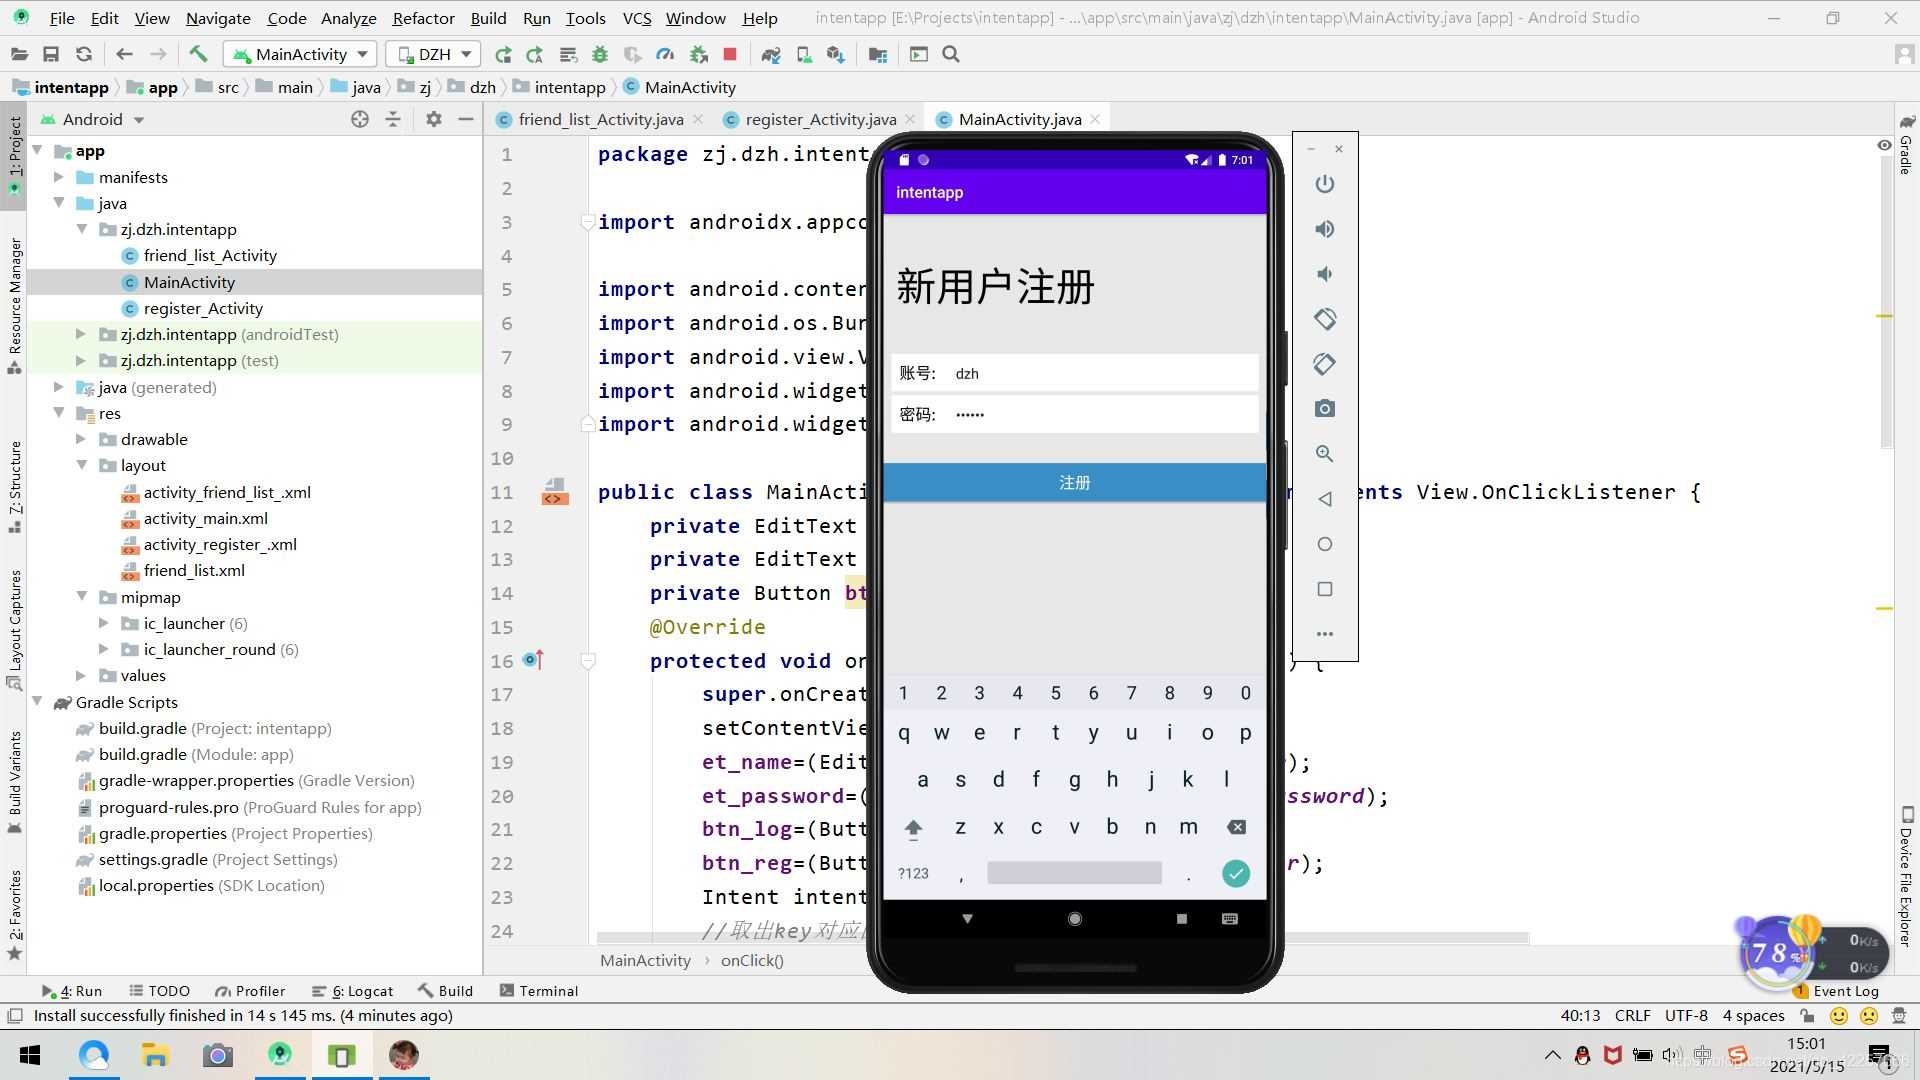
3、输入账号密码然后注册,回到登录界面,账号密码也穿过来了
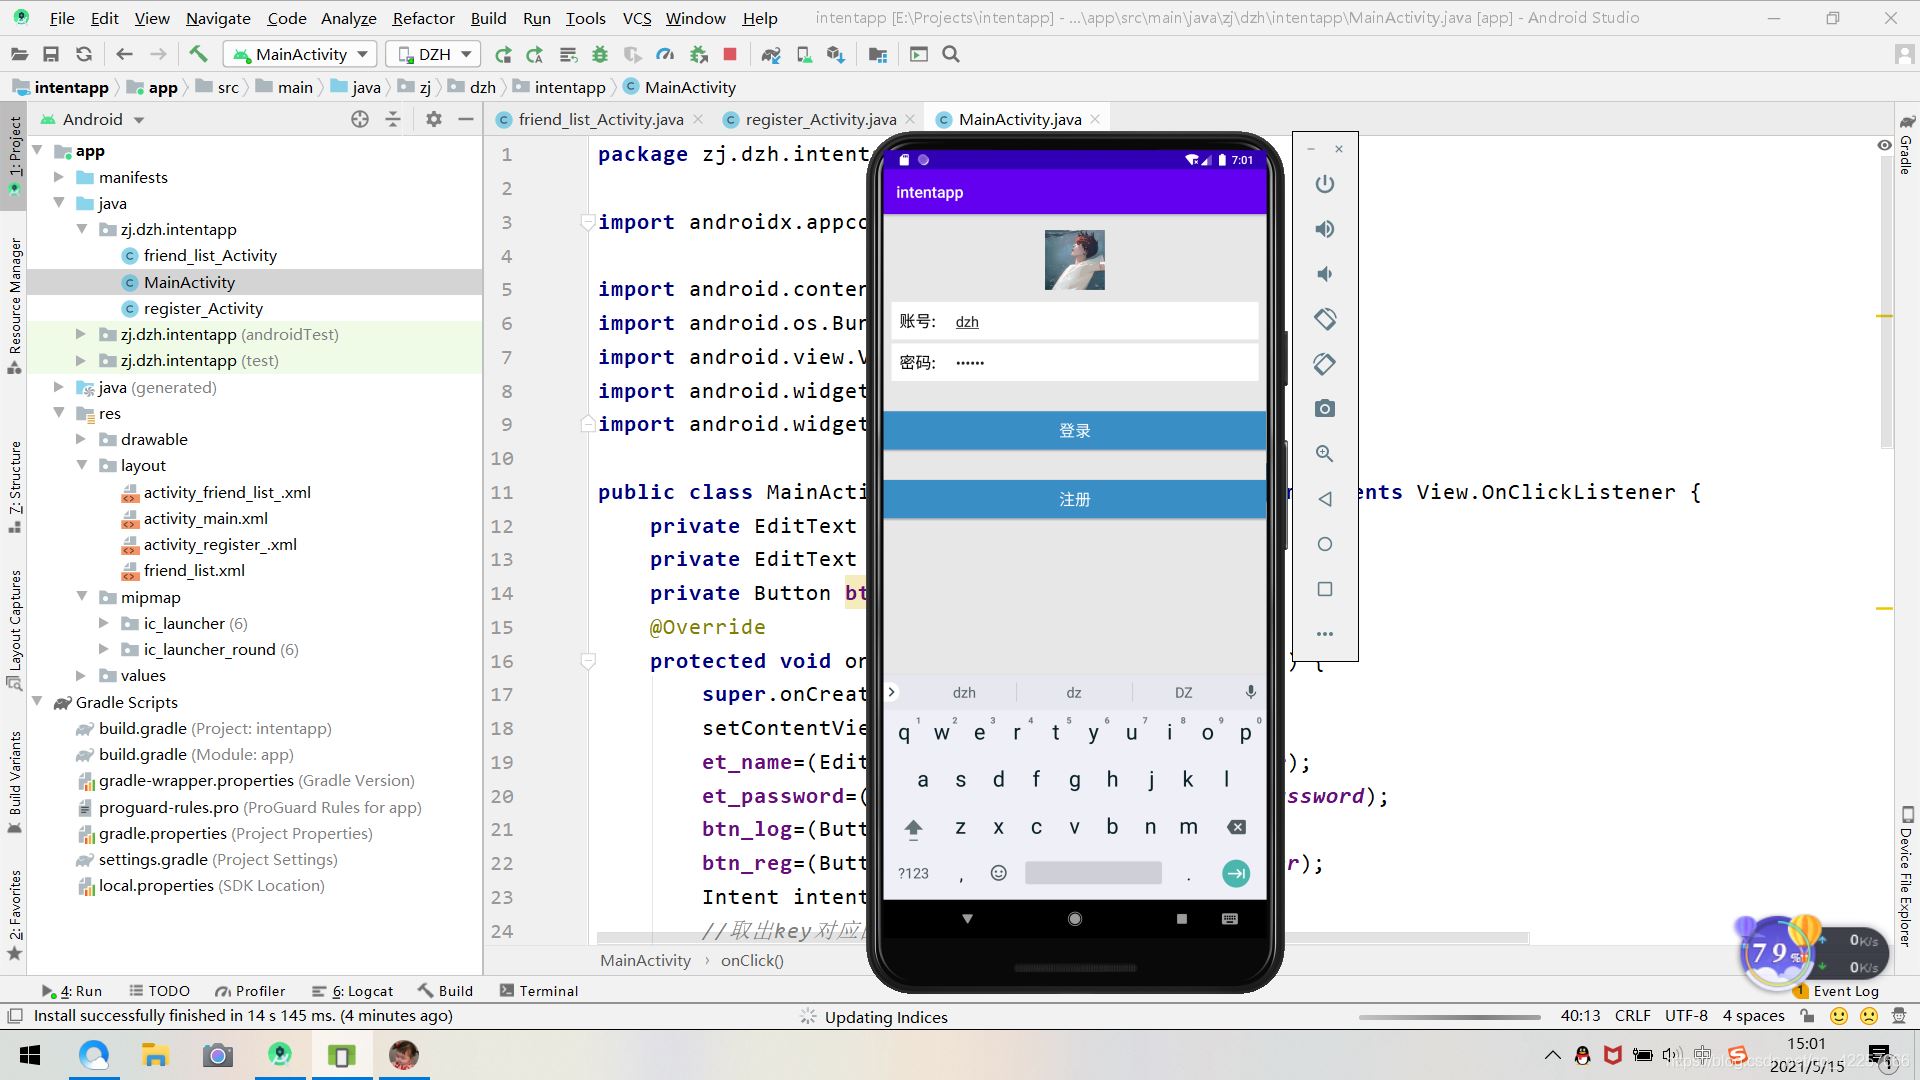
4、点击登录进入好友列表界面,账号也被传过来了
五、项目总结
本次QQ页面跳转项目主要考验学生对于ListView和intent的使用,对多个页面之间的跳转和传值要熟稔于心,这些知识点在今后的Android项目中会经常使用,因此希望大家能够熟练掌握上述知识点的使用,方便后续开发项目。
源码下载
到此这篇关于Android Studio实现QQ的注册登录和好友列表跳转的文章就介绍到这了,更多相关Android Studio 注册登录和好友列表跳转内容请搜索以前的文章或继续浏览下面的相关文章希望大家以后多多支持!
- Android studio 利用共享存储进行用户的注册和登录验证功能
- Android Studio+Servlet+MySql实现登录注册
- Android Studio连接MySql实现登录注册(附源代码)
- Android Studio连接SQLite数据库的登录注册实现
- Android使用Intent显示实现页面跳转
- Android Intent实现页面跳转的两种方法
- Android启动页面定时跳转的三种方法
- Android 接收推送消息跳转到指定页面的方法
- Android实现外部唤起应用跳转指定页面的方法
- Android Studio实现注册页面跳转登录页面的创建

Android Studio实现登录功能案例讲解
LoginActivity.java

包 com.hyx.example.mymap;


import java.text.SimpleDateFormat;
import java.util.Date;


import android.app.Activity;
import android.content.Intent;
import android.content.SharedPreferences;
import android.os.Bundle;
import android.os.Handler;
import android.view.KeyEvent;
import android.view.Menu;
import android.view.View;
import android.view.View.OnClickListener;
import android.widget.Button;
import android.widget.EditText;
import android.widget.TextView;
import android.widget.Toast;


公共类 LoginActivity扩展 Activity {
     private EditText username = null ;
    private EditText password = null ;
    private Button login = null ;
    private SharedPreferences sharedPreferences ;

    //初始化控件
 公共无效的init(){
        用户名 =(的EditText)findViewById(R.id。 username_edit);
        密码 =(的EditText)findViewById(R.id。 userpassword_edit);
        login =(Button)findViewById( R.id.login_button);


    }

    @Override
 protected void onCreate(Bundle savedInstanceState){
         super .onCreate(savedInstanceState);
        的setContentView(R.layout 登录); //显示自己的UI视图
 //        初始化控件
 init();
//调用验证是否第一次登录方法
         userUpdate();
//调用登录验证方法
         loginVerify();


    }

    //判断是否第一次登录初始化用户名密码
 public void userUpdate(){
 //读取文件内容
 sharedPreferences = getSharedPreferences( “myfile”, MODE_PRIVATE);
//读取数据
 String susername = sharedPreferences .getString( “username”, “”);
        String spwd = sharedPreferences .getString(“pwd”,“”);
//第一次进入程序读取用户名密码为空,则写入初始化数据并提示用户
 if(susername.equals(“”)&& spwd.equals(“”)){

//写入数据
             SharedPreferences.Editor editor = sharedPreferences .edit();
            editor.putString(“username”,“admin”);
            editor.putString(“pwd”,“123456”);
//提交数据
             editor.commit();
            吐司。makeText(LoginActivity。这个,“初始化用户名管理员密码123456” ,
                    吐司。LENGTH_LONG)。show();
        }
    }


    //登录验证
 public void loginVerify(){


//点击登录按钮所发生的事件。(1,验证合法2,验证不合法)
 login .setOnClickListener( new OnClickListener(){


            @Override
 public void onClick(查看arg0){
 //定义变量
 String strUsername,strPassword;
//得到输入框内容
 strUsername = username .getText()。toString();
                strPassword = password .getText()。toString();

//读取文件内容得到用户名密码
 sharedPreferences = getSharedPreferences( “myfile”, MODE_PRIVATE);
//读取数据
 String susername = sharedPreferences .getString( “username”, “”);
                String spwd = sharedPreferences .getString(“pwd”,“”);


//登录校验
 if(strUsername.equals(susername)&& strPassword.equals(spwd)){
 //登录成功后提示
 Toast。makeText(LoginActivity。这个, “登陆成功!” ,
                            吐司。LENGTH_SHORT).show();
//登陆成功后切换到MainActivity.class
                    意图意图= 新意图(LoginActivity。此,
                            主要活动。课程);
//启动
                     startActivity(intent);

//登录成功后销毁登录界面
                     finish();
                } else {
                    吐司。makeText(LoginActivity。这个,“登陆失败!” ,
                            吐司。LENGTH_SHORT).show();
                }

            }
        });
    }


// @Override
 // public boolean onCreateOptionsMenu(菜单菜单){
 // getMenuInflater()。inflate(R.menu.main,menu);
//返回true;
//}

 }

login.xml
< RelativeLayout xmlns:android = “http://schemas.android.com/apk/res/android”
xmlns:custom = “http://schemas.android.com/apk/res-auto”
android :layout_width = “match_parent “
android :layout_height = ”match_parent“
android :fitsSystemWindows = ”true“ >
< RelativeLayout
android :id = “@ + id / login_layout”
android :layout_width = “match_parent”
android :layout_height = “wrap_content”
android :layout_marginLeft = “20dp”
android :layout_marginRight = “20dp”
android :gravity = “center” >
< FrameLayout
android :id = “@ + id / username_layout”
android :layout_width = “fill_parent”
android :layout_height = “wrap_content”
android :layout_marginTop = “55dp”
android :gravity = “center” >
< EditText
android :id = “@ + id / username_edit”
android :layout_width = “match_parent”
android :layout_height = “55dp”
android :layout_marginTop = “5dp”
android :hint = “账号/手机号/邮箱”
android :paddingRight = “60dp”
android :maxLength = “20”
android :paddingLeft = “55dp” >
</ EditText >
< ImageView
android :layout_width = “22dp”
android :layout_height = “21dp”
android :layout_marginStart = “8dp”
android :layout_gravity = “left | center_vertical”
android :background = “@ drawable / zhanghao”
android :visibility = “visible” / >
< TextView
android :id = “@ + id / contry_sn”
android :layout_width = “40dp”
android :layout_height = “50dp”
android :layout_gravity = “left | center_vertical”
android :layout_marginTop = “4dp”
android :gravity = “center”
android :text = “+ 62” android :textColor = “@
android :color / black”
android :textSize = “18sp”
android :visibility = “invisible” />
</ FrameLayout >
< FrameLayout
android :id = “@ + id / usercode_layout”
android :layout_width = “fill_parent”
android :layout_height = “wrap_content”
android :layout_below = “@ id / username_layout”
android :layout_marginTop = “6dp”
android :gravity = “center “ >
< EditText
android :id = “@ + id / userpassword_edit”
android :layout_width = “match_parent”
android :layout_height = “55dp”
android :hint = “密码”
android :inputType = “textPassword”
android :paddingRight = “60dp”
android : maxLength = “20”
android :paddingLeft = “55dp” >
</ EditText >
< ImageView
android :layout_width = “24dp”
android :layout_height = “22dp”
android :layout_marginStart = “7dp”
android :layout_gravity = “left | center_vertical”
android :background = “@ drawable / mima” />
< 按钮
android :id = “@ + id / passwordeye”
android :layout_width = “23dp”
android :layout_height = “23dp”
android :background = “@ drawable / kejian”
android :layout_gravity = “right | center_vertical”
android :layout_marginRight = “10dp”
/>
</ FrameLayout >
< Button
android :id = “@ + id / login_button”
android :layout_width = “wrap_content”
android :layout_height = “45dp”
android :layout_below = “@ + id / usercode_layout”
android :layout_centerHorizontal = “true”
android :layout_marginTop = “ 34dp“
android :background = ”@ drawable / bluebutton“
android :textSize = ”18sp“ android :text = ” 登录
“
android :textColor = ”#fffffff“ />
< Button
android :id = “@ + id / login_error”
android :layout_width = “wrap_content”
android :layout_height = “wrap_content”
android :layout_alignRight = “@ id / login_button”
android :layout_below = “@ id / login_button”
android :text = “忘记密码”
android :background = “#00000000”
android :textSize = “16sp” />
< Button
android :id = “@ + id / register”
android :layout_width = “wrap_content”
android :layout_height = “wrap_content”
android :layout_alignLeft = “@ id / login_button”
android :layout_below = “@ id / login_button”
android :background = “#00000000”
android :gravity = “left | center_vertical”
android :text = “注册”
android :textSize = “16sp”
android :visibility = “visible” />
</ RelativeLayout >
< RelativeLayout
android :id = “@ + id / remember_layout000”
android :layout_width = “wrap_content”
android :layout_height = “wrap_content”
android :layout_alignParentBottom = “true”
android :layout_marginBottom = “1dp”
android :layout_marginLeft = “20dp”
android : layout_marginRight = “20dp” >
</ RelativeLayout >
</ RelativeLayout >
注意:一定要在AndroidManifest.xml里加activity啊!!!
到此这篇关于Android Studio实现登录功能案例讲解的文章就介绍到这了,更多相关Android Studio实现登录内容请搜索以前的文章或继续浏览下面的相关文章希望大家以后多多支持!
- Android Studio实现简易登录界面制作
- Android Studio实现登录界面功能
- Android studio 利用共享存储进行用户的注册和登录验证功能
- Android Studio实现QQ的注册登录和好友列表跳转
- Android Studio+Servlet+MySql实现登录注册
- Android Studio连接MySql实现登录注册(附源代码)
- Android Studio连接SQLite数据库的登录注册实现
- Android Studio实现简单的QQ登录界面的示例代码
- Android Studio 通过登录功能介绍SQLite数据库的使用流程
- Android studio实现app登录界面
关于Android实现QQ登录功能和android实现qq登录界面的介绍现已完结,谢谢您的耐心阅读,如果想了解更多关于Android QQ登录界面绘制代码、Android SQLite数据库连接实现登录功能、Android Studio实现QQ的注册登录和好友列表跳转、Android Studio实现登录功能案例讲解的相关知识,请在本站寻找。
本文标签:


![[转帖]Ubuntu 安装 Wine方法(ubuntu如何安装wine)](https://www.gvkun.com/zb_users/cache/thumbs/4c83df0e2303284d68480d1b1378581d-180-120-1.jpg)

