如果您对Android-7.1SDK去掉锁屏界面感兴趣,那么本文将是一篇不错的选择,我们将为您详在本文中,您将会了解到关于Android-7.1SDK去掉锁屏界面的详细内容,我们还将为您解答安卓去除锁
如果您对Android-7.1SDK去掉锁屏界面感兴趣,那么本文将是一篇不错的选择,我们将为您详在本文中,您将会了解到关于Android-7.1SDK去掉锁屏界面的详细内容,我们还将为您解答安卓去除锁屏的相关问题,并且为您提供关于android ------ 实现高德定位并获取相应信息 ( 最新版高德SDK 和 Android SDK版本)、Android 2.2 SDK 操作系统界面截屏、Android 4.2.2 取消锁屏界面、Android 7.1.1 锁屏界面启动流程的有价值信息。
本文目录一览:- Android-7.1SDK去掉锁屏界面(安卓去除锁屏)
- android ------ 实现高德定位并获取相应信息 ( 最新版高德SDK 和 Android SDK版本)
- Android 2.2 SDK 操作系统界面截屏
- Android 4.2.2 取消锁屏界面
- Android 7.1.1 锁屏界面启动流程
")
Android-7.1SDK去掉锁屏界面(安卓去除锁屏)
当我们默认设备无密码时,还是会有个滑动解锁界面,有时客户就会要求去掉这个锁屏界面,去掉这个界面的修改处是在frameworks/base/packages/SettingsProvider/res/values/defaults.xml文件中的def_lockscreen_disabled属性
")
android ------ 实现高德定位并获取相应信息 ( 最新版高德SDK 和 Android SDK版本)
Android开发项目时常常会遇到定位这个功能, 很久以前写过一篇了,官方也更新了一些东西,我也更新下
以前使用的是jar包 导入来实现高德定位
老版本 链接:https://blog.csdn.net/DickyQie/article/details/56840100
现在通过Gradle集成SDK(也可以使用jar包)
 //定位依赖
    implementation ''com.amap.api:location:latest.integration''
之后到高德申请key值,登录打开控制台 点击创建应用,如图:
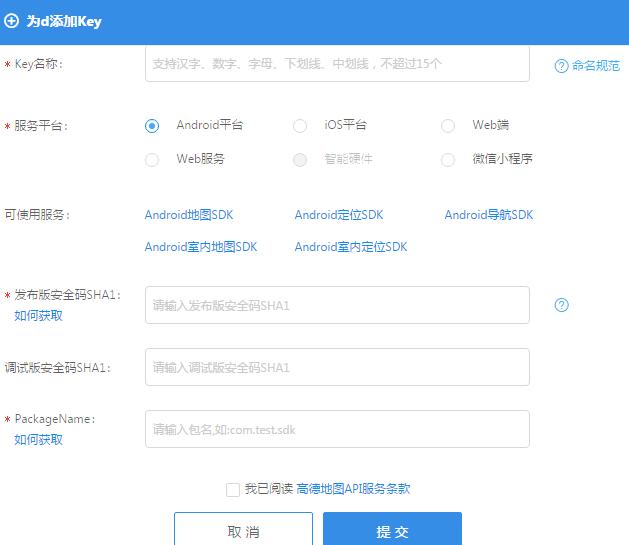
填写相应信息,
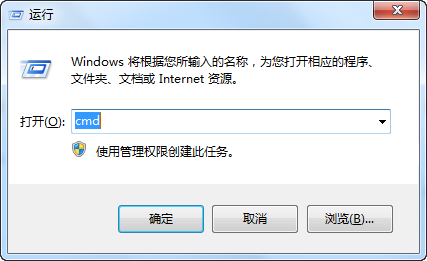
名称,PackageName:项目的包名,至于SHA1安全码可以这样获取,可以 Window+R 打开控制台 输入cmd点击确定
之后在弹框中完成以下操作就可以看到SHA1安全码了
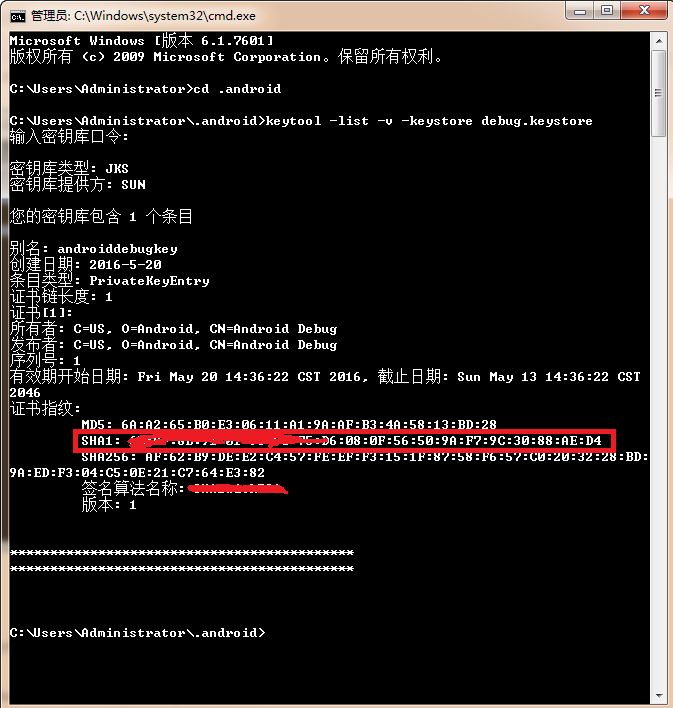
上图的密钥库口令默认的是:android (注:输入口令是看不见的,输入完成Enter即可)
以上是测试版获取SHA1,发布版SHA1获取请看博客 Android Studio apk打包,keystore.jks文件生成,根据keystore密钥获取SHA1安全码
输入完信息确定就可以看到key值了

AndroidManifest.xml中加入权限
复制代码

  <!--用于进行网络定位-->
    <uses-permission android:name="android.permission.ACCESS_COARSE_LOCATION"></uses-permission>
    <!--用于访问GPS定位-->
    <uses-permission android:name="android.permission.ACCESS_FINE_LOCATION"></uses-permission>
    <!--用于获取运营商信息,用于支持提供运营商信息相关的接口-->
    <uses-permission android:name="android.permission.ACCESS_NETWORK_STATE"></uses-permission>
    <!--用于访问wifi网络信息,wifi信息会用于进行网络定位-->
    <uses-permission android:name="android.permission.ACCESS_WIFI_STATE"></uses-permission>
    <!--用于获取wifi的获取权限,wifi信息会用来进行网络定位-->
    <uses-permission android:name="android.permission.CHANGE_WIFI_STATE"></uses-permission>
    <!--用于访问网络,网络定位需要上网-->
    <uses-permission android:name="android.permission.INTERNET"></uses-permission>
    <!--用于读取手机当前的状态-->
    <uses-permission android:name="android.permission.READ_PHONE_STATE"></uses-permission>
    <!--用于写入缓存数据到扩展存储卡-->
    <uses-permission android:name="android.permission.WRITE_EXTERNAL_STORAGE"></uses-permission>
    <!--用于申请调用A-GPS模块-->
    <uses-permission android:name="android.permission.ACCESS_LOCATION_EXTRA_COMMANDS"></uses-permission>
    <!--用于申请获取蓝牙信息进行室内定位-->
    <uses-permission android:name="android.permission.BLUETOOTH"></uses-permission>
    <uses-permission android:name="android.permission.BLUETOOTH_ADMIN"></uses-permission>
<application>标签中添加Key值信息
<service android:name="com.amap.api.location.APSService"></service>
 <meta-data android:name="com.amap.api.v2.apikey" android:value="2ca77496c8ae6b92cef9e15dfd68b87b">
 </meta-data>
Activity代码:(和以前的相比少了很多不必要的代码)
/***
* 定位
*/
private void showLocation() {
try {
mlocationClient = new AMapLocationClient(this);
mLocationOption = new AMapLocationClientOption();
mlocationClient.setLocationListener(this);
//设置定位模式为高精度模式,Battery_Saving为低功耗模式,Device_Sensors是仅设备模式
mLocationOption.setLocationMode(AMapLocationClientOption.AMapLocationMode.Hight_Accuracy);
mLocationOption.setInterval(5000);
//设置定位参数
mlocationClient.setLocationOption(mLocationOption);
//启动定位
mlocationClient.startLocation();
} catch (Exception e) {
}
}
@Override
public void onLocationChanged(AMapLocation amapLocation) {
try {
if (amapLocation != null) {
if (amapLocation.getErrorCode() == 0) {
//定位成功回调信息,设置相关消息
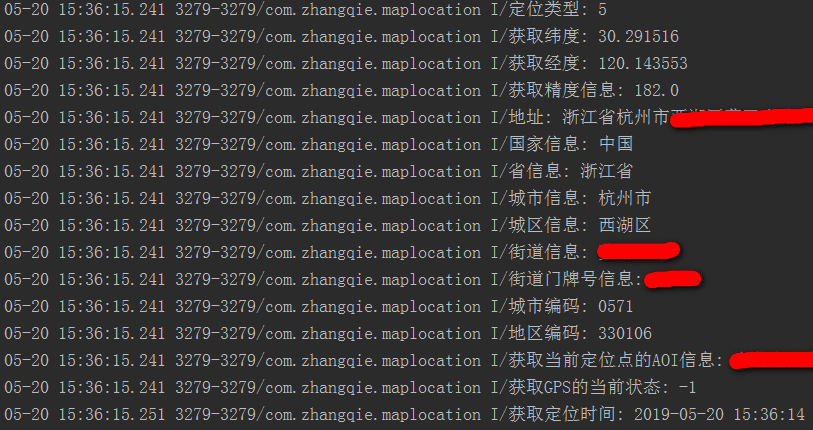
//获取当前定位结果来源,如网络定位结果,详见定位类型表
Log.i("定位类型", amapLocation.getLocationType() + "");
Log.i("获取纬度", amapLocation.getLatitude() + "");
Log.i("获取经度", amapLocation.getLongitude() + "");
Log.i("获取精度信息", amapLocation.getAccuracy() + "");
//如果option中设置isNeedAddress为false,则没有此结果,网络定位结果中会有地址信息,GPS定位不返回地址信息。
Log.i("地址", amapLocation.getAddress());
Log.i("国家信息", amapLocation.getCountry());
Log.i("省信息", amapLocation.getProvince());
Log.i("城市信息", amapLocation.getCity());
Log.i("城区信息", amapLocation.getDistrict());
Log.i("街道信息", amapLocation.getStreet());
Log.i("街道门牌号信息", amapLocation.getStreetNum());
Log.i("城市编码", amapLocation.getCityCode());
Log.i("地区编码", amapLocation.getAdCode());
Log.i("获取当前定位点的AOI信息", amapLocation.getAoiName());
Log.i("获取当前室内定位的建筑物Id", amapLocation.getBuildingId());
Log.i("获取当前室内定位的楼层", amapLocation.getFloor());
Log.i("获取GPS的当前状态", amapLocation.getGpsAccuracyStatus() + "");
//获取定位时间
SimpleDateFormat df = new SimpleDateFormat("yyyy-MM-dd HH:mm:ss");
Date date = new Date(amapLocation.getTime());
Log.i("获取定位时间", df.format(date));
// 停止定位
mlocationClient.stopLocation();
} else {
//定位失败时,可通过ErrCode(错误码)信息来确定失败的原因,errInfo是错误信息,详见错误码表。
Log.e("AmapError", "location Error, ErrCode:"
+ amapLocation.getErrorCode() + ", errInfo:"
+ amapLocation.getErrorInfo());
}
}
} catch (Exception e) {
}
}
@Override
protected void onStop() {
super.onStop();
// 停止定位
if (null != mlocationClient) {
mlocationClient.stopLocation();
}
}
/**
* 销毁定位
*/
private void destroyLocation() {
if (null != mlocationClient) {
/**
* 如果AMapLocationClient是在当前Activity实例化的,
* 在Activity的onDestroy中一定要执行AMapLocationClient的onDestroy
*/
mlocationClient.onDestroy();
mlocationClient = null;
}
}
@Override
protected void onDestroy() {
destroyLocation();
super.onDestroy();
}运行得到日志:
代码地址Github :https://github.com/DickyQie/android-map

Android 2.2 SDK 操作系统界面截屏
传说 Android 2.2 不仅在功能上有很大的提升,速度上也是通过引入 JIT 后得以非常大的改善。不过多数用户更关心的是界面好不好看,这往往是决定购买的第一因素。
以下为Android2.2 SDK开发者套件截图


主界面及菜单界面


设置菜单及本机信息


网上浏览及车载模式
下一页Android2.2与2.1界面对比
Android2.2与2.1界面对比

主界面(左为2.1 右为2.2)

设置界面(左为2.1 右为2.2)

邮件界面(左为2.1 右为2.2)

邮件界面(左为2.1 右为2.2)
更多Android2.2与2.1界面对比

邮件界面(左为2.1 右为2.2)

搜索栏(左为2.1 右为2.2)

日历界面(左为2.1 右为2.2)

GPS设置界面(左为2.1 右为2.2)

车载界面(左为2.1 右为2.2)
更多Android2.2与2.1界面对比

拍照界面(下为2.1 上为2.2)

视频界面(下为2.1 上为2.2)

软件管理界面(左为2.1 右为2.2)看到了Flash10.1

搜索界面(左为2.1 右为2.2)


Android 4.2.2 取消锁屏界面
frameworks/base/policy/src/com/android/internal/policy/impl/keyguard/KeyguardViewMediator.java
    /**
     * External apps (like the phone app) can tell us to disable the keygaurd.
     */
    private boolean mExternallyEnabled = true;
改为false

$ source build/envsetup.sh
$ mmm frameworks/base/policy/

$ adb push android.policy.jar /system/framework/
Android 7.1.1 锁屏界面启动流程
前几天遇到一个低概率复现锁屏界面不显示,仅仅显示状态栏的问题,跟了下锁屏界面启动显示的流程,在这分享下,也方便以后自己查看。前面简介了下Zygote启动流程, Zygote进程启动后会首先创建一个SystemServer进程,SystemServer进程在调用startOtherServices同一时候也会调用WindowManagerService的systemReady()方法
//frameworks/base/services/java/com/android/server/SystemServer.java
  private void startOtherServices() {
       ...
       wm = WindowManagerService.main(context, inputManager,
                    mFactoryTestMode != FactoryTest.FACTORY_TEST_LOW_LEVEL,
                    !mFirstBoot, mOnlyCore);
        ...
        try {
            wm.systemReady();
            Slog.i("jason11", "SystemServer wm.systemReady");
        } catch (Throwable e) {
            reportWtf("making Window Manager Service ready", e);
        }
        ...
    }
在WindowManagerService中直接调用了PhoneWindowManager里的systemReady()
//frameworks/base/services/core/java/com/android/server/wm/WindowManagerService.java
  //final WindowManagerPolicy mPolicy = new PhoneWindowManager();
    public void systemReady() {
        mPolicy.systemReady();
    }
在PhoneWindowManager的systemReady()会依据一个Boolean值bindKeyguardNow来决定是否绑定keyguard service
//frameworks/base/services/core/java/com/android/server/policy/PhoneWindowManager.java
  /** {@inheritDoc} */
    @Override
    public void systemReady() {
        mKeyguardDelegate = new KeyguardServiceDelegate(mContext);
        mKeyguardDelegate.onSystemReady();

        readCameraLensCoverState();
        updateUiMode();
        boolean bindKeyguardNow;
        synchronized (mLock) {
            updateOrientationListenerLp();
            mSystemReady = true;
            mHandler.post(new Runnable() {
                @Override
                public void run() {
                    updateSettings();
                }
            });

            bindKeyguardNow = mDeferBindKeyguard;
            if (bindKeyguardNow) {
                // systemBooted ran but wasn''t able to bind to the Keyguard, we''ll do it now.
                mDeferBindKeyguard = false;
            }
        }
        if (bindKeyguardNow) {
            mKeyguardDelegate.bindService(mContext);
            mKeyguardDelegate.onBootCompleted();
        }
        mSystemGestures.systemReady();
    }
看到这里,可能会想到假设bindKeyguardNow为false就会不绑定,后面通过继续跟踪发如今PhoneWindowManager的systemBooted()里也会去绑定keyguard service。假设在systemBooted里绑定了就不在systemReady里再去绑定,自己測试的时候是在systemBooted绑定的
//frameworks/base/services/core/java/com/android/server/policy/PhoneWindowManager.java
     /** {@inheritDoc} */
    @Override
    public void systemBooted() {
        boolean bindKeyguardNow = false;
        synchronized (mLock) {
            // Time to bind Keyguard; take care to only bind it once, either here if ready or
            // in systemReady if not.
            if (mKeyguardDelegate != null) {
                bindKeyguardNow = true;
            } else {
                // Because mKeyguardDelegate is null, we know that the synchronized block in
                // systemReady didn''t run yet and setting this will actually have an effect.
                mDeferBindKeyguard = true;
            }
        }
        if (bindKeyguardNow) {
            mKeyguardDelegate.bindService(mContext);
            mKeyguardDelegate.onBootCompleted();
        }
        synchronized (mLock) {
            mSystemBooted = true;
        }
        startedWakingUp();
        screenTurningOn(null);
        screenTurnedOn();
    }
以下就通过例如以下的时序图看看是怎样调用到systemBooted的,就不在一步步跟了

通过上面的分析知道。不管是在systemReady或systemBooted,都调用了KeyguardServiceDelegate对象的bindService方法,以下就以这种方法開始。看看锁屏界面是怎么显示出来的,先看看以下的时序图,再来分步解说

1、先来看看在KeyguardServiceDelegate怎样绑定KeyguardService的
//frameworks/base/services/core/java/com/android/server/policy/keyguard/KeyguardServiceDelegate.java
public class KeyguardServiceDelegate {
    ...
    public void bindService(Context context) {
        Intent intent = new Intent();
        final Resources resources = context.getApplicationContext().getResources();

        final ComponentName keyguardComponent = ComponentName.unflattenFromString(
                resources.getString(com.android.internal.R.string.config_keyguardComponent));
        intent.setComponent(keyguardComponent);

        if (!context.bindServiceAsUser(intent, mKeyguardConnection,
                Context.BIND_AUTO_CREATE, UserHandle.OWNER)) {
            Log.v(TAG, "*** Keyguard: can''t bind to " + keyguardComponent);
            mKeyguardState.showing = false;
            mKeyguardState.showingAndNotOccluded = false;
            mKeyguardState.secure = false;
            synchronized (mKeyguardState) {
                // TODO: Fix synchronisation model in this class. The other state in this class
                // is at least self-healing but a race condition here can lead to the scrim being
                // stuck on keyguard-less devices.
                mKeyguardState.deviceHasKeyguard = false;
                hideScrim();
            }
        } else {
            if (DEBUG) Log.v(TAG, "*** Keyguard started");
        }
    }
    ...
}
在bindService中调用了bindServiceAsUser绑定指定intent的service,config_keyguardComponent的定义例如以下
//frameworks/base/core/res/res/values/config.xml
    <!-- Keyguard component -->
    <string name="config_keyguardComponent" translatable="false">com.android.systemui/com.android.systemui.keyguard.KeyguardService</string>
当绑定成功后会调用mKeyguardConnection里的onServiceConnected方法
//frameworks/base/services/core/java/com/android/server/policy/keyguard/KeyguardServiceDelegate.java
public class KeyguardServiceDelegate {
    ...
      private final ServiceConnection mKeyguardConnection = new ServiceConnection() {
        @Override
        public void onServiceConnected(ComponentName name, IBinder service) {
            if (DEBUG) Log.v(TAG, "*** Keyguard connected (yay!)");
            mKeyguardService = new KeyguardServiceWrapper(mContext,
                    IKeyguardService.Stub.asInterface(service));
            if (mKeyguardState.systemIsReady) {
                // If the system is ready, it means keyguard crashed and restarted.
                mKeyguardService.onSystemReady();
                // This is used to hide the scrim once keyguard displays.
                if (mKeyguardState.interactiveState == INTERACTIVE_STATE_AWAKE) {
                    mKeyguardService.onStartedWakingUp();
                }
                if (mKeyguardState.screenState == SCREEN_STATE_ON
                        || mKeyguardState.screenState == SCREEN_STATE_TURNING_ON) {
                    mKeyguardService.onScreenTurningOn(
                            new KeyguardShowDelegate(mDrawnListenerWhenConnect));
                }
                if (mKeyguardState.screenState == SCREEN_STATE_ON) {
                    mKeyguardService.onScreenTurnedOn();
                }
                mDrawnListenerWhenConnect = null;
            }
            if (mKeyguardState.bootCompleted) {
                mKeyguardService.onBootCompleted();
            }
            if (mKeyguardState.occluded) {
                mKeyguardService.setOccluded(mKeyguardState.occluded);
            }
        }

        @Override
        public void onServiceDisconnected(ComponentName name) {
            if (DEBUG) Log.v(TAG, "*** Keyguard disconnected (boo!)");
            mKeyguardService = null;
        }

    };
    ...
}
当mKeyguardState.systemIsReady为true是。就会通过KeyguardServiceWrapper的实例mKeyguardService调用onSystemReady方法。在KeyguardServiceWrapper的onSystemReady里调用了上面刚刚绑定成功的KeyguardService的onSystemReady方法
//frameworks/base/services/core/java/com/android/server/policy/keyguard/KeyguardServiceWrapper.java
public class KeyguardServiceWrapper implements IKeyguardService {
    ...
    @Override // Binder interface
    public void onSystemReady() {
        try {
            mService.onSystemReady();
        } catch (RemoteException e) {
            Slog.w(TAG , "Remote Exception", e);
        }
    }
    ...
}
在KeyguardService的onSystemReady里调用了KeyguardViewMediator里的onSystemReady,在这里就不贴这个代码了,直接看看KeyguardViewMediator.onSystemReady这个里面干啥了
2、KeyguardViewMediator.onSystemReady
//frameworks/base/packages/SystemUI/src/com/android/systemui/keyguard/KeyguardViewMediator.java
public class KeyguardViewMediator extends SystemUI {
    ...
    public void onSystemReady() {
        mSearchManager = (SearchManager) mContext.getSystemService(Context.SEARCH_SERVICE);
        synchronized (this) {
            if (DEBUG) Log.d(TAG, "onSystemReady");
            mSystemReady = true;
            doKeyguardLocked(null);
            mUpdateMonitor.registerCallback(mUpdateCallback);
        }
        // Most services aren''t available until the system reaches the ready state, so we
        // send it here when the device first boots.
        maybeSendUserPresentBroadcast();
    }
    ...
}
在这种方法里主要调用了doKeyguardLocked和注冊了KeyguardUpdateMonitorCallback
3、通过调用doKeyguardLocked显示锁屏界面
//frameworks/base/packages/SystemUI/src/com/android/systemui/keyguard/KeyguardViewMediator.java
public class KeyguardViewMediator extends SystemUI {
    ...
    private void doKeyguardLocked(Bundle options) {
        // if another app is disabling us, don''t show
        if (!mExternallyEnabled) {
            if (DEBUG) Log.d(TAG, "doKeyguard: not showing because externally disabled");

            // note: we *should* set mNeedToReshowWhenReenabled=true here, but that makes
            // for an occasional ugly flicker in this situation:
            // 1) receive a call with the screen on (no keyguard) or make a call
            // 2) screen times out
            // 3) user hits key to turn screen back on
            // instead, we reenable the keyguard when we know the screen is off and the call
            // ends (see the broadcast receiver below)
            // TODO: clean this up when we have better support at the window manager level
            // for apps that wish to be on top of the keyguard
            return;
        }

        // if the keyguard is already showing, don''t bother
        if (mStatusBarKeyguardViewManager.isShowing()) {
            if (DEBUG) Log.d(TAG, "doKeyguard: not showing because it is already showing");
            resetStateLocked();
            return;
        }

        // if the setup wizard hasn''t run yet, don''t show
        final boolean requireSim = !SystemProperties.getBoolean("keyguard.no_require_sim", false);
        final boolean absent = SubscriptionManager.isValidSubscriptionId(
                mUpdateMonitor.getNextSubIdForState(IccCardConstants.State.ABSENT));
        final boolean disabled = SubscriptionManager.isValidSubscriptionId(
                mUpdateMonitor.getNextSubIdForState(IccCardConstants.State.PERM_DISABLED));
        final boolean lockedOrMissing = mUpdateMonitor.isSimPinSecure()
                || ((absent || disabled) && requireSim);

        if (!lockedOrMissing && shouldWaitForProvisioning()) {
            if (DEBUG) Log.d(TAG, "doKeyguard: not showing because device isn''t provisioned"
                    + " and the sim is not locked or missing");
            return;
        }

        if (mLockPatternUtils.isLockScreenDisabled(KeyguardUpdateMonitor.getCurrentUser())
                && !lockedOrMissing) {
            if (DEBUG) Log.d(TAG, "doKeyguard: not showing because lockscreen is off");
            return;
        }

        if (mLockPatternUtils.checkVoldPassword(KeyguardUpdateMonitor.getCurrentUser())) {
            if (DEBUG) Log.d(TAG, "Not showing lock screen since just decrypted");
            // Without this, settings is not enabled until the lock screen first appears
            setShowingLocked(false);
            hideLocked();
            mUpdateMonitor.reportSuccessfulStrongAuthUnlockAttempt();
            return;
        }

        if (DEBUG) Log.d(TAG, "doKeyguard: showing the lock screen");
        showLocked(options);
    }
    ...
}
这段代码主要是在是否要显示锁屏之前做了5个推断:1.假设启用第三方锁屏界面。不显示原生界面;2.锁屏界面已经显示了话,又一次更新下状态;3.假设第一次开机引导界面setup wizard 还没有执行,也先不显示;4.屏幕没有亮不显示;5.当前正在解密界面不显示。
假设这几个条件都不满足。则调用showLocked显示锁屏界面。在showLocked通过mHandler发送Message。在handleMessage里“case SHOW:”时调用handleShow
4、在handleShow里设置一些锁屏状态和显示锁屏界面
//frameworks/base/packages/SystemUI/src/com/android/systemui/keyguard/KeyguardViewMediator.java
public class KeyguardViewMediator extends SystemUI {
    ...
        private void handleShow(Bundle options) {
        synchronized (KeyguardViewMediator.this) {
            if (!mSystemReady) {
                if (DEBUG) Log.d(TAG, "ignoring handleShow because system is not ready.");
                return;
            } else {
                if (DEBUG) Log.d(TAG, "handleShow");
            }

            setShowingLocked(true);
            mStatusBarKeyguardViewManager.show(options);
            mHiding = false;
            mWakeAndUnlocking = false;
            resetKeyguardDonePendingLocked();
            mHideAnimationRun = false;
            updateActivityLockScreenState();
            adjustStatusBarLocked();
            userActivity();

            mShowKeyguardWakeLock.release();
        }
        mKeyguardDisplayManager.show();
    }
    ...
}
5、通过调用StatusBarKeyguardViewManager的show重置当前状态显示keyguard
//frameworks/base/packages/SystemUI/src/com/android/systemui/statusbar/phone/StatusBarKeyguardViewManager.java
public class StatusBarKeyguardViewManager {
    ...
    public void show(Bundle options) {
        mShowing = true;
        mStatusBarWindowManager.setKeyguardShowing(true);
        mScrimController.abortKeyguardFadingOut();
        reset();
    }
    ...
}
在reset里调用本类的showBouncerOrKeyguard,在这种方法里通过KeyguardBouncer的实例mBouncer调用prepare(),在prepare里调用了KeyguardHostView的showPrimarySecurityScreen
6、KeyguardSecurityContainer.showPrimarySecurityScreen
在KeyguardHostView的showPrimarySecurityScreen里调用KeyguardSecurityContainer的showPrimarySecurityScreen方法。例如以下
//frameworks/base/packages/Keyguard/src/com/android/keyguard/KeyguardSecurityContainer.java
public class KeyguardSecurityContainer extends FrameLayout implements KeyguardSecurityView {
    ...
    void showPrimarySecurityScreen(boolean turningOff) {
        SecurityMode securityMode = mSecurityModel.getSecurityMode();
        if (DEBUG) Log.v(TAG, "showPrimarySecurityScreen(turningOff=" + turningOff + ")");
        showSecurityScreen(securityMode);
    }
    ...
}
在这种方法里调用了showSecurityScreen,依据mSecurityModel.getSecurityMode()获取的SecurityMode来显示不同界面,SecurityMode定义例如以下
//frameworks/base/packages/Keyguard/src/com/android/keyguard/KeyguardSecurityModel.java
public class KeyguardSecurityModel {
    public enum SecurityMode {
        Invalid, // NULL state
        None, // No security enabled
        Pattern, // Unlock by drawing a pattern.
        Password, // Unlock by entering an alphanumeric password
        PIN, // Strictly numeric password
        SimPin, // Unlock by entering a sim pin.
        SimPuk // Unlock by entering a sim puk
    }
    ...
}
showSecurityScreen方法例如以下:
//frameworks/base/packages/Keyguard/src/com/android/keyguard/KeyguardSecurityContainer.java
public class KeyguardSecurityContainer extends FrameLayout implements KeyguardSecurityView {
    ...
    private void showSecurityScreen(SecurityMode securityMode) {
        if (DEBUG) Log.d(TAG, "showSecurityScreen(" + securityMode + ")");

        if (securityMode == mCurrentSecuritySelection) return;

        KeyguardSecurityView oldView = getSecurityView(mCurrentSecuritySelection);
        KeyguardSecurityView newView = getSecurityView(securityMode);//依据securityMode获取相应的view

        // Emulate Activity life cycle
        if (oldView != null) {
            oldView.onPause();
            oldView.setKeyguardCallback(mNullCallback); // ignore requests from old view
        }
        if (securityMode != SecurityMode.None) {
            newView.onResume(KeyguardSecurityView.VIEW_REVEALED);
            newView.setKeyguardCallback(mCallback);
        }

        // Find and show this child.
        final int childCount = mSecurityViewFlipper.getChildCount();

        final int securityViewIdForMode = getSecurityViewIdForMode(securityMode);
        for (int i = 0; i < childCount; i++) {
            if (mSecurityViewFlipper.getChildAt(i).getId() == securityViewIdForMode) {
                mSecurityViewFlipper.setDisplayedChild(i);
                break;
            }
        }

        mCurrentSecuritySelection = securityMode;
        mSecurityCallback.onSecurityModeChanged(securityMode,
                securityMode != SecurityMode.None && newView.needsInput());
    }
    ...
}
到这里锁屏就启动完毕了,这里简单总结一下:
1. 在KeyguardServiceDelegate里绑定KeyguardService,并调用onSystemReady方法。
2. KeyguardViewMediator里调用doKeyguardLocked来决定是否须要显示锁屏界面。假设显示则调用StatusBarKeyguardViewManager的show,最后调用到KeyguardHostView的showPrimarySecurityScreen()。
3. 在KeyguardSecurityContainer的showPrimarySecurityScreen利用mSecurityModel.getSecurityMode()获取当前的securityMode,传入showSecurityScreen来显示不同锁屏界面。
关于Android-7.1SDK去掉锁屏界面和安卓去除锁屏的介绍已经告一段落,感谢您的耐心阅读,如果想了解更多关于android ------ 实现高德定位并获取相应信息 ( 最新版高德SDK 和 Android SDK版本)、Android 2.2 SDK 操作系统界面截屏、Android 4.2.2 取消锁屏界面、Android 7.1.1 锁屏界面启动流程的相关信息,请在本站寻找。
本文标签:


![[转帖]Ubuntu 安装 Wine方法(ubuntu如何安装wine)](https://www.gvkun.com/zb_users/cache/thumbs/4c83df0e2303284d68480d1b1378581d-180-120-1.jpg)

