对于想了解AndroidNDK-7和AWK的问题的读者,本文将是一篇不可错过的文章,我们将详细介绍androidndkapi,并且为您提供关于androidndk(Notoolchainsfoundi
对于想了解Android NDK-7和AWK的问题的读者,本文将是一篇不可错过的文章,我们将详细介绍android ndk api,并且为您提供关于android ndk (No toolchains found in the NDK toolchains folder for ABI with prefix...)、Android NDK - 使用多个 NDK 构建构建应用程序、Android NDK :在 C语言代码中输出Log、Android NDK and OpenCV Development With Android Studio的有价值信息。
本文目录一览:- Android NDK-7和AWK的问题(android ndk api)
- android ndk (No toolchains found in the NDK toolchains folder for ABI with prefix...)
- Android NDK - 使用多个 NDK 构建构建应用程序
- Android NDK :在 C语言代码中输出Log
- Android NDK and OpenCV Development With Android Studio
")
Android NDK-7和AWK的问题(android ndk api)
ligi@ligid:~$ndk-build
/home/ligi/bin/android-ndk/prebuilt/linux-x86/bin/awk: 1: ELF: not found
/home/ligi/bin/android-ndk/prebuilt/linux-x86/bin/awk: 4: Syntax error: word unexpected (expecting ")")
Android NDK: Host 'awk' tool is outdated. Please define HOST_AWK to point to Gawk or Nawk !
/home/ligi/bin/android-ndk/build/core/init.mk:258: *** Android NDK: Aborting.    .  Stop.

ligi@ligid:~$`echo $HOST_AWK --v`
GNU Awk 3.1.7
我的股票ubuntu蚂蚁完全是出于想法和好的关键字搜索
解决方法
http://d.hatena.ne.jp/yohpapa/20111113/1321198570
我希望我能够正确地解读Google Translated的东西 – 无论如何,基本上都是在新的NDK安装中找到这个目录:
..../android-ndk-r7/prebuilt/linux-x86/bin
并将文件“awk”重命名为其他类似“awk_”
我这样做,ndk_build现在适合我.如果我正在阅读make文件,那么有一个名为init.mk的文件,如果找到它,则使用预构建的值替换HOST_AWK …所以重命名awk文件默认为您的gawk.
希望有帮助
吉备
")
android ndk (No toolchains found in the NDK toolchains folder for ABI with prefix...)

今天刚在 android studio (3.0.1)版本搭建 ndk 环境时遇到如上问题
在 r18b 版本中发现了一段话,大概解释了如上问题原因
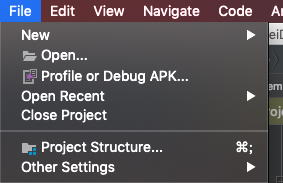
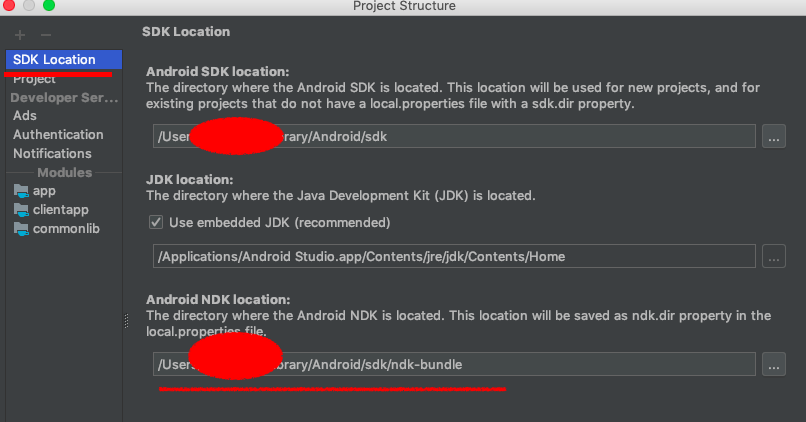
Android NDK location 即本地 NDK 路径。

Android NDK - 使用多个 NDK 构建构建应用程序
如何解决Android NDK - 使用多个 NDK 构建构建应用程序
是否可以像这样在 build.gradle 中链接多个本地库(用 C 编写):
externalNativeBuild {ndkBuild {path ''src/main/c/Lib1Android.mk''path ''src/main/c/Lib2Android.mk''}}
当我使用它时,我的 JNI 文件无法看到来自 Lib1 的本机函数 :(
解决方法
根据 NdkBuild doc,您只需要指定根 ndk-build 脚本,但在其中您可以调用任意数量的其他 Android.mk 文件(此处讨论如何执行此操作 Android NDK: how to include Android.mk into another Android.mk (hierarchical project structure)? ).

Android NDK :在 C语言代码中输出Log
Android NDK :在 C语言代码中输出Log
本篇文章来源于 Linux公社网站(www.linuxidc.com) 原文链接:http://www.linuxidc.com/Linux/2012-07/66106.htmAndroid NDK 开发时,想要在 .c 文件中打印一些调试信息的话,是不能使用 printf() 方法的,NDK 根本不支持,就算写了,在
LogCat 中也不会显示,正确的方式应该是 调用NDK 下的log.h 来打印Log 日志,具体方法如下:
1. 导入log头文件:在你使用的 .c/ .cpp 文件中,导入 log.h 头文件: #include<android/log.h>
2. 定义LOG 函数:先定义一个全局变量,再定义一些输出的LOG函数:
1.#define LOG "ffmpegDemo-jni" // 这个是自定义的LOG的标识
2.#define LOGD(...) __android_log_print(ANDROID_LOG_DEBUG,LOG,__VA_ARGS__) // 定义LOGD类型
3.#define LOGI(...) __android_log_print(ANDROID_LOG_INFO,LOG,__VA_ARGS__) // 定义LOGI类型
4.#define LOGW(...) __android_log_print(ANDROID_LOG_WARN,LOG,__VA_ARGS__) // 定义LOGW类型
5.#define LOGE(...) __android_log_print(ANDROID_LOG_ERROR,LOG,__VA_ARGS__) // 定义LOGE类型
6.#define LOGF(...) __android_log_print(ANDROID_LOG_FATAL,LOG,__VA_ARGS__) // 定义LOGF类型
上述代码中定义的函数,分别对应于Android 的Java代码中的 Log.d(), Log.i(), Log.w(),Log.e(), Log.f()等方法;
3. 使用上述方法:在.c 代码中直接按照一下方式书写:
1.LOGD(LOG, "这是Debug的信息");
2.LOGE(LOG, "程序错误!!!");
除此之外,更可以给在打印时带上一些变量:
1.int width=10;
2.int height=20;
3.LOGI(LOG, "长和宽分别为 %d ,%d“,width,height);
这种方式更加灵活,非常类似于 C语言中的 printf()函数。
全文结束,希望能给大家一些帮助~
本篇文章来源于 Linux公社网站(www.linuxidc.com) 原文链接:http://www.linuxidc.com/Linux/2012-07/66106.htm

Android NDK and OpenCV Development With Android Studio
---------------- If you do NOT know Chinese, you can just skip this part ----------------
一直打算将原来的XFace进行改进,最近终于有了些时间可以动手了,改进计划如下:开发上使用Android Studio作为新的开发环境,配上新的构建系统Gradle;应用上将修改原来的UI设计,内部代码也将有很大的变化,可能会用上ContentProvider和Service等略高级内容;算法上打算让应用扩展性增强以适应不同的算法,并结合强大的Android Studio和Gradle让这个项目变得更加丰富。说了一堆废话,言归正传,本文的重点是介绍如何在Android Studio中进行NDK开发(目前它还不完全支持NDK开发),难点是NDK中还包含OpenCV的动态库。最后的最后,本文剩下部分将使用英文,因为它要成为我在StackOverflow上的处女答,么么哒 ~O(∩_∩)O~
---------------------------- Here is the right stuff you may need --------------------------------
This post shows how to develop an Android NDK application with OpenCV included using Android Studio and Gradle. If you''re working on migrating your original Eclipse Project to Android Studio, you may find this post is what exactly you want!
OK,Let''s start!
Section 1: Three things you must know
1.Firstly, if you are not familiar with Android Studio and Gradle, you may find these links useful. (if you already know these well, skip this part)
①Creating a new Project with Android Studio
②Building Your Project with Gradle
③Gradle Plugin User Guide or you may want to read a Chinese commented version in my blog here.
2.Secondly, if your android ndk project is not that complicated(for example, having no opencv included), you may wanna see ph0b ''s introduction here, it''s quite a nice job with a video recorded! (you can also follow Section 2 in this post to get a simple Android NDK demo application)
ph0b''s post: ANDROID STUDIO, GRADLE AND NDK INTEGRATION
3.Thirdly, if those above two do not meet your needs, then I think you may want to customize the Android.mk with Gradle in Android Studio. Thanks to Gaku Ueda , he had made a great job explaining how to achieve that goal. Actually I have found another nicer solution without adding that many codes and also achieve that goal. :-) Find it out in the next sections.
Gaku Ueda''s post: Using custom Android.mk with Gradle/Android Studio
OK, I will cover all above and give another nice solution in the end, have fun!
Section 2: A simple Android NDK demo application
This section shows creating a simple Android NDK demo application, if you already know, you can directly go the section 3.
1.Create a new Android project named NDKDemo with a blank Activity in AS(=Android Studio).
2.Give an id to the TextView in activity_my.xml such as android:id="@+id/textview", then add these codes in MyActivity.java.
@Override
protected void onCreate(Bundle savedInstanceState) {
    super.onCreate(savedInstanceState);
    setContentView(R.layout.activity_my);

    TextView textView = (TextView) findViewById(R.id.textview);
    textView.setText(hello());
}

static {
    System.loadLibrary("hello");
}

public native String hello();
3.Create a new directory jni in folder app/src/main, then you have java, jni and res in this folder.
4.This step is very important! You can add a external tool to run the javah command without typing that much code!
Open AS''s Preferences, then find External Tools in IDE Settings, click + to add one tool with the following configurations. (Make sure you have add JDK tools in your system path, if you don''t know how, click here)

With the help of this tool, each time we right click on a class file, then choose Android Tools -> javah to run this tool, it will automatically generate a C head file for us in the target folder $ModuleFileDir$/src/main/jni , in this case, it is app/src/main/jni. Try this on MyActivity.java file now! The console will print out a log like:
/usr/bin/javah -v -jni -d /Users/hujiawei/AndroidStudioProjects/NDKDemo/app/src/main/jni com.android.hacks.ndkdemo.MyActivity
[Creating file RegularFileObject[/Users/hujiawei/AndroidStudioProjects/NDKDemo/app/src/main/jni/
com_android_hacks_ndkdemo_MyActivity.h]]
Then you get a com_android_hacks_ndkdemo_MyActivity.h file in jni folder with the following content.
/* DO NOT EDIT THIS FILE - it is machine generated */
#include <jni.h>
/* Header for class com_android_hacks_ndkdemo_MyActivity */

#ifndef _Included_com_android_hacks_ndkdemo_MyActivity
#define _Included_com_android_hacks_ndkdemo_MyActivity
#ifdef __cplusplus
extern "C" {
#endif
/*
 * Class:     com_android_hacks_ndkdemo_MyActivity
 * Method:    hello
 * Signature: ()Ljava/lang/String;
 */
JNIEXPORT jstring JNICALL Java_com_android_hacks_ndkdemo_MyActivity_hello
  (JNIEnv *, jobject);

#ifdef __cplusplus
}
#endif
#endif
5.Write a simple C implementation file named main.c in jni folder
#include <jni.h>
#include "com_android_hacks_ndkdemo_MyActivity.h"

JNIEXPORT jstring JNICALL Java_com_android_hacks_ndkdemo_MyActivity_hello
  (JNIEnv * env, jobject obj){
    return (*env)->NewStringUTF(env, "Hello from JNI");
  }
6.In the build.gradle file under app module, add the following codes to configure ndk in defaultConfig element, here we just give the uni module a name hello, you can find other configurations in Gradle Plugin User Guide.
defaultConfig {
    applicationId "com.android.hacks.ndkdemo"
    minSdkVersion 16
    targetSdkVersion 20
    versionCode 1
    versionName "1.0"

    ndk{
        moduleName "hello"
    }
}
7.In order to let Gradle run ndk-build command (in some task, maybe NdkCompile task), we should configure the ndk.dir in local.properties file in Project root.
sdk.dir=/Volumes/hujiawei/Users/hujiawei/Android/android_sdk
ndk.dir=/Volumes/hujiawei/Users/hujiawei/Android/android_ndk
8.OK, everything is ready, click Run to give it a try, you will see the result like

All right, so what''s happening inside?
Since you have a jni folder, Gradle will consider it as a default native code folder. When Gradle builds the app, it will run ndk-build command(since you have configured ndk.dir, Gradle knows where to find it) with a generated Android.mk file(locates in app/build/intermediates/ndk/debug/Android.mk), after compiling the native codes, it will generate the libs and obj folder into folder app/build/intermediates/ndk/debug/. Gradle will then package the libs into final apk file in folder app/build/outputs/apk/app-debug.apk(you can unarchive this file to check whether libs is contained)
app/build/intermediates/ndk/debug (lib and obj folders)

app/build/outputs/apk/app-debug.apk (and files within it)

Secontion 3: Using OpenCV
If your project do not use OpenCV, then the section 2 is just enough. But what if you wanna use OpenCV to do other stuff? Of course, we want to use OpenCV for Android instead of JavaCV here, and Of course, we need to package OpenCV library for Android into our application''s APK file (then users who use this app does not have to install OpenCV Manager). So, how can we achieve these goals?
The simplest way has been posted by TGMCians on Stack Overflow here, that is, let the main app include the OpenCV library as a dependency, and copy all <abi>/*.so files in OpenCV for Android SDK to jniLibs folder under app/src/main/, Gradle will automatically package these <abi>/*.so files into libs folder within the final APK file. Of course, this method will work, but it has a few backwards: (1) Unless you only copy the needed *.so files, you will always have a large APK due to this reason; (2) How about the building of the jni files? How to run ndk-build if these files contain opencv related codes?
So, here comes to our Using custom Android.mk with Gradle and Android Studio part. For testing, we first creat an Android.mk and an Application.mk file under jni folder.
Android.mk
LOCAL_PATH := $(call my-dir)

include $(CLEAR_VARS)

LOCAL_SRC_FILES := main.c
LOCAL_LDLIBS += -llog
LOCAL_MODULE := hello

include $(BUILD_SHARED_LIBRARY)
Application.mk
APP_ABI := armeabi
APP_PLATFORM := android-16
Thanks to Gaku Ueda, he had made a great job explaining how to achieve that goal with this post. The core idea of his method is to run ndk-build command in some task, then zip the <abi>/*.so files under the output app/build/libs/ folder into a jar file which is finally put in app/build/libs/ folder, then add a compile dependency to this jar file. The key code for his method listed below
Notice 1: When using custom Android.mk, we should first disable Gradle to build the jni folder as before, and sourceSets.main.jni.srcDirs = [] just does this job!
Notice 2: The code is not exactly the same with Gaku Ueda''s code: tasks.withType(Compile) to tasks.withType(JavaCompile), because Compile is deprecated.
Notice 3: You can get $ndkDir variable with project.plugins.findPlugin(''com.android.application'').getNdkFolder() or you can define it in grade.properties file under Project root, so you need to add ndkDir=path/to/your/ndk in that file, if the file is not created, simply create a new one.
android{
    ...
    sourceSets.main.jni.srcDirs = []

    task ndkBuild(type: Exec, description: ''Compile JNI source via NDK'') {
        ndkDir = project.plugins.findPlugin(''com.android.application'').getNdkFolder()
        commandLine "$ndkDir/ndk-build",
                ''NDK_PROJECT_PATH=build'',
                ''APP_BUILD_SCRIPT=src/main/jni/Android.mk'',
                ''NDK_APPLICATION_MK=src/main/jni/Application.mk''
    }

    task ndkLibsToJar(type: Zip, dependsOn: ''ndkBuild'', description: ''Create a JAR of the native libs'') {
        destinationDir new File(buildDir, ''libs'')
        baseName ''ndk-libs''
        extension ''jar''
        from(new File(buildDir, ''libs'')) { include ''**/*.so'' }
        into ''lib/''
    }

    tasks.withType(JavaCompile) {
        compileTask -> compileTask.dependsOn ndkLibsToJar
    }
    ...
}

dependencies {
    compile fileTree(dir: ''libs'', include: [''*.jar''])
    // add begin
    compile fileTree(dir: new File(buildDir, ''libs''), include: ''*.jar'')
    // add end
}
But we can still do a little improvements here. We have already know that Gradle will take jniLibs folder as its default native libraries folder, so we can simply output the libs/<abi>/*.so files generated by ndk-build command into jniLibs folder, so there''s no need to zip these *.so files into a jar file.
The final build.gradle file under app module
apply plugin: ''com.android.application''

android {
    compileSdkVersion 20
    buildToolsVersion "20.0.0"

    defaultConfig {
        applicationId "com.android.hacks.ndkdemo"
        minSdkVersion 16
        targetSdkVersion 20
        versionCode 1
        versionName "1.0"
    }

    // add begin
    sourceSets.main.jni.srcDirs = []

    task ndkBuild(type: Exec, description: ''Compile JNI source via NDK'') {
        ndkDir = project.plugins.findPlugin(''com.android.application'').getNdkFolder()
        commandLine "$ndkDir/ndk-build",
                ''NDK_PROJECT_PATH=build/intermediates/ndk'',
                ''NDK_LIBS_OUT=src/main/jniLibs'',
                ''APP_BUILD_SCRIPT=src/main/jni/Android.mk'',
                ''NDK_APPLICATION_MK=src/main/jni/Application.mk''
    }

    tasks.withType(JavaCompile) {
        compileTask -> compileTask.dependsOn ndkBuild
    }
    // add end

    buildTypes {
        release {
            runProguard false
            proguardFiles getDefaultProguardFile(''proguard-android.txt''), ''proguard-rules.pro''
        }
    }
}

dependencies {
    compile fileTree(dir: ''libs'', include: [''*.jar''])
}
So simple, right? ''NDK_LIBS_OUT=src/main/jniLibs'' helps us do the right job!
For testing, you can also add some lines relating with OpenCV in your Android.mk file and some line in your main.c to check whether everything is readlly working. For example, add #include <opencv2/core/core.hpp> in main.c file, and change Android.mk to
LOCAL_PATH := $(call my-dir)

include $(CLEAR_VARS)

#opencv
OPENCVROOT:= /Volumes/hujiawei/Users/hujiawei/Android/opencv_sdk
OPENCV_CAMERA_MODULES:=on
OPENCV_INSTALL_MODULES:=on
OPENCV_LIB_TYPE:=SHARED
include ${OPENCVROOT}/sdk/native/jni/OpenCV.mk

LOCAL_SRC_FILES := main.c
LOCAL_LDLIBS += -llog
LOCAL_MODULE := hello

include $(BUILD_SHARED_LIBRARY)
In Gradle Console window, you can see these similar lines

*.so files relating with OpenCV has been packaged into the final APK

One More Thing
Of course, maybe you don''t want to change your build.grale file with that much code, and Of course, you also don''t want to run ndk-build outside the IDE, then copy the <abi>/*.so files into jniLibs folder each time you want to rebuild the native codes!
At last, I came out another nicer solution, if you like, that is to create a ndk-build external tool in Android Studio, and every time you want to rebuild the native codes, simply run the external tool, then it automatically generates the libs/<abi>/*.so files into jniLibs folder, so everything is ready to run this app, :-)
The configuration is simple
Parameters: NDK_PROJECT_PATH=$ModuleFileDir$/build/intermediates/ndk NDK_LIBS_OUT=$ModuleFileDir$/src/main/jniLibs NDK_APPLICATION_MK=$ModuleFileDir$/src/main/jni/Application.mk APP_BUILD_SCRIPT=$ModuleFileDir$/src/main/jni/Android.mk V=1

OK, I hope it is helpful. Let me know if it is really helpful, or tell me what''s your problem. :-)
我们今天的关于Android NDK-7和AWK的问题和android ndk api的分享就到这里,谢谢您的阅读,如果想了解更多关于android ndk (No toolchains found in the NDK toolchains folder for ABI with prefix...)、Android NDK - 使用多个 NDK 构建构建应用程序、Android NDK :在 C语言代码中输出Log、Android NDK and OpenCV Development With Android Studio的相关信息,可以在本站进行搜索。
本文标签:


