在本文中,我们将带你了解AndroidOreo的后台服务在这篇文章中,我们将为您详细介绍AndroidOreo的后台服务的方方面面,并解答android后端服务器常见的疑惑,同时我们还将给您一些技巧,
在本文中,我们将带你了解Android Oreo的后台服务在这篇文章中,我们将为您详细介绍Android Oreo的后台服务的方方面面,并解答android后端服务器常见的疑惑,同时我们还将给您一些技巧,以帮助您实现更有效的Android 10蓝牙断开后台服务、Android : App 客户端与后台服务的 AIDL 通信以及后台服务的 JNI 接口实现、Android Oreo JobIntentService继续在Android 7及以下版本的后台运行,并且经常在Android 8及以上版本中崩溃、Android O后台服务限制。
本文目录一览:- Android Oreo的后台服务(android后端服务器)
- Android 10蓝牙断开后台服务
- Android : App 客户端与后台服务的 AIDL 通信以及后台服务的 JNI 接口实现
- Android Oreo JobIntentService继续在Android 7及以下版本的后台运行,并且经常在Android 8及以上版本中崩溃
- Android O后台服务限制
")
Android Oreo的后台服务(android后端服务器)
如何在不显示通知点的情况下继续在Android Oreo中进行后台服务?我使用通知继续后台服务,但我不想显示正在运行的服务的通知。
答案1
小编典典如果您可以在此处的某处正确阅读
Android Oreo 8.0
文档,则可能未在此处发布此问题。
步骤1: 确保您将服务作为前台启动,
Service如以下代码所示
ContextCompat.startForegroundService(mainActivity, new Intent(getContext(), GpsServices.class));ContextCompat.startForegroundService(mainActivity, new Intent(getContext(), BluetoothService.class));ContextCompat.startForegroundService(mainActivity, new Intent(getContext(), BackgroundApiService.class));步骤2: 使用通知显示您的服务正在运行。在的
onCreate方法中的代码下面添加一行Service。
@Overridepublic void onCreate() { ... if (Build.VERSION.SDK_INT >= Build.VERSION_CODES.O) { startForeground(NOTIFICATION_ID, notification); } ...}步骤3:
notification在服务停止或销毁时删除。
@Overridepublic void onDestroy() { ... if (Build.VERSION.SDK_INT >= Build.VERSION_CODES.O) { stopForeground(true); //true will remove notification } ...}该解决方案的一个问题是,它将一直显示,notification直到您Service在 Android Oreo 8.0
上运行的所有设备上运行为止。
我确信即使该应用程序处于后台或处于终止状态,该解决方案也能正常工作。
重要说明: 在ANDROID OREO 8.0中必须显示在后台运行服务的通知(在后台或处于杀死状态的APP)。您 不能逃避 它。因此,
建议 您对应用程序进行必要的更改,以按照ANDROID遵循或要求的 最佳 做法正确地使它正常工作。
我希望这可能有助于解决您的问题。

Android 10蓝牙断开后台服务
原来,这还取决于电话类型本身。一些电话公司试图延长某些类型电话的电池寿命,因此它关闭了所有未使用的后台服务。
一种变通方法,可以通过创建一个循环来完成,该循环每隔一小段时间发送一条消息以维持连接。

Android : App 客户端与后台服务的 AIDL 通信以及后台服务的 JNI 接口实现
一、APP 客户端进程与后台服务进程的 AIDL 通信
AIDL(Android Interface definition language-“接口定义语言”) 是 Android 提供的一种进程间通信 (IPC:Inter-Process Communication) 机制,支持的数据类型:
1. Java 的原生类型;
2. String 和 CharSequence;
3. List 和 Map ,List 和 Map 对象的元素必须是 AIDL 支持的数据类型; 以上三种类型都不需要导入 (import);
4. AIDL 自动生成的接口 需要导入 (import);
5. 实现 android.os.Parcelable 接口的类. 需要导入 (import)。
Android studio 工程建立如下:
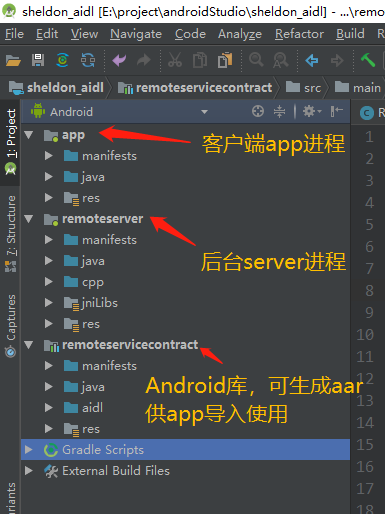
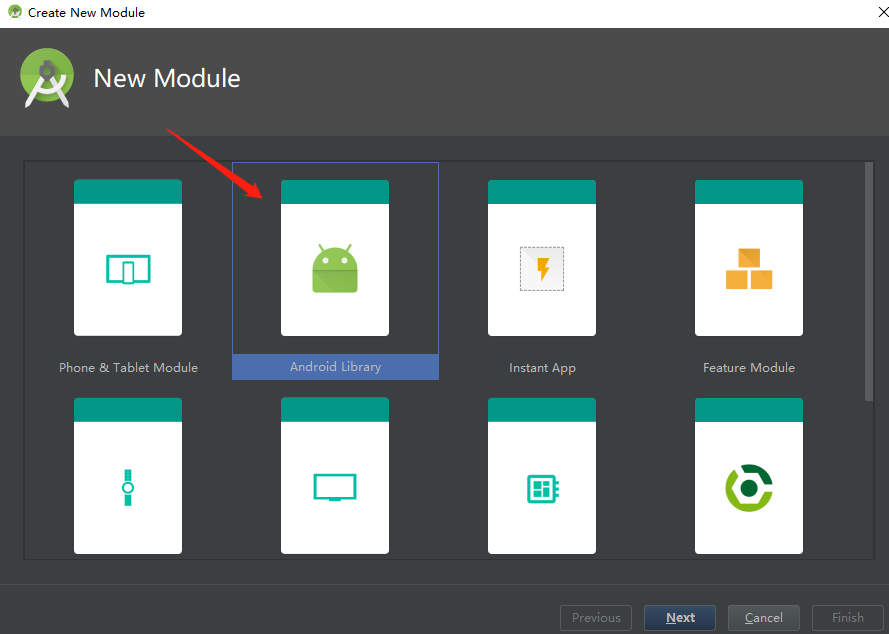
app 和 remoteserver 按常规应用建立,remoteservicecontract 通过新建 Android Library 生成:

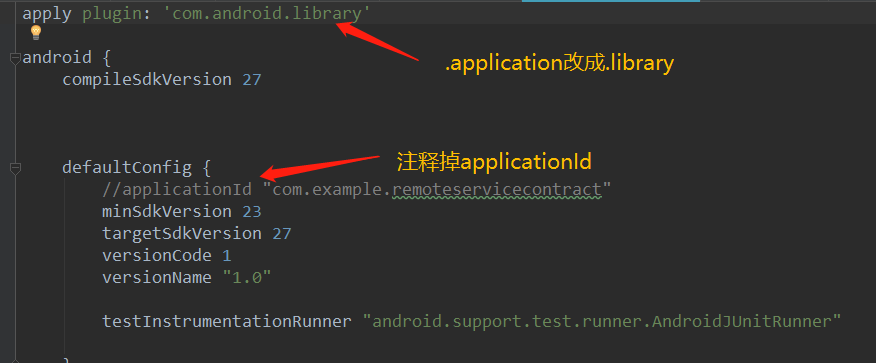
也可以将原本的应用模块改成库模块:
然后在 remoteservicecontract 建立 aidl 目录并新建 AIDL 文件:
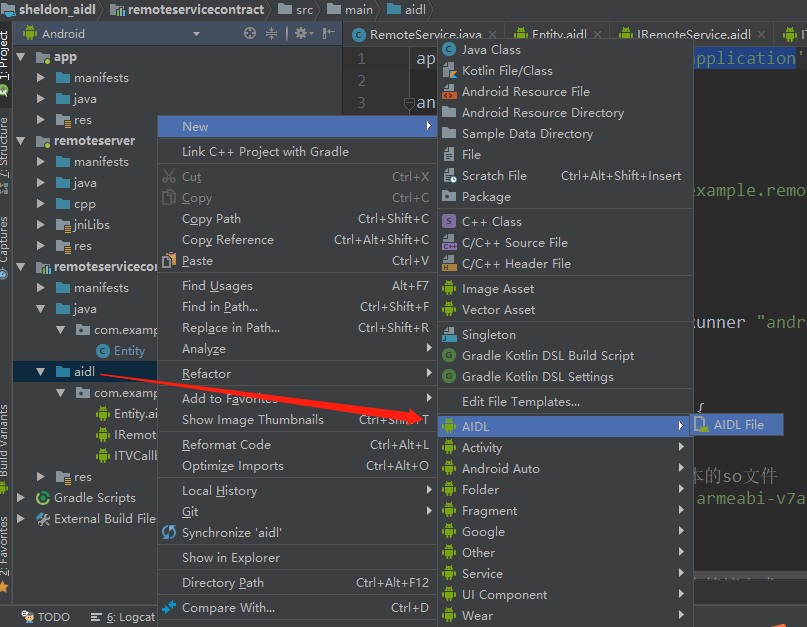
建立如下三个 AIDL 接口:
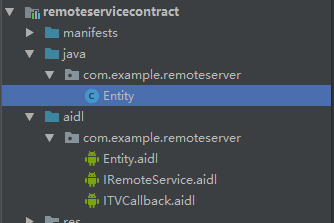
aidl 文件的声明和 java 实现如下:
(1)Entity.aidl 是声明本地实现的 android.os.Parcelable 接口的类
// Entity.aidl
package com.example.remoteserver;
parcelable Entity;
java 实现:
package com.example.remoteserver;

import android.os.Parcel;
import android.os.Parcelable;
import android.util.Log;

public class Entity implements Parcelable {
    private int age;
    private String name;
    private final String TAG = "Engity";

    public Entity() {
    }

    public Entity(int age, String name) {
        Log.i(TAG,"new age="+age+",name="+name);
        this.age = age;
        this.name = name;
    }

    protected Entity(Parcel in) {
        age = in.readInt();
        name = in.readString();
    }

    public static final Creator<Entity> CREATOR = new Creator<Entity>() {
        @Override
        public Entity createFromParcel(Parcel in) {
            return new Entity(in);
        }

        @Override
        public Entity[] newArray(int size) {
            return new Entity[size];
        }
    };

    public int getAge() {
        Log.i(TAG,"get age="+age);
        return this.age;
    }

    public void setAge(int age) {
        Log.i(TAG,"set age="+age);
        this.age = age;
    }

    public String getName() {
        Log.i(TAG,"get name="+name);
        return this.name;
    }

    public void setName(String name) {
        Log.i(TAG,"set name="+name);
        this.name = name;
    }

    @Override
    public int describeContents() {
        return 0;
    }

    @Override
    public void writeToParcel(Parcel dest, int flags) {
        dest.writeInt(age);
        dest.writeString(name);
    }

    @Override
    public String toString() {
        return String.format("age=%s, name=%s", getAge(), getName());
    }
}(2)IRemoteService.aidl声明服务端供客户端调用的接口:// IRemoteService.aidl
package com.example.remoteserver;
import com.example.remoteserver.Entity;
import com.example.remoteserver.ITVCallback;
// Declare any non-default types here with import statements
interface IRemoteService {
void doSomeThing(int anInt,String aString);
void addEntity(in Entity entity);
void setEntity(int index,in Entity entity);
List<Entity> getEntity();
void asyncCallSomeone( String para, ITVCallback callback);
}java实现:package com.example.remoteserver;
import android.Manifest;
import android.app.Service;import android.content.Context;
import android.content.Intent;
import android.content.pm.PackageManager;
import android.location.LocationManager;
import android.os.Build;
import android.os.Handler;
import android.os.IBinder;
import android.os.Looper;
import android.os.RemoteCallbackList;
import android.os.RemoteException;
import android.provider.Settings;
import android.support.annotation.Nullable;
import android.support.v4.content.ContextCompat;
import android.util.Log;
import android.view.LayoutInflater;
import android.view.View;
import android.view.ViewGroup;
import android.widget.BaseAdapter;
import android.widget.Toast;
import java.nio.ByteBuffer;
import java.util.ArrayList;
import java.util.List;
public class RemoteService extends Service {
public static final String TAG = "RemoteService";
private List<Entity> data = new ArrayList<Entity>();
int mStartMode; // indicates how to behave if the service is killed
final RemoteCallbackList<ITVCallback> remoteCallbackList = new RemoteCallbackList<>();
public void onCreate() {
// Used to load the ''native-lib'' library on application startup.
System.loadLibrary("RemoteServiceJNI"); //加载native接口的c库
pthreadState = true;
DataThread datathread = new DataThread();
datathread.start();
Nano_Printf("service onCreate");
Nano_Printf(String.format("<%s>",stringFromJNI())); //调用JNI接口
}
public int onStartCommand(Intent intent, int flags, int startId) {
Nano_Printf("service onStartCommand");
return mStartMode;
}
/*返回Binder对象实例*/
public IBinder onBind(Intent intent) {
Nano_Printf("service on bind,intent = %s",intent.toString());
return binder;
}
public void onDestroy() {
Nano_Printf("service onDestroy");
pthreadState = false;
// 取消掉所有的回调
remoteCallbackList.kill();
}
private void Nano_Printf(String...args) {
String str = "";
for(int i = 0; i < args.length; i++){
str += args[i];
if( i != args.length - 1){
str += ", ";
}
}
Log.d(TAG, str);
}
/*生成的 Binder 对象实例,实现接口定义的方法*/
private final IRemoteService.Stub binder = new IRemoteService.Stub() {
@Override
public void doSomeThing(int anInt, String aString) throws RemoteException {
Log.i(TAG, String.format("rcv:%s, %s", anInt, aString));
}
@Override
public void addEntity(Entity entity) throws RemoteException {
Log.i(TAG, String.format("rcv:entity = %s", entity));
data.add(entity);
}
@Override
public List<Entity> getEntity() throws RemoteException {
Log.i(TAG, String.format("get:List<Entity> = %s", data));
return data;
}
public void setEntity(int index, Entity entity) throws RemoteException {
Log.i(TAG, String.format("set:entity[%d] = %s", index, entity));
data.set(index, entity);
}
@Override
/*客户端调用asyncCallSomeone接口并传过来callback实例,服务端注册callback并回调修改结果*/
public void asyncCallSomeone(String para, ITVCallback callback) throws RemoteException {
Log.i(TAG, String.format("asyncCallSomeone..."));
remoteCallbackList.register(callback);
final int len = remoteCallbackList.beginBroadcast();
for (int i = 0; i < len; i++) {
remoteCallbackList.getBroadcastItem(i).onSuccess(para + "_callbck");
}
remoteCallbackList.finishBroadcast();
}
};
/*native interface*/
public native String stringFromJNI();
}(3)ITVCallback.aidl声明客户端向服务端注册的回调接口:// Callback.aidl
package com.example.remoteserver;
// Declare any non-default types here with import statements
interface ITVCallback {
/**
* Demonstrates some basic types that you can use as parameters
* and return values in AIDL.
*/
void onSuccess(String aString);
}app 客户端 Java 实现:
package com.example.administrator.sheldon_aidl;

import android.content.ComponentName;
import android.content.Context;
import android.content.Intent;
import android.content.ServiceConnection;
import android.nfc.Tag;
import android.os.IBinder;
import android.os.Looper;
import android.os.RemoteException;
import android.support.v7.app.AppCompatActivity;
import android.os.Bundle;
import android.util.Log;
import android.view.View;
import android.widget.Toast;

/*导入资源库中AIDL定义的类*/
import com.example.remoteserver.Entity;
import com.example.remoteserver.ITVCallback;
import com.example.remoteserver.IRemoteService;

import java.util.List;

public class MainActivity extends AppCompatActivity {

    private boolean mBound = false;
    private IRemoteService iRemoteService;

    @Override
    protected void onCreate(Bundle savedInstanceState) {
        super.onCreate(savedInstanceState);
        setContentView(R.layout.activity_main);
findViewById(R.id.add).setOnClickListener(new View.OnClickListener() {
    @Override
    public void onClick(View v) {
        if (!mBound) {
            alert("未连接到远程服务");
            return;
        }
        try {
            Entity entity = new Entity(100, "sheldon");
            if (iRemoteService != null){
                iRemoteService.addEntity(entity); //调用服务端的接口添加成员变量

                iRemoteService.registerCallBack(mCallback);
            }

        } catch (RemoteException e) {
            e.printStackTrace();
        }
    }
});
        findViewById(R.id.modify).setOnClickListener(new View.OnClickListener() {
            @Override
            public void onClick(View v) {
                if (!mBound) {
                    alert("未连接到远程服务");
                    return;
                }

                if (iRemoteService != null) {
                    try {
                        List<Entity> entityList = iRemoteService.getEntity();
                        int pos = 1;
                        if(entityList.size()>pos){
                            entityList.get(pos).setAge(1314);
                            entityList.get(pos).setName("li");
                            iRemoteService.setEntity(pos,entityList.get(pos)); //调用服务端的接口修改成员变量
                        }
                    } catch (RemoteException e) {
                        e.printStackTrace();
                    }
                }
            }
        });

        findViewById(R.id.callback).setOnClickListener(new View.OnClickListener() {
            @Override
            public void onClick(View v) {
                if (!mBound) {
                    alert("未连接到远程服务");
                    return;
                }

                if (iRemoteService != null) {
                    try {
                        final String para = "canshu";
                        iRemoteService.asyncCallSomeone(para, mCallback); //调用服务端的接口并传入回调
                    } catch (RemoteException e) {
                        e.printStackTrace();
                    }
                }
            }
        });
    }

    private void alert(String str) {
        //解决在子线程中调用Toast的异常情况处理(还是有异常)
        //Looper.prepare();
        Toast.makeText(this, str, 0).show();
        //Looper.loop();
    }

    @Override
    protected void onStart() {
        super.onStart();
        if (!mBound) {
            attemptToBindService();    // 尝试绑定服务
        }
    }

    @Override
    protected void onStop() {
        super.onStop();
        if (mBound) {
            unbindService(mServiceConnection); // 解绑服务
            mBound = false;
        }
    }

    /**
     * 尝试与服务端建立连接
     */
    private void attemptToBindService() {
        Intent intent = new Intent();
        intent.setAction("com.example.REMOTE.myserver"); //这里的action由..\remoteserver\src\main\AndroidManifest.xml中指定
        intent.setPackage("com.example.remoteserver");  //这里即为服务端进程包名
        bindService(intent, mServiceConnection, Context.BIND_AUTO_CREATE);
    }

  /*实现 ServiceConnection 接口,在其中拿到IRemoteService AIDL类*/
    private ServiceConnection mServiceConnection = new ServiceConnection() {
        @Override
        public void onServiceConnected(ComponentName name, IBinder service) {
            Log.i(getLocalClassName(), "service connected");
            iRemoteService = IRemoteService.Stub.asInterface(service);

            mBound = true;

            if (iRemoteService != null) {
                try {
                    iRemoteService.doSomeThing(0, "anything string");
                } catch (RemoteException e) {
                    e.printStackTrace();
                }
            }
        }

        @Override
        public void onServiceDisconnected(ComponentName name) {
            Log.i(getLocalClassName(), "service disconnected");
            mBound = false;
        }
    };

    /*实现callback接口*/
    private ITVCallback mCallback = new ITVCallback.Stub() {
        @Override
        public void onSuccess(String aString) throws RemoteException {  //回调接口被服务端调用,获得结果并用Toast显示
            Log.d("nano-client ", String.format("service arrived %s",aString));
            alert(String.format("回调: %s", aString));
        }
    };
}
客户端和服务端的通信AIDL接口定义在remoteservicecontract库中,需要在各模块导入使用,
如果各模块在同一个Android Studio工程开发,可通过修改build.gradle直接应用: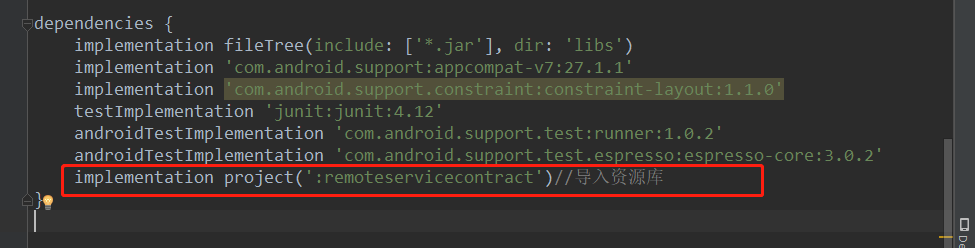
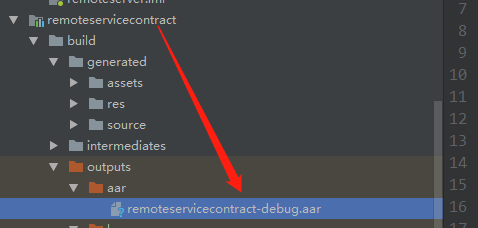
也可以将生成的 aar, 提供给另一个工程导入使用:

二、后台服务的JNI接口实现:
目录结构如下:
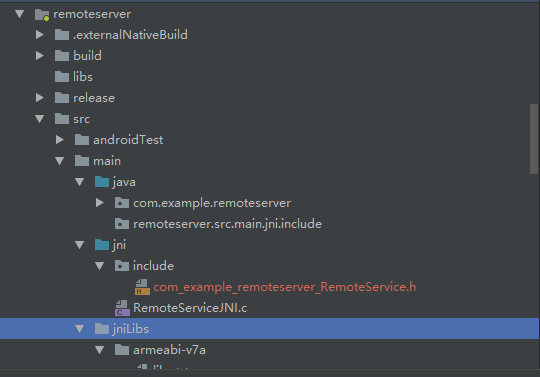
1.声明native方法,如 RemoteService.java 中声明的:/*native interface*/
public native String stringFromJNI();
2.通过javah生成native格式的头文件 com_example_remoteserver_RemoteService.h:
![]()
javah -d 【头文件生成路径】 -classpath 【java 文件路径】-jni 【包名。类名】
/* DO NOT EDIT THIS FILE - it is machine generated */
#include <jni.h>
/* Header for class com_example_remoteserver_RemoteService */

#ifndef _Included_com_example_remoteserver_RemoteService
#define _Included_com_example_remoteserver_RemoteService
#ifdef __cplusplus
extern "C" {
#endif
/*
 * Class:     com_example_remoteserver_RemoteService
 * Method:    stringFromJNI
 * Signature: ()Ljava/lang/String;
*/
JNIEXPORT jstring JNICALL Java_com_example_remoteserver_RemoteService_stringFromJNI
(JNIEnv *, jobject);
#ifdef __cplusplus
}
#endif
#endif3. 根据生成的 jni 头文件建立 RemoteServiceJNI.c 文件实现其接口:
#include <jni.h>
#include <string.h>
#include <android/log.h>


#define TAG "nano-jni"
#define LOGD(...) __android_log_print(ANDROID_LOG_DEBUG,TAG ,__VA_ARGS__)
#define LOGI(...) __android_log_print(ANDROID_LOG_INFO,TAG ,__VA_ARGS__)
#define LOGW(...) __android_log_print(ANDROID_LOG_WARN,TAG ,__VA_ARGS__)
#define LOGE(...) __android_log_print(ANDROID_LOG_ERROR,TAG ,__VA_ARGS__)
#define LOGF(...) __android_log_print(ANDROID_LOG_FATAL,TAG ,__VA_ARGS__)


#ifdef __cplusplus
extern "C" {
#endif

/*
 * Class:     com_example_remoteserver_RemoteService
 * Method:    stringFromJNI
 * Signature: ()Ljava/lang/String;
参数说明:
    Native的对应函数名要以“Java_”开头,后面依次跟上Java的“package名”、“class名”、“函数名”,中间以下划线“_” 分割,在package名中的“.”也要改为“_”。
关于函数的参数和返回值也有相应的规则。对于 Java 中的基本类型如 int 、double 、char 等,
在 Native 端都有相对应的类型来表示,如 jint 、jdouble 、jchar 等;其他的对象类型则统统由 jobject 来表示,
(String 是个例外,由于其使用广泛,故在 Native 代码中有 jstring 这个类型来表示)。
而对于 Java 中的数组,在 Native 中由 jarray 对应,具体到基本类型和一般对象类型的数组则有 jintArray 等
和 jobjectArray 分别对应(String 数组在这里没有例外,同样用 jobjectArray 表示)。
另外在 JNI 的 Native 函数中,其前两个参数 JNIEnv * 和 jobject 是必需的,前者是一个 JNIEnv 结构体的指针,这个结构体中定义了很多 JNI 的接口函数指针,
使开发者可以使用 JNI 所定义的接口功能;后者指代的是调用这个 JNI 函数的 Java 对象,有点类似于 C++ 中的 this 指针。
在上述两个参数之后,还需要根据 Java 端的函数声明依次对应添加参数,如下 Java 中声明的 JNI 函数没有参数,则 Native 的对应函数只有类型为 JNIEnv * 和 jobject 的两个参数。
*/
JNIEXPORT jstring JNICALL Java_com_example_remoteserver_RemoteService_stringFromJNI
  (JNIEnv *env, jobject thiz){
    return (*env)->NewStringUTF(env, "Hi! Sheldon, I`m JNI ~");
  }

#ifdef __cplusplus
}
#endif
4. 编译 c 文件生成 so:
Android studio 的gradle3.0版本以下可以配置NDK编译c/cpp文件:
修改对应模块的build.gradle在defaultConfig中添加:
//gradle3.0以上已经不支持该方式
 ndk {
     moduleName "libRemoteServiceJNI"            //指定生成的so文件名
     ldLibs     "log", "z", "m"                  //添加log库
     abiFilters "armeabi", "armeabi-v7a", "x86"  //支持cpu的类型
 }
而 gradle3.0 以上版本需要用 CMake 工具编译:
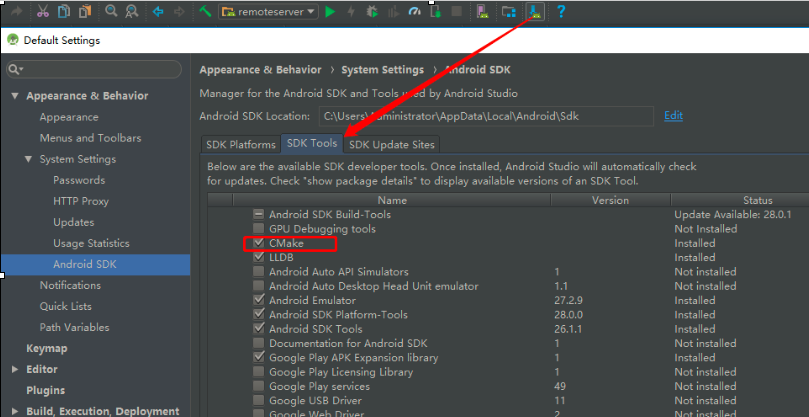
首先 Android studio 安装 CMake 工具:
然后同样在 defaultConfig {} 中添加编译参数:
// 使用Cmake工具
        externalNativeBuild {
            cmake {
                cppFlags ""
                //生成多个版本的so文件
                abiFilters ''armeabi-v7a'' //,''arm64-v8a'',''x86'',''x86_64''
            }
        }
另外在 defaultConfig {} 的外一层即 android {} 中配置编译脚本的路径:
// 配置CMakeLists.txt路径
    externalNativeBuild {
        cmake {
            path "CMakeLists.txt" //编译脚本
        }
    }
比较关键的是 CMakeLists.txt 编译脚本,具体内容如下:
###############################
#1.cmake verson,指定cmake版本
cmake_minimum_required(VERSION 3.4.1)

#2.C++ 的编译选项是 CMAKE_CXX_FLAGS
# 指定编译参数,可选
#SET(CMAKE_C_FLAGS "-Wno-error=format-security -Wno-error=pointer-sign")

#3.设置cmake生成so输出的路径
set(CMAKE_LIBRARY_OUTPUT_DIRECTORY ${CMAKE_SOURCE_DIR}/src/main/jniLibs/${ANDROID_ABI})

#4.包含头文件,导入第三方动态库
include_directories(
${CMAKE_SOURCE_DIR}/src/main/jni/include
)

#5.指定源文件和编译生成so名及类型
# 生成在intermediates/cmake/和以上指定的目录下(指定的话build.gradle设置pickFirst避免冲突)
add_library(RemoteServiceJNI SHARED
${CMAKE_SOURCE_DIR}/src/main/jni/RemoteServiceJNI.c)

#6.设置需要生成so的第三方链接库
target_link_libraries(
RemoteServiceJNI
log
android
)

#添加子目录,将会调用子目录中的CMakeLists.txt
#ADD_SUBDIRECTORY(one)
#ADD_SUBDIRECTORY(two)
###############################
配置好编译环境后,点击 make project 生成 so 在 remoteserver\build\intermediates\cmake\debug\obj\armeabi-v7a\libRemoteServiceJNI.so
在 java 中加载调用即可:
如果遇到: More than one file was found with OS independent path ''lib/armeabi-v7a/xxx.so'' 的报错,则在 build.gradle 中的 android {} 里添加:
packagingOptions { //For Error: More than one file was found with OS independent path
        pickFirst ''lib/armeabi-v7a/libnano_socket.so''
        pickFirst ''lib/armeabi-v7a/libRemoteServiceJNI.so''
    }
完整工程已上传到 GitHub: https://github.com/dragonforgithub/sheldon_aidl.git

Android Oreo JobIntentService继续在Android 7及以下版本的后台运行,并且经常在Android 8及以上版本中崩溃
Android 8&以上:
在Android 8及更高版本中连续发生崩溃.这里有一张票提到了同样的问题https://issuetracker.google.com/issues/63622293,我添加了一些极客建议的临时解决方案.
Android 7&下面:
一旦工作完成,JobIntentService就像Intent Service一样不会停止.
我在服务中实现了JobIntentService,只要用户执行某些操作就会触发该服务.
码
public class SampleJobIntentService extends FixedJobIntentService {

public static void postData(Context context,String data) {
    Intent intent = new Intent(context,SampleJobIntentService.class);
            intent.setAction(INITIAL_ACTION);
            intent.putExtra(SAMPLE_ID,data);
            SampleJobIntentService.enqueueWork(context,intent);
}

public static void enqueueWork(Context context,Intent work) {
    SampleJobIntentService.enqueueWork(context,SampleJobIntentService.class,JOB_ID,work);

 @Override
    protected void onHandleWork(@NonNull Intent intent) {
        if (intent != null) {
            SampleRequest sampleRequest = requests.get(intent.getAction());
            if (sampleRequest != null) {
                try {
                   // perform some networking operations
                } catch (Exception ex) {
                    Log.d("Error for intent ");
                }
                Log.i("send action ");
            } else
                Log.e("action not found for ");
        }
    }
    }
为了避免JobIntentService崩溃,我从https://issuetracker.google.com/issues/63622293获取了一些参考资料
public abstract class FixedJobIntentService extends JobIntentService {

    @Override
    GenericWorkItem dequeueWork() {
        try {
            return new FixedGenericWorkItem(super.dequeueWork());
        } catch (SecurityException ignored) {
            doStopCurrentWork();
        }
        return null;
    }

    private class FixedGenericWorkItem implements GenericWorkItem {
        final GenericWorkItem mGenericWorkItem;

        FixedGenericWorkItem(GenericWorkItem genericWorkItem) {
            mGenericWorkItem = genericWorkItem;
        }

        @Override
        public Intent getIntent() {
            if (mGenericWorkItem != null) {
                return mGenericWorkItem.getIntent();
            }
            return null;
        }

        @Override
        public void complete() {
            try {
                if (mGenericWorkItem != null) {
                    mGenericWorkItem.complete();
                }
            } catch (IllegalArgumentException ignored) {
                doStopCurrentWork();
            }
        }
    }
}
解决方法
Well…,Its a lot big theory…!! It would not be able to put it all here. I will try my best which will make some your concepts clear.
我已经失去了2年阅读谷歌文档的完整年份…哪些是无用的…没有适当的文档,没有适合其开发人员的示例代码.. !!所以我在堆栈溢出的每个帖子中提到这一点,因为它有助于节省其他人的时间.. !!
它看起来你是一个优秀的程序员;只需要对您发布的问题提供一些提示:
提示-1:
YOU :- I have recently replaced all my service to foreground services and
JobIntentService
前台服务:
如果你需要所有的时间运行过程;什么都不会结束……一旦开始它就会在服务中使用它从其OnStartCommand返回START_STICKY.再次不建议使用,好像你想不惜一切代价实现它…那么你将不得不使用setongoing的通知(true)哪个最终用户无法刷掉你的通知,它将保留在那里永远….
使用前台服务:
接收器也有限制;在Oreo之上,您不能通过在清单中声明它并仅通过创建接收器来使用所有接收器和意图操作…我建议只使用BootComplete权限并使用单个接收器接收boot_completed意图并调用服务在O之下并调用O之上的前台服务.现在从该前台服务中为所有人实现运行时接收器并在Ondestroy方法中取消注册它.我从来没有找到实现运行时接收器的官方示例代码,最后我已经成功实施了几个月的艰苦工作…是的,这不是一个聪明的工作,因为谷歌
何时使用前台服务:
只有你想实现广播接收器….如果你不想实现任何广播接收器;远离…….
提示-2:
YOU :- I have recently replaced all my service to foreground services and
JobIntentService
**服务质量:**
只做一个非常微小的工作……然后退出……它必须由StopSelf()退出……再次,如果多次调用服务可能会导致数据丢失……同样的服务线程可以运行更多不止一次…再次,如果你想要一项服务做很多工作……使用START_STICKY ……但是不建议再次推荐我已经建议,何时在提示1中使用它.
** Intentservice的质量如下:**
执行相对较长时间运行的任务并且它只具有串行执行属性如果您反复调用同一个intentService,则所有调用将保留在队列中,并在逐个完成后逐个执行.如上所述,这不是服务中的情况.它自己结束……没有必要由开发人员结束.. !!
**独特的品质:**
一旦他们崩溃,android可以阻止他们将来调用,而不会通知你,因为它崩溃的应用程序.需要使用try-catch-exception处理它们以避免崩溃.再次……如果您在服务中实现线程,那么try-catch-exception将不会使您的应用程序崩溃…
**那么地狱&如何实施呢:**
使用FireBaseJobScedular: –
>易于使用
>使用简单的JobService
>可以运行更长或更短的时间任务……即使是所有的时间运行任务
>甚至非标准公司支持,如vivo,mi,oppo,one 3,…这需要库存 – android会对其进行更改,并提供FunTouchO,ColorOs,OxygenO等名称
>只需将电池设置更改为“不优化此应用”
>是谷歌正式支持它并建议使用它
>它创建GooglePlyService的实例并在其中运行.显然,非标准公司也不会限制谷歌应用程序执行其任务.
>在Oreo上工作..,即使我已经在Android P上测试过它,并且在Android版本5.0下作为AlarmManager任务工作.
>我仍然建议使用16以上的minsdk,目标sdk 26,好像万一你要将你的应用程序上传到谷歌播放它现在是强制性的,那个消息会听到你的消息.并编译sdk 26.
>只需将您的JobService绑定在清单中,并使用receive_boot_complete的单行权限
>只需安排它……它将在每个制造商的市场上的每个设备上启动……即使是冷启动和热启动
>它最大限度地减少了很多代码,你可以专注于实际的任务.
>任务完成后,您可以返回false以指示任务已完成,它将结束JobService.
为什么我建议,因为我是一个UNKNown公司的首席技术官,并且经历过许多类型的Android手机制造商的前台服务引起的问题……不是Apple和ios所以我们必须经历它.自18年以来一直是开发人员,我今天大部分都在编码…在所有开发项目中,我的开发策略仅由我来考虑.
Correct me … too… As you have not mentioned
what your tasksandprojectis related to… and what you exactly wants to be done in aforeground service and intent-service… Let me kNow…,It would be my pleasure to help you. It is a general theoretical answer rather than what you wants…. But for giving you actual answer i will need exact your project scope..

Android O后台服务限制
但我在NotificationManager中看不到任何startServiceInForeground()方法.我错过了什么?
解决方法
您应该使用在26.0.0-beta1支持库版本中添加的@RobCo建议的以下方法
ContextCompat.startForegroundService()
是的,迁移指南是错误的,即使在API 26中,notificationmanager也没有名为startForegroundService()的方法.
PS:迁移指南已更正,现在它正确链接到ContextCompat.startForegroundService()方法.
今天的关于Android Oreo的后台服务和android后端服务器的分享已经结束,谢谢您的关注,如果想了解更多关于Android 10蓝牙断开后台服务、Android : App 客户端与后台服务的 AIDL 通信以及后台服务的 JNI 接口实现、Android Oreo JobIntentService继续在Android 7及以下版本的后台运行,并且经常在Android 8及以上版本中崩溃、Android O后台服务限制的相关知识,请在本站进行查询。
本文标签:


![[转帖]Ubuntu 安装 Wine方法(ubuntu如何安装wine)](https://www.gvkun.com/zb_users/cache/thumbs/4c83df0e2303284d68480d1b1378581d-180-120-1.jpg)

