如果您对更改Elasticsearch中现有索引的设置和映射感兴趣,那么本文将是一篇不错的选择,我们将为您详在本文中,您将会了解到关于更改Elasticsearch中现有索引的设置和映射的详细内容,我
如果您对更改Elasticsearch中现有索引的设置和映射感兴趣,那么本文将是一篇不错的选择,我们将为您详在本文中,您将会了解到关于更改Elasticsearch中现有索引的设置和映射的详细内容,我们还将为您解答elasticsearch修改索引的相关问题,并且为您提供关于46、elasticsearch(搜索引擎)scrapy写入数据到elasticsearch中、Elasticsearch 入门到高手的成长阶梯-索引的基本操作(2)-索引的收缩和拆分、Elasticsearch 数据作为所有索引的输入,输出为各自的文件 (index-name.txt)、Elasticsearch 索引的全量 / 增量更新的有价值信息。
本文目录一览:- 更改Elasticsearch中现有索引的设置和映射(elasticsearch修改索引)
- 46、elasticsearch(搜索引擎)scrapy写入数据到elasticsearch中
- Elasticsearch 入门到高手的成长阶梯-索引的基本操作(2)-索引的收缩和拆分
- Elasticsearch 数据作为所有索引的输入,输出为各自的文件 (index-name.txt)
- Elasticsearch 索引的全量 / 增量更新
")
更改Elasticsearch中现有索引的设置和映射(elasticsearch修改索引)
我想要对Elasticsearch中已存在的索引进行以下设置和映射设置:
{ "analysis": { "analyzer": { "dot-analyzer": { "type": "custom", "tokenizer": "dot-tokenizer" } }, "tokenizer": { "dot-tokenizer": { "type": "path_hierarchy", "delimiter": "." } } }}{ "doc": { "properties": { "location": { "type": "string", "index_analyzer": "dot-analyzer", "search_analyzer": "keyword" } } }}我试图添加以下两行代码:
client.admin().indices().prepareUpdateSettings(Index).setSettings(settings).execute().actionGet();client.admin().indices().preparePutMapping(Index).setType(Type).setSource(mapping).execute().actionGet();但这是结果:
org.elasticsearch.index.mapper.MapperParsingException: Analyzer [dot-analyzer] not found for field [location]任何人?非常感谢,
斯汀
这似乎可行:
if (client.admin().indices().prepareExists(Index).execute().actionGet().exists()) { client.admin().indices().prepareClose(Index).execute().actionGet(); client.admin().indices().prepareUpdateSettings(Index).setSettings(settings.string()).execute().actionGet(); client.admin().indices().prepareOpen(Index).execute().actionGet(); client.admin().indices().prepareDeleteMapping(Index).setType(Type).execute().actionGet(); client.admin().indices().preparePutMapping(Index).setType(Type).setSource(mapping).execute().actionGet();} else { client.admin().indices().prepareCreate(Index).addMapping(Type, mapping).setSettings(settings).execute().actionGet();}答案1
小编典典如果在发送更改后查看设置,您会发现分析仪不存在。实际上,您不能在实时索引上更改设置的“分析”部分。最好使用所需的设置来创建它,否则您可以将其关闭:
curl -XPOST localhost:9200/index_name/_close关闭索引后,您可以发送新设置。之后,您可以重新打开索引:
curl -XPOST localhost:9200/index_name/_open关闭索引后,它不会使用任何群集资源,但是它既不可读也不可写。如果要使用Java API关闭并重新打开索引,可以使用以下代码:
client.admin().indices().prepareClose(indexName).execute().actionGet();//TODO update settingsclient.admin().indices().prepareOpen(indexName).execute().actionGet();scrapy写入数据到elasticsearch中")
46、elasticsearch(搜索引擎)scrapy写入数据到elasticsearch中
【百度云搜索,搜各种资料:http://www.lqkweb.com】
【搜网盘,搜各种资料:http://www.swpan.cn】
前面我们讲到的elasticsearch(搜索引擎)操作,如:增、删、改、查等操作都是用的elasticsearch的语言命令,就像sql命令一样,当然elasticsearch官方也提供了一个python操作elasticsearch(搜索引擎)的接口包,就像sqlalchemy操作数据库一样的ORM框,这样我们操作elasticsearch就不用写命令了,用elasticsearch-dsl-py这个模块来操作,也就是用python的方式操作一个类即可
elasticsearch-dsl-py下载
下载地址:https://github.com/elastic/el...
文档说明:http://elasticsearch-dsl.read...
首先安装好elasticsearch-dsl-py模块
1、elasticsearch-dsl模块使用说明
create_connection(hosts=[''127.0.0.1'']):连接elasticsearch(搜索引擎)服务器方法,可以连接多台服务器
class Meta:设置索引名称和表名称
索引类名称.init(): 生成索引和表以及字段
实例化索引类.save():将数据写入elasticsearch(搜索引擎)
elasticsearch_orm.py 操作elasticsearch(搜索引擎)文件
#!/usr/bin/env python
# -*- coding:utf8 -*-
from datetime import datetime
from elasticsearch_dsl import DocType, Date, Nested, Boolean, \
    analyzer, InnerObjectWrapper, Completion, Keyword, Text, Integer

# 更多字段类型见第三百六十四节elasticsearch(搜索引擎)的mapping映射管理

from elasticsearch_dsl.connections import connections       # 导入连接elasticsearch(搜索引擎)服务器方法
connections.create_connection(hosts=[''127.0.0.1''])

class lagouType(DocType):                                                   # 自定义一个类来继承DocType类
    # Text类型需要分词,所以需要知道中文分词器,ik_max_wordwei为中文分词器
    title = Text(analyzer="ik_max_word")                                    # 设置,字段名称=字段类型,Text为字符串类型并且可以分词建立倒排索引
    description = Text(analyzer="ik_max_word")
    keywords = Text(analyzer="ik_max_word")
    url = Keyword()                                                         # 设置,字段名称=字段类型,Keyword为普通字符串类型,不分词
    riqi = Date()                                                           # 设置,字段名称=字段类型,Date日期类型

    class Meta:                                                             # Meta是固定写法
        index = "lagou"                                                     # 设置索引名称(相当于数据库名称)
        doc_type = ''biao''                                                   # 设置表名称

if __name__ == "__main__":          # 判断在本代码文件执行才执行里面的方法,其他页面调用的则不执行里面的方法
    lagouType.init()                # 生成elasticsearch(搜索引擎)的索引,表,字段等信息

# 使用方法说明:
# 在要要操作elasticsearch(搜索引擎)的页面,导入此模块
# lagou = lagouType()           #实例化类
# lagou.title = ''值''            #要写入字段=值
# lagou.description = ''值''
# lagou.keywords = ''值''
# lagou.url = ''值''
# lagou.riqi = ''值''
# lagou.save()                  #将数据写入elasticsearch(搜索引擎)
2、scrapy写入数据到elasticsearch中
爬虫文件
# -*- coding: utf-8 -*-
import scrapy
from scrapy.linkextractors import LinkExtractor
from scrapy.spiders import CrawlSpider, Rule
from adc.items import LagouItem,LagouItemLoader  #导入items容器类,和ItemLoader类
import time

class LagouSpider(CrawlSpider):                     #创建爬虫类
    name = ''lagou''                                  #爬虫名称
    allowed_domains = [''www.luyin.org'']             #起始域名
    start_urls = [''http://www.luyin.org/'']          #起始url

    custom_settings = {
        "AUTOTHROTTLE_ENABLED": True,                             #覆盖掉settings.py里的相同设置,开启COOKIES
        "DOWNLOAD_DELAY":5
    }

    rules = (
        #配置抓取列表页规则
        Rule(LinkExtractor(allow=(''ggwa/.*'')), follow=True),

        #配置抓取内容页规则
        Rule(LinkExtractor(allow=(''post/\d+.html.*'')), callback=''parse_job'', follow=True),
    )

    def parse_job(self, response):                  #回调函数,注意:因为CrawlS模板的源码创建了parse回调函数,所以切记我们不能创建parse名称的函数
        atime = time.localtime(time.time())         #获取系统当前时间
        dqatime = "{0}-{1}-{2} {3}:{4}:{5}".format(
            atime.tm_year,
            atime.tm_mon,
            atime.tm_mday,
            atime.tm_hour,
            atime.tm_min,
            atime.tm_sec
        )  # 将格式化时间日期,单独取出来拼接成一个完整日期

        url = response.url

        item_loader = LagouItemLoader(LagouItem(), response=response)   # 将数据填充进items.py文件的LagouItem
        item_loader.add_xpath(''title'', ''/html/head/title/text()'')
        item_loader.add_xpath(''description'', ''/html/head/meta[@name="Description"]/@content'')
        item_loader.add_xpath(''keywords'', ''/html/head/meta[@name="keywords"]/@content'')
        item_loader.add_value(''url'', url)
        item_loader.add_value(''riqi'', dqatime)
        article_item = item_loader.load_item()
yield article_item
items.py文件
# -*- coding: utf-8 -*-

# Define here the models for your scraped items
#
# See documentation in:
# http://doc.scrapy.org/en/latest/topics/items.html
#items.py,文件是专门用于,接收爬虫获取到的数据信息的,就相当于是容器文件

import scrapy
from scrapy.loader.processors import MapCompose,TakeFirst
from scrapy.loader import ItemLoader                #导入ItemLoader类也就加载items容器类填充数据
from adc.models.elasticsearch_orm import lagouType  #导入elasticsearch操作模块

class LagouItemLoader(ItemLoader):                  #自定义Loader继承ItemLoader类,在爬虫页面调用这个类填充数据到Item类
    default_output_processor = TakeFirst()          #默认利用ItemLoader类,加载items容器类填充数据,是列表类型,可以通过TakeFirst()方法,获取到列表里的内容

def tianjia(value):                                 #自定义数据预处理函数
    return value                                    #将处理后的数据返给Item

class LagouItem(scrapy.Item):                       #设置爬虫获取到的信息容器类
    title = scrapy.Field(                           #接收爬虫获取到的title信息
        input_processor=MapCompose(tianjia),        #将数据预处理函数名称传入MapCompose方法里处理,数据预处理函数的形式参数value会自动接收字段title
    )
    description = scrapy.Field()
    keywords = scrapy.Field()
    url = scrapy.Field()
    riqi = scrapy.Field()

    def save_to_es(self):
        lagou = lagouType()                         # 实例化elasticsearch(搜索引擎对象)
        lagou.title = self[''title'']                 # 字段名称=值
        lagou.description = self[''description'']
        lagou.keywords = self[''keywords'']
        lagou.url = self[''url'']
        lagou.riqi = self[''riqi'']
        lagou.save()                                # 将数据写入elasticsearch(搜索引擎对象)
        return
pipelines.py文件
# -*- coding: utf-8 -*-

# Define your item pipelines here
#
# Don''t forget to add your pipeline to the ITEM_PIPELINES setting
# See: http://doc.scrapy.org/en/latest/topics/item-pipeline.html
from adc.models.elasticsearch_orm import lagouType  #导入elasticsearch操作模块

class AdcPipeline(object):
    def process_item(self, item, spider):

        #也可以在这里将数据写入elasticsearch搜索引擎,这里的缺点是统一处理
        # lagou = lagouType()
        # lagou.title = item[''title'']
        # lagou.description = item[''description'']
        # lagou.keywords = item[''keywords'']
        # lagou.url = item[''url'']
        # lagou.riqi = item[''riqi'']
        # lagou.save()
        item.save_to_es()       #执行items.py文件的save_to_es方法将数据写入elasticsearch搜索引擎
        return item
settings.py文件,注册pipelines
# Configure item pipelines
# See http://scrapy.readthedocs.org/en/latest/topics/item-pipeline.html
ITEM_PIPELINES = {
   ''adc.pipelines.AdcPipeline'': 300,
}
main.py爬虫启动文件
#!/usr/bin/env python
# -*- coding:utf8 -*-

from scrapy.cmdline import execute  #导入执行scrapy命令方法
import sys
import os

sys.path.append(os.path.join(os.getcwd())) #给Python解释器,添加模块新路径 ,将main.py文件所在目录添加到Python解释器

execute([''scrapy'', ''crawl'', ''lagou'', ''--nolog''])  #执行scrapy命令

# execute([''scrapy'', ''crawl'', ''lagou''])  #执行scrapy命令
运行爬虫

写入elasticsearch(搜索引擎)情况

补充:elasticsearch-dsl 的 增删改查
#!/usr/bin/env python
# -*- coding:utf8 -*-
from datetime import datetime
from elasticsearch_dsl import DocType, Date, Nested, Boolean, \
    analyzer, InnerObjectWrapper, Completion, Keyword, Text, Integer

# 更多字段类型见第三百六十四节elasticsearch(搜索引擎)的mapping映射管理

from elasticsearch_dsl.connections import connections       # 导入连接elasticsearch(搜索引擎)服务器方法
connections.create_connection(hosts=[''127.0.0.1''])

class lagouType(DocType):                                                   # 自定义一个类来继承DocType类
    # Text类型需要分词,所以需要知道中文分词器,ik_max_wordwei为中文分词器
    title = Text(analyzer="ik_max_word")                                    # 设置,字段名称=字段类型,Text为字符串类型并且可以分词建立倒排索引
    description = Text(analyzer="ik_max_word")
    keywords = Text(analyzer="ik_max_word")
    url = Keyword()                                                         # 设置,字段名称=字段类型,Keyword为普通字符串类型,不分词
    riqi = Date()                                                           # 设置,字段名称=字段类型,Date日期类型

    class Meta:                                                             # Meta是固定写法
        index = "lagou"                                                     # 设置索引名称(相当于数据库名称)
        doc_type = ''biao''                                                   # 设置表名称

if __name__ == "__main__":          # 判断在本代码文件执行才执行里面的方法,其他页面调用的则不执行里面的方法
    lagouType.init()                # 生成elasticsearch(搜索引擎)的索引,表,字段等信息

# 使用方法说明:
# 在要要操作elasticsearch(搜索引擎)的页面,导入此模块
# lagou = lagouType()           #实例化类
# lagou.title = ''值''            #要写入字段=值
# lagou.description = ''值''
# lagou.keywords = ''值''
# lagou.url = ''值''
# lagou.riqi = ''值''
# lagou.save()                  #将数据写入elasticsearch(搜索引擎)
1新增数据
from adc.models.elasticsearch_orm import lagouType  #导入刚才配置的elasticsearch操作模块

     lagou = lagouType()                         # 实例化elasticsearch(搜索引擎对象)
     lagou._id = 1             #自定义ID,很重要,以后都是根据ID来操作

        lagou.title = self[''title'']                 # 字段名称=值
        lagou.description = self[''description'']
        lagou.keywords = self[''keywords'']
        lagou.url = self[''url'']
        lagou.riqi = self[''riqi'']
        lagou.save()                                # 将数据写入elasticsearch(搜索引擎对象)
2删除指定数据
from adc.models.elasticsearch_orm import lagouType #导入刚才配置的elasticsearch操作模块sousuo_orm = lagouType() # 实例化
sousuo_orm.get(id=1).delete() # 删除id等于1的数据3修改指定的数据
from adc.models.elasticsearch_orm import lagouType  #导入刚才配置的elasticsearch操作模块

sousuo_orm = lagouType()                           # 实例化
sousuo_orm.get(id=1).update(title=''123456789'')     # 修改id等于1的数据
以上全部使用elasticsearch-dsl模块
注意下面使用的原生elasticsearch模块
删除指定使用,就是相当于删除指定数据库
使用原生elasticsearch模块删除指定索引
from elasticsearch import Elasticsearch                                     # 导入原生的elasticsearch(搜索引擎)接口
client = Elasticsearch(hosts=settings.Elasticsearch_hosts)                  # 连接原生的elasticsearch

# 使用原生elasticsearch模块删除指定索引
#要做容错处理,如果索引不存在会报错
            try:
                client.indices.delete(index=''jxiou_zuopin'')
            except Exception as e:
                pass
原生查询
from elasticsearch import Elasticsearch                 # 导入原生的elasticsearch(搜索引擎)接口
            client = Elasticsearch(hosts=Elasticsearch_hosts)       # 连接原生的elasticsearch

response = client.search(                               # 原生的elasticsearch接口的search()方法,就是搜索,可以支持原生elasticsearch语句查询
                index="jxiou_zuopin",                               # 设置索引名称
                doc_type="zuopin",                                  # 设置表名称
                body={                                              # 书写elasticsearch语句
                    "query": {
                        "multi_match": {                            # multi_match查询
                            "query": sousuoci,                      # 查询关键词
                            "fields": ["title"]                     # 查询字段
                        }
                    },
                    "from": (page - 1) * tiaoshu,                   # 从第几条开始获取
                    "size": tiaoshu,                                # 获取多少条数据
                    "highlight": {                                  # 查询关键词高亮处理
                        "pre_tags": [''<span >''],    # 高亮开始标签
                        "post_tags": [''</span>''],                   # 高亮结束标签
                        "fields": {                                 # 高亮设置
                            "title": {}                             # 高亮字段
                        }
                    }
                }
            )
            # 开始获取数据
            total_nums = response["hits"]["total"]                  # 获取查询结果的总条数

            hit_list = []                                           # 设置一个列表来储存搜索到的信息,返回给html页面

            for hit in response["hits"]["hits"]:                                # 循环查询到的结果
                hit_dict = {}                                                   # 设置一个字典来储存循环结果
                if "title" in hit["highlight"]:                                 # 判断title字段,如果高亮字段有类容
                    hit_dict["title"] = "".join(hit["highlight"]["title"])      # 获取高亮里的title
                else:
                    hit_dict["title"] = hit["_source"]["title"]                 # 否则获取不是高亮里的title

                hit_dict["id"] = hit["_source"]["nid"]                          # 获取返回nid

                # 加密样音地址
                hit_dict["yangsrc"] = jia_mi(str(hit["_source"]["yangsrc"]))    # 获取返回yangsrc

hit_list.append(hit_dict)-索引的收缩和拆分")
Elasticsearch 入门到高手的成长阶梯-索引的基本操作(2)-索引的收缩和拆分
一、收缩索引
1、介绍
在大型的集群中,索引的分片也往往比较多,但是随着时间的推移,有一些索引慢慢的就会由“热”变“冷”,到最终基本上不再使用;还有一些索引,它本身的索引文档的数据量并不多,但是却还是使用了不少的分片。如果不对这些索引进行管理,这些索引的分片信息就会一直被集群所维护着,集群主节点维护分片的压力就会越来越大,如果是涉及到集群恢复,也会耗费更多的时间。
Elasticsearch本身提供了集群收缩的shrink API来执行这方面的操作,但不是针对源索引执行操作,它会创建一个和源索引除主分片数不一样的目标索引来存储数据,在收缩完成后,源索引就可以被删除了,这样就达到索引收缩的目的。
索引收缩工作过程
- 创建一个新的目标索引,其定义与源索引相同,只是主分片数量较少;
- 将源索引中的段硬链接到目标索引(如果文件系统不支持硬链接,则会将所有段复制到新索引中,这是一个更耗时的过程);
- 恢复目标索引,像重新打开一个关闭的索引一样;
索引被收缩需要满足的条件
- 目标索引必须是不存在;
- 源索引必须被设置为只读状态;
- 当前集群的健康状态须为绿色;
- 源索引必须比目标索引有更多的主分片数;
- 目标索引中的主分片数,必须是源索引的一个因子,或者可以理解为目标索引的分片数可以被源索引整除。如源索引有8个主分片,则目标索引的主分片可以是4个、2个或1个,如源索引有15个主分片本,则目标索引的主分片可以是5个、3个或1个,如源索引的主分片数是一个素数,如7个,则目标索引的主分片数则只能够是1个;
- 源索引的所有索引文档数量如果超过了2,147,483,519个,则不能够将其收缩为只有一个主分片的目标索引中,因为这已经超过了单个分片所能够存放的最大的索引文档数;
- 用于执行索引收缩的节点,必须有足够的硬盘空间,以便于存储新的索引;
- 在执行索引的收缩之前,需要确保当前索引的所有分片(分片可以是主分片或副本)必须存在于同一个节点之前,因而在执行索引的收缩之前,需要先执行分片的移动。如被收收缩的索引有5个主分片,其中有3个主分片:主分片1、主分片2、主分片3,和2个副本:副本4和副本5都已经迁移到了同一个节点上,则这个时候才可以执行索引的收缩操作。
下面是针对具有5个主分片1个副本的索引new_index的收缩过程,new_index所在的索引包括了三个节点:es-learnnode-1、es-learnnode-2和es-learnnode-3,使用节点es-learnnode-1来执行收缩操作,此时new_index的分片在集群中是如下分布的:
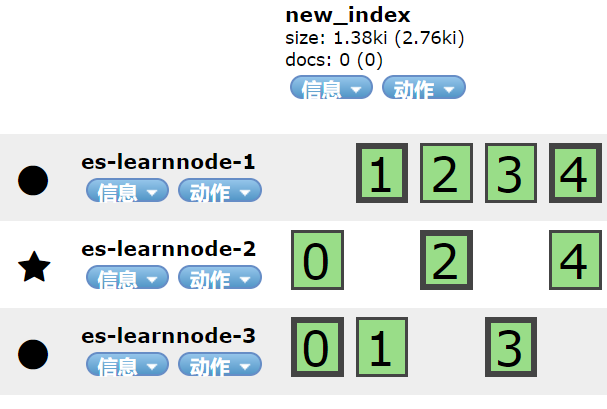
2、移动分片并设置源节点为只读状态
PUT /new_index/_settings
{
"settings": {
"index.routing.allocation.require._name": "es-learnnode-1",
"index.blocks.write": true
}
}
该操作强制将new_index的每个分片的一份(可能是主分片或副本)都移动到了节点es-learnnode-1上,并将new_index设置为只读。
如果响应为:
| { "acknowledged" : true } |
则表示操作执行成功。
如果索引中索引文档的数量比较多,这个操作将会花费一定的时间,移动完成后,可以在head插件上直接观察到分片的分布情况,如下图所示:
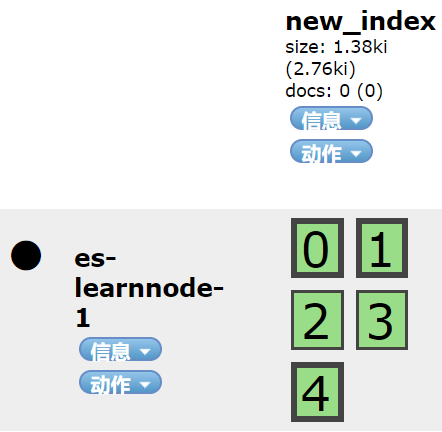
3、执行索引的收缩
执行如下请求:
| POST /new_index/_shrink/new_index_target { "settings": { "index.routing.allocation.require._name": null, "index.blocks.write": null } } |
该操作执行了以下几个动作:
- 执行索引的压缩;
- 通过设置index.routing.allocation.require._name的值为null,清除了目标库中从源索引中带过来的强制索引分片的每一份都分配置到指定节点设置;
- 通过设置index.blocks.write属性,清除了目标库中从源过引库带过来的拒绝写入的设置;
响应如果为:
| { "acknowledged" : true, "shards_acknowledged" : true, "index" : "new_index_target" } |
则表示操作执行成功,再查看集群中的索引,发现目标索引new_index_target已经建立成功了。
上面执行的收缩过程中,创建了一个新的索引,其实这本身也确实是一个创建索引的过程,此时也可以指定一些参数目标索引,如指定主分片数(一定要注意目标索引的主分片数可以被源索引的主分片数给整除,且小于源索引的主分片数)和副本数、别名等,如下示例:
| POST /new_index/_shrink/new_index_target { "settings": { "index.routing.allocation.require._name": null, "index.blocks.write": null, "number_of_shards":1, "number_of_replicas" : 2, "index.codec": "best_compression" } } |
注:mapping不可以在索引收缩的过程中指定。
这里举一个错误的示例,如果这里将目标索引的主分片数设置为2,则会报如下异常:
| { "error": { "root_cause": [ { "type": "remote_transport_exception", "reason": "[es-learnnode-2][indices:admin/resize]" } ], "type": "illegal_argument_exception", "reason": "the number of source shards [5] must be a multiple of [2]" }, "status": 400 } |
二、索引的拆分
1、介绍
索引可以被拆分的次数(以及每个原始分片可以拆分成的分片数)由路由分片的数量设置index.number_of_routing_shards的值确定,拆分后的总分片数不能够超过该值,路由分片的数量指定了内部可使用的最大散列空间,以便在具有一致性散列的分片中分发文档。例如,一个具有5个索引分片的索引其路由分片数量number_of_routing_shards设置为30,则可以按因子2或3分割。换句话说,它可以按如下方式拆分:
| 5→10→30(每个分片先拆分成2个,然后再把拆分后的分片每个拆分成3个) 5→15→30(每个分片先拆分成3个,然后再把拆分后的分片每个拆分成2个) 5→30(每个分片拆分成6个) |
路由分片数量的默认值为1024,也就是索引分片最多可以被拆分成1024个,但是这个还取决于原始主分片的数量。如原始主分片只有1个,则原始分片可被拆分成1-1024中任意数量的主分片数;如原始主分片的数量为5个,则主分片被拆分成的数量可以是10、20、40、80、160、320或最多640个分片,要达到最多的640个分片,可以通过一次拆分或者通过多次拆分。
也可以在创建索引时显式通过指定参数index.number_of_routing_shards进行设置,如下所示:
| PUT /new_index_2 { "settings": { "number_of_shards":2, "number_of_replicas" : 2, "index.number_of_routing_shards": "1000" } } |
拆分的工作过程
- 创建一个新的目标索引,其定义与源索引相同,但主分片数量比源索引多;
- 将源索引中的段硬链接到目标索引(如果文件系统不支持硬链接,则会将所有段复制到新索引中,这是一个比硬链接耗时的多过程);
- 创建低级文件后,将再次对所有文档进行哈希处理,以删除不属于当前分片的文档;
- 恢复了目标索引,像重新打开原来关闭的索引一样;
索引可以被拆分的条件
- 索引需要被设置为只读;
- 当前集群的健康状况须为绿色;
- 目录索引必须是不存在的;
- 源索引的主分片须小于目标索引的主分片数;
- 目标索引的主分片数须是源索引分片数的倍数;
- 用于执行拆分的节点须有足够的硬盘空间,以便于保留拆分出来的新的索引;
还是以有5个主分片1个副本的索引new_index为例。
2、将源索引设为只读状态
执行如下语句:
| PUT /new_index/_settings { "settings": { "index.blocks.write": true } } |
响应:
| { "acknowledged" : true } |
表示执行成功,将索引new_index设置为只读状态。
3、索引拆分
将目标索引的主分片数设置为源索引的2倍即10个,执行如下语句:
| POST /new_index/_split/new_index_split { "settings":{ "index.number_of_shards":10 } } |
响应:
| { "acknowledged" : true } |
表示执行成功,再查看elasticsearch-head中new_index和new_index_split的集群分片分布如下:
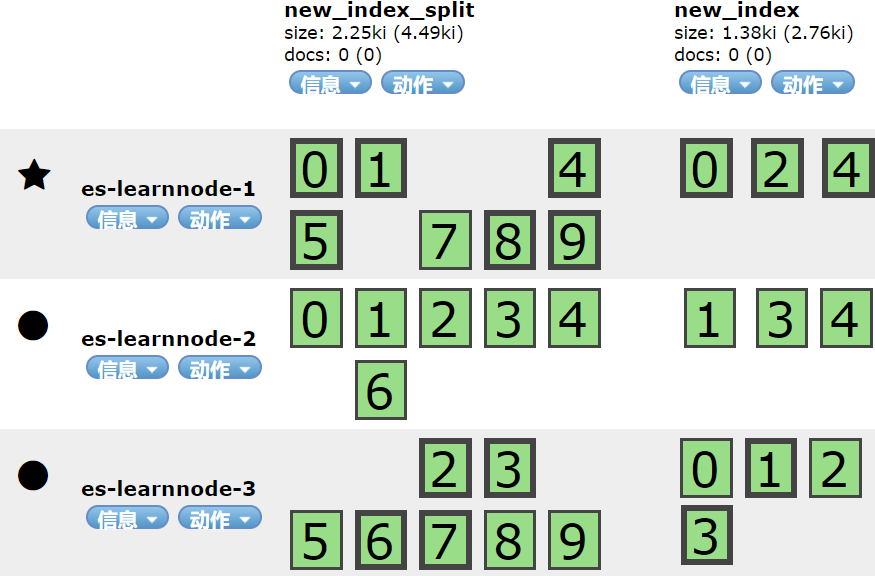
可以看到new_index_split的分片数量已经是new_index的2倍了,再次确认执行拆分成功。
以下执行一下错误的示例,把目标索引的主分片数量设置为不是源索引主分片数量的倍,如设置为11个,则会报如下错误信息:
| { "error": { "root_cause": [ { "type": "illegal_argument_exception", "reason": "the number of source shards [5] must be a factor of [11]" } ], "type": "illegal_argument_exception", "reason": "the number of source shards [5] must be a factor of [11]" }, "status": 400 } |
")
Elasticsearch 数据作为所有索引的输入,输出为各自的文件 (index-name.txt)
如何解决Elasticsearch 数据作为所有索引的输入,输出为各自的文件 (index-name.txt)?
我正在尝试使用 Logstash 将我的 Elasticsearch 数据发送到 S3。 在这个过程中,我有多个 ES 索引驻留在 Logstash 的输入过滤器中。 我想为不同的索引使用不同的文件,并将它们的名称作为文件名。
输入过滤器:-
input {
 elasticsearch {
    hosts => "localhost"
    index => "index1,index2,index3,index4,index5,index6"              #Multiple indices as input
    query => ''
    {
    "query": {
    "match_all": {}
    }
    }
  ''
  }
}
现在我想将所有索引的输出保存在一个以索引为文件名的文件中。 喜欢:index1 ---> index1.txt
输出过滤器:-
output {
 s3 {
     region => *********
     bucket => ***********
     size_file => ********
     codec => "json"
     encoding => "gzip"
     prefix => "data/(indexName)/%{+YYYY}/%{+MM}/%{+dd}"
   }

}
解决方法
使用 Elasticsearch 输入中的 docinfo => true 设置添加有关源文档的 @metadata 字段。该设置记录在 here 中。然后字段 [@metadata][_index] 将可用于输出插件。
基于您的配置的示例:
input {
  elasticsearch {
    hosts => "localhost"
    index => "index1,index2,index3,index4,index5,index6"
  }
}

output {
 s3 {
     region => *********
     bucket => ***********
     size_file => ********
     codec => "json"
     encoding => "gzip"
     prefix => "data/%{[@metadata][_index]}/%{+YYYY}/%{+MM}/%{+dd}"
   }

}
与您的相比,我在此配置中所做的两个重要更改是:
- 在输入插件中启用
docinfo - 在输出插件中将
(index)替换为%{[@metadata][_index]}
为了可读性,我还删减了 match_all 查询。

Elasticsearch 索引的全量 / 增量更新
Elasticsearch 索引的全量 / 增量更新
当你的 es 索引数据从 mysql 全量导入之后,如何根据其他客户端改变索引数据源带来的变动来更新 es 索引数据呢。
首先用 Python 全量生成 Elasticsearch 和 ik 初始的分词索引数据,增量更新索引实现如下:
服务端(Python+redis-sub)
# Python-redis 开启监听 ''leon'' 等待客户端推送消息,来增量更新 es 文档
#-*- coding:utf8 -*-
import sys
import redis
import json
import elasticsearch
import os
class Task(object):
def __init__(self):
es_servers = [{
"host": "server-host",
"port": "es-port"
}]
self.es_client = elasticsearch.Elasticsearch(hosts=es_servers)
pool = redis.ConnectionPool(host=''redis-host'', port=6379,db=0,password=''user:passwd'')
self.r = redis.Redis(connection_pool=pool)
self.ps = self.r.pubsub()
self.ps.subscribe(''leon'')
def listen_task(self):
for i in self.ps.listen():
# print i
if i[''type''] == ''message'':
data = json.loads(i[''data''])
for key, value in data.iteritems():
# print key, ''corresponds to'', data[key]
self.index = data[''index'']
self.doc_type = data[''type'']
cate = data[''cate'']
id = data[''id'']
if cate == ''update'':
row_obj = data[''params'']
if cate == ''update'':
self.update_by_id(id,row_obj)
elif cate == ''delete'':
self.delete_by_id(id)
else:
self.create_by_id(id)
def update_by_id(self, id,row_obj):
"""row_obj 就是 包含了 _id 和 其他 要更新的字段的 kv [] 取 id 和 剩下的根据给定的_id, 更新 ES 文档"""
res = self.es_client.update(index=self.index, doc_type=self.doc_type, body={"doc": row_obj}, id=id)
print res
def create_by_id(self, id):
"""id ; 创建新的 ES 文档"""
create_by_id = "python /workspace/django-bash/elastic/autobash/info_es.py " + str(id)
res = os.popen(create_by_id).read()
print res
def delete_by_id(self, _id):
"""
根据给定的 id, 删除文档
暂时先不用可以根据查询 条件 isdeleted = 0 来判断
"""
self.es_client.delete(index=self.index, doc_type=self.doc_type, id=_id)
if __name__ == ''__main__'':
print ''listen task queue''
Task().listen_task()
创建 info single 的 Python 脚本
def crete_info_single(self,ID):
index = ''info''
type = ''full''
# 生成 info 的 json
model = Model(''ali'', ''Info'')
info_list = model.getAllInfoByID(ID)
all_len = len(info_list)
for i in range(0, all_len):
# 业务逻辑代码・・・・・
document = info_list[i]
request_timeout = 100
create_response = self.es.crete_index(index, type, document, request_timeout, ID)
客户端(Php + redis-pub )
# php-redis sub ''leon'' , 传递约定的格式,指定对 es 文档的操作类型
# elk 软删除
$message = array(
"index" => "info",
"type"=>"full",
"id" => $info[0][''ID''],
"cate"=>''update'',
"params"=> array(
"IsDeleted"=>1
)
);
$json_mess =json_encode($message);
$redis->publish(''leon'', $json_mess);
这样,当客户端更改了 mysql 时候,往 redis leon 频道 publish 一条对应的消息,服务端接收消息后,就会更新对应的 es 索引。
---------------------
作者:Npcccccc
来源:CSDN
原文:https://blog.csdn.net/qq_28018283/article/details/79277478
版权声明:本文为博主原创文章,转载请附上博文链接!
今天关于更改Elasticsearch中现有索引的设置和映射和elasticsearch修改索引的讲解已经结束,谢谢您的阅读,如果想了解更多关于46、elasticsearch(搜索引擎)scrapy写入数据到elasticsearch中、Elasticsearch 入门到高手的成长阶梯-索引的基本操作(2)-索引的收缩和拆分、Elasticsearch 数据作为所有索引的输入,输出为各自的文件 (index-name.txt)、Elasticsearch 索引的全量 / 增量更新的相关知识,请在本站搜索。
本文标签:


![[转帖]Ubuntu 安装 Wine方法(ubuntu如何安装wine)](https://www.gvkun.com/zb_users/cache/thumbs/4c83df0e2303284d68480d1b1378581d-180-120-1.jpg)

