如果您对第7篇:一张图让你读懂ElasticSearch强大的搜索能力感兴趣,那么本文将是一篇不错的选择,我们将为您详在本文中,您将会了解到关于第7篇:一张图让你读懂ElasticSearch强大的搜
如果您对第7篇: 一张图让你读懂ElasticSearch强大的搜索能力感兴趣,那么本文将是一篇不错的选择,我们将为您详在本文中,您将会了解到关于第7篇: 一张图让你读懂ElasticSearch强大的搜索能力的详细内容,我们还将为您解答elasticsearch搜索引擎的相关问题,并且为您提供关于46、elasticsearch(搜索引擎)scrapy写入数据到elasticsearch中、50、elasticsearch(搜索引擎)用Django实现我的搜索以及热门搜索、6、一张图把 elasticsearch 的基础知识串起来、docker 部署 elasticsearch + elasticsearch-head + elasticsearch-head 跨域问题 + IK 分词器的有价值信息。
本文目录一览:- 第7篇: 一张图让你读懂ElasticSearch强大的搜索能力(elasticsearch搜索引擎)
- 46、elasticsearch(搜索引擎)scrapy写入数据到elasticsearch中
- 50、elasticsearch(搜索引擎)用Django实现我的搜索以及热门搜索
- 6、一张图把 elasticsearch 的基础知识串起来
- docker 部署 elasticsearch + elasticsearch-head + elasticsearch-head 跨域问题 + IK 分词器
")
第7篇: 一张图让你读懂ElasticSearch强大的搜索能力(elasticsearch搜索引擎)
背景:目前国内有大量的公司都在使用 Elasticsearch,包括阿里、京东、滴滴、今日头条、小米、vivo等诸多知名公司。除了搜索功能之外,Elasticsearch还结合Kibana、Logstash、Elastic Stack还被广泛运用在大数据近实时分析领域,包括日志分析、指标监控等多个领域。
欢迎加入老王的成长社区,我们一起进步
本节内容:一张图让你读懂ElasticSearch强大的搜索能力。
目录
1、 ElasticSearch搜索操作(Java版)
2、ElasticSearch分布式搜索流程
2.1 搜索源码概览
2.1.1 定位有效节点
2.1.2 遍历节点及并行搜索
2.2 搜索核心流程全景图
2.3 核心模块执行流程
2.3.1 Elasticsearch转Lucene操作 ①
2.3.2 构建目标Nodes列表 ②
2.3.3 查询阶段文档ID和排序值获取 ③ ④
2.3.4 查询Query阶段返回处理 ⑤
2.3.5 取回Fetch阶段请求 ⑥
2.3.6 根据索引ID查询对应文档数据 ⑦
2.3.7 对整体结果集处理 ⑧ ⑨ ⑩
3、分布式搜索性能高的原因总结
3.1 写入对读的影响比较小
3.2 广播式查询提升并发性能
3.3 Query阶段数据量传输相对较少
3.4 Fetch阶段请求前逻辑优化
3.5 Fetch阶段索引快
说明:以下源码及流程图基于Elasticsearch 7.X,其它版本类似。
1、 ElasticSearch搜索操作(Java版)
为了更好地说明Elasticsearch搜索的原理,我们先来看下客户端查询操作代码及搜索流程。具体实战案例参考老王前面的文章 Elasticsearch 7.X增删改查实战
/**
* 搜索
* @param indexName
* @throws IOException
*/
public static void search(String indexName) throws IOException {
    SearchRequest request = new SearchRequest(indexName);
    //构建搜索条件
    SearchSourceBuilder builder = new SearchSourceBuilder();
    builder.query(QueryBuilders.termQuery("name","test")); // term
    builder.sort("createTime",SortOrder.DESC);
    builder.timeout(new TimeValue(60,TimeUnit.SECONDS));
    request.source(builder);
    SearchResponse response = restHighLevelClient.search(request,RequestOptions.DEFAULT); //搜索
    System.out.println(JSON.toJSONString(response.getHits()));
    for (SearchHit hit : response.getHits().getHits()) {
        System.out.println(hit.getSourceAsMap());
    }
}
在发起查询请求时,我们通常会传入一些查询过滤参数,这些参数可能需要:精确匹配、前缀匹配或后缀匹配。那这些不同的搜索条件Elasticsearch是如何快速搜索的呢?
2、ElasticSearch分布式搜索流程

如果对ES整体架构不太了解的朋友,可以先看下前面的两篇文章,能有助于大家理解本篇内容。
Elasticsearch架构及模块功能介绍
ElasticSearch写操作—原理及近实时性分析(完整版)
2.1 搜索源码概览
2.1.1 定位有效节点
/**
* 查找可用节点
*/
private NodeTuple<Iterator<Node>> nextNodes() throws IOException {
    NodeTuple<List<Node>> tuple = this.nodeTuple;
    Iterable<Node> hosts = selectNodes(tuple,blacklist,lastNodeIndex,nodeselector);
    return new NodeTuple<>(hosts.iterator(),tuple.authCache);
}
主要查询当前集群有哪些可用节点,过滤掉黑名单和无权限的节点,便于搜索时能直接根据有效节点进行数据搜索。
2.1.2 遍历节点及并行搜索
/**
* @param tuple 遍历节点
* @param request 请求参数
* @param prevIoUsException
* @return
* @throws IOException
*/
private Response performRequest(final NodeTuple<Iterator<Node>> tuple,final InternalRequest request,Exception prevIoUsException)
    throws IOException {
    RequestContext context = request.createContextForNextAttempt(tuple.nodes.next(),tuple.authCache);
    HttpResponse httpResponse;
    try {
        // 真正执行搜索操作的位置- asyncResponseConsumer为异步查询
        httpResponse = client.execute(context.requestProducer,context.asyncResponseConsumer,context.context,null)
                             .get();// 异步获取结果
    } catch (Exception e) {
       //... 忽略多余代码
    }
    ResponSEOrResponseException responSEOrResponseException = convertResponse(request,context.node,httpResponse);
    if (responSEOrResponseException.responseException == null) {
        return responSEOrResponseException.response;
    }
    addSuppressedException(prevIoUsException,responSEOrResponseException.responseException);
    if (tuple.nodes.hasNext()) { //循环迭代node
        // 递归调用 performRequest 函数
        return performRequest(tuple,request,responSEOrResponseException.responseException);
    }
    throw responSEOrResponseException.responseException;
}
该步骤主要针对可用节点进行依次循环,循环内部为异步从服务端获取数据。
public <T> Future<T> execute(HttpAsyncRequestProducer requestProducer,HttpAsyncResponseConsumer<T> responseConsumer,HttpContext context,FutureCallback<T> callback) {
    this.ensureRunning();
    BasicFuture<T> future = new BasicFuture(callback);
    HttpClientContext localcontext = HttpClientContext.adapt
            ((HttpContext)(context != null ? context : new BasicHttpContext()));

    // DefaultClientExchangeHandlerImpl
    // MinimalClientExchangeHandlerImpl

    try {
        handler.start();
    } catch (Exception var9) {
        handler.Failed(var9);
    }
    return new FutureWrapper(future,handler);//异步获取结果
}
通过异步方式,对Quesry Response结果进行排序合并后,将最终结果返回到客户端。
2.2 搜索核心流程全景图

2.3 核心模块执行流程
2.3.1 Elasticsearch转Lucene操作 ①
我们知道,Elasticsearch是基于Lucene底座基础之上做了很多封装,老王在前面文章
因此,在实际搜索之前,需要将用户传入的ES 查询API 转换为Lucene的查询API。即Elasticsearch Query转 Lucene Query。(具体API会在后面的文章会讲到)
2.3.2 构建目标Nodes列表 ②
首先,我们需要知道为什么要构建Nodes列表?
在发起请求之前,需要知道哪些节点是可用的,哪些节点是有权限。因为在实际生产当中,节点可能会出现异常或者权限控制。所以需要对可用节点进行过滤。
其次,为什么不直接找主节点呢?
我们知道Node是由多个Shard组成的,而Shard存在主分片和副本分片。一版生产环境中主副分片是不在同一台机器上,这样做是解决单台机器出现故障的情况下数据不丢失问题。所以,我们需要的数据在其他节点上也会存在它的副本。因此,只需要找到其中一个主搜索节点A(不一定是主节点)做协调节点,其余节点做分查询即可。
最后,主搜索节点A查询完可用节点后,接着会构建出一个长度为from+size的优先队列,这个队列用于存储各节点返回数据列表。然后,通过广播模式将请求信息分发到所有可用节点,等待数据返回。
2.3.3 查询阶段文档ID和排序值获取 ③ ④
各节点接收到主搜索节点A发送过来的请求,在自己内部的segment中进行搜索。其中,每个节点内部也会维护一个from+size大小的优先队列,用于存放本身查询的结果数据集。关于Segment的各个组成要素及作用可以看看前面的文章
1)为什么只获取查询文档ID和排序值
这里面主要考虑数据传输过大的性能问题,如果是已知搜索文档ID,即可以通过Elasticsearch的路由机制快速定位到存储该数据的任一分片副本;如果是非已知搜索文档,则需要根据过滤条件搜索所有节点。这就会导致整个查询数据量会比较庞大,特别是在from+size比较大的情况下更为明显。
2)如何生成这个排序值
其中sort值为数组,支持多字段排序。比如时间维度递减或地递增排序,sort会记录每个ID的日期值。
3)单分片如何提升查询性能
当词条数量较少时,可以顺序遍历词条获取结果,但如果词条有成千上万个时,Elasticsearch为了能快速找到某个词条,它对所有的词条都进行了排序,随后使用二分法查找词条,其查找效率为log(N)。此处排序词条的集合也称为Term Dictionary。
为了提高查询性能,Elasticsearch直接通过内存查找词条,而并不是从磁盘中直接读取。如果词条太多,显然Term Dictionary也会很大,此时全部放在内存有些不现实,于是引入了Term Index。
Term Index就像字典中的索引页,其中的内容如字母A开头的有哪些词条,以及这些词条分别在哪个页。通过Term Index,Elasticsearch也可以快速定位到Term Dictionary的某个OffSet(位置偏移),然后从这个位置再往后顺序查找。
2.3.4 查询Query阶段返回处理 ⑤
每个分片返回本地优先级序列中所记录的ID与sort值,并发送给节点A。节点A将这些值合并到自己的本地优先级队列中,并做出全局的排序。
2.3.5 取回Fetch阶段请求 ⑥
根据⑤最终的排序结果,再次发起Featch请求。比如此时找出最终排序的from起的size条数据,此时请求参数胡会携带ID值。
2.3.6 根据索引ID查询对应文档数据 ⑦
根据文档ID,通过Elasticsearch的路由机制可快速定位到存储该数据的任一分片,从而达到快速查询的效果。
2.3.7 对整体结果集处理 ⑧ ⑨ ⑩
请求节点将来自所有分片的数据做合并处理,并在请求节点上进行排序,文档被按照查询要求进行选择。最终,实际文档从它们各自所在的独立的分片上被检索出来,最终将结果返回给客户端。
3、分布式搜索性能高的原因总结
从以上流程中,我们可以大致推断出影响Elasticsearch搜索性能的一些因素。
3.1 写入对读的影响比较小
数据写入磁盘文件之前,会先进入os cache,先进入操作系统级别的一个内存缓存中。只要buffer中的数据被refresh到os cache中,数据就可以被检索到了。因此,存储和实际查询的区域互不影响。而且是基于内存检索,加速查询效率。
3.2 广播式查询提升并发性能
主搜索节点通过广播模式向各节点发起请求,这样会让多核节点并行执行,大大提升了查询性能。
3.3 Query阶段数据量传输相对较少
从前面的查询阶段了解到,该步骤仅返回查询文档ID和排序值,而没有把所有文档数据返回,这样避免了因数据量过大而导致查询性能下降。更为重要的是,这个过程当中会用到倒排索引,必然进一步加速了查询性能。
3.4 Fetch阶段请求前逻辑优化
这一步主要是对各节点返回的数据进行重新排序,比如分页,只查询当前页需要的数据即可,这样也进一步减少了无效数据量的传输。
3.5 Fetch阶段索引快
fetch阶段传入,请求参数文档ID根据路由规则直接计算出对应数据存储的分片,从而避免了全节点检索的效率问题。
scrapy写入数据到elasticsearch中")
46、elasticsearch(搜索引擎)scrapy写入数据到elasticsearch中
【百度云搜索,搜各种资料:http://www.lqkweb.com】
【搜网盘,搜各种资料:http://www.swpan.cn】
前面我们讲到的elasticsearch(搜索引擎)操作,如:增、删、改、查等操作都是用的elasticsearch的语言命令,就像sql命令一样,当然elasticsearch官方也提供了一个python操作elasticsearch(搜索引擎)的接口包,就像sqlalchemy操作数据库一样的ORM框,这样我们操作elasticsearch就不用写命令了,用elasticsearch-dsl-py这个模块来操作,也就是用python的方式操作一个类即可
elasticsearch-dsl-py下载
下载地址:https://github.com/elastic/el...
文档说明:http://elasticsearch-dsl.read...
首先安装好elasticsearch-dsl-py模块
1、elasticsearch-dsl模块使用说明
create_connection(hosts=[''127.0.0.1'']):连接elasticsearch(搜索引擎)服务器方法,可以连接多台服务器
class Meta:设置索引名称和表名称
索引类名称.init(): 生成索引和表以及字段
实例化索引类.save():将数据写入elasticsearch(搜索引擎)
elasticsearch_orm.py 操作elasticsearch(搜索引擎)文件
#!/usr/bin/env python
# -*- coding:utf8 -*-
from datetime import datetime
from elasticsearch_dsl import DocType, Date, Nested, Boolean, \
    analyzer, InnerObjectWrapper, Completion, Keyword, Text, Integer

# 更多字段类型见第三百六十四节elasticsearch(搜索引擎)的mapping映射管理

from elasticsearch_dsl.connections import connections       # 导入连接elasticsearch(搜索引擎)服务器方法
connections.create_connection(hosts=[''127.0.0.1''])

class lagouType(DocType):                                                   # 自定义一个类来继承DocType类
    # Text类型需要分词,所以需要知道中文分词器,ik_max_wordwei为中文分词器
    title = Text(analyzer="ik_max_word")                                    # 设置,字段名称=字段类型,Text为字符串类型并且可以分词建立倒排索引
    description = Text(analyzer="ik_max_word")
    keywords = Text(analyzer="ik_max_word")
    url = Keyword()                                                         # 设置,字段名称=字段类型,Keyword为普通字符串类型,不分词
    riqi = Date()                                                           # 设置,字段名称=字段类型,Date日期类型

    class Meta:                                                             # Meta是固定写法
        index = "lagou"                                                     # 设置索引名称(相当于数据库名称)
        doc_type = ''biao''                                                   # 设置表名称

if __name__ == "__main__":          # 判断在本代码文件执行才执行里面的方法,其他页面调用的则不执行里面的方法
    lagouType.init()                # 生成elasticsearch(搜索引擎)的索引,表,字段等信息

# 使用方法说明:
# 在要要操作elasticsearch(搜索引擎)的页面,导入此模块
# lagou = lagouType()           #实例化类
# lagou.title = ''值''            #要写入字段=值
# lagou.description = ''值''
# lagou.keywords = ''值''
# lagou.url = ''值''
# lagou.riqi = ''值''
# lagou.save()                  #将数据写入elasticsearch(搜索引擎)
2、scrapy写入数据到elasticsearch中
爬虫文件
# -*- coding: utf-8 -*-
import scrapy
from scrapy.linkextractors import LinkExtractor
from scrapy.spiders import CrawlSpider, Rule
from adc.items import LagouItem,LagouItemLoader  #导入items容器类,和ItemLoader类
import time

class LagouSpider(CrawlSpider):                     #创建爬虫类
    name = ''lagou''                                  #爬虫名称
    allowed_domains = [''www.luyin.org'']             #起始域名
    start_urls = [''http://www.luyin.org/'']          #起始url

    custom_settings = {
        "AUTOTHROTTLE_ENABLED": True,                             #覆盖掉settings.py里的相同设置,开启COOKIES
        "DOWNLOAD_DELAY":5
    }

    rules = (
        #配置抓取列表页规则
        Rule(LinkExtractor(allow=(''ggwa/.*'')), follow=True),

        #配置抓取内容页规则
        Rule(LinkExtractor(allow=(''post/\d+.html.*'')), callback=''parse_job'', follow=True),
    )

    def parse_job(self, response):                  #回调函数,注意:因为CrawlS模板的源码创建了parse回调函数,所以切记我们不能创建parse名称的函数
        atime = time.localtime(time.time())         #获取系统当前时间
        dqatime = "{0}-{1}-{2} {3}:{4}:{5}".format(
            atime.tm_year,
            atime.tm_mon,
            atime.tm_mday,
            atime.tm_hour,
            atime.tm_min,
            atime.tm_sec
        )  # 将格式化时间日期,单独取出来拼接成一个完整日期

        url = response.url

        item_loader = LagouItemLoader(LagouItem(), response=response)   # 将数据填充进items.py文件的LagouItem
        item_loader.add_xpath(''title'', ''/html/head/title/text()'')
        item_loader.add_xpath(''description'', ''/html/head/meta[@name="Description"]/@content'')
        item_loader.add_xpath(''keywords'', ''/html/head/meta[@name="keywords"]/@content'')
        item_loader.add_value(''url'', url)
        item_loader.add_value(''riqi'', dqatime)
        article_item = item_loader.load_item()
yield article_item
items.py文件
# -*- coding: utf-8 -*-

# Define here the models for your scraped items
#
# See documentation in:
# http://doc.scrapy.org/en/latest/topics/items.html
#items.py,文件是专门用于,接收爬虫获取到的数据信息的,就相当于是容器文件

import scrapy
from scrapy.loader.processors import MapCompose,TakeFirst
from scrapy.loader import ItemLoader                #导入ItemLoader类也就加载items容器类填充数据
from adc.models.elasticsearch_orm import lagouType  #导入elasticsearch操作模块

class LagouItemLoader(ItemLoader):                  #自定义Loader继承ItemLoader类,在爬虫页面调用这个类填充数据到Item类
    default_output_processor = TakeFirst()          #默认利用ItemLoader类,加载items容器类填充数据,是列表类型,可以通过TakeFirst()方法,获取到列表里的内容

def tianjia(value):                                 #自定义数据预处理函数
    return value                                    #将处理后的数据返给Item

class LagouItem(scrapy.Item):                       #设置爬虫获取到的信息容器类
    title = scrapy.Field(                           #接收爬虫获取到的title信息
        input_processor=MapCompose(tianjia),        #将数据预处理函数名称传入MapCompose方法里处理,数据预处理函数的形式参数value会自动接收字段title
    )
    description = scrapy.Field()
    keywords = scrapy.Field()
    url = scrapy.Field()
    riqi = scrapy.Field()

    def save_to_es(self):
        lagou = lagouType()                         # 实例化elasticsearch(搜索引擎对象)
        lagou.title = self[''title'']                 # 字段名称=值
        lagou.description = self[''description'']
        lagou.keywords = self[''keywords'']
        lagou.url = self[''url'']
        lagou.riqi = self[''riqi'']
        lagou.save()                                # 将数据写入elasticsearch(搜索引擎对象)
        return
pipelines.py文件
# -*- coding: utf-8 -*-

# Define your item pipelines here
#
# Don''t forget to add your pipeline to the ITEM_PIPELINES setting
# See: http://doc.scrapy.org/en/latest/topics/item-pipeline.html
from adc.models.elasticsearch_orm import lagouType  #导入elasticsearch操作模块

class AdcPipeline(object):
    def process_item(self, item, spider):

        #也可以在这里将数据写入elasticsearch搜索引擎,这里的缺点是统一处理
        # lagou = lagouType()
        # lagou.title = item[''title'']
        # lagou.description = item[''description'']
        # lagou.keywords = item[''keywords'']
        # lagou.url = item[''url'']
        # lagou.riqi = item[''riqi'']
        # lagou.save()
        item.save_to_es()       #执行items.py文件的save_to_es方法将数据写入elasticsearch搜索引擎
        return item
settings.py文件,注册pipelines
# Configure item pipelines
# See http://scrapy.readthedocs.org/en/latest/topics/item-pipeline.html
ITEM_PIPELINES = {
   ''adc.pipelines.AdcPipeline'': 300,
}
main.py爬虫启动文件
#!/usr/bin/env python
# -*- coding:utf8 -*-

from scrapy.cmdline import execute  #导入执行scrapy命令方法
import sys
import os

sys.path.append(os.path.join(os.getcwd())) #给Python解释器,添加模块新路径 ,将main.py文件所在目录添加到Python解释器

execute([''scrapy'', ''crawl'', ''lagou'', ''--nolog''])  #执行scrapy命令

# execute([''scrapy'', ''crawl'', ''lagou''])  #执行scrapy命令
运行爬虫

写入elasticsearch(搜索引擎)情况

补充:elasticsearch-dsl 的 增删改查
#!/usr/bin/env python
# -*- coding:utf8 -*-
from datetime import datetime
from elasticsearch_dsl import DocType, Date, Nested, Boolean, \
    analyzer, InnerObjectWrapper, Completion, Keyword, Text, Integer

# 更多字段类型见第三百六十四节elasticsearch(搜索引擎)的mapping映射管理

from elasticsearch_dsl.connections import connections       # 导入连接elasticsearch(搜索引擎)服务器方法
connections.create_connection(hosts=[''127.0.0.1''])

class lagouType(DocType):                                                   # 自定义一个类来继承DocType类
    # Text类型需要分词,所以需要知道中文分词器,ik_max_wordwei为中文分词器
    title = Text(analyzer="ik_max_word")                                    # 设置,字段名称=字段类型,Text为字符串类型并且可以分词建立倒排索引
    description = Text(analyzer="ik_max_word")
    keywords = Text(analyzer="ik_max_word")
    url = Keyword()                                                         # 设置,字段名称=字段类型,Keyword为普通字符串类型,不分词
    riqi = Date()                                                           # 设置,字段名称=字段类型,Date日期类型

    class Meta:                                                             # Meta是固定写法
        index = "lagou"                                                     # 设置索引名称(相当于数据库名称)
        doc_type = ''biao''                                                   # 设置表名称

if __name__ == "__main__":          # 判断在本代码文件执行才执行里面的方法,其他页面调用的则不执行里面的方法
    lagouType.init()                # 生成elasticsearch(搜索引擎)的索引,表,字段等信息

# 使用方法说明:
# 在要要操作elasticsearch(搜索引擎)的页面,导入此模块
# lagou = lagouType()           #实例化类
# lagou.title = ''值''            #要写入字段=值
# lagou.description = ''值''
# lagou.keywords = ''值''
# lagou.url = ''值''
# lagou.riqi = ''值''
# lagou.save()                  #将数据写入elasticsearch(搜索引擎)
1新增数据
from adc.models.elasticsearch_orm import lagouType  #导入刚才配置的elasticsearch操作模块

     lagou = lagouType()                         # 实例化elasticsearch(搜索引擎对象)
     lagou._id = 1             #自定义ID,很重要,以后都是根据ID来操作

        lagou.title = self[''title'']                 # 字段名称=值
        lagou.description = self[''description'']
        lagou.keywords = self[''keywords'']
        lagou.url = self[''url'']
        lagou.riqi = self[''riqi'']
        lagou.save()                                # 将数据写入elasticsearch(搜索引擎对象)
2删除指定数据
from adc.models.elasticsearch_orm import lagouType #导入刚才配置的elasticsearch操作模块sousuo_orm = lagouType() # 实例化
sousuo_orm.get(id=1).delete() # 删除id等于1的数据3修改指定的数据
from adc.models.elasticsearch_orm import lagouType  #导入刚才配置的elasticsearch操作模块

sousuo_orm = lagouType()                           # 实例化
sousuo_orm.get(id=1).update(title=''123456789'')     # 修改id等于1的数据
以上全部使用elasticsearch-dsl模块
注意下面使用的原生elasticsearch模块
删除指定使用,就是相当于删除指定数据库
使用原生elasticsearch模块删除指定索引
from elasticsearch import Elasticsearch                                     # 导入原生的elasticsearch(搜索引擎)接口
client = Elasticsearch(hosts=settings.Elasticsearch_hosts)                  # 连接原生的elasticsearch

# 使用原生elasticsearch模块删除指定索引
#要做容错处理,如果索引不存在会报错
            try:
                client.indices.delete(index=''jxiou_zuopin'')
            except Exception as e:
                pass
原生查询
from elasticsearch import Elasticsearch                 # 导入原生的elasticsearch(搜索引擎)接口
            client = Elasticsearch(hosts=Elasticsearch_hosts)       # 连接原生的elasticsearch

response = client.search(                               # 原生的elasticsearch接口的search()方法,就是搜索,可以支持原生elasticsearch语句查询
                index="jxiou_zuopin",                               # 设置索引名称
                doc_type="zuopin",                                  # 设置表名称
                body={                                              # 书写elasticsearch语句
                    "query": {
                        "multi_match": {                            # multi_match查询
                            "query": sousuoci,                      # 查询关键词
                            "fields": ["title"]                     # 查询字段
                        }
                    },
                    "from": (page - 1) * tiaoshu,                   # 从第几条开始获取
                    "size": tiaoshu,                                # 获取多少条数据
                    "highlight": {                                  # 查询关键词高亮处理
                        "pre_tags": [''<span >''],    # 高亮开始标签
                        "post_tags": [''</span>''],                   # 高亮结束标签
                        "fields": {                                 # 高亮设置
                            "title": {}                             # 高亮字段
                        }
                    }
                }
            )
            # 开始获取数据
            total_nums = response["hits"]["total"]                  # 获取查询结果的总条数

            hit_list = []                                           # 设置一个列表来储存搜索到的信息,返回给html页面

            for hit in response["hits"]["hits"]:                                # 循环查询到的结果
                hit_dict = {}                                                   # 设置一个字典来储存循环结果
                if "title" in hit["highlight"]:                                 # 判断title字段,如果高亮字段有类容
                    hit_dict["title"] = "".join(hit["highlight"]["title"])      # 获取高亮里的title
                else:
                    hit_dict["title"] = hit["_source"]["title"]                 # 否则获取不是高亮里的title

                hit_dict["id"] = hit["_source"]["nid"]                          # 获取返回nid

                # 加密样音地址
                hit_dict["yangsrc"] = jia_mi(str(hit["_source"]["yangsrc"]))    # 获取返回yangsrc

hit_list.append(hit_dict)用Django实现我的搜索以及热门搜索")
50、elasticsearch(搜索引擎)用Django实现我的搜索以及热门搜索
【百度云搜索,搜各种资料:http://www.lqkweb.com】
【搜网盘,搜各种资料:http://www.swpan.cn】
第三百七十一节,Python分布式爬虫打造搜索引擎Scrapy精讲—elasticsearch(搜索引擎)用Django实现我的搜索以及热门

我的搜素简单实现原理
我们可以用js来实现,首先用js获取到输入的搜索词
设置一个数组里存放搜素词,
判断搜索词在数组里是否存在如果存在删除原来的词,重新将新词放在数组最前面
如果不存在直接将新词放在数组最前面即可,然后循环数组显示结果即可
热门搜索
实现原理,当用户搜索一个词时,可以保存到数据库,然后记录搜索次数,
利用redis缓存搜索次数最到的词,过一段时间更新一下缓存
备注:Django结合Scrapy的开源项目可以学习一下
django-dynamic-scraper
https://github.com/holgerd77/...
补充
默认的elasticsearch(搜索引擎)只能搜索1万条数据,在大就会报错了**
设置方法
步骤一:
打开项目的索引库地址,将该索引先关闭,否则设置操步骤二无法提交

步骤二:
打开复合查询,填入如下信息,记得选择PUT方式提交,credit_trace_data改为本索引库中的索引,max_result_window设为20亿,此值是integer类型,不能无限大
http://127.0.0.1:9200/ PUT
credit_trace_data/_settings?preserve_existing=true
{
"max_result_window" : "2000000000"
}

最后点击提交申请,如果配置正确右侧窗口会显示如下信息

如果要查询max_result_window时只需要将PUT改为get即可

最后记得开启索引!

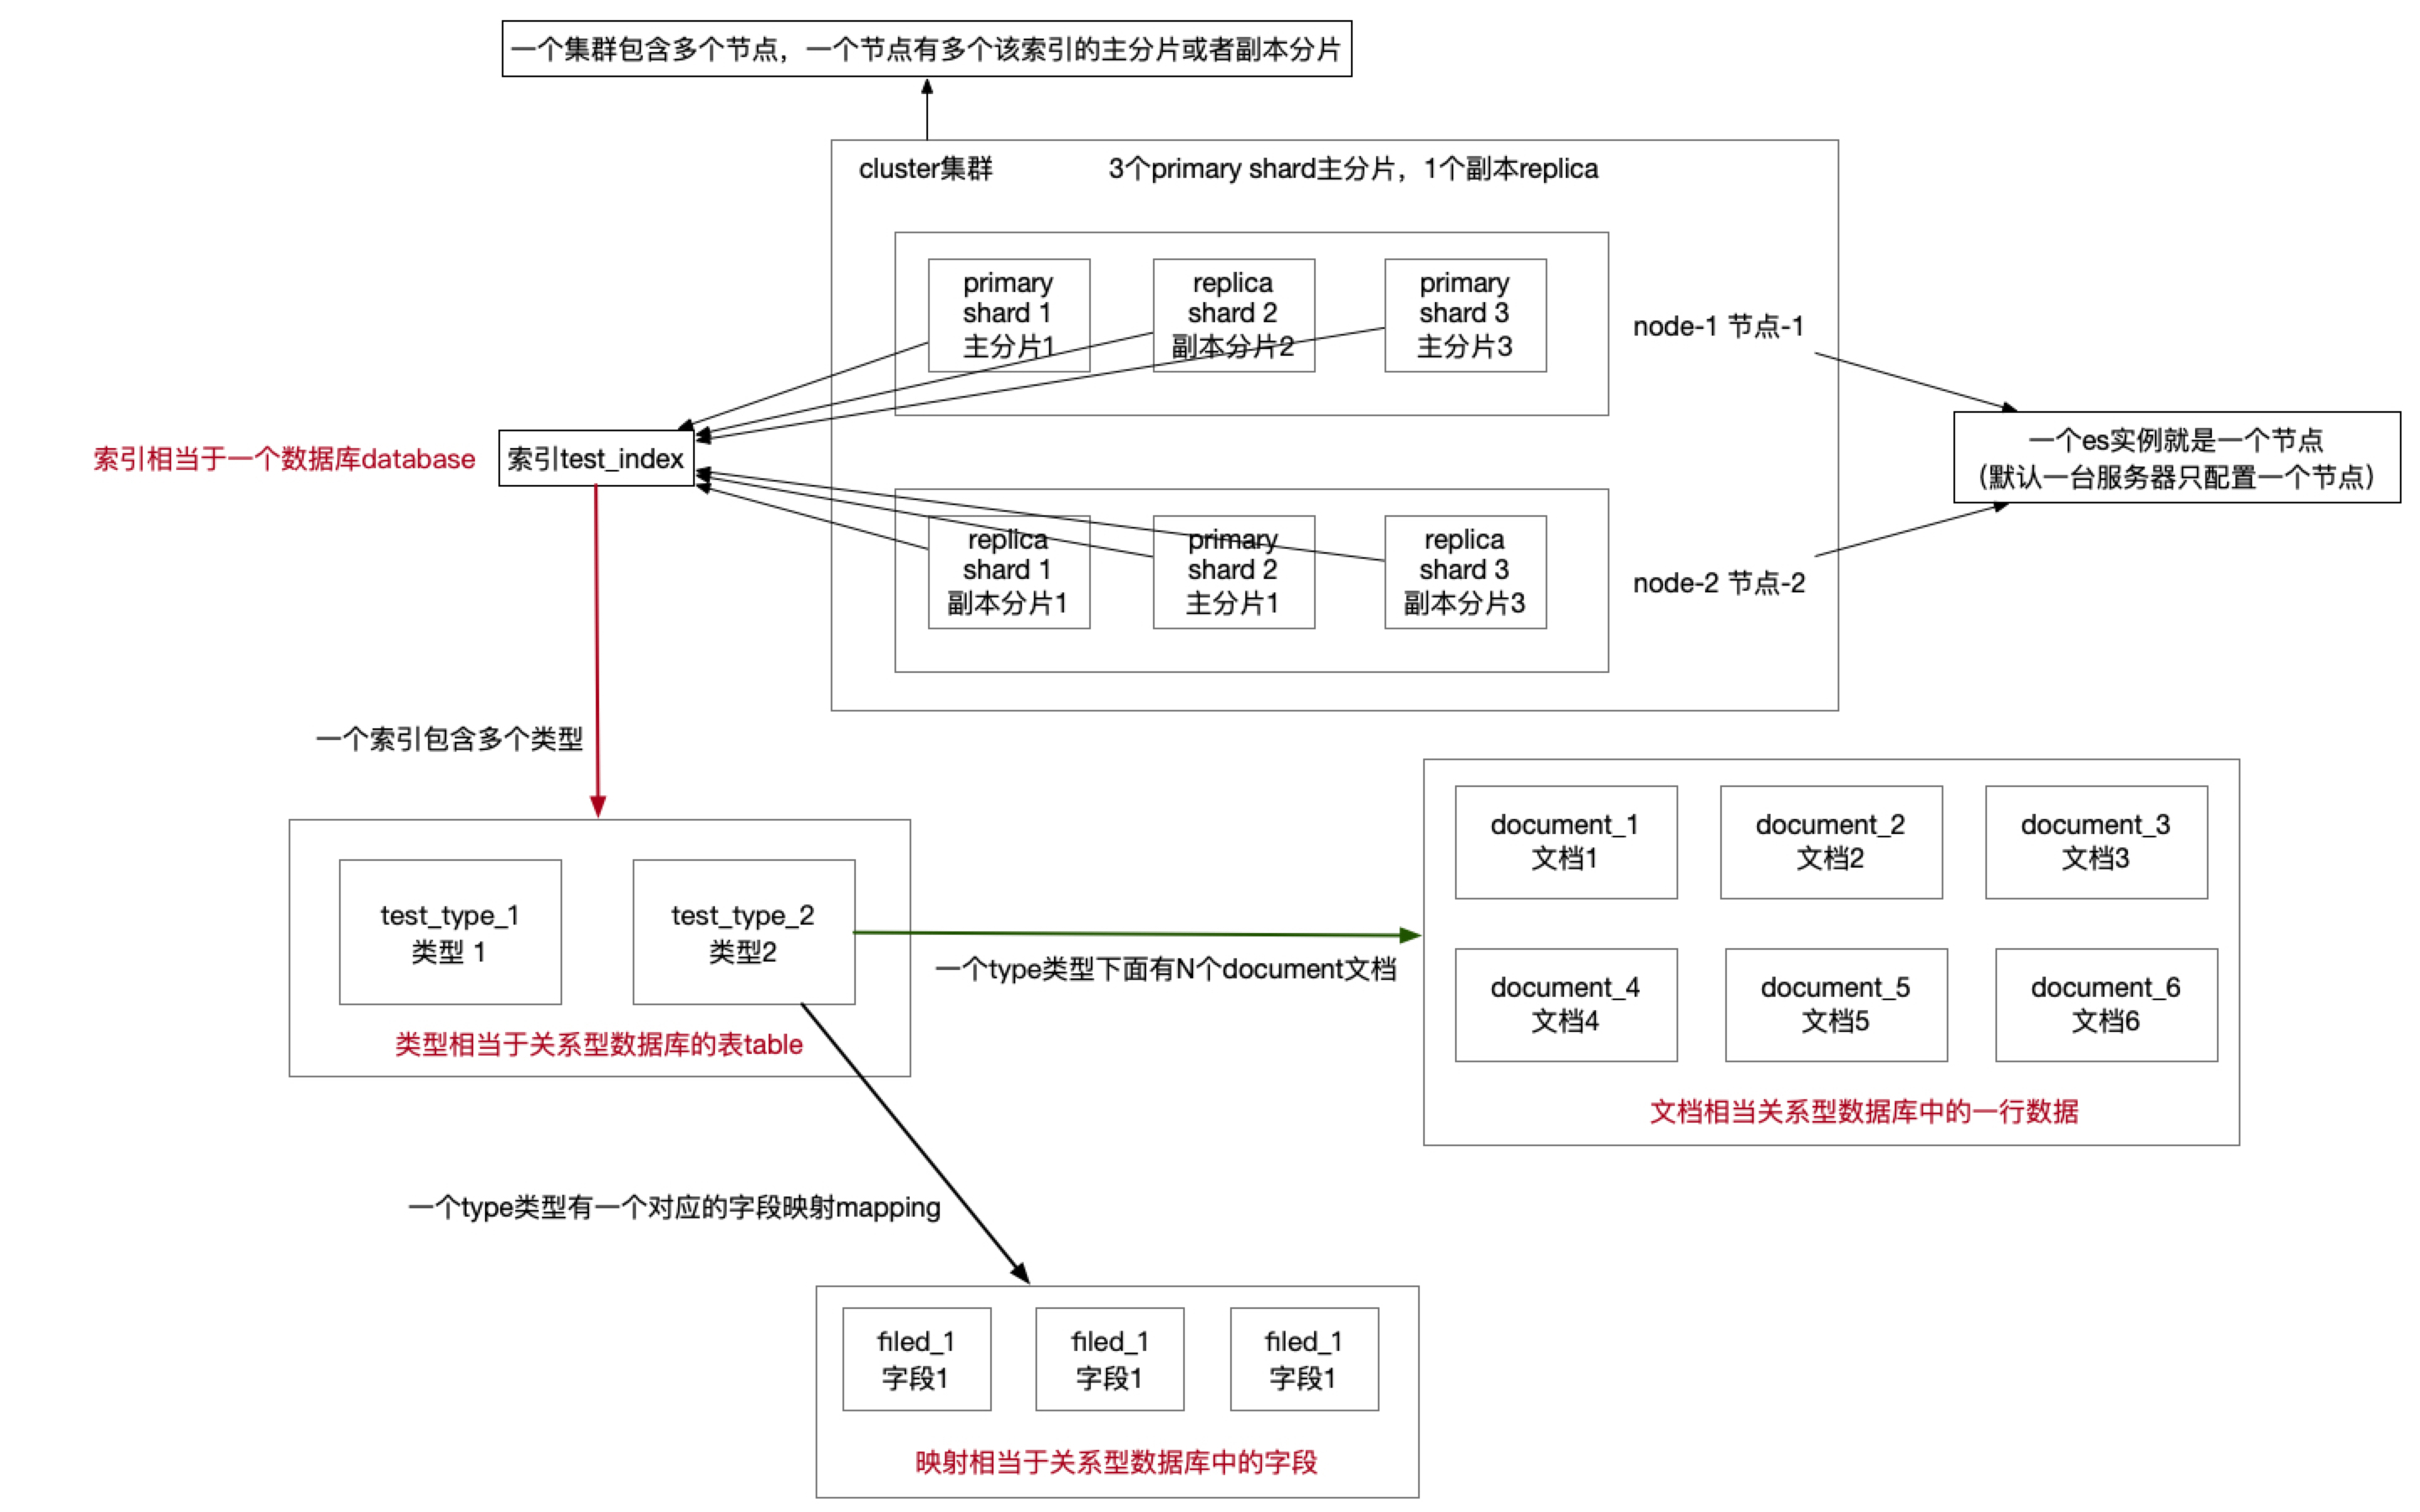
6、一张图把 elasticsearch 的基础知识串起来
我们用一张图把 es 的相关基础知识串起来,更便于大家理解

docker 部署 elasticsearch + elasticsearch-head + elasticsearch-head 跨域问题 + IK 分词器
0. docker pull 拉取 elasticsearch + elasticsearch-head 镜像
1. 启动 elasticsearch Docker 镜像
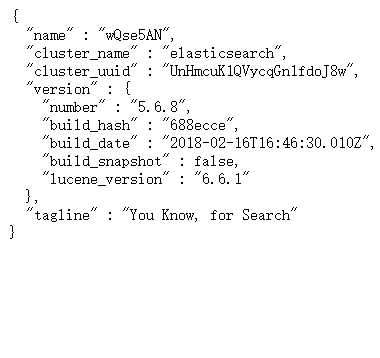
docker run -di --name tensquare_elasticsearch -p 9200:9200 -p 9300:9300 elasticsearch![]()
对应 IP:9200 ---- 反馈下边 json 数据,表示启动成功
2. 启动 elasticsearch-head 镜像
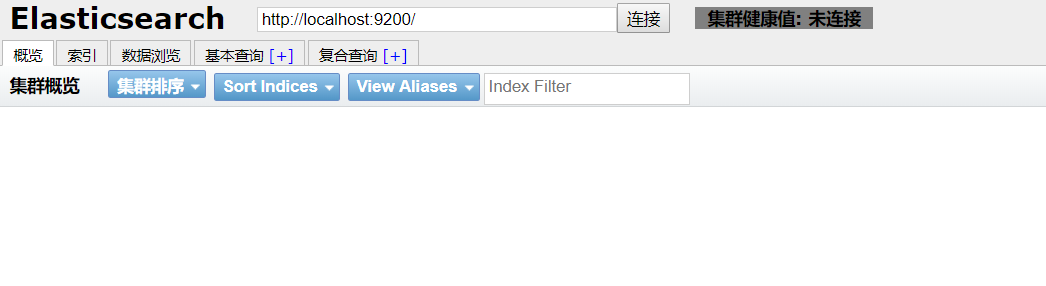
docker run -d -p 9100:9100 elasticsearch-head![]()
对应 IP:9100 ---- 得到下边页面,即启动成功
3. 解决跨域问题
进入 elasticsearch-head 页面,出现灰色未连接状态 , 即出现跨域问题

1. 根据 docker ps 得到 elasticsearch 的 CONTAINER ID
2. docker exec -it elasticsearch 的 CONTAINER ID /bin/bash 进入容器内
3. cd ./config
4. 修改 elasticsearch.yml 文件
echo "
http.cors.enabled: true
http.cors.allow-origin: ''*''" >> elasticsearch.yml
4. 重启 elasticsearch
docker restart elasticsearch的CONTAINER ID重新进入 IP:9100 进入 elasticsearch-head, 出现绿色标注,配置成功 !

5. ik 分词器的安装
将在 ik 所在的文件夹下,拷贝到 /usr/share/elasticsearch/plugins --- 注意: elasticsearch 的版本号必须与 ik 分词器的版本号一致
docker cp ik elasticsearch的CONTAINER ID:/usr/share/elasticsearch/plugins
重启elasticsearch
docker restart elasticsearch

未添加ik分词器:http://IP:9200/_analyze?analyzer=chinese&pretty=true&text=我爱中国
添加ik分词器后:http://IP:9200/_analyze?analyzer=ik_smart&pretty=true&text=我爱中国今天的关于第7篇: 一张图让你读懂ElasticSearch强大的搜索能力和elasticsearch搜索引擎的分享已经结束,谢谢您的关注,如果想了解更多关于46、elasticsearch(搜索引擎)scrapy写入数据到elasticsearch中、50、elasticsearch(搜索引擎)用Django实现我的搜索以及热门搜索、6、一张图把 elasticsearch 的基础知识串起来、docker 部署 elasticsearch + elasticsearch-head + elasticsearch-head 跨域问题 + IK 分词器的相关知识,请在本站进行查询。
本文标签:


![[转帖]Ubuntu 安装 Wine方法(ubuntu如何安装wine)](https://www.gvkun.com/zb_users/cache/thumbs/4c83df0e2303284d68480d1b1378581d-180-120-1.jpg)

