本文将分享第10篇:Mac/Windows安装ElasticSearch可视化Head插件的详细内容,并且还将对macelasticsearch进行详尽解释,此外,我们还将为大家带来关于centos6
本文将分享第10篇:Mac/Windows安装ElasticSearch可视化Head插件的详细内容,并且还将对mac elasticsearch进行详尽解释,此外,我们还将为大家带来关于centos 6.5安装Elasticsearch 5.6.3集群和Head插件、CentOS 安装ElasticSearch-head插件、docker安装elasticsearch及head插件、docker安装elasticsearch和head插件的相关知识,希望对你有所帮助。
本文目录一览:- 第10篇:Mac/Windows安装ElasticSearch可视化Head插件(mac elasticsearch)
- centos 6.5安装Elasticsearch 5.6.3集群和Head插件
- CentOS 安装ElasticSearch-head插件
- docker安装elasticsearch及head插件
- docker安装elasticsearch和head插件
")
第10篇:Mac/Windows安装ElasticSearch可视化Head插件(mac elasticsearch)
背景:目前国内有大量的公司都在使用 Elasticsearch,包括阿里、京东、滴滴、今日头条、小米、vivo等诸多知名公司。除了搜索功能之外,Elasticsearch还结合Kibana、Logstash、Elastic Stack还被广泛运用在大数据近实时分析领域,包括日志分析、指标监控等多个领域。
本节内容:Mac Windows 如何安装ElasticSearch可视化Head插件。
目录
1、Mac安装ElasticSearch-head
2、Windows安装ElasticSearch-head
1、Mac安装 ElasticSearch-head
第1步:在GitHub上寻找head插件:输入网址:https://github.com
第2步:搜索 elasticsearch-head

第3步:进入 mobz/elasticsearch-head

第4步:下载ZIP包。

第5步:关闭之前启动的elasticsearch服务 Mac终端:Ctrl + c
第6步:安装Node.js。
科普:Node.js 是一个用Chrome's V8 JavaScript engine 构建的 JavaScript 运行时框架。Node.js 使用事件驱动、非阻塞式 I/O 模块使得它非常的轻量级和非常的高效。Node.js 生态系统,npm 是世界上最大的开源库生态系统。NPM的全称是Node Package Manager,是Nodejs的包管理器。Node.js本身身提供了基本的模块,但是我们利用这些基本模块开发实际应用需要编写大量的代码,做较多的工作。NPM上已经有很多Node.js库或框架,这些库或框架可以帮助Node.js的开发者用较少的代码完成较复杂的应用。而npm上的库或者框架已达30,0000个,其中Node.js 的库和框架也有几千个,真不愧是世界上最大的开源库生态系统。

下载完后,直接双击一路下一步即可。

验证node.js是否安装成功:
$: node -v
输出:v16.15.0 #表示安装成功
查看npm版本号:
$: npm -v
8.5.5
第7步:启动插件(npm是node的包的安装工具)
输入命令: npm run start
启动时,可能会出现如下异常。
$ npm run start
> elasticsearch-head@0.0.0 start
> grunt server
sh: grunt: command not found
此时,开始安装grunt.
安装命令:sudo npm install -g grunt-cli
检查是否安装成功。
$: grunt --version
grunt-cli v1.4.3
再次启动,报错: Fatal error: Unable to find local grunt.
npm run start
> elasticsearch-head@0.0.0 start
> grunt server
grunt-cli: The grunt command line interface (v1.4.3)
Fatal error: Unable to find local grunt.
If you're seeing this message,grunt hasn't been installed locally to
your project. For more information about installing and configuring grunt,
please see the Getting Started guide:
https://gruntjs.com/getting-started
此时,需要按照如下四个依赖包:
这些是Gruntfile.js中引用的,依次安装:
npm install grunt-contrib-copy
npm install grunt-contrib-concat
npm install grunt-contrib-uglify
npm install grunt-css
安装完后,再次启动:
npm run start
> elasticsearch-head@0.0.0 start
> grunt server
Running "connect:server" (connect) task
Waiting forever...
Started connect web server on http://localhost:9100
在浏览器中输入http://localhost:9100。 出现如下界面,表示安装成功。

第8步:此时集群状态值为未连接状态,由于是刚把ElasticSearch服务停掉了,此时先把head插件也停掉: Ctrl + c
第9步:由于head插件与ElasticSearch是两个独立的进程,它们之间的访问会有跨域问题,则需要对ElasticSearch的配置进行相应的修改,执行编辑命令:
vim config/elasticsearch.yml
在文件末端输入:
http.cors.enabled: true
http.cors.allow-origin: "*"

编辑完后, 按 Esc 输入 :wq! 保存退出。
第9步:此时后台启动ElasticSearch,输入命令 :./bin/elasticsearch -d
第10步:再次开启head插件,在elasticsearch-head-master目录下, 输入命令: npm run start

2、Windows安装ElasticSearch-head
第1步:首先下载head插件:https://github.com/mobz/elasticsearch-head
第2步:elasticsearch安装目录下的plugins目录下创建head文件夹。
第3步:把elasticsearch-head-master.zip压缩文件压缩到head文件夹中。
第4步:安装node.js 。地址:https://nodejs.org/en/。下载node-vx.x.x-x64.msi。然后按默认安装。
安装完成后,cmd进入命令窗口页面,执行 node -v可查看版本号。
执行npm install -g grunt-cli 安装grunt。
安装完成后执行grunt - version查看是否安装成功,会显示安装的版本号。

第5步:将解压的 elasticsearch-head 复制到es的安装目录下。新版本的es不支持复制到plugins目录下。

第6步:进入es安装目录下的config目录,修改elasticsearch.yml文件。
在文件结尾增加如下信息:
http.cors.enabled: true
http.cors.allow-origin: "*"
node.master: true
node.data: true
去掉elasticsearch.yml文件中下列注释 network.host;cluster.name;node.name;http.port的注释(也就是去掉#),network.host可以改为network.host: 0.0.0.0。修改elasticsearch-head-master\Gruntfile.js文件,在对应的位置加上hostname:'*'
connect: {
server: {
options: {
port: 9100,
base: '.',
keepalive: true,
hostname: '*'
}
}
}
第7步:在F:\es\elasticsearch-7.10.1\elasticsearch-head-master\ 下执行npm install 安装。
第8步:完成后执行grunt server 或者npm run start 运行head插件。
如果不成功则重新安装grunt。
第9步:执行F:\es\elasticsearch-7.10.1\bin目录下的elasticsearch.bat。
第10步:启动后就可以正常访问es和head插件了。

以上,Mac版和Windows版的Elasticsearch-head已安装完毕。

centos 6.5安装Elasticsearch 5.6.3集群和Head插件

CentOS 安装ElasticSearch-head插件
1 下载ElasticSearch-head安装包
1.1 Git下载ElasticSearch-head
#安装git,若机器环境已存在,不需要再次安装
yum install git
#下载
git clone https://github.com/mobz/elasticsearch-head.git
1.2 在GitHub上下载安装包
GitHub下载地址:https://github.com/mobz/elasticsearch-head
2 下载安装nodejs环境
elasticsearch-head是基于nodejs开发的,所以需要安装nodejs环境
2.1 直接安装nodejs
此方式安装过程较慢,主要是下载相关依赖由于网络原因会比较慢。
#安装nodejs环境,若机器环境已存在,不需要再次安装
yum install nodejs

2.2 手动安装配置nodejs
2.2.1 下载nodejs
--目前最新版本 Latest LTS Version: 12.18.3 (includes npm 6.14.6)
wget https://nodejs.org/dist/v12.18.3/node-v12.18.3-linux-x64.tar.gz
2.2.2 创建nodejs安装目录
mkdir /opt/nodejs
2.2.3 解压nodejs安装包
mv node-v12.18.3-linux-x64.tar.gz nodejs/
cd /opt/nodejs
tar -zxvf node-v12.18.3-linux-x64.tar.gz

2.2.4 配置nodejs环境变量
vim /etc/profile
配置nodejs 的HOME目录
export NODEJS_HOME=/opt/nodejsnode-v12.18.3-linux-x64
加入nodejs的环境变量
export PATH=$PATH:${NODEJS_HOME}/bin
让配置生效
source /etc/profile


2.2.5 测试nodejs的版本
node -v
3 安装ElasticSearch-head插件
3.1 使用npm安装
#安装 (elasticsearch-head目录下执行)
npm install
3.2 解压安装包并安装
# 安装unzip解压命令
yum install unzip
unzip elasticsearch-head-master.zip

4 配置ElasticSearch-head插件
# 修改服务器监听地址,增加hostname属性,设置为 hostname: '*'
vim /opt/elasticsearch-head-master/Gruntfile.js
connect: {

server: {

options: {

port: 9100,

hostname: '*',

base: '.',

keepalive: true

}

}

}


#修改默认elasticsearch服务连接地址,将localhost修改为elasticsearch的服务器地址
vim /opt/elasticsearch-head-master/_site/app.js

init: function(parent) {
		this._super();
		this.prefs = services.Preferences.instance();
		this.base_uri = this.config.base_uri || this.prefs.get("app-base_uri") || "http://es服务器ip地址:9200";
}

vi /opt/elasticsearch/config/elasticsearch.yml
#若连接不上elasticsearch服务,请检查、修改Elasticsearch配置,允许跨域访问,修改后重新启动Elasticsearch,添加如下配置,支持跨域访问
http.cors.enabled: true
http.cors.allow-origin: "*"

5 启动ElasticSearch-head
# elasticsearch-head目录下执行
npm run start
6 访问

docker安装elasticsearch及head插件
使用 Docker 拉取ElasticSearch镜像
docker pull elasticsearch:7.0.0
查看镜像 ID
docker images运行
docker run -e ES_JAVA_OPTS="-Xms256m -Xmx256m" -d --name elasticsearch -p 9200:9200 -p 9300:9300 *****[注:这是要运行的镜像id]
-e ES_JAVA_OPTS="-Xms256m -Xmx256m" //设置初始堆内存和最大内存 也可以调整虚拟机内存
测试:
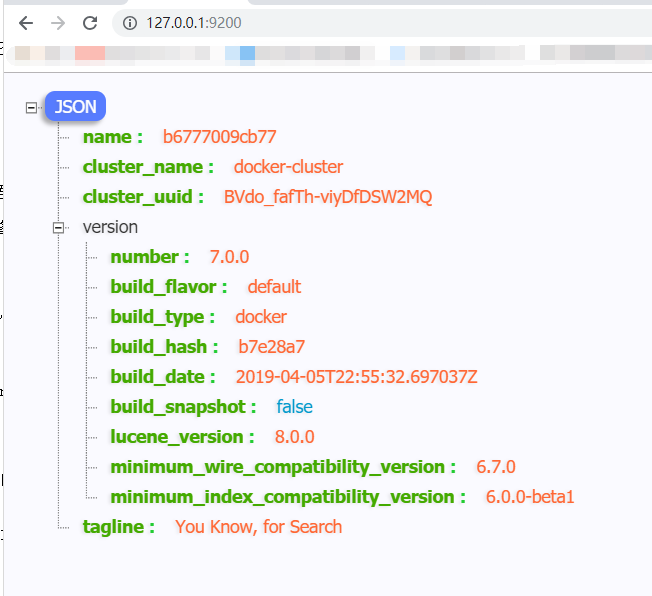
浏览器输入:http://127.0.0.1:9200/ 你的服务器ip 端口号
浏览器返回类似如下信息,证明安装成功

安装elasticsearch head插件监控管理
docker pull mobz/elasticsearch-head:5

docker run -d -p 9100:9100 docker.io/mobz/elasticsearch-head:5
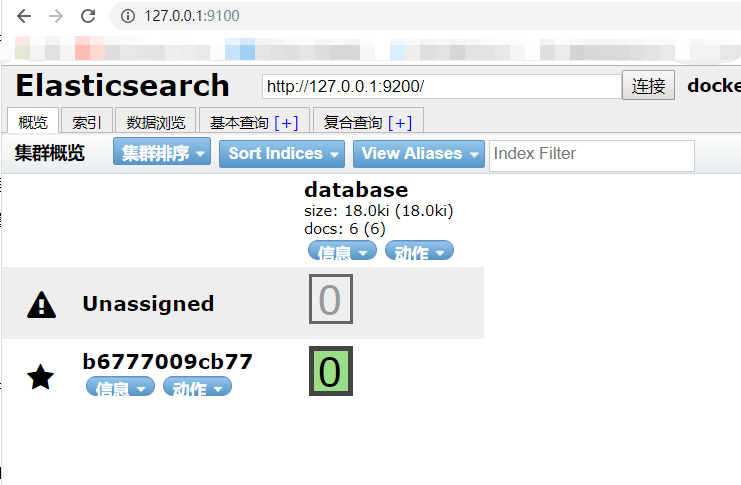
在浏览器中打开elasticsearch-head页面,填入ElasticSearch地址
在这里可能会出现跨域拒绝访问问题:
解决方式1:
进入elasticsearch容器内部,修改配置文件elasticsearch.yml
docker ps -a   #拿到运行容器elasticsearch 的 id

docker exec -it ******(容器id) /bin/bash

cd ./config

vim elasticsearch.yml
在elasticsearch.yml中添加:
http.cors.enabled: true
http.cors.allow-origin: "*"
重启 elasticsearch容器
docker restart elasticsearch
人生,因静而从容,因从容而优雅。淡然于心,自在于世间。云淡得悠闲,水淡育万物。世间之事,纷纷扰扰,对错得失,难求完美。若一心想要事事求顺意,反而深陷于计较的泥潭,不能自拔。若凡事但求无愧于心,得失荣辱不介怀,自然落得清闲自在。人活一世,心态比什么都重要。

docker安装elasticsearch和head插件
使用 Docker 拉取ElasticSearch镜像
docker pull elasticsearch:7.0.0查看镜像 ID
docker images运行
docker run -e ES_JAVA_OPTS="-Xms256m -Xmx256m" -d --name elasticsearch -p 9200:9200 -p 9300:9300 *****[注:这是要运行的镜像id]-e ES_JAVA_OPTS="-Xms256m -Xmx256m" //设置初始堆内存和最大内存 也可以调整虚拟机内存测试:
浏览器输入:http://127.0.0.1:9200/ 你的服务器ip 端口号
浏览器返回类似如下信息,证明安装成功
安装elasticsearch head插件监控管理
docker pull mobz/elasticsearch-head:5

docker run -d -p 9100:9100 docker.io/mobz/elasticsearch-head:5
在浏览器中打开elasticsearch-head页面,填入ElasticSearch地址

在这里可能会出现跨域拒绝访问问题:
解决方式1:
进入elasticsearch容器内部,修改配置文件elasticsearch.yml
docker ps -a   #拿到运行容器elasticsearch 的 id

docker exec -it ******(容器id) /bin/bash

cd ./config

vim elasticsearch.yml
在elasticsearch.yml中添加:
http.cors.enabled: true
http.cors.allow-origin: "*"
重启 elasticsearch容器
docker restart elasticsearch
今天关于第10篇:Mac/Windows安装ElasticSearch可视化Head插件和mac elasticsearch的分享就到这里,希望大家有所收获,若想了解更多关于centos 6.5安装Elasticsearch 5.6.3集群和Head插件、CentOS 安装ElasticSearch-head插件、docker安装elasticsearch及head插件、docker安装elasticsearch和head插件等相关知识,可以在本站进行查询。
本文标签:


![[转帖]Ubuntu 安装 Wine方法(ubuntu如何安装wine)](https://www.gvkun.com/zb_users/cache/thumbs/4c83df0e2303284d68480d1b1378581d-180-120-1.jpg)

