针对[Web前端]018css清除浮动的四种方法和清除浮动css写法这两个问题,本篇文章进行了详细的解答,同时本文还将给你拓展018-直接利用Socket/TCP开发网络游戏一、018AndroidA
针对[Web 前端] 018 css 清除浮动的四种方法和清除浮动css写法这两个问题,本篇文章进行了详细的解答,同时本文还将给你拓展018 - 直接利用 Socket/TCP 开发网络游戏一、018 Android Activity界面移入与移出的动画效果、018 Android 单选按钮 (RadioButton) 和复选框 (CheckBox) 的使用、018 Ceph的mon和osd的删除和添加等相关知识,希望可以帮助到你。
本文目录一览:- [Web 前端] 018 css 清除浮动的四种方法(清除浮动css写法)
- 018 - 直接利用 Socket/TCP 开发网络游戏一
- 018 Android Activity界面移入与移出的动画效果
- 018 Android 单选按钮 (RadioButton) 和复选框 (CheckBox) 的使用
- 018 Ceph的mon和osd的删除和添加
![[Web 前端] 018 css 清除浮动的四种方法(清除浮动css写法)](http://www.gvkun.com/zb_users/upload/2025/04/3ed69ce9-d1d5-4848-9a98-ca9a26ef46da1745343323937.jpg "[Web 前端] 018 css 清除浮动的四种方法(清除浮动css写法)")
[Web 前端] 018 css 清除浮动的四种方法(清除浮动css写法)
清除浮动的四种方法
- 加 clear: ...(见例1)
- 父级上增加属性 overflow:hidden(见例2.1)
- 在最后一个子元素的后面加一个空的 div,给它一个样式属性 clear: both(不推荐)(见例2.2)
- 使用成熟的清浮动样式类 clearfix(见例3)
少废话,上例子
例 1
<!DOCTYPE html>
<html>
    <head>
        <Meta charset="utf-8">
        <title>test</title>
        <link rel="stylesheet" type="text/css" href="./static/CSS/test.css">
    </head>
    <body>
        <divhttps://www.jb51.cc/tag/Box/" target="_blank">Box1">Box1</div>
        <divhttps://www.jb51.cc/tag/Box/" target="_blank">Box2">Box2</div>
        <divhttps://www.jb51.cc/tag/Box/" target="_blank">Box3">Box3</div>
        <divhttps://www.jb51.cc/tag/Box/" target="_blank">Box4">Box4</div>
        <divhttps://www.jb51.cc/tag/Box/" target="_blank">Box5">Box5</div>
        <divhttps://www.jb51.cc/tag/Box/" target="_blank">Box6">Box6</div>
    </body>
</html>
div{
    width: 100px;
    height: 100px;
    float: left;
}
.Box1{
    background: red;
}
.Box2{
    background: orange;
}
.Box3{
    background: yellow;
}
.Box4{
    background: green;
    /* 清除浮动
        left: 清除左浮动
        right: 清除有浮动
        both: 清除左右两边的浮动 */
    /*clear: left; 只加上这句,效果见效果截图 2*/
    /*clear: rightt; 只加上这句,显示上没有变化 */
}
.Box5{
    background: blue;
}
.Box6{
    background: indigo;
}
.Box7{
    background: purple;
}
- 效果截图 1

- 缩小浏览器的宽度后的截图

- 效果截图 2

例 2
<!-- 例2 -->
<!DOCTYPE html>
<html>
    <head>
        <Meta charset="utf-8">
        <title>test</title>
        <link rel="stylesheet" type="text/css" href="./static/CSS/test.css">
    </head>
    <body>
        <div>
            <divhttps://www.jb51.cc/tag/Box/" target="_blank">Box1">Box1</div>
            <divhttps://www.jb51.cc/tag/Box/" target="_blank">Box2">Box2</div>
            <divhttps://www.jb51.cc/tag/Box/" target="_blank">Box3">Box3</div>
            <divhttps://www.jb51.cc/tag/Box/" target="_blank">Box4">Box4</div>
            <divhttps://www.jb51.cc/tag/Box/" target="_blank">Box5">Box5</div>
            <divhttps://www.jb51.cc/tag/Box/" target="_blank">Box6">Box6</div>
            <divhttps://www.jb51.cc/tag/Box/" target="_blank">Box7">Box7</div>
        </div>
    </body>
</html>
<!-- 例2.1 -->
.wrap{
    border: 2px solid;
    /* 清除浮动
        解决父级元素高度无法撑开问题
        注意: 是给浮动元素的父级添加 */
    /*overflow: hidden; 加上这句,见效果截图 4 */
}
.Box1,.Box2,.Box3,.Box4,.Box5,.Box6,.Box7{
    width: 100px;
    height: 100px;
    float: left;
}
.Box1{
    background: red;
}
.Box2{
    background: orange;
}
.Box3{
    background: yellow;
}
.Box4{
    background: green;
    clear: left;
}
.Box5{
    background: blue;
}
.Box6{
    background: indigo;
}
.Box7{
    background: purple;
}
- 效果截图 3

- 效果截图 4

<!-- 例2.2 html 不变 -->
.wrap{
    border: 2px solid;
}
.wrap:after{    /* 伪类选择器 */
    /* 也有 before,但一般使用 after
        这种方法的思路:
            1. 在父级元素后插入一个空的字符串
            2. 将这个字符串转成块级元素
            3. 用 clear: both 给此元素清除浮动
            4. 没有添加不必要的标签,不影响页面结构
        注意:给浮动元素的父级添加 */
    content: '';
    display: table;
    /* display: block; 从效果上看,block 与 table 一致 */
    clear: both;
}
.Box1,.Box7{
    width: 100px;
    height: 100px;
    float: left;
}
.Box1{
    background: red;
}
.Box2{
    background: orange;
}
.Box3{
    background: yellow;
}
.Box4{
    background: green;
    clear: left;
}
.Box5{
    background: blue;
}
.Box6{
    background: indigo;
}
.Box7{
    background: purple;
}
- 效果截图 5
- 与效果截图 4 一般无二,故略
例 3
<!DOCTYPE html>
<html>
    <head>
        <Meta charset="utf-8">
        <title>test</title>
        <link rel="stylesheet" type="text/css" href="./static/CSS/test.css">
    </head>
    <body>
        <div>
            <divhttps://www.jb51.cc/tag/Box/" target="_blank">Box1">Box1</div>
            <divhttps://www.jb51.cc/tag/Box/" target="_blank">Box2">Box2</div>
            <divhttps://www.jb51.cc/tag/Box/" target="_blank">Box3">Box3</div>
            <divhttps://www.jb51.cc/tag/Box/" target="_blank">Box4">Box4</div>
            <divhttps://www.jb51.cc/tag/Box/" target="_blank">Box5">Box5</div>
            <divhttps://www.jb51.cc/tag/Box/" target="_blank">Box6">Box6</div>
            <divhttps://www.jb51.cc/tag/Box/" target="_blank">Box7">Box7</div>
            <div></div>      <!-- 多了这句 -->
        </div>
    </body>
</html>
.wrap{
    border: 2px solid;
}
.cl{    /* 可行,但不推荐,因为会对页面结构产生影响 */
    clear: both;
}
.Box1,.Box7{
    width: 100px;
    height: 100px;
    float: left;
}
.Box1{
    background: red;
}
.Box2{
    background: orange;
}
.Box3{
    background: yellow;
}
.Box4{
    background: green;
    clear: left;
}
.Box5{
    background: blue;
}
.Box6{
    background: indigo;
}
.Box7{
    background: purple;
}
- 效果截图 6
- 与效果截图 4 一般无二,故略
补充
- 有时会加一句
zoom:1;,这样做是为了兼容 IE
参考:北京图灵学院的 Web 前端公开课

018 - 直接利用 Socket/TCP 开发网络游戏一
由于在前几天,我已经花了很多的时间在 fishingJoy 上面的,在这里就不写了,因为在写一遍也没有什么作用。
今天我们正式开始网络部分的学习,在这个网络的部分我们直接是使用 c# 中的 socket 来开发的,所有,这样就会更加直接,相对于用框架而言。如其他的类一样,vs 也把网络部分封装成一个类,这样就大大减少了我们开发的难度。在此之前,我们还是有必要来了解一下网络部分的基础知识。就是 IP 与端口号。
网络之间互连的协议也就是为计算机网络相互连接进行通信而设计的协议。在因特网中,它是能使连接到网上的所有计算机网络实现相互通信的一套规则,规定了计算机在因特网上进行通信时应当遵守的规则。任何厂家生产的计算机系统,只要遵守 IP 协议就可以与因特网互连互通。IP 地址具有唯一性,根据用户性质的不同,可以分为 5 类。另外,IP 还有进入防护,知识产权,指针寄存器等含义。
在网络技术中,端口(Port)包括逻辑端口和物理端口两种类型。物理端口指的是物理存在的端口,如 ADSL Modem、集线器、交换机、路由器上用 于连接其他网络设备的接口,如 RJ-45 端口、SC 端口等等。逻辑端口是指逻辑意义上用于区分服务的端口,如 TCP/IP 协议中的服务端口,端口号的范围从 0 到 65535,比如用于浏览网页服务的 80 端口,用于 FTP 服务的 21 端口等。由于物理端口和逻辑端口数量较多,为了对端口进行区分,将每个端口进行了编号,这就是端口号
以上就是有关 IP 与端口号的解释,我们对于这个只要知道一下就行了,IP 与端口号绑定才能上网。
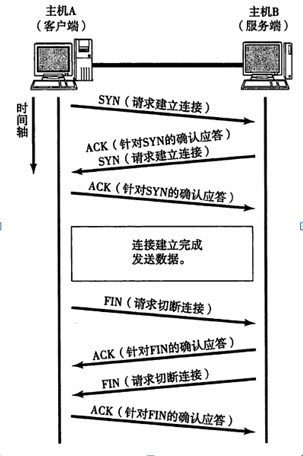
说到网络连接,我们只要要讲到 TCP 的三次握手,与四次挥手。只有完成三次握手,客户端与服务器端才能进行通信。只有完成四次挥手,客户端与服务器端才能完成断开连接,否则会报错。
我们首先创建一个解决方案,叫 TCP 服务器端,要注意的一点就是是客户端端向服务器端发起请求。
//实例化服务器端
            Socket serverSocket = new Socket(AddressFamily.InterNetwork, SocketType.Stream, ProtocolType.Tcp);
            //获得IP地址
            IPAddress iPAddress = IPAddress.Parse("127.0.0.1");
            //端口号与IP地址
            IPEndPoint iPEndPoint = new IPEndPoint(iPAddress, 88);
            //服务器端绑定IP地址与端口号
            serverSocket.Bind(iPEndPoint);
            serverSocket.Listen(0);
首先创建一个服务器的 socket 类,将其中的类型,写好,在其中设定 IP 地址与端口号,并进行绑定。
serverSocket.BeginAccept(AcceptCallBack, serverSocket);接着就是开始接受,注意的是这里需要有一个回调函数,接着
static void AcceptCallBack(IAsyncResult ar)
        {
            Socket serverSocket = ar.AsyncState as Socket;
            Socket clientSocket = serverSocket.EndAccept(ar);
            string msg = "Hello Client 您好...";
            byte[] data = Encoding.UTF8.GetBytes(msg);
            clientSocket.Send(data);

            clientSocket.BeginReceive(dataBuffer, 0, 1024, SocketFlags.None, ReceiveCallBack, clientSocket);
            serverSocket.BeginAccept(AcceptCallBack, serverSocket);
        }
开始写回调函数,将用于返回的 socket 定义成服务器 socket,将结束接受并传来的 socket 定义成客服端 socket,服务器端向客户端发送一个信息,表示已经正常连接了,接受客户端向服务器端传送信息,就是 begin receive 方法。但是这个方法也是需要回调函数的,所以我们还要写
static void ReceiveCallBack(IAsyncResult ar)
        {
            Socket clientSocket = null;
            try
            {
                clientSocket = ar.AsyncState as Socket;
                int count = clientSocket.EndReceive(ar);
                if (count == 0)
                {
                    clientSocket.Close();
                    return;
                }
                string msg = Encoding.UTF8.GetString(dataBuffer, 0, count);
                Console.WriteLine("从客户端接受到的数据:" + msg);
                clientSocket.BeginReceive(dataBuffer, 0, 1024, SocketFlags.None, ReceiveCallBack, clientSocket);
            }
            catch (Exception e)
            {
                Console.WriteLine(e);
                if (clientSocket != null)
                {
                    clientSocket.Close();
                }
            }
        }
如果你在方法中穿的是什么,那个这个 AsyncState 的类型就是什么,得到客户端发送结束的信息,并把它说出,因为客户端有可能多次的发送数据,所以我们需要在其中在写调用自己的方法,这样,就可以再次输出数据的了,前面的再次调用接受也是一样的,这样写的是为了可以接受多个客户端。接下来:
static void Main(string[] args)
        {
            ServerAsync();
            Console.ReadKey();
        }
以上是服务器端的部分,接下来就是客户端的部分了。
前面的基本操作也是一样的:
static void Main(string[] args)
        {
            //创建客户端的的socket类
            Socket clientSocket = new Socket(AddressFamily.InterNetwork, SocketType.Stream, ProtocolType.Tcp);
            //与客户端的进行绑定
            clientSocket.Connect(new IPEndPoint(IPAddress.Parse("127.0.0.1"), 88));
            byte[] data = new byte[1024];
            int count = clientSocket.Receive(data);
            string msg = Encoding.UTF8.GetString(data, 0, count);
            Console.Write(msg);
            while (true)
            {
                string s = Console.ReadLine();
                if (s == "c")
                {
                    clientSocket.Close();
                    return;
                }
                //向客户端发送信息
                clientSocket.Send(Encoding.UTF8.GetBytes(s));
            }
            Console.ReadKey();
            clientSocket.Close();
        }
其实就是这么多。我们要注意的是 127.0.0.1 是主机就是 localhost。今天的部分就是这么多。

018 Android Activity界面移入与移出的动画效果
1.平移动画
上一页移入动画 (-屏幕宽度,y)------>(0,y)
上一页移出动画 (0,y)-------------->(屏幕宽度,y)
下一页移入动画 (屏幕宽度,y)-------------->(0,y)
下一页移出动画 (0,y)-------------->(-屏幕宽度,y)
2.分析过程
(1)上一页按钮对应的过程(上一个界面移入,当前页移出)
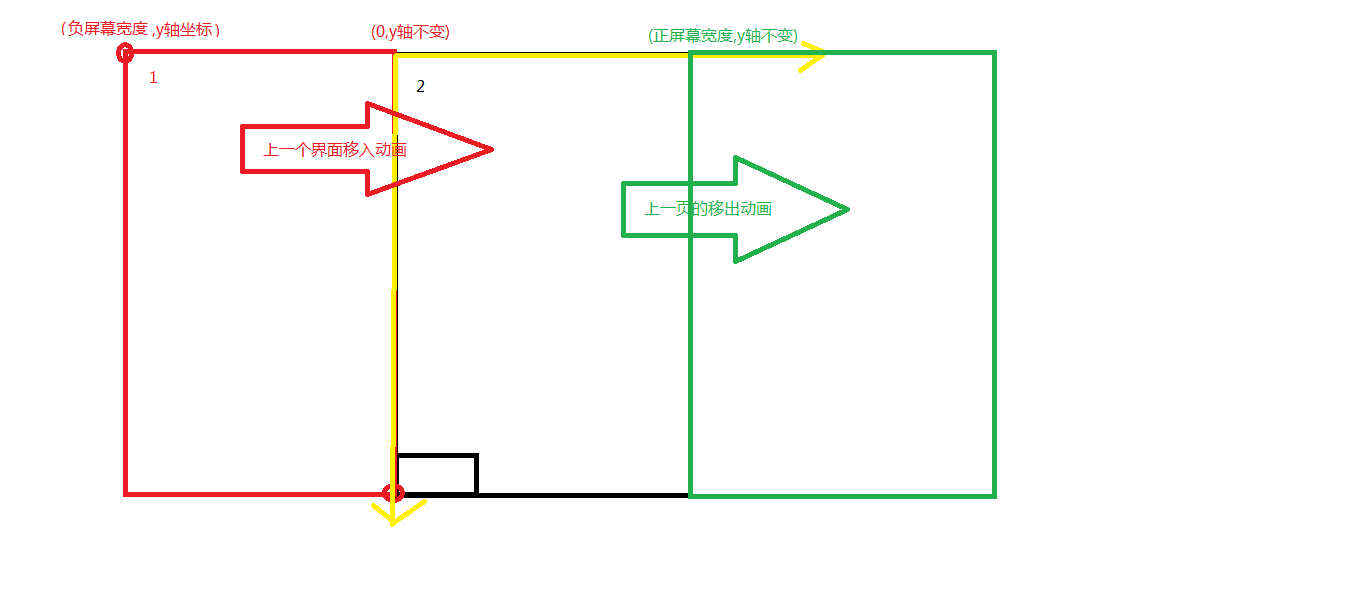
(2)下一页按钮对应的过程(下一页的界面移入,当前页面移出)

3.实现步骤
(1)在app--->res新建一个dictionary,将其命名为anim(固定写法)
(2)在anim文件夹下新建Adimation resource file
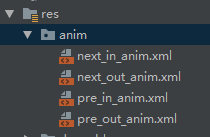
(3)xml文件代码
<?xml version="1.0" encoding="utf-8"?>
<translate xmlns:android="http://schemas.android.com/apk/res/android"
    android:fromXDelta="100%p"
    android:toXDelta="0">

</translate>
(4)java后台
btSetup1_nextPage.setOnClickListener(new View.OnClickListener() {
            @Override
            public void onClick(View v) {
                Intent intent=new Intent(Setup1Activity.this,Setup2Activity.class);
                startActivity(intent);
                finish();
                //开启平移动画
                overridePendingTransition(R.anim.next_in_anim,R.anim.next_out_anim);
            }
        });
4.效果图
 和复选框 (CheckBox) 的使用")
018 Android 单选按钮 (RadioButton) 和复选框 (CheckBox) 的使用
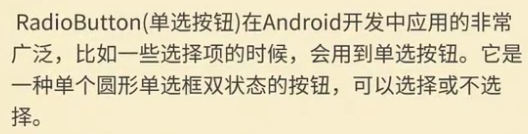
1.RadioButton
(1) 介绍
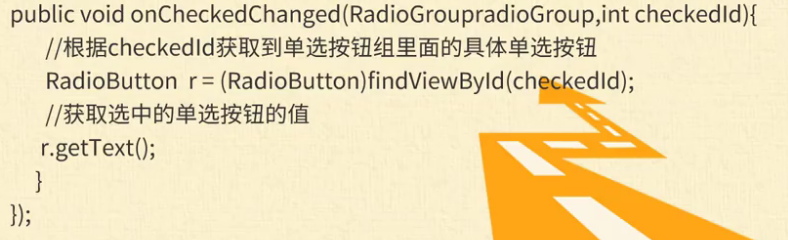
(2) 单选按钮点击事件的用法
(3) RadioButton 与 RadioGroup 配合使用实现单选题功能
(4) xml 布局及使用
<?xml version="1.0" encoding="utf-8"?>
<LinearLayout xmlns:android="http://schemas.android.com/apk/res/android"
    xmlns:app="http://schemas.android.com/apk/res-auto"
    xmlns:tools="http://schemas.android.com/tools"
    android:layout_width="match_parent"
    android:layout_height="match_parent"
    android:orientation="vertical"
    tools:context=".MainActivity">


    <TextView
        android:id="@+id/textView"
        android:layout_width="match_parent"
        android:layout_height="wrap_content"
        android:text="您最喜欢的城市是" />

    <RadioGroup
        android:id="@+id/radiogroup"
        android:layout_width="match_parent"
        android:layout_height="wrap_content"
        android:orientation="vertical">

        <RadioButton
            android:id="@+id/radioButton"
            android:layout_width="match_parent"
            android:layout_height="wrap_content"
            android:text="北京" />

        <RadioButton
            android:id="@+id/radioButton2"
            android:layout_width="match_parent"
            android:layout_height="wrap_content"
            android:text="上海" />

        <RadioButton
            android:id="@+id/radioButton3"
            android:layout_width="match_parent"
            android:layout_height="wrap_content"
            android:text="广州" />

        <RadioButton
            android:id="@+id/radioButton4"
            android:layout_width="match_parent"
            android:layout_height="wrap_content"
            android:text="杭州" />
    </RadioGroup>

    <Button
        android:id="@+id/button"
        android:layout_width="wrap_content"
        android:layout_height="wrap_content"
        android:text="确定" />
</LinearLayout>
2. 复选框 (CheckBox)
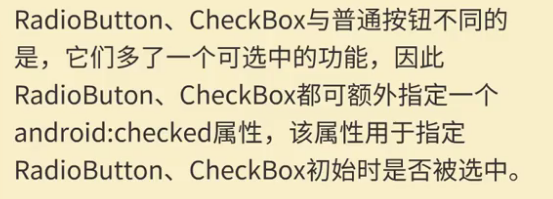
(1) 介绍
(2) xml 文件
<TextView
        android:id="@+id/textview2"
        android:layout_width="match_parent"
        android:layout_height="wrap_content"
        android:text="你最喜欢的运动是"/>

    <CheckBox
        android:id="@+id/checkBox"
        android:layout_width="match_parent"
        android:layout_height="wrap_content"
        android:text="乒乓球" />

    <CheckBox
        android:id="@+id/checkBox2"
        android:layout_width="match_parent"
        android:layout_height="wrap_content"
        android:text="羽毛球" />

    <CheckBox
        android:id="@+id/checkBox3"
        android:layout_width="match_parent"
        android:layout_height="wrap_content"
        android:text="排球" />

    <CheckBox
        android:id="@+id/checkBox4"
        android:layout_width="match_parent"
        android:layout_height="wrap_content"
        android:text="足球" />
    <Button
        android:id="@+id/button2"
        android:layout_width="wrap_content"
        android:layout_height="wrap_content"
        android:text="确定" />
(3) java 后台
对应工程名:test23
package com.lucky.test23;

import android.support.v7.app.AppCompatActivity;
import android.os.Bundle;
import android.view.View;
import android.widget.Button;
import android.widget.CheckBox;
import android.widget.RadioButton;
import android.widget.RadioGroup;
import android.widget.Toast;

public class MainActivity extends AppCompatActivity {

    Button button1;
    Button button2;
    RadioGroup radioGroup;
    CheckBox checkBox1;
    CheckBox checkBox2;
    CheckBox checkBox3;
    CheckBox checkBox4;
    @Override
    protected void onCreate(Bundle savedInstanceState) {
        super.onCreate(savedInstanceState);
        setContentView(R.layout.activity_main);
        button1=findViewById(R.id.button);
        button2=findViewById(R.id.button2);
        radioGroup=findViewById(R.id.radiogroup);
        checkBox1=findViewById(R.id.checkBox);
        checkBox2=findViewById(R.id.checkBox2);
        checkBox3=findViewById(R.id.checkBox3);
        checkBox4=findViewById(R.id.checkBox4);

        //绑定按钮点击事件
        button1.setOnClickListener(new View.OnClickListener() {
            @Override
            public void onClick(View v) {
                for (int i = 0; i <radioGroup.getChildCount(); i++) {   //radioGroup.getChildCount()获取子容器数量
                    RadioButton radioButton= (RadioButton) radioGroup.getChildAt(i);

                    //判断按钮是否被选中
                    if(radioButton.isChecked()){
                        String str=radioButton.getText().toString();
                        Toast.makeText(MainActivity.this,str,Toast.LENGTH_SHORT).show();
                        break;
                    }
                }
            }
        });

        button2.setOnClickListener(new View.OnClickListener() {
            @Override
            public void onClick(View v) {
                //将变量放入数组中便于取用
                CheckBox[] cbox={checkBox1,checkBox2,checkBox3,checkBox4};
                String str="";
                //遍历数组,判断各个复选框的选中情况
                for (int i = 0; i <cbox.length ; i++) {
                    if(cbox[i].isChecked()){
                        str=str+cbox[i].getText().toString();
                    }
                }
                Toast.makeText(MainActivity.this,str,Toast.LENGTH_SHORT).show();
            }
        });
    }
}
3. 效果图

018 Ceph的mon和osd的删除和添加
一、OSD管理
1.1 移出故障osd
查看当前节点的osd的id
[root@ceph2 ceph]# df -hT
Filesystem     Type      Size  Used Avail Use% Mounted on
/dev/vda1      xfs        40G  2.7G   38G   7% /
devtmpfs       devtmpfs  1.9G     0  1.9G   0% /dev
tmpfs          tmpfs     1.9G     0  1.9G   0% /dev/shm
tmpfs          tmpfs     1.9G  201M  1.7G  11% /run
tmpfs          tmpfs     1.9G     0  1.9G   0% /sys/fs/cgroup
/dev/vdb1      xfs        15G  213M   15G   2% /var/lib/ceph/osd/ceph-0
/dev/vdc1      xfs        15G  228M   15G   2% /var/lib/ceph/osd/ceph-3
/dev/vdd1      xfs        15G  152M   15G   1% /var/lib/ceph/osd/ceph-6
tmpfs          tmpfs     380M     0  380M   0% /run/user/0
停止故障osd
[root@ceph2 ceph]# systemctl stop ceph-osd@0
产看状态
[root@ceph2 ceph]# ceph -s
 cluster:
    id:     35a91e48-8244-4e96-a7ee-980ab989d20d
    health: HEALTH_WARN
            1 osds down
            Degraded data redundancy: 67/663 objects degraded (10.106%), 170 pgs unclean, 170 pgs degraded
  services:
    mon:        3 daemons, quorum ceph2,ceph3,ceph4
    mgr:        ceph4(active), standbys: ceph3, ceph2
    mds:        cephfs-1/1/1 up  {0=ceph2=up:active}, 1 up:standby
    osd:        9 osds: 8 up, 9 in
    rbd-mirror: 1 daemon active
  data:
    pools:   13 pools, 504 pgs
    objects: 221 objects, 241 MB
    usage:   1770 MB used, 133 GB / 134 GB avail
    pgs:     67/663 objects degraded (10.106%)
             334 active+clean
             170 active+undersized+degraded
[root@ceph2 ceph]# ceph osd tree
ID  CLASS WEIGHT  TYPE NAME          STATUS REWEIGHT PRI-AFF
 -9       0.13499 root dc1
-10       0.04500     rack rack1
 -3       0.04500         host ceph2
  0   hdd 0.01500             osd.0    down  1.00000 1.00000
  3   hdd 0.01500             osd.3      up  1.00000 1.00000
  6   hdd 0.01500             osd.6      up  1.00000 1.00000
-11       0.04500     rack rack2
 -7       0.04500         host ceph3
  2   hdd 0.01500             osd.2      up  1.00000 1.00000
  5   hdd 0.01500             osd.5      up  1.00000 1.00000
  8   hdd 0.01500             osd.8      up  1.00000 1.00000
-12       0.04500     rack rack3
 -5       0.04500         host ceph4
  1   hdd 0.01500             osd.1      up  1.00000 1.00000
  4   hdd 0.01500             osd.4      up  1.00000 0.50000
  7   hdd 0.01500             osd.7      up  1.00000 1.00000
 -1       0.13499 root default
 -3       0.04500     host ceph2
  0   hdd 0.01500         osd.0        down  1.00000 1.00000
  3   hdd 0.01500         osd.3          up  1.00000 1.00000
  6   hdd 0.01500         osd.6          up  1.00000 1.00000
 -7       0.04500     host ceph3
  2   hdd 0.01500         osd.2          up  1.00000 1.00000
  5   hdd 0.01500         osd.5          up  1.00000 1.00000
  8   hdd 0.01500         osd.8          up  1.00000 1.00000
 -5       0.04500     host ceph4
  1   hdd 0.01500         osd.1          up  1.00000 1.00000
  4   hdd 0.01500         osd.4          up  1.00000 0.50000
  7   hdd 0.01500         osd.7          up  1.00000 1.00000
[root@ceph2 ceph]# ceph osd out osd.0
marked out osd.0.[root@ceph2 ceph]# ceph -s
 cluster:
    id:     35a91e48-8244-4e96-a7ee-980ab989d20d
    health: HEALTH_WARN
            Degraded data redundancy: 126/663 objects degraded (19.005%), 24 pgs unclean, 24 pgs degraded
  services:
    mon:        3 daemons, quorum ceph2,ceph3,ceph4
    mgr:        ceph4(active), standbys: ceph3, ceph2
    mds:        cephfs-1/1/1 up  {0=ceph2=up:active}, 1 up:standby
    osd:        9 osds: 8 up, 8 in
    rbd-mirror: 1 daemon active
  data:
    pools:   13 pools, 504 pgs
    objects: 221 objects, 241 MB
    usage:   1587 MB used, 118 GB / 119 GB avail
    pgs:     126/663 objects degraded (19.005%)
             480 active+clean
             23  active+recovery_wait+degraded
             1   active+recovering+degraded
  io:
    client:   4196 B/s rd, 0 B/s wr, 3 op/s rd, 0 op/s wr
    recovery: 2873 kB/s, 0 keys/s, 2 objects/s
[root@ceph2 ceph]# ceph osd crush rm osd.0
removed item id 0 name ''osd.0'' from crush map[root@ceph2 ceph]# ceph auth list|grep osd.0
installed auth entries:

osd.0
[root@ceph2 ceph]# ceph auth rm osd.0
updated[root@ceph2 ceph]# ceph -s
 cluster:
    id:     35a91e48-8244-4e96-a7ee-980ab989d20d
    health: HEALTH_OK
  services:
    mon:        3 daemons, quorum ceph2,ceph3,ceph4
    mgr:        ceph4(active), standbys: ceph3, ceph2
    mds:        cephfs-1/1/1 up  {0=ceph2=up:active}, 1 up:standby
    osd:        9 osds: 8 up, 8 in
    rbd-mirror: 1 daemon active
  data:
    pools:   13 pools, 504 pgs
    objects: 221 objects, 241 MB
    usage:   1656 MB used, 118 GB / 119 GB avail
    pgs:     504 active+clean
  io:
    client:   0 B/s wr, 0 op/s rd, 0 op/s wr
[root@ceph2 ceph]# ceph osd rm osd.0
removed osd.0[root@ceph2 ceph]# ceph -s
 cluster:
    id:     35a91e48-8244-4e96-a7ee-980ab989d20d
    health: HEALTH_OK

  services:
    mon:        3 daemons, quorum ceph2,ceph3,ceph4
    mgr:        ceph4(active), standbys: ceph3, ceph2
    mds:        cephfs-1/1/1 up  {0=ceph2=up:active}, 1 up:standby
    osd:        8 osds: 8 up, 8 in
    rbd-mirror: 1 daemon active

  data:
    pools:   13 pools, 504 pgs
    objects: 221 objects, 241 MB
    usage:   1656 MB used, 118 GB / 119 GB avail
    pgs:     504 active+clean

  io:
    client:   5321 B/s rd, 0 B/s wr, 5 op/s rd, 0 op/s wr
方法二
ceph osd out osd.3
systemctl stop ceph-osd@3
ceph osd purge osd.3            #综合这一步,就可以完成操作
删除配置文件中针对该osd的配置
1.2添加回osd
上述实验,是模拟osd坏掉,然后进行移除操作,但是osd这个硬盘的挂载,分区并没有清除,也就是说,在本次添加的时候,直接从创建osd秘钥开始,但是在生产环境中,更换了osd后,需要从创建盘格式化开始,过程请参照https://www.cnblogs.com/zyxnhr/p/10553717.html
具体过程如下
[root@ceph2 ceph-0]# ceph osd create
0
[root@ceph2 ceph-0]# ceph-authtool --create-keyring /etc/ceph/ceph.osd.0.keyring --gen-key -n osd.0 --cap mon ''allow profile osd'' --cap mgr ''allow profile osd'' --cap osd ''allow *''
creating /etc/ceph/ceph.osd.0.keyring
[root@ceph2 ceph-0]# ceph auth import -i /etc/ceph/ceph.osd.0.keyring
imported keyring
[root@ceph2 ceph-0]#  ceph auth get-or-create osd.0 -o /var/lib/ceph/osd/ceph-0/keyring
[root@ceph2 ceph-0]# ceph-osd -i 0 --mkfs  --cluster ceph
2019-03-29 07:57:58.928076 7f564d51fd00 -1 created object store /var/lib/ceph/osd/ceph-0 for osd.0 fsid 35a91e48-8244-4e96-a7ee-980ab989d20d
[root@ceph2 ceph-0]# cd /var/lib/ceph/osd/ceph-0
[root@ceph2 ceph-0]# rm -f journal
[root@ceph2 ceph-0]#  partuuid_0=`blkid /dev/vdb1|awk -F "[\"\"]" ''{print $8}''`
[root@ceph2 ceph-0]#  echo $partuuid_0
745dce53-1c63-4c50-b434-d441038dafe4
[root@ceph2 ceph-0]# ln -s /dev/disk/by-partuuid/$partuuid_0 ./journal
[root@ceph2 ceph-0]# ll
total 64
-rw-r--r--   1 root root   393 Mar 16 12:46 activate.monmap
-rw-r--r--   1 ceph ceph     3 Mar 16 12:46 active
-rw-r--r--   1 ceph ceph    37 Mar 16 12:46 ceph_fsid
drwxr-xr-x 344 ceph ceph 12288 Mar 28 10:40 current
-rw-r--r--   1 ceph ceph    37 Mar 16 12:46 fsid
lrwxrwxrwx   1 root root    58 Mar 29 07:59 journal -> /dev/disk/by-partuuid/745dce53-1c63-4c50-b434-d441038dafe4
-rw-r--r--   1 ceph ceph    37 Mar 16 12:46 journal_uuid
-rw-------   1 ceph ceph    56 Mar 29 07:57 keyring
-rw-r--r--   1 ceph ceph    21 Mar 16 12:46 magic
-rw-r--r--   1 ceph ceph     6 Mar 16 12:46 ready
-rw-r--r--   1 ceph ceph     4 Mar 16 12:46 store_version
-rw-r--r--   1 ceph ceph    53 Mar 16 12:46 superblock
-rw-r--r--   1 ceph ceph     0 Mar 16 12:47 systemd
-rw-r--r--   1 ceph ceph    10 Mar 16 12:46 type
-rw-r--r--   1 ceph ceph     2 Mar 16 12:46 whoami
[root@ceph2 ceph-0]# chown ceph.ceph -R /var/lib/ceph
[root@ceph2 ceph-0]# ceph-osd --mkjournal -i 0 --cluster ceph
2019-03-29 08:00:02.007442 7f416ec90d00 -1 journal read_header error decoding journal header
2019-03-29 08:00:02.018206 7f416ec90d00 -1 created new journal /var/lib/ceph/osd/ceph-0/journal for object store /var/lib/ceph/osd/ceph-0
[root@ceph2 ceph-0]# chown ceph.ceph /dev/disk/by-partuuid/$partuuid_0
[root@ceph2 ceph-0]# ceph osd crush add-bucket ceph2 host --cluster ceph
bucket ''ceph2'' already exists                          #不用创建bucket,在移除的时候,并没有移除主机的bucket
[root@ceph2 ceph-0]# ceph osd crush move ceph2 root=default --cluster ceph       #也不需要把ceph2添加到default的这个crushrule中
no need to move item id -3 name ''ceph2'' to location {root=default} in crush map
[root@ceph2 ceph-0]# ceph osd crush add osd.0 0.01500 root=default host=ceph2
add item id 0 name ''osd.0'' weight 0.015 at location {host=ceph2,root=default} to crush map
[root@ceph2 ceph-0]# systemctl start ceph-osd@0
[root@ceph2 ceph-0]# systemctl enable ceph-osd@0
[root@ceph2 ceph-0]# ps -ef|grep osd
ceph     1147069       1  0 Mar28 ?        00:02:51 /usr/bin/ceph-osd -f --cluster ceph --id 6 --setuser ceph --setgroup ceph
ceph     1147169       1  0 Mar28 ?        00:03:19 /usr/bin/ceph-osd -f --cluster ceph --id 3 --setuser ceph --setgroup ceph
ceph     1220601       1  6 08:04 ?        00:00:01 /usr/bin/ceph-osd -f --cluster ceph --id 0 --setuser ceph --setgroup ceph
root     1220713 1156971  0 08:04 pts/0    00:00:00 grep --color=auto osd
[root@ceph2 ceph-0]# ceph -s
  cluster:
    id:     35a91e48-8244-4e96-a7ee-980ab989d20d
    health: HEALTH_WARN
            1/2481 objects misplaced (0.040%)
            Degraded data redundancy: 423/2481 objects degraded (17.050%), 8 pgs unclean, 16 pgs degraded    #有数据正在重平衡
  services:
    mon:        3 daemons, quorum ceph2,ceph3,ceph4
    mgr:        ceph4(active), standbys: ceph3, ceph2
    mds:        cephfs-1/1/1 up  {0=ceph2=up:active}, 1 up:standby
    osd:        9 osds: 9 up, 9 in; 1 remapped pgs
    rbd-mirror: 1 daemon active
  data:
    pools:   13 pools, 504 pgs
    objects: 827 objects, 2206 MB
    usage:   6747 MB used, 128 GB / 134 GB avail
    pgs:     423/2481 objects degraded (17.050%)
             1/2481 objects misplaced (0.040%)
             487 active+clean
             14  active+recovery_wait+degraded
             2   active+recovering+degraded
             1   active+remapped+backfill_wait
  io:
    client:   4093 B/s rd, 0 B/s wr, 4 op/s rd, 0 op/s wr
    recovery: 20080 kB/s, 0 keys/s, 6 objects/s
[root@ceph2 ceph-0]# ceph -s
  cluster:
    id:     35a91e48-8244-4e96-a7ee-980ab989d20d
    health: HEALTH_OK

  services:
    mon:        3 daemons, quorum ceph2,ceph3,ceph4
    mgr:        ceph4(active), standbys: ceph3, ceph2
    mds:        cephfs-1/1/1 up  {0=ceph2=up:active}, 1 up:standby
    osd:        9 osds: 9 up, 9 in        #恢复正常,有9个OSD,切集群处于健康状态
    rbd-mirror: 1 daemon active
  data:
    pools:   13 pools, 504 pgs
    objects: 827 objects, 2206 MB
    usage:   6614 MB used, 128 GB / 134 GB avail
    pgs:     504 active+clean
  io:
    client:   4093 B/s rd, 0 B/s wr, 4 op/s rd, 0 op/s wr
1.2 移除故障节点
方法一:
1. 先移除节点上所有osd
2. ceph osd crush remove serverc
方法二:
1. 先迁移节点上所有osd
2. 修改crushmap,删除所有与该节点相关的配置
1.3 恢复和回填OSD
在OSD添加或移除时,Ceph会重平衡PG。数据回填和恢复操作可能会产生大量的后端流量,影响集群性能。
为避免性能降低,可对回填/恢复操作进行配置:
osd_recovery_op_priority # 值为1-63,默认为10,相对于客户端操作,恢复操作的优先级,默认客户端操作的优先级为63,参数为osd_client_op_priority
osd_recovery_max_active # 每个osd一次处理的活跃恢复请求数量,默认为15,增大此值可加速恢复,但会增加集群负载
osd_recovery_threads # 用于数据恢复时的线程数,默认为1
osd_max_backfills # 单个osd的最大回填操作数,默认为10
osd_backfill_scan_min # 回填操作时最小扫描对象数量,默认为64
osd_backfill_scan_max # 回填操作的最大扫描对象数量,默认为512
osd_backfill_full_ratio # osd的占满率达到多少时,拒绝接受回填请求,默认为0.85
osd_backfill_retry_interval # 回填重试的时间间隔
二、 monitor管理
2.1 摘除monitor
停止monitor进程
[root@ceph2 ceph]# systemctl stop ceph-mon@ceph2
删除monitor
[root@ceph2 ceph]# ceph mon remove ceph2
removing mon.ceph2 at 172.25.250.11:6789/0, there will be 2 monitors[root@ceph2 ceph]# ceph -s
  services:
    mon:        2 daemons, quorum ceph3,ceph4
    mgr:        ceph4(active), standbys: ceph2, ceph3
    mds:        cephfs-1/1/1 up  {0=ceph2=up:active}, 1 up:standby
    osd:        9 osds: 9 up, 9 in
    rbd-mirror: 1 daemon active
删除monitor文件
[root@ceph2 ceph]# cd /var/lib/ceph/mon/
[root@ceph2 mon]# ls
ceph-ceph2
[root@ceph2 mon]# rm -rf ceph-ceph2/
2.2 添加monitor节点
[root@ceph2 mon]# cd
创建文件
[root@ceph2 ~]# mkdir /var/lib/ceph/mon/ceph-ceph2
[root@ceph2 ~]# chown ceph.ceph -R !$
chown ceph.ceph -R /var/lib/ceph/mon/ceph-ceph2[root@ceph2 ~]# ceph auth get mon.
exported keyring for mon.
[mon.]
key = AQDqfYxcAAAAABAAIc47ZLcYh013gzu3WWruew==
caps mon = "allow *"
[root@ceph2 ~]# ceph auth get mon. -o /tmp/ceph.mon.keyring
exported keyring for mon.[root@ceph2 ~]# cat /tmp/ceph.mon.keyring
[mon.]
key = AQDqfYxcAAAAABAAIc47ZLcYh013gzu3WWruew==
caps mon = "allow *"
[root@ceph2 ~]# ceph mon getmap -o /tmp/monmap.bin
got monmap epoch 2[root@ceph2 ~]# monmaptool --print /tmp/monmap.bin
monmaptool: monmap file /tmp/monmap.bin
epoch 2
fsid 35a91e48-8244-4e96-a7ee-980ab989d20d
last_changed 2019-03-28 08:57:25.819243
created 2019-03-16 12:39:14.839999
0: 172.25.250.12:6789/0 mon.ceph3
1: 172.25.250.13:6789/0 mon.ceph4
[root@ceph2 ~]# sudo -u ceph ceph-mon -i ceph2 --mkfs --monmap /tmp/monmap.bin --keyring /tmp/ceph.mon.keyring
[root@ceph2 ~]# ll /var/lib/ceph/mon/ceph-ceph2/
total 8
-rw------- 1 ceph ceph 77 Mar 28 09:03 keyring
-rw-r--r-- 1 ceph ceph 8 Mar 28 09:03 kv_backend
drwxr-xr-x 2 ceph ceph 112 Mar 28 09:03 store.db
[root@ceph2 ~]# ps -ef |grep ceph-mon
root 1135665 1088603 0 09:12 pts/0 00:00:00 grep --color=auto ceph-mon[root@ceph2 ~]# sudo -u ceph ceph-mon -i ceph2 --public-addr 172.25.250.11:6789
[root@ceph2 ~]# !ps
ps -ef |grep ceph-mon
ceph 1135726 1 1 09:13 ? 00:00:00 ceph-mon -i ceph2 --public-addr 172.25.250.11:6789
root 1135771 1088603 0 09:13 pts/0 00:00:00 grep --color=auto ceph-mon
[root@ceph2 ~]# ceph -s
services:
mon: 3 daemons, quorum ceph2,ceph3,ceph4
mgr: ceph4(active), standbys: ceph2, ceph3
mds: cephfs-1/1/1 up {0=ceph2=up:active}, 1 up:standby
osd: 9 osds: 9 up, 9 in
rbd-mirror: 1 daemon active
2.3 monitor故障排查
[root@ceph2 ~]# ceph daemon mon.ceph2 quorum_status
{       #查看monipot票数
    "election_epoch": 128,
    "quorum": [
        0,
        1,
        2
    ],
    "quorum_names": [
        "ceph2",
        "ceph3",
        "ceph4"
    ],
    "quorum_leader_name": "ceph2",
    "monmap": {
        "epoch": 3,
        "fsid": "35a91e48-8244-4e96-a7ee-980ab989d20d",
        "modified": "2019-03-28 09:13:19.932456",
        "created": "2019-03-16 12:39:14.839999",
        "features": {
            "persistent": [
                "kraken",
                "luminous"
            ],
            "optional": []
        },
        "mons": [
            {
                "rank": 0,
                "name": "ceph2",
                "addr": "172.25.250.11:6789/0",
                "public_addr": "172.25.250.11:6789/0"
            },
            {
                "rank": 1,
                "name": "ceph3",
                "addr": "172.25.250.12:6789/0",
                "public_addr": "172.25.250.12:6789/0"
            },
            {
                "rank": 2,
                "name": "ceph4",
                "addr": "172.25.250.13:6789/0",
                "public_addr": "172.25.250.13:6789/0"
            }
        ]
    }
}
2.4 利用admin sockets管理守护进程
通过admin sockets,管理员可以直接与守护进程交互。如查看和修改守护进程的配置参数。
守护进程的socket文件一般是/var/run/ceph/$cluster-$type.$id.asok
基于admin sockets的操作:
ceph daemon $type.$id command
或者ceph --admin-daemon /var/run/ceph/$cluster-$type.$id.asok command
常用command如下:
help
config get parameter
config set parameter
config show
perf dump
查看
[root@ceph2 ceph]# ceph daemon osd.6 config show|grep osd_default
"osd_default_data_pool_replay_window": "45",
    "osd_default_notify_timeout": "30",
[root@ceph2 ceph]# ceph daemon osd.6 config get xio_mp_max_64
{
    "xio_mp_max_64": "65536"
}
修改
[root@ceph2 ceph]# ceph tell osd.* injectargs --xio_mp_max_64 65536
osd.1: xio_mp_max_64 = ''65536'' (not observed, change may require restart)
osd.2: xio_mp_max_64 = ''65536'' (not observed, change may require restart)
osd.3: xio_mp_max_64 = ''65536'' (not observed, change may require restart)
osd.4: xio_mp_max_64 = ''65536'' (not observed, change may require restart)
osd.5: xio_mp_max_64 = ''65536'' (not observed, change may require restart)
osd.6: xio_mp_max_64 = ''65536'' (not observed, change may require restart)
osd.7: xio_mp_max_64 = ''65536'' (not observed, change may require restart)
osd.8: xio_mp_max_64 = ''65536'' (not observed, change may require restart)博主声明:本文的内容来源主要来自誉天教育晏威老师,由本人实验完成操作验证,需要的博友请联系誉天教育(http://www.yutianedu.com/),获得官方同意或者晏老师(https://www.cnblogs.com/breezey/)本人同意即可转载,谢谢!
今天关于[Web 前端] 018 css 清除浮动的四种方法和清除浮动css写法的介绍到此结束,谢谢您的阅读,有关018 - 直接利用 Socket/TCP 开发网络游戏一、018 Android Activity界面移入与移出的动画效果、018 Android 单选按钮 (RadioButton) 和复选框 (CheckBox) 的使用、018 Ceph的mon和osd的删除和添加等更多相关知识的信息可以在本站进行查询。
本文标签:


![[转帖]Ubuntu 安装 Wine方法(ubuntu如何安装wine)](https://www.gvkun.com/zb_users/cache/thumbs/4c83df0e2303284d68480d1b1378581d-180-120-1.jpg)

