想了解Gif读取之解决ArrayIndexOutOfBoundsException:4096读取gif文件的新动态吗?本文将为您提供详细的信息,我们还将为您解答关于gif文件解析的相关问题,此外,我们
想了解Gif读取之解决ArrayIndexOutOfBoundsException:4096读取gif文件的新动态吗?本文将为您提供详细的信息,我们还将为您解答关于gif文件解析的相关问题,此外,我们还将为您介绍关于android – TextView样式ArrayIndexOutOfBoundsException、ArrayIndexOutOfBoundsException 160、ArrayIndexOutOfBoundsException >> arr lenght 引起的异常、ArrayIndexOutOfBoundsException数组越界 --- 之二的新知识。
本文目录一览:- Gif读取之解决ArrayIndexOutOfBoundsException:4096读取gif文件(gif文件解析)
- android – TextView样式ArrayIndexOutOfBoundsException
- ArrayIndexOutOfBoundsException 160
- ArrayIndexOutOfBoundsException >> arr lenght 引起的异常
- ArrayIndexOutOfBoundsException数组越界 --- 之二
")
Gif读取之解决ArrayIndexOutOfBoundsException:4096读取gif文件(gif文件解析)
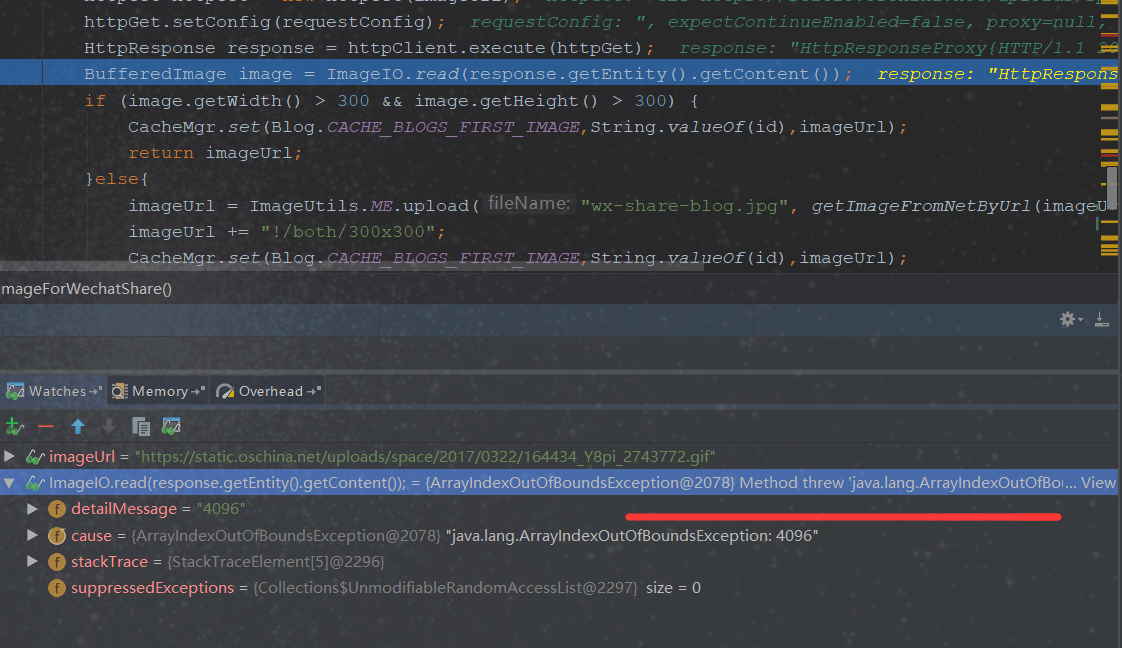
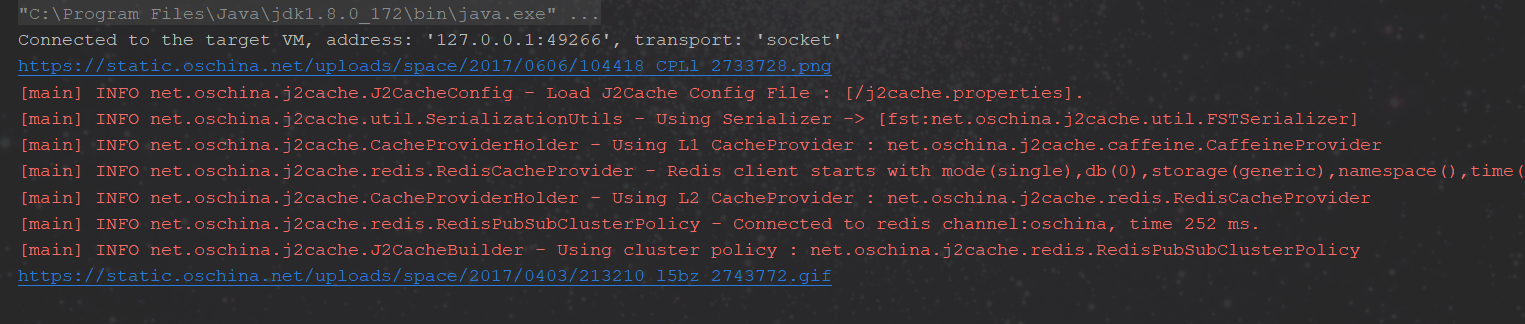
昨天遇到个读取图片问题,在 ImageIO.read读取大部分图片时候没有问题,可是遇到个别的gif读取就报错了: ArrayIndexOutOfBoundsException
google一番,发现这是jdk6~8历史遗留问题。。。。。。差点翻车了
个别的gif很顽强!
附上链接:https://blog.csdn.net/clive_hua/article/details/77610591 , https://www.jianshu.com/p/18888311fc9e
------------------------------------------华丽的解决分界线------------------------------------
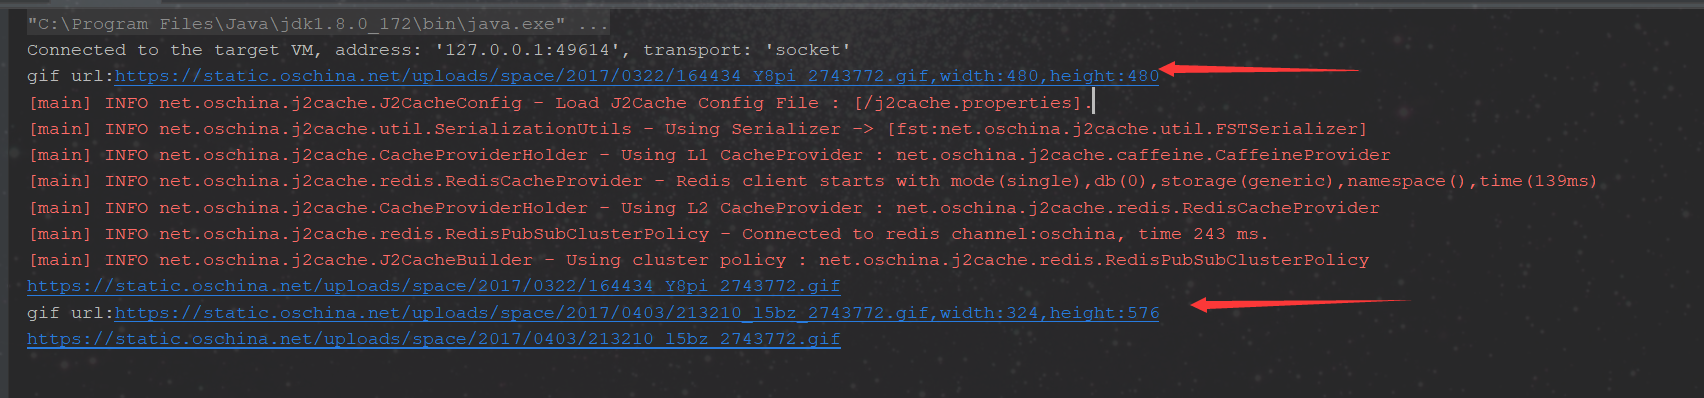
成功读取了gif,嘿嘿。
附上解决代码:
/**
 * 从博客中获取用于微信分享的图片链接:大小要求300x300
 * @param htmlContent
 * @param id  博客ID
 * @return
 */
public static String getImageForWechatShare(String htmlContent, long id) {
    String originImageUrl = "https://static.oschina.net/uploads/space/2017/0606/104418_CPLl_2733728.png";
    if (StringUtils.isNotBlank(htmlContent)) {
        Document document = Jsoup.parse(htmlContent);
        Elements elements = document.select("img[src~=(?i)\\.(gif|png|bmp|svg|jpe?g)]");
        if (null == elements) {
            return originImageUrl;
        }
        if(elements.size() == 0) {
            return originImageUrl;
        }
        try {
            for(int i = 0; i < elements.size(); i++) {
                String imageUrl = elements.get(i).attr("src");
                if(GIF.equalsIgnoreCase(ImageUtils.getSuffix(imageUrl))){
                    return readGif(originImageUrl,imageUrl,id);
                }
                HttpClient httpClient = HttpClients.createDefault();
                RequestConfig requestConfig = RequestConfig.custom().setConnectTimeout(1000).setConnectionRequestTimeout(1000).setSocketTimeout(1000).build();
                HttpGet httpGet = new HttpGet(imageUrl);
                httpGet.setConfig(requestConfig);
                HttpResponse response = httpClient.execute(httpGet);
                BufferedImage image = ImageIO.read(response.getEntity().getContent());
                if (image.getWidth() > 300 && image.getHeight() > 300) {
                    CacheMgr.set(Blog.CACHE_BLOGS_FIRST_IMAGE,String.valueOf(id),imageUrl);
                    return imageUrl;
                }else{
                    return uploadToUp(originImageUrl,imageUrl,id);
                }
            }
        } catch (Exception e) {
            return originImageUrl;
        }

    }
    return originImageUrl;
}

/**
 * 读取gif
 *
 * @param originImageUrl  osc 300*300 LOGO
 * @param imageUrl        博客第一张图片
 * @param id              博客ID
 * @return
 */
public static String readGif(String originImageUrl,String imageUrl,long id) {
    GifDecoder.GifImage gif = null;
    try {
        gif = GifDecoder.read(getImageFromNetByUrl(imageUrl));
        System.out.println(String.format("gif url:%s,width:%d,height:%d",imageUrl,gif.getWidth(),gif.getHeight()));
    } catch (IOException e) {
        return originImageUrl;
    }
    if (gif.getWidth() > 300 && gif.getHeight() > 300) {
         CacheMgr.set(Blog.CACHE_BLOGS_FIRST_IMAGE,String.valueOf(id),imageUrl);
         return imageUrl;
     }else{
         return uploadToUp(originImageUrl,imageUrl,id);
     }
}

/**
 * 上传图片至又拍云
 *
 * @param originImageUrl  osc 300*300 LOGO
 * @param imageUrl        博客第一张图片
 * @param id              博客ID
 * @return
 */
public static String uploadToUp(String originImageUrl,String imageUrl,long id){
    try {
        imageUrl = ImageUtils.ME.upload("wx-share-blog.jpg", getImageFromNetByUrl(imageUrl));
    } catch (Exception e) {
       return originImageUrl;
    }
    imageUrl += "!/both/300x300";
    CacheMgr.set(Blog.CACHE_BLOGS_FIRST_IMAGE,String.valueOf(id),imageUrl);
    return imageUrl;
}


/**
 * 根据地址获得数据的字节流
 * @param strUrl 网络连接地址
 * @return
 */
public static byte[] getImageFromNetByUrl(String strUrl){
    try {
        URL url = new URL(strUrl);
        HttpURLConnection conn = (HttpURLConnection)url.openConnection();
        conn.setRequestMethod("GET");
        conn.setConnectTimeout(5 * 1000);
        InputStream inStream = conn.getInputStream();
        byte[] btImg = readInputStream(inStream);
        return btImg;
    } catch (Exception e) {
        e.printStackTrace();
    }
    return null;
}

/**
 * 从输入流中获取数据
 * @param inStream 输入流
 * @return
 * @throws Exception
 */
public static byte[] readInputStream(InputStream inStream) throws Exception{
    ByteArrayOutputStream outStream = new ByteArrayOutputStream();
    byte[] buffer = new byte[1024];
    int len = 0;
    while( (len=inStream.read(buffer)) != -1 ){
        outStream.write(buffer, 0, len);
    }
    inStream.close();
    return outStream.toByteArray();

}
获取图片后缀:
public static String getSuffix(String name) {
   Pattern pat = Pattern.compile("[\\w]+[\\.](" + SUFFIXES + ")");// 正则判断
   Matcher mc = pat.matcher(name.toLowerCase());// 条件匹配
   String fileName = null;
   while (mc.find()) {
      fileName = mc.group();// 截取文件名后缀名
   }
   if (fileName != null) {
      return fileName.substring(fileName.lastIndexOf(".") + 1);
   }
   return null;
}
GifDecoder.java代码:
import static java.lang.System.arraycopy;
import java.awt.Color;
import java.awt.Graphics2D;
import java.awt.image.BufferedImage;
import java.awt.image.DataBufferInt;
import java.io.IOException;
import java.io.InputStream;
import java.util.ArrayList;
import java.util.List;
/*
* Copyright 2014 Dhyan Blum
*
* Licensed under the Apache License, Version 2.0 (the "License");
* you may not use this file except in compliance with the License.
* You may obtain a copy of the License at
*
* http://www.apache.org/licenses/LICENSE-2.0
*
* Unless required by applicable law or agreed to in writing, software
* distributed under the License is distributed on an "AS IS" BASIS,
* WITHOUT WARRANTIES OR CONDITIONS OF ANY KIND, either express or implied.
* See the License for the specific language governing permissions and
* limitations under the License.
*/
/**
* <p>
* A decoder capable of processing a GIF data stream to render the graphics
* contained in it. This implementation follows the official
* <A HREF="http://www.w3.org/Graphics/GIF/spec-gif89a.txt">GIF
* specification</A>.
* </p>
*
* <p>
* Example usage:
* </p>
*
* <p>
*
* <pre>
* final GifImage gifImage = GifDecoder.read(int[] data);
* final int width = gifImage.getWidth();
* final int height = gifImage.getHeight();
* final int frameCount = gifImage.getFrameCount();
* for (int i = 0; i < frameCount; i++) {
* final BufferedImage image = gifImage.getFrame(i);
* final int delay = gif.getDelay(i);
* }
* </pre>
*
* </p>
*
* @author Dhyan Blum
* @version 1.09 November 2017
*
*/
public final class GifDecoder {
static final class BitReader {
private int bitPos; // Next bit to read
private int numBits; // Number of bits to read
private int bitMask; // Use to kill unwanted higher bits
private byte[] in; // Data array
// To avoid costly bounds checks, ''in'' needs 2 more 0-bytes at the end
private final void init(final byte[] in) {
this.in = in;
bitPos = 0;
}
private final int read() {
// Byte indices: (bitPos / 8), (bitPos / 8) + 1, (bitPos / 8) + 2
int i = bitPos >>> 3; // Byte = bit / 8
// Bits we''ll shift to the right, AND 7 is the same as MODULO 8
final int rBits = bitPos & 7;
// Byte 0 to 2, AND to get their unsigned values
final int b0 = in[i++] & 0xFF, b1 = in[i++] & 0xFF, b2 = in[i] & 0xFF;
// Glue the bytes together, don''t do more shifting than necessary
final int buf = ((b2 << 8 | b1) << 8 | b0) >>> rBits;
bitPos += numBits;
return buf & bitMask; // Kill the unwanted higher bits
}
private final void setNumBits(final int numBits) {
this.numBits = numBits;
bitMask = (1 << numBits) - 1;
}
}
static final class CodeTable {
private final int[][] tbl; // Maps codes to lists of colors
private int initTableSize; // Number of colors +2 for CLEAR + EOI
private int initCodeSize; // Initial code size
private int initCodeLimit; // First code limit
private int codeSize; // Current code size, maximum is 12 bits
private int nextCode; // Next available code for a new entry
private int nextCodeLimit; // Increase codeSize when nextCode == limit
private BitReader br; // Notify when code sizes increases
public CodeTable() {
tbl = new int[4096][1];
}
private final int add(final int[] indices) {
if (nextCode < 4096) {
if (nextCode == nextCodeLimit && codeSize < 12) {
codeSize++; // Max code size is 12
br.setNumBits(codeSize);
nextCodeLimit = (1 << codeSize) - 1; // 2^codeSize - 1
}
tbl[nextCode++] = indices;
}
return codeSize;
}
private final int clear() {
codeSize = initCodeSize;
br.setNumBits(codeSize);
nextCodeLimit = initCodeLimit;
nextCode = initTableSize; // Don''t recreate table, reset pointer
return codeSize;
}
private final void init(final GifFrame fr, final int[] activeColTbl, final BitReader br) {
this.br = br;
final int numColors = activeColTbl.length;
initCodeSize = fr.firstCodeSize;
initCodeLimit = (1 << initCodeSize) - 1; // 2^initCodeSize - 1
initTableSize = fr.endOfInfoCode + 1;
nextCode = initTableSize;
for (int c = numColors - 1; c >= 0; c--) {
tbl[c][0] = activeColTbl[c]; // Translated color
} // A gap may follow with no colors assigned if numCols < CLEAR
tbl[fr.clearCode] = new int[] { fr.clearCode }; // CLEAR
tbl[fr.endOfInfoCode] = new int[] { fr.endOfInfoCode }; // EOI
// Locate transparent color in code table and set to 0
if (fr.transpColFlag && fr.transpColIndex < numColors) {
tbl[fr.transpColIndex][0] = 0;
}
}
}
final class GifFrame {
// Graphic control extension (optional)
// Disposal: 0=NO_ACTION, 1=NO_DISPOSAL, 2=RESTORE_BG, 3=RESTORE_PREV
private int disposalMethod; // 0-3 as above, 4-7 undefined
private boolean transpColFlag; // 1 Bit
private int delay; // Unsigned, LSByte first, n * 1/100 * s
private int transpColIndex; // 1 Byte
// Image descriptor
private int x; // Position on the canvas from the left
private int y; // Position on the canvas from the top
private int w; // May be smaller than the base image
private int h; // May be smaller than the base image
private int wh; // width * height
private boolean hasLocColTbl; // Has local color table? 1 Bit
private boolean interlaceFlag; // Is an interlace image? 1 Bit
@SuppressWarnings("unused")
private boolean sortFlag; // True if local colors are sorted, 1 Bit
private int sizeOfLocColTbl; // Size of the local color table, 3 Bits
private int[] localColTbl; // Local color table (optional)
// Image data
private int firstCodeSize; // LZW minimum code size + 1 for CLEAR & EOI
private int clearCode;
private int endOfInfoCode;
private byte[] data; // Holds LZW encoded data
private BufferedImage img; // Full drawn image, not just the frame area
}
public final class GifImage {
public String header; // Bytes 0-5, GIF87a or GIF89a
private int w; // Unsigned 16 Bit, least significant byte first
private int h; // Unsigned 16 Bit, least significant byte first
private int wh; // Image width * image height
public boolean hasGlobColTbl; // 1 Bit
public int colorResolution; // 3 Bits
public boolean sortFlag; // True if global colors are sorted, 1 Bit
public int sizeOfGlobColTbl; // 2^(val(3 Bits) + 1), see spec
public int bgColIndex; // Background color index, 1 Byte
public int pxAspectRatio; // Pixel aspect ratio, 1 Byte
public int[] globalColTbl; // Global color table
private final List<GifFrame> frames = new ArrayList<GifFrame>(64);
public String appId = ""; // 8 Bytes at in[i+3], usually "NETSCAPE"
public String appAuthCode = ""; // 3 Bytes at in[i+11], usually "2.0"
public int repetitions = 0; // 0: infinite loop, N: number of loops
private BufferedImage img = null; // Currently drawn frame
private int[] prevPx = null; // Previous frame''s pixels
private final BitReader bits = new BitReader();
private final CodeTable codes = new CodeTable();
private Graphics2D g;
private final int[] decode(final GifFrame fr, final int[] activeColTbl) {
codes.init(fr, activeColTbl, bits);
bits.init(fr.data); // Incoming codes
final int clearCode = fr.clearCode, endCode = fr.endOfInfoCode;
final int[] out = new int[wh]; // Target image pixel array
final int[][] tbl = codes.tbl; // Code table
int outPos = 0; // Next pixel position in the output image array
codes.clear(); // Init code table
bits.read(); // Skip leading clear code
int code = bits.read(); // Read first code
int[] pixels = tbl[code]; // Output pixel for first code
arraycopy(pixels, 0, out, outPos, pixels.length);
outPos += pixels.length;
try {
while (true) {
final int prevCode = code;
code = bits.read(); // Get next code in stream
if (code == clearCode) { // After a CLEAR table, there is
codes.clear(); // no previous code, we need to read
code = bits.read(); // a new one
pixels = tbl[code]; // Output pixels
arraycopy(pixels, 0, out, outPos, pixels.length);
outPos += pixels.length;
continue; // Back to the loop with a valid previous code
} else if (code == endCode) {
break;
}
final int[] prevVals = tbl[prevCode];
final int[] prevValsAndK = new int[prevVals.length + 1];
arraycopy(prevVals, 0, prevValsAndK, 0, prevVals.length);
if (code < codes.nextCode) { // Code table contains code
pixels = tbl[code]; // Output pixels
arraycopy(pixels, 0, out, outPos, pixels.length);
outPos += pixels.length;
prevValsAndK[prevVals.length] = tbl[code][0]; // K
} else {
prevValsAndK[prevVals.length] = prevVals[0]; // K
arraycopy(prevValsAndK, 0, out, outPos, prevValsAndK.length);
outPos += prevValsAndK.length;
}
codes.add(prevValsAndK); // Previous indices + K
}
} catch (final ArrayIndexOutOfBoundsException e) {
}
return out;
}
private final int[] deinterlace(final int[] src, final GifFrame fr) {
final int w = fr.w, h = fr.h, wh = fr.wh;
final int[] dest = new int[src.length];
// Interlaced images are organized in 4 sets of pixel lines
final int set2Y = (h + 7) >>> 3; // Line no. = ceil(h/8.0)
final int set3Y = set2Y + ((h + 3) >>> 3); // ceil(h-4/8.0)
final int set4Y = set3Y + ((h + 1) >>> 2); // ceil(h-2/4.0)
// Sets'' start indices in source array
final int set2 = w * set2Y, set3 = w * set3Y, set4 = w * set4Y;
// Line skips in destination array
final int w2 = w << 1, w4 = w2 << 1, w8 = w4 << 1;
// Group 1 contains every 8th line starting from 0
int from = 0, to = 0;
for (; from < set2; from += w, to += w8) {
arraycopy(src, from, dest, to, w);
} // Group 2 contains every 8th line starting from 4
for (to = w4; from < set3; from += w, to += w8) {
arraycopy(src, from, dest, to, w);
} // Group 3 contains every 4th line starting from 2
for (to = w2; from < set4; from += w, to += w4) {
arraycopy(src, from, dest, to, w);
} // Group 4 contains every 2nd line starting from 1 (biggest group)
for (to = w; from < wh; from += w, to += w2) {
arraycopy(src, from, dest, to, w);
}
return dest; // All pixel lines have now been rearranged
}
private final void drawFrame(final GifFrame fr) {
// Determine the color table that will be active for this frame
final int[] activeColTbl = fr.hasLocColTbl ? fr.localColTbl : globalColTbl;
// Get pixels from data stream
int[] pixels = decode(fr, activeColTbl);
if (fr.interlaceFlag) {
pixels = deinterlace(pixels, fr); // Rearrange pixel lines
}
// Create image of type 2=ARGB for frame area
final BufferedImage frame = new BufferedImage(fr.w, fr.h, 2);
arraycopy(pixels, 0, ((DataBufferInt) frame.getRaster().getDataBuffer()).getData(), 0, fr.wh);
// Draw frame area on top of working image
g.drawImage(frame, fr.x, fr.y, null);
// Visualize frame boundaries during testing
// if (DEBUG_MODE) {
// if (prev != null) {
// g.setColor(Color.RED); // Previous frame color
// g.drawRect(prev.x, prev.y, prev.w - 1, prev.h - 1);
// }
// g.setColor(Color.GREEN); // New frame color
// g.drawRect(fr.x, fr.y, fr.w - 1, fr.h - 1);
// }
// Keep one copy as "previous frame" in case we need to restore it
prevPx = new int[wh];
arraycopy(((DataBufferInt) img.getRaster().getDataBuffer()).getData(), 0, prevPx, 0, wh);
// Create another copy for the end user to not expose internal state
fr.img = new BufferedImage(w, h, 2); // 2 = ARGB
arraycopy(prevPx, 0, ((DataBufferInt) fr.img.getRaster().getDataBuffer()).getData(), 0, wh);
// Handle disposal of current frame
if (fr.disposalMethod == 2) {
// Restore to background color (clear frame area only)
g.clearRect(fr.x, fr.y, fr.w, fr.h);
} else if (fr.disposalMethod == 3 && prevPx != null) {
// Restore previous frame
arraycopy(prevPx, 0, ((DataBufferInt) img.getRaster().getDataBuffer()).getData(), 0, wh);
}
}
/**
* Returns the background color of the first frame in this GIF image. If
* the frame has a local color table, the returned color will be from
* that table. If not, the color will be from the global color table.
* Returns 0 if there is neither a local nor a global color table.
*
* @param index
* Index of the current frame, 0 to N-1
* @return 32 bit ARGB color in the form 0xAARRGGBB
*/
public final int getBackgroundColor() {
final GifFrame frame = frames.get(0);
if (frame.hasLocColTbl) {
return frame.localColTbl[bgColIndex];
} else if (hasGlobColTbl) {
return globalColTbl[bgColIndex];
}
return 0;
}
/**
* If not 0, the delay specifies how many hundredths (1/100) of a second
* to wait before displaying the frame <i>after</i> the current frame.
*
* @param index
* Index of the current frame, 0 to N-1
* @return Delay as number of hundredths (1/100) of a second
*/
public final int getDelay(final int index) {
return frames.get(index).delay;
}
/**
* @param index
* Index of the frame to return as image, starting from 0.
* For incremental calls such as [0, 1, 2, ...] the method''s
* run time is O(1) as only one frame is drawn per call. For
* random access calls such as [7, 12, ...] the run time is
* O(N+1) with N being the number of previous frames that
* need to be drawn before N+1 can be drawn on top. Once a
* frame has been drawn it is being cached and the run time
* is more or less O(0) to retrieve it from the list.
* @return A BufferedImage for the specified frame.
*/
public final BufferedImage getFrame(final int index) {
if (img == null) { // Init
img = new BufferedImage(w, h, 2); // 2 = ARGB
g = img.createGraphics();
g.setBackground(new Color(0, true)); // Transparent color
}
GifFrame fr = frames.get(index);
if (fr.img == null) {
// Draw all frames until and including the requested frame
for (int i = 0; i <= index; i++) {
fr = frames.get(i);
if (fr.img == null) {
drawFrame(fr);
}
}
}
return fr.img;
}
/**
* @return The number of frames contained in this GIF image
*/
public final int getFrameCount() {
return frames.size();
}
/**
* @return The height of the GIF image
*/
public final int getHeight() {
return h;
}
/**
* @return The width of the GIF image
*/
public final int getWidth() {
return w;
}
}
static final boolean DEBUG_MODE = false;
/**
* @param in
* Raw image data as a byte[] array
* @return A GifImage object exposing the properties of the GIF image.
* @throws IOException
* If the image violates the GIF specification or is truncated.
*/
public static final GifImage read(final byte[] in) throws IOException {
final GifDecoder decoder = new GifDecoder();
final GifImage img = decoder.new GifImage();
GifFrame frame = null; // Currently open frame
int pos = readHeader(in, img); // Read header, get next byte position
pos = readLogicalScreenDescriptor(img, in, pos);
if (img.hasGlobColTbl) {
img.globalColTbl = new int[img.sizeOfGlobColTbl];
pos = readColTbl(in, img.globalColTbl, pos);
}
while (pos < in.length) {
final int block = in[pos] & 0xFF;
switch (block) {
case 0x21: // Extension introducer
if (pos + 1 >= in.length) {
throw new IOException("Unexpected end of file.");
}
switch (in[pos + 1] & 0xFF) {
case 0xFE: // Comment extension
pos = readTextExtension(in, pos);
break;
case 0xFF: // Application extension
pos = readAppExt(img, in, pos);
break;
case 0x01: // Plain text extension
frame = null; // End of current frame
pos = readTextExtension(in, pos);
break;
case 0xF9: // Graphic control extension
if (frame == null) {
frame = decoder.new GifFrame();
img.frames.add(frame);
}
pos = readGraphicControlExt(frame, in, pos);
break;
default:
throw new IOException("Unknown extension at " + pos);
}
break;
case 0x2C: // Image descriptor
if (frame == null) {
frame = decoder.new GifFrame();
img.frames.add(frame);
}
pos = readImgDescr(frame, in, pos);
if (frame.hasLocColTbl) {
frame.localColTbl = new int[frame.sizeOfLocColTbl];
pos = readColTbl(in, frame.localColTbl, pos);
}
pos = readImgData(frame, in, pos);
frame = null; // End of current frame
break;
case 0x3B: // GIF Trailer
return img; // Found trailer, finished reading.
default:
// Unknown block. The image is corrupted. Strategies: a) Skip
// and wait for a valid block. Experience: It''ll get worse. b)
// Throw exception. c) Return gracefully if we are almost done
// processing. The frames we have so far should be error-free.
final double progress = 1.0 * pos / in.length;
if (progress < 0.9) {
throw new IOException("Unknown block at: " + pos);
}
pos = in.length; // Exit loop
}
}
return img;
}
/**
* @param is
* Image data as input stream. This method will read from the
* input stream''s current position. It will not reset the
* position before reading and won''t reset or close the stream
* afterwards. Call these methods before and after calling this
* method as needed.
* @return A GifImage object exposing the properties of the GIF image.
* @throws IOException
* If an I/O error occurs, the image violates the GIF
* specification or the GIF is truncated.
*/
public static final GifImage read(final InputStream is) throws IOException {
final byte[] data = new byte[is.available()];
is.read(data, 0, data.length);
return read(data);
}
/**
* @param ext
* Empty application extension object
* @param in
* Raw data
* @param i
* Index of the first byte of the application extension
* @return Index of the first byte after this extension
*/
static final int readAppExt(final GifImage img, final byte[] in, int i) {
img.appId = new String(in, i + 3, 8); // should be "NETSCAPE"
img.appAuthCode = new String(in, i + 11, 3); // should be "2.0"
i += 14; // Go to sub-block size, it''s value should be 3
final int subBlockSize = in[i] & 0xFF;
// The only app extension widely used is NETSCAPE, it''s got 3 data bytes
if (subBlockSize == 3) {
// in[i+1] should have value 01, in[i+5] should be block terminator
img.repetitions = in[i + 2] & 0xFF | in[i + 3] & 0xFF << 8; // Short
return i + 5;
} // Skip unknown application extensions
while ((in[i] & 0xFF) != 0) { // While sub-block size != 0
i += (in[i] & 0xFF) + 1; // Skip to next sub-block
}
return i + 1;
}
/**
* @param in
* Raw data
* @param colors
* Pre-initialized target array to store ARGB colors
* @param i
* Index of the color table''s first byte
* @return Index of the first byte after the color table
*/
static final int readColTbl(final byte[] in, final int[] colors, int i) {
final int numColors = colors.length;
for (int c = 0; c < numColors; c++) {
final int a = 0xFF; // Alpha 255 (opaque)
final int r = in[i++] & 0xFF; // 1st byte is red
final int g = in[i++] & 0xFF; // 2nd byte is green
final int b = in[i++] & 0xFF; // 3rd byte is blue
colors[c] = ((a << 8 | r) << 8 | g) << 8 | b;
}
return i;
}
/**
* @param ext
* Graphic control extension object
* @param in
* Raw data
* @param i
* Index of the extension introducer
* @return Index of the first byte after this block
*/
static final int readGraphicControlExt(final GifFrame fr, final byte[] in, final int i) {
fr.disposalMethod = (in[i + 3] & 0b00011100) >>> 2; // Bits 4-2
fr.transpColFlag = (in[i + 3] & 1) == 1; // Bit 0
fr.delay = in[i + 4] & 0xFF | (in[i + 5] & 0xFF) << 8; // 16 bit LSB
fr.transpColIndex = in[i + 6] & 0xFF; // Byte 6
return i + 8; // Skipped byte 7 (blockTerminator), as it''s always 0x00
}
/**
* @param in
* Raw data
* @param img
* The GifImage object that is currently read
* @return Index of the first byte after this block
* @throws IOException
* If the GIF header/trailer is missing, incomplete or unknown
*/
static final int readHeader(final byte[] in, final GifImage img) throws IOException {
if (in.length < 6) { // Check first 6 bytes
throw new IOException("Image is truncated.");
}
img.header = new String(in, 0, 6);
if (!img.header.equals("GIF87a") && !img.header.equals("GIF89a")) {
throw new IOException("Invalid GIF header.");
}
return 6;
}
/**
* @param fr
* The GIF frame to whom this image descriptor belongs
* @param in
* Raw data
* @param i
* Index of the first byte of this block, i.e. the minCodeSize
* @return
*/
static final int readImgData(final GifFrame fr, final byte[] in, int i) {
final int fileSize = in.length;
final int minCodeSize = in[i++] & 0xFF; // Read code size, go to block
final int clearCode = 1 << minCodeSize; // CLEAR = 2^minCodeSize
fr.firstCodeSize = minCodeSize + 1; // Add 1 bit for CLEAR and EOI
fr.clearCode = clearCode;
fr.endOfInfoCode = clearCode + 1;
final int imgDataSize = readImgDataSize(in, i);
final byte[] imgData = new byte[imgDataSize + 2];
int imgDataPos = 0;
int subBlockSize = in[i] & 0xFF;
while (subBlockSize > 0) { // While block has data
try { // Next line may throw exception if sub-block size is fake
final int nextSubBlockSizePos = i + subBlockSize + 1;
final int nextSubBlockSize = in[nextSubBlockSizePos] & 0xFF;
arraycopy(in, i + 1, imgData, imgDataPos, subBlockSize);
imgDataPos += subBlockSize; // Move output data position
i = nextSubBlockSizePos; // Move to next sub-block size
subBlockSize = nextSubBlockSize;
} catch (final Exception e) {
// Sub-block exceeds file end, only use remaining bytes
subBlockSize = fileSize - i - 1; // Remaining bytes
arraycopy(in, i + 1, imgData, imgDataPos, subBlockSize);
imgDataPos += subBlockSize; // Move output data position
i += subBlockSize + 1; // Move to next sub-block size
break;
}
}
fr.data = imgData; // Holds LZW encoded data
i++; // Skip last sub-block size, should be 0
return i;
}
static final int readImgDataSize(final byte[] in, int i) {
final int fileSize = in.length;
int imgDataPos = 0;
int subBlockSize = in[i] & 0xFF;
while (subBlockSize > 0) { // While block has data
try { // Next line may throw exception if sub-block size is fake
final int nextSubBlockSizePos = i + subBlockSize + 1;
final int nextSubBlockSize = in[nextSubBlockSizePos] & 0xFF;
imgDataPos += subBlockSize; // Move output data position
i = nextSubBlockSizePos; // Move to next sub-block size
subBlockSize = nextSubBlockSize;
} catch (final Exception e) {
// Sub-block exceeds file end, only use remaining bytes
subBlockSize = fileSize - i - 1; // Remaining bytes
imgDataPos += subBlockSize; // Move output data position
break;
}
}
return imgDataPos;
}
/**
* @param fr
* The GIF frame to whom this image descriptor belongs
* @param in
* Raw data
* @param i
* Index of the image separator, i.e. the first block byte
* @return Index of the first byte after this block
*/
static final int readImgDescr(final GifFrame fr, final byte[] in, int i) {
fr.x = in[++i] & 0xFF | (in[++i] & 0xFF) << 8; // Byte 1-2: left
fr.y = in[++i] & 0xFF | (in[++i] & 0xFF) << 8; // Byte 3-4: top
fr.w = in[++i] & 0xFF | (in[++i] & 0xFF) << 8; // Byte 5-6: width
fr.h = in[++i] & 0xFF | (in[++i] & 0xFF) << 8; // Byte 7-8: height
fr.wh = fr.w * fr.h;
final byte b = in[++i]; // Byte 9 is a packed byte
fr.hasLocColTbl = (b & 0b10000000) >>> 7 == 1; // Bit 7
fr.interlaceFlag = (b & 0b01000000) >>> 6 == 1; // Bit 6
fr.sortFlag = (b & 0b00100000) >>> 5 == 1; // Bit 5
final int colTblSizePower = (b & 7) + 1; // Bits 2-0
fr.sizeOfLocColTbl = 1 << colTblSizePower; // 2^(N+1), As per the spec
return ++i;
}
/**
* @param img
* @param i
* Start index of this block.
* @return Index of the first byte after this block.
*/
static final int readLogicalScreenDescriptor(final GifImage img, final byte[] in, final int i) {
img.w = in[i] & 0xFF | (in[i + 1] & 0xFF) << 8; // 16 bit, LSB 1st
img.h = in[i + 2] & 0xFF | (in[i + 3] & 0xFF) << 8; // 16 bit
img.wh = img.w * img.h;
final byte b = in[i + 4]; // Byte 4 is a packed byte
img.hasGlobColTbl = (b & 0b10000000) >>> 7 == 1; // Bit 7
final int colResPower = ((b & 0b01110000) >>> 4) + 1; // Bits 6-4
img.colorResolution = 1 << colResPower; // 2^(N+1), As per the spec
img.sortFlag = (b & 0b00001000) >>> 3 == 1; // Bit 3
final int globColTblSizePower = (b & 7) + 1; // Bits 0-2
img.sizeOfGlobColTbl = 1 << globColTblSizePower; // 2^(N+1), see spec
img.bgColIndex = in[i + 5] & 0xFF; // 1 Byte
img.pxAspectRatio = in[i + 6] & 0xFF; // 1 Byte
return i + 7;
}
/**
* @param in
* Raw data
* @param pos
* Index of the extension introducer
* @return Index of the first byte after this block
*/
static final int readTextExtension(final byte[] in, final int pos) {
int i = pos + 2; // Skip extension introducer and label
int subBlockSize = in[i++] & 0xFF;
while (subBlockSize != 0 && i < in.length) {
i += subBlockSize;
subBlockSize = in[i++] & 0xFF;
}
return i;
}
}
-----ps:微信分享博客,需要300*300以上的图片。。。闹心

android – TextView样式ArrayIndexOutOfBoundsException
我从来没有重现过这次崩溃,它似乎只是来自三星galaxy设备(虽然不太确定).来自sdk 4.1版& 4.2& 4.3
这是完整的StackTrace:
android.view.InflateException: Binary XML file line #31: Error inflating class <unkNown>
at android.view.LayoutInflater.createView(LayoutInflater.java:613)
at com.android.internal.policy.impl.PhoneLayoutInflater.onCreateView(PhoneLayoutInflater.java:56)
at android.view.LayoutInflater.onCreateView(LayoutInflater.java:660)
at android.view.LayoutInflater.createViewFromTag(LayoutInflater.java:685)
at android.view.LayoutInflater.rInflate(LayoutInflater.java:746)
at android.view.LayoutInflater.inflate(LayoutInflater.java:489)
at android.view.LayoutInflater.inflate(LayoutInflater.java:396)
at com.android.internal.widget.ActionBarContextView.initClose(ActionBarContextView.java:262)
at com.android.internal.widget.ActionBarContextView.onConfigurationChanged(ActionBarContextView.java:136)
at android.view.View.dispatchConfigurationChanged(View.java:7761)
at android.view.ViewGroup.dispatchConfigurationChanged(ViewGroup.java:1056)
at android.view.ViewGroup.dispatchConfigurationChanged(ViewGroup.java:1060)
at android.view.ViewGroup.dispatchConfigurationChanged(ViewGroup.java:1060)
at android.view.ViewGroup.dispatchConfigurationChanged(ViewGroup.java:1060)
at android.view.ViewGroup.dispatchConfigurationChanged(ViewGroup.java:1060)
at android.view.ViewRootImpl.updateConfiguration(ViewRootImpl.java:2800)
at android.view.ViewRootImpl.performTraversals(ViewRootImpl.java:1509)
at android.view.ViewRootImpl.doTraversal(ViewRootImpl.java:1107)
at android.view.ViewRootImpl$TraversalRunnable.run(ViewRootImpl.java:4464)
at android.view.Choreographer$CallbackRecord.run(Choreographer.java:725)
at android.view.Choreographer.doCallbacks(Choreographer.java:555)
at android.view.Choreographer.doFrame(Choreographer.java:525)
at android.view.Choreographer$FramedisplayEventReceiver.run(Choreographer.java:711)
at android.os.Handler.handleCallback(Handler.java:615)
at android.os.Handler.dispatchMessage(Handler.java:92)
at android.os.Looper.loop(Looper.java:137)
at android.app.ActivityThread.main(ActivityThread.java:4895)
at java.lang.reflect.Method.invokeNative(Native Method)
at java.lang.reflect.Method.invoke(Method.java:511)
at com.android.internal.os.ZygoteInit$MethodAndArgsCaller.run(ZygoteInit.java:994)
at com.android.internal.os.ZygoteInit.main(ZygoteInit.java:761)
at dalvik.system.NativeStart.main(Native Method)
Caused by: java.lang.reflect.InvocationTargetException
at java.lang.reflect.Constructor.constructNative(Native Method)
at java.lang.reflect.Constructor.newInstance(Constructor.java:417)
at android.view.LayoutInflater.createView(LayoutInflater.java:587)
... 31 more
Caused by: java.lang.Arrayindexoutofboundsexception: length=24; index=691
at android.content.res.StringBlock.get(StringBlock.java:64)
at android.content.res.XmlBlock$Parser.getPooledString(XmlBlock.java:458)
at android.content.res.TypedArray.loadStringValueAt(TypedArray.java:720)
at android.content.res.TypedArray.getString(TypedArray.java:124)
at android.widget.TextView.<init>(TextView.java:916)
at android.widget.TextView.<init>(TextView.java:562)
... 34 more
我想也许这是由我给TextView的风格(特别是fontFamily)引起的.所以这里是我的价值观风格-v16> styles.xml(values-v16):
<style name="TextViewHour">
        <item name="android:layout_width">wrap_content</item>
        <item name="android:layout_height">wrap_content</item>
        <item name="android:layout_marginLeft">5dip</item>
        <item name="android:ellipsize">end</item>
        <item name="android:maxLines">1</item>
        <item name="android:textSize">@dimen/text_hour_size</item>
        <item name="android:textColor">@color/item_hour</item>
        <item name="android:fontFamily">sans-serif-condensed</item>
        <item name="android:textStyle">bold</item>
    </style>
来自价值观> styles.xml
<style name="TextViewHour">
        <item name="android:layout_width">wrap_content</item>
        <item name="android:layout_height">wrap_content</item>
        <item name="android:layout_marginLeft">5dip</item>
        <item name="android:ellipsize">end</item>
        <item name="android:maxLines">1</item>
        <item name="android:textSize">@dimen/text_hour_size</item>
        <item name="android:textColor">@color/item_hour</item>
        <item name="android:textStyle">bold</item>
    </style>
这里是一个使用TextView的例子:
<TextViewandroid:id="@+id/name"
    android:layout_width="wrap_content"
    android:layout_height="wrap_content"
    android:textColor="@color/item_date_separator"/>
我对我的应用程序在某些设备上崩溃的原因一无所知.
所以,如果有人有想法,我全都耳朵!
编辑:似乎它不仅在galaxy设备上,我也有这个Nexus 7的崩溃.
解决方法
public class MyTextView extends TextView {

public MyTextView(Context context,AttributeSet attrs,int defStyle) {
    super(context,attrs,defStyle);
    init();
}

public MyTextView(Context context,AttributeSet attrs) {
    super(context,attrs);
    init();
}

public MyTextView(Context context) {
    super(context);
    init();
}

private void init() {
    Typeface tf = Typeface.createFromAsset(getContext().getAssets(),"your_font.ttf");
    setTypeface(tf);
}
}
并在你的xml中.
<com.mypackage.test.MyTextView
 android:id="@+id/txt"
 android:layout_width="fill_parent"
 android:layout_height="wrap_content"
 android:gravity="center"
 android:layout_weight="1"
 android:text="custom text view. "
 android:textSize="30dip"
 android:textColor="#ff0000"
>

ArrayIndexOutOfBoundsException 160
解决方法,升级fastjson的版本

ArrayIndexOutOfBoundsException >> arr lenght 引起的异常
如何解决ArrayIndexOutOfBoundsException >> arr lenght 引起的异常?
对 Arrayindexoutofboundsexception 有点熟悉但无法解决。
突出显示错误所在的行。
如果为数组的长度引入 5,程序将指出为什么 d 可能等于 arr 的长度值(在本例中为 5)。
我知道这是一个愚蠢的错误,因此我很生气......
已突出显示错误的行。
任何帮助??
enter image description here
解决方法
暂无找到可以解决该程序问题的有效方法,小编努力寻找整理中!
如果你已经找到好的解决方法,欢迎将解决方案带上本链接一起发送给小编。
小编邮箱:dio#foxmail.com (将#修改为@)

ArrayIndexOutOfBoundsException数组越界 --- 之二
现象:
Caused by: java.lang.ArrayIndexOutOfBoundsException: 7786
at org.springframework.asm.ClassReader.readClass(Unknown Source)
at org.springframework.asm.ClassReader.accept(Unknown Source)
at org.springframework.asm.ClassReader.accept(Unknown Source)
at org.springframework.core.type.classreading.SimpleMetadataReader.<init>(SimpleMetadataReader.java:54)
at org.springframework.core.type.classreading.SimpleMetadataReaderFactory.getMetadataReader(SimpleMetadataReaderFactory.java:80)
at org.springframework.core.type.classreading.CachingMetadataReaderFactory.getMetadataReader(CachingMetadataReaderFactory.java:101)
at org.springframework.context.annotation.ClassPathScanningCandidateComponentProvider.findCandidateComponents(ClassPathScanningCandidateComponentProvider.java:236)
... 45 more

问题及解决方案:
executor.execute(() -> threadTask(activityId, mobiles, content));
改为:
executor.execute(new Runnable() {
    @Override
    public void run() {
        threadTask(activityId, mobiles, content);
    }
});
今天关于Gif读取之解决ArrayIndexOutOfBoundsException:4096读取gif文件和gif文件解析的讲解已经结束,谢谢您的阅读,如果想了解更多关于android – TextView样式ArrayIndexOutOfBoundsException、ArrayIndexOutOfBoundsException 160、ArrayIndexOutOfBoundsException >> arr lenght 引起的异常、ArrayIndexOutOfBoundsException数组越界 --- 之二的相关知识,请在本站搜索。
在本文中,我们将详细介绍Derby使用3—Embedded模式的各个方面,并为您提供关于de embedding的相关解答,同时,我们也将为您带来关于@Embeddable中具有@GeneratedValue的@EmbeddedId、Action: Consider the following: If you want an embedded database (H2, HSQL or Derby), please pu...、com.amazonaws.services.dynamodbv2.local.embedded.DynamoDBEmbedded的实例源码、Elixir Ranch: Embedded 模式的有用知识。
本文目录一览:- Derby使用3—Embedded模式(de embedding)
- @Embeddable中具有@GeneratedValue的@EmbeddedId
- Action: Consider the following: If you want an embedded database (H2, HSQL or Derby), please pu...
- com.amazonaws.services.dynamodbv2.local.embedded.DynamoDBEmbedded的实例源码
- Elixir Ranch: Embedded 模式
")
Derby使用3—Embedded模式(de embedding)
零、回顾
这部分先来回顾一下上两篇博客中的主要内容。第一篇博客中主要简单介绍了Derby数据的历史,特点,安装以及使用的两种模式。第二篇文章主要介绍了客户机-服务器(C/S)模式的使用。今天继续介绍第二种使用模式,内嵌模式(Embedded Mode)。
一、客户端使用内嵌模式
与之前介绍的C/S模式不同,使用内嵌模式时不需要开启一个数据库的服务进程来监听并处理客户端的请求,客户端可以自行的完成这些命令。所以使用内嵌模式是有一定优势的。
下面来具体介绍这种模式的使用。首先还是要设置好CLASSPATH的环境变量。同样有两种方法,即使用Derby数据库编译好的脚本文件。可以执行命令:
setEmbeddedCP将所需要的jar文件配置在CLASSPATH环境变量中。或者自己手动加入,执行命令:
export CLASSPATH=$DERBY_HOME/lib/derbytools.jar:$DERBY_HOME\lib\derby.jar:我们还是需要运行ij工具,运行方式可以参照上一篇博客。之后还是执行连接数据库的命令:
jdbc:derby:DB_Path/DB_NAME;create=true''这里需要多说一句,就是查找数据路径的根目录位置,如果没有设置derby.system.home(即数据库主目录的位置),那么默认的将会从启动ij的当前目录作为主目录对数据库的位置进行递归查找,后面第二部分介绍的程序运行Embedded模式也会遇到相同的问题。这部分先来介绍一下怎么来设置derby.system.home。设置这个时需要在启动ij工具的同时就不值设定好,所以可以执行命令:
java -Dderby.system.home=DB_ROOT_DIR org.apache.derby.tools.ij上述设置完derby.system.home后再连接数据库会有一个ERROR XBM0H的错误,不知道怎么解决,希望知道的可以指出一下,亦或是我设置derby.system.home的方式有问题,谢谢大家给出问题的解决方案。另外这个模式只能访问本地的数据库,对其操作。连接上数据库后就可以执行SQL语句了,这里就不在赘述了。关闭数据库只须执行exit;即可。
二、程序使用内嵌模式
这里给出的程序是根据Apache Derby文件夹demo/program/sample中的例子改写的,下面附上程序:
package trianlge23.derby.embedded.demo;

import java.sql.Connection;
import java.sql.DriverManager;
import java.sql.PreparedStatement;
import java.sql.ResultSet;
import java.sql.SQLException;
import java.sql.Statement;
import java.util.ArrayList;

public class DerbyEmbeddedDemo {
	// the default framework is embedded if you want to use client framework
	// please pass the "derbyclient" in the first argument
	private String framework = "embedded";
	private String driver = "org.apache.derby.jdbc.EmbeddedDriver";
	private String protocol = "jdbc:derby:";

	public static void main(String[] args) {

		new DerbyEmbeddedDemo().run(args);
		System.out.println("DerbyEmbeddedDemo finished");
	}

	public void run(String[] args) {
		parseArguments(args);

		System.out.println("DerbyEmbeddedDemo starting in " + framework
				+ " mode");

		loaddriver();

		Connection conn = null;
		ArrayList<Statement> statements = new ArrayList<Statement>();
		PreparedStatement psInsert = null;
		PreparedStatement psUpdate = null;
		Statement s = null;
		ResultSet rs = null;

		String userHomeDir = System.getProperty("user.home", ".");
		String dbPath = userHomeDir + "/Testdata/";
		System.setProperty("derby.system.home", dbPath);
		String dbName = "testDB";

		String dbURL = protocol + dbPath + dbName + ";create=true";
		try {
			conn = DriverManager.getConnection(dbURL);

			conn.setAutoCommit(false);

			s = conn.createStatement();
			statements.add(s);

			s.execute("CREATE TABLE basicinfo(id INT, name VARCHAR(18), cityname VARCHAR(12))");
			System.out.println("Created table basicinfo");

			psInsert = conn
					.prepareStatement("INSERT INTO basicinfo VALUES (?, ?, ?)");
			statements.add(psInsert);

			psInsert.setInt(1, 100);
			psInsert.setString(2, "Triangle23.lzl");
			psInsert.setString(3, "Shanghai");
			psInsert.executeUpdate();
			System.out.println("Inserted 100 Triangle23.lzl Shanghai");

			psInsert.setInt(1, 1);
			psInsert.setString(2, "Adrastos");
			psInsert.setString(3, "Shanghai");
			psInsert.executeUpdate();
			System.out.println("Inserted 1 Adrastos Shanghai");

			psUpdate = conn
					.prepareStatement("UPDATE basicinfo SET id=?, name=?, cityname=? WHERE id=?");
			statements.add(psUpdate);

			psUpdate.setInt(1, 0);
			psUpdate.setString(2, "Triangle23");
			psUpdate.setString(3, "Beijing");
			psUpdate.setInt(4, 100);
			psUpdate.executeUpdate();
			System.out
					.println("Updated 0 Triangle23.lzl Shanghai to 0 Triangle23 Beijing");

			rs = s.executeQuery("SELECT * FROM basicinfo ORDER BY id");

			int id;
			boolean failure = false;
			if (!rs.next()) {
				failure = true;
				reportFailure("No rows in ResultSet");
			}
			if ((id = rs.getInt(1)) != 0) {
				failure = true;
				reportFailure("Wrong row returned, expected id=0, got " + id);
			}

			if (!failure) {
				System.out.println("Verified the rows");
			}

			s.execute("drop table basicinfo");
			System.out.println("Dropped table basicinfo");

			conn.commit();
			System.out.println("Committed the transaction");

			if (framework.equals("embedded")) {
				try {
					DriverManager.getConnection("jdbc:derby:;shutdown=true");
				} catch (SQLException se) {
					if (((se.getErrorCode() == 50000) && ("XJ015".equals(se
							.getSQLState())))) {
						// we got the expected exception
						System.out.println("Derby shut down normally");
						// Note that for single database shutdown, the expected
						// SQL state is "08006", and the error code is 45000.
					} else {
						System.err.println("Derby did not shut down normally");
						printSQLException(se);
					}
				}
			}

		} catch (SQLException sqle) {
			printSQLException(sqle);
		} finally {
			// release all open resources to avoid unnecessary memory usage

			// ResultSet
			try {
				if (rs != null) {
					rs.close();
					rs = null;
				}
			} catch (SQLException sqle) {
				printSQLException(sqle);
			}
			// Remove Statements and PreparedStatements
			int i = 0;
			while (!statements.isEmpty()) {
				// PreparedStatement extend Statement
				Statement st = (Statement) statements.remove(i);
				try {
					if (st != null) {
						st.close();
						st = null;
					}
				} catch (SQLException sqle) {
					printSQLException(sqle);
				}
			}

			// Close Connection
			try {
				if (conn != null) {
					conn.close();
					conn = null;
				}
			} catch (SQLException sqle) {
				printSQLException(sqle);
			}
		}

	}

	private void reportFailure(String message) {
		System.err.println("\nData verification failed:");
		System.err.println(''\t'' + message);
	}

	public static void printSQLException(SQLException e) {
		while (e != null) {
			System.err.println("\n----- SQLException -----");
			System.err.println("  SQL State:  " + e.getSQLState());
			System.err.println("  Error Code: " + e.getErrorCode());
			System.err.println("  Message:    " + e.getMessage());
			e = e.getNextException();
		}

	}

	private void loaddriver() {
		try {
			Class.forName(driver).newInstance();
			System.out.println("Loaded the appropriate driver");
		} catch (InstantiationException ie) {
			System.err.println("\nUnable to instantiate the JDBC driver "
					+ driver);
			ie.printStackTrace(System.err);
		} catch (IllegalAccessException iae) {
			System.err.println("\nNot allowed to access the JDBC driver "
					+ driver);
			iae.printStackTrace(System.err);
		} catch (ClassNotFoundException cnfe) {
			System.err.println("\nUnable to load the JDBC driver " + driver);
			System.err.println("Please check your CLASSPATH.");
			cnfe.printStackTrace(System.err);
		}
	}

	/* parse arguments choosing client mode whether or not */
	private void parseArguments(String[] args) {
		if (0 < args.length) {
			if ("derbyclient".equalsIgnoreCase(args[0])) {
				framework = "derbyclient";
				driver = "org.apache.derby.jdbc.ClientDriver";
				protocol = "jdbc:derby://localhost:1527/";
			}
		}
	}
}
上述中有程序中有设置derby.system.home的代码段,可以自行体会一下,另外程序给提供了两种模式模式的方式,也算是对之前博客示例的一个追加吧。如果需要查看更完整的注释内容,可以参考Apache给出的示例(之前所述的文件位置)。另外还需要说一点就是,在程序运行时,不能有另一个指向程序所用数据库的服务进程,简单的讲,一个数据库不应该有两个服务进程(不是线程)同时监听请求并处理(不知道解释的对不对啊),内嵌模式是和程序共用jvm的。
三、后面的话
Derby的使用大概就介绍这三篇博客,后续的可能还会有一些derby数据库使用方面的心得。希望这三篇博客可以让大家对使用Derby数据库可以快速上手,也希望大家一起交流给出补充或不足,谢谢。
四、参考资料
- Embedded Derby:http://db.apache.org/derby/papers/DerbyTut/embedded_intro.html
- permission denied on derby.log:
http://apache-database.10148.n7.nabble.com/permission-denied-on-derby-log-td106537.html - Derby 笔记: http://pengyan.iteye.com/blog/207355

@Embeddable中具有@GeneratedValue的@EmbeddedId
我有一个具有以下结构的MySQL数据库(节选):
CREATE TABLE MENU( id_menu TINYINT UNSIGNED NOT NULL AUTO_INCREMENT, name VARCHAR(50) NOT NULL, PRIMARY KEY (id_menu));CREATE TABLE OPERATION( id_operation SMALLINT UNSIGNED NOT NULL AUTO_INCREMENT, id_menu TINYINT UNSIGNED NOT NULL, operation VARCHAR(50) NOT NULL, url VARCHAR(100) NOT NULL, PRIMARY KEY (id_operation, id_menu));CREATE TABLE operation_role( id_operation SMALLINT UNSIGNED NOT NULL, id_menu TINYINT UNSIGNED NOT NULL, role CHAR(15) NOT NULL, id_user BIGINT UNSIGNED NOT NULL, PRIMARY KEY (id_operation, id_menu, role, id_user));CREATE TABLE role_user( role CHAR(15) NOT NULL id_user BIGINT UNSIGNED NOT NULL, PRIMARY KEY (role, id_user));-- RELATIONSHIPS-- -- TABLE: OPERATION -- Meaning: a MENU has several OPERATION (One to Many relationship)ALTER TABLE OPERACION ADD CONSTRAINT fk_menu_operacion FOREIGN KEY (id_menu) REFERENCES MENU(id_menu);-- -- TABLE: operation_rol -- This is the join table for the Many to Many relatioship OPERATION-role_userALTER TABLE operation_role ADD CONSTRAINT fk_operation_oprole FOREIGN KEY (id_operation, id_menu) REFERENCES OPERATION(id_operation, id_menu);ALTER TABLE operaciones_rol ADD CONSTRAINT fk_roles_operation FOREIGN KEY (role, id_user) REFERENCES role_user(role, id_user);-- -- TABLE: roles_usuario -- Meaning: a user can have several roles (One to Many)ALTER TABLE roles_usuario ADD CONSTRAINT fk_usuario_roles FOREIGN KEY (id_usuario) REFERENCES USUARIO(id_usuario);另外,还有一个USER表,但这并不重要,有了这些表,您可以了解问题的全貌。
如您所见,某些列具有AUTO_INCREMENT将@GeneratedValue(strategy =GenerationType.IDENTITY)在@Entity类中变为的属性。
OPERATION并且role_user由于它们与其他表的关系而具有复合主键,因此我无法更改。由于为CompositePK,因此映射的类必须具有一个@EmbeddedId带有相应@Embeddable类的。
问题是我需要@GeneratedValue在组合的 “本机”
部分中添加一个PK,例如:OPERATION.id_operation必须具有JPA @GeneratedValue @ EmbeddedId@GeneratedValue并OPERATION.id_menu从中传播。我能正确解释情况吗?MENU.id_menu, butdoesnot supportin`
我尝试使用NetBeans 从DataBase 选项的 Entity类 的 “建议”
,但是为具有简单列的标识符(如)的表生成注释,而不为组合对象的表(如)生成注释。 __@GeneratedValue``MENU``OPERATION
所以问题是 我该如何进行映射? 。更改数据库的结构不是一种选择,因为业务需要,所以要这样做。
任何帮助或指导表示赞赏。提前非常感谢您。
答案1
小编典典您的JPA @Id不需要匹配数据库PK列。只要它是唯一的,那么这就是所有要紧的事情,并且由于关联的列是自动递增的列,因此会是这种情况。
从https://en.wikibooks.org/wiki/Java_Persistence/Identity_and_Sequencing:
JPA Id不必总是与数据库表的主键约束匹配,也不需要主键或唯一约束。
因此,尽管可以按照PRIMARY KEY (id_operation,id_menu)看起来的方式配置关联表的PK,但id_operation通过自动递增,它可以单独作为PK,因此可以将操作映射如下:
@Entitypublic class Operation{ @Id @GeneratedValue(strategy = GenerationType.IDENTITY) private Long id; @ManyToOne @JoinColumn(name = "id_menu") private Menu menu;}如果创建相关的IDClass,则可以如下映射OperationRole。有关此方案以及ID类如何查找的示例,请参见:
https://zh.wikibooks.org/wiki/Java_Persistence/Identity_and_Sequencing#Example_JPA_2.0_ManyToOne_id_annotation
@Entity@IdClass(OperationRolePk.class)public class OperationRole{ @Id @ManyToOne @JoinColumn(name = "id_operation") private Operation operation; @Id @ManyToOne @JoinColumn(name = "id_menu") private Menu menu; @Id @ManyToOne @JoinColumn(name = "id_user") private User user;}, please pu...")
Action: Consider the following: If you want an embedded database (H2, HSQL or Derby), please pu...
更多精彩关注微信公众号

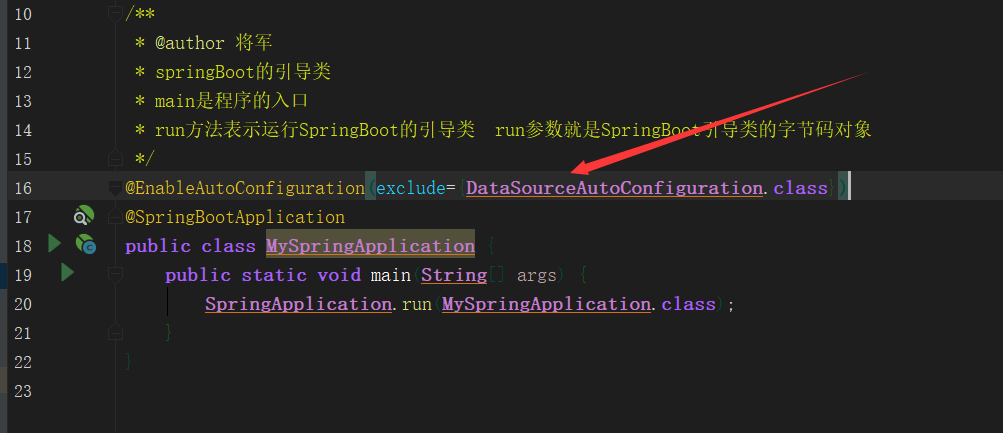
错误原因
在pom中引入了mybatis-spring-boot-starter ,Spring boot默认会加载org.springframework.boot.autoconfigure.jdbc.DataSourceAutoConfiguration类,DataSourceAutoConfiguration类使用了@Configuration注解向spring注入了dataSource bean。因为工程中没有关于dataSource相关的配置信息,当spring创建dataSource bean因缺少相关的信息就会报错。
解决错误
在Spring boot的启动引导类上增加@EnableAutoConfiguration(exclude={DataSourceAutoConfiguration.class}),阻止Spring boot自动注入dataSource
推荐阅读:
IntelliJ IDEA打开Maven项目,Spring boot所有依赖红名,不可用
IDEA 导入Springboot 项目
创建Maven项目,GroupId和Artifact Id该如何填写?
问:hibernate的sessionfactory是干嘛的?session又是干嘛的呢?

com.amazonaws.services.dynamodbv2.local.embedded.DynamoDBEmbedded的实例源码
/**
 * setup
 */
@Before
public void setup() {
    // Create an in-memory and in-process instance of DynamoDB Local that skips HTTP
    dynamodbClient = DynamoDBEmbedded.create().amazonDynamoDB();

    // Create and verify table
    final CreateTableResult createTableResult = createTable();
    assertEquals(TABLE_NAME,createTableResult.getTableDescription().getTableName());
}
public static AmazonDynamoDB createInMemoryDb() {
    AmazonDynamoDB dynamodb = null;
    try {
        // Create an in-memory and in-process instance of DynamoDB Local
        AmazonDynamoDBLocal amazonDynamoDBLocal = DynamoDBEmbedded.create();
        dynamodb = amazonDynamoDBLocal.amazonDynamoDB();
        return dynamodb;
    } catch (Exception e){
        if(dynamodb != null)
            dynamodb.shutdown();// Shutdown the thread pools in DynamoDB Local / Embedded
    }
    return dynamodb;
}
@BeforeClass
public static void beforeClass() {
    sDynamoDB = DynamoDBEmbedded.create().amazonDynamoDB();
    sDynamoDBMapper = new DynamoDBMapper(sDynamoDB);
    sDynamoDBRepository = new DynamoDBRepository();
    sDynamoDBRepository.setDynamoDBMapper(sDynamoDBMapper);
    sDynamoDBRepository.setLockDurationMs(LOCK_DURATION_MS);
}
@Override
protected void before() throws Throwable {
    try {
        amazonDynamoDB = DynamoDBEmbedded.create().amazonDynamoDB();
    } catch (Exception e) {
        throw new RuntimeException(e);
    }
}
@Override
protected void before() throws Throwable {
  nativeLibraryRule.before();
  System.setProperty("sqlite4java.library.path",nativeLibraryRule.getNativeLibrariesFolder().toString());

  client = DynamoDBEmbedded.create().amazonDynamoDB();
}
@Before
public void setup() {
    methodCalls = new HashMap<String,Integer>();
    client = instrument(DynamoDBEmbedded.create(),AmazonDynamoDB.class,methodCalls);
    metastore.createTable(client,TABLE_NAME,new ProvisionedThroughput(1L,1L));
    store = new metastore(client,ENCRYPTOR);
    ctx = new EncryptionContext.Builder().build();
    methodCalls.clear();
}
@Before
public void setup() {
    client = synchronize(DynamoDBEmbedded.create(),AmazonDynamoDB.class);
    metastore.createTable(client,ENCRYPTOR);
    ctx = new EncryptionContext.Builder().build();
}
@Before
public void setUp() {
    client = DynamoDBEmbedded.create();

    ArrayList<AttributeDeFinition> attrDef = new ArrayList<AttributeDeFinition>();
    attrDef.add(new AttributeDeFinition().withAttributeName("hashKey").withAttributeType(ScalarattributeType.N));
    attrDef.add(new AttributeDeFinition().withAttributeName("rangeKey").withAttributeType(ScalarattributeType.N));

    ArrayList<KeySchemaElement> keySchema = new ArrayList<KeySchemaElement>();
    keySchema.add(new KeySchemaElement().withAttributeName("hashKey").withKeyType(KeyType.HASH));
    keySchema.add(new KeySchemaElement().withAttributeName("rangeKey").withKeyType(KeyType.RANGE));

    client.createTable(new CreateTableRequest().withTableName("TableName")
            .withAttributeDeFinitions(attrDef)
            .withKeySchema(keySchema)
            .withProvisionedThroughput(new ProvisionedThroughput(100L,100L)));

    attrDef = new ArrayList<AttributeDeFinition>();
    attrDef.add(new AttributeDeFinition().withAttributeName("hashKey").withAttributeType(ScalarattributeType.S));
    keySchema = new ArrayList<KeySchemaElement>();
    keySchema.add(new KeySchemaElement().withAttributeName("hashKey").withKeyType(KeyType.HASH));

    client.createTable(new CreateTableRequest().withTableName("HashKeyOnly")
            .withAttributeDeFinitions(attrDef)
            .withKeySchema(keySchema)
            .withProvisionedThroughput(new ProvisionedThroughput(100L,100L)));

    attrDef = new ArrayList<AttributeDeFinition>();
    attrDef.add(new AttributeDeFinition().withAttributeName("hashKey").withAttributeType(ScalarattributeType.B));
    attrDef.add(new AttributeDeFinition().withAttributeName("rangeKey").withAttributeType(ScalarattributeType.N));

    keySchema = new ArrayList<KeySchemaElement>();
    keySchema.add(new KeySchemaElement().withAttributeName("hashKey").withKeyType(KeyType.HASH));
    keySchema.add(new KeySchemaElement().withAttributeName("rangeKey").withKeyType(KeyType.RANGE));

    client.createTable(new CreateTableRequest().withTableName("DeterministicTable")
            .withAttributeDeFinitions(attrDef)
            .withKeySchema(keySchema)
            .withProvisionedThroughput(new ProvisionedThroughput(100L,100L)));
}
/**
 * You can use mvn to run DynamoDBLocalFixture,e.g.
 * <p>
 * $ mvn clean package
 * <p>
 * $ mvn exec:java -Dexec.main\
 * -Dexec.classpathScope="test" \
 * -Dsqlite4java.library.path=target/dependencies
 * <p>
 * It's recommended to run "aws configure" one time before you run DynamoDBLocalFixture
 *
 * @param args - no args
 * @throws Exception
 */
public static void main(String[] args) throws Exception {
    AmazonDynamoDB dynamodb = null;
    try {
        // Create an in-memory and in-process instance of DynamoDB Local that skips HTTP
        dynamodb = DynamoDBEmbedded.create().amazonDynamoDB();
        // use the DynamoDB API with DynamoDBEmbedded
        listTables(dynamodb.listTables(),"DynamoDB Embedded");
    } finally {
        // Shutdown the thread pools in DynamoDB Local / Embedded
        if(dynamodb != null) {
            dynamodb.shutdown();
        }
    }

    // Create an in-memory and in-process instance of DynamoDB Local that runs over HTTP
    final String[] localArgs = { "-inMemory" };
    DynamoDBProxyServer server = null;
    try {
        server = ServerRunner.createServerFromCommandLineArgs(localArgs);
        server.start();

        dynamodb = AmazonDynamoDBClientBuilder.standard().withEndpointConfiguration(
            // we can use any region here
            new AwsClientBuilder.EndpointConfiguration("http://localhost:8000","us-west-2"))
            .build();

        // use the DynamoDB API over HTTP
        listTables(dynamodb.listTables(),"DynamoDB Local over HTTP");
    } finally {
        // Stop the DynamoDB Local endpoint
        if(server != null) {
            server.stop();
        }
    }
}
public CloudNoticeDAO(boolean local) {
    ddb = local ? DynamoDBEmbedded.create().amazonDynamoDB()
            : AmazonDynamoDBClientBuilder.defaultClient();
    verifyTables();
    mapper = new DynamoDBMapper(ddb);
}
@Bean
@Primary
public AmazonDynamoDB createAmazonDynamoDBLocal() throws Exception {
    return DynamoDBEmbedded.create().amazonDynamoDB();
}

Elixir Ranch: Embedded 模式
嵌入模式允许你把
Ranch监听器直接插入到你的监控树中. 如果整个应用程序其他部分挂掉了, 可以通过关闭监听器的方法, 来提供更好的容错控制.
嵌入(Embedding)
要嵌入 Ranch 到你自己的应用程序中, 只需要简单地把子进程规范添加到监控树中即可. 在应用程序的一个(一般在顶层Supervisor, 如果应用程序比较复杂, 也可能是其他层) Supervisor 的 init/1 函数中完成这个过程.
对于嵌入, Ranch 要求最少两种类型的子进程规范. 首先,需要添加 ranch_sup 到监控树, 只需要一次, 不管使用多少个监听器. 然后需要为每个监听器添加子进程规范.
可以添加多个监听器, 比如80端口的HTTP监听器, 和443端口的HTTPS监听器.
Ranch 提供了一个简便的辅助函数 ranch:child_spec/6 获取监听器的子进程规范, 其工作方式类似于 ranch:start_listener/6, 只是它不启动任何进程, 只是返回子进程规范.
对于 ranch_sup, 子进程规范足够的简单, 不需要辅助函数.
下面的例子添加 ranch_sup 和一个监听器到另一个应用程序的监控树中.
直接嵌入 Ranch 到监控树中
init([]) ->
    RanchSupSpec = {
        ranch_sup,
        {ranch_sup, start_link, []},
        permanent,
        5000,
        supervisor,
        [ranch_sup]
    },
    ListenerSpec = ranch:child_spec(
        echo,
        100,
        ranch_tcp,
        [{port, 5555}],
        echo_protocol,
        []
    ),
    {ok, {{one_for_one, 10, 10}, [RanchSupSpec, ListenerSpec]}}.
记住, 可以按需要添加多个监听器, 但是只能有一个
ranch_sup子进程规范!
Elixir 的 Supervisor 实现
嵌入前的 Supervisor
require Logger
defmodule RanchEmbededMode.Supervisor do
  use Supervisor

  def start_link do
    Logger.debug "Start supervisor."
    Supervisor.start_link(__MODULE__, [], name: __MODULE__)
  end

  def init([]) do
    children = [
      worker(RanchEmbededMode.TcpAcceptor, []),
    ]
    Logger.debug "supervisor child spec #{inspect children}"
    opts = [strategy: :one_for_one, max_restarts: 3]
    Logger.debug "strategy #{inspect opts}"
    supervise(children, opts)
  end
end
嵌入前的监控树结构
嵌入前
Ranch是一个独立的Application

嵌入前
RanchEmbededMode应用程序监控树结构

嵌入后的 SupervisorEmbed
require Logger
defmodule RanchEmbededMode.SupervisorEmbed do
  use Supervisor

  def start_link do
    Logger.debug "Start supervisor."
    Supervisor.start_link(__MODULE__, [], name: __MODULE__)
  end

  def init([]) do
    children = [
      ranch_sup(),
      ranch_embeded_mode_listener()
    ]
    Logger.debug "supervisor child spec #{inspect children}"
    opts = [strategy: :one_for_one, name: __MODULE__]
    Logger.debug "strategy #{inspect opts}"
    supervise(children, opts)
  end

  def ranch_sup do
    supervisor(:ranch_sup, [], [shutdown: 5000])
  end

  @doc """
  Ranch 提供了一个辅助函数能够更便捷的创建监听器的 Child Spec
  """
  def ranch_embeded_mode_listener do
    :ranch.child_spec(
      :ranch_embeded_mode_listener,
      10,
      :ranch_tcp,
      [port: 5555],
      RanchEmbededMode.TcpProtocolHandler, []
    )
  end
end
嵌入后的监控树结构, 独立的 Ranch Application 不在了.

需要特别注意的地方
当 Ranch 作为独立的 Application 时, 请确保 Ranch 在当前应用程序之前启动
当 Ranch 作为嵌入模式运行时, 请确保不要在mix.exs或其他位置启动 Ranch, 当前应用程序的 Supervisor 会负责启动 Ranch, 并作为当前应用程序监控树的子树运行.

独立模式下, 如果没有在 mix.exs 提前启动 ranch, 报如下错误:

嵌入模式下, 如果在 mix.exs 中提前启动了 ranch, 报如下错误:

建议:
在设计监控树的结构方面, 确保当ranch_sup挂掉时, 重启所有监听器. 详情请参考 Ranch 官网 Guide 的 Internal 章节了解如何这样做.
示例程序
本文的示例代码位于 https://github.com/developerworks/ranch_embeded_mode
另外, 如果你想要给你的项目取个你喜欢的名字, 请执行下面的步骤
git clone https://github.com/developerworks/ex_ranch_server_tasks.git
cd ex_ranch_server_tasks
mix archive.build
mix archive.install                # 输入Y确认
mix ranch.new <project_name> --sup # 用实际的项目名称替换 <project_name>独立模式使用RanchEmbededMode.Supervisor.start_link启动
嵌入模式使用RanchEmbededMode.SupervisorEmbed.start_link启动
参考资料
https://github.com/ninenines/ranch/blob/master/doc/src/guide/embedded.asciidoc
关于Derby使用3—Embedded模式和de embedding的问题我们已经讲解完毕,感谢您的阅读,如果还想了解更多关于@Embeddable中具有@GeneratedValue的@EmbeddedId、Action: Consider the following: If you want an embedded database (H2, HSQL or Derby), please pu...、com.amazonaws.services.dynamodbv2.local.embedded.DynamoDBEmbedded的实例源码、Elixir Ranch: Embedded 模式等相关内容,可以在本站寻找。
本文将带您了解关于Firebug Tutorial (Section 1)– Logging, Profiling and CommandLine (Part I)的新内容,另外,我们还将为您提供关于11:12:21.924 [main] DEBUG org.apache.ibatis.logging.LogFactory - Logging initialized using ''c...、48-Command line is too long. Shorten command line、Angular 2 User Registration and Login Example & Tutorial - Built with Angular 2.0 Final.、Automating code reviews and application profiling with Amazon CodeGuru的实用信息。
本文目录一览:- Firebug Tutorial (Section 1)– Logging, Profiling and CommandLine (Part I)
- 11:12:21.924 [main] DEBUG org.apache.ibatis.logging.LogFactory - Logging initialized using ''c...
- 48-Command line is too long. Shorten command line
- Angular 2 User Registration and Login Example & Tutorial - Built with Angular 2.0 Final.
- Automating code reviews and application profiling with Amazon CodeGuru
– Logging, Profiling and CommandLine (Part I)")
Firebug Tutorial (Section 1)– Logging, Profiling and CommandLine (Part I)
Firebug Tutorial – Logging, Profiling and CommandLine (Part I)
Firebug Tutorial
Section 1: Console Tab : Logging, Profiling and CommandLine (Part II)
Overview of Console Tab
This tab is mainly used for logging. It also can be used as CommandLine window (like immediate window in Microsoft Visual Studio) while you are debugging the Javascript. It can be used for monitoring the execution of Javascript code by using Profiling service.
The following topic will be covered in this section.
- Logging in Firebug (with String Substitution pattern )
- Grouping the logs or messages
- console.dir and console.dirxml
- Assertion ( console.assert() )
- Tracing ( console.trace() )
- Timing ( Measuring the time of your code)
- Javascript Profiler (An introduction in this tutorial, the details will be covered in next tutorial.)
#1. Logging in Firebug
Firebug supports logging in Console tab. So, you don’t need to use alert(‘something’) or document.write(‘something’) anymore.
There are five types of logging in Firebug.
- console.log : Write a message without icon.
- console.debug : Writes a message to the console, including a hyperlink to the line where it was called
-
 console.error() : Writes a message to the console with the visual “error” icon and color coding and a hyperlink to the line where it was called.
 -
 console.info() : Writes a message to the console with the visual “info” icon and color coding and a hyperlink to the line where it was called.
 -
 console.warn() : Writes a message to the console with the visual “warning” icon and color coding and a hyperlink to the line where it was called.
Example Code:
- Open the htm file called “Plain HTML” or create one HTML file.
- Paste the following code with <body> tag.
<script language="javascript" type="text/javascript">
console.log(''This is log message'');
console.debug(''This is debug message'');
console.error(''This is error message'');
console.info(''This is info message'');
console.warn(''This is warning message'');
</script>
You will get the following output. If you click on hyperlink (“test.htm” in this case), it will take you to script tab and will highlight the line that wrote this message.

String Substitution Patterns
String substitution parterns can be used in console.log, console.info, console.debug, console.warn and console.error . You can use the same way that we used in C/C++.
| %s | String |
| %d, %i | Integer (numeric formatting is not yet supported) |
| %f | Floating point number (numeric formatting is not yet supported) |
| %o | Object hyperlink |
Example :
Note: I will use console.log in the example below even all console objects (console.log, console.info, console.debug, console.warn and console.error ) support string substitution.
- Remove “script” tag that we pasted for the previous example.
- Paste the code below within <body> tag.
<script language="javascript" type="text/javascript">

//This is for normal string substitution " %s, %d, %i, %f".
console.log("My Name is <strong>%s</strong>. My Date of Birth is <strong>%dth %s, %i</strong>. My height is <strong>%f</strong> m.", "Nicolas Cage", 7, ''January'', 1964, 1.8542);

function Foo(){
this.LeftHand = function(){
return "Left Hand";
}
this.RightHand = function(){
return "Right Hand";
}
}

//This is for object "%o".
var objFoo = new Foo();
console.log(''This is <strong>%o</strong> of Foo class.'', objFoo);

</script>
If you are using %o in your log, the object will be shown as a hyperlink in green color. This hyperlink is linked to the DOM tab. So, If you click “object” in second line, you will see the list of properties of that object (LeftHand and RightHand in this case.)
#2. Grouping
Firebug allows you to group the message or log in Console tab. If you have some many logs in your code, you can probably divide your log into small group or subgroup
Example ~
<script language="javascript" type="text/javascript">

var groupname = ''group1'';
console.group("message group : %s " , groupname);
console.log("log message 1 from %s", groupname);
console.log("log message 2 from %s", groupname);
console.log("log message 3 from %s", groupname);
console.groupEnd();

groupname = ''group2'';
console.group("message group : %s " , groupname);
console.log("log message 1 from %s", groupname);

var subgroupname = ''subgroup1'';
console.group("message group : %s " , subgroupname);
console.log("log message 1 from %s", subgroupname);
console.log("log message 2 from %s", subgroupname);
console.log("log message 3 from %s", subgroupname);
console.groupEnd();

console.log("log message 3 from %s", groupname);
console.groupEnd();

</script>
#3. console.dir and console.dirxml
- console.dir : It can be used for getting all properties and methods of a particular object. According the example below, we can get the Model (property) and getManufactor (method) of Car object by using console.dir(); You can also pass the object of HTML element (eg: console.dir(document.getElementById(‘tbl1′)); ) instead of objCar and let’s see the result. (You will get all properties and methods of the HTML table called “tbl1′).
- console.dirxml : print the XML source tree of HTML element.
<table id="tbl1" cellpadding="0" cellspacing="0" border="0">
<tr>
<td>A</td>
<td>B</td>
<td>C</td>
</tr>
</table>
<script language="javascript" type="text/javascript">
//Create a class
function Car(){
this.Model = "Old Model";

this.getManufactor = new function(){
return "Toyota";
}
}

//Create a object
var objCar = new Car();

//Firebug
console.dir(objCar);
console.dirxml(document.getElementById(''tbl1''));

</script>
#4. Assertion ( console.assert() )
You can use console.assert() to test whether an expression is true or not. If the expression is false, it will write a message to the console and throw an exception.
Example :
<script language="javascript" type="text/javascript">
function whatIsMyAge(year){
var currYear = 2007;
return currYear - year;
}

var yearOfBirth1 = 1982;
var age1 = 25;
console.assert(whatIsMyAge(yearOfBirth1) == age1);

var yearOfBirth2 = 1982;
var age2 = 11;
console.assert(whatIsMyAge(yearOfBirth2) == age2); //You should get the error here.
</script>
#5. Tracing ( console.trace() )
This function is very interesting. Before I tell you the way that I understand, let’s take a look what console.trace does exactly in official website.
console.trace()
Prints an interactive stack trace of JavaScript execution at the point where it is called.
The stack trace details the functions on the stack, as well as the values that were passed as arguments to each function. You can click each function to take you to its source in the Script tab, and click each argument value to inspect it in the DOM or HTML tabs.
This function will tell you about the route information from start point to end point. If you are not clear what I mean, let’s take a look at the sample code and the result.
<!DOCTYPE html PUBLIC "-//W3C//DTD XHTML 1.0 Transitional//EN" "http://www.w3.org/TR/xhtml1/DTD/xhtml1-transitional.dtd">
<html xmlns="http://www.w3.org/1999/xhtml" >
<head>
<title>Firebug</title>
<script language="javascript" type="text/javascript">
function startTrace(str){
return method1(100,200);
}
function method1(arg1,arg2){
return method2(arg1 + arg2 + 100);
}
function method2(arg1){
var var1 = arg1 / 100;
return method3(var1);
}
function method3(arg1){
console.trace();
var total = arg1 * 100;
return total;
}

</script>
</head>
<body>
<input type="button" value="Trace" onclick="startTrace(''Result'');"/>
</body>
</html>
Suppose: we wanna know how “method3′ function is invoked. So, we put this code “console.trace()” in that method. then, we run the program and we got the result as picture above. If we read the result from bottom to top, we will see “onclick(click clientX=34, clientY=26)”. That means the execution of Javascript started at on click event of button. then, we got “startTrace(“Result”)” in second line. That means startTrace function is invoked after firing onclick event and the parameter is “Result”. If we keep on checking from bottom to top, we will figure out the completed route from onclick event to method3.
If you wanna test more, you can move this code “console.trace()” to method2(). then, firebug will give the new route from onclick event which is a started point to method2() which is the end point.
I think that it’s pretty useful if you are debugging the other developer’s source code and you have no idea why this function is invoked.
Let me know if you are not clear what I’m trying to explain about console.trace();.
#6. Timing ( Measuring the time of your code)
You can use console.time(timeName) function to measure how long a particular code or function take. This feature is very helpful if you are trying to improve the performance of your Javascript code.
Example :
<!DOCTYPE html PUBLIC "-//W3C//DTD XHTML 1.0 Transitional//EN" "http://www.w3.org/TR/xhtml1/DTD/xhtml1-transitional.dtd">
<html xmlns="http://www.w3.org/1999/xhtml" >
<head>
<title>Firebug</title>
<script language="javascript" type="text/javascript">
function measuretheTime(){
var timeName = ''measuringTime'';
console.time(timeName);
for(var i=0;i<1000;i++){
///do something
for(var j=0;j<100;j++){
//do another thing.
}
}
console.timeEnd(timeName);
}
</script>
</head>
<body>
<input type="button" value="Trace" onclick="measuretheTime();"/>
</body>
</html>Result : measuringTime: 16ms
#7. Javascript Profiler
You can start the profiler thought code (console.profile(‘profileName’)) or by clicking “Profile” button from “Console” tag. It can be used for improving the performance of Javascript. It is similiar to the console.time() function but profiler can give your more advanced and detailed information.
I will tell you about this more details in next tutorial (Part2) . I hope you all are clear about this tutorial. If you have any comment or suggestion, please drop a comment.. Thanks. C ya tomorrow.
Reference ~
- Console API
posted in Firebug, Firefox by Michael Sync
![11:12:21.924 [main] DEBUG org.apache.ibatis.logging.LogFactory - Logging initialized using ''c...](http://www.gvkun.com/zb_users/upload/2025/02/7f42556d-cb7d-4433-a25a-2bfd5598c0341739580697546.jpg "11:12:21.924 [main] DEBUG org.apache.ibatis.logging.LogFactory - Logging initialized using ''c...")
11:12:21.924 [main] DEBUG org.apache.ibatis.logging.LogFactory - Logging initialized using ''c...
11:12:21.924 [main] DEBUG org.apache.ibatis.logging.LogFactory - Logging initialized using ''class org.apache.ibatis.logging.slf4j.Slf4jImpl'' adapter.

org.apache.ibatis.exceptions.PersistenceException:
### Error opening session.  Cause: java.lang.NullPointerException
### Cause: java.lang.NullPointerException

	at org.apache.ibatis.exceptions.ExceptionFactory.wrapException(ExceptionFactory.java:30)
	at org.apache.ibatis.session.defaults.DefaultSqlSessionFactory.openSessionFromDataSource(DefaultSqlSessionFactory.java:100)
	at org.apache.ibatis.session.defaults.DefaultSqlSessionFactory.openSession(DefaultSqlSessionFactory.java:47)
	at com.website.DB.DBAcess.getSqlSession(DBAcess.java:15)
	at com.website.controller.ProductControllerTest.insert(ProductControllerTest.java:58)
	at sun.reflect.NativeMethodAccessorImpl.invoke0(Native Method)
	at sun.reflect.NativeMethodAccessorImpl.invoke(NativeMethodAccessorImpl.java:62)
	at sun.reflect.DelegatingMethodAccessorImpl.invoke(DelegatingMethodAccessorImpl.java:43)
	at java.lang.reflect.Method.invoke(Method.java:498)
	at org.junit.runners.model.FrameworkMethod$1.runReflectiveCall(FrameworkMethod.java:50)
	at org.junit.internal.runners.model.ReflectiveCallable.run(ReflectiveCallable.java:12)
	at org.junit.runners.model.FrameworkMethod.invokeExplosively(FrameworkMethod.java:47)
	at org.junit.internal.runners.statements.InvokeMethod.evaluate(InvokeMethod.java:17)
	at org.junit.runners.ParentRunner.runLeaf(ParentRunner.java:325)
	at org.junit.runners.BlockJUnit4ClassRunner.runChild(BlockJUnit4ClassRunner.java:78)
	at org.junit.runners.BlockJUnit4ClassRunner.runChild(BlockJUnit4ClassRunner.java:57)
	at org.junit.runners.ParentRunner$3.run(ParentRunner.java:290)
	at org.junit.runners.ParentRunner$1.schedule(ParentRunner.java:71)
	at org.junit.runners.ParentRunner.runChildren(ParentRunner.java:288)
	at org.junit.runners.ParentRunner.access$000(ParentRunner.java:58)
	at org.junit.runners.ParentRunner$2.evaluate(ParentRunner.java:268)
	at org.junit.runners.ParentRunner.run(ParentRunner.java:363)
	at org.junit.runner.JUnitCore.run(JUnitCore.java:137)
	at com.intellij.junit4.JUnit4IdeaTestRunner.startRunnerWithArgs(JUnit4IdeaTestRunner.java:68)
	at com.intellij.rt.execution.junit.IdeaTestRunner$Repeater.startRunnerWithArgs(IdeaTestRunner.java:47)
	at com.intellij.rt.execution.junit.JUnitStarter.prepareStreamsAndStart(JUnitStarter.java:242)
	at com.intellij.rt.execution.junit.JUnitStarter.main(JUnitStarter.java:70)
Caused by: java.lang.NullPointerException
	at org.apache.ibatis.session.defaults.DefaultSqlSessionFactory.openSessionFromDataSource(DefaultSqlSessionFactory.java:95)
	... 25 more


Process finished with exit code -1
我使用Mybatis的时候,遇到了这个报错,不明所以,后来发现是因为我没有写数据库配置的原因
<!-- 设置一个默认的连接环境信息 -->
    <environments default="mysql_developer">
        <environment id="mysql_developer">
            <!-- mybatis使用jdbc事务管理方式 -->
            <transactionManager type="JDBC"></transactionManager>
            <!-- mybatis使用连接池方式来获取连接 -->
            <dataSource type="POOLED">
                <!-- 配置与数据库交互的4个必要属性,不要直接写,单独写在一个配置文件中 -->
                <property name="driver" value="com.mysql.cj.jdbc.Driver"/>
                <property name="url" value="jdbc:mysql://127.0.0.1:3306/shuyunquan?serverTimezone=UTC"/>
                <property name="username" value="root"/>
                <property name="password" value="123"/>
            </dataSource>
        </environment>
    </environments>
就是这个,我没配置,我在application.yml里面已经配置了数据库连接了,所以这里没有配置,同时也忘了使用properties标签去引入数据库配置。所以才导致了这个错误。

48-Command line is too long. Shorten command line
Command line is too long. Shorten command line for Test or also for Application default configuration?
报错内容:
Error running ''ServiceStarter'': Command line is too long. Shorten command line for ServiceStarter or also for Application default configuration.
解决办法:
修改项目下 .idea\workspace.xml,找到标签 <component name="PropertiesComponent"> , 在标签里 <property name="dynamic.classpath" value="true" />

Angular 2 User Registration and Login Example & Tutorial - Built with Angular 2.0 Final.
http://jasonwatmore.com/post/2016/09/29/angular-2-user-registration-and-login-example-tutorial
Built with Angular 2.0 Final.
After getting a lot of interest in a previous tutorial I posted on how to build a User Registration and Login with Angular 1, and since Angular 2 Final was recently released I thought it was time to post an updated example built with Angular 2 and TypeScript.
The project is available on GitHub at https://github.com/cornflourblue/angular2-registration-login-example.
The example uses a fake backend that stores users in HTML5 local storage, to switch to using a real web service simply remove the fake backend providers in the app.module.ts file below the comment "// providers used to create fake backend".
Here it is in action: (See on Plunker at http://plnkr.co/edit/9luTng?p=preview)
Running the Angular 2 User Registration & Login Example Locally
- Install NodeJS (> v4) and NPM (> v3) from https://nodejs.org/en/download/, you can check the versions you have installed by running
node -vandnpm -vfrom the command line.
- Download the project source code from https://github.com/cornflourblue/angular2-registration-login-example
- Install all required npm packages by running
npm installfrom the command line in the project root folder (where the package.json is located).
- Start the application by running
npm startfrom the command line in the project root folder.
Angular 2 Project Structure
I used the Angular 2 quickstart project as a base for the application, it''s written in TypeScript and uses systemjs for loading modules. If you''re new to angular 2 I''d recommend checking out the quickstart as it provides details on the project tooling and configuration files which aren''t covered in this post.
The project and code structure mostly follows the recommendations in the official Angular 2 style guide, with my own tweaks here and there.
Each feature has it''s own folder (home & login), other code such as services, models, guards etc are placed in folders prefixed with an underscore to easily differentiate them and group them together at the top of the folder structure.
Here''s the project structure:
- app
- _directives
- alert.component.html
- alert.component.ts
- index.ts
- _guards
- auth.guard.ts
- index.ts
- _helpers
- fake-backend.ts
- index.ts
- _models
- user.ts
- index.ts
- _services
- alert.service.ts
- authentication.service.ts
- index.ts
- user.service.ts
- home
- home.component.html
- home.component.ts
- index.ts
- login
- index.ts
- login.component.html
- login.component.ts
- register
- index.ts
- register.component.html
- register.component.ts
- app.component.html
- app.component.ts
- app.module.ts
- app.routing.ts
- main.ts
- _directives
- app.css
- index.html
- package.json
- system.config.js
- tsconfig.json
- typings.json
Below are brief descriptions and the code for the main files of the example application, all files are available in the github project linked at the top of the post.
Angular 2 Alert Component Template
The alert component template contains the html for displaying alert messages at the top of the page.
|
1
|
<
div
*
ngIf
=
"message"
[ngClass]="{ ''alert'': message, ''alert-success'': message.type === ''success'', ''alert-danger'': message.type === ''error'' }">{{message.text}}</
div
>
|
Angular 2 Alert Component
The alert component passes alert messages to the template whenever a message is received from the alert service. It does this by subscribing to the alert service''s getMessage() method which returns an Observable.
|
1
2
3
4
5
6
7
8
9
10
11
12
13
14
15
16
17
18
19
|
import { Component, OnInit } from
''@angular/core''
;
import { AlertService } from
''../_services/index''
;
@Component({
moduleId: module.id,
selector:
''alert''
,
templateUrl:
''alert.component.html''
})
export class AlertComponent {
message: any;
constructor(private alertService: AlertService) { }
ngOnInit() {
this
.alertService.getMessage().subscribe(message => {
this
.message = message; });
}
}
|
Angular 2 Auth Guard
The auth guard is used to prevent unauthenticated users from accessing restricted routes, in this example it''s used in app.routing.ts to protect the home page route. For more information about angular 2 guards you can check out this post on the thoughtram blog.
|
1
2
3
4
5
6
7
8
9
10
11
12
13
14
15
16
17
18
19
|
import { Injectable } from
''@angular/core''
;
import { Router, CanActivate } from
''@angular/router''
;
@Injectable()
export class AuthGuard implements CanActivate {
constructor(private router: Router) { }
canActivate() {
if
(localStorage.getItem(
''currentUser''
)) {
// logged in so return true
return
true
;
}
// not logged in so redirect to login page
this
.router.navigate([
''/login''
]);
return
false
;
}
}
|
Angular 2 Fake Backend Provider
The fake backend provider enables the example to run without a backend / backendless, it uses HTML5 local storage for storing registered user data and provides fake implementations for authentication and CRUD methods, these would be handled by a real api and database in a production application.
It uses the Angular 2 MockBackend to replace the default backend used by the Http service, the MockBackend enables you to intercept http requests made within the application and provide fake responses, it''s also used for unit testing.
|
1
2
3
4
5
6
7
8
9
10
11
12
13
14
15
16
17
18
19
20
21
22
23
24
25
26
27
28
29
30
31
32
33
34
35
36
37
38
39
40
41
42
43
44
45
46
47
48
49
50
51
52
53
54
55
56
57
58
59
60
61
62
63
64
65
66
67
68
69
70
71
72
73
74
75
76
77
78
79
80
81
82
83
84
85
86
87
88
89
90
91
92
93
94
95
96
97
98
99
100
101
102
103
104
105
106
107
108
109
110
111
112
113
114
115
116
117
118
119
120
121
122
123
124
125
126
|
import { Http, BaseRequestOptions, Response, ResponseOptions, RequestMethod } from
''@angular/http''
;
import { MockBackend, MockConnection } from
''@angular/http/testing''
;
export let fakeBackendProvider = {
// use fake backend in place of Http service for backend-less development
provide: Http,
useFactory: (backend, options) => {
// array in local storage for registered users
let users: any[] = JSON.parse(localStorage.getItem(
''users''
)) || [];
// configure fake backend
backend.connections.subscribe((connection: MockConnection) => {
// wrap in timeout to simulate server api call
setTimeout(() => {
// authenticate
if
(connection.request.url.endsWith(
''/api/authenticate''
) && connection.request.method === RequestMethod.Post) {
// get parameters from post request
let params = JSON.parse(connection.request.getBody());
// find if any user matches login credentials
let filteredUsers = users.filter(user => {
return
user.username === params.username && user.password === params.password;
});
if
(filteredUsers.length) {
// if login details are valid return 200 OK with user details and fake jwt token
let user = filteredUsers[0];
connection.mockRespond(
new
Response(
new
ResponseOptions({
status: 200,
body: {
id: user.id,
username: user.username,
firstName: user.firstName,
lastName: user.lastName,
token:
''fake-jwt-token''
}
})));
}
else
{
// else return 400 bad request
connection.mockError(
new
Error(
''Username or password is incorrect''
));
}
}
// get users
if
(connection.request.url.endsWith(
''/api/users''
) && connection.request.method === RequestMethod.Get) {
// check for fake auth token in header and return users if valid, this security is implemented server side in a real application
if
(connection.request.headers.get(
''Authorization''
) ===
''Bearer fake-jwt-token''
) {
connection.mockRespond(
new
Response(
new
ResponseOptions({ status: 200, body: users })));
}
else
{
// return 401 not authorised if token is null or invalid
connection.mockRespond(
new
Response(
new
ResponseOptions({ status: 401 })));
}
}
// get user by id
if
(connection.request.url.match(/\/api\/users\/\d+$/) && connection.request.method === RequestMethod.Get) {
// check for fake auth token in header and return user if valid, this security is implemented server side in a real application
if
(connection.request.headers.get(
''Authorization''
) ===
''Bearer fake-jwt-token''
) {
// find user by id in users array
let urlParts = connection.request.url.split(
''/''
);
let id = parseInt(urlParts[urlParts.length - 1]);
let matchedUsers = users.filter(user => {
return
user.id === id; });
let user = matchedUsers.length ? matchedUsers[0] :
null
;
// respond 200 OK with user
connection.mockRespond(
new
Response(
new
ResponseOptions({ status: 200, body: user })));
}
else
{
// return 401 not authorised if token is null or invalid
connection.mockRespond(
new
Response(
new
ResponseOptions({ status: 401 })));
}
}
// create user
if
(connection.request.url.endsWith(
''/api/users''
) && connection.request.method === RequestMethod.Post) {
// get new user object from post body
let newUser = JSON.parse(connection.request.getBody());
// validation
let duplicateUser = users.filter(user => {
return
user.username === newUser.username; }).length;
if
(duplicateUser) {
return
connection.mockError(
new
Error(
''Username "''
+ newUser.username +
''" is already taken''
));
}
// save new user
newUser.id = users.length + 1;
users.push(newUser);
localStorage.setItem(
''users''
, JSON.stringify(users));
// respond 200 OK
connection.mockRespond(
new
Response(
new
ResponseOptions({ status: 200 })));
}
// delete user
if
(connection.request.url.match(/\/api\/users\/\d+$/) && connection.request.method === RequestMethod.Delete) {
// check for fake auth token in header and return user if valid, this security is implemented server side in a real application
if
(connection.request.headers.get(
''Authorization''
) ===
''Bearer fake-jwt-token''
) {
// find user by id in users array
let urlParts = connection.request.url.split(
''/''
);
let id = parseInt(urlParts[urlParts.length - 1]);
for
(let i = 0; i < users.length; i++) {
let user = users[i];
if
(user.id === id) {
// delete user
users.splice(i, 1);
localStorage.setItem(
''users''
, JSON.stringify(users));
break
;
}
}
// respond 200 OK
connection.mockRespond(
new
Response(
new
ResponseOptions({ status: 200 })));
}
else
{
// return 401 not authorised if token is null or invalid
connection.mockRespond(
new
Response(
new
ResponseOptions({ status: 401 })));
}
}
}, 500);
});
return
new
Http(backend, options);
},
deps: [MockBackend, BaseRequestOptions]
};
|
Angular 2 User Model
The user model is a small class that defines the properties of a user.
|
1
2
3
4
5
6
|
export class User {
username: string;
password: string;
firstName: string;
lastName: string;
}
|
Angular 2 Alert Service
The alert service enables any component in the application to display alert messages at the top of the page via the alert component.
It has methods for displaying success and error messages, and a getMessage() method that returns an Observable that is used by the alert component to subscribe to notifications for whenever a message should be displayed.
|
1
2
3
4
5
6
7
8
9
10
11
12
13
14
15
16
17
18
19
20
21
22
23
24
25
26
27
28
29
30
31
32
33
34
35
36
37
38
39
|
import { Injectable } from
''@angular/core''
;
import { Router, NavigationStart } from
''@angular/router''
;
import { Observable } from
''rxjs''
;
import { Subject } from
''rxjs/Subject''
;
@Injectable()
export class AlertService {
private subject =
new
Subject<any>();
private keepAfterNavigationChange =
false
;
constructor(private router: Router) {
// clear alert message on route change
router.events.subscribe(event => {
if
(event
instanceof
NavigationStart) {
if
(
this
.keepAfterNavigationChange) {
// only keep for a single location change
this
.keepAfterNavigationChange =
false
;
}
else
{
// clear alert
this
.subject.next();
}
}
});
}
success(message: string, keepAfterNavigationChange =
false
) {
this
.keepAfterNavigationChange = keepAfterNavigationChange;
this
.subject.next({ type:
''success''
, text: message });
}
error(message: string, keepAfterNavigationChange =
false
) {
this
.keepAfterNavigationChange = keepAfterNavigationChange;
this
.subject.next({ type:
''error''
, text: message });
}
getMessage(): Observable<any> {
return
this
.subject.asObservable();
}
}
|
Angular 2 Authentication Service
The authentication service is used to login and logout of the application, to login it posts the users credentials to the api and checks the response for a JWT token, if there is one it means authentication was successful so the user details including the token are added to local storage.
The logged in user details are stored in local storage so the user will stay logged in if they refresh the browser and also between browser sessions until they logout. If you don''t want the user to stay logged in between refreshes or sessions the behaviour could easily be changed by storing user details somewhere less persistent such as session storage or in a property of the authentication service.
|
1
2
3
4
5
6
7
8
9
10
11
12
13
14
15
16
17
18
19
20
21
22
23
24
25
26
|
import { Injectable } from
''@angular/core''
;
import { Http, Headers, Response } from
''@angular/http''
;
import { Observable } from
''rxjs/Observable''
;
import
''rxjs/add/operator/map''
@Injectable()
export class AuthenticationService {
constructor(private http: Http) { }
login(username, password) {
return
this
.http.post(
''/api/authenticate''
, JSON.stringify({ username: username, password: password }))
.map((response: Response) => {
// login successful if there''s a jwt token in the response
let user = response.json();
if
(user && user.token) {
// store user details and jwt token in local storage to keep user logged in between page refreshes
localStorage.setItem(''currentUser
'', JSON.stringify(user));
}
});
}
logout() {
// remove user from local storage to log user out
localStorage.removeItem(''
currentUser'');
}
}
|
Angular 2 User Service
The user service contains a standard set of CRUD methods for managing users, it contains a jwt() method that''s used to add the JWT token from local storage to the Authorization header of each http request.
|
1
2
3
4
5
6
7
8
9
10
11
12
13
14
15
16
17
18
19
20
21
22
23
24
25
26
27
28
29
30
31
32
33
34
35
36
37
38
|
import { Injectable } from
''@angular/core''
;
import { Http, Headers, RequestOptions, Response } from
''@angular/http''
;
@Injectable()
export class UserService {
constructor(private http: Http) { }
getAll() {
return
this
.http.get(
''/api/users''
,
this
.jwt()).map((response: Response) => response.json());
}
getById(id) {
return
this
.http.get(
''/api/users/''
+ id,
this
.jwt()).map((response: Response) => response.json());
}
create(user) {
return
this
.http.post(
''/api/users''
, user,
this
.jwt()).map((response: Response) => response.json());
}
update(user) {
return
this
.http.put(
''/api/users/''
+ user.id, user,
this
.jwt()).map((response: Response) => response.json());
}
delete
(id) {
return
this
.http.
delete
(
''/api/users/''
+ id,
this
.jwt()).map((response: Response) => response.json());
}
// private helper methods
private jwt() {
// create authorization header with jwt token
let currentUser = JSON.parse(localStorage.getItem(
''currentUser''
));
if
(currentUser && currentUser.token) {
let headers =
new
Headers({
''Authorization''
:
''Bearer ''
+ currentUser.token });
return
new
RequestOptions({ headers: headers });
}
}
}
|
Angular 2 Home Component Template
The home component template contains html and angular 2 template syntax for displaying a simple welcome message, a list of users and a logout link.
|
1
2
3
4
5
6
7
8
9
10
11
12
|
<
div
class
=
"col-md-6 col-md-offset-3"
>
<
h1
>Hi {{currentUser.firstName}}!</
h1
>
<
p
>You''re logged in with Angular 2!!</
p
>
<
h3
>All registered users:</
h3
>
<
ul
>
<
li
*
ngFor
=
"let user of users"
>
{{user.username}} ({{user.firstName}} {{user.lastName}})
- <
a
(click)="deleteUser(user.id)">Delete</
a
>
</
li
>
</
ul
>
<
p
><
a
[routerLink]="[''/login'']">Logout</
a
></
p
>
</
div
>
|
Angular 2 Home Component
The home component gets the current user from local storage and all users from the user service, and makes them available to the template.
|
1
2
3
4
5
6
7
8
9
10
11
12
13
14
15
16
17
18
19
20
21
22
23
24
25
26
27
28
29
30
|
import { Component, OnInit } from
''@angular/core''
;
import { User } from
''../_models/index''
;
import { UserService } from
''../_services/index''
;
@Component({
moduleId: module.id,
templateUrl:
''home.component.html''
})
export class HomeComponent implements OnInit {
currentUser: User;
users: User[] = [];
constructor(private userService: UserService) {
this
.currentUser = JSON.parse(localStorage.getItem(
''currentUser''
));
}
ngOnInit() {
this
.loadAllUsers();
}
deleteUser(id) {
this
.userService.
delete
(id).subscribe(() => {
this
.loadAllUsers() });
}
private loadAllUsers() {
this
.userService.getAll().subscribe(users => {
this
.users = users; });
}
}
|
Angular 2 Login Component Template
The login component template contains a login form with username and password fields. It displays validation messages for invalid fields when the submit button is clicked. On submit the login() method is called as long as the form is valid.
|
1
2
3
4
5
6
7
8
9
10
11
12
13
14
15
16
17
18
19
20
|
<
div
class
=
"col-md-6 col-md-offset-3"
>
<
h2
>Login</
h2
>
<
form
name
=
"form"
(ngSubmit)="f.form.valid && login()" #
f
=
"ngForm"
novalidate>
<
div
class
=
"form-group"
[ngClass]="{ ''has-error'': f.submitted && !username.valid }">
<
label
for
=
"username"
>Username</
label
>
<
input
type
=
"text"
class
=
"form-control"
name
=
"username"
[(ngModel)]="model.username" #
username
=
"ngModel"
required />
<
div
*
ngIf
=
"f.submitted && !username.valid"
class
=
"help-block"
>Username is required</
div
>
</
div
>
<
div
class
=
"form-group"
[ngClass]="{ ''has-error'': f.submitted && !password.valid }">
<
label
for
=
"password"
>Password</
label
>
<
input
type
=
"password"
class
=
"form-control"
name
=
"password"
[(ngModel)]="model.password" #
password
=
"ngModel"
required />
<
div
*
ngIf
=
"f.submitted && !password.valid"
class
=
"help-block"
>Password is required</
div
>
</
div
>
<
div
class
=
"form-group"
>
<
button
[disabled]="loading"
class
=
"btn btn-primary"
>Login</
button
>
<
img
*
ngIf
=
"loading"
src
=
"data:image/gif;base64,R0lGODlhEAAQAPIAAP///wAAAMLCwkJCQgAAAGJiYoKCgpKSkiH/C05FVFNDQVBFMi4wAwEAAAAh/hpDcmVhdGVkIHdpdGggYWpheGxvYWQuaW5mbwAh+QQJCgAAACwAAAAAEAAQAAADMwi63P4wyklrE2MIOggZnAdOmGYJRbExwroUmcG2LmDEwnHQLVsYOd2mBzkYDAdKa+dIAAAh+QQJCgAAACwAAAAAEAAQAAADNAi63P5OjCEgG4QMu7DmikRxQlFUYDEZIGBMRVsaqHwctXXf7WEYB4Ag1xjihkMZsiUkKhIAIfkECQoAAAAsAAAAABAAEAAAAzYIujIjK8pByJDMlFYvBoVjHA70GU7xSUJhmKtwHPAKzLO9HMaoKwJZ7Rf8AYPDDzKpZBqfvwQAIfkECQoAAAAsAAAAABAAEAAAAzMIumIlK8oyhpHsnFZfhYumCYUhDAQxRIdhHBGqRoKw0R8DYlJd8z0fMDgsGo/IpHI5TAAAIfkECQoAAAAsAAAAABAAEAAAAzIIunInK0rnZBTwGPNMgQwmdsNgXGJUlIWEuR5oWUIpz8pAEAMe6TwfwyYsGo/IpFKSAAAh+QQJCgAAACwAAAAAEAAQAAADMwi6IMKQORfjdOe82p4wGccc4CEuQradylesojEMBgsUc2G7sDX3lQGBMLAJibufbSlKAAAh+QQJCgAAACwAAAAAEAAQAAADMgi63P7wCRHZnFVdmgHu2nFwlWCI3WGc3TSWhUFGxTAUkGCbtgENBMJAEJsxgMLWzpEAACH5BAkKAAAALAAAAAAQABAAAAMyCLrc/jDKSatlQtScKdceCAjDII7HcQ4EMTCpyrCuUBjCYRgHVtqlAiB1YhiCnlsRkAAAOwAAAAAAAAAAAA=="
/>
<
a
[routerLink]="[''/register'']"
class
=
"btn btn-link"
>Register</
a
>
</
div
>
</
form
>
</
div
>
|
Angular 2 Login Component
The login component uses the authentication service to login and logout of the application. It automatically logs the user out when it initializes (ngOnInit) so the login page can also be used to logout.
|
1
2
3
4
5
6
7
8
9
10
11
12
13
14
15
16
17
18
19
20
21
22
23
24
25
26
27
28
29
30
31
32
33
34
35
36
37
|
import { Component, OnInit } from
''@angular/core''
;
import { Router } from
''@angular/router''
;
import { AlertService, AuthenticationService } from
''../_services/index''
;
@Component({
moduleId: module.id,
templateUrl:
''login.component.html''
})
export class LoginComponent implements OnInit {
model: any = {};
loading =
false
;
constructor(
private router: Router,
private authenticationService: AuthenticationService,
private alertService: AlertService) { }
ngOnInit() {
// reset login status
this
.authenticationService.logout();
}
login() {
this
.loading =
true
;
this
.authenticationService.login(
this
.model.username,
this
.model.password)
.subscribe(
data => {
this
.router.navigate([
''/''
]);
},
error => {
this
.alertService.error(error);
this
.loading =
false
;
});
}
}
|
Angular 2 Register Component Template
The register component template contains a simplae registration form with fields for first name, last name, username and password. It displays validation messages for invalid fields when the submit button is clicked. On submit the register() method is called if the form is valid.
|
1
2
3
4
5
6
7
8
9
10
11
12
13
14
15
16
17
18
19
20
21
22
23
24
25
26
27
28
29
30
|
<
div
class
=
"col-md-6 col-md-offset-3"
>
<
h2
>Register</
h2
>
<
form
name
=
"form"
(ngSubmit)="f.form.valid && register()" #
f
=
"ngForm"
novalidate>
<
div
class
=
"form-group"
[ngClass]="{ ''has-error'': f.submitted && !username.valid }">
<
label
for
=
"firstName"
>First Name</
label
>
<
input
type
=
"text"
class
=
"form-control"
name
=
"firstName"
[(ngModel)]="model.firstName" #
firstName
=
"ngModel"
required />
<
div
*
ngIf
=
"f.submitted && !firstName.valid"
class
=
"help-block"
>First Name is required</
div
>
</
div
>
<
div
class
=
"form-group"
[ngClass]="{ ''has-error'': f.submitted && !username.valid }">
<
label
for
=
"lastName"
>Last Name</
label
>
<
input
type
=
"text"
class
=
"form-control"
name
=
"lastName"
[(ngModel)]="model.lastName" #
lastName
=
"ngModel"
required />
<
div
*
ngIf
=
"f.submitted && !lastName.valid"
class
=
"help-block"
>Last Name is required</
div
>
</
div
>
<
div
class
=
"form-group"
[ngClass]="{ ''has-error'': f.submitted && !username.valid }">
<
label
for
=
"username"
>Username</
label
>
<
input
type
=
"text"
class
=
"form-control"
name
=
"username"
[(ngModel)]="model.username" #
username
=
"ngModel"
required />
<
div
*
ngIf
=
"f.submitted && !username.valid"
class
=
"help-block"
>Username is required</
div
>
</
div
>
<
div
class
=
"form-group"
[ngClass]="{ ''has-error'': f.submitted && !password.valid }">
<
label
for
=
"password"
>Password</
label
>
<
input
type
=
"password"
class
=
"form-control"
name
=
"password"
[(ngModel)]="model.password" #
password
=
"ngModel"
required />
<
div
*
ngIf
=
"f.submitted && !password.valid"
class
=
"help-block"
>Password is required</
div
>
</
div
>
<
div
class
=
"form-group"
>
<
button
[disabled]="loading"
class
=
"btn btn-primary"
>Register</
button
>
<
img
*
ngIf
=
"loading"
src
=
"data:image/gif;base64,R0lGODlhEAAQAPIAAP///wAAAMLCwkJCQgAAAGJiYoKCgpKSkiH/C05FVFNDQVBFMi4wAwEAAAAh/hpDcmVhdGVkIHdpdGggYWpheGxvYWQuaW5mbwAh+QQJCgAAACwAAAAAEAAQAAADMwi63P4wyklrE2MIOggZnAdOmGYJRbExwroUmcG2LmDEwnHQLVsYOd2mBzkYDAdKa+dIAAAh+QQJCgAAACwAAAAAEAAQAAADNAi63P5OjCEgG4QMu7DmikRxQlFUYDEZIGBMRVsaqHwctXXf7WEYB4Ag1xjihkMZsiUkKhIAIfkECQoAAAAsAAAAABAAEAAAAzYIujIjK8pByJDMlFYvBoVjHA70GU7xSUJhmKtwHPAKzLO9HMaoKwJZ7Rf8AYPDDzKpZBqfvwQAIfkECQoAAAAsAAAAABAAEAAAAzMIumIlK8oyhpHsnFZfhYumCYUhDAQxRIdhHBGqRoKw0R8DYlJd8z0fMDgsGo/IpHI5TAAAIfkECQoAAAAsAAAAABAAEAAAAzIIunInK0rnZBTwGPNMgQwmdsNgXGJUlIWEuR5oWUIpz8pAEAMe6TwfwyYsGo/IpFKSAAAh+QQJCgAAACwAAAAAEAAQAAADMwi6IMKQORfjdOe82p4wGccc4CEuQradylesojEMBgsUc2G7sDX3lQGBMLAJibufbSlKAAAh+QQJCgAAACwAAAAAEAAQAAADMgi63P7wCRHZnFVdmgHu2nFwlWCI3WGc3TSWhUFGxTAUkGCbtgENBMJAEJsxgMLWzpEAACH5BAkKAAAALAAAAAAQABAAAAMyCLrc/jDKSatlQtScKdceCAjDII7HcQ4EMTCpyrCuUBjCYRgHVtqlAiB1YhiCnlsRkAAAOwAAAAAAAAAAAA=="
/>
<
a
[routerLink]="[''/login'']"
class
=
"btn btn-link"
>Cancel</
a
>
</
div
>
</
form
>
</
div
>
|
Angular 2 Register Component
The register component has a single register() method that creates a new user with the user service when the register form is submitted.
|
1
2
3
4
5
6
7
8
9
10
11
12
13
14
15
16
17
18
19
20
21
22
23
24
25
26
27
28
29
30
31
32
33
34
|
import { Component } from
''@angular/core''
;
import { Router } from
''@angular/router''
;
import { AlertService, UserService } from
''../_services/index''
;
@Component({
moduleId: module.id,
templateUrl:
''register.component.html''
})
export class RegisterComponent {
model: any = {};
loading =
false
;
constructor(
private router: Router,
private userService: UserService,
private alertService: AlertService) { }
register() {
this
.loading =
true
;
this
.userService.create(
this
.model)
.subscribe(
data => {
// set success message and pass true paramater to persist the message after redirecting to the login page
this
.alertService.success(
''Registration successful''
,
true
);
this
.router.navigate([
''/login''
]);
},
error => {
this
.alertService.error(error);
this
.loading =
false
;
});
}
}
|
Angular 2 App Component Template
The app component template is the root component template of the application, it contains a router-outlet directive for displaying the contents of each view based on the current route, and an alert directive for displaying alert messages from anywhere in the system.
|
1
2
3
4
5
6
7
8
9
|
<!-- main app container -->
<
div
class
=
"jumbotron"
>
<
div
class
=
"container"
>
<
div
class
=
"col-sm-8 col-sm-offset-2"
>
<
alert
></
alert
>
<
router-outlet
></
router-outlet
>
</
div
>
</
div
>
</
div
>
|
Angular 2 App Component
The app component is the root component of the application, it defines the root tag of the app as <app></app> with the selector property.
The moduleId property is set to allow a relative path to be used for the templateUrl.
|
1
2
3
4
5
6
7
8
9
|
import { Component } from
''@angular/core''
;
@Component({
moduleId: module.id,
selector:
''app''
,
templateUrl:
''app.component.html''
})
export class AppComponent { }
|
Angular 2 App Module
The app module defines the root module of the application along with metadata about the module. For more info about angular 2 modules check out this page on the official docs site.
This is where the fake backend provider is added to the application, to switch to a real backend simply remove the providers located under the comment "// providers used to create fake backend".
|
1
2
3
4
5
6
7
8
9
10
11
12
13
14
15
16
17
18
19
20
21
22
23
24
25
26
27
28
29
30
31
32
33
34
35
36
37
38
39
40
41
42
43
44
45
46
47
48
49
|
import { NgModule } from
''@angular/core''
;
import { BrowserModule } from
''@angular/platform-browser''
;
import { FormsModule } from
''@angular/forms''
;
import { HttpModule } from
''@angular/http''
;
// used to create fake backend
import { fakeBackendProvider } from
''./_helpers/index''
;
import { MockBackend, MockConnection } from
''@angular/http/testing''
;
import { BaseRequestOptions } from
''@angular/http''
;
import { AppComponent } from
''./app.component''
;
import { routing } from
''./app.routing''
;
import { AlertComponent } from
''./_directives/index''
;
import { AuthGuard } from
''./_guards/index''
;
import { AlertService, AuthenticationService, UserService } from
''./_services/index''
;
import { HomeComponent } from
''./home/index''
;
import { LoginComponent } from
''./login/index''
;
import { RegisterComponent } from
''./register/index''
;
@NgModule({
imports: [
BrowserModule,
FormsModule,
HttpModule,
routing
],
declarations: [
AppComponent,
AlertComponent,
HomeComponent,
LoginComponent,
RegisterComponent
],
providers: [
AuthGuard,
AlertService,
AuthenticationService,
UserService,
// providers used to create fake backend
fakeBackendProvider,
MockBackend,
BaseRequestOptions
],
bootstrap: [AppComponent]
})
export class AppModule { }
|
Angular 2 App Routing
The app routing file defines the routes of the application, each route contains a path and associated component. The home route is secured by passing the AuthGuard to the canActivate property of the route.
|
1
2
3
4
5
6
7
8
9
10
11
12
13
14
15
16
17
|
import { Routes, RouterModule } from
''@angular/router''
;
import { HomeComponent } from
''./home/index''
;
import { LoginComponent } from
''./login/index''
;
import { RegisterComponent } from
''./register/index''
;
import { AuthGuard } from
''./_guards/index''
;
const appRoutes: Routes = [
{ path:
''''
, component: HomeComponent, canActivate: [AuthGuard] },
{ path:
''login''
, component: LoginComponent },
{ path:
''register''
, component: RegisterComponent },
// otherwise redirect to home
{ path:
''**''
, redirectTo:
''''
}
];
export const routing = RouterModule.forRoot(appRoutes);
|
Angular 2 Main (Bootstrap) File
The main file is the entry point used by angular to launch and bootstrap the application.
|
1
2
3
4
5
|
import { platformBrowserDynamic } from
''@angular/platform-browser-dynamic''
;
import { AppModule } from
''./app.module''
;
platformBrowserDynamic().bootstrapModule(AppModule);
|
Angular 2 Development Consultant Sydney
Feel free to drop me a line if you''re looking for an Angular 2 development consultant in Sydney Australia, I also provide remote contracting services for clients outside Sydney.
By Jason Watmore
Tags: Angular 2, Login, Registration, Authentication and Authorization

Automating code reviews and application profiling with Amazon CodeGuru
https://amazonaws-china.com/blogs/devops/automating-code-reviews-and-application-profiling-with-amazon-codeguru/
Amazon CodeGuru is a machine learning-based service released during re:Invent 2019 for automated code reviews and application performance recommendations. CodeGuru equips the development teams with the tools to maintain a high bar for coding standards in their software development process.
CodeGuru Reviewer helps developers avoid introducing issues that are difficult to detect, troubleshoot, reproduce, and root-cause. It also enables them to improve application performance. This not only improves the reliability of the software, but also cuts down the time spent chasing difficult issues like race conditions, slow resource leaks, thread safety issues, use of un-sanitized inputs, inappropriate handling of sensitive data, and application performance impact, to name a few.
CodeGuru is powered by machine learning, best practices, and hard-learned lessons across millions of code reviews and thousands of applications profiled on open source projects and internally at Amazon.
The service leverages machine-learning abilities to provide following two functionalities:
a) Reviewer: provides automated code reviews for static code analysis
b) Profiler: provides visibility into and recommendations about application performance during runtime
This blog post provides a short workshop to get a feel for both the above functionalities.
Solution overview
The following diagram illustrates a typical developer workflow in which the CodeGuru service is used in the code-review stage and the application performance-monitoring stage. The code reviewer is used for static code analysis backed with trained machine-learning models, and the profiler is used to monitor application performance when the code artifact is deployed and executed on the target compute.
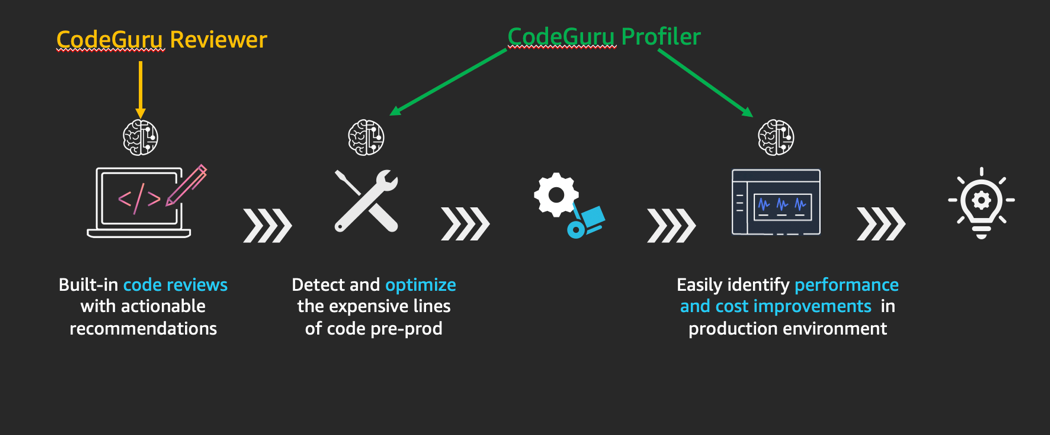
The following diagram depicts additional details to show the big picture in the overall schema of the CodeGuru workflow:
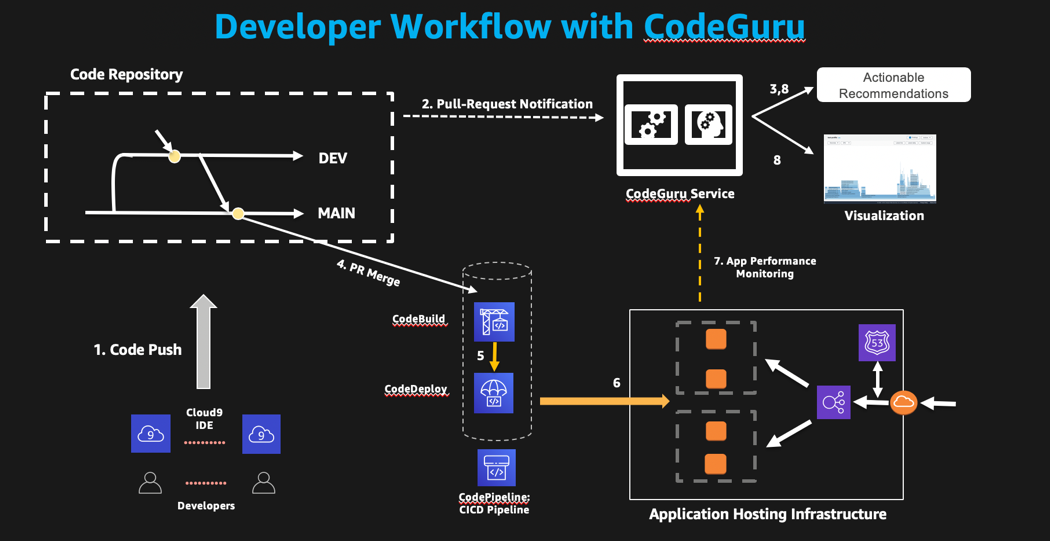
This blog workshop automates the deployment of a sample application from a GitHub link via an AWS CloudFormation template, including the dependencies needed. It also demonstrates the Reviewer functionality.
Pre-requisites
Follow these steps to get set up:
1. Set up your AWS Cloud9 environment and access the bash terminal, preferably in the us-east-1 region.
2. Ensure you have an individual GitHub account.
3. Configure an Amazon EC2 key-pair (preferably in the us-east-1 region) and make the .pem file available from the terminal being used.
CodeGuru Reviewer
This section demonstrates how to configure CodeGuru Reviewer functionality and associate it with the GitHub repository. Execute the following configuration steps:
Step 1: Fork the GitHub repository
First, log in to your GitHub account and navigate to this sample code. Choose Fork and wait for it to create a fork in your account, as shown in the following screenshot.
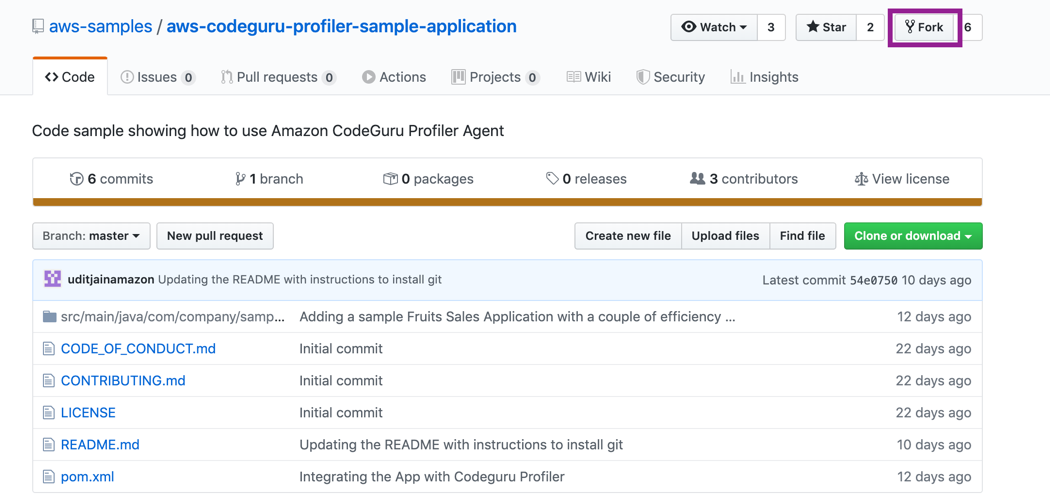
Step 2: Associate the GitHub repository
Log in to the CodeGuru dashboard and follow these steps:
1. Choose Reviewer from the left panel and choose Associate repository.
2. Choose GitHub and then choose Connect to GitHub.
3. Once authenticated and connection made, you can select the repository aws-codeguru-profiler-sample-application from the Repository location drop-down list and choose Associate, as shown in the following screenshot.
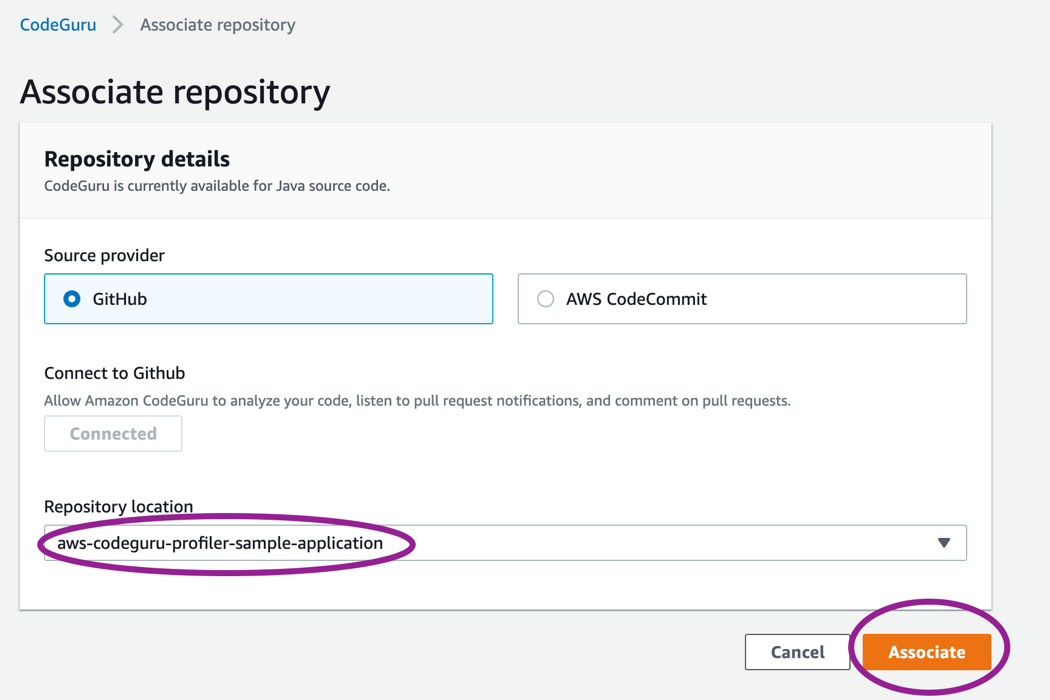
This associates the CodeGuru Reviewer with the specified repository and continues to listen for any pull-request events.
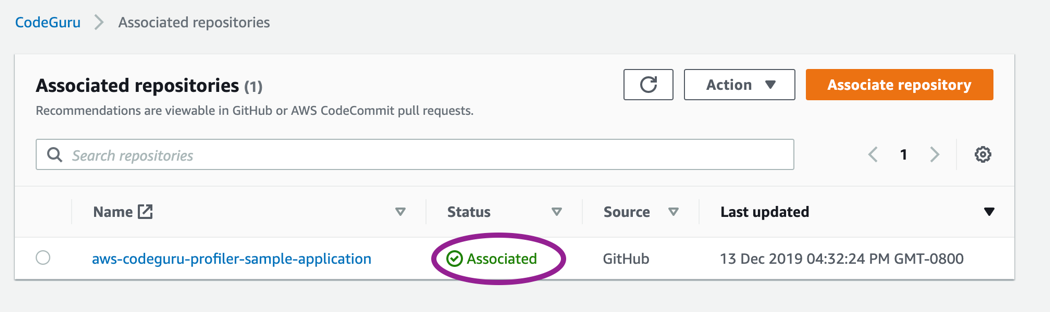
Step 3: Prepare your code
From your AWS Cloud9 terminal, clone the repository, create a new branch, using the following example commands:
git clone https://github.com/<your-userid>/aws-codeguru-profiler-sample-application.git
cd aws-codeguru-profiler-sample-application
git branch dev
git checkout dev
cd src/main/java/com/company/sample/application/
Open the file: CreateOrderThread.java and goto the line 63. Below line 63 which adds an order entry, insert the if statement under the comment to introduce an order entry check. Please indent the lines with spaces so they are well aligned as shown below.
SalesSystem.orders.put(orderDate, order);
//Check if the Order entered and present
if (SalesSystem.orders.containsKey(orderDate)) {
        System.out.println("New order verified to be present in hashmap: " + SalesSystem.orders.get(orderDate));
}
id++;
Once the above changes are introduced in the file, save and commit it to git and push it to the Repository.
git add .
git commit -s -m "Introducing new code that is potentially thread unsafe and inefficient"
cd ../../../../../../../
ls src/main/java/com/company/sample/application/
Now, upload the new branch to the GitHub repository using the following commands. Enter your credentials when asked to authenticate against your GitHub account:
git status
git push --set-upstream origin dev
ls
Step 4: Create a Pull request on GitHub:
In your GitHub account, you should see a new branch: dev.
1. Go to your GitHub account and choose the Pull requests tab.
2. Select New pull request.
3. Under Comparing Changes, select <userid>/aws-codeguru-profiler-sample-application as the source branch.
4. Select the options from the two drop-down lists that selects a merge proposal from the dev branch to the master branch, as shown in the following screenshot.
5. Review the code diffs shown. It should say that the diffs are mergeable (able to merge). Choose Create Pull request to complete the process.
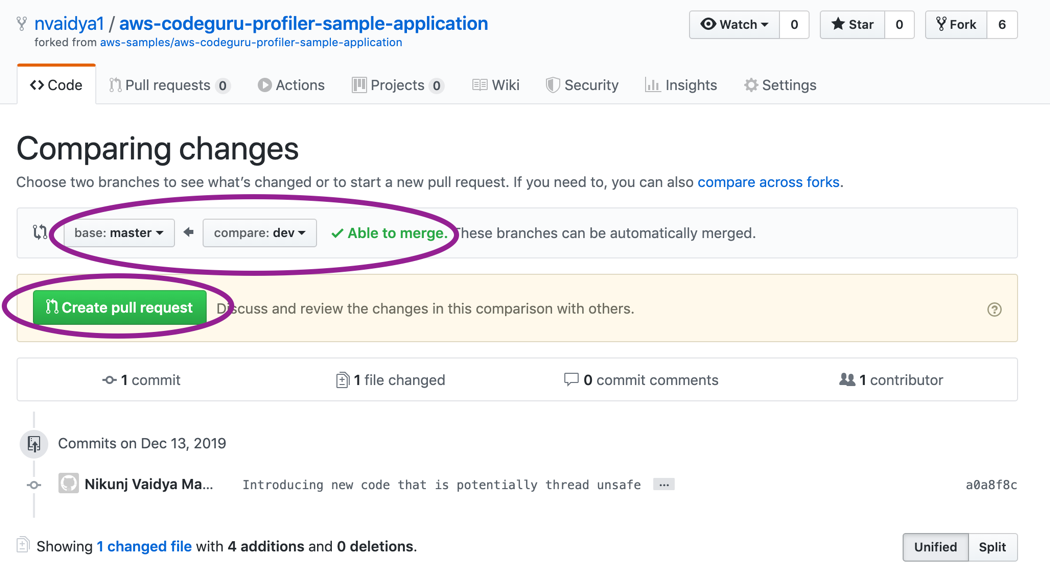
This sends a Pull request notification to the CodeGuru service and is reflected on the CodeGuru dashboard, as shown in the following screenshot.
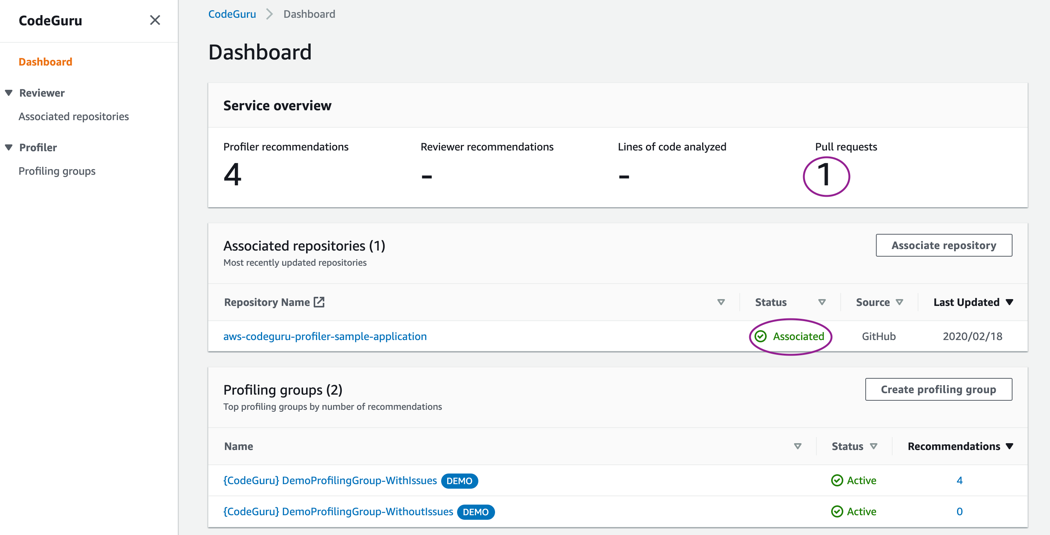
After a short time, a set of recommendations appears on the same GitHub page on which the Pull request was created.
The demo profiler configuration and recommendations shown on the dashboard are provided by default as a sample application profile. See the profiler section of this post for further discussion.
The following screenshot shows a recommendation generated about potential thread concurrency susceptibility:
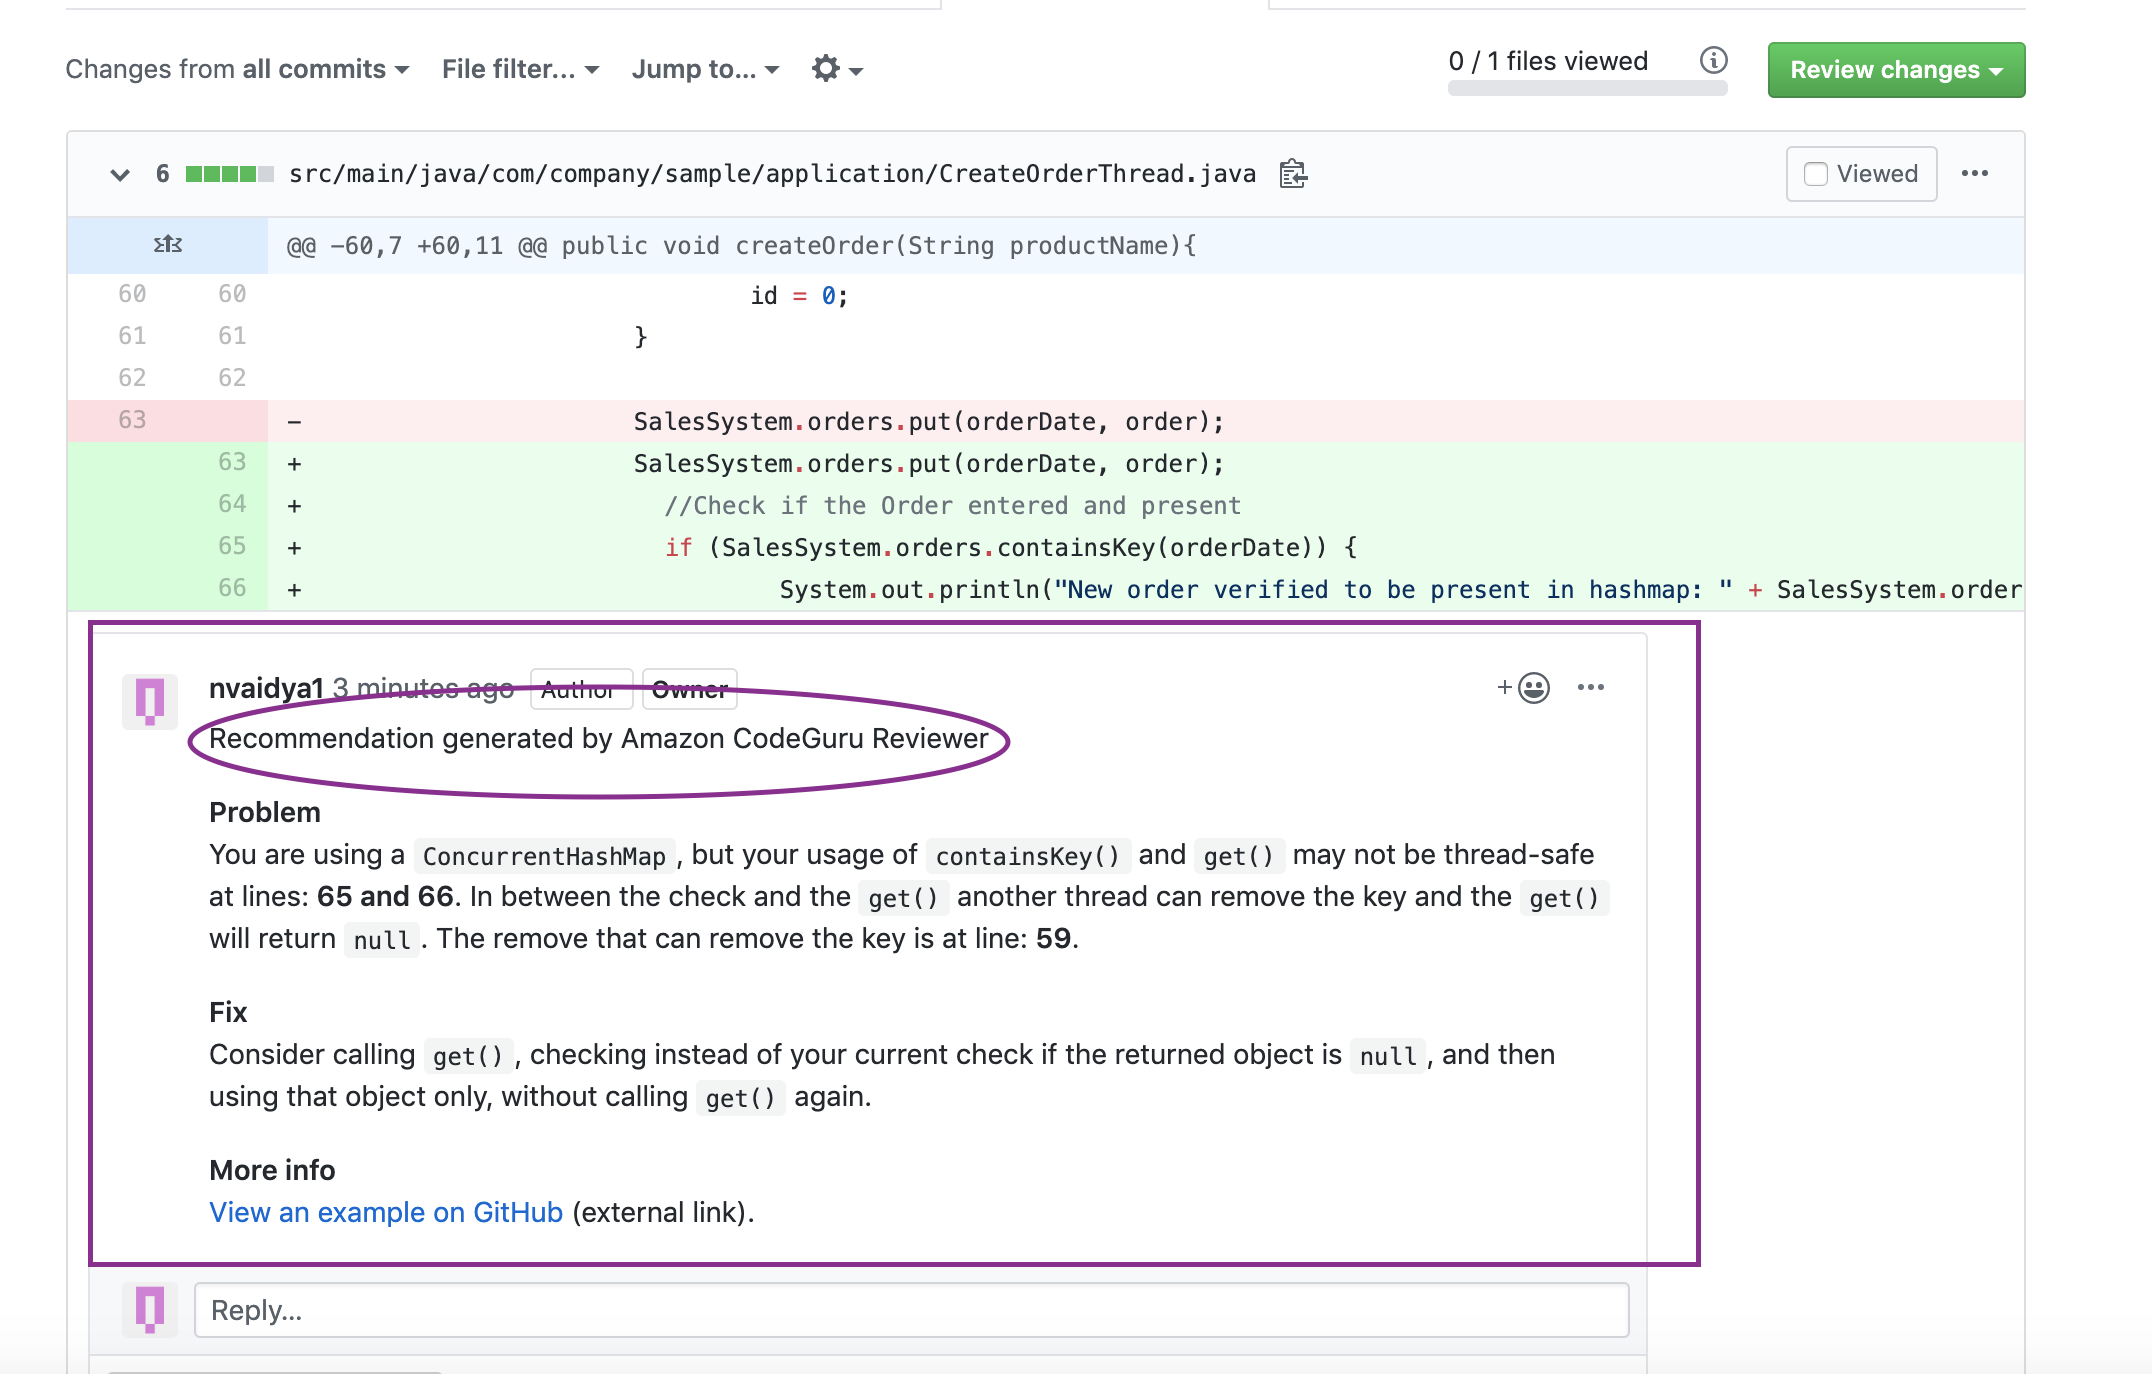
Another example below to show how the developer can provide feedback about recommendations using emojis:
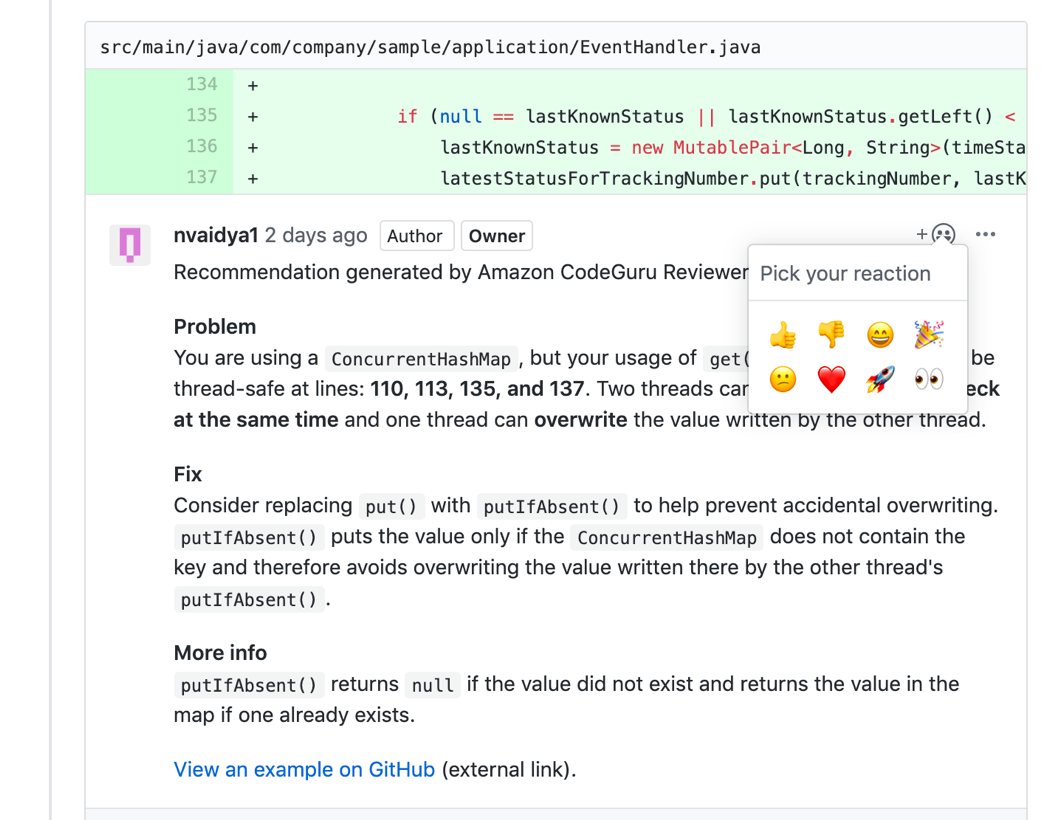
As you can see from the recommendations, not only are the code issues detected, but a detailed recommendation is also provided on how to fix the issues, along with a link to examples, and documentation, wherever applicable. For each of the recommendations, a developer can give feedback about whether the recommendation was useful or not with a simple emoji selection under Pick your reaction.
Please note that the CodeGuru service is used to identify difficult-to-find functional defects and not syntactical errors. Syntax errors should be flagged by the IDE and addressed at an early stage of development. CodeGuru is introduced at a later stage in a developer workflow, when the code is already developed, unit-tested, and ready for code-review.
CodeGuru Profiler
CodeGuru Profiler functionality focuses on searching for application performance optimizations, identifying your most “expensive” lines of code that take unnecessarily long times or higher-than-expected CPU cycles, for which there is a better/faster/cheaper alternative. It generates recommendations with actions you can take in order to reduce your CPU use, lower your compute costs, and overall improve your application’s performance. The profiler simplifies the troubleshooting and exploration of the application’s runtime behavior using visualizations. Examples of such issues include excessive recreation of expensive objects, expensive deserialization, usage of inefficient libraries, and excessive logging.
This post provides two sample application Demo profiles by default in the profiler section to demonstrate the visualization of CPU and latency characteristics of those profiles. This offers a quick and easy way to check the profiler output without onboarding an application. Additionally, there are recommendations shown for the {CodeGuru} DemoProfilingGroup-WithIssues application profile. However, if you would like to run a proof-of-concept with real application, please follow the procedure below.
The following steps launch a sample application on Amazon EC2 and configure Profiler to monitor the application performance from the CodeGuru service.
Step 1: Create a profiling group
Follow these steps to create a profiling group:
1. From the CodeGuru dashboard, choose Profiler from the left panel.
2. Under Profiling groups, select Create profiling group and type the name of your group. This workshop uses the name DemoProfilingGroup.
3. After typing the name, choose Create in the bottom right corner.
The output page shows you instructions on how to onboard the CodeGuru Profiler Agent library into your application, along with the necessary permissions required to successfully submit data to CodeGuru. This workshop uses the AWS CloudFormation template to automate the onboarding configuration and launch Amazon EC2 with the application and its dependencies.
Step 2: Run AWS Cloudformation to launch Amazon EC2 with the Java application:
This example runs an AWS CloudFormation template that does all the undifferentiated heavy lifting of launching an Amazon EC2 machine and installing JDK, Maven, and the sample demo application.
Once done, it configures the application to use a profiling group named DemoProfilingGroup, compiles the application, and executes it as a background process. This results in the sample demo application running in the region you choose, and submits profiling data to the CodeGuru Profiler Service under the DemoProfilingGroup profiling group created in the previous step.
To launch the AWS CloudFormation template that deploys the demo application, choose the following Launch Stack button, and fill in the Stack name, Key-pair name, and Profiling Group name.

Once the AWS CloudFormation deployment succeeds, log in to your terminal of choice and use ssh to connect to the Amazon EC2 machine. Check the running application using the following commands:
ssh -i ''<path-to-keypair.pem-file>'' ec2-user@<ec2-ip-address>
java -version
mvn -v
ps -ef | grep SalesSystem  => This is the java application running in the background
tail /var/log/cloud-init-output.log  => You should see output as INFO: Successfully reported profile
Once the CodeGuru agent is imported into the application, a separate profiler thread spawns when the application runs. It samples the application CPU and Latency characteristics and delivers them to the backend Profiler service for building the application profile.
Step 3: Check the Profiler flame-graphs:
Wait for 10-15 minutes for your profiling-group to become active (if not already) and for profiling data to be submitted and aggregated by the CodeGuru Profiler service.
Visit the Profiling Groups page and choose DemoProfilingGroup. You should see the following page showing your application’s profiling data in a visualization called a flame-graph, as shown in the screenshot below. Detailed explanation about flame-graphs and how to read them follow.
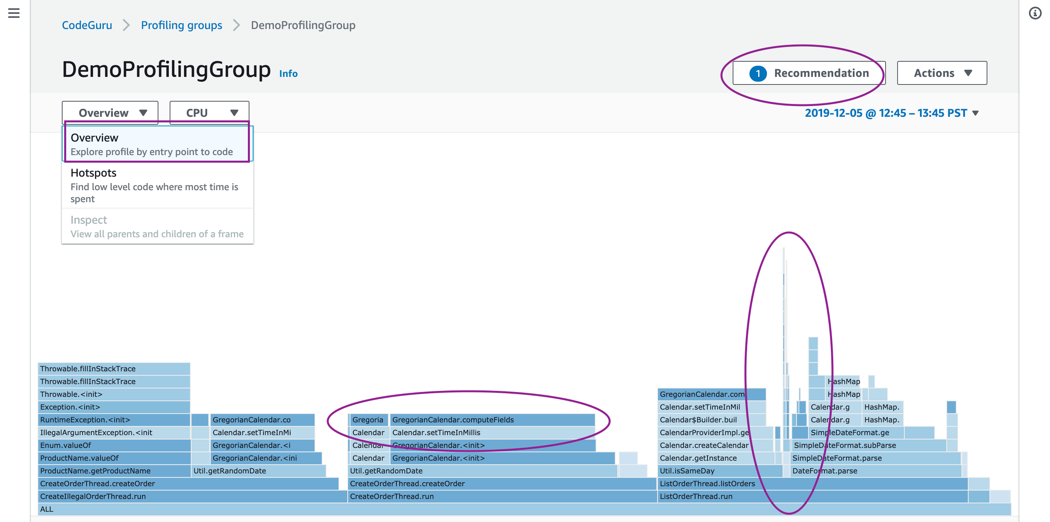
Profiler extensively uses flame-graph visualizations to display your application’s profiling data since they’re a great way to convey issues once you understand how to read them.
The x-axis shows the stack profile population (collection of stack traces) sorted alphabetically (not chronologically), and the y-axis shows stack depth, counting from zero at the bottom. Each rectangle represents a stack frame. The wider a frame is is, the more often it was present in the stacks. The top edge shows what is on CPU, and beneath it is its ancestry. The colors are usually not significant (they’re picked randomly to differentiate frames).
As shown in the preceding screenshot, the stack traces for the three threads are shown, which are triggered by the code in the SalesSystem.java file.
1) createOrderThread.run
2) createIllegalOrderThread.run
3) listOrderThread.run
The flame-graph also depicts the stack depth and points out specific function names when you hover over that block. The marked areas in the flame-graph highlight the top block functions on-CPU and spikes in stack-trace. This may indicate an opportunity to optimize.
It is evident from the preceding diagram that significant CPU time is being used by an exception stack trace (leftmost). It’s also highlighted in the recommendation report as described in Step 4 below.
The exception is caused by trying to instantiate an Enum class giving it invalid String values. If you review the file CreateIllegalOrderThread.java, you should notice the constructors being called with illegal product names, which are defined in ProductName.java.
Step 4: Profiler Recommendations:
Apart from the real-time visualization of application performance described in the preceding section, a recommendation report (generated after a period of time) may appear, pointing out suspected inefficiencies to fix to improve the application performance. Once the recommendation appears, select the Recommendation link to see the details.
Each section in the Recommendations report can be expanded in order to get instructions on how to resolve the issue, or to examine several locations in which there were issues in your data, as shown in the following screenshot.
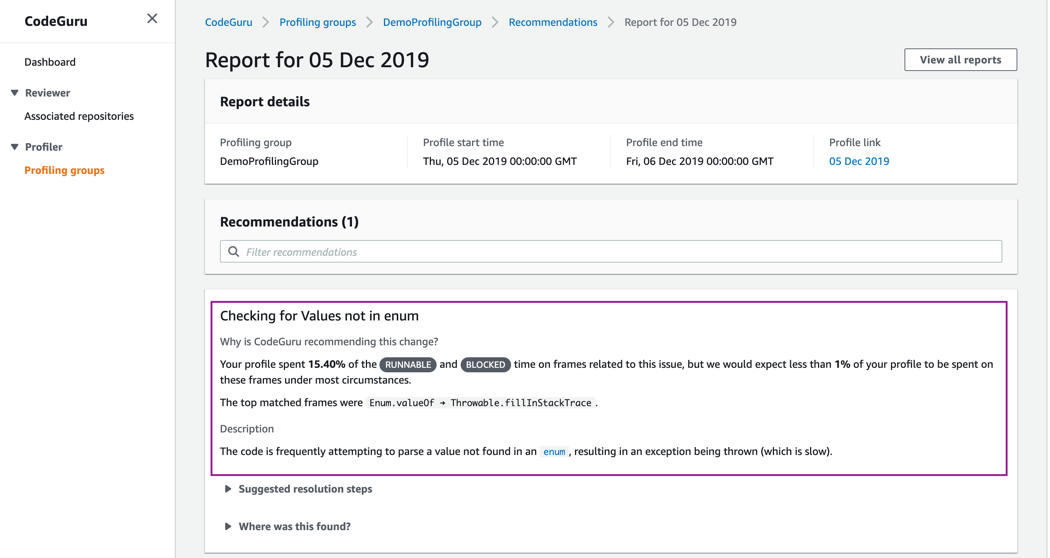
In the preceding example, the report includes an issue named Checking for Values not in enum, in which it conveys that more time (15.4%) was spent processing exceptions than expected (less than 1%). The reason for the exceptions is described in Step 3 and the resolution recommendations are provided in the report.
CodeGuru supportability:
CodeGuru currently supports native Java-based applications for the Reviewer and Profiler functionality. The Reviewer functionality currently supports AWS CodeCommit and all cloud-hosted non-enterprise versions of GitHub products, including Free/Pro/Team, as code repositories.
Amazon CodeGuru Profiler does not have any code repository dependence and works with Java applications hosted on Amazon EC2, containerized applications running on Amazon ECS and Amazon EKS, serverless applications running on AWS Fargate, and on-premises hosts with adequate AWS credentials.
Cleanup
At the end of this workshop, once the testing is completed, follow these steps to disable the service to avoid incurring any further charges.
1. Reviewer: Remove the association of the CodeGuru service to the repository, so that any further Pull-request notifications don’t trigger the CodeGuru service to perform an automated code-review.
2. Profiler: Remove the profiling group.
3. Amazon EC2 Compute: Go to the Amazon EC2 service, select the CodeGuru EC2 machine, and select the option to terminate the Amazon EC2 compute.
Conclusion
This post reviewed the CodeGuru service and implemented code examples for the Reviewer and Profiler functionalities. It described Reviewer functionality providing automated code-reviews and detailed guidance on fixes. The Profiler functionality enabled you to visualize your real-time application stack for granular inspection and generate recommendations that provided guidance on performance improvements.
I hope this post was informative and enabled you to onboard and test the service, as well as to leverage this service in your application development workflow.
About the Author

Nikunj Vaidya is a Sr. Solutions Architect with Amazon Web Services, focusing in the area of DevOps services. From his past experience in Sr. Engineering roles, he cares about improving the software quality and customer experience, and closely works with the customers to offer technical guidance on building DevOps solutions.
我们今天的关于Firebug Tutorial (Section 1)– Logging, Profiling and CommandLine (Part I)的分享就到这里,谢谢您的阅读,如果想了解更多关于11:12:21.924 [main] DEBUG org.apache.ibatis.logging.LogFactory - Logging initialized using ''c...、48-Command line is too long. Shorten command line、Angular 2 User Registration and Login Example & Tutorial - Built with Angular 2.0 Final.、Automating code reviews and application profiling with Amazon CodeGuru的相关信息,可以在本站进行搜索。
本文标签:


![[转帖]Ubuntu 安装 Wine方法(ubuntu如何安装wine)](https://www.gvkun.com/zb_users/cache/thumbs/4c83df0e2303284d68480d1b1378581d-180-120-1.jpg)

