对于UnderstandinghowuidandgidworkinDockercontainers感兴趣的读者,本文将会是一篇不错的选择,并为您提供关于AngularJsUnderstandingth
对于Understanding how uid and gid work in Docker containers感兴趣的读者,本文将会是一篇不错的选择,并为您提供关于AngularJs Understanding the Controller Component、BERT: Pre-training of Deep Bidirectional Transformers for Language Understanding、Building Windows containers with AWS CodePipeline and custom actions、Configuring and Running Django + Celery in Docker Containers的有用信息。
本文目录一览:- Understanding how uid and gid work in Docker containers
- AngularJs Understanding the Controller Component
- BERT: Pre-training of Deep Bidirectional Transformers for Language Understanding
- Building Windows containers with AWS CodePipeline and custom actions
- Configuring and Running Django + Celery in Docker Containers

Understanding how uid and gid work in Docker containers
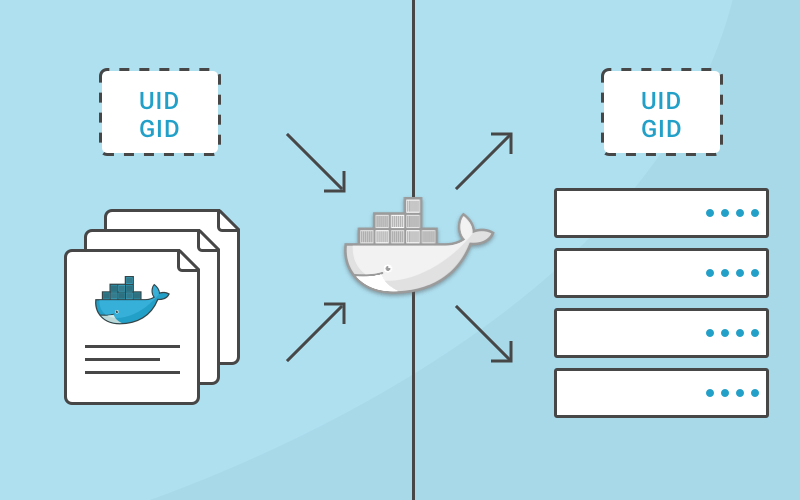
Understanding how usernames, group names, user ids (uid) and group ids (gid) map between the processes running inside a container and the host system is important to building a secure system. Without any other option provided, processes in containers will execute as root (unless a different uid was supplied in the Dockerfile). This article will explain how this works, how to properly grant privileges and show examples to illustrate.
Step by step analysis of uid/gid security
To start, let’s review how uids and gids are implemented. The linux kernel is responsible for managing the uid and gid space, and it’s kernel-level syscalls that are used to determine if requested privileges should be granted. For example, when a process attempts to write to a file, the uid and gid that created the process are examined by the kernel to determine if it has enough privileges to modify the file. The username isn’t used here, the uid is used.
When running Docker containers on a server, there’s still a single kernel. A huge part of the value that containerization brings is that all of these separate processes can continue to share a single kernel. This means that even on a server that is running Docker containers, the entire world of uids and gids is controlled by a single kernel.
So you can’t have different users with the same uid inside different containers. That’s because the username (and group names) that show up in common linux tools aren’t part of the kernel, but are managed by external tools (/etc/passwd, LDAP, Kerberos, etc). So, you might see different usernames, but you can’t have different privileges for the same uid/gid, even inside different containers. This can seem pretty confusing at first, so let’s illustrate it with a few examples:
Simple Docker Run
I’m going to start by logging in to a server as a normal user (marc) that is in the docker group. This allows me to start docker containers without using the sudo command. Then, from outside the container, let’s look at how this process appears.
marc@server:~$ docker run -d ubuntu:latest sleep infinity
92c57a8a4eda60678f049b906f99053cbe3bf68a7261f118e411dee173484d10
marc@server:~$ ps aux | grep sleep
root 15638 0.1 0.0 4380 808 ? Ss 19:49 0:00 sleep infinity
Interesting. Even though I never typed sudo and I wasn’t root, the sleep command I executed is started as the root user and has root privileges. How do I know it has root privileges? Does root inside the container == root outside the container? Yes, because, as I mentioned, there’s a single kernel and a single, shared pool of uids and gids. Because the username is showing up outside the container as “root”, I can know for certain that the process inside the container was started with a user that has uid = 0.
Dockerfile with a defined user
What happens when I create a different user inside my Dockerfile and start the command as that user? To simplify this example, I’m not specifying a gid here, but the same concept applies to group ids.
First, I’m running these commands as user “marc” which has uid of 1001.
marc@server:~$ echo $UID
1001
And the Dockerfile:
FROM ubuntu:latest
RUN useradd -r -u 1001 -g appuser appuser
USER appuser
ENTRYPOINT [“sleep”, “infinity”]
Let’s build and run this:
marc@server:~$ docker build -t test .
Sending build context to Docker daemon 14.34 kB
Step 1/4 : FROM ubuntu:latest
 — -> f49eec89601e
Step 2/4 : RUN useradd -r -u 1001 appuser
 — -> Running in 8c4c0a442ace
 — -> 6a81547f335e
Removing intermediate container 8c4c0a442ace
Step 3/4 : USER appuser
 — -> Running in acd9e30b4aba
 — -> fc1b765e227f
Removing intermediate container acd9e30b4aba
Step 4/4 : ENTRYPOINT sleep infinity
 — -> Running in a5710a32a8ed
 — -> fd1e2ab0fb75
Removing intermediate container a5710a32a8ed
Successfully built fd1e2ab0fb75
marc@server:~$ docker run -d test
8ad0cd43592e6c4314775392fb3149015adc25deb22e5e5ea07203ff53038073
marc@server:~$ ps aux | grep sleep
marc 16507 0.3 0.0 4380 668 ? Ss 20:02 0:00 sleep infinitymarc@server:~$ docker exec -it 8ad0 /bin/bash
appuser@8ad0cd43592e:/$ ps aux | grep sleep
appuser 1 0.0 0.0 4380 668 ? Ss 20:02 0:00 sleep infinityWhat exactly is happening here and what does this show? I built a Docker image that has a user named “appuser” and this user has a defined uid of 1001. On my test server, the account I’m using is named “marc”, and it also has the uid of 1001. When I start the container, the sleep command executes as appuser, because the Dockerfile contains the line “USER appuser”. But this really doesn’t make it run as appuser, it makes it run as the uid of the user that the Docker images knows as appuser.
When I examine the processes running outside of the container, I see that it’s mapped to the user “marc”, but inside the container it’s mapped to the user “appuser”. Both of these usernames are just showing the username that their execution context knows maps to 1001.
This isn’t super important. But what is important is the know that inside the container, the user “appuser” is getting the rights and privileges of the user “marc” from outside the container. Granting a privilege to user marc or uid 1001 on the linux host will also be granting those privileges to appuser inside the container.
How to control the access a container has
Another option is to run a docker container and specify the username or uid, and also the group name or gid at runtime.
Using the initial example from above again.
marc@server:~$ docker run -d --user 1001 ubuntu:latest sleep infinity
84f436065c90ac5f59a2256e8a27237cf8d7849d18e39e5370c36f9554254e2b
marc@server$ ps aux | grep sleep
marc     17058 0.1 0.0 4380 664 ? Ss 21:23 0:00 sleep infinity
What did I do here? I created the container to start as the 1001 user. So the process maps to the “marc” user when I execute commands such as ps or top (or most monitoring tools).
Interestingly, when I exec into that container, you can see that the 1001 user doesn’t have an entry in the /etc/passwd file, and shows up as “I have no name!” in the bash prompt of the container.
marc@server:~$ docker exec -it 84f43 /bin/bash
I have no name!@84f436065c90:/$
It’s important to note that specifying a user flag when creating a container also overrides that value from the Dockerfile. Remember the second example where I used a Dockerfile that had a uid that mapped to a different username on the local host? What happens when we run that with a user flag on the command line to start a container that executes the “sleep infinity” process?
marc@server:$ docker run -d test
489a236261a0620e287e434ed1b15503c844648544694e538264e69d534d0d65
marc@server:~$ ps aux | grep sleep
marc     17689 0.2 0.0 4380 680 ? Ss 21:28 0:00 sleep infinity
marc@server:~$ docker run --user 0 -d test
ac27849fcbce066bad37190b5bf6a46cf526f56d889af61e7a02c3726438fa7a
marc@server:~$ ps aux | grep sleep
marc 17689 0.0 0.0 4380 680 ? Ss 21:28 0:00 sleep infinity
root 17783 0.3 0.0 4380 668 ? Ss 21:28 0:00 sleep infinityIn the final example above, you can see that I ended up with 2 containers running the sleep process, one as “marc” and one as “root”. This is because the second command changed the uid by passing the --user flag on the command line.
What this means
Now that we’ve explored this, it makes sense that the ways to run containers with limited privileges both leverage the user system from the host:
- If there’s a known uid that the process inside the container is executing as, it could be as simple as restricting access to the host system so that the uid from the container has limited access.
- The better solution is to start containers with a known uid using the
--user(you can use a username also, but remember that it’s just a friendlier way of providing a uid from the host’s username system), and then limiting access to the uid on the host that you’ve decided the container will run as. - Because of how uids and usernames (and gids and group names) map from a container to the host, specifying the user that a containerized process runs as can make the process appear to be owned by different users inside vs outside the container.
Note on these tests
I ran these tests on an Ubuntu 16.04 server. While it’s possible to execute the same commands and tests on Docker for OSX, you’ll see different results because Docker for OSX is actually executing docker-engine on a Alpine Linux based virtual machine, and the commands you execute are executing on OSX.

AngularJs Understanding the Controller Component
在angular中,controller是一个javascript 函数(type/class),被用作扩展除了root scope在外的angular scope(https://www.jb51.net/article/91749.htm)的实例。当我们或者angular通过scope.$new API(http://docs.angularjs.org/api/ng.$rootScope.Scope#$new)创建新的child scope时,有一个选项作为方法的参数传入controller(这里没看明白,只知道controller的第一个参数是一个新创建的scope,有绑定parent scope)。这将告诉angular需要联合controller和新的scope,并且扩展它的行为。
controller可以用作:
1.设置scope对象的初始状态。
2.增加行为到scope中。
一、 Setting up the initial state of a scope object(设置scope对象的初始状态)
通常,当我们创建应用的时候,我们需要为angular scope设置初始化状态。
angular将一个新的scope对象应用到controller构造函数(估计是作为参数传进去的意思),建立了初始的scope状态。这意味着angular从不创建controller类型实例(即不对controller的构造函数使用new操作符)。构造函数一直都应用于存在的scope对象。
我们通过创建model属性,建立了scope的初始状态。例如:
function GreetingCtrl ($scope) {$scope.greeting = “Hola!”;}
“GreetingCtrl”这个controller创建了一个叫“greeting”的,可以被应用到模版中的model。
二、 Adding Behavior to a Scope Object(在scope object中增加行为)
在angular scope对象上的行为,是以scope方法属性的形式,供模版、视图使用。这行为(behavior)可以修改应用的model。
正如指引的model章节(https://www.jb51.net/article/91777.htm)讨论的那样,任意对象(或者原始的类型)赋值到scope中,成为了model属性。任何附加到scope中的function,对于模版视图来说都是可用的,可以通过angular expression调用,也可以通过ng event handler directive调用(如ngClick)。
三、 Using Controllers Correctly
一般而言,controller不应该尝试做太多的事情。它应该仅仅包含单个视图所需要的业务逻辑(还有点没转过弯了,一直认为Controller就是个做转发的……)。
保持Controller的简单性,常见办法是抽出那些不属于controller的工作到service中,在controller通过依赖注入来使用这些service。这些东西会在向导的Dependency Injection Services章节中讨论。
不要在Controller中做以下的事情:
- 任何类型的DOM操作 - controller应该仅仅包含业务逻辑。DOM操作,即应用的表现逻辑,它的测试难度是众所周知的。将任何表现逻辑放到controller中,大大地影响了应用逻辑的可测试性。angular为了自动操作(更新)DOM,提供的数据绑定(http://docs.angularjs.org/guide/dev_guide.templates.databinding)。如果我们希望执行我们自定义的DOM操作,可以把表现逻辑抽取到directive(https://www.jb51.net/article/91739.htm)中。
- Input formatting(输入格式化) - 使用angular form controls (https://www.jb51.net/article/91744.htm)代替。
- Output filtering (输出格式化过滤) - 使用angular filters 代替。
- 执行无状态或有状态的、controller共享的代码 - 使用angular services 代替。
- 实例化或者管理其他组件的生命周期(例如创建一个服务实例)。
四、 Associating Controllers with Angular Scope Objects
我们可以显式地通过scope.$new关联controller和scope对象,或者隐式地通过ngController directive(http://docs.angularjs.org/api/ng.directive:ngController)或者$route service(http://docs.angularjs.org/api/ng.$route)。
1. Controller 构造函数和方法的 Example
为了说明controller组件是如何在angular中工作的,让我们使用以下组件创建一个小应用:
- 一个有两个按钮和一个简单消息的template。
- 一个由名为”spice”的字符串属性组成的model。
- 一个有两个设置spice属性的方法的controller。
在我们的模版里面的消息,包含一个到spice model的绑定,默认设置为”very”。根据被单击按钮,将spice model的值设置为”chili”或者” jalapeño”,消息会被数据绑定自动更新。
<!DOCTYPE html>
<html ng-app>
<head>
 <meta http-equiv="Content-Type" content="text/html; charset=utf-8"/>
 <title>spicy-controller</title>
 <meta content="IE=edge,chrome=1" http-equiv="X-UA-Compatible">
 <style type="text/css">
 .ng-cloak {
  display: none;
 }
 </style>
</head>
<body>
 <div ng-controller="SpicyCtrl">
 <button ng-click="chiliSpicy()">Chili</button>
 <button ng-click="jalapenoSpicy(''jalapeño'')">Jalapeño</button>
 <p>The food is {{spice}} spicy!</p>
 </div>

 <script src="../angular-1.0.1.js" type="text/javascript"></script>
 <script type="text/javascript">
 function SpicyCtrl($scope) {
  $scope.spice = "very";
  $scope.chiliSpicy = function() {
  $scope.spice = "chili";
  };
  $scope.jalapenoSpicy = function(val) {
  this.spice = val;
  };
 }
 </script>
</body>
</html>
在上面例子中需要注意的东东:
- ngController directive被用作为我们的模版(隐式)创建scope,那个scope会称为SpicyCtrl的参数。
- SpicyCtrl只是一个普通的javascript function。作为一个(随意)的命名规则,名称以大写字母开头,并以”Ctrl”或者”Controller”结尾。
- 对属性赋值可以创建或者更新$scope的model。
- controller方法可以通过直接分配到$scope实现创建。(chiliSpicy方法)
- controller的两个方法在template中都是可用的(在ng-controller属性所在的元素以及其子元素中都有效)。
- 注意:之前版本的angular(1.0RC之前)允许我们使用this来代替$scope定义$scope的方法,但这里不再适用。在定义在scope上的方法中,this跟$scope是等价的(angular将this至为scope),但不是在我们的controller构造函数中。
- 注意:之前版本的angular(1.0RC之前),会自动增加controller的prototype方法到scope中,但现在不会了。所有方法都需要人工加入到scope中。(印象中之前有一个guide,有用过这个。还没更新-_-!)
controller方法可以带参数的,正如下面例子所示:
<!DOCTYPE html>
<html ng-app>
<head>
 <meta http-equiv="Content-Type" content="text/html; charset=utf-8"/>
 <title>controller-method-aruments</title>
 <meta content="IE=edge,chrome=1" http-equiv="X-UA-Compatible">
 <style type="text/css">
 .ng-cloak {
  display: none;
 }
 </style>
</head>
<body>
 <div ng-controller="SpicyCtrl">
 <input ng-model="customSpice" value="wasabi"/>
 <button ng-click="spicy(customSpice)">customSpice</button>
 <br/>
 <button ng-click="spicy(''Chili'')">Chili</button>
 <p>The food is {{spice}} spicy!</p>
 </div>

 <script src="../angular-1.0.1.js" type="text/javascript"></script>
 <script type="text/javascript">
 function SpicyCtrl($scope) {
  $scope.spice = "very";
  $scope.spicy = function(spice) {
  $scope.spice = spice;
  };
 }
 </script>
</body>
</html>
注意那个SpicyCtrl controller现在只定义了一个有一个参数”spice”、叫”spicy”的方法。template可以引用controller方法并为它传递常量字符串或model值。
Controller继承在angular是基于scope继承的。让我们看看下面的例子:
<!DOCTYPE html>
<html ng-app>
<head>
 <meta http-equiv="Content-Type" content="text/html; charset=utf-8"/>
 <title>controller-inheritance</title>
 <meta content="IE=edge,chrome=1" http-equiv="X-UA-Compatible">
 <style type="text/css">
 .ng-cloak {
  display: none;
 }
 </style>
</head>
<body>
 <div ng-controller="MainCtrl">
 <p>Good {{timeOfDay}}, {{name}}!</p>
 <div ng-controller="ChildCtrl">
  <p>Good {{timeOfDay}}, {{name}}!</p>
  <p ng-controller="BabyCtrl">Good {{timeOfDay}}, {{name}}!</p>
 </div>
 </div>

 <script src="../angular-1.0.1.js" type="text/javascript"></script>
 <script type="text/javascript">
 function MainCtrl($scope) {
  $scope.timeOfDay = ''Main时间'';
  $scope.name = ''Main名称'';
 }

 function ChildCtrl($scope) {
  $scope.name = ''Child名称'';
 }

 function BabyCtrl($scope) {
  $scope.timeOfDay = ''Baby时间'';
  $scope.name = ''Baby名称'';
 }
 </script>
</body>
</html>
注意我们如何嵌套3个ngController directive到模版中的。为了我们的视图,这模版结构将会导致4个scope被创建:
- root scope。
- MainCtrl scope,包含timeOfDay和name model。
- ChildCtrl scope,覆盖了MainCtrl scope的name model,继承了timeOfDay model。
- BabyCtrl scope,覆盖了MainCtrl scope 的timeOfDay以及ChildCtrl scope的name。
继承的工作,在controller和model中是一样的。所以我们前一个例子中,所有model可以通过controller被重写。
注意:在两个Controller之间标准原型继承不是如我们所想地那样工作的,因为正如我们之前提到的,controller不是通过angular直接初始化的,但相反地,apply了那个scope对象。(controllers are not instantiated directly by angular, but rather are applied to the scope object,这里跟之前一样,我还是没理解。)
五、 Testing Controller
虽然有很多方法去测试controller,最好的公约之一,如下面所示,需要注入$rootScope和$controller。(测试需要配合jasmine.js)
<!DOCTYPE html>
<html ng-app>
<head>
 <meta http-equiv="Content-Type" content="text/html; charset=utf-8"/>
 <title>controller-test</title>
 <meta content="IE=edge,chrome=1" http-equiv="X-UA-Compatible">
 <link rel="stylesheet" href="../jasmine.css">
 <style type="text/css">
 .ng-cloak {
  display: none;
 }
 </style>
</head>
<body>

<script src="../angular-1.0.1.js" type="text/javascript"></script>
<script src="../angular-scenario-1.0.1.js" type="text/javascript"></script>
<script src="../jasmine.js" type="text/javascript"></script>
<script src="../jasmine-html.js" type="text/javascript"></script>
<script src="../angular-mocks-1.0.1.js" type="text/javascript"></script>
<script type="text/javascript">
 function MyController($scope) {
 $scope.spices = [
  {"name":"pasilla", "spiciness":"mild"},
  {"name":"jalapeno", "spiceiness":"hot hot hot!"},
  {"name":"habanero", "spiceness":"LAVA HOT!!"}
 ];

 $scope.spice = "habanero";
 }
 describe("MyController function", function () {
 describe("MyController", function () {
  var scope;
  beforeEach(inject(function ($rootScope, $controller) {
  scope = $rootScope.$new();
  var ctrl = $controller(MyController, {$scope:scope});
  }));

  it(''should create "cpices" model with 3 spices'', function () {
  expect(scope.spices.length).toBe(3);
  });

  it(''should set the default value of spice'', function () {
  expect(scope.spice).toBe("habanero");
  });
 });
 });

 (function () {
 var jasmineEnv = jasmine.getEnv();
 jasmineEnv.updateInterval = 1000;

 var trivialReporter = new jasmine.TrivialReporter();

 jasmineEnv.addReporter(trivialReporter);

 jasmineEnv.specFilter = function (spec) {
  return trivialReporter.specFilter(spec);
 };

 var currentWindowOnload = window.onload;

 window.onload = function () {
  if (currentWindowOnload) {
  currentWindowOnload();
  }
  execJasmine();
 };

 function execJasmine() {
  jasmineEnv.execute();
 }

 })();

</script>
</body>
</html>
如果我们需要测试嵌套的controller,我们需要在test中创建与DOM里面相同的scope继承关系。
<!DOCTYPE html>
<html ng-app>
<head>
 <meta http-equiv="Content-Type" content="text/html; charset=utf-8"/>
 <title>controller-test</title>
 <meta content="IE=edge,chrome=1" http-equiv="X-UA-Compatible">
 <link rel="stylesheet" href="../jasmine.css">
 <style type="text/css">
 .ng-cloak {
  display: none;
 }
 </style>
</head>
<body>

<script src="../angular-1.0.1.js" type="text/javascript"></script>
<script src="../angular-scenario-1.0.1.js" type="text/javascript"></script>
<script src="../jasmine.js" type="text/javascript"></script>
<script src="../jasmine-html.js" type="text/javascript"></script>
<script src="../angular-mocks-1.0.1.js" type="text/javascript"></script>
<script type="text/javascript">
 function MainCtrl($scope) {
 $scope.timeOfDay = ''Main时间'';
 $scope.name = ''Main名称'';
 }

 function ChildCtrl($scope) {
 $scope.name = ''Child名称'';
 }

 function BabyCtrl($scope) {
 $scope.timeOfDay = ''Baby时间'';
 $scope.name = ''Baby名称'';
 }

 describe("MyController", function () {
 var mainScope,childScope,babyScope;
 beforeEach(inject(function ($rootScope, $controller) {
  mainScope = $rootScope.$new();
  var mainCtrl = $controller(MainCtrl, {$scope:mainScope});
  childScope = mainScope.$new();
  var childCtrl = $controller(ChildCtrl, {$scope:childScope});
  babyScope = childScope.$new();
  var babyCtrl = $controller(BabyCtrl, {$scope:babyScope});
 }));

 it(''should have over and selected'', function () {
  expect(mainScope.timeOfDay).toBe("Main时间");
  expect(mainScope.name).toBe("Main名称");
  expect(childScope.timeOfDay).toBe("Main时间");
  expect(childScope.name).toBe("Child名称");
  expect(babyScope.timeOfDay).toBe("Baby时间");
  expect(babyScope.name).toBe("Baby名称");
 });
 });

 (function () {
 var jasmineEnv = jasmine.getEnv();
 jasmineEnv.updateInterval = 1000;

 var trivialReporter = new jasmine.TrivialReporter();

 jasmineEnv.addReporter(trivialReporter);

 jasmineEnv.specFilter = function (spec) {
  return trivialReporter.specFilter(spec);
 };

 var currentWindowOnload = window.onload;

 window.onload = function () {
  if (currentWindowOnload) {
  currentWindowOnload();
  }
  execJasmine();
 };

 function execJasmine() {
  jasmineEnv.execute();
 }

 })();

</script>
</body>
</html>
以上就是关于 AngularJs Understanding the Controller Component的资料整理,后续继续补充相关资料,谢谢大家的支持!
- AngularJS实践之使用NgModelController进行数据绑定
- Angularjs中controller的三种写法分享
- AngularJs Injecting Services Into Controllers详解
- AngularJS利用Controller完成URL跳转
- AngularJS ng-controller 指令简单实例
- AngularJs学习第五篇从Controller控制器谈谈$scope作用域
- AngularJS控制器controller正确的通信的方法
- AngularJS入门心得之directive和controller通信过程
- angularjs学习笔记之三大模块(modal,controller,view)
- AngularJs根据访问的页面动态加载Controller的解决方案
- Angularjs的Controller间通信机制实例分析

BERT: Pre-training of Deep Bidirectional Transformers for Language Understanding
## 摘要: 提出了一个新的语言表示模型 (language representation), BERT: Bidirectional Encoder Representations from Transformers。不同于以往提出的语言表示模型,它在每一层的每个位置都能利用其左右两侧的信息用于学习,因此,它具有强大的表示能力,所以,BERT 在预训练之后,只需要加一个简单的输出层,并在新结构上 fine-tuned 就能获得 SOTA 的结果。
## 引言 语言模型预训练在自然语言处理任务中占据着越来越重要的位置。当前有两种方法将预训练的特征表示用于具体的任务,分别是:
- feature based。 如 ELMo 针对不同的任务使用不同的网络结构,并将预训练的特征表示作为额外的特征输入到具体的网络中。
- fine-tuning。如 GPT,对不同的任务只引入很少的额外参数,在应用到下游任务时直接在 pre-train 的网络上 fine-tune。
它们的目标函数都是单向的语言模型。从左到右的单向语言模型的表达能力有限,因为在 attention layer 中,每个单词只能获取到其左边的信息,而在 SQuAD 这样的 token-level 的任务中,获取左右两边的信息是至关重要的。BERT 提出了两个新的预训练的目标函数:
- Masked Language Model
- Next Sentence Prediction
其中 MLM 的目标函数允许 BERT 采用双向的 attention(一般的 LM 建模只能是单向的,因为如果采用双向 attention,那么对于指定 token,其在网络下一层的输入信息会包含当前 token 的相关信息,因为信息是双向流动的,每个 token 位置都能获取整个句子的信息,由于 LM 的任务是给定一个序列,预测序列的下一个 token,所以 LM 不能获取 token 后面的信息,BERT 采用的是双向的 attention,相当于 Transformer 中的 encoder 部分)。MLM 能使用双向的 attention 是因为其随机屏蔽一段句子中的一部分单词,然后 MLM 的任务就是预测这些被屏蔽的单词,所以即便信息是双向流动,也不导致信息泄露。
BERT
### 模型结构 BERT 的每一层都是 transformer 中的双向 encoder 结构,假设 层数为 L,hidden size 为 H,self-attention head 的个数为 A, 设 feedforward 部分的 hidden size 为 4H。 BERT base: L=12,H=768,A=12, total parameter:110M BERT large:L=24, H=1024,A=16, total parameter:340M  BERT 与 GPT 和 ELMo 的结构对比如上图。 bert 是 language understanding model,因为他的信息是双向流动的,不好做 generation 的任务,双向的 transformer 也被称为 transformer ecoder。 gpt 是 language generation model, 他基于单向的 lm,所以可以做序列生成的任务,也被称为 transformer decoder, 但其实称为 transformer decoder 并不准确,因为 transformer decoder 除了 self-attention 之外还有来自 encoder 的 cross-attention,但 gpt 并没有 cross-attention。
### 输入表示
 输入可以分为三部分,分别是 token 的表示,segment 的表示 (用于区分句子 A 和句子 B,比如 QA 等问题需要涉及 sentence-level 的学习), 和 positional encoding.
### 预训练任务
Masked LM 随机屏蔽掉一部分 token, MLM 的任务是根据未屏蔽的 token 预测被屏蔽的 token. 每个句子屏蔽 15% 的单词,用 [MASK] 替代,但是这种做法会导致 预训练过程和 fine-tining 阶段不匹配,因为 fine-tuning 阶段没有 [MASK] 这个 token。所以,并不总是将 masked 单词替换成 [MASK],具体做法如下: a. 对于被 15% 被替换的单词,80% 的时间都是用 [MASK] 替换 b. 10% 的时间随机选择一个单词替代 c. 10% 的时间保持不变 transformer encoder 不知道它要预测的是哪个单词,也不知道哪个单词是被随机替换的,所以,对于每个单词,它都需要学习到上下文的表示分布情况(这个比较玄学)。而且只有 1.5% 的单词被随机替换了,这并不不会干扰模型的学习。
MLM 的另一个缺点是在每个 batch 中只会预测 15% 的 token,相比于预测全部的 token,它需要更多的迭代次数以收敛。
- Next Sentence Prediction 很多 nlp 任务比如 Question Answering (QA), Natural Language Inference (NLI) 都需要理解句子间的关系,而在 语言建模中这种关系并不会直接体现。bert 在预训练中加入了一个二分类任务:判断一个句子是不是另一个句子的下一句。
实验
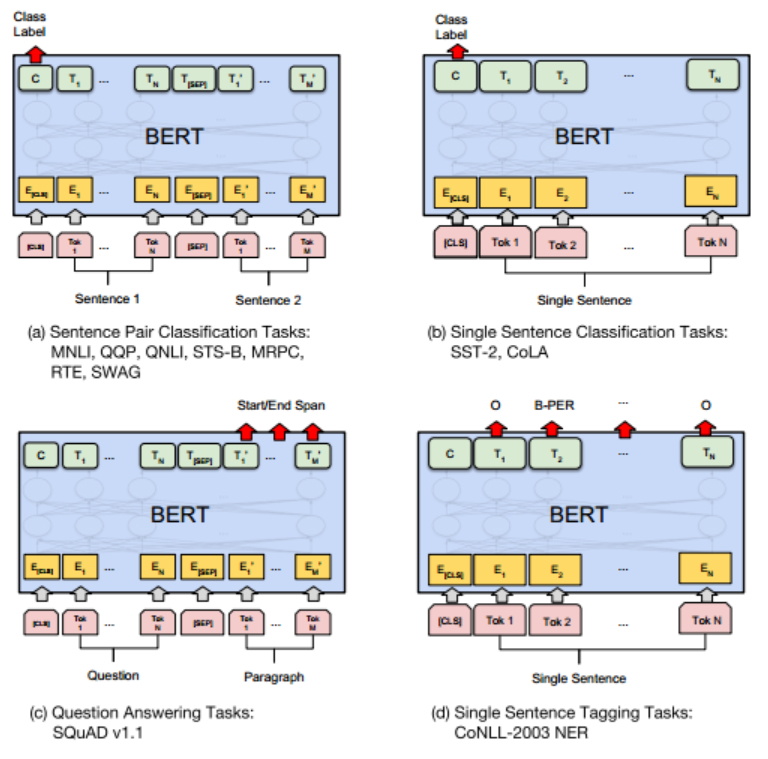
GLUE dataset
这是一个用于 language understanding 模型的数据集合,其中有 single-sentence 的任务也有 sentence-pair 的任务,如上图 (a) 所示,两个句子拼接在一起,通过 segment embedding 区分句子 A 和句子 B,取第一个 token [CLS] 在最后一层对应的 hidden state 作为整个 sequence 的 represention C,然后将 C 与待 fine-tunning 的参数 W 相乘之后取 softmax 就是分类的各类概率。
SQuAD v1.1
问答数据集。如上图 (c) 所示, 问答的输入一个问题以及一段话,需要在这一段话中找到问题的答案,具体到这里的任务其实是定位答案在这一段话中的位置,所以需要找到 start position 和 end position。在 fine-tunning 阶段需要学习一个 start vector $S\in R^{H}$ 和一个 end vector $E\in R^{H}$,对于每个 token,其最后一层的 hidden state 表示为 $T_i\in R^{H}$,那么每个 token 为 start token 的概率为:
Named Entity Recognition
CoNLL2003 中的每个单词都被标注为 {Person, Organization, Location, Miscellaneous, Other (non-named entity)}。任务是对每个 input token 进行分类,将最后一层的 $T_i$ 输入到 classificaiton layer 就行。

Building Windows containers with AWS CodePipeline and custom actions
https://amazonaws-china.com/blogs/devops/building-windows-containers-with-aws-codepipeline-and-custom-actions/
Dmitry Kolomiets, DevOps Consultant, Professional Services
AWS CodePipeline and AWS CodeBuild are the primary AWS services for building CI/CD pipelines. AWS CodeBuild supports a wide range of build scenarios thanks to various built-in Docker images. It also allows you to bring in your own custom image in order to use different tools and environment configurations. However, there are some limitations in using custom images.
Considerations for custom Docker images:
- AWS CodeBuild has to download a new copy of the Docker image for each build job, which may take longer time for large Docker images.
- AWS CodeBuild provides a limited set of instance types to run the builds. You might have to use a custom image if the build job requires higher memory, CPU, graphical subsystems, or any other functionality that is not part of the out-of-the-box provided Docker image.
Windows-specific limitations
- AWS CodeBuild supports Windows builds only in a limited number of AWS regions at this time.
- AWS CodeBuild executes Windows Server containers using Windows Server 2016 hosts, which means that build containers are huge—it is not uncommon to have an image size of 15 GB or more (with .NET Framework SDK installed). Windows Server 2019 containers, which are almost half as small, cannot be used due to host-container mismatch.
- AWS CodeBuild runs build jobs inside Docker containers. You should enable privileged mode in order to build and publish Linux Docker images as part of your build job. However, DIND is not supported on Windows and, therefore, AWS CodeBuild cannot be used to build Windows Server container images.
The last point is the critical one for microservice type of applications based on Microsoft stacks (.NET Framework, Web API, IIS). The usual workflow for this kind of applications is to build a Docker image, push it to ECR and update ECS / EKS cluster deployment.
Here is what I cover in this post:
- How to address the limitations stated above by implementing AWS CodePipeline custom actions (applicable for both Linux and Windows environments).
- How to use the created custom action to define a CI/CD pipeline for Windows Server containers.
CodePipeline custom actions
By using Amazon EC2 instances, you can address the limitations with Windows Server containers and enable Windows build jobs in the regions where AWS CodeBuild does not provide native Windows build environments. To accommodate the specific needs of a build job, you can pick one of the many Amazon EC2 instance types available.
The downside of this approach is additional management burden—neither AWS CodeBuild nor AWS CodePipeline support Amazon EC2 instances directly. There are ways to set up a Jenkins build cluster on AWS and integrate it with CodeBuild and CodeDeploy, but these options are too “heavy” for the simple task of building a Docker image.
There is a different way to tackle this problem: AWS CodePipeline provides APIs that allow you to extend a build action though custom actions. This example demonstrates how to add a custom action to offload a build job to an Amazon EC2 instance.
Here is the generic sequence of steps that the custom action performs:
- Acquire EC2 instance (see the Notes on Amazon EC2 build instances section).
- Download AWS CodePipeline artifacts from Amazon S3.
- Execute the build command and capture any errors.
- Upload output artifacts to be consumed by subsequent AWS CodePipeline actions.
- Update the status of the action in AWS CodePipeline.
- Release the Amazon EC2 instance.
Notice that most of these steps are the same regardless of the actual build job being executed. However, the following parameters will differ between CI/CD pipelines and, therefore, have to be configurable:
- Instance type (t2.micro, t3.2xlarge, etc.)
- AMI (builds could have different prerequisites in terms of OS configuration, software installed, Docker images downloaded, etc.)
- Build command line(s) to execute (MSBuild script, bash, Docker, etc.)
- Build job timeout
Serverless custom action architecture
CodePipeline custom build action can be implemented as an agent component installed on an Amazon EC2 instance. The agent polls CodePipeline for build jobs and executes them on the Amazon EC2 instance. There is an example of such an agent on GitHub, but this approach requires installation and configuration of the agent on all Amazon EC2 instances that carry out the build jobs.
Instead, I want to introduce an architecture that enables any Amazon EC2 instance to be a build agent without additional software and configuration required. The architecture diagram looks as follows:

There are multiple components involved:
- An Amazon CloudWatch Event triggers an AWS Lambda function when a custom CodePipeline action is to be executed.
- The Lambda function retrieves the action’s build properties (AMI, instance type, etc.) from CodePipeline, along with location of the input artifacts in the Amazon S3 bucket.
- The Lambda function starts a Step Functions state machine that carries out the build job execution, passing all the gathered information as input payload.
- The Step Functions flow acquires an Amazon EC2 instance according to the provided properties, waits until the instance is up and running, and starts an AWS Systems Manager command. The Step Functions flow is also responsible for handling all the errors during build job execution and releasing the Amazon EC2 instance once the Systems Manager command execution is complete.
- The Systems Manager command runs on an Amazon EC2 instance, downloads CodePipeline input artifacts from the Amazon S3 bucket, unzips them, executes the build script, and uploads any output artifacts to the CodePipeline-provided Amazon S3 bucket.
- Polling Lambda updates the state of the custom action in CodePipeline once it detects that the Step Function flow is completed.
The whole architecture is serverless and requires no maintenance in terms of software installed on Amazon EC2 instances thanks to the Systems Manager command, which is essential for this solution. All the code, AWS CloudFormation templates, and installation instructions are available on the GitHub project. The following sections provide further details on the mentioned components.
Custom Build Action
The custom action type is defined as an AWS::CodePipeline::CustomActionType resource as follows:
  Ec2BuildActionType:
    Type: AWS::CodePipeline::CustomActionType
    Properties:
      Category: !Ref CustomActionProviderCategory
      Provider: !Ref CustomActionProviderName
      Version: !Ref CustomActionProviderVersion
      ConfigurationProperties:
        - Name: ImageId
          Description: AMI to use for EC2 build instances.
          Key: true
          Required: true
          Secret: false
          Queryable: false
          Type: String
        - Name: InstanceType
          Description: Instance type for EC2 build instances.
          Key: true
          Required: true
          Secret: false
          Queryable: false
          Type: String
        - Name: Command
          Description: Command(s) to execute.
          Key: true
          Required: true
          Secret: false
          Queryable: false
          Type: String
        - Name: WorkingDirectory
          Description: Working directory for the command to execute.
          Key: true
          Required: false
          Secret: false
          Queryable: false
          Type: String
        - Name: OutputArtifactPath
          Description: Path of the file(-s) or directory(-es) to use as custom action output artifact.
          Key: true
          Required: false
          Secret: false
          Queryable: false
          Type: String
      InputArtifactDetails:
        MaximumCount: 1
        MinimumCount: 0
      OutputArtifactDetails:
        MaximumCount: 1
        MinimumCount: 0
      Settings:
        EntityUrlTemplate: !Sub "https://${AWS::Region}.console.aws.amazon.com/systems-manager/documents/${RunBuildJobOnEc2Instance}"
        ExecutionUrlTemplate: !Sub "https://${AWS::Region}.console.aws.amazon.com/states/home#/executions/details/{ExternalExecutionId}"
The custom action type is uniquely identified by Category, Provider name, and Version.
Category defines the stage of the pipeline in which the custom action can be used, such as build, test, or deploy. Check the AWS documentation for the full list of allowed values.
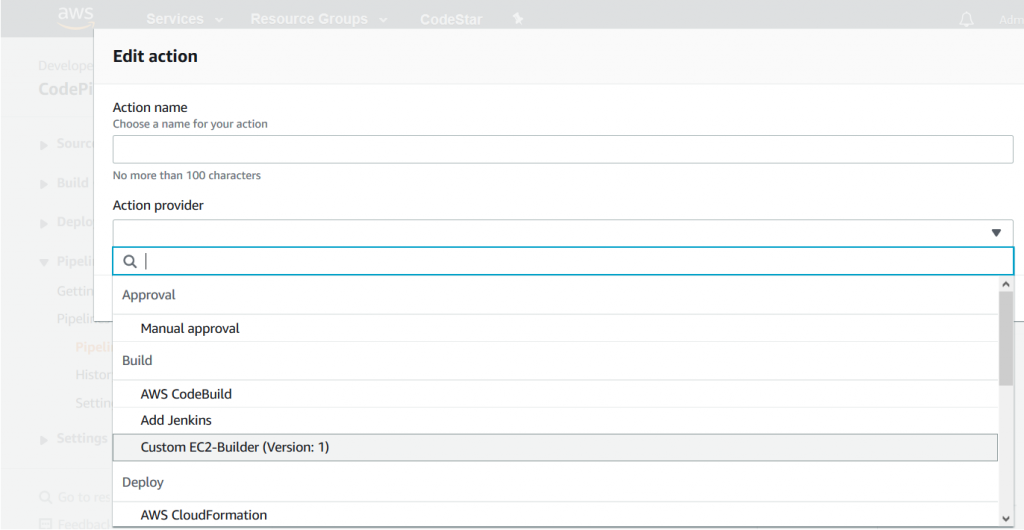
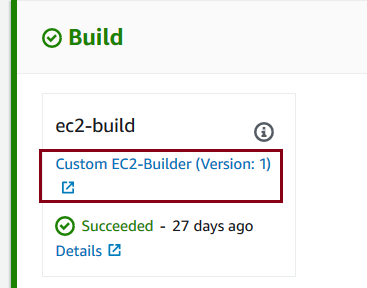
Provider name and Version are the values used to identify the custom action type in the CodePipeline console or AWS CloudFormation templates. Once the custom action type is installed, you can add it to the pipeline, as shown in the following screenshot:
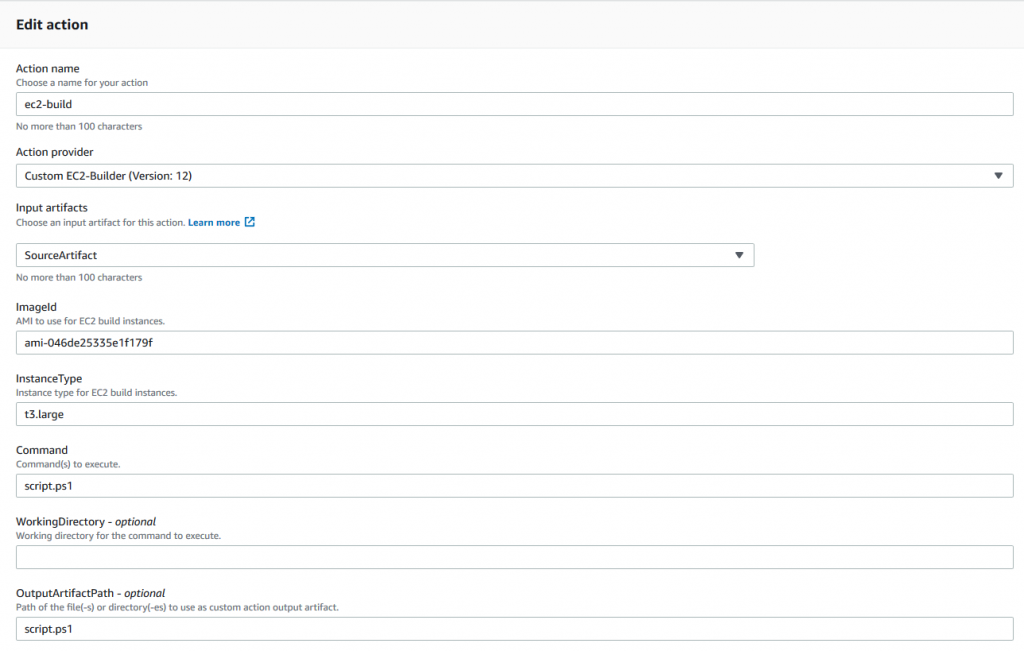
The custom action type also defines a list of user-configurable properties—these are the properties identified above as specific for different CI/CD pipelines:
- AMI Image ID
- Instance Type
- Command
- Working Directory
- Output artifacts
The properties are configurable in the CodePipeline console, as shown in the following screenshot:
Note the last two settings in the Custom Action Type AWS CloudFormation definition: EntityUrlTemplate and ExecutionUrlTemplate.
EntityUrlTemplate defines the link to the AWS Systems Manager document that carries over the build actions. The link is visible in AWS CodePipeline console as shown in the following screenshot:
ExecutionUrlTemplate defines the link to additional information related to a specific execution of the custom action. The link is also visible in the CodePipeline console, as shown in the following screenshot:

This URL is defined as a link to the Step Functions execution details page, which provides high-level information about the custom build step execution, as shown in the following screenshot:

This page is a convenient visual representation of the custom action execution flow and may be useful for troubleshooting purposes as it gives an immediate access to error messages and logs.
The polling Lambda function
The Lambda function polls CodePipeline for custom actions when it is triggered by the following CloudWatch event:
  source:
    - "aws.codepipeline"
  detail-type:
    - "CodePipeline Action Execution State Change"
  detail:
    state:
      - "STARTED"
The event is triggered for every CodePipeline action started, so the Lambda function should verify if, indeed, there is a custom action to be processed.
The rest of the lambda function is trivial and relies on the following APIs to retrieve or update CodePipeline actions and deal with instances of Step Functions state machines:
CodePipeline API
- poll_for_jobs
- acknowledge_job
- put_job_success_result
- put_job_failure_result
AWS Step Functions API
- start_execution
- describe_execution
You can find the complete source of the Lambda function on GitHub.
Step Functions state machine
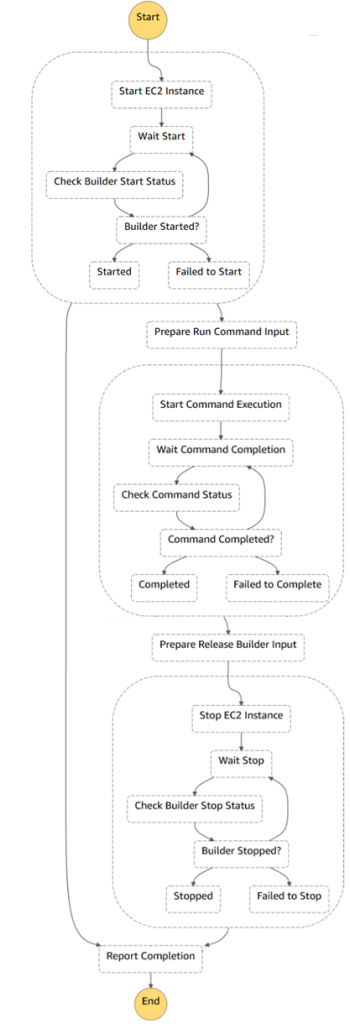
The following diagram shows complete Step Functions state machine. There are three main blocks on the diagram:
- Acquiring an Amazon EC2 instance and waiting while the instance is registered with Systems Manager
- Running a Systems Manager command on the instance
- Releasing the Amazon EC2 instance
Note that it is necessary to release the Amazon EC2 instance in case of error or exception during Systems Manager command execution, relying on Fallback States to guarantee that.
You can find the complete definition of the Step Function state machine on GitHub.
Systems Manager Document
The AWS Systems Manager Run Command does all the magic. The Systems Manager agent is pre-installed on AWS Windows and Linux AMIs, so no additional software is required. The Systems Manager run command executes the following steps to carry out the build job:
- Download input artifacts from Amazon S3.
- Unzip artifacts in the working folder.
- Run the command.
- Upload output artifacts to Amazon S3, if any; this makes them available for the following CodePipeline stages.
The preceding steps are operating-system agnostic, and both Linux and Windows instances are supported. The following code snippet shows the Windows-specific steps.
You can find the complete definition of the Systems Manager document on GitHub.
mainSteps:
  - name: win_enable_docker
    action: aws:configureDocker
    inputs:
      action: Install

  # Windows steps
  - name: windows_script
    precondition:
      StringEquals: [platformType, Windows]
    action: aws:runPowerShellScript
    inputs:
      runCommand:
        # Ensure that if a command fails the script does not proceed to the following commands
        - "$ErrorActionPreference = \"Stop\""

        - "$jobDirectory = \"{{ workingDirectory }}\""
        # Create temporary folder for build artifacts, if not provided
        - "if ([string]::IsNullOrEmpty($jobDirectory)) {"
        - "    $parent = [System.IO.Path]::GetTempPath()"
        - "    [string] $name = [System.Guid]::NewGuid()"
        - "    $jobDirectory = (Join-Path $parent $name)"
        - "    New-Item -ItemType Directory -Path $jobDirectory"
                # Set current location to the new folder
        - "    Set-Location -Path $jobDirectory"
        - "}"

        # Download/unzip input artifact
        - "Read-S3Object -BucketName {{ inputBucketName }} -Key {{ inputObjectKey }} -File artifact.zip"
        - "Expand-Archive -Path artifact.zip -DestinationPath ."

        # Run the build commands
        - "$directory = Convert-Path ."
        - "$env:PATH += \";$directory\""
        - "{{ commands }}"
        # We need to check exit code explicitly here
        - "if (-not ($?)) { exit $LASTEXITCODE }"

        # Compress output artifacts, if specified
        - "$outputArtifactPath  = \"{{ outputArtifactPath }}\""
        - "if ($outputArtifactPath) {"
        - "    Compress-Archive -Path $outputArtifactPath -DestinationPath output-artifact.zip"
                # Upload compressed artifact to S3
        - "    $bucketName = \"{{ outputBucketName }}\""
        - "    $objectKey = \"{{ outputObjectKey }}\""
        - "    if ($bucketName -and $objectKey) {"
                    # Don''t forget to encrypt the artifact - CodePipeline bucket has a policy to enforce this
        - "        Write-S3Object -BucketName $bucketName -Key $objectKey -File output-artifact.zip -ServerSideEncryption aws:kms"
        - "    }"
        - "}"
      workingDirectory: "{{ workingDirectory }}"
      timeoutSeconds: "{{ executionTimeout }}"
CI/CD pipeline for Windows Server containers
Once you have a custom action that offloads the build job to the Amazon EC2 instance, you may approach the problem stated at the beginning of this blog post: how to build and publish Windows Server containers on AWS.
With the custom action installed, the solution is quite straightforward. To build a Windows Server container image, you need to provide the value for Windows Server with Containers AMI, the instance type to use, and the command line to execute, as shown in the following screenshot:
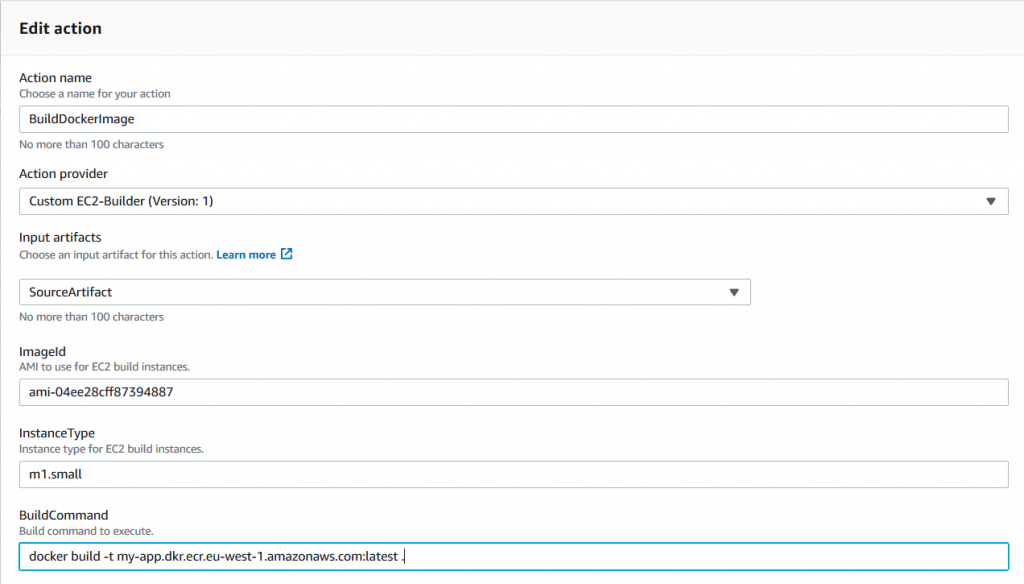
This example executes the Docker build command on a Windows instance with the specified AMI and instance type, using the provided source artifact. In real life, you may want to keep the build script along with the source code and push the built image to a container registry. The following is a PowerShell script example that not only produces a Docker image but also pushes it to AWS ECR:
# Authenticate with ECR
Invoke-Expression -Command (Get-ECRLoginCommand).Command

# Build and push the image
docker build -t <ecr-repository-url>:latest .
docker push <ecr-repository-url>:latest

return $LASTEXITCODE
You can find a complete example of the pipeline that produces the Windows Server container image and pushes it to Amazon ECR on GitHub.
Notes on Amazon EC2 build instances
There are a few ways to get Amazon EC2 instances for custom build actions. Let’s take a look at a couple of them below.
Start new EC2 instance per job and terminate it at the end
This is a reasonable default strategy that is implemented in this GitHub project. Each time the pipeline needs to process a custom action, you start a new Amazon EC2 instance, carry out the build job, and terminate the instance afterwards.
This approach is easy to implement. It works well for scenarios in which you don’t have many builds and/or builds take some time to complete (tens of minutes). In this case, the time required to provision an instance is amortized. Conversely, if the builds are fast, instance provisioning time could be actually longer than the time required to carry out the build job.
Use a pool of running Amazon EC2 instances
There are cases when it is required to keep builder instances “warm”, either due to complex initialization or merely to reduce the build duration. To support this scenario, you could maintain a pool of always-running instances. The “acquisition” phase takes a warm instance from the pool and the “release” phase returns it back without terminating or stopping the instance. A DynamoDB table can be used as a registry to keep track of “busy” instances and provide waiting or scaling capabilities to handle high demand.
This approach works well for scenarios in which there are many builds and demand is predictable (e.g. during work hours).
Use a pool of stopped Amazon EC2 instances
This is an interesting approach, especially for Windows builds. All AWS Windows AMIs are generalized using a sysprep tool. The important implication of this is that the first start time for Windows EC2 instances is quite long: it could easily take more than 5 minutes. This is generally unacceptable for short-living build jobs (if your build takes just a minute, it is annoying to wait 5 minutes to start the instance).
Interestingly, once the Windows instance is initialized, subsequent starts take less than a minute. To utilize this, you could create a pool of initialized and stopped Amazon EC2 instances. In this case, for the acquisition phase, you start the instance, and when you need to release it, you stop or hibernate it.
This approach provides substantial improvements in terms of build start-up time.
The downside is that you reuse the same Amazon EC2 instance between the builds—it is not completely clean environment. Build jobs have to be designed to expect the presence of artifacts from the previous executions on the build instance.
Using an Amazon EC2 fleet with spot instances
Another variation of the previous strategies is to use Amazon EC2 Fleet to make use of cost-efficient spot instances for your build jobs.
Amazon EC2 Fleet makes it possible to combine on-demand instances with spot instances to deliver cost-efficient solution for your build jobs. On-demand instances can provide the minimum required capacity and spot instances provide a cost-efficient way to improve performance of your build fleet.
Note that since spot instances could be terminated at any time, the Step Functions workflow has to support Amazon EC2 instance termination and restart the build on a different instance transparently for CodePipeline.
Limits and Cost
The following are a few final thoughts.
Custom action timeouts
The default maximum execution time for CodePipeline custom actions is one hour. If your build jobs require more than an hour, you need to request a limit increase for custom actions.
Cost of running EC2 build instances
Custom Amazon EC2 instances could be even more cost effective than CodeBuild for many scenarios. However, it is difficult to compare the total cost of ownership of a custom-built fleet with CodeBuild. CodeBuild is a fully managed build service and you pay for each minute of using the service. In contrast, with Amazon EC2 instances you pay for the instance either per hour or per second (depending on instance type and operating system), EBS volumes, Lambda, and Step Functions. Please use the AWS Simple Monthly Calculator to get the total cost of your projected build solution.
Cleanup
If you are running the above steps as a part of workshop / testing, then you may delete the resources to avoid any further charges to be incurred. All resources are deployed as part of CloudFormation stack, so go to the Services, CloudFormation, select the specific stack and click delete to remove the stack.
Conclusion
The CodePipeline custom action is a simple way to utilize Amazon EC2 instances for your build jobs and address a number of CodePipeline limitations.
With AWS CloudFormation template available on GitHub you can import the CodePipeline custom action with a simple Start/Terminate instance strategy into your account and start using the custom action in your pipelines right away.
The CodePipeline custom action with a simple Start/Terminate instance strategy is available on GitHub as an AWS CloudFormation stack. You could import the stack to your account and start using the custom action in your pipelines right away.
An example of the pipeline that produces Windows Server containers and pushes them to Amazon ECR can also be found on GitHub.
I invite you to clone the repositories to play with the custom action, and to make any changes to the action definition, Lambda functions, or Step Functions flow.
Feel free to ask any questions or comments below, or file issues or PRs on GitHub to continue the discussion.

Configuring and Running Django + Celery in Docker Containers
Configuring and Running Django + Celery in Docker Containers

After reading this blog post, you will be able to configure Celery with Django, PostgreSQL, Redis, and RabbitMQ, and then run everything in Docker containers.
Today, you''ll learn how to set up a distributed task processing system for quick prototyping. You will configure Celery with Django, PostgreSQL, Redis, and RabbitMQ, and then run everything in Docker containers. You''ll need some working knowledge of Docker for this tutorial, which you can get in one my previous posts here.
Django is a well-known Python web framework, and Celery is a distributed task queue. You''ll use PostgreSQL as a regular database to store jobs, RabbitMQ as message broker, and Redis as a task storage backend.
Motivation
When you build a web application, sooner or later you''ll have to implement some kind of offline task processing.
Example:
Alice wants to convert her cat photos from .jpg to .png or create a .pdf from her collection of .jpg cat files. Doing either of these tasks in one HTTP request will take too long to execute and will unnecessarily burden the web server - meaning we can''t serve other requests at the same time. The common solution is to execute the task in the background - often on another machine - and poll for the result.
A simple setup for an offline task processing could look like this:
1. Alice uploads a picture.
2. Web server schedules job on worker.
3. Worker gets job and converts photo.
4. Worker creates some result of the task (in this case, a converted photo).
5. Web browser polls for the result.
6. Web browser gets the result from the server.
This setup looks clear, but it has a serious flaw - it doesn''t scale well. What if Alice has a lot of cat pictures and one server wouldn''t be enough to process them all at once? Or, if there was some other very big job and all other jobs would be blocked by it? Does she care if all of the images are processed at once? What if processing fails at some point?
Frankly, there is a solution that won''t kill your machine every time you get a bigger selection of images. You need something between the web server and worker: a broker. The web server would schedule new tasks by communicating with the broker, and the broker would communicate with workers to actually execute these tasks. You probably also want to buffer your tasks, retry if they fail, and monitor how many of them were processed.
You would have to create queues for tasks with different priorities, or for those suitable for different kinds of workers.
All of this can be greatly simplified by using Celery - an open-source, distributed tasks queue. It works like a charm after you configure it - as long as you do so correctly.
How Celery is built
Celery consists of:
- Tasks, as defined in your app
- A broker that routes tasks to workers and queues
- Workers doing the actual work
- A storage backend
You can watch a more in-depth introduction to Celery here or jump straight to Celery''s getting started guide.
Your setup
Start with the standard Django project structure. It can be created with django-admin, by running in shell:
$ django-admin startproject myproject
Which creates a project structure:
.
└── myproject
    ├── manage.py
    └── myproject
        ├── __init__.py
        ├── settings.py
        ├── urls.py
        └── wsgi.py
At the end of this tutorial, it''ll look like this:
.
├── Dockerfile
├── docker-compose.yml
├── myproject
│   ├── manage.py
│   └── myproject
│       ├── celeryconf.py
│       ├── __init__.py
│       ├── models.py
│       ├── serializers.py
│       ├── settings.py
│       ├── tasks.py
│       ├── urls.py
│       ├── views.py
│       └── wsgi.py
├── requirements.txt
├── run_celery.sh
└── run_web.sh
Creating containers
Since we are working with Docker 1.12, we need a proper Dockerfile to specify how our image will be built.
Custom container
Dockerfile
# use base python image with python 2.7
FROM python:2.7

# add requirements.txt to the image
ADD requirements.txt /app/requirements.txt

# set working directory to /app/
WORKDIR /app/

# install python dependencies
RUN pip install -r requirements.txt

# create unprivileged user
RUN adduser --disabled-password --gecos '''' myuser
Our dependencies are:
requirements.txt
Django==1.9.8
celery==3.1.20
djangorestframework==3.3.1
psycopg2==2.5.3
redis==2.10.5
I''ve frozen versions of dependencies to make sure that you will have a working setup. If you wish, you can update any of them, but it''s not guaranteed to work.
Choosing images for services
Now we only need to set up RabbitMQ, PostgreSQL, and Redis. Since Docker introduced its official library, I use its official images whenever possible. However, even these can be broken sometimes. When that happens, you''ll have to use something else.
Here are images I tested and selected for this project:
- Official PostgreSQL image
- Official Redis image
- Official RabbitMQ image
Using docker-compose to set up a multicontainer app
Now you''ll use docker-compose to combine your own containers with the ones we chose in the last section.
docker-compose.yml
version: ''2''

services:
  # PostgreSQL database
  db:
    image: postgres:9.4
    hostname: db
    environment:
      - POSTGRES_USER=postgres
      - POSTGRES_PASSWORD=postgres
      - POSTGRES_DB=postgres
    ports:
      - "5432:5432"

  # Redis
  redis:
    image: redis:2.8.19
    hostname: redis

  # RabbitMQ
  rabbit:
    hostname: rabbit
    image: rabbitmq:3.6.0
    environment:
      - RABBITMQ_DEFAULT_USER=admin
      - RABBITMQ_DEFAULT_PASS=mypass
    ports:
      - "5672:5672"  # we forward this port because it''s useful for debugging
      - "15672:15672"  # here, we can access rabbitmq management plugin

  # Django web server
  web:
    build:
      context: .
      dockerfile: Dockerfile
    hostname: web
    command: ./run_web.sh
    volumes:
      - .:/app  # mount current directory inside container
    ports:
      - "8000:8000"
    # set up links so that web knows about db, rabbit and redis
    links:
      - db
      - rabbit
      - redis
    depends_on:
      - db

  # Celery worker
  worker:
    build:
      context: .
      dockerfile: Dockerfile
    command: ./run_celery.sh
    volumes:
      - .:/app
    links:
      - db
      - rabbit
      - redis
    depends_on:
      - rabbit
Configuring the web server and worker
You''ve probably noticed that both the worker and web server run some starting scripts. Here they are (make sure they''re executable):
run_web.sh
#!/bin/sh

# wait for PSQL server to start
sleep 10

cd myproject
# prepare init migration
su -m myuser -c "python manage.py makemigrations myproject"
# migrate db, so we have the latest db schema
su -m myuser -c "python manage.py migrate"
# start development server on public ip interface, on port 8000
su -m myuser -c "python manage.py runserver 0.0.0.0:8000"
run_celery.sh
#!/bin/sh

# wait for RabbitMQ server to start
sleep 10

cd myproject
# run Celery worker for our project myproject with Celery configuration stored in Celeryconf
su -m myuser -c "celery worker -A myproject.celeryconf -Q default -n default@%h"
The first script - run_web.sh - will migrate the database and start the Django development server on port 8000.
The second one , run_celery.sh, will start a Celery worker listening on a queue default.
At this stage, these scripts won''t work as we''d like them to because we haven''t yet configured them. Our app still doesn''t know that we want to use PostgreSQL as the database, or where to find it (in a container somewhere). We also have to configure Redis and RabbitMQ.
But before we get to that, there are some useful Celery settings that will make your system perform better. Below are the complete settings of this Django app.
myproject/settings.py
import os

from kombu import Exchange, Queue


BASE_DIR = os.path.dirname(os.path.dirname(__file__))

# SECURITY WARNING: keep the secret key used in production secret!
SECRET_KEY = ''megg_yej86ln@xao^+)it4e&ueu#!4tl9p1h%2sjr7ey0)m25f''

# SECURITY WARNING: don''t run with debug turned on in production!
DEBUG = True
TEMPLATE_DEBUG = True
ALLOWED_HOSTS = []

# Application definition

INSTALLED_APPS = (
    ''rest_framework'',
    ''myproject'',
    ''django.contrib.sites'',
    ''django.contrib.staticfiles'',

    # required by Django 1.9
    ''django.contrib.auth'',
    ''django.contrib.contenttypes'',

)

MIDDLEWARE_CLASSES = (
)

REST_FRAMEWORK = {
    ''DEFAULT_PERMISSION_CLASSES'': (''rest_framework.permissions.AllowAny'',),
    ''PAGINATE_BY'': 10
}

ROOT_URLCONF = ''myproject.urls''

WSGI_APPLICATION = ''myproject.wsgi.application''

# Localization ant timezone settings

TIME_ZONE = ''UTC''
USE_TZ = True

CELERY_ENABLE_UTC = True
CELERY_TIMEZONE = "UTC"

LANGUAGE_CODE = ''en-us''
USE_I18N = True
USE_L10N = True

# Static files (CSS, JavaScript, Images)
# https://docs.djangoproject.com/en/1.7/howto/static-files/
STATIC_URL = ''/static/''

# Database Condocker-composeuration
DATABASES = {
    ''default'': {
        ''ENGINE'': ''django.db.backends.postgresql_psycopg2'',
        ''NAME'': os.environ.get(''DB_ENV_DB'', ''postgres''),
        ''USER'': os.environ.get(''DB_ENV_POSTGRES_USER'', ''postgres''),
        ''PASSWORD'': os.environ.get(''DB_ENV_POSTGRES_PASSWORD'', ''postgres''),
        ''HOST'': os.environ.get(''DB_PORT_5432_TCP_ADDR'', ''db''),
        ''PORT'': os.environ.get(''DB_PORT_5432_TCP_PORT'', ''''),
    },
}

# Redis

REDIS_PORT = 6379
REDIS_DB = 0
REDIS_HOST = os.environ.get(''REDIS_PORT_6379_TCP_ADDR'', ''redis'')

RABBIT_HOSTNAME = os.environ.get(''RABBIT_PORT_5672_TCP'', ''rabbit'')

if RABBIT_HOSTNAME.startswith(''tcp://''):
    RABBIT_HOSTNAME = RABBIT_HOSTNAME.split(''//'')[1]

BROKER_URL = os.environ.get(''BROKER_URL'',
                            '''')
if not BROKER_URL:
    BROKER_URL = ''amqp://{user}:{password}@{hostname}/{vhost}/''.format(
        user=os.environ.get(''RABBIT_ENV_USER'', ''admin''),
        password=os.environ.get(''RABBIT_ENV_RABBITMQ_PASS'', ''mypass''),
        hostname=RABBIT_HOSTNAME,
        vhost=os.environ.get(''RABBIT_ENV_VHOST'', ''''))

# We don''t want to have dead connections stored on rabbitmq, so we have to negotiate using heartbeats
BROKER_HEARTBEAT = ''?heartbeat=30''
if not BROKER_URL.endswith(BROKER_HEARTBEAT):
    BROKER_URL += BROKER_HEARTBEAT

BROKER_POOL_LIMIT = 1
BROKER_CONNECTION_TIMEOUT = 10

# Celery configuration

# configure queues, currently we have only one
CELERY_DEFAULT_QUEUE = ''default''
CELERY_QUEUES = (
    Queue(''default'', Exchange(''default''), routing_key=''default''),
)

# Sensible settings for celery
CELERY_ALWAYS_EAGER = False
CELERY_ACKS_LATE = True
CELERY_TASK_PUBLISH_RETRY = True
CELERY_DISABLE_RATE_LIMITS = False

# By default we will ignore result
# If you want to see results and try out tasks interactively, change it to False
# Or change this setting on tasks level
CELERY_IGNORE_RESULT = True
CELERY_SEND_TASK_ERROR_EMAILS = False
CELERY_TASK_RESULT_EXPIRES = 600

# Set redis as celery result backend
CELERY_RESULT_BACKEND = ''redis://%s:%d/%d'' % (REDIS_HOST, REDIS_PORT, REDIS_DB)
CELERY_REDIS_MAX_CONNECTIONS = 1

# Don''t use pickle as serializer, json is much safer
CELERY_TASK_SERIALIZER = "json"
CELERY_ACCEPT_CONTENT = [''application/json'']

CELERYD_HIJACK_ROOT_LOGGER = False
CELERYD_PREFETCH_MULTIPLIER = 1
CELERYD_MAX_TASKS_PER_CHILD = 1000
Those settings will configure the Django app so that it will discover the PostgreSQL database, Redis cache, and Celery.
Now, it''s time to connect Celery to the app. Create a file celeryconf.py and paste in this code:
myproject/celeryconf.py
import os

from celery import Celery
from django.conf import settings

os.environ.setdefault("DJANGO_SETTINGS_MODULE", "myproject.settings")

app = Celery(''myproject'')

CELERY_TIMEZONE = ''UTC''

app.config_from_object(''django.conf:settings'')
app.autodiscover_tasks(lambda: settings.INSTALLED_APPS)
That should be enough to connect Celery to our app, so the run_X scripts will work. You can read more about first steps with Django and Celery here.
Defining tasks
Celery looks for tasks inside the tasks.py file in each Django app. Usually, tasks are created either with a decorator, or by inheriting the Celery Task Class.
Here''s how you can create a task using decorator:
@app.task
def power(n):
    """Return 2 to the n''th power"""
    return 2 ** n
And here''s how you can create a task by inheriting after the Celery Task Class:
class PowerTask(app.Task):
    def run(self, n):
    """Return 2 to the n''th power"""
        return 2 ** n
Both are fine and good for slightly different use cases.
myproject/tasks.py
from functools import wraps

from myproject.celeryconf import app
from .models import Job

# decorator to avoid code duplication

def update_job(fn):
    """Decorator that will update Job with result of the function"""

    # wraps will make the name and docstring of fn available for introspection
    @wraps(fn)
    def wrapper(job_id, *args, **kwargs):
        job = Job.objects.get(id=job_id)
        job.status = ''started''
        job.save()
        try:
            # execute the function fn
            result = fn(*args, **kwargs)
            job.result = result
            job.status = ''finished''
            job.save()
        except:
            job.result = None
            job.status = ''failed''
            job.save()
    return wrapper


# two simple numerical tasks that can be computationally intensive

@app.task
@update_job
def power(n):
    """Return 2 to the n''th power"""
    return 2 ** n


@app.task
@update_job
def fib(n):
    """Return the n''th Fibonacci number.
    """
    if n < 0:
        raise ValueError("Fibonacci numbers are only defined for n >= 0.")
    return _fib(n)


def _fib(n):
    if n == 0 or n == 1:
        return n
    else:
        return _fib(n - 1) + _fib(n - 2)

# mapping from names to tasks

TASK_MAPPING = {
    ''power'': power,
    ''fibonacci'': fib
}
Building an API for scheduling tasks
If you have tasks in your system, how do you run them? In this section, you''ll create a user interface for job scheduling. In a backend application, the API will be your user interface. Let''s use the Django REST Framework for your API.
To make it as simple as possible, your app will have one model and only one ViewSet (endpoint with many HTTP methods).
Create your model, called Job, in myproject/models.py.
from django.db import models


class Job(models.Model):
    """Class describing a computational job"""

    # currently, available types of job are:
    TYPES = (
        (''fibonacci'', ''fibonacci''),
        (''power'', ''power''),
    )

    # list of statuses that job can have
    STATUSES = (
        (''pending'', ''pending''),
        (''started'', ''started''),
        (''finished'', ''finished''),
        (''failed'', ''failed''),
    )

    type = models.CharField(choices=TYPES, max_length=20)
    status = models.CharField(choices=STATUSES, max_length=20)

    created_at = models.DateTimeField(auto_now_add=True)
    updated_at = models.DateTimeField(auto_now=True)
    argument = models.PositiveIntegerField()
    result = models.IntegerField(null=True)

    def save(self, *args, **kwargs):
        """Save model and if job is in pending state, schedule it"""
        super(Job, self).save(*args, **kwargs)
        if self.status == ''pending'':
            from .tasks import TASK_MAPPING
            task = TASK_MAPPING[self.type]
            task.delay(job_id=self.id, n=self.argument)
Then create a serializer, view, and URL configuration to access it.
myproject/serializers.py
from rest_framework import serializers

from .models import Job


class JobSerializer(serializers.HyperlinkedModelSerializer):
    class Meta:
        model = Job
myproject/views.py
from rest_framework import mixins, viewsets

from .models import Job
from .serializers import JobSerializer


class JobViewSet(mixins.CreateModelMixin,
                 mixins.ListModelMixin,
                 mixins.RetrieveModelMixin,
                 viewsets.GenericViewSet):
    """
    API endpoint that allows jobs to be viewed or created.
    """
    queryset = Job.objects.all()
    serializer_class = JobSerializer
myproject/urls.py
from django.conf.urls import url, include
from rest_framework import routers

from myproject import views


router = routers.DefaultRouter()
# register job endpoint in the router
router.register(r''jobs'', views.JobViewSet)

# Wire up our API using automatic URL routing.
# Additionally, we include login URLs for the browsable API.
urlpatterns = [
    url(r''^'', include(router.urls)),
    url(r''^api-auth/'', include(''rest_framework.urls'', namespace=''rest_framework''))
]
For completeness, there is also myproject/wsgi.py, defining WSGI config for the project:
import os
os.environ.setdefault("DJANGO_SETTINGS_MODULE", "myproject.settings")

from django.core.wsgi import get_wsgi_application
application = get_wsgi_application()
and manage.py
#!/usr/bin/env python
import os
import sys

if __name__ == "__main__":
    os.environ.setdefault("DJANGO_SETTINGS_MODULE", "myproject.settings")

    from django.core.management import execute_from_command_line

    execute_from_command_line(sys.argv)
Leave __init__.py empty.
That''s all. Uh... lots of code. Luckily, everything is on GitHub, so you can just fork it.
Running the setup
Since everything is run from Docker Compose, make sure you have both Docker and Docker Compose installed before you try to start the app:
$ cd /path/to/myproject/where/is/docker-compose.yml
$ docker-compose build
$ docker-compose up
The last command will start five different containers, so just start using your API and have some fun with Celery in the meantime.
Accessing the API
Navigate in your browser to 127.0.0.1:8000 to browse your API and schedule some jobs.
Scale things out
Currently, we have only one instance of each container. We can get information about our group of containers with the docker-compose ps command.
$ docker-compose ps
           Name                          Command               State                                        Ports
------------------------------------------------------------------------------------------------------------------------------------------------------
dockerdjangocelery_db_1       /docker-entrypoint.sh postgres   Up      0.0.0.0:5432->5432/tcp
dockerdjangocelery_rabbit_1   /docker-entrypoint.sh rabb ...   Up      0.0.0.0:15672->15672/tcp, 25672/tcp, 4369/tcp, 5671/tcp, 0.0.0.0:5672->5672/tcp
dockerdjangocelery_redis_1    /entrypoint.sh redis-server      Up      6379/tcp
dockerdjangocelery_web_1      ./run_web.sh                     Up      0.0.0.0:8000->8000/tcp
dockerdjangocelery_worker_1   ./run_celery.sh                  Up
Scaling out a container with docker-compose is extremely easy. Just use the docker-compose scale command with the container name and amount:
$ docker-compose scale worker=5
Creating and starting dockerdjangocelery_worker_2 ... done
Creating and starting dockerdjangocelery_worker_3 ... done
Creating and starting dockerdjangocelery_worker_4 ... done
Creating and starting dockerdjangocelery_worker_5 ... done
Output says that docker-compose just created an additional four worker containers for us. We can double-check it with the docker-compose ps command again:
$ docker-compose ps
           Name                          Command               State                                        Ports
------------------------------------------------------------------------------------------------------------------------------------------------------
dockerdjangocelery_db_1       /docker-entrypoint.sh postgres   Up      0.0.0.0:5432->5432/tcp
dockerdjangocelery_rabbit_1   /docker-entrypoint.sh rabb ...   Up      0.0.0.0:15672->15672/tcp, 25672/tcp, 4369/tcp, 5671/tcp, 0.0.0.0:5672->5672/tcp
dockerdjangocelery_redis_1    /entrypoint.sh redis-server      Up      6379/tcp
dockerdjangocelery_web_1      ./run_web.sh                     Up      0.0.0.0:8000->8000/tcp
dockerdjangocelery_worker_1   ./run_celery.sh                  Up
dockerdjangocelery_worker_2   ./run_celery.sh                  Up
dockerdjangocelery_worker_3   ./run_celery.sh                  Up
dockerdjangocelery_worker_4   ./run_celery.sh                  Up
dockerdjangocelery_worker_5   ./run_celery.sh                  Up
You''ll see there five powerful Celery workers. Nice!
Summary
Congrats! You just married Django with Celery to build a distributed asynchronous computation system. I think you''ll agree it was pretty easy to build an API, and even easier to scale workers for it! However, life isn''t always so nice to us, and sometimes we have to troubleshoot.
Contribution
Original article written by Justyna Ilczuk, updated by Michał Kobus.
ENGINEERING | DOCKER | CELERY | DJANGO | DOCKER COMPOSEShare:
今天关于Understanding how uid and gid work in Docker containers的介绍到此结束,谢谢您的阅读,有关AngularJs Understanding the Controller Component、BERT: Pre-training of Deep Bidirectional Transformers for Language Understanding、Building Windows containers with AWS CodePipeline and custom actions、Configuring and Running Django + Celery in Docker Containers等更多相关知识的信息可以在本站进行查询。
本文标签:


![[转帖]Ubuntu 安装 Wine方法(ubuntu如何安装wine)](https://www.gvkun.com/zb_users/cache/thumbs/4c83df0e2303284d68480d1b1378581d-180-120-1.jpg)

