对于想了解javafx如何使用FXML从TableView获取选定的数据的读者,本文将提供新的信息,我们将详细介绍javafx怎么获取textfield,并且为您提供关于java–从ListView获
对于想了解javafx如何使用FXML从TableView获取选定的数据的读者,本文将提供新的信息,我们将详细介绍javafx怎么获取textfield,并且为您提供关于java – 从ListView获取选定的元素、JavaFX 2.1 TableView刷新项、JavaFx 2用单列创建TableView、JavaFX TableView的有价值信息。
本文目录一览:- javafx如何使用FXML从TableView获取选定的数据(javafx怎么获取textfield)
- java – 从ListView获取选定的元素
- JavaFX 2.1 TableView刷新项
- JavaFx 2用单列创建TableView
- JavaFX TableView
")
javafx如何使用FXML从TableView获取选定的数据(javafx怎么获取textfield)
我正在一个项目中,我想获取选定的tableview数据,但我正在使用FXML。
我有无FXML的代码,但无法将其用于FXML。
码:
public class person1 { private final StringProperty firstName = new SimpleStringProperty(""); private final StringProperty surname = new SimpleStringProperty(""); private final StringProperty goodnameof1 = new SimpleStringProperty(""); public person1(String firstName) { setFirstName(firstName); } public String getFirstName() { return firstName.get(); } public void setFirstName(String name) { this.firstName.set(name); } public StringProperty firstNameProperty() { return firstName; } public String getSurname() { return surname.get(); } public void setSurname(String name) { surname.set(name); } public StringProperty surnameProperty() { return surname; } public String getGoodnameof1() { return goodnameof1.get(); } public void setGoodnameof1(String name) { goodnameof1.set(name); }}TestController:
public class TestController implements Initializable { /** * Initializes the controller class. */ @Override public void initialize(URL url, ResourceBundle rb) { } @FXML private TableView<person1> table; @FXML void add(ActionEvent event) { table.getItems().add(new person1("dsdsd")); }}现在我想知道我该如何编码以从tableview获取选定的数据
请帮我。
谢谢。
答案1
小编典典如果要选择行索引,请使用
table.getSelectionModel().getSelectedIndex();
java – 从ListView获取选定的元素
我想获取该ListView的字段值.我可以用什么方法?
我只是想我也可以在onclick上添加一个事件并将其保存在控件的属性上.这也是可以接受的吗?
解决方法
ListView<String> listView =new ListView<String>();
从ListView中获取选定的元素:
listView.getSelectionModel().getSelectedItem();
跟踪(聆听)列表视图选择中的更改:
listView.getSelectionModel().selectedItemproperty().addListener(new changelistener<String>() {
    @Override
    public void changed(ObservableValue<? extends String> observable,String oldValue,String newValue) {
        System.out.println("ListView selection changed from oldValue = "
                + oldValue + " to newValue = " + newValue);
    }
});

JavaFX 2.1 TableView刷新项
我有这个常见的问题,看来是这样。重置项目后,我的表格视图不会刷新我的项目。我检查了数据,这是新的数据。
我尝试了多种互联网解决方案,但没有成功。
无法重置所有列,因为它会额外增加一个空一(不知道为什么),并且调整大小会中断。
我的表不可编辑。新数据已更改。
如果更改项目的顺序并且行更改(:|),则刷新数据。
我只是没有想法。
目前,刷新代码非常简单。
ObservableList<User> data = FXCollections.observableArrayList(User.getResellers());reseller_table.setItems(data);同样,新数据是正确的。当我对tableView进行选择时,它将返回新的正确Item。
答案1
小编典典我在刷新时也遇到了类似的问题。我的解决方案是将的操作限制在ObservableList可以正常使用的操作上bind()。
假设ObservableList obsList是的基础列表TableView。
然后,obsList.clear()(从继承java.util.List<>)不会TableView正确更新,但是。
同样调用setItem(obsList)也无法触发刷新…但是…
obsList.removeAll(obsList)(由覆盖ObservableList)工作正常,因为它可以正确触发changeEvent。
然后使用全新内容重新填充列表,如下所示:
obsList.removeAll(obsList);obsList.add(...); //e.g. in a loop...
要么
obsList.removeAll(obsList);FXCollections.copy(obsList, someSourceList)

JavaFx 2用单列创建TableView
我正在尝试使用以下代码创建具有单个列的表:
TableView<String> table = new TableView<String>();
table.getColumns().clear();
table.getColumns().add(new TableColumn<String,String>("City Name"));
table.setItems(cityList);
但是我得到一个带有“城市名称”列的表,后面是一个空白列
我是JavaFx的新手,所以可能会有更好的方法。

JavaFX TableView
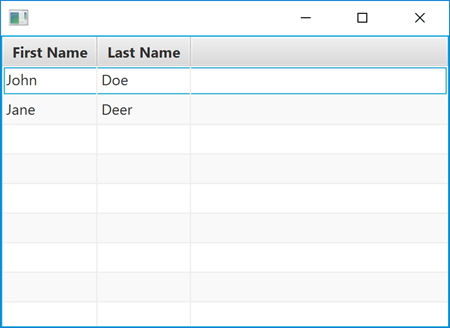
The JavaFX TableView enables you to display table views inside your JavaFX applications. The JavaFX TableView is represented by the class javafx.scene.control.TableView . Here is a screenshot of a JavaFX TableView:
JavaFX的TableView实例可以在你的程序中显示表格。TableView实例是javafx.scene.control.TableView的实例,小面的截图就是一个TableView实例。
Classes Related to TableView
TableView的相关类
The JavaFX TableView class uses a set of related classes to do its job. These classes are:
- TableColumn
- TableRow
- TableCell
- TablePosition
- TableViewFocusModel
- TableViewSelectionModel
What exactly these classes do will be covered in the corresponding sections later in this tutorial.
JavaFX向TableView提供一系列类显示处理数据。
    TableColumn
    TableRow
    TableCell
    TablePosition
    TableViewFocusModel
    TableViewSelectionModel
在后面的例子中我将依次介绍这些类的功能。
JavaFX TableView Example
Here is a full, but simple JavaFX TableView code example:
例子如下:
import javafx.application.Application;
import javafx.collections.FXCollections;
import javafx.collections.ObservableList;
import javafx.scene.Scene;
import javafx.scene.control.Label;
import javafx.scene.control.TableColumn;
import javafx.scene.control.TableView;
import javafx.scene.control.cell.MapValueFactory;
import javafx.scene.control.cell.PropertyValueFactory;
import javafx.scene.layout.VBox;
import javafx.stage.Stage;

/**************************************************************************************************
 * @copyright 2023-2022
 * @package   tutorial.tableview
 * @file      TableViewExample.java
 * @date      2023-03-14 22:04
 * @author    qiao wei
 * @version   1.0
 * @brief     TableView示例
 * @history
 *************************************************************************************************/
public class TableViewExample extends Application {

    public static void main(String[] args) {
        Application.launch(TableViewExample.class, args);
    }

    @Override
    public void start(Stage primaryStage) throws Exception {
        start01(primaryStage);
    }

    private void start01(Stage primaryStage) {
        // Create a TableView instance
        TableView tableView = new TableView();

        // 创建TableColumn实例,参数Person表示列中显示数据来自于那里,参数String表示显示数据的类型,
        // 参数First Name是该列显示的列表头内容
        TableColumn<Person, String> column1 = new TableColumn<>("First Name");

        // PropertyValueFactory的参数是Person对象的字段,绑定Person的字段显示。
        // In the example shown earlier, a second PropertyValueFactory is set on the second
        // TableColumn instance. The property name passed to the second PropertyValueFactory is
        // lastName, which will match the getter method getLastName() of the Person class
        column1.setCellValueFactory(new PropertyValueFactory<>("lastName"));
//        column1.setCellValueFactory(new PropertyValueFactory<>("firstName"));
        TableColumn<Person, String> column2 = new TableColumn<>("Last Name");
        column2.setCellValueFactory(new PropertyValueFactory<>("lastName"));

//        tableView.getColumns().add(column1);
//        tableView.getColumns().add(column2);
//        tableView.getColumns().addAll(column1, column2);
        tableView.getColumns().addAll(column2, column1);
//        tableView.getItems().add(new Person("John", "Doe"));
//        tableView.getItems().add(new Person("alex", "Clinton"));
        tableView.setPlaceholder(new Label("No rows to display"));

        VBox vbox = new VBox(tableView);
        Scene scene = new Scene(vbox);
        primaryStage.setScene(scene);

        primaryStage.show();
    }
}
Here is the Person class used in this example:
TableViewExample中的Person类:
/**************************************************************************************************
 @Copyright 2003-2023
 @package tutorial.tableview
 @date 2023-03-14
 @author qiao wei
 @version 1.0
 @brief TODO
 @history
 *************************************************************************************************/
public class Person {

    public Person() {}

    public Person(String firstName, String lastName) {
        this.firstName = firstName;
        this.lastName = lastName;
    }

    public String getFirstName() {
        return firstName;
    }

    public void setFirstName(String firstName) {
        this.firstName = firstName;
    }

    public String getLastName() {
        return lastName;
    }

    public void setLastName(String lastName) {
        this.lastName = lastName;
    }

    private String firstName = null;

    private String lastName = null;
}
示例如下:
Create a TableView
In order to use a JavaFX TableView component you must first create a TableView instance. Here is an example of creating a JavaFX TableView instance:
在使用TableView控件之前,首先要创建TableView实例。
TableView tableView = new TableView();
Add TableColumn to the TableView
Having created a TableView you need to add one or more TableColumn instances to the TableView instance. A TableColumn represents a vertical column of values. Each value is displayed on its own row, and is typically extracted from the list of objects being displayed in the TableView. Here is an example of adding two TableColumn instances to a JavaFX TableView instance:
创建TableView实例后,需要使用一个或多个TableColumn实例添加到TableView中显示数据,一个TableColumn实例显示一列数据。每个数据会正确的显示在自己的行处,并且每个数据都从绑定的模型中提取。下面是一个添加2个TableColumn的TableView例子:
TableView tableView = new TableView();

TableColumn<Person, String> firstNameColumn =
    TableColumn<>("First Name");
firstNameColumn.setCellValueFactory(
    new PropertyValueFactory<>("firstName"));

TableColumn<Person, String> lastNameColumn =
    new TableColumn<>("Last Name");
lastNameColumn.setCellValueFactory(
    new PropertyValueFactory<>("lastName"));
Notice the Java String parameter passed to the constructor of the TableColumn class. This string will be displayed as the column header above the column. You can see an example of such a column header title in the screenshot at the top of this page.
String字段作为参数传给TableColumn的构造函数。String参数作为标题显示在TableColumn的列表头。
TableColumn Cell Value Factory
A TableColumn must have a cell value factory set on it. The cell value factory extracts the value to be displayed in each cell (on each row) in the column. In the example above a PropertyValueFactory is used. The PropertyValueFactory factory can extract a property value (field value) from a Java object. The name of the property is passed as a parameter to the PropertyValueFactory constructor, like this:
TableColumn必须使用项工厂设置列表的项。工厂为列中的每个项设置值并显示。前面的例子中使用PropertyValueFactory,工厂从Java对象提取属性Property值,属性名作为参数传递给PropertyValueFactory的构造函数,示例如下:
PropertyValueFactory factory = new PropertyValueFactory<>("firstName");The property name firstName will match the getter getter method getFirstName() of the Person objects which contain the values are displayed on each row.
属性名firstName匹配Person实例中的get方法getFirstName(),通过方法getFirstName()获取相应的值并在每行中显示(lastName字符串和方法getFirstName)。
In the example shown earlier, a second PropertyValueFactory is set on the second TableColumn instance. The property name passed to the second PropertyValueFactory is lastName, which will match the getter method getLastName() of the Person class.
在前面的示例中,第二个PropertyValueFactory设置在第二个TableColumn实例中,属性lastName匹配Person实例中的getter方法getLastName(),属性作为参数传递给第二个PropertyValueFactory。
Add Data to TableView
Once you have added TableColumn instances to the JavaFX TableView, you can add the data to be displayed to the TableView. The data is typically contained in a list of regular Java objects (POJOs). Here is an example of adding two Person objects (class shown earlier in this JavaFX TableView tutorial) to a TableView :
将TableColumn实例添加到JavaFX的TableView中可以显示添加在TableColumn中的数据,数据以Java对象保存在列表中。前面的例子添加了2个Person实例在TableView中显示:
tableView.getItems().add(new Person("John", "Doe"));
tableView.getItems().add(new Person("Jane", "Deer"));
Using Maps as Data Items
It is possible to use standard Java Map instances for your data items instead of creating a specific class for them (as the Person class in earlier examples).
也可以使用Map实例替代具体的数据类型(Person)。
To use a Map as a data item the TableColumn instances attached to the TableView need to use a special cell value factory called a MapValueFactory. Here is an example of how configuring two TableColumn instances to display first name and last name extracted from a Map looks:
使用Map作为数据在TableColumn中使用要用到MapValueFactory而不是PropertyValueFactory,下面的例子说明怎样在TableView中显示Map中的数据:
TableColumn<Map, String> firstNameColumn = new TableColumn<>("firstName");
firstNameColumn.setCellValueFactory(new MapValueFactory<>("firstName"));

TableColumn<Map, String> lastNameColumn = new TableColumn<>("lastName");
lastNameColumn.setCellValueFactory(new MapValueFactory<>("lastName"));
With these TableColumn configurations you can use Map instances as data items. Here is a full example showing how to use Map instances as data items:
可以使用Map实例作为TableColumn的数据项,下面是使用Map显示数据的完整示例:
TableView tableView = new TableView();

TableColumn<Map, String> firstNameColumn = new TableColumn<>("firstName");
firstNameColumn.setCellValueFactory(new MapValueFactory<>("firstName"));

TableColumn<Map, String> lastNameColumn = new TableColumn<>("lastName");
lastNameColumn.setCellValueFactory(new MapValueFactory<>("lastName"));

tableView.getColumns().add(firstNameColumn);
tableView.getColumns().add(lastNameColumn);


ObservableList<Map<String, Object>> items =
    FXCollections.<Map<String, Object>>observableArrayList();

Map<String, Object> item1 = new HashMap<>();
item1.put("firstName", "Randall");
item1.put("lastName" , "Kovic");

items.add(item1);

Map<String, Object> item2 = new HashMap<>();
item2.put("firstName", "Irmelin");
item2.put("lastName" , "Satoshi");

items.add(item2);

tableView.getItems().addAll(items);
Set Placeholder When No Rows to Display
You can set a placeholder to be displayed when the JavaFX TableView has no rows to display. The placeholder must be an instance of the JavaFX Node class, which most (if not all) JavaFX controls are. Thus, you can use an JavaFX ImageView or JavaFX Label as placeholder. Here is an example of using a Label as placeholder in a JavaFX TableView :
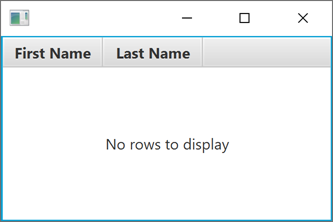
当TableView没有绑定数据时,可以使用占位标识。占位标识必须是JavaFX的Node类或其子类,因此,我们使用JavaFX的ImageView或Label控件作为占位标识。在这里我们使用Label作为占位标识的例子:
tableView.setPlaceholder(new Label("No rows to display"));And here is how the corresponding TableView looks with the placeholder displayed:
运行结果如下:
TableView Selection Model
The JavaFX TableView component has an internal SelectionModel which is used to either read what rows and / or cells the user has selected, or to select rows and cells programmatically. In the following sections I will take a closer look at the JavaFX TableView SelectionModel.
JavaFX的TableView控件持有内置SelectionModel,SelectionModel读取用户选择的行或项数据。接下来,我们来测试TableView的SelectionModel。
Obtain TableView SelectionModel Instance
获取TableView的SelectionModel实例
To obtain the JavaFX TableView SelectionModel you must call its getSelectionModel() method. Here is an example of obtaining the SelectionModel from a JavaFX TableView:
JavaFX使用 方法getSelectionModel()获取SelectionModel实例,示例如下:
TableViewSelectionModel selectionModel = tableView.getSelectionModel();The TableViewSelectionModel class can have a generic type set on it. Typically that type will be the same as was used for the data displayed in the TableView. Here is an example of declaring a generic type on the TableViewSelectionModel when obtaining it:
TableViewSelectionModel 类也可以使用泛型数据设置,使用方法与前面类似,示例如下:
TableViewSelectionModel<Person> selectionModel = tableView.getSelectionModel();Set Selection Mode
You can set the selection mode of the TableView TableViewSelectionModel using its setSelectionMode() method. You can choose whether it should be possible to select only one row, or multiple rows, or even individual cells. Here is an example of setting the selection mode of a TableViewSelectionModel:
你可以使用方法setSelectionModel()设置TableViewSelectionModel 的选择模式,单行选择、多行选择甚至只选择单独一个项,示例如下:
// set selection mode to only 1 row
selectionModel.setSelectionMode(SelectionMode.SINGLE);

// set selection mode to multiple rows
selectionModel.setSelectionMode(SelectionMode.MULTIPLE);
The first line sets the selection mode to only allow a single row to be selected at a time. This is the default setting of the TableViewSelectionModel, by the way.
第一行设置允许每次选择单行,这也是TableViewSelectionModel的默认选择模式。
The second line sets the selection mode to allow the selection of multiple rows. The user will need to hold down the SHIFT or CTRL key while selecting rows to select more than one row.
第一行设置允许每次选择多行,用户在选择时同时按下SHIFT或者CTRL按钮进行复选。
Get Selected Rows
To obtain a list of the selected row items of a JavaFX TableView, you call the SelectionModel getSelectedItems() method. The list returned is read-only. Here is an example of obtaining a list of the selected rows from a JavaFX TableView SelectionModel:
可以通过方法getSelectedItems()获取TableView中的选择的多行项,返回的多行项时只读型,示例如下:
ObservableList selectedItems = selectionModel.getSelectedItems();If the TableViewSelectionModel has a generic type set on it, the ObservableList returned from the getSelectedItems() will have the same generic type. Here is an example:
如果TableViewSelectionModel使用泛型配置,则方法getSelectedItems()返回的ObservableList也是泛型类型,示例如下:
ObservableList<Person> selectedItems = selectionModel.getSelectedItems();Get Selected Indices
You can also just obtain a list of the indices of the selected rows, instead of the selected items themselves. Here is an example of obtaining a list of the indices of selected rows from a TableViewSelectionModel:
我们也可以读取选择的列表项的索引,而不是列表项本身。示例如下:
ObservableList<Integer> selectedIndices = selectionModel.getSelectedIndices();Clear Selection
You can clear all selected rows and cells using the TableViewSelectionModel clearSelection() method. Here is an example of clearing all selected rows or cells of a TableView via the TableViewSelectionModel clearSelection() method:
可以通过方法clearSelection()清空所选择的行或数据项,示例如下:
selectionModel.clearSelection();Listening for Selection Changes
It is possible to listen for selection changes in the TableViewSelectionModel. To do so, you must attach a listener to one of the ObservableList''s returned by either getSelectedItems() or getSelectedIndices(). Which of the two lists you should use depends on whether you need to obtain the selected items or selected indices when selection changes. Here is an example of attaching a change listener to the the ObservableList returned by getSelectedItems():
我们可以监听TableViewSelectionModel所选择的数据。通过方法getSelectedItems()或者方法getSelectedIndices()获取选择的项或索引,并给其添加监听器listener。当被选择的项或者索引变化时,变化会触发注册到列表的监听器。通过项监听的示例如下:
ObservableList<Person> selectedItems =
    selectionModel.getSelectedItems();

selectedItems.addListener(
  new ListChangeListener<Person>() {
    @Override
    public void onChanged(
      Change<? extends Person> change) {
        System.out.println(
          "Selection changed: " + change.getList());
      }
})
Select Rows Programmatically
It is possible to select rows programmatically in a JavaFX TableView. You do so via the TableViewSelectionModel object''s many selection methods. To select a row with a specific index you can use the select(int) method. Here is an example of selecting a single row with a given index in a JavaFX TableView:
可以在 JavaFX 表视图中以编程方式选择行。您可以通过 TableViewSelectionModel 对象的不同选择方法执行此操作。可以使用方法select(int)根据索引选择特定的行。下面是在 JavaFX 表视图中选择具有给定索引的单个行的示例:
selectionModel.select(1);This example selects the row with index 1. Remember that row indices starts from 0 .
上面的例子选择索引1的项,注意索引是从0开始计数。
Nested Columns
The JavaFX TableView supports nesting of the TableColumn instances you add to it. By nesting columns is simply meant that a table column named "Customer" can be subdivided into two nested columns - e.g. "Customer No" and "Name". And the "Name" column can be subdivided again into "First Name" and "Last Name". Here is a JavaFX TableView nested column example showing that:
JavaFX的TableView类支持嵌套TableColumn的实例添加到TableView。使用嵌套列可以将Customer列划分成两个列“Customer No”和“Name”。其中“Name”又可以划分为“First Name”和“Last Name”列。示例如下:
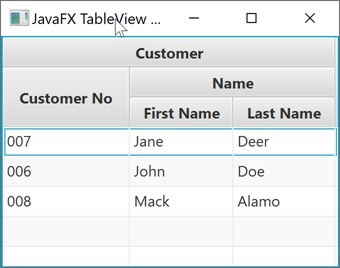
The TableColumn instances lowest in the nesting levels are called leaf columns. Only leaf columns can show data. Thus, you only add cell value factories to the leaf TableColumn instances. The TableColumn instances higher up in the nesting levels are primarily there as a visual effect.
嵌套层中最底层的TableColumn是叶column。只有叶column能够显示数据。因此,你只需要将CellValueFactory项数据工厂添加到叶TableColumn实例。
Here is the code for the above JavaFX TableView nested column example:
示例如下:
TableView tableView = new TableView();

TableColumn<Customer, String> customer   = new TableColumn<>("Customer");
TableColumn<Customer, String> customerId = new TableColumn<>("Customer No");
TableColumn<Customer, String> name = new TableColumn<>("Name");
TableColumn<Customer, String> firstName  = new TableColumn<>("First Name");
TableColumn<Customer, String> lastName   = new TableColumn<>("Last Name");

name.getColumns().addAll(firstName, lastName);
customer .getColumns().addAll(customerId, name);
tableView.getColumns().addAll(customer);

customerId.setCellValueFactory(new PropertyValueFactory<>("customerNo"));
firstName .setCellValueFactory(new PropertyValueFactory<>("firstName"));
lastName  .setCellValueFactory(new PropertyValueFactory<>("lastName"));

tableView.getItems().add(new Customer("007", "Jane", "Deer"));
tableView.getItems().add(new Customer("006", "John", "Doe"));
tableView.getItems().add(new Customer("008", "Mack", "Alamo"));
Visible Leaf Columns
The JavaFX TableView class has a method called c which can return a visible leaf column (TableColumn) of the TableView. You pass the index of the visible leaf column to get as parameter to the getVisibleLeafColumn() method. Here is an example of obtaining the second (index 1) visible leaf column from a JavaFX TableView:
JavaFX的TableView类提供一个返回可见的叶column(TableColumn)的方法getVisibleLeafColumn(int)。将可见的叶column索引传递给getVisibleLeafColumn()方法,示例如下,获取TableView中第二个可见的叶column:
TableColumn<String, Customer> leafColumn = tableView.getVisibleLeafColumn(1);If the above code was executed against the TableView configured in the example in the previous section, the TableColumn returned would be the "First Name" TableColumn.
You can also obtain all visible leaf columns via the TableView getVisibleLeafColumns() .
如果上述代码是针对上一节示例中配置的 TableView 执行的,则返回的 TableColumn 将是“First Name”TableColumn。你也可以通过方法getVisibleLeafColumns()获取所有的叶column。
Hide Columns
The JavaFX TableView enables you to hide a TableColumn by calling the TableColumn setVisible() passing false as parameter. Here is an example of hiding a TableColumn:
通过TableColumn的方法setVisible(bool)可以设置TableColumn是否隐藏,如下所示:
tableColumn.setVisible(false);To show a hidden column again, simply call setVisible() with true as parameter value. Here is an example of showing a TableColumn:
使用方法setVisible(true)可以将隐藏列显示给用户。示例如下:
tableColumn.setVisible(true);Reorder Columns
The JavaFX TableView enables you to reorder its columns. There are two ways you can recorder its columns.
JavaFX的TableView允许你按不同顺序重写排列列。以下有2种方式重新排列列。
The first method is to drag a column to a different horizontal position inside the TableView. This is done by the end user - not the developer.
第一种方法是在TableView中拖拽列挪动到不同位置,这种方法只能由用户操作,而不是开发人员。
The second method is to change the order of the TableColumn instances in the ObservableList returned by the TableView getColumns() method. This is done programmatically. Here is an example of removing the first column and adding it again as the last column of the TableView:
第二种方法是改变ObservableList中TableColumn实例的顺序,ObservableList通过TableView的方法getColumns()可以获取。示例是将第一列从TableView中移除,并将该列添加到最后一列处。
tableView.getColumns().add(tableView.getColumns().remove(0));Sorting Rows
The JavaFX TableView enables you to sort the rows in the TableView. There are two ways rows can be sorted.
JavaFX的TableView允许你对其中的多行(rows)进行排序。对行排序有以下两种方法。
The first way is for the user to click on the TableColumn header cell (where the column title is displayed). This will sort the rows in the TableView after the values of that column. If the user clicks on the same TableColumn cell one more time, the sort order is reversed. And if the user clicks a third time, the sorting on that column is disabled again.
第一种方法是用户点击TableColumn的表头项(显示列表头的项),这样TableView中的多行会根据该列中的数据进行排序。当用户在同一个TableColumn项点击2次时,排序顺序颠倒,当用户点击3次时,排序恢复成数据初始状态(不正序排列,也不反序排列)。
The second way to sort the rows of a TableView is programmatic. You can set the sort order (ascending or descending), set a custom Comparator to compare the values of a TableColumn, set a custom sort icon to be displayed, and even disable sorting completely for a given TableColumn. These options will be explained in more detail below.
第二种TableView排列多行是编程方式。程序员可以设置排序方式(增序或降序),设置一个自定义比较器比较TableColumn中的数据,设置一个排序图标显示,甚至可以将给定的TableColumn禁止排序。以上设置示例如下所示:
Sort Type
You can specify which sort type you want the column to use using the TableColumn setSortType() method. You can set the sort type to either ascending or descending. Here are two examples that show how to set both sort types:
你可以通过TableColumn的方法setSortType()设置排列类型。排列类型有升序、降序两种选择,示例如下:
tableColumn.setSortType(TableColumn.SortType.ASCENDING);
tableColumn.setSortType(TableColumn.SortType.DESCENDING);
Disable Sorting for a Column
It is possible to complete disable sorting for a given TableColumn. You do so via the TableColumn setSortable() method. Here is an example of disabling sorting for a given TableColumn:
通过TableColumn的方法setSortable()可以对指定的TableColumn禁用排序,禁用排序示例如下:
tableColumn.setSortable(false);To re-enable sorting for the TableColumn, simply call setSortable() with the value true as parameter - like this:
设置方法setSortable()参数为true,TableColumn可以进行排序:
tableColumn.setSortable(false);Column Custom Comparator
You can set a custom Comparator interface implementation on a TableColumn. This Comparator implementation will determine how values displayed in that column will get sorted. You set a Comparator on a TableColumn via its setComparator() method. Here is an example of setting a custom Comparator on a TableColumn:
你可以对TableColumn设置一个继承了接口Comparator的选择器,选择器根据规则显示排序的数据。程序员通过方法setComparator()设置选择器。选择器示例如下:
Comparator<String> columnComparator =
    (String v1, String v2) -> {
        return v1.toLowerCase().compareTo(v2.toLowerCase());
};

tableColumn.setComparator(columnComparator);
This example first creates a Comparator implementation that compares String objects in their lowercase forms. Then it sets this Comparator on a TableColumn. This Comparator will then determine the sort order of values displayed in that column.
上例创建了一个比较小写格式的String对象的比较器。比较器决定了该列的排序方式。
Column Default Comparator
The TableColumn has a default Comparator set on it which can perform some intelligent form of default sorting for you. Sometimes that default Comparator is enough. Here is how the default Comparator compares two values displayed inside the same column:
TableColumn有默认比较器来智能的排序,一般情况下默认比较器功能够用。下面列举了默认比较器如何比较数据:
- Checks for
nullvalues. Anullvalue is considered less than a non-null value. If both values arenullthey are considered equal. - If the first value is an object implementing the Comparable interface, then the default Comparator will return
value1.compareTo(value2). - If rule 1 and 2 did not apply to the values - the default Comparator converts the two values into Strings using their
.toString()methods, and compares these.
Column Sort Node
The TableColumn class uses a "sort Node" to display the type of sorting currently being applied to that column. The sort Node is displayed inside the column header. The default sort Node is an arrow-like triangle.
TableColumn类使用“排序节点”显示当前列排序方式,排序节点在列表头中显示,默认情况下排序节点是箭头符号。
You can change the sort Node for a TableColumn via its setSortNode() method, passing a JavaFX Node to be used as sort Node. Here is an example of setting an ImageView as sort Node on a TableColumn:
你可以通过方法setSortNode()设置排序节点,JavaFX的Node类可以作为排序节点使用,设置ImageView作为排序节点,示例如下:
FileInputStream input = new FileInputStream("images/sort-image.png");
Image image = new Image(input);
ImageView sortImage = new ImageView(image);

tableColumn.setSortNode(sortImage);
Note: The default sort Node used by the TableColumn is rotated 180 degrees when the sort type changes from ascending to descending. However, this rotation does not seem to happen for a custom sort Node. You will probably have to manage the change of sort Node yourself when the sort type is changed.
Column Sort Order
The JavaFX TableView enables you to specify the default sort order of a TableView. The items in the TableView will be sorted according to this order - until the user clicks some TableColumn headers and changes the sort order.
TableView允许你设置默认排序方式,TableView以默认排序显示数据,当用户点击TableColumn头时改变排序方式。
The default sort order consists of an ObservableList of TableColumn instances. Items in the TableView will be sorted after the sorting set on the first TableColumn in this list. If the values of the first TableColumn are equal, the items will be sorted accordinng to the sorting set on the second TableColumn, and if they are equal then the third TableColumn etc.
Here is an example of setting the default sort order:
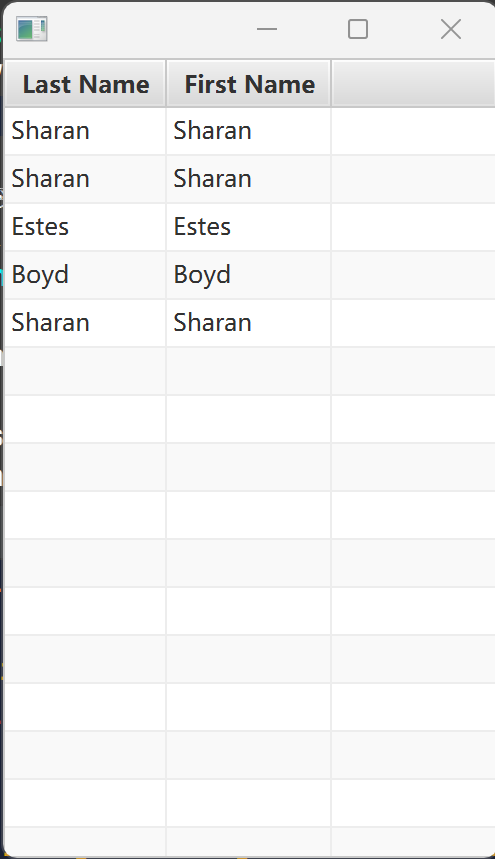
tableView.getSortOrder().addAll(lastNameColumn, firstNameColumn);This example sets the sort order to lastNameColumn first, and then firstNameColumn second.
Note: I am having a bit of challenges seeing the sort order reflected correctly in the items displayed in the TableView when I run my examples - but something happens though. You might have to play a bit with this feature to get it to do as you want!
Trigger Sorting Manually
The JavaFX TableView control contains a method named sort() which when called will trigger sorting of the items in the TableView. Here is an example of caling the TableView sort() method:
tableView.sort();Sort Events
The JavaFX TableView fires a sort event just before sorting of the items is carried out. You can listen for sort events using the TableView setOnSort() method, passing an EventHandler interface implementation as parameter. Here is an example of listening for sort events on a JavaFX TableView:
tableView.setOnSort((event) -> {
    System.out.println("Sorting items");
});
By the way, if the event listener calls event.consume() - then the sorting will be canceled. Here is how that could look:
tableView.setOnSort((event) -> {
    event.consume();
});
Disable Sorting for TableView
You can disable sorting for the whole TableView either by listening for sort events and consume them (call event.consume() ) or by disabling sorting on all TableColumn instances. There are other ways to disable sorting for the whole TableView too - but these two should suffice.
Virtualized Cell Rendering
The rendering of cells in a JavaFX TableView is virtualized. That means, that the TableView will only create cell rendering objects for the rows / columns that are visible - not for all rows in the backing data set. Thus, if a TableView contains 1,000 rows, but only 10 of them are visible at a time, then the TableView will only create cell rendering objects for the 10 rows that are visible - not for all 1,000 rows. As the user scrolls through the data in the data set displayed in the TableView, the already created cell rendering objects are reused to display the rows that become visible. This way, the TableView can handle very large data sets with less memory overhead from cell rendering objects.
Custom Cell Rendering
The JavaFX TableView enables you to customize the rendering of the cells displayed in the TableView. Each TableColumn added to the TableView has one cell per visible row in the TableView. That means, that if the TableView has 10 visible rows, and 3 columns, then each column (TableColumn) has 10 cells - for a grand total of 30 cells.
As mentioned, the cell count is determined by the number of visible rows and columns (visible cells). It doesn''t matter if there are 1000 data items (rows) in the items list of the TableView. It only matters how many rows are visible at a given time. The visible cell objects will be reused to display the values of whatever rows are visible at any given time. This design saves a lot of cell object creation compared to creating a cell object for each column of each row (data item).
To customize the cell rendering you must set a cell factory on the TableColumn for which you want to customize the cell rendering. You set a cell factory via the TableColumn setCellFactory() method. The setCellFactory() method takes a Callback interface implementation as parameter. The Callback implementation creates TableCell instances. Each TableCell instance corresponds to one visible cell in the TableView. The Callback implementation will be called one time per TableCell to create, so the Callback implementation does not need to know how many visible cells there are in the TableView.
To better understand how cell factories work, let us look at an example of setting a cell factory on a TableColumn:
customerColumn.setCellFactory((tableColumn) -> {
    TableCell<Customer, String> tableCell = new TableCell<>() {
        @Override
        protected void updateItem(String item, boolean empty) {
            super.updateItem(item, empty);

            this.setText(null);
            this.setGraphic(null);

            if(!empty){
                this.setText(item.toUpperCase());
            }
        }
    };

    return tableCell;
});
This example calls the setCellFactory() method with a Callback implementation as a Java Lambda Expression.
The Callback implementation creates a TableCell and returns it. The TableCell created is an anonymous subclass of the TableCell class, where the updateItem() method is overridden. The updateItem() method on the TableCell subclass is called every time the TableCell is to show the column value for a new item (row). That is why the updateItem() method first calls setText(null) and setGraphic(null) - to clear whatever text and graphics the TableCell was showing before.
After clearing the values from the previous item (row), the new value is set - if the cell is not empty that is. The second parameter passed to updateItem() is a boolean which will have the value true if the cell is empty. If the cell is empty the TableCell should not show any value.
A TableCell is rendered similarly to a JavaFX Label - meaning it can show both a graphic and a text. To show a graphic the TableCell updateItem() call the setGraphic() method with a JavaFX Node object as parameter. To show a text call setText() with a String as parameter. The TableCell can show both graphic and text at the same time.
Editable TableView
It is possible to make a JavaFX TableView editable. Making a JavaFX TableView editable requires a few steps. First, you must call the setEditable() method of the TableView, passing a value of true as parameter. Here is how that looks:
tableView.setEditable(true);Second, you must set a different cell renderer on the TableColumn''s you want to be editable. JavaFX comes with 4 built-in cell renderers you can use:
- TextFieldTableCell
- CheckBoxTableCell
- ChoiceBoxTableCell
- ComboBoxTableCell
The TextFieldTableCell cell renderer is used to enable editing of a cell value using a TextField. The CheckBoxTableCell cell renderer is used to enable editing of a cell value using a CheckBox. The ChoiceBoxTableCell cell renderer is used to enable editing of a cell value using a ChoiceBox. The ComboBoxTableCell cell renderer is used to enable editing of a cell value using a ComboBox.
Here is an example of how to use these cell renderers:
TableView tableView = new TableView();
tableView.setEditable(true);

TableColumn<Person, String> column1 = new TableColumn<>("First Name");
column1.setCellValueFactory(new PropertyValueFactory<>("firstName"));

TableColumn<Person, String> column2 = new TableColumn<>("Last Name");
column2.setCellValueFactory(new PropertyValueFactory<>("lastName"));
column2.setCellFactory(TextFieldTableCell.<Person>forTableColumn());

TableColumn<Person, String> column3 = new TableColumn<>("Category");
column3.setCellValueFactory(new PropertyValueFactory<>("category"));
column3.setCellFactory(ComboBoxTableCell.<Person, String>forTableColumn("Category 1", "Category 2"));

TableColumn<Person, Boolean> column4 = new TableColumn<>("Is XYZ");
column4.setCellValueFactory( cellData -> new ReadOnlyBooleanWrapper(cellData.getValue().getIsXyz()));
column4.setCellFactory(CheckBoxTableCell.<Person>forTableColumn(column4));


tableView.getColumns().add(column1);
tableView.getColumns().add(column2);
tableView.getColumns().add(column3);
tableView.getColumns().add(column4);

tableView.getItems().add(new Person("John"  , "Doe"  , null, false));
tableView.getItems().add(new Person("Jane"  , "Deer" , "Category 1", true));
tableView.getItems().add(new Person("Dinesh", "Gupta", "Category 2", true));
The Person class used in this example looks like this:
public class Person {

    private String firstName = null;
    private String lastName = null;

    private String category = null;

    private boolean isXyz = true;

    public Person() {
    }

    public Person(String firstName, String lastName) {
        this.firstName = firstName;
        this.lastName = lastName;
    }

    public Person(String firstName, String lastName, String category, boolean isXyz) {
        this.firstName = firstName;
        this.lastName  = lastName;
        this.category  = category;
        this.isXyz     = isXyz;
    }

    public String getFirstName() {
        return firstName;
    }

    public void setFirstName(String firstName) {
        this.firstName = firstName;
    }

    public String getLastName() {
        return lastName;
    }

    public void setLastName(String lastName) {
        this.lastName = lastName;
    }

    public String toString() {
        return "{ firstName: ''" + this.firstName + ", lastName: " + this.lastName + " }";
    }


    public String getCategory() {
        return this.category;
    }

    public void setCategory(String category) {
        this.category = category;
    }

    public Boolean getIsXyz() {
        return this.isXyz;
    }

    public void setIsXyz(Boolean isXyz) {
        this.isXyz = isXyz;
    }
}
我们今天的关于javafx如何使用FXML从TableView获取选定的数据和javafx怎么获取textfield的分享就到这里,谢谢您的阅读,如果想了解更多关于java – 从ListView获取选定的元素、JavaFX 2.1 TableView刷新项、JavaFx 2用单列创建TableView、JavaFX TableView的相关信息,可以在本站进行搜索。
本文标签:


