本文的目的是介绍html–CSS–悬停时文本移动的详细情况,特别关注css鼠标悬停文字时显示图片的相关信息。我们将通过专业的研究、有关数据的分析等多种方式,为您呈现一个全面的了解html–CSS–悬停
本文的目的是介绍html – CSS – 悬停时文本移动的详细情况,特别关注css鼠标悬停文字时显示图片的相关信息。我们将通过专业的研究、有关数据的分析等多种方式,为您呈现一个全面的了解html – CSS – 悬停时文本移动的机会,同时也不会遗漏关于CSS + HTML 鼠标在图片上悬停时的显示文字,移走时文字消失、css – 图标悬停时滑入文本、HTML Canvas - 基于鼠标移动的文本移动和显示层、HTML CSS 实现鼠标悬停时图片拉近效果的知识。
本文目录一览:- html – CSS – 悬停时文本移动(css鼠标悬停文字时显示图片)
- CSS + HTML 鼠标在图片上悬停时的显示文字,移走时文字消失
- css – 图标悬停时滑入文本
- HTML Canvas - 基于鼠标移动的文本移动和显示层
- HTML CSS 实现鼠标悬停时图片拉近效果
")
html – CSS – 悬停时文本移动(css鼠标悬停文字时显示图片)
我现在已经在这里待了大约一个小时,似乎无法抓住它.
每当我将鼠标悬停在此文本上时(我想为其悬停一个背景颜色),文本会随着bgcolor一起移动.
这是我得到的:
        #innerheader ul {
            list-style:none;
            margin:0;
            padding:0;
        }
        #innerheader li {
            display:block;
            float:left;
            height:25px;
            margin:0 2px;
            padding:15px 10px 0 10px;
            color:#FFFFFF;
            font-weight:bold;
            font-size:10px;
            text-transform:uppercase;
        }

        #innerheader li a,#innerheader li a:link,#innerheader li a:visited,#innerheader li a:active {
            color:#FFFFFF;
            text-decoration:none;
        }
        #innerheader li a:hover {
            background-color: blue;
            padding: 10px 10px 10px 10px
        }
文本移动的原因是锚点上没有填充,然后当你悬停时,就会出现填充.
#innerheader li a,#innerheader li a:active {
        color:#FFFFFF;
        text-decoration:none;
        padding: 10px;
    }
    #innerheader li a:hover {
        background-color: blue;
    }

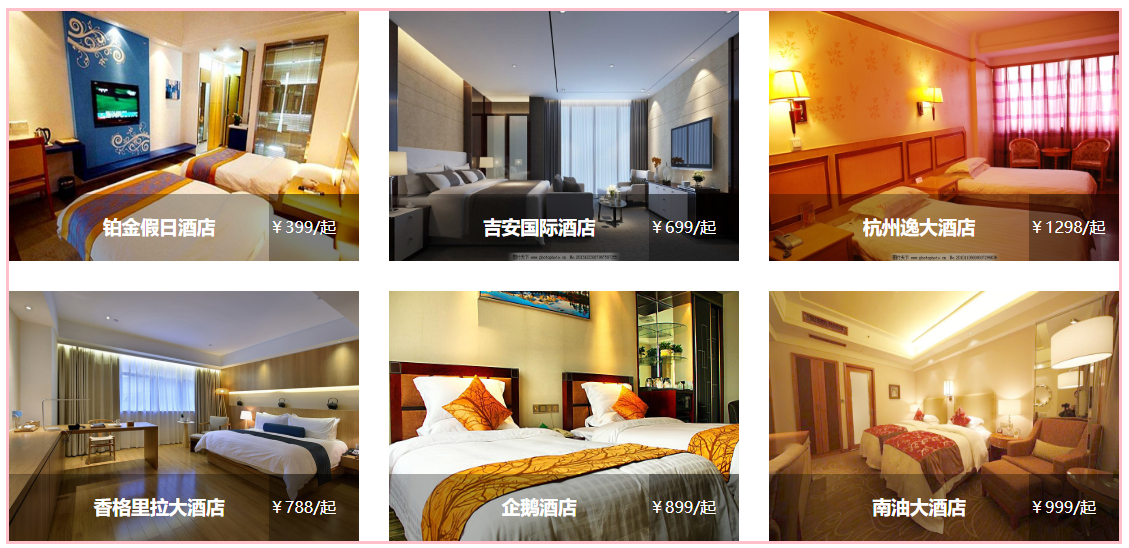
CSS + HTML 鼠标在图片上悬停时的显示文字,移走时文字消失
鼠标在图片上悬停时的显示介绍,移走时介绍消失
加载完成时的效果图
鼠标悬停时弹出的效果

样式


html,
            body {
                height: 100%;
            }

            #div1 {
                width: 1110px;
                height: 530px;
                border: 3px solid pink;
                overflow: hidden;
                position: absolute;
            }

            #div2 {
                margin-right: -30px;
                margin-bottom: -30px;
                overflow: auto;
            }

            .box {
                position: relative;
                width: 350px;
                height: 250px;
                margin: 0 30px 30px 0;
                background-size: 100% 100%;
                float: left;
            }
            .box img{
                width: 350px;
                height: 250px;
            }

            .box:hover .details {
                display: block;
            }

            .text {
                position: absolute;
                bottom: 0px;
                width: 100%;
                line-height: 30px;
                background-color: rgba(0, 0, 0, 0.3);
            }

            .blank {
                float: left;
                width: 80px;
                background-color: transparent;
                height: 30px;
            }

            .h3 {
                float: left;
                width: 140px;
                text-align: center;
                color: #ffffff;
            }

            .details {
                color: #FFFFFF;
                display: none;
            }

            .price {
                position: absolute;
                top: 0;
                bottom: 0;
                right: 0;
                width: 90px;
                background-color: rgba(0, 0, 0, 0.3);
                color: white;
            }

            .price div {
                height: 30px;
                position: absolute;
                top: 0;
                bottom: 0;
                right: 0;
                left: 0;
                margin: auto;
            }
HTML
<div id="div1">
            <div id="div2">
                <div class="box" >
                    <img src="img/123.jpg"/>
                    <div class="text">
                        <div class="blank"></div>
                        <div class="h3">
                            <h3>铂金假日酒店</h3>
                            <p class="details">
                                假日酒店遍布全美国高速公路可以通达的每个地方,并走向全世界,从而使假日酒店集团成为世界上第一家
                            </p>
                        </div>
                        <div class="price">
                            <div>¥399/起</div>
                        </div>
                    </div>
                </div>
                <div class="box">
                    <img src="img/5f1.jpg"/>
                    <div class="text">
                        <div class="blank">
                        </div>
                        <div class="h3">
                            <h3>吉安国际酒店</h3>
                            <p class="details">
                                吉安国际酒店是集餐饮、旅业、会议、休闲娱乐为一体的吉安唯一涉外综合型商务酒店
                            </p>
                        </div>
                        <div class="price">
                            <div>¥699/起</div>
                        </div>
                    </div>
                </div>
                <div class="box" >
                    <img src="img/91.jpg"/>
                    <div class="text">
                        <div class="blank">
                        </div>
                        <div class="h3">
                            <h3>杭州逸大酒店</h3>
                            <p class="details">
                                杭州逸酒店地处市中心区域,距西湖仅10分钟车程,毗邻历史悠久的武林广场。
                            </p>
                        </div>
                        <div class="price">
                            <div>¥1298/起</div>
                        </div>
                    </div>
                </div>
                <div class="box">
                    <img src="img/a32.jpg"/>
                    <div class="text">
                        <div class="blank">
                        </div>
                        <div class="h3">
                            <h3>香格里拉大酒店</h3>
                            <p class="details">
                                香格里拉酒店集团便不断向国际迈进;以香港为大本营,今日香格里拉已是大的豪华酒店
                            </p>
                        </div>
                        <div class="price">
                            <div>¥788/起</div>
                        </div>
                    </div>
                </div>
                <div class="box">
                    <img src="img/e0.jpg"/>
                    <div class="text">
                        <div class="blank">
                        </div>
                        <div class="h3">
                            <h3>企鹅酒店</h3>
                            <p class="details">
                                长隆企鹅酒店,紧邻海洋王国主题公园;主题客房数量达2000间,拥有难得一见的企鹅馆
                            </p>
                        </div>
                        <div class="price">
                            <div>¥899/起</div>
                        </div>
                    </div>
                </div>
                <div class="box">
                    <img src="img/e500.jpg"/>
                    <div class="text">
                        <div class="blank">
                        </div>
                        <div class="h3">
                            <h3>南油大酒店</h3>
                            <p class="details">
                                珠海南油大酒店坐落于风景秀丽的水湾路地段,交通便利,距吉大商业中心及情侣路仅百米之遥。
                            </p>
                        </div>
                        <div class="price">
                            <div>¥999/起</div>
                        </div>
                    </div>
                </div>
            </div>
        </div>
css – 图标悬停时滑入文本
我一直试图在下面得到一个效果:
>图标字体显示,旁边的文字被隐藏.
>当悬停在图标上时,滑动隐藏的文本.从右侧滑入.
这是我到目前为止所尝试的:
(因为它需要很长时间,用一些随机键盘符号替换图标)
http://jsfiddle.net/h9EX9/
ul li { display: inline-block; list-style-type: none; margin-right: 10px; background: #eee; }
ul li span { display: inline-block; }
ul li a { display: inline-block; width: 0; height: 0; overflow: hidden;  }
ul li:hover a  { transition: all 1s ease-out; width: 100%; height: auto; }
这就是我想要完成的效果.注释的文本和宽度从右侧滑动.但除此之外还有其他图标.我希望它也可以在背景宽度扩大时滑动它们.
这样可能,如果是这样的话怎么样?
演示:http://jsfiddle.net/Marcel/h9EX9/1/
正确实现时,您可能希望使用额外的包装元素来设置动画而不是< a>.因为你将有多个< a>例如,“标签”按钮中的元素.

HTML Canvas - 基于鼠标移动的文本移动和显示层
如何解决HTML Canvas - 基于鼠标移动的文本移动和显示层?
这将是一个简短的。基本上,我正在尝试重新创建本网站主页上看到的 Y - https://yalantis.com/。
我以前从未使用过 Canvas,对 JS 不是很精通。
我已经设法绘制了一个画布,并获得了我想要的形状和旋转动画,但我似乎无法找到解释画布如何在 yalantis 网站上移动的来源。
这是我目前所做的:
var canvas = document.getElementById(''canvas'');
const ctx = canvas.getContext("2d");
// create mouse event listener
const mouse = { x: 0,y: 0 };
function mouseEvents(e) {
  const bounds = canvas.getBoundingClientRect();
  mouse.x = e.pageX - bounds.left - scrollX;
  mouse.y = e.pageY - bounds.top - scrollY;
}
document.addEventListener("mousemove",mouseEvents);

// draw design at x,y and rotated by angle
function drawRotated(x,y,angle) {
  ctx.setTransform(1,1,x,y);
  ctx.rotate(angle);
  ctx.beginPath();
  // ctx.arc(0,100,Math.PI * 2);
  // ctx.moveto(-100,0);
  // ctx.lineto(100,0);
  // ctx.lineto(60,-80);
  // ctx.stroke();
  ctx.font = ''600pt Rig Sans'';
  ctx.linewidth = 1;
  ctx.strokeblue'';
  ctx.strokeText(''W'',y);
  ctx.closePath();
  ctx.stroke();
}

// render loop called 60 times a second
function update(timer) {
  ctx.setTransform(1,0); // reset transform
  ctx.clearRect(0,300,300);

  // get angle from center to mouse
  var angle = Math.atan2(mouse.y - 150,mouse.x - 150);

  // draw rotated design
  drawRotated(150,150,angle);
  requestAnimationFrame(update);
}
requestAnimationFrame(update);


  $(''#canvas'').attr(''height'',$(document).height());
  $(''#canvas'').attr(''width'',$(document).width());
虽然这也有点失败,因为它在每次鼠标移动时都会复制自己,并在一个奇怪的位置原地旋转。
任何帮助将不胜感激。 谢谢。
解决方法
您可以通过绘制多个字母然后根据鼠标位置偏移它们来执行类似的操作。
在鼠标位置,我将 x 和 y 偏移了绘制字母的位置,在本例中为画布的中心。
    mouse.x = e.x - bounds.x - canvas.width/2;
    mouse.y = e.y - bounds.y - canvas.height/2;
因此,当我的鼠标位于字母中间时,它显示为一个字母。现在在我的循环中创建每个字母我可以使用 i 来抵消每次迭代。除以 10 只是我选择的一个数字,以防止字母移动太多。与乘以 i*0.25 相同。这只是基于我认为每个字母与前一个字母移动多远看起来不错的结果。
    ctx.strokeText(''W'',x - (mouse.x/10*(i*0.25)),y - (mouse.y/10*(i*0.25)));
    ctx.fillText(''W'',y - (mouse.y/10*(i*0.25)));
您会看到鼠标离字母中心越远,字母的每个迭代越分散。
var canvas = document.getElementById("canvas");
const ctx = canvas.getContext("2d");
canvas.width = innerWidth;
canvas.height = innerHeight;
let bounds = canvas.getBoundingClientRect();
// create mouse event listener
const mouse = { x: 0,y: 0 };
function mouseEvents(e) {
  bounds = canvas.getBoundingClientRect();
  mouse.x = e.x - bounds.x - canvas.width / 2;
  mouse.y = e.y - bounds.y - canvas.height / 2;
}
canvas.addEventListener("mousemove",mouseEvents);

// draw design at x,y and rotated by angle
function drawRotated(x,y) {
  ctx.textAlign = "center";
  ctx.beginPath();
  ctx.font = "300pt Rig Sans";
  ctx.fill;
  ctx.shadowColor = "rgb(255,153,51)";
  ctx.stroke;
  let j = 1;
  for (let i = 7; i > 1; i--) {
    ctx.lineWidth = j;
    ctx.shadowBlur = j;
    ctx.strokeText(
      "W",x - (mouse.x / 10) * (i * 0.25),y - (mouse.y / 10) * (i * 0.25)
    );
    ctx.fillText(
      "W",y - (mouse.y / 10) * (i * 0.25)
    );
    ctx.closePath();
    j++
  }
}

function update() {
  ctx.clearRect(0,canvas.width,canvas.height);
  ctx.fillRect(0,canvas.height);

  // draw rotated design
  drawRotated(canvas.width / 2,canvas.height / 2 + 100);
  requestAnimationFrame(update);
}
update();

window.addEventListener("resize",() => {
  bounds = canvas.getBoundingClientRect();
  canvas.width = innerWidth;
  canvas.height = innerHeight;
});
//$(''#canvas'').attr(''height'',$(document).height());
//$(''#canvas'').attr(''width'',$(document).width());
<canvas id="canvas"></canvas>可能有更好的方法来做到这一点,但它可以帮助您入门。

HTML CSS 实现鼠标悬停时图片拉近效果
前言
为了让网页的使用体验更好,我们会让网页的某些元素对鼠标的动作做出响应。例如鼠标滑过、单击按钮的时候按钮变色、变形。之前在很多网页上看到了鼠标滑过一个图片链接时图片放大、拉近的效果,今天尝试实现一下。
1. 使用background实现
思路:设置以图片作为
div元素的背景,鼠标滑过div的时候通过background属性放大图片。
<!DOCTYPE html>
<html>

<head>
  <meta charset="UTF-8">
  <title>background实现图片拉近效果</title>
  <style>
    #box {
      background: url(../images/img022.png);
      width: 720px;
      height: 720px;
      margin: 0 auto;
      border: 1px solid #aaa;
      background-color: #444;
    }

    #box:hover {
      background-size: 100.5% 100.5%;
    }
  </style>
</head>

<body>
  <div id=''box''>

  </div>
</body>

</html>
2. 使用img元素的width height属性实现
思路:当鼠标滑过图片时,修改
img元素的width和height属性放大图片
<!DOCTYPE html>
<html>
<head>
  <meta charset="UTF-8">
  <title>img图片拉近效果</title>
  <style>
    #box{
      width:60%;
      min-width:1000px;
      min-height:800px;
      margin:0 auto;
      border:1px solid #aaa;
      background-color:#444;
      text-align:center;

    }

    img:hover{
      width:723px;
      height:723px;
    }
  </style>
</head>
<body>
  <div id=''box''>
    <img src="../images/img022.png" width=''720px'' height=''720px'' />
  </div>
</body>
</html>
3. 使用transform放大图片
<!DOCTYPE html>
<html>

<head>
  <meta charset="UTF-8">
  <title>transform实现图片拉近效果</title>
  <style>
    a:hover img {
      transform: scale(1.005, 1.005);
    }
  </style>
</head>

<body>
    <a href="#">
        <img src="../images/img022.png" />
    </a>
</body>

</html>
4. 使用transform和transition来放大图片
以上的3种实现方式中,图片放大过程几乎都是瞬间完成的,感觉不流畅,视觉体验也不好。同
transition可以设置放大过程经历的时间,从而有流畅的感觉。
<!DOCTYPE html>
<html>

    <head>
        <meta charset="UTF-8">
        <title>transform、transform实现图片拉近</title>
        <style>

            .test_a {
                display: block;
                margin: 0 auto;
                width:400px;
                overflow: hidden;
            }

            .test_a img {
                width: 100%;
            }

            .test_a:hover img {
                transform: scale(1.2);
                transition: all 1s ease 0s;
            }


        </style>
    </head>

    <body>
        <a href="">
          <img src="../images/img022.png" />
        </a>
    </body>

</html>
上面这种方式,图片放大过程是流畅的,但是缩小过程很生硬,可以改进一下。
<!DOCTYPE html>
<html>

    <head>
        <meta charset="UTF-8">
        <title>transform、transform 图片拉近 优化</title>
        <style>

            .test_a {
                display: block;
                margin: 0 auto;
                width:400px;
                overflow: hidden;
            }

            .test_a img {
                width: 100%;
                transform: scale(1);
                transition: all 1s ease 0s;
            }

            .test_a:hover img {
                transform: scale(1.2);
                transition: all 1s ease 0s;
            }
        </style>
    </head>

    <body>
        <a href="">
          <img src="../images/img022.png" />
        </a>
    </body>

</html>
后语
实验的时候发现很多知识有点模糊了,该补习了。
在线DEMO https://hgy9473.github.io/myl...
关于html – CSS – 悬停时文本移动和css鼠标悬停文字时显示图片的介绍已经告一段落,感谢您的耐心阅读,如果想了解更多关于CSS + HTML 鼠标在图片上悬停时的显示文字,移走时文字消失、css – 图标悬停时滑入文本、HTML Canvas - 基于鼠标移动的文本移动和显示层、HTML CSS 实现鼠标悬停时图片拉近效果的相关信息,请在本站寻找。
本文标签:


![[转帖]Ubuntu 安装 Wine方法(ubuntu如何安装wine)](https://www.gvkun.com/zb_users/cache/thumbs/4c83df0e2303284d68480d1b1378581d-180-120-1.jpg)

