对于optuna.integration.lightGBM自定义优化指标感兴趣的读者,本文将提供您所需要的所有信息,并且为您提供关于202205073.Integration-EnterpriseJa
对于optuna.integration.lightGBM 自定义优化指标感兴趣的读者,本文将提供您所需要的所有信息,并且为您提供关于20220507 3. Integration - Enterprise JavaBeans (EJB) Integration、5、AFM(Attention+FM)-----Attentional Factorization Machines:Learning the Weight of Feature Interac...、AWS Single Sign-On Integration Guide for Dynatrace、Azure AD B2C 自定义策略是否可以使用 AzureApplicationInsightsProvider 设置 Application Insights operation_id的宝贵知识。
本文目录一览:- optuna.integration.lightGBM 自定义优化指标
- 20220507 3. Integration - Enterprise JavaBeans (EJB) Integration
- 5、AFM(Attention+FM)-----Attentional Factorization Machines:Learning the Weight of Feature Interac...
- AWS Single Sign-On Integration Guide for Dynatrace
- Azure AD B2C 自定义策略是否可以使用 AzureApplicationInsightsProvider 设置 Application Insights operation_id

optuna.integration.lightGBM 自定义优化指标
如何解决optuna.integration.lightGBM 自定义优化指标?
我正在尝试使用 optuna 优化 lightGBM 模型。
阅读文档时我注意到有两种方法可以使用,如下所述:LightGBM Tuner: New Optuna Integration for Hyperparameter Optimization。
第一种方法使用 optuna 优化的“标准”方式(目标函数 + 试验),第二种方法使用 .train() 函数将所有内容包装在一起。第一个基本上尝试超参数值的组合,而第二个根据超参数的逐步方法进行优化。
在 optuna github 存储库中的以下代码示例中展示了这两种方法:
- First approach
- Second approach
两种代码对相同的参数执行完全相同的优化(第二种方法优化的参数描述为 here),但方式不同(组合与逐步)。
我的问题是:
-
是否可以在第二种方法中指定自定义评估指标?在第一个中,我可以使用任何自定义指标轻松更改 github 示例中使用的准确度。
作为一个例子,我可以写:import lightgbm as lgb import numpy as np import sklearn.datasets import sklearn.metrics from sklearn.model_selection import train_test_split import optuna def my_eval_metric(valid_y,pred_labels): # my custom metric .......... .......... return my_metric def objective(trial): data,target = sklearn.datasets.load_breast_cancer(return_X_y=True) train_x,valid_x,train_y,valid_y = train_test_split(data,target,test_size=0.25) dtrain = lgb.Dataset(train_x,label=train_y) param = { "objective": "binary","metric": "binary_logloss","verbosity": -1,"boosting_type": "gbdt","lambda_l1": trial.suggest_float("lambda_l1",1e-8,10.0,log=True),"lambda_l2": trial.suggest_float("lambda_l2","num_leaves": trial.suggest_int("num_leaves",2,256),"feature_fraction": trial.suggest_float("feature_fraction",0.4,1.0),"bagging_fraction": trial.suggest_float("bagging_fraction","bagging_freq": trial.suggest_int("bagging_freq",1,7),"min_child_samples": trial.suggest_int("min_child_samples",5,100),} gbm = lgb.train(param,dtrain) preds = gbm.predict(valid_x) pred_labels = np.rint(preds) my_eval_metric_value = my_eval_metric(valid_y,pred_labels) return custom_metric_value if __name__ == "__main__": study = optuna.create_study(direction="maximize") study.optimize(objective,n_trials=100) print("Number of finished trials: {}".format(len(study.trials))) print("Best trial:") trial = study.best_trial print(" Value: {}".format(trial.value)) print(" Params: ") for key,value in trial.params.items(): print(" {}: {}".format(key,value))
此代码将返回使我的自定义指标最大化的 lightGBM 模型的参数。但是,在第二种方法中,我无法指定自己的自定义指标。
更新:
我设法在第二种方法中定义了我自己的自定义指标及其用法。最小的可重现代码如下(只需通过 scikit 使用 train_test_split 传递数据):
from sklearn.metrics import average_precision_score
import optuna.integration.lightgbm as lgb_sequential

def tune_lightGBM_sequential(X_train,X_val,y_train,y_val):

    def calculate_ctr(gt):
        positive = len([x for x in gt if x == 1])
        ctr = positive/float(len(gt))
        return ctr

    def compute_rce(preds,train_data):
        gt = train_data.get_label()
        cross_entropy = log_loss(gt,preds)
        data_ctr = calculate_ctr(gt)
        strawman_cross_entropy = log_loss(gt,[data_ctr for _ in range(len(gt))])
        rce = (1.0 - cross_entropy/strawman_cross_entropy)*100.0
        return (''rce'',rce,True)

    def compute_avg_precision(preds,train_data):
        gt = train_data.get_label()
        avg_precision= average_precision_score(gt,preds)
        return(''avg_precision'',avg_precision,True)

    params = {
        "objective": "binary","metric": ''custom'',"verbose" : 2
    }

    dtrain = lgb_sequential.Dataset(X_train,label=y_train)
    dval = lgb_sequential.Dataset(X_val,label=y_val)

    print(''Starting training lightGBM sequential'')
    model = lgb_sequential.train(
        params,dtrain,valid_sets=[dtrain,dval],verbose_eval=True,num_boost_round =2,early_stopping_rounds=100,feval = [compute_rce,compute_avg_precision]
    )

    return model.params
然而,Optuna 似乎无法根据我的自定义指标选择最佳试验,事实上,我收到以下错误:
[W 2021-05-16 15:56:48,759] 试验 0 失败,原因如下 错误:KeyError(''custom'') 回溯(最近一次调用):文件 "C:\Users\Mattia\anaconda3\envs\rec_sys_challenge\lib\site-packages\optuna_optimize.py",第 217 行,在 _run_trial value_or_values = func(trial) 文件中 "C:\Users\Mattia\anaconda3\envs\rec_sys_challenge\lib\site-packages\optuna\integration_lightgbm_tuner\optimize.py",第 251 行,调用 val_score = self._get_booster_best_score(booster) 文件 "C:\Users\Mattia\anaconda3\envs\rec_sys_challenge\lib\site-packages\optuna\integration_lightgbm_tuner\optimize.py",第 118 行,在 _get_booster_best_score val_score = booster.best_score[valid_name][metric] KeyError: ''custom''
这似乎是图书馆的问题(您可以在此处找到更多信息:GitHub Issue),我尝试了许多建议的解决方案,但都没有奏效。
有什么帮助吗?
解决方法
暂无找到可以解决该程序问题的有效方法,小编努力寻找整理中!
如果你已经找到好的解决方法,欢迎将解决方案带上本链接一起发送给小编。
小编邮箱:dio#foxmail.com (将#修改为@)
 Integration")
20220507 3. Integration - Enterprise JavaBeans (EJB) Integration
前言
文档地址
作为一个轻量级容器,Spring 通常被认为是 EJB 的替代品。我们确实相信,对于大多数应用程序和用例来说,Spring 作为一个容器,结合它在事务领域的丰富支持功能,ORM 和 JDBC 访问,是一个比通过 EJB 容器和 EJB 实现等效功能更好的选择。
但是,需要注意的是,使用 Spring 并不妨碍您使用 EJB 。实际上,Spring 使得访问 EJB 和在其中实现 EJB 和功能变得更加容易。此外,使用 Spring 访问 EJB 提供的服务允许这些服务的实现以后在本地 EJB、远程 EJB 或 POJO (普通 Java 对象) 变体之间透明地进行切换,而不必更改客户端代码。
其他略
-----Attentional Factorization Machines:Learning the Weight of Feature Interac...")
5、AFM(Attention+FM)-----Attentional Factorization Machines:Learning the Weight of Feature Interac...
1、摘要:
提出一个Attentional FM,Attention模型+因子分解机,其通过Attention学习到特征交叉的权重。因为很显然不是所有的二阶特征交互的重要性都是一样的,如何通过机器自动的从中学习到这些重要性是这篇论文解决的最重要的问题,
比如:作者举了一个例子,在句子"US continues taking a leading role on foreign payment transparency"中,除了"foreign payment transparency",其它句子明显与财经新闻无关,它们之间的交叉作用可认为对主题预测是一种噪音。
2、FM
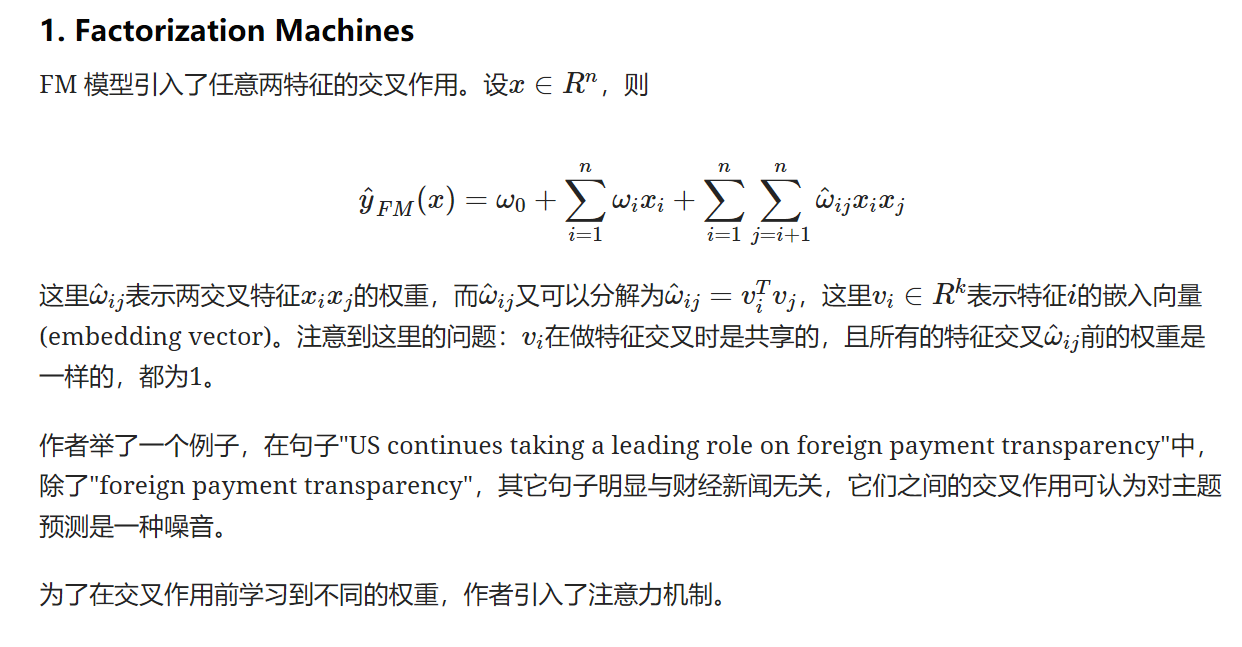
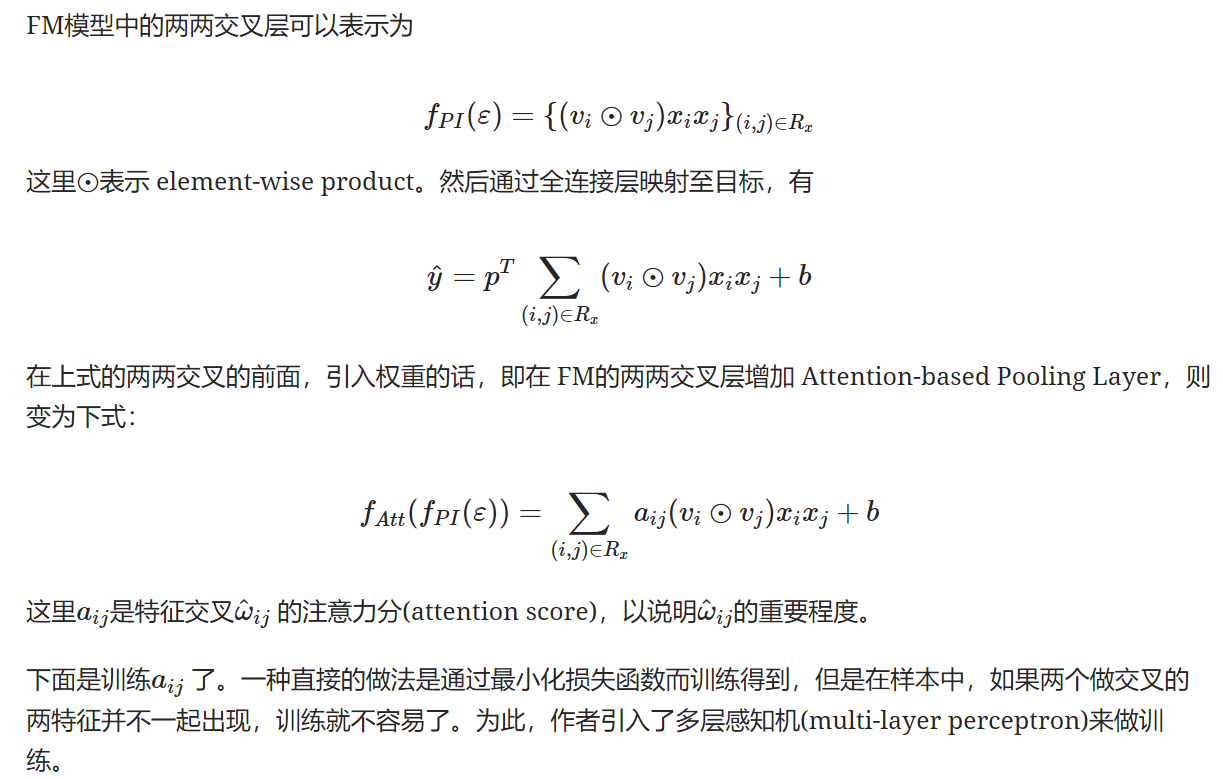
3、注意力机制
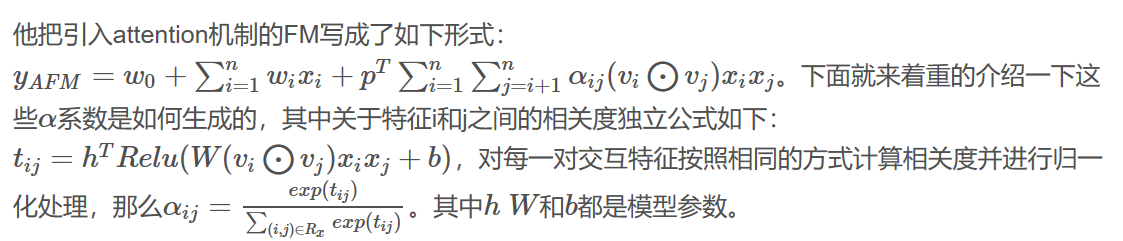
AFM模型架构:


AWS Single Sign-On Integration Guide for Dynatrace
https://amazonaws-china.com/blogs/apn/aws-single-sign-on-integration-guide-for-dynatrace/
By Shashiraj Jeripotula, Sr. Partner Solutions Architect at AWS
 End users can now configure AWS Single Sign-On (AWS SSO) to access Dynatrace with a single sign-on experience using the same credentials they use with their Amazon Web Services (AWS) account.
AWS Single Sign-On provides administrators a simple way to assign users and groups access to AWS accounts, roles, and SAML-based applications. This makes it easy for end users to sign into the AWS Console to access AWS resources, and also have a single sign-on experience to applications with a single set of credentials.
Customers can choose to create their user identities and groups in AWS SSO, or they can connect AWS SSO to use the identities and groups they already administer in Active Directory or Azure AD.
Dynatrace is an AWS Partner Network (APN) Advanced Technology Partner with AWS Competencies in DevOps, Migration, and Containers. Dynatrace provides an artificial intelligence-powered platform that delivers full-stack, automated monitoring. It goes beyond collecting data and can help you address the root cause of the performance problems in operations, DevOps, cloud migration, and customer experience.
Until now, customers had to sign into the AWS Console to work with AWS resources, and they had to sign in separately to Dynatrace to monitor their environment or the resources in their environment, or to monitor the resources in their environment.
AWS SSO includes a simple way to connect Dynatrace, enabling users to have one portal to access their AWS accounts and Dynatrace. From there, Dynatrace will work with the same identities you choose to use within AWS SSO, and it’s easier to administer the users.
In this post, I’ll show you how to connect Dynatrace with AWS SSO using SAML 2.0, so your users have a single experience to access both the AWS Console and Dynatrace.
Prerequisites
For this walkthrough, you should have the following prerequisites:
- AWS account.
- Access to the AWS SSO console with permissions to manage applications.
- Dynatrace account with permissions to configure SAML SSO.
Walkthrough
This post will help you configure AWS SSO to facilitate single sign-on for Dynatrace using SAML.
Configuring AWS SSO
- Log in to the AWS Console and navigate to the AWS SSO Console.
- In the AWS Console, select Applications.
- Choose Add a New Application.
- On the Add New Application page, in the AWS SSO Application Catalog, enter Dynatrace into the search bar.
- Select Dynatrace, and then choose Add Application.
- On the Configure Dynatrace page, in the Details section, you may optionally update the default application name and description. I suggest choosing a unique display name if you plan to have more than one of the same application.
- In the AWS SSO metadata section, scroll to the AWS SSO SAML Metadata File section, choose the download link and save a copy of the AWS SSO metadata file to your computer.
- Finally, click Save.
Configuring Dynatrace for Use with AWS SSO
- Open a new browser and log in to https://DOMAINNAME.live.dynatrace.com/ as an administrator.
- Click on your account, and then choose Account Settings.
- In the left navigation, choose Single Sign-On.
- On the SSO page, choose Add New Domain to begin specifying a domain.

- Verify your domain in Dynatrace. To learn more, see the documentation.
- In the Domain box, enter the domain (for example, @mycompanyname.com) for which you want to set up SAML.
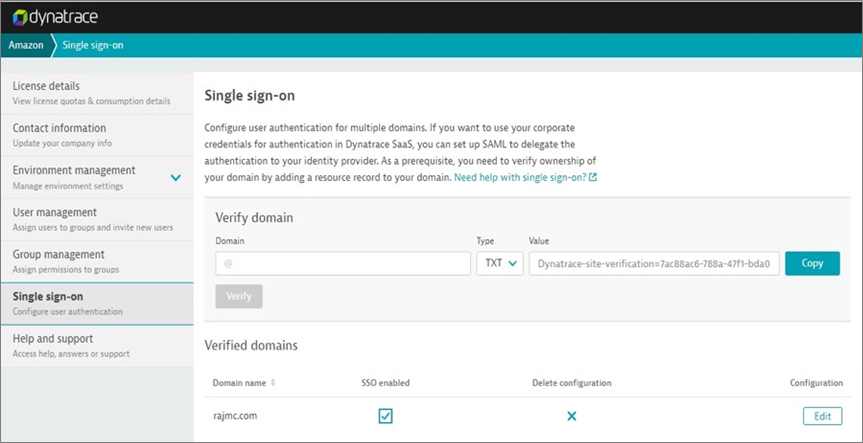
- Click Copy and add the TXT resource record to your domain’s DNS configuration.
- Select Verify so that Dynatrace can verify the record was added to your domain’s DNS. It may take a few minutes for the record to be propagated in the DNS system and the value to become available for Dynatrace to verify.
- After successful verification, the Verify button will change to Verified.
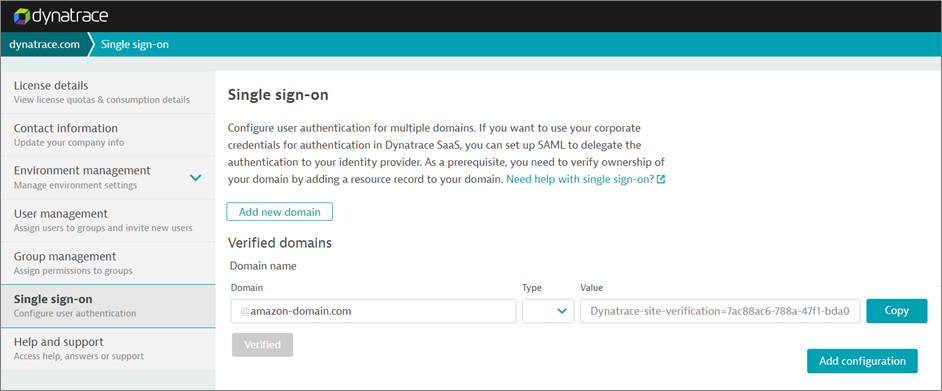
- Once your domain is verified, click Add Configuration.
- Upload AWS SSO Metadata File to Dynatrace by clicking on Upload XML.
- Next, insert the following values:
- First name: firstname
- Last name: lastname
Assigning AWS SSO Users to Test the Setup
- Assign a user to the application in AWS SSO. To learn how, see the documentation.
- Go back to the SSO Configuration page for Dynatrace, and click Validate Configuration.
- Sign in with a user assigned to the Dynatrace application in AWS SSO.
- Once logged in, you will see the message, “You will get the SAML configuration validation complete page.”
- Go back to the SSO Configuration page for Dynatrace, and click Continue.
- Check the box next to Single Sign-On.
- Click on Save.
Verification
Use the following sections to verify the SSO integration.
- Ensure the user performing the verification is logged out of both AWS SSO and the application before performing the steps in each section.
- Users will not be able to log in using SSO unless they exist in both your AWS SSO directory and Custom SAML 2.0, and the user is assigned to the application.
Verifying SSO from AWS SSO:
- Access the AWS SSO end user portal using the credentials of a user assigned to the Dynatrace application. You can find this URL by going to the AWS SSO Console’s Setting page.
- In the list of applications, choose Dynatrace to initiate a login to Dynatrace.
- If login is successful, you will be signed in to the Dynatrace application. If sign in is not successful, please see the troubleshooting steps below.
Verifying Service Provider Initiated SSO from Dynatrace:
- Access Dynatrace using the following URL: https://DOMAINNAME.live.dynatrace.com/
- Type the credentials of a user assigned to the application in the AWS SSO console and a user which exists in Dynatrace.
- Choose Sign In.
- On the Dynatrace home page, verify that both Dynatrace and AWS SSO are logged in with the same user. If sign in isn’t successful, please see the troubleshooting steps below.
Troubleshooting
Issue
- When AWS SSO creates a SAML Assertion for a user, it uses the value of the ’email’ and ‘subject’ fields (if they are present) from the identity source to populate the ‘Email’ and ‘Subject’ attributes in the SAML assertion.
- Many service providers expect these attributes to contain the user’s email address.
Solution
- Your directory may be configured to contain the users email in the ‘Email’ attribute instead. If so, you may need to change this in your identity source settings.
- If your identity source is Active Directory, update the Active Directory Attribute Mappings in AWS SSO to use email from AD.
- If you use a SAML IdP as an identity source with automatic user synchronization via the SCIM protocol, you must update the attribute mappings in your IdP (refer to your IdP vendor’s documentation).
For general troubleshooting problems, please refer to our guide on Troubleshooting AWS SSO Issues.
Summary
In this post, I have demonstrate how to configure Dynatrace to use AWS Single Sign-On (AWS SSO) for authentication, which will provide the ability for users to access Dynatrace applications by logging in to the AWS Console.
This eliminates the need for users to log in to Dynatrace separately. Previously, users did not have the ability to navigate to Dynatrace directly from AWS account.
In addition, AWS SSO manages single sign-on access to multiple AWS accounts and business applications. AWS SSO will also help you create SAML2.0 integrations to extend AWS SSO access to any of your SAML-enabled applications.
To learn more, see the AWS SSO home page. If you have any questions, please post them on AWS SSO service forum.

Azure AD B2C 自定义策略是否可以使用 AzureApplicationInsightsProvider 设置 Application Insights operation_id
如何解决Azure AD B2C 自定义策略是否可以使用 AzureApplicationInsightsProvider 设置 Application Insights operation_id?
是否可以使用 AzureApplicationInsightsProvider 在 App Insights 中设置 operation_id 字段或其他顶级字段,例如 session_id、operation_ParentId 等?
使用 PartnerClaimType="{property:PropertyName}" 似乎只在事件的 customDimensions 中设置属性,即使我使用像 {property:operation_id} 这样的语法。
同样,使用 PartnerClaimType="operation_id" 或 PartnerClaimType="eventOperationId" 似乎会被忽略。
解决方法
暂无找到可以解决该程序问题的有效方法,小编努力寻找整理中!
如果你已经找到好的解决方法,欢迎将解决方案带上本链接一起发送给小编。
小编邮箱:dio#foxmail.com (将#修改为@)
关于optuna.integration.lightGBM 自定义优化指标的介绍已经告一段落,感谢您的耐心阅读,如果想了解更多关于20220507 3. Integration - Enterprise JavaBeans (EJB) Integration、5、AFM(Attention+FM)-----Attentional Factorization Machines:Learning the Weight of Feature Interac...、AWS Single Sign-On Integration Guide for Dynatrace、Azure AD B2C 自定义策略是否可以使用 AzureApplicationInsightsProvider 设置 Application Insights operation_id的相关信息,请在本站寻找。
本文标签:


![[转帖]Ubuntu 安装 Wine方法(ubuntu如何安装wine)](https://www.gvkun.com/zb_users/cache/thumbs/4c83df0e2303284d68480d1b1378581d-180-120-1.jpg)

