在这篇文章中,我们将为您详细介绍使用springboot时如何在apachecamelspringxml路由中给出端点标签的内容,并且讨论关于springboot指定端口号的相关问题。此外,我们还会涉
在这篇文章中,我们将为您详细介绍使用spring boot时如何在apachecamel spring xml路由中给出端点标签的内容,并且讨论关于springboot 指定端口号的相关问题。此外,我们还会涉及一些关于Apache Camel 2.23 发布,支持 Spring Boot 2.1、Apache Camel Spring Boot、Apache Camel 、Springboot怎么实现文件传输、Apache Camel,Spring Boot 实现文件复制,转移 (转)的知识,以帮助您更全面地了解这个主题。
本文目录一览:- 使用spring boot时如何在apachecamel spring xml路由中给出端点标签(springboot 指定端口号)
- Apache Camel 2.23 发布,支持 Spring Boot 2.1
- Apache Camel Spring Boot
- Apache Camel 、Springboot怎么实现文件传输
- Apache Camel,Spring Boot 实现文件复制,转移 (转)
")
使用spring boot时如何在apachecamel spring xml路由中给出端点标签(springboot 指定端口号)
如何解决使用spring boot时如何在apachecamel spring xml路由中给出端点标签?
我正在使用带有 Spring Boot 的 apache camel,因为我想提供端点标签。但是在camel spring-boot 路由文件中我们只能提到路由。 我的骆驼路线文件:
<?xml version="1.0" encoding="UTF-8"?>
<routes xmlns="http://camel.apache.org/schema/spring">
<route id="route-1" autoStartup="true">
<from id="readingFileRoute1"
uri="file://D:/camel-project-fuse/in?noop=false" />
<!--<transacted ref="required" />-->
<to id="validatorRoute1"
uri="validator:file:{{pacs008.xsd.Directory}}" />
<log message="File XSD validation done successfully." />
<!--<bean id="jspPopulateData1" ref="jspExecute"
method="execute(${exchange},auditBeanRoute1)" />
<to uri="genaudit://route1Audit?endtoend=y" /> -->
<split id="splitterRoute1" parallelProcessing="true">
<method id="inMsgMethod" ref="inMsg" method="process" />
<to uri="direct://subroute-1" />
<log message="MSGDB route-1 map ${header.AceQ_Write_MsgdbBean}" />
<log message="Going to insert in DB" />
<to uri="aceq://endpointwrite?queueID=CPTESTQ&pollStatus=446" />
<!--<to uri="genaudit://route1Audit?endtoend=y" />-->
<log message="Inserted into DB" />
</split>
<log message="Message processed successfully.." />
<stop />
</route>
<route id="subroute-1">
<from uri="direct://subroute-1" />
<bean id="xmlParserSubroute1" ref="xmlParser" />
<bean id="jspPopulateData2" ref="jspExecute"
method="execute(${exchange},extract)" />
<to uri="genaudit://route1Audit?endtoend=y" />
<log message="In subroute-1 MSGDB map after extract ${header.AceQ_Write_MsgdbBean}" />
</route>
</routes>
我想使用:
<endpoint id="foo" uri="ftp://foo@myserver">
    <property key="password" value="secret"/>
    <property key="recursive" value="true"/>
    <property key="ftpClient.dataTimeout" value="30000"/>
    <property key="ftpClient.serverLanguageCode" value="fr"/>
  </endpoint>
但是由于 spring-boot 我只能在路由器文件中使用。
解决方法
暂无找到可以解决该程序问题的有效方法,小编努力寻找整理中!
如果你已经找到好的解决方法,欢迎将解决方案带上本链接一起发送给小编。
小编邮箱:dio#foxmail.com (将#修改为@)

Apache Camel 2.23 发布,支持 Spring Boot 2.1
Apache Camel 2.23 已发布,最值得关注的新功能是支持 Spring Boot 2.1 ,此外还改进了 starter 组件,并针对已改进的 Spring Boot 自动配置进行了再次优化。
此版本包含 262 项修复和改进,并添加了以下新组件:
AWS IAM - for managing Amazon IAM
Corda - to interactive with corda nodes
FHIR - to work with the fhir standard (health care)
Google Big Query Standard SQL - Google bigdata warehouse analytics
Google Calendar Stream - Google calendar in streaming mode
Google Sheets - To work with google sheets
Google Sheets Stream - To work with google sheets in streaming mode
IPFS - Interplanetary File System
Kubernetes HPA - To execute Kubernetes HPA operations
Kubernetes Job - To execute Kubernetes job operations
NSQ - To integrate with the NSQ messaging system
完整更新列表:
https://cwiki.apache.org/confluence/display/CAMEL/Camel+2.23.0+Release
开发团队表示,下一个版本将是 Camel 2.24 ,这也可能是 2.x 系列的最终版本,他们即将启动 Camel 3.0 的开发工作。

Apache Camel Spring Boot
Camel应用初始化
Apache Camel 采用的是组件化的设计思想,通过Camel Component对接第三方的应用,Camel核心模块会扫描classpath 加载这些Camel Component。 Camel应用在启动的过程中,需要将应用涉及到的路由(Route),节点 (Endpoint),类型转换器(TypeConverter)以及发送接收模板(ProducerTemplate, ConsumerTemplate)加载到 Camel上下文环境(CamelContext)进行组装。
在Camel早期时代,Camel直接提供了一套XML的DSL来描述路由规则,以及配置Camel应用相关模块,这样我们只需要在应用程序入口创建Spring 应用,加载相关的XML配置文件就可以了。 Spring创建ApplicationContext时候会加载对应Camel路由规则,并完成有关CamelContext创建和组装工作。
随着Spring Boot的普及,大家逐步走上了通过标注和在starter依赖中加入很多自动配置模块的方式来配置相关组件的道路, Camel Spring Boot Starter 为Camel提供了一个自动配置组件。 通过自动配置不但将有Spring管理的Camel Routes组装到Camel Context中, 而且可以通过Autowire的方式向业务代码注入其他与Camel 应用运行相关的组件。
如何管理Spring Boot与Apache Camel依赖
一般来说可以通过maven的依赖管理如下方式管理Spring Boot 以及Apache Camel的依赖。
<properties>
   <!-- 通过spring-boot 以及 camel的提供的 BOM管理依赖 -->
   <camel.version>2.24.1</camel.version>
   <spring-boot.version>2.1.6.RELEASE</spring-boot.version>
</properties>

<dependencyManagement>
   <dependencies>
      <dependency>
         <groupId>org.springframework.boot</groupId>
         <artifactId>spring-boot-dependencies</artifactId>
         <version>${spring-boot.version}</version>
         <type>pom</type>
         <scope>import</scope>
      </dependency>
      <dependency>
         <groupId>org.apache.camel</groupId>
         <artifactId>camel-spring-boot-dependencies</artifactId>
         <version>${camel.version}</version>
         <type>pom</type>
         <scope>import</scope>
      </dependency>
   </dependencies>
</dependencyManagement>
以下是典型的Apache Camel 应用的依赖包
<dependencies>
   <!-- Camel Spring Boot Starter 包依赖,
  包含了Spring Boot以及Apache Camel Core的依赖 -->
   <dependency>
      <groupId>org.apache.camel</groupId>
      <artifactId>camel-spring-boot-starter</artifactId>
   </dependency>

   <!-- Camel应用涉到其他的Camel组件
  大家可以从https://github.com/apache/camel/blob/master/components/readme.adoc
  获取有关Camel组件的信息-->
   <dependency>
       <groupId>org.apache.camel</groupId>
       <artifactId>camel-rabbitmq-starter</artifactId>
   </dependency>
</dependencies>
配置Camel Context 以及加载路由规则
添加完相关的starter依赖之后,我们还需要定义相关的Camel路由规则。添加@Component,可以让Camel自动加载相关路由规则。 如果有多个路由规则,你可以通过定义多个RouterBuilder实例,或者在单个RouterBuilder的configure方法中定义多个 from的方式来实现。
package com.example;

import org.apache.camel.builder.RouteBuilder;
import org.springframework.stereotype.Component;

@Component
public class MyRoute extends RouteBuilder {

    @Override
    public void configure() throws Exception {
        from("timer:foo")
          .to("log:bar");
    }
}
当然你可以通过@Configuration来对路由实例进行精确控制。
@Configuration
public class MyRouterConfiguration {

  @Bean
  RoutesBuilder myRouter() {
    return new RouteBuilder() {

      @Override
      public void configure() throws Exception {
        from("jms:invoices")
          .to("file:/invoices");
      }
    };
  }
}
这样在Spring Boot 应用启动的时候就自动加载这些定义好的路由规则。 如果想阻塞Spring Boot的主线程的话,你可以通过加入 spring-boot-starter-web依赖,或者在Spring Boot应的配置文件(application.properties, application.yaml) 中添加 camel.springboot.main-run-controller=true。
组装设置CamelContext
Apache Camel 的自动配置模块会提供一个配置好的CamelContext,这个CamelContext实例用camelContext在Spring应用上下文中进行注册,可以通过@Autowired注入到你的应用中。 这样可以基于CamelContext创建相关的服务或者组件。
@Configuration
public class MyAppConfig {

  @Autowired
  CamelContext camelContext;

  @Bean
  MyService myService() {
    return new DefaultMyService(camelContext);
  }

}
如果预先对CamelContext做一些设置的话, 可以通过预先创建CamelContextConfiguration的方式来进行配置。这样在Spring应用启动之前,Spring Boot会自动加载这些预先设置好的CamelContextConfiguration实例,回调相关的配置方法。
@Configuration
public class MyAppConfig {

  ...

  @Bean
  CamelContextConfiguration contextConfiguration() {
    return new CamelContextConfiguration() {
      @Override
      void beforeApplicationStart(CamelContext context) {
        // 在此编写Spring应用初始化之前,需要设置CamelContext的代码。
      }
    };
  }
设置ConsumerTemplate和ProducerTemplate
Camel支持自动创建以及配置ProducerTemplate以及 ConsumerTemplate。 如下展示的内容,你可以使用平常Spring管理的对象一样通过Autowired方式注入这些对象。
@Component
public class InvoiceProcessor {

  @Autowired
  private ProducerTemplate producerTemplate;

  @Autowired
  private ConsumerTemplate consumerTemplate;
  public void processNextInvoice() {
    Invoice invoice = consumerTemplate.receiveBody("jms:invoices", Invoice.class);
    ...
    producerTemplate.sendBody("netty-http:http://invoicing.com/received/" + invoice.id());
  }
}
缺省情况下 ConsumerTemplate 和 ProducerTemplate缺省设置的endpoint的缓存大小是1000。你可以通过修改Spring属性文件的方式设置缓存大小。
camel.springboot.consumerTemplateCacheSize = 100
camel.springboot.producerTemplateCacheSize = 200
编写单元测试
可以通过CamelSpringBootRunner来支持Spring Boot应用的单元测试, 下面是一个具体的例子大家可以参考一下。
@ActiveProfiles("test")
@RunWith(CamelSpringBootRunner.class)
@SpringBootTest
@DirtiesContext(classMode = ClassMode.AFTER_EACH_TEST_METHOD)
@DisableJmx(true)
public class MyRouteTest extends CamelTestSupport {

	@Autowired
	private CamelContext camelContext;

	@Override
	protected CamelContext createCamelContext() throws Exception {
		return camelContext;
	}

	@EndpointInject(uri = "direct:myEndpoint")
	private ProducerTemplate endpoint;

	@Override
	public void setUp() throws Exception {
		super.setUp();
		RouteDefinition definition = context().getRouteDefinitions().get(0);
		definition.adviceWith(context(), new RouteBuilder() {
			@Override
			public void configure() throws Exception {
				onException(Exception.class).maximumRedeliveries(0);
			}
		});
	}

	@Override
	public String isMockEndpointsAndSkip() {
    return "myEndpoint:put*";
	}

	@Test
	public void shouldSucceed() throws Exception {
		assertNotNull(camelContext);
		assertNotNull(endpoint);

		String expectedValue = "expectedValue";
		MockEndpoint mock = getMockEndpoint("mock:myEndpoint:put");
		mock.expectedMessageCount(1);
		mock.allMessages().body().isEqualTo(expectedValue);
		mock.allMessages().header(MY_HEADER).isEqualTo("testHeader");
		endpoint.sendBodyAndHeader("test", MY_HEADER, "testHeader");

		mock.assertIsSatisfied();
	}
}
参考资料
Camel官方文档
Camel Spring Boot 示例代码

Apache Camel 、Springboot怎么实现文件传输
1.创立一个Spring Boot项目
 新建项目
新建项目
选择依赖jar包:增加camel及web的依赖
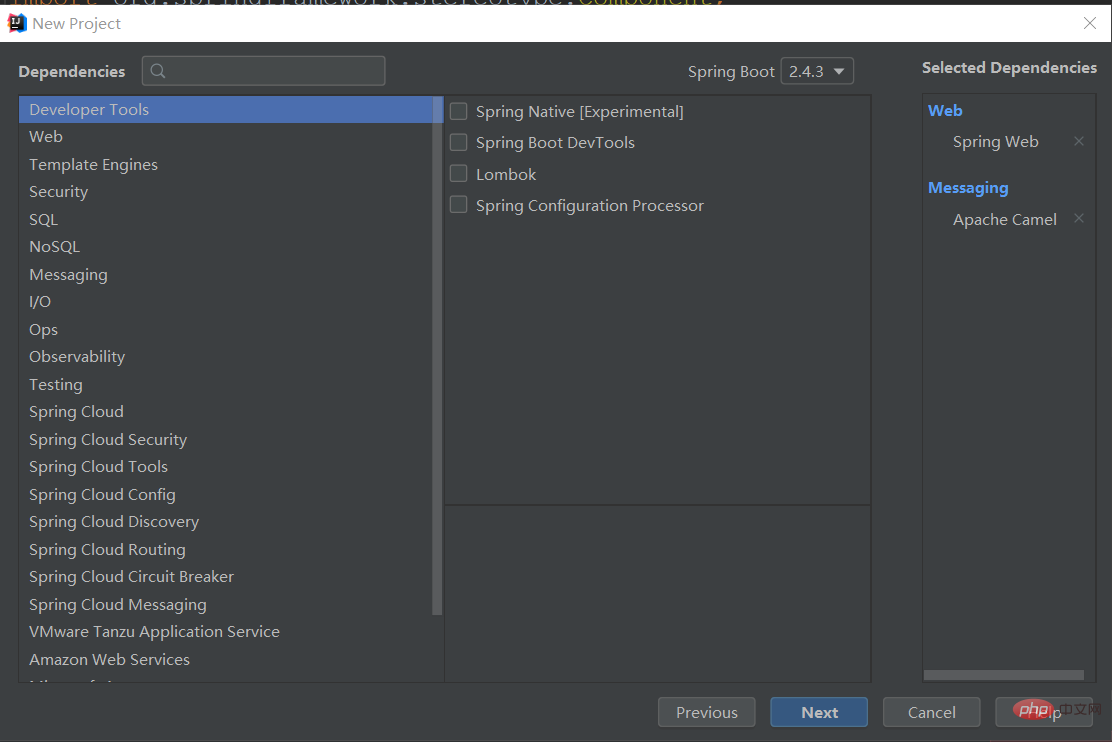 图-2
图-2
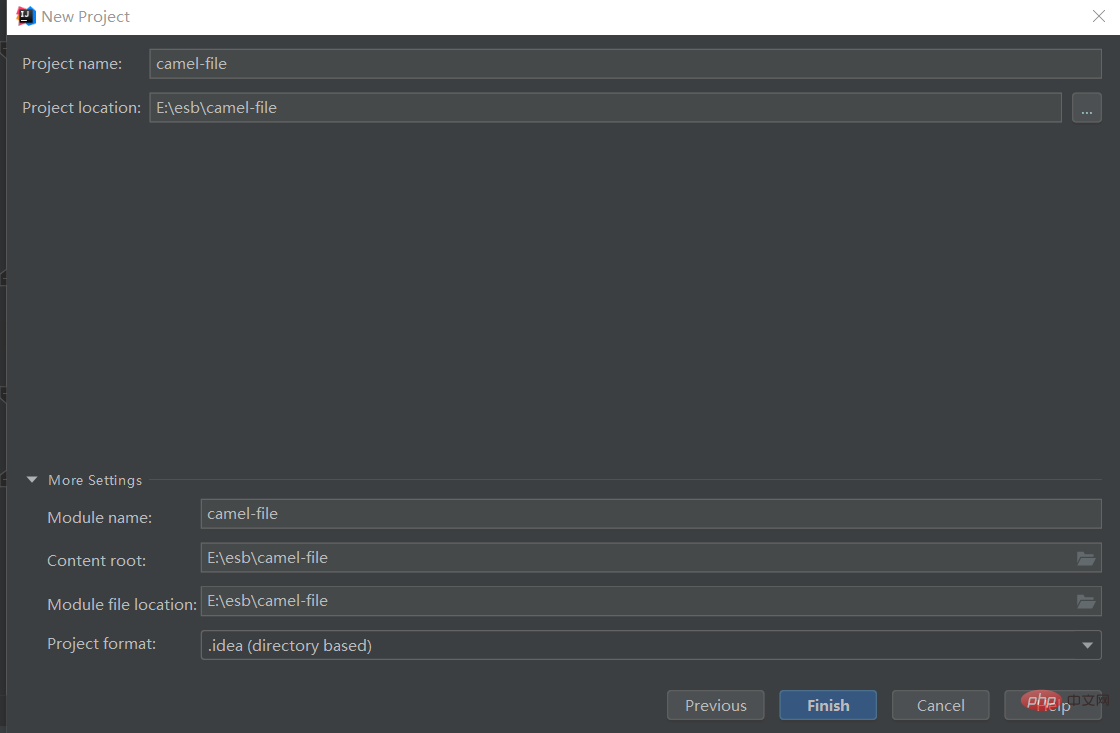 项目信息确认
2.在POM文件中增加其余依赖
xsi:schemaLocation="http://maven.apache.org/POM/4.0.0 https://maven.apache.org/xsd/maven-4.0.0.xsd">
以上就是Apache Camel 、Springboot怎么实现文件传输的详细内容,更多请关注php中文网其它相关文章!
")
Apache Camel,Spring Boot 实现文件复制,转移 (转)
基本框架
-
Apache Camel
-
Spring Boot
-
Maven
开发过程
1.新建一个POM(quickstart)项目,在POM文件中添加Camel和Spring Boot的依赖
<parent>
  <groupId>org.springframework.boot</groupId>
  <artifactId>spring-boot-starter-parent</artifactId>
  <version>1.4.1.RELEASE</version>
</parent>
<dependencies>
<dependency>
 <groupId>org.apache.camel</groupId>
 <artifactId>camel-spring-boot-starter</artifactId>
 <version>2.18.1</version>
</dependency>
</dependencies>
2.新建Application.java 启动类
@SpringBootApplication
public class Application{
    public static void main(String[] args) {
          final ApplicationContext context = new SpringApplication(Application.class).run(args);
          final CamelSpringBootApplicationController controller = context.getBean(CamelSpringBootApplicationController.class);
          controller.run();
    }
}
3.新建RouteBuilder.java 消息路由
@Component
public class RouteBuilder extends SpringRouteBuilder {

    @Override
    public void configure() throws Exception {
         from("file:C:/Temp/inbox").to("file:C:/Temp/outbox");
    }
}
4.启动Application的main函数,C:/Temp/inbox下的文件将会被自动拷贝到C:/Temp/outbox,camel会一直监控inbox文件夹,一旦有新文件出现,就会被立即拷贝到outbox。
5.更多高级应用的参数配置
- 处理完的文件移动到C:/Temp/inbox/.done 目录中,进行备份,不指定的话,会默认备份至C:/Temp/inbox/.camel
from("file:C:/Temp/inbox?move=.done").to("file:C:/Temp/outbox"); - 删除处理完成的文件
from("file:C:/Temp/inbox?delete=true").to("file:C:/Temp/outbox"); - 处理中的文件单独放在一个文件夹,文件第一步从inbox移动到inprogress,处理完成之后,再移动到.done
from("file:C:/Temp/inbox?preMove=inprogress&move=.done").to("file:C:/Temp/outbox"); - 按日期备份处理完的文件
from("file:C:/Temp/inbox?move=backup/${date:now:yyyyMMdd}/${file:name}").to("file:C:/Temp/outbox"); - 记录处理失败的文件
moveFailed=/error/${file:name.noext}-${date:now:yyyyMMddHHmmssSSS}.${file:ext}
转载至:https://www.jianshu.com/p/3e505db9cd63
我们今天的关于使用spring boot时如何在apachecamel spring xml路由中给出端点标签和springboot 指定端口号的分享就到这里,谢谢您的阅读,如果想了解更多关于Apache Camel 2.23 发布,支持 Spring Boot 2.1、Apache Camel Spring Boot、Apache Camel 、Springboot怎么实现文件传输、Apache Camel,Spring Boot 实现文件复制,转移 (转)的相关信息,可以在本站进行搜索。
本文标签:


![[转帖]Ubuntu 安装 Wine方法(ubuntu如何安装wine)](https://www.gvkun.com/zb_users/cache/thumbs/4c83df0e2303284d68480d1b1378581d-180-120-1.jpg)

