以上就是给各位分享[源码分析]从FlatMap用法到Flink的内部实现,其中也会对flinkflatmap原理进行解释,同时本文还将给你拓展AndroidLayoutInflater.inflate
以上就是给各位分享[源码分析] 从FlatMap用法到Flink的内部实现,其中也会对flink flatmap原理进行解释,同时本文还将给你拓展Android LayoutInflater.inflate源码分析、Collection 源码分析(四):LinkedHashMap 源码分析、Flask源码分析二:路由内部实现原理、Flask源码分析(三)Flask的请求上下文等相关知识,如果能碰巧解决你现在面临的问题,别忘了关注本站,现在开始吧!
本文目录一览:- [源码分析] 从FlatMap用法到Flink的内部实现(flink flatmap原理)
- Android LayoutInflater.inflate源码分析
- Collection 源码分析(四):LinkedHashMap 源码分析
- Flask源码分析二:路由内部实现原理
- Flask源码分析(三)Flask的请求上下文
![[源码分析] 从FlatMap用法到Flink的内部实现(flink flatmap原理)](http://www.gvkun.com/zb_users/upload/2025/02/cf7b7b3d-579d-4bcc-a6ac-98d4f0d4445a1738917866554.jpg "[源码分析] 从FlatMap用法到Flink的内部实现(flink flatmap原理)")
[源码分析] 从FlatMap用法到Flink的内部实现(flink flatmap原理)
[源码分析] 从FlatMap用法到Flink的内部实现
0x00 摘要
本文将从FlatMap概念和如何使用开始入手,深入到Flink是如何实现FlatMap。希望能让大家对这个概念有更深入的理解。
0x01 Map vs FlatMap
首先我们先从概念入手。
自从响应式编程慢慢壮大以来,这两个单词现在越来越被大家熟悉了。前端能见到它们的身影,后台也能见到;安卓里面有,iOS也有。很多兄弟刚遇到它们时候是懵圈的,搞不清楚之间的区别。下面我就给大家简单讲解下。
map
它把数组流中的每一个值,使用所提供的函数执行一遍,一一对应。得到与元素个数相同的数组流。然后返回这个新数据流。
flatMap
flat是扁平的意思。所以这个操作是:先映射(map),再拍扁(join)。
flatMap输入可能是多个子数组流。所以flatMap先针对 每个子数组流的每个元素进行映射操作。然后进行扁平化处理,最后汇集所有进行扁平化处理的结果集形成一个新的列表(扁平化简而言之就是去除所有的修饰)。
flatMap与map另外一个不一样的地方就是传入的函数在处理完后返回值必须是List。
实例
比如拿到一个文本文件之后,我们是按行读取,按行处理。如果要对每一行的单词数进行计数,那么应该选择Map方法,如果是统计词频,就应该选择flatMap方法。
如果还不清楚,可以看看下面这个例子:
梁山新进一批好马,准备给每个马军头领配置一批。于是得到函数以及头领名单如下:

函数 = ( 头领 => 头领 + 好马 )
五虎将 = List(关胜、林冲、秦明、呼延灼、董平 )
八骠骑 = List(花荣、徐宁、杨志、索超、张清、朱仝、史进、穆弘 )

// Map函数的例子
利用map函数,我们可以得到 五虎将马军

五虎将马军 = 五虎将.map( 头领 => 头领 + 好马 )
结果是 List( 关胜 + 马、林冲 + 马、秦明 + 马、呼延灼 + 马、董平 + 马 )

// flatMap函数的例子
但是为了得到统一的马军,则可以用flatMap:

马军头领 = List(五虎将,八骠骑)
马军 = 马军头领.flatMap( 头领 => 头领 + 好马 )

结果就是:List( 关胜 + 马、林冲 + 马、秦明 + 马、呼延灼 + 马、董平 + 马,花荣 + 马、徐宁 + 马、杨志 + 马、索超 + 马、张清 + 马、朱仝 + 马、史进 + 马、穆弘 + 马 )
现在大家应该清楚了吧。接下来看看几个FlatMap的实例。
Scala语言的实现
Scala本身对于List类型就有map和flatMap操作。举例如下:
val names = List("Alice","James","Apple")
val strings = names.map(x => x.toupperCase)
println(strings)
// 输出 List(ALICE,JAMES,APPLE)

val chars = names.flatMap(x=> x.toupperCase())
println(chars)
// 输出 List(A,L,I,C,E,J,A,M,S,P,E)
Flink的例子
以上是scala语言层面的实现。下面我们看看Flink框架是如何使用FlatMap的。
网上常见的一个Flink应用的例子:
//加载数据源
val source = env.fromElements("china is the best country","beijing is the capital of china")

//转化处理数据
val ds = source.flatMap(_.split(" ")).map((_,1)).groupBy(0).sum(1)
Flink源码中的例子
case class WordWithCount(word: String,count: Long)

val text = env.socketTextStream(host,port,'\n')

val windowCounts = text.flatMap { w => w.split("\\s") }
  .map { w => WordWithCount(w,1) }
  .keyBy("word")
  .timeWindow(Time.seconds(5))
  .sum("count")

windowCounts.print()
0x02 自定义算子(in Flink)
上面提到的都是简单的使用,如果有复杂需求,在Flink中,我们可以通过继承FlatMapFunction和RichFlatMapFunction来自定义算子。
函数类FlatMapFunction
对于不涉及到状态的使用,可以直接继承 FlatMapFunction,其定义如下:
@Public
@FunctionalInterface
public interface FlatMapFunction<T,O> extends Function,Serializable {
	void flatMap(T value,Collector<O> out) throws Exception;
}
如何自定义算子呢,这个可以直接看看Flink中的官方例子
// FlatMapFunction that tokenizes a String by whitespace characters and emits all String tokens.
public class Tokenizer implements FlatMapFunction<String,String> {
  @Override
  public void flatMap(String value,Collector<String> out) {
    for (String token : value.split("\\W")) {
      out.collect(token);
    }
  }
}

// [...]
DataSet<String> textLines = // [...]
DataSet<String> words = textLines.flatMap(new Tokenizer());
Rich函数类RichFlatMapFunction
对于涉及到状态的情况,用户可以使用继承 RichFlatMapFunction 类的方式来实现UDF。
RichFlatMapFunction属于Flink的Rich函数类。从名称上来看,这种函数类在普通的函数类上增加了Rich前缀,比如RichMapFunction、RichFlatMapFunction或RichReduceFunction等等。比起普通的函数类,Rich函数类增加了:
-
open()方法:Flink在算子调用前会执行这个方法,可以用来进行一些初始化工作。 -
close()方法:Flink在算子最后一次调用结束后执行这个方法,可以用来释放一些资源。 -
getRuntimeContext方法:获取运行时上下文。每个并行的算子子任务都有一个运行时上下文,上下文记录了这个算子运行过程中的一些信息,包括算子当前的并行度、算子子任务序号、广播数据、累加器、监控数据。最重要的是,我们可以从上下文里获取状态数据。
FlatMap对应的RichFlatMapFunction如下:
@Public
public abstract class RichFlatMapFunction<IN,OUT> extends AbstractRichFunction implements FlatMapFunction<IN,OUT> {
	@Override
	public abstract void flatMap(IN value,Collector<OUT> out) throws Exception;
}
其基类 AbstractRichFunction 如下,可以看到主要是和运行时上下文建立了联系,并且有初始化和退出操作:
@Public
public abstract class AbstractRichFunction implements RichFunction,Serializable {

	private transient RuntimeContext runtimeContext;

	@Override
	public void setRuntimeContext(RuntimeContext t) {
		this.runtimeContext = t;
	}

	@Override
	public RuntimeContext getRuntimeContext() {
			return this.runtimeContext;
	}

	@Override
	public IterationRuntimeContext getIterationRuntimeContext() {
    if (this.runtimeContext instanceof IterationRuntimeContext) {
			return (IterationRuntimeContext) this.runtimeContext;
		}
	}

	@Override
	public void open(Configuration parameters) throws Exception {}

	@Override
	public void close() throws Exception {}
}
如何最好的使用? 当然还是官方文档和例子最靠谱。
因为涉及到状态,所以如果使用,你必须创建一个 StateDescriptor,才能得到对应的状态句柄。 这保存了状态名称(你可以创建多个状态,并且它们必须具有唯一的名称以便可以引用它们),状态所持有值的类型,并且可能包含用户指定的函数,例如ReduceFunction。 根据不同的状态类型,可以创建ValueStateDescriptor,ListStateDescriptor, ReducingStateDescriptor,FoldingStateDescriptor 或 MapStateDescriptor。
状态通过 RuntimeContext 进行访问,因此只能在 rich functions 中使用。 但是我们也会看到一个例子。RichFunction 中 RuntimeContext 提供如下方法:
ValueState getState(ValueStateDescriptor)ReducingState getReducingState(ReducingStateDescriptor)ListState getListState(ListStateDescriptor)AggregatingState getAggregatingState(AggregatingStateDescriptor)FoldingState getFoldingState(FoldingStateDescriptor)MapState getMapState(MapStateDescriptor)
下面是一个 FlatMapFunction 的例子,展示了如何将这些部分组合起来:
class CountwindowAverage extends RichFlatMapFunction[(Long,Long),(Long,Long)] {

  private var sum: ValueState[(Long,Long)] = _

  override def flatMap(input: (Long,out: Collector[(Long,Long)]): Unit = {

    // access the state value
    val tmpCurrentSum = sum.value

    // If it hasn't been used before,it will be null
    val currentSum = if (tmpCurrentSum != null) {
      tmpCurrentSum
    } else {
      (0L,0L)
    }

    // update the count
    val newSum = (currentSum._1 + 1,currentSum._2 + input._2)

    // update the state
    sum.update(newSum)

    // if the count reaches 2,emit the average and clear the state
    if (newSum._1 >= 2) {
      out.collect((input._1,newSum._2 / newSum._1))
      sum.clear()
    }
  }

  override def open(parameters: Configuration): Unit = {
    sum = getRuntimeContext.getState(
      new ValueStateDescriptor[(Long,Long)]("average",createTypeinformation[(Long,Long)])
    )
  }
}

object ExampleCountwindowAverage extends App {
  val env = StreamExecutionEnvironment.getExecutionEnvironment

  env.fromCollection(List(
    (1L,3L),(1L,5L),7L),4L),2L)
  )).keyBy(_._1)
    .flatMap(new CountwindowAverage())
    .print()
  // the printed output will be (1,4) and (1,5)

  env.execute("ExampleManagedState")
}
这个例子实现了一个简单的计数窗口。 我们把元组的第一个元素当作 key(在示例中都 key 都是 “1”)。 该函数将出现的次数以及总和存储在 “ValueState” 中。 一旦出现次数达到 2,则将平均值发送到下游,并清除状态重新开始。 请注意,我们会为每个不同的 key(元组中第一个元素)保存一个单独的值。
0x03 从Flink源码入手看FlatMap实现
FlatMap从Flink编程模型角度讲属于一个算子,用来对数据流或者数据集进行转换。从框架角度说,FlatMap是怎么实现的呢? 或者说FlatMap是怎么从用户代码转换到Flink运行时呢 ?
1. DataSet
首先说说 DataSet相关这套系统中FlatMap的实现。
请注意,DataSteam对应的那套系统中,operator名字都是带着Stream的,比如StreamOperator。
DataSet
val ds = source.flatMap(_.split(" ")).map((_,1)).groupBy(0).sum(1) 这段代码调用的就是DataSet中的API。具体如下:
public abstract class DataSet<T> {

	public <R> FlatMapOperator<T,R> flatMap(FlatMapFunction<T,R> flatMapper) {

		String callLocation = Utils.getCallLocationName();

		Typeinformation<R> resultType = TypeExtractor.getFlatMapReturnTypes(flatMapper,getType(),callLocation,true);
		return new FlatMapOperator<>(this,resultType,clean(flatMapper),callLocation);
	}
}
FlatMapOperator
可以看出,flatMap @ DataSet 主要就是生成了一个FlatMapOperator,这个可以理解为是逻辑算子。其定义如下:
public class FlatMapOperator<IN,OUT> extends SingleInputUdfOperator<IN,OUT,FlatMapOperator<IN,OUT>> {

	protected final FlatMapFunction<IN,OUT> function;
	protected final String defaultName;

	public FlatMapOperator(DataSet<IN> input,Typeinformation<OUT> resultType,FlatMapFunction<IN,OUT> function,String defaultName) {
		super(input,resultType);
		this.function = function;
		this.defaultName = defaultName;
	}

	@Override
	protected FlatMapFunction<IN,OUT> getFunction() {
		return function;
	}

  // 这个translatetoDataFlow就是生成计划(Plan)的关键代码
	@Override
	protected FlatMapOperatorBase<IN,OUT>> translatetoDataFlow(Operator<IN> input) {
		String name = getName() != null ? getName() : "FlatMap at " + defaultName;
		// create operator
		FlatMapOperatorBase<IN,OUT>> po = new FlatMapOperatorBase<IN,OUT>>(function,new UnaryOperatorinformation<IN,OUT>(getInputType(),getResultType()),name);
		// set input
		po.setInput(input);
		// set parallelism
		if (this.getParallelism() > 0) {
			// use specified parallelism
			po.setParallelism(this.getParallelism());
		} else {
			// if no parallelism has been specified,use parallelism of input operator to enable chaining
			po.setParallelism(input.getParallelism());
		}
		return po;
	}
}
FlatMapOperator的基类如下:
public abstract class SingleInputUdfOperator<IN,O extends SingleInputUdfOperator<IN,O>> extends SingleInputoperator<IN,O> implements UdfOperator<O> {

}

// Base class for operations that operates on a single input data set.
public abstract class SingleInputoperator<IN,O extends SingleInputoperator<IN,O>> extends Operator<OUT,O> {
  	private final DataSet<IN> input;
}
生成计划
DataSet API所编写的批处理程序跟DataStream API所编写的流处理程序在生成作业图(JobGraph)之前的实现差别很大。流处理程序是生成流图(StreamGraph),而批处理程序是生成计划(Plan)并由优化器对其进行优化并生成优化后的计划(Optimizedplan)。
计划(Plan)以数据流(dataflow)的形式来表示批处理程序,但它只是批处理程序最初的表示,在一个批处理程序生成作业图之前,计划还会被进行优化以产生更高效的方案。Plan不同于流图(StreamGraph),它以sink为入口,因为一个批处理程序可能存在若干个sink,所以Plan采用集合来存储它。另外Plan还封装了批处理作业的一些基本属性:jobId、jobName以及defaultParallelism等。
生成Plan的核心部件是算子翻译器(OperatorTranslation),createProgramPlan方法通过它来”翻译“出计划,核心代码如下
public class OperatorTranslation {

   // 接收每个需遍历的DataSink对象,然后将其转换成GenericDataSinkBase对象
   public Plan translatetoPlan(List<DataSink<?>> sinks,String jobName) {
       List<GenericDataSinkBase<?>> planSinks = new ArrayList<>();
       //遍历sinks集合
       for (DataSink<?> sink : sinks) {
            //将翻译生成的GenericDataSinkBase加入planSinks集合*,对每个sink进行”翻译“
            planSinks.add(translate(sink));
        }
       //以planSins集合构建Plan对象
       Plan p = new Plan(planSinks);
       p.setJobName(jobName);
       return p;
    }

	private <I,O> org.apache.flink.api.common.operators.Operator<O>    translateSingleInputoperator(SingleInputoperator<?,?,?> op) {
    //会调用到 FlatMapOperator 的 translatetoDataFlow
	org.apache.flink.api.common.operators.Operator<O> dataFlowOp = typedOp.translatetoDataFlow(input);
  }

}
FlatMapOperatorBase就是生成的plan中的一员。
public class FlatMapOperatorBase<IN,FT extends FlatMapFunction<IN,OUT>> extends SingleInputoperator<IN,FT> {
	@Override
	protected List<OUT> executeOnCollections(List<IN> input,RuntimeContext ctx,ExecutionConfig executionConfig) throws Exception {
		FlatMapFunction<IN,OUT> function = userFunction.getUserCodeObject();

		FunctionUtils.setFunctionRuntimeContext(function,ctx);
		FunctionUtils.openFunction(function,parameters);

		ArrayList<OUT> result = new ArrayList<OUT>(input.size());

		TypeSerializer<IN> inSerializer = getoperatorInfo().getInputType().createSerializer(executionConfig);
		TypeSerializer<OUT> outSerializer = getoperatorInfo().getoutputType().createSerializer(executionConfig);

		copyingListCollector<OUT> resultCollector = new copyingListCollector<OUT>(result,outSerializer);

		for (IN element : input) {
			IN incopy = inSerializer.copy(element);
			function.flatMap(incopy,resultCollector);
		}

		FunctionUtils.closeFunction(function);

		return result;
	}
}
而最后优化时候,则FlatMapOperatorBase会被优化成FlatMapNode。
public class GraphCreatingVisitor implements Visitor<Operator<?>> {
	public boolean preVisit(Operator<?> c) {
    else if (c instanceof FlatMapOperatorBase) {
			n = new FlatMapNode((FlatMapOperatorBase<?,?>) c);
		}
  }
}
自此,FlatMap就被组合到 DataSet的 Optimizedplan 中。下一步Flink会依据Optimizedplan来生成 JobGraph。
作业图(JobGraph)是唯一被Flink的数据流引擎所识别的表述作业的数据结构,也正是这一共同的抽象体现了流处理和批处理在运行时的统一。至此就完成了从用户业务代码到Flink运行系统的转化。
在运行状态下,如果上游有数据流入,则FlatMap这个算子就会发挥作用。
2. DataStream
对于DataStream,则是另外一套体系结构。首先我们找一个使用DataStream的例子看看。
//获取数据: 从socket中获取
val textDataStream = env.socketTextStream("127.0.0.1",8888,'\n')
val tupDataStream = textDataStream.flatMap(_.split(" ")).map(WordWithCount(_,1))

//groupby: 按照指定的字段聚合
val windowDstram = tupDataStream.keyBy("word").timeWindow(Time.seconds(5),Time.seconds(1))
windowDstram.sum("count").print()
上面例子中,flatMap 调用的是DataStream中的API,具体如下:
public class DataStream<T> {

	public <R> SingleOutputStreamOperator<R> flatMap(FlatMapFunction<T,R> flatMapper) {
    //clean函数用来移除FlatMapFunction类对象的外部类部分,这样就可以进行序列化
    //getType用来获取类对象的输出类型
		Typeinformation<R> outType = TypeExtractor.getFlatMapReturnTypes(clean(flatMapper),Utils.getCallLocationName(),true);
		return flatMap(flatMapper,outType);
	}

  // 构建了一个StreamFlatMap的Operator
	public <R> SingleOutputStreamOperator<R> flatMap(FlatMapFunction<T,R> flatMapper,Typeinformation<R> outputType) {
		return transform("Flat Map",outputType,new StreamFlatMap<>(clean(flatMapper)));
	}

  // 依次调用下去
	@PublicEvolving
	public <R> SingleOutputStreamOperator<R> transform(
			String operatorName,Typeinformation<R> outTypeInfo,OneInputStreamOperator<T,R> operator) {
		return doTransform(operatorName,outTypeInfo,SimpleOperatorFactory.of(operator));
	}

	protected <R> SingleOutputStreamOperator<R> doTransform(
			String operatorName,StreamOperatorFactory<R> operatorFactory) {
		// read the output type of the input Transform to coax out errors about MissingTypeInfo
		transformation.getoutputType();
    // 构建Transform对象,Transform对象中包含其上游Transform对象,这样上游下游就串成了一个Transform链。
		OneInputTransformation<T,R> resultTransform = new OneInputTransformation<>(
				this.transformation,operatorName,operatorFactory,environment.getParallelism());
		@SuppressWarnings({"unchecked","rawtypes"})
		SingleOutputStreamOperator<R> returnStream = new SingleOutputStreamOperator(environment,resultTransform);
    // 将这Transform对象放入env的transform对象列表。
		getExecutionEnvironment().addOperator(resultTransform);
    // 返回流
		return returnStream;
	}
}
上面源码中的几个概念需要澄清。
Transformation:首先,FlatMap在FLink编程模型中是算子API,在DataStream中会生成一个Transformation,即逻辑算子。
逻辑算子Transformation最后会对应到物理算子Operator,这个概念对应的就是StreamOperator。
StreamOperator:DataStream 上的每一个 Transformation 都对应了一个 StreamOperator,StreamOperator是运行时的具体实现,会决定UDF(user-defined Funtion)的调用方式。
processElement()方法也是UDF的逻辑被调用的地方,例如FlatMapFunction里的flatMap()方法。
public class StreamFlatMap<IN,OUT>
		extends AbstractUdfStreamOperator<OUT,OUT>>
		implements OneInputStreamOperator<IN,OUT> {

	private transient TimestampedCollector<OUT> collector;

	public StreamFlatMap(FlatMapFunction<IN,OUT> flatMapper) {
		super(flatMapper);
		chainingStrategy = ChainingStrategy.ALWAYS;
	}

	@Override
	public void open() throws Exception {
		super.open();
		collector = new TimestampedCollector<>(output);
	}

	@Override
	public void processElement(StreamRecord<IN> element) throws Exception {
		collector.setTimestamp(element);
    // 调用用户定义的FlatMap
		userFunction.flatMap(element.getValue(),collector);
	}
}
我们可以看到,StreamFlatMap继承了AbstractUdfStreamOperator,从而间接继承了StreamOperator。
public abstract class AbstractStreamOperator<OUT>
		implements StreamOperator<OUT>,SetupableStreamOperator<OUT>,Serializable {
}
StreamOperator是根接口。对于 Streaming 来说所有的算子都继承自 StreamOperator。继承了StreamOperator的扩展接口则有OneInputStreamOperator,TwoInputStreamOperator。实现了StreamOperator的抽象类有AbstractStreamOperator以及它的子类AbstractUdfStreamOperator。
从 API 到 逻辑算子 Transformation,再到 物理算子Operator,就生成了 StreamGraph。下一步Flink会依据StreamOperator来生成 JobGraph。
作业图(JobGraph)是唯一被Flink的数据流引擎所识别的表述作业的数据结构,也正是这一共同的抽象体现了流处理和批处理在运行时的统一。至此就完成了从用户业务代码到Flink运行系统的转化。
0x04 参考
Flink中richfunction的一点小作用
【浅显易懂】scala中map与flatMap的区别
Working with State
flink简单应用: scala编写wordcount
【Flink】Flink基础之实现WordCount程序(Java与Scala版本)
Flink进阶教程:以flatMap为例,如何进行算子自定义
Flink运行时之批处理程序生成计划

Android LayoutInflater.inflate源码分析
LayoutInflater.inflate源码详解
LayoutInflater的inflate方法相信大家都不陌生,在Fragment的onCreateView中或者在BaseAdapter的getView方法中我们都会经常用这个方法来实例化出我们需要的View.
假设我们有一个需要实例化的布局文件menu_item.xml:
<LinearLayout xmlns:android="http://schemas.android.com/apk/res/android"
  android:layout_width="match_parent"
  android:layout_height="wrap_content"
  android:orientation="vertical">

  <TextView
    android:id="@+id/id_menu_title_tv"
    android:layout_width="match_parent"
    android:layout_height="300dp"
    android:gravity="center_vertical"
    android:textColor="@android:color/black"
    android:textSize="16sp"
    android:text="@string/menu_item"/>
</LinearLayout>
我们想在BaseAdapter的getView()方法中对其进行实例化,其实例化的方法有三种,分别是:
2个参数的方法:
convertView = mInflater.inflate(R.layout.menu_item,null);
3个参数的方法(attachToRoot=false):
convertView = mInflater.inflate(R.layout.menu_item,parent,false);
3个参数的方法(attachToRoot=true):
convertView = mInflater.inflate(R.layout.menu_item,true);
究竟我们应该用哪个方法进行实例化View,这3个方法又有什么区别呢?如果有同学对三个方法的区别还不是特别清楚,那么就和我一起从源码的角度来分析一下这个问题吧.
源码
inflate
我们先来看一下两个参数的inflate方法,源码如下:
public View inflate(@LayoutRes int resource,@Nullable ViewGroup root) {
  return inflate(resource,root,root != null);
}
从代码我们看出,其实两个参数的inflate方法根据父布局parent是否为null作为第三个参数来调用三个参数的inflate方法,三个参数的inflate方法源码如下:
public View inflate(@LayoutRes int resource,@Nullable ViewGroup root,boolean attachToRoot) {
  // 获取当前应用的资源集合
  final Resources res = getContext().getResources();
  // 获取指定资源的xml解析器
  final XmlResourceParser parser = res.getLayout(resource);
  try {
    return inflate(parser,attachToRoot);
  } finally {
    // 返回View之前关闭parser资源
    parser.close();
  }
}
这里需要解释一下,我们传入的资源布局id是无法直接实例化的,需要借助XmlResourceParser.
而XmlResourceParser是借助Android的pull解析方法是解析布局文件的.继续跟踪inflate方法源码:
public View inflate(XmlPullParser parser,boolean attachToRoot) {
  synchronized (mConstructorArgs) {
    // 获取上下文对象,即LayoutInflater.from传入的Context.
    final Context inflaterContext = mContext;
    // 根据parser构建XmlPullAttributes.
    final AttributeSet attrs = Xml.asAttributeSet(parser);
    // 保存之前的Context对象.
    Context lastContext = (Context) mConstructorArgs[0];
    // 赋值为传入的Context对象.
    mConstructorArgs[0] = inflaterContext;
    // 注意,默认返回的是父布局root.
    View result = root;

    try {
      // 查找xml的开始标签.
      int type;
      while ((type = parser.next()) != XmlPullParser.START_TAG &&
          type != XmlPullParser.END_DOCUMENT) {
        // Empty
      }

      // 如果没有找到有效的开始标签,则抛出InflateException异常.
      if (type != XmlPullParser.START_TAG) {
        throw new InflateException(parser.getPositionDescription()
            + ": No start tag found!");
      }

      // 获取控件名称.
      final String name = parser.getName();

      // 特殊处理merge标签
      if (TAG_MERGE.equals(name)) {
        if (root == null || !attachToRoot) {
          throw new InflateException("<merge /> can be used only with a valid "
              + "ViewGroup root and attachToRoot=true");
        }

        rInflate(parser,inflaterContext,attrs,false);
      } else {
        // 实例化我们传入的资源布局的view
        final View temp = createViewFromTag(root,name,attrs);
        ViewGroup.LayoutParams params = null;

        // 如果传入的parent不为空.
        if (root != null) {
          if (DEBUG) {
            System.out.println("Creating params from root: " +
                root);
          }
          // 创建父类型的LayoutParams参数.
          params = root.generateLayoutParams(attrs);
          if (!attachToRoot) {
            // 如果实例化的View不需要添加到父布局上,则直接将根据父布局生成的params参数设置
            // 给它即可.
            temp.setLayoutParams(params);
          }
        }

        // 递归的创建当前布局的所有控件
        rInflateChildren(parser,temp,true);

        // 如果传入的父布局不为null,且attachToRoot为true,则将实例化的View加入到父布局root中
        if (root != null && attachToRoot) {
          root.addView(temp,params);
        }

        // 如果父布局为null或者attachToRoot为false,则将返回值设置成我们实例化的View
        if (root == null || !attachToRoot) {
          result = temp;
        }
      }

    } catch (XmlPullParserException e) {
      InflateException ex = new InflateException(e.getMessage());
      ex.initCause(e);
      throw ex;
    } catch (Exception e) {
      InflateException ex = new InflateException(
          parser.getPositionDescription()
              + ": " + e.getMessage());
      ex.initCause(e);
      throw ex;
    } finally {
      // Don't retain static reference on context.
      mConstructorArgs[0] = lastContext;
      mConstructorArgs[1] = null;
    }

    Trace.traceEnd(Trace.TRACE_TAG_VIEW);

    return result;
  }
}
上述代码中的关键部分我已经加入了中文注释.从上述代码中我们还可以发现,我们传入的布局文件是通过createViewFromTag来实例化每一个子节点的.
createViewFromTag
函数源码如下:
/**
 * 方便调用5个参数的方法,ignoreThemeAttr的值为false.
 */
private View createViewFromTag(View parent,String name,Context context,AttributeSet attrs) {
  return createViewFromTag(parent,context,false);
}

View createViewFromTag(View parent,AttributeSet attrs,boolean ignoreThemeAttr) {
  if (name.equals("view")) {
    name = attrs.getAttributeValue(null,"class");
  }

  // Apply a theme wrapper,if allowed and one is specified.
  if (!ignoreThemeAttr) {
    final TypedArray ta = context.obtainStyledAttributes(attrs,ATTRS_THEME);
    final int themeResId = ta.getResourceId(0,0);
    if (themeResId != 0) {
      context = new ContextThemeWrapper(context,themeResId);
    }
    ta.recycle();
  }

  // 特殊处理“1995”这个标签(ps: 平时我们写xml布局文件时基本没有使用过).
  if (name.equals(TAG_1995)) {
    // Let's party like it's 1995!
    return new BlinkLayout(context,attrs);
  }

  try {
    View view;
    if (mFactory2 != null) {
      view = mFactory2.onCreateView(parent,attrs);
    } else if (mFactory != null) {
      view = mFactory.onCreateView(name,attrs);
    } else {
      view = null;
    }

    if (view == null && mPrivateFactory != null) {
      view = mPrivateFactory.onCreateView(parent,attrs);
    }

    if (view == null) {
      final Object lastContext = mConstructorArgs[0];
      mConstructorArgs[0] = context;
      try {
        if (-1 == name.indexOf('.')) {
          view = onCreateView(parent,attrs);
        } else {
          view = createView(name,null,attrs);
        }
      } finally {
        mConstructorArgs[0] = lastContext;
      }
    }

    return view;
  } catch (InflateException e) {
    throw e;

  } catch (ClassNotFoundException e) {
    final InflateException ie = new InflateException(attrs.getPositionDescription()
        + ": Error inflating class " + name);
    ie.initCause(e);
    throw ie;

  } catch (Exception e) {
    final InflateException ie = new InflateException(attrs.getPositionDescription()
        + ": Error inflating class " + name);
    ie.initCause(e);
    throw ie;
  }
}
在createViewFromTag方法中,最终是通过createView方法利用反射来实例化view控件的.
createView
public final View createView(String name,String prefix,AttributeSet attrs)
  throws ClassNotFoundException,InflateException {
  // 以View的name为key,查询构造函数的缓存map中是否已经存在该View的构造函数.
  Constructor<? extends View> constructor = sConstructorMap.get(name);
  Class<? extends View> clazz = null;

  try {
    // 构造函数在缓存中未命中
    if (constructor == null) {
      // 通过类名去加载控件的字节码
      clazz = mContext.getClassLoader().loadClass(prefix != null ? (prefix + name) : name).asSubClass(View.class);
      // 如果有自定义的过滤器并且加载到字节码,则通过过滤器判断是否允许加载该View
      if (mFilter != null && clazz != null) {
        boolean allowed = mFilter.onLoadClass(clazz);
        if (!allowed) {
          failNotAllowed(name,prefix,attrs);
        }
      }
      // 得到构造函数
      constructor = clazz.getConstructor(mConstructorSignature);
      constructor.setAccessible(true);
      // 缓存构造函数
      sConstructorMap.put(name,constructor);
    } else {
      if (mFilter != null) {
        // 过滤的map是否包含了此类名
        Boolean allowedState = mFilterMap.get(name);
        if (allowedState == null) {
          // 重新加载类的字节码
          clazz = mContext.getClassLoader().loadClass(prefix != null ? (prefix + name) : name).asSubclass(View.class);
          boolean allowed = clazz != null && mFilter.onLoadClass(clazz);
          mFilterMap.put(name,allowed);
          if (!allowed) {
            failNotAllowed(name,attrs);
          }
        } else if (allowedState.equals(Boolean.FALSE)) {
          failNotAllowed(name,attrs);
        }
      }
    }

    // 实例化类的参数数组(mConstructorArgs[0]为Context,[1]为View的属性)
    Object[] args = mConstructorArgs;
    args[1] = attrs;
    // 通过构造函数实例化View
    final View view = constructor.newInstance(args);
    if (View instanceof ViewStub) {
      final ViewStub viewStub = (ViewStub) view;
      viewStub.setLayoutInflater(cloneInContext((Context)args[0]))
    }
    return view;
  } catch (NoSunchMethodException e) {
    // ......
  } catch (ClassNotFoundException e) {
    // ......
  } catch (Exception e) {
    // ......
  } finally {
    // ......
  }
}
总结
通过学习了inflate函数源码,我们再回过头去看BaseAdapter的那三种方法,我们可以得出的结论是:
第一种方法使用不够规范,且会导致实例化View的LayoutParams属性失效.(ps: 即layout_width和layout_height等参数失效,因为源码中这种情况的LayoutParams为null).
第二种是最正确,也是最标准的写法.
第三种由于attachToRoot为true,所以返回的View其实是父布局ListView,这显然不是我们想要实例化的View.因此,第三种写法是错误的.
感谢阅读,希望能帮助到大家,谢谢大家对本站的支持!
:LinkedHashMap 源码分析")
Collection 源码分析(四):LinkedHashMap 源码分析
点开 LinkedHashMap 的源码 可以看到 继承 HashMap<K,V> 实现 Map 接口

我们注意到 在源码开头描述中有一段话
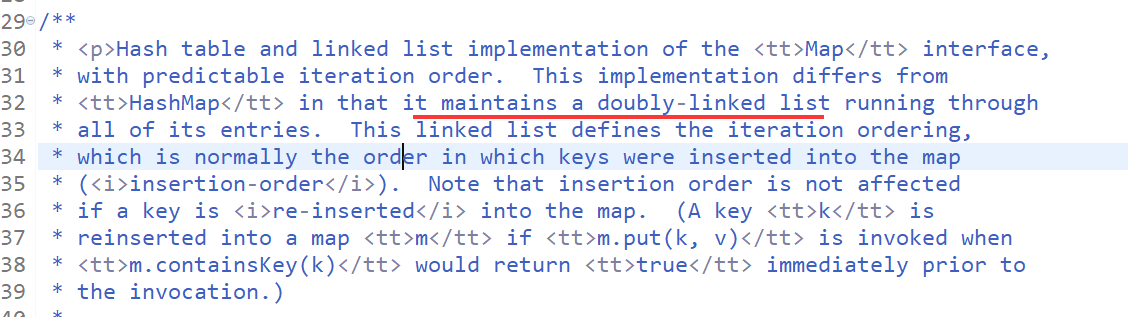
都实现了 Map 接口 并且区别在于 linkedHashMap 是一个双端队列组成
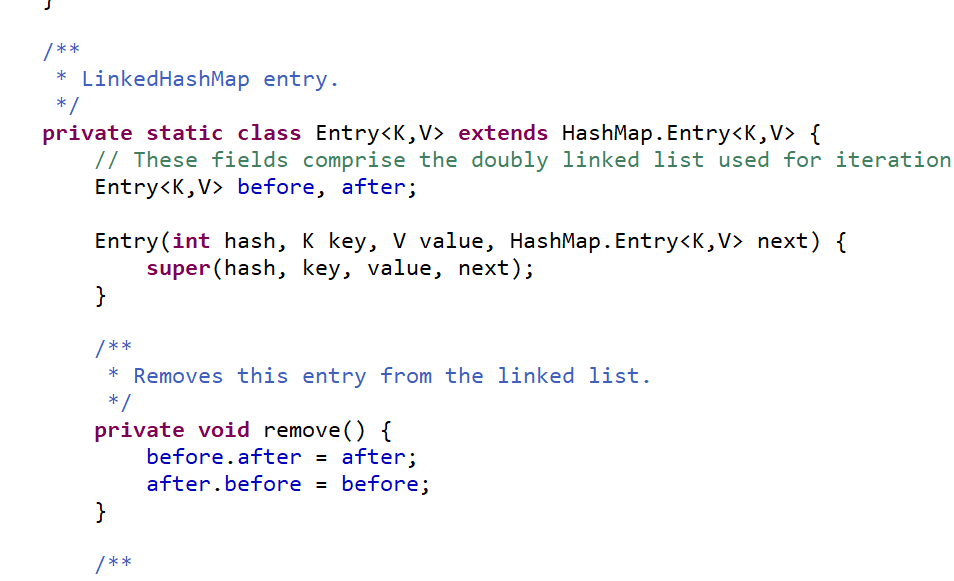
可以看见比 HashMap 的 Entry 多了两个参数 before,after
也是使用的 Hash''Map 的 Entry 构造器
包括实例化 LinkedHashMap 的时候调用的也是父类(HashMap)的构造器,put 方法,remove 方法都是走的 HashMap 的方法 可以看到 LinkedHashMap 的内存结构与 HashMap 是一样的 唯一区别就是他的链表
HashMap 的 Entry 链表 只有一个 next 参数 相当于单向链表
而 LinkedHashMap 的链表有 after,before 两个参数 相当于双向链表
可以看出 在做大量查找操作的时候 LinkedHashMap 的效率要比 HashMap 的高 其他基本无区别
做增加操作基本等量 也就多了两个 “指针” 赋值 注意此处的指针 并不是真正的指针

Flask源码分析二:路由内部实现原理
前言
Flask是目前为止我最喜欢的一个Python Web框架了,为了更好的掌握其内部实现机制,这两天准备学习下Flask的源码,将由浅入深跟大家分享下,其中Flask版本为1.1.1。
上次了解了Flask服务的启动流程,今天我们来看下路由的内部实现机理。
Flask系列文章:
- Flask开发初探
- Flask源码分析一:服务启动
关于路由
所谓路由,就是处理请求URL和函数之间关系的程序。
Flask中也是对URL规则进行统一管理的,创建URL规则有两种方式:
- 使用@app.route修饰器,并传入URL规则作为参数,将函数绑定到URL,这个过程便将一个函数注册为路由,这个函数则被称为视图函数。
- 使用app.add_url_rule()。
在开始阅读源码之前,我是有这几点疑问的?
- 注册路由的过程是什么?
- Flask内部是如何进行URL规则管理的?
- 一个视图函数绑定多个URL内部是如何实现的?
- 动态URL是如何进行视图函数匹配的呢?
- 匹配路由的过程是怎样的呢?
那就让我们带着这几点疑问一起去学习源码吧!
正文
注册路由
首先,route()装饰器:
def route(self, rule, **options):

        def decorator(f):
            endpoint = options.pop("endpoint", None)
            self.add_url_rule(rule, endpoint, f, **options)
            return f

        return decorator
route()有两个参数,rule表示url规则。该函数对参数进行处理之后,调用方法add_url_role(),这里也就验证了两种注册路由的方法等价。我们来看下代码:
def add_url_rule(
        self,
        rule,
        endpoint=None,
        view_func=None,
        provide_automatic_options=None,
        **options
    ):

        if endpoint is None:
            endpoint = _endpoint_from_view_func(view_func)
        options["endpoint"] = endpoint
        methods = options.pop("methods", None)

        # if the methods are not given and the view_func object knows its
        # methods we can use that instead.  If neither exists, we go with
        # a tuple of only ``GET`` as default.
        if methods is None:
            methods = getattr(view_func, "methods", None) or ("GET",)
        if isinstance(methods, string_types):
            raise TypeError(
                "Allowed methods have to be iterables of strings, "
                ''for example: @app.route(..., methods=["POST"])''
            )
        methods = set(item.upper() for item in methods)

        # Methods that should always be added
        required_methods = set(getattr(view_func, "required_methods", ()))

        # starting with Flask 0.8 the view_func object can disable and
        # force-enable the automatic options handling.
        if provide_automatic_options is None:
            provide_automatic_options = getattr(
                view_func, "provide_automatic_options", None
            )

        if provide_automatic_options is None:
            if "OPTIONS" not in methods:
                provide_automatic_options = True
                required_methods.add("OPTIONS")
            else:
                provide_automatic_options = False

        # Add the required methods now.
        methods |= required_methods

        rule = self.url_rule_class(rule, methods=methods, **options)
        rule.provide_automatic_options = provide_automatic_options

        self.url_map.add(rule)
        if view_func is not None:
            old_func = self.view_functions.get(endpoint)
            if old_func is not None and old_func != view_func:
                raise AssertionError(
                    "View function mapping is overwriting an "
                    "existing endpoint function: %s" % endpoint
                )
            self.view_functions[endpoint] = view_func
入参包括:
- rule: url规则
- endpoint : 要注册规则的endpoint,默认是视图函数的名儿
- view_func: 视图函数
- provide_automatic_options: 请求方法是否添加OPTIONS方法的一个标志
- options: 关于请求处理的一些方法等
可以看到,add_url_rule()首先进行参数处理,包括:
- endpoint默认为视图函数的name
- url请求的方法默认为GET
- 若请求方法中没有设置OPTIONS,添加该方法。
在处理完所有的参数后,将该URL规则写入url_map(创建好Rule对象,并添加到Map对象中),将视图函数写入view_function字典中。
其中,url_map 是werkzeug.routing:Map 类的对象,rule是 werkzeug.routing:Rule 类的对象,也就是Flask的核心路由逻辑是在werkzeug中实现的。
werkzeug
werkzeug是使用Python编写的一个WSGI工具集,werkzeug.routing模块主要用于url解析。
Rule类
Rule类继承自RuleFactory类,一个Rule实例代表一个URL模式,一个WSGI应用会处理很多个不同的URL模式,与此同时产生很多个Rule实例,这些实例将作为参数传给Map类。
Map类
Map类构造的实例存储所有的url规则,解析并匹配请求对应的视图函数。
路由匹配
在应用初始化的过程中,会注册所有的路由规则,可以调用(app.url_map)查看,当服务收到URL请求时,就需要进行路由匹配,以找到对应的视图函数,对应的流程和原理是什么呢?
当用户请求进入Flask应用时,调用Flask类的wsgi_app方法:
def wsgi_app(self, environ, start_response):

    ctx = self.request_context(environ)
    error = None
    try:
        try:
            ctx.push()
            response = self.full_dispatch_request()
        except Exception as e:
            error = e
            response = self.handle_exception(e)
        except:  # noqa: B001
            error = sys.exc_info()[1]
            raise
        return response(environ, start_response)
    finally:
        if self.should_ignore_error(error):
            error = None
        ctx.auto_pop(error)
该函数的处理过程包括:
- 创建RequestContext对象,在对象初始化的过程中调用app.create_url_adapter()方法,将请求参数environ传给Map对象创建MapAdapter对象,保存在url_adapter字段中
- 将RequestContext对象推入_request_ctx_stack栈中
- 通过RequestContext的match_request方法,调用MapAdapter对象的match方法找到匹配的Rule并解析出参数,保存在request的url_rule和view_args字段中
- 调用full_dispatch_request()
接下来我们看下full_dispatch_request方法:
def full_dispatch_request(self):
    self.try_trigger_before_first_request_functions()
    try:
        request_started.send(self)
        rv = self.preprocess_request()
        if rv is None:
            rv = self.dispatch_request()
    except Exception as e:
        rv = self.handle_user_exception(e)
    return self.finalize_request(rv)
可以看到,重点执行dispatch_request():
def dispatch_request(self):
    req = _request_ctx_stack.top.request
    if req.routing_exception is not None:
        self.raise_routing_exception(req)
    rule = req.url_rule
    # if we provide automatic options for this URL and the
    # request came with the OPTIONS method, reply automatically
    if (
        getattr(rule, "provide_automatic_options", False)
        and req.method == "OPTIONS"
    ):
        return self.make_default_options_response()
    # otherwise dispatch to the handler for that endpoint
    return self.view_functions[rule.endpoint](**req.view_args)
处理的过程是:获取请求对象的request,找到对应的endpoint,继而从view_functions中找到对应的视图函数,传递请求参数,视图函数处理内部逻辑并返回,完成一次请求分发。
以上,就是Flask路由的内部实现原理。
Flask的请求上下文")
Flask源码分析(三)Flask的请求上下文
flask是如何管理上下文的
1.什么是上下文
通俗的说,就是一个容器,存储了一些与程序运行相关的参数变量等,这些内容支持着程序的运行。
在flask中谈论的上下文为两个:请求上下文和应用上下文。比如常用的g、session、request,属于请求上下文,其内容只在各自的请求中有效。而current_app就是应用上下文。flask引入应用上下文的概念是为了更好的支持多应用开发。
2.flask是如何管理上下文的
2.1 继续从上篇文章falsk是如何处理请求的接着说。上篇文章说到wsgi_app时,提到了调用self.request_context方法时会创建请求上下文对象。
def wsgi_app(self, environ, start_response):
    # 创建当前请求的上下文空间
    ctx = self.request_context(environ)
    error = None
    try:
        try:
            # 将上下文压入栈中
            ctx.push()
            response = self.full_dispatch_request()
        except Exception as e:
            error = e
            response = self.handle_exception(e)
        except:  # noqa: B001
            error = sys.exc_info()[1]
            raise
        return response(environ, start_response)
    finally:
        if self.should_ignore_error(error):
            error = None
        # 将当前上下文从栈空间弹出
        ctx.auto_pop(error)
2.2 那就先看一下self.request_context执行了什么(已删减部分源码)。内部首先是实例化了RequestContext这个类(这个名字很明显吧),实例化方法内部还实例化了request_class这个类(继承自BaseRequest),返回了请求对象,这个请求对象包含了请求的相关信息。RequestContext类中实现了两个重要的方法:push和pop方法。看到这里,依稀明白了请求上下文的处理流程。
上面wsgi_app中提到的full_dispatch_request方法在处理请求时,会到_request_ctx_stack取栈顶的请求上下文(可继续看源码,内容太多,就不贴出来了),对请求处理结束返回相应的响应对象后,再调用auto_pop(内部调用pop)将请求上下文从栈空间弹出。
flask是支持多线程和协程的,比如多线程访问时,flask是如何保证取请求上下文不会取到同一个呢?
def request_context(self, environ):
    # self即当前app,environ是请求的参数
    return RequestContext(self, environ)

class RequestContext(object):

    def __init__(self, app, environ, request=None, session=None):
        self.app = app
        if request is None:
            request = app.request_class(environ)
        self.request = request
        self._implicit_app_ctx_stack = []

        self.preserved = False


    def push(self):
        """Binds the request context to the current context."""
         # 取_request_ctx_stack栈顶的请求上下文
        top = _request_ctx_stack.top
        # 如果某次异常,会导致上次请求上下文没有正常弹出,这里确保栈顶没有请求上下文
        if top is not None and top.preserved:
            top.pop(top._preserved_exc)
         # 取_app_ctx_stack栈顶的应用上下文
        app_ctx = _app_ctx_stack.top
        # 确保当前请求上下文在这个应用上下文内
        if app_ctx is None or app_ctx.app != self.app:
            app_ctx = self.app.app_context()
            app_ctx.push()
            self._implicit_app_ctx_stack.append(app_ctx)
        else:
            self._implicit_app_ctx_stack.append(None)

        if hasattr(sys, "exc_clear"):
            sys.exc_clear()
         # 将自身压入_request_ctx_stack栈中
        _request_ctx_stack.push(self)


    def pop(self, exc=_sentinel):
        app_ctx = self._implicit_app_ctx_stack.pop()

        try:
            clear_request = False
            if not self._implicit_app_ctx_stack:
                self.preserved = False
                self._preserved_exc = None
                if exc is _sentinel:
                    exc = sys.exc_info()[1]
                self.app.do_teardown_request(exc)

                if hasattr(sys, "exc_clear"):
                    sys.exc_clear()

                request_close = getattr(self.request, "close", None)
                if request_close is not None:
                    request_close()
                clear_request = True
        finally:
            # 弹出当前请求上下文
            rv = _request_ctx_stack.pop()

            if clear_request:
                rv.request.environ["werkzeug.request"] = None

            # Get rid of the app as well if necessary.
            if app_ctx is not None:
                app_ctx.pop(exc)
             # 确保弹出的上下文空间是自身
            assert rv is self, "Popped wrong request context. (%r instead of %r)" % (
                rv,
                self,
            )
2.3 答案是使用线程或协程的唯一标识,即get_ident这个函数。来看_request_ctx_stack源码,_request_ctx_stack是个全局变量,一开始实例化Flask类时,就会实例化LocalStack这个类并且导入了这个变量。
调用push方法时,会触发self._local的__getattr__方法,如果self._local没有存储当前线程或协程的唯一标识,会触发自身的__setattr__方法,然后将当前请求上下文存储到这个__storage__属性中,这样就保证并发请求时,正确使用对应的上下文啦。
_request_ctx_stack = LocalStack()
_app_ctx_stack = LocalStack()

try:
    from greenlet import getcurrent as get_ident
except ImportError:
    try:
        from thread import get_ident
    except ImportError:
        from _thread import get_ident

class Local(object):
    __slots__ = ("__storage__", "__ident_func__")

    def __init__(self):
        object.__setattr__(self, "__storage__", {})
        object.__setattr__(self, "__ident_func__", get_ident)

    def __getattr__(self, name):
        try:
            return self.__storage__[self.__ident_func__()][name]
        except KeyError:
            raise AttributeError(name)

    def __setattr__(self, name, value):
        ident = self.__ident_func__()
        storage = self.__storage__
        try:
            storage[ident][name] = value
        except KeyError:
            storage[ident] = {name: value}


class LocalStack(object):

    def __init__(self):
        self._local = Local()

    def push(self, obj):
        """Pushes a new item to the stack"""
        # 调用self._local对象中的__getattr__方法
        rv = getattr(self._local, "stack", None)
        if rv is None:
            # 调用self._local对象中的__setattr__方法,设置当前线程或协程唯一标识
            self._local.stack = rv = []
        # 压入栈中当前的请求上下文
        # 最终self._local中__storage__的内容类似为:
        # {241253254325: {''stack'': RequestContext}}
        rv.append(obj)
        return rv

    def pop(self):
        pass

    @property
    def top(self):
        pass
关于[源码分析] 从FlatMap用法到Flink的内部实现和flink flatmap原理的介绍已经告一段落,感谢您的耐心阅读,如果想了解更多关于Android LayoutInflater.inflate源码分析、Collection 源码分析(四):LinkedHashMap 源码分析、Flask源码分析二:路由内部实现原理、Flask源码分析(三)Flask的请求上下文的相关信息,请在本站寻找。
本文标签:


![[转帖]Ubuntu 安装 Wine方法(ubuntu如何安装wine)](https://www.gvkun.com/zb_users/cache/thumbs/4c83df0e2303284d68480d1b1378581d-180-120-1.jpg)

