如果您对centos7安装csvn感兴趣,那么本文将是一篇不错的选择,我们将为您详在本文中,您将会了解到关于centos7安装csvn的详细内容,我们还将为您解答centos7安装gcc9的相关问题,
如果您对centos 7 安装csvn感兴趣,那么本文将是一篇不错的选择,我们将为您详在本文中,您将会了解到关于centos 7 安装csvn的详细内容,我们还将为您解答centos 7 安装gcc9的相关问题,并且为您提供关于CentOS 6.2 SVN 搭建 (YUM 安装)、CentOS 6.5安装SVN、CentOS 6.5安装SVN 客户端TortoiseSVN、CentOS 7 安装 svn 服务器的有价值信息。
本文目录一览:- centos 7 安装csvn(centos 7 安装gcc9)
- CentOS 6.2 SVN 搭建 (YUM 安装)
- CentOS 6.5安装SVN
- CentOS 6.5安装SVN 客户端TortoiseSVN
- CentOS 7 安装 svn 服务器
")
centos 7 安装csvn(centos 7 安装gcc9)
一.环境介绍
1.centos 7
2.Java1.8.0_211
二.Java环境配置
1.先在网上找jdk包和csvn包
2. 先ls查看一下你有没有这两个包
3.[[email protected] soft]# tar xf jdk-8u211-linux-x64.tar.gz -C /usr/local/
4.[[email protected] soft]# cd /usr/local/
5.[@L_301_2@ local]# mv jdk1.8.0_211/ java/
6.[[email protected] local]# vim /etc/profile # 末尾添加三行(java环境变量);
export JAVA_HOME=/usr/local/java
export CLAsspATH=.:$JAVA_HOME/lib/dt.jar:$JAVA_HOME/lib/tools.jar
export PATH=$PATH:$JAVA_HOME/bin

7.[[email protected] local]# source /etc/profile
8.[[email protected] local]# java -version # 查看java版本;

三.创建CSVN用户
[[email protected] ~]# useradd -m csvn
[[email protected] ~]# passwd csvn
四.部署CSVN
1.[[email protected] soft]# mkdir /data # 创建csvn家目录
2.[[email protected] soft]# tar xf CollabNetSubversionEdge-4.0.11_linux-x86_64.tar.gz -C /data/ # 解压csvn源码包
3.[[email protected] soft]# cd /data/
4.[[email protected] data]# ls
csvn

5.[[email protected] data]# chown -R csvn.csvn csvn
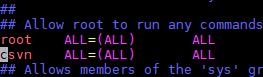
6.[[email protected] data]# vim /etc/sudoers
98 root ALL=(ALL) ALL
99 csvn ALL=(ALL) ALL
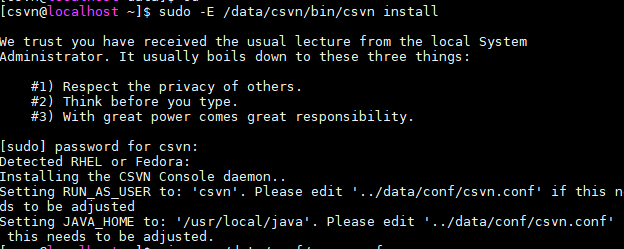
7.[[email protected] data]# su csvn
8.[[email protected] ~]$ sudo -E /data/csvn/bin/csvn install
We trust you have received the usual lecture from the local System
Administrator. It usually boils down to these three things:
#1) Respect the privacy of others.
#2) Think before you type.
#3) With great power comes great responsibility.
[sudo] password for csvn:
Detected RHEL or Fedora:
Installing the CSVN Console daemon..
Setting RUN_AS_USER to: ‘csvn‘. Please edit ‘../data/conf/csvn.conf‘ if this needs to be adjusted
Setting JAVA_HOME to: ‘/usr/local/java‘. Please edit ‘../data/conf/csvn.conf‘ if this needs to be adjusted.
查看生成的文件
[[email protected] data]$ vim csvn/data/conf/csvn.conf (在/data下面)
9 RUN_AS_USER=csvn
46 JAVA_required=true
47 JAVA_required_VERSION=1.6
48 JAVA_HOME=/usr/local/java
五.启动CSVN
csvn/bin/csvn start

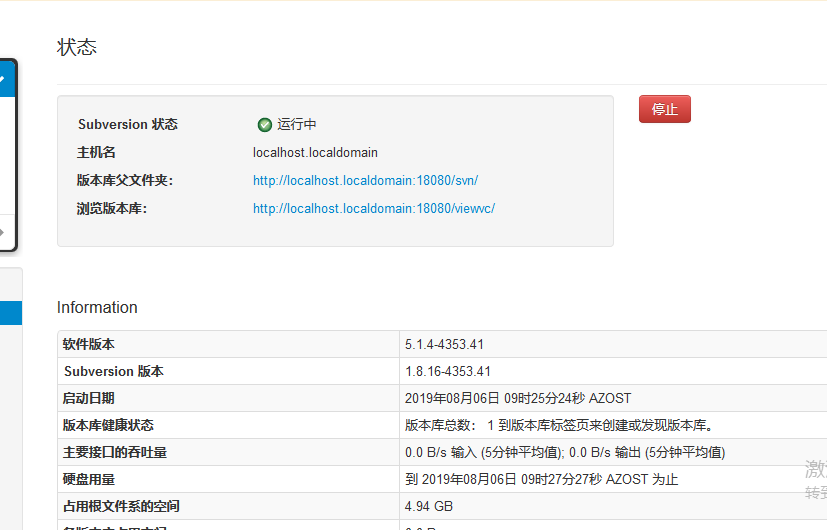
六.在浏览器上输入http://IP地址加端口号和csvn
默认用户名和密码都是admin
点启动

     再点版本库

点创建(名字随便起)

随便勾一个文件,然后点Download

再点创建
再点浏览
就可以上传下载了


")
CentOS 6.2 SVN 搭建 (YUM 安装)
帮助文档:http://wiki.centos.org/zh/HowTos/Subversion
CentOS 6.2 SVN 搭建 (YUM 安装)
安装说明
安装了一下 SVN 服务器,本文没有与 Apache 整合,过程如下:
系统环境:CentOS-6.2
安装方式:yum install (源码安装容易产生版本兼容的问题)
安装软件:系统自动下载 SVN 软件
检查已安装版本
#检查是否安装了低版本的 SVN
[root@localhost /]# rpm -qa subversion
#如果存储旧版本,卸载旧版本 SVN
[root@localhost modules]# yum remove subversion
安装 SVN
[root@localhost modules]# yum install subversion
验证安装
检验已经安装的 SVN 版本信息
[root@localhost modules]# svnserve --version
svnserve,版本 1.6.11 (r934486)
编译于 Jun 23 2012,00:44:03
版权所有 (C) 2000-2009 CollabNet。
Subversion 是开放源代码软件,请参阅 http://subversion.tigris.org/ 站点。
此产品包含由 CollabNet (http://www.Collab.Net/) 开发的软件。
下列版本库后端 (FS) 模块可用:
* fs_base : 模块只能操作 BDB 版本库。
* fs_fs : 模块与文本文件 (FSFS) 版本库一起工作。
Cyrus SASL 认证可用。
代码库创建
SVN 软件安装完成后还需要建立 SVN 库
[root@localhost modules]# mkdir -p /opt/svn/repo
[root@localhost modules]# svnadmin create /opt/svn/repo
执行上面的命令后,自动建立 repo 测试库,查看 /opt/svn/repo 文件夹发现包含了 conf, db,format,hooks, locks, README.txt 等文件,说明一个 SVN 库已经建立。
配置代码库
进入上面生成的文件夹 conf 下,进行配置
[root@localhost modules]# cd /opt/svn/repo/conf
用户密码 passwd 配置
[root@localhost password]# cd /opt/svn/repos/conf
[root@admin conf]# vim passwd
修改 passwd 为以下内容:
[users]
# harry = harryssecret
# sally = sallyssecret
hello=123
用户名 = 密码
这样我们就建立了 hello 用户, 123 密码
以上语句都必须顶格写 , 左侧不能留空格 , 否则会出错.
权限控制 authz 配置
[root@admin conf]# vi + authz
目的是设置哪些用户可以访问哪些目录,向 authz 文件追加以下内容:
#设置 [/] 代表根目录下所有的资源
[/] 或者写成 [repl:/]
hello = rw
意思是 hello 用户对 repo 测试库下所有的目录有读写权限,当然也可以限定。
如果是自己用,就直接是读写吧。
以上语句都必须顶格写 , 左侧不能留空格 , 否则会出错.
服务 svnserve.conf 配置
[root@admin conf]# vim svnserve.conf
追加以下内容:
[general]
#匿名访问的权限,可以是 read,write,none, 默认为 read
anon-access=none
#使授权用户有写权限
auth-access=write
#密码数据库的路径
password-db=passwd
#访问控制文件
authz-db=authz
#认证命名空间,subversion 会在认证提示里显示,并且作为凭证缓存的关键字
realm=/opt/svn/repositories
以上语句都必须顶格写 , 左侧不能留空格 , 否则会出错.

CentOS 6.5安装SVN
项目要用SVN来管理,所以需要给服务器要安装SVN,是服务器端的。
这里仅使用svn://协议来访问SVN服务器,不启用sasl。
客户端系统都是Windows,使用起来很简单,这里就不用说了。
SVN是Subversion的简称,是一个开放源代码的版本控制系统。
安装
- 检查是否安装了低版本的SVN
- #rpm-qasubversion
- 卸载旧版本SVN
- #yumremovesubversion
- 前两步可省略
- 安装SVN
- #yuminstallsubversion
- 检验已经安装的SVN版本信息
- #svn--version
创建和配置代码库
创建代码库
SVN软件安装完成后需要建立SVN库
- #svnadmincreate/opt/svn/repository
如果目录不存在,svnadmin会建立此目录。执行上面的命令后,将自动建立起repository库,查看/opt/svn/repository文件夹发现包含了conf,db,format,hooks,locks,README.txt等文件,说明一个SVN库已经建立。
进入上面生成的文件夹conf下,有以下几个文件authz,passwd,svnserve.conf。其中authz是权限控制,可以设置哪些用户可以访问哪些目录,passwd是设置用户和密码的,svnserve.conf是设置svn相关操作的。
svnserve.conf
这个文件控制svnserve的配置。包含两个selection:[general]和[sasl],由于不使用sasl,所以仅需要考虑如何设置[general]即可。
- [general]
- #匿名访问的权限,可为none,read,write
- anon-access=none
- #授权用户的权限,可为none,read,write
- auth-access=write
- #密码数据文件的路径,如不以/开头,则为相对路径
- password-db=passwd
- #访问控制文件的路径,如不以/开头,则为相对路径
- authz-db=authz
- #认证命名空间,subversion会在认证提示里显示,并且作为凭证缓存的关键字,不同的代码库需要不同的realm
- realm=the1strepository
密码数据文件
- [users]
- yankz=password
这样就建立了用户yankz,密码是password。可参照此建立多个用户,一行一个。
访问控制文件
[aliases]可以来设置别名,这里没用到;[groups]用来设定小组;其他selection用来设置每个目录的具体权限。
- [groups]
- admin=yankz,houyf,taoxd,ljying
- [/]
- yankz=rw
- @admin=r
- *=
- [/ljying]
- ljying=rw
- @admin=r
- *=
这里设置的是thor小组包含四个成员,根目录yankz具有读写权限,admin其他成员具有读权限,其他人没有权限。ljying目录,ljying具有读写权限,admin其他成员具有读权限,其他人没有权限。
启动和停止
执行“svnserve -d -r /opt/svn/repository”就可以启动了,默认使用3690端口。
如果已经有svn在运行,可以换一个端口运行
svnserve -d -r /opt/svn/repository --listen-port 3391
这样配置,每个端口仅有一个版本库,可以通过这种方式运行多个svnserve。
执行“killall svnserve”就停止了所有的svnserve。如果要停止某个svnserve,就先用“ ps -ef | grep svnserve”获取对应的pid,用“kill -9 pid”停止。
多版本库控制
除了通过使用不同的端口来运行多个svnserve,还有另一种方式。
如果svnserve的启动参数-r所指定的目录直接指定到版本库,例如上面的情况,此时一个svnserve只能为一个版本库工作。
如果-r指定到版本库的上级目录,如“svnserve-d-r/opt/svn”,这种情况,一个svnserve可以为多个版本库工作。
使用类似这样的“svn://192.168.0.1/project1” 即可访问project1,这样的“svn://192.168.0.1/project2 ”即可访问project2。
另外,如果某个访问控制文件需要同时对多个版本库进行控制,就应该指定具体的库,每个目录必须写成[版本库的名字:路径]的形式,像这样:
- [groups]
- admin=user1
- [project1:/]
- @admin=rw
其他
一、防火墙
# vi /etc/sysconfig/iptables
添加以下内容:
-A INPUT -m state --state NEW -m tcp -p tcp --dport 3690 -j ACCEPT
保存后重启防火墙
# service iptables restart
二、检测SVN端口
# netstat -ln | grep 3690
tcp 0 0.0.0.0:3690 0.0.0.0:* LISTEN

CentOS 6.5安装SVN 客户端TortoiseSVN
转载地址:http://www.linuxidc.com/Linux/2015-01/111748.htm
TortoiseSVN简介:
TortoiseSVN 是 Subversion 版本控制系统的一个免费开源客户端,可以超越时间的管理文件和目录。文件保存在中央版本库,除了能记住文件和目录的每次修改以外,版本库非常像普通的文件服务器。你可以将文件恢复到过去的版本,并且可以通过检查历史知道数据做了哪些修改,谁做的修改。这就是为什么许多人将 Subversion 和版本控制系统看作一种“时间机器”。
环境说明:
系统版本:CentOS6.5,内核(uname -r):2.6.32-431.el6.x86_64
安装命令:
yum install -y subversion
SVN客户端命令:
查看svn命令帮助:
svn help
查看子命令帮助:
svn checkout --help
checkout (co): Check out a working copy from a repository.
usage: checkout URL[@REV]... [PATH]
If specified,REV determines in which revision the URL is first
looked up.
If PATH is omitted,the basename of the URL will be used as
the destination. If multiple URLs are given each will be checked
out into a sub-directory of PATH,with the name of the sub-directory
being the basename of the URL.
If --force is used,unversioned obstructing paths in the working
copy destination do not automatically cause the check out to fail.
If the obstructing path is the same type (file or directory) as the
corresponding path in the repository it becomes versioned but its
contents are left 'as-is' in the working copy. This means that an
obstructing directory's unversioned children may also obstruct and
become versioned. For files,any content differences between the
obstruction and the repository are treated like a local modification
to the working copy. All properties from the repository are applied
to the obstructing path.
See also 'svn help update' for a list of possible characters
reporting the action taken.
Valid options:
-r [--revision] ARG : ARG (some commands also take ARG1:ARG2 range)
A revision argument can be one of:
NUMBER revision number
'{' DATE '}' revision at start of the date
'HEAD' latest in repository
'BASE' base rev of item's working copy
'COMMITTED' last commit at or before BASE
'PREV' revision just before COMMITTED
-q [--quiet] : print nothing,or only summary information
-N [--non-recursive] : obsolete; try --depth=files or --depth=immediates
--depth ARG : limit operation by depth ARG ('empty','files',
'immediates',or 'infinity')
--force : force operation to run
--ignore-externals : ignore externals deFinitions
Global options:
--username ARG : specify a username ARG
--password ARG : specify a password ARG
--no-auth-cache : do not cache authentication tokens
--non-interactive : do no interactive prompting
--trust-server-cert : accept unkNown SSL server certificates without
prompting (but only with '--non-interactive')
--config-dir ARG : read user configuration files from directory ARG
--config-option ARG : set user configuration option in the format:
FILE:SECTION:OPTION=[VALUE]
For example:
servers:global:http-library=serf
svn list --help
list (ls): List directory entries in the repository.
usage: list [TARGET[@REV]...]
List each TARGET file and the contents of each TARGET directory as
they exist in the repository. If TARGET is a working copy path,the
corresponding repository URL will be used. If specified,REV determines
in which revision the target is first looked up.
The default TARGET is '.',meaning the repository URL of the current
working directory.
With --verbose,the following fields will be shown for each item:
Revision number of the last commit
Author of the last commit
If locked,the letter 'O'. (Use 'svn info URL' to see details)
Size (in bytes)
Date and time of the last commit
Valid options:
-r [--revision] ARG : ARG (some commands also take ARG1:ARG2 range)
A revision argument can be one of:
NUMBER revision number
'{' DATE '}' revision at start of the date
'HEAD' latest in repository
'BASE' base rev of item's working copy
'COMMITTED' last commit at or before BASE
'PREV' revision just before COMMITTED
-v [--verbose] : print extra information
-R [--recursive] : descend recursively,same as --depth=infinity
--depth ARG : limit operation by depth ARG ('empty',or 'infinity')
--incremental : give output suitable for concatenation
--xml : output in XML
svn list使用示例:
svn list svn://192.168.231.1/SVNHome
遇到连接超时的错误:
查看连接的IP上是否已经启动SVN服务,检查防火墙端口开放状态。
解决连通问题之后,会提示输入“root”用户的密码,如下图:
这里使用其它用户访问,直接回车就可以了,然后提示输入用户名,输入完成回车,
然后提示输入密码,输入完成回车,如果输入正确就可以看到类似的信息了。
svn checkout使用示例:
先创建一个目录,例如:mkdir test
检出到test目录下
svn checkout svn://192.168.231.1/SVNHome ./test
由于之前已经选择保存密码了,所以这里不再需要验证,输出如下图:
Checked out revision 10.检出成功,去test目录下看看吧。
更新版本库:
切换目录到之前检出的文件目录,然后执行命令:svn update
如果之前没有选择保存密码,则会提示输入检出时使用的用户的密码!
如果需要使用其它用户,则直接按回车,这样就会提示你输入用户名,输入用户名之后按回车,会提示输入密码,输入正确并且用户有权限的话,就会开始更新了。

CentOS 7 安装 svn 服务器
SVN 是 Subversion 的简称,是一个开放源代码的版本控制系统,它采用了分支管理系统。
安装 svn 服务器
-
安装 subversion 软件
yum install -y subversion -
新建目录存储所有的 svn 文件
查看
/etc/sysconfig/svnserve文件,里面有个选项OPTIONS="-r /var/svn"这样我们直接建立这个目录即可。
mkdir -p /var/svn -
创建版本仓库 (revision repository)
svnadmin create /var/svn/svn -
创建用户,在
conf/passwd中增加一行[users] pm = pm_pw -
修改用户访问策略
conf/authz文件[groups] project_p = pm [svn:/] @project_p = rw * = -
修改
conf/svnserve.conf文件[general] anon-access = none auth-access = write password-db = passwd authz-db = authz -
启动 svn 服务器
systemctl restart svnserve
systemctl enable svnserve
核心语句是以下一行:
svnserve -d -r /var/svn
防火墙配置
svnserve 默认使用的是 3690 端口,所以我们需要开放 3690 端口供客户端访问:
firewall-cmd --permanent --add-port=3690/tcp
firewall-cmd --reload
客户端验证
svn co svn://192.168.0.7/svn
我们今天的关于centos 7 安装csvn和centos 7 安装gcc9的分享已经告一段落,感谢您的关注,如果您想了解更多关于CentOS 6.2 SVN 搭建 (YUM 安装)、CentOS 6.5安装SVN、CentOS 6.5安装SVN 客户端TortoiseSVN、CentOS 7 安装 svn 服务器的相关信息,请在本站查询。
本文标签:


![[转帖]Ubuntu 安装 Wine方法(ubuntu如何安装wine)](https://www.gvkun.com/zb_users/cache/thumbs/4c83df0e2303284d68480d1b1378581d-180-120-1.jpg)

