在本文中,我们将详细介绍CreateavirtualboxBasedCentOS6OpenStackCloudImage的各个方面,同时,我们也将为您带来关于(1)Centos7installVirt
在本文中,我们将详细介绍Create a virtualbox Based CentOS 6 OpenStack Cloud Image的各个方面,同时,我们也将为您带来关于(1) Centos 7 install VirtualBox guest additions、centos 6.5 双网卡 上网 virtualbox nat hostonly、CentOS 6.6 Minimal设置VirtualBox的共享文件夹、centos 7 install VirtualBox的有用知识。
本文目录一览:- Create a virtualbox Based CentOS 6 OpenStack Cloud Image
- (1) Centos 7 install VirtualBox guest additions
- centos 6.5 双网卡 上网 virtualbox nat hostonly
- CentOS 6.6 Minimal设置VirtualBox的共享文件夹
- centos 7 install VirtualBox

Create a virtualbox Based CentOS 6 OpenStack Cloud Image
前言:
openstack 环境已经部署好了,接下来就是运行实例,运行实例就需要镜像了。镜像的来源分为官方镜像,三方镜像,以及自定义镜像。
官方的镜像不能自动扩容根目录大小
三方镜像嘛……这个看需求吧
自定义镜像,也就是自己动手来做一个镜像。我比较喜欢这种方式,在制作过程中可以学到新东西。由于本人使用的ubuntu 系统已经安装了virtualBox 此例就使用virtualBox 为例。
磁盘格式:
openstack 镜像服务支持的虚拟机镜像磁盘格式有
aki
亚马逊 kernel 镜像
ami
亚马逊 machine 镜像
ari
亚马逊 ramdisk 镜像
iso
光盘数据格式
qcow2
支持QEMU 能动态扩展,支持写时复制
raw
裸磁盘格式。各种格式可以在裸格式间转换
vdi
支持VirtualBox虚拟机和QEMU
vhd
VHD磁盘格式,支持VMware,Xen,Microsoft,VirtualBox和其它虚拟化
vhdx
增强版本的VHD格式,支持更大磁盘大小
vmdk
常见磁盘格式,支持常见虚拟化格式
需求:
可根据磁盘大小自动扩展根目,修改主机名,注入ssh密钥,根据作用安装相应软件,如Nginx、apache、tomcat、PHP-fpm、DB……
实现以上需求,需要借用几个工具实现
cloud-init (https://launchpad.net/cloud-init/)功能
设置默认语言环境
设置实例主机名
生成实例ssh私钥
添加ssh密钥到用户 .ssh/authorized_keys 使其能够登录
设置临时挂载点
cloud-utils https://launchpad.net/cloud-utils
扩大硬盘
linux-rootfs-resize https://github.com/flegmatik/linux-rootfs-resize
调用cloud-utils ,虚拟机启动时检测硬盘扩大,则自动扩展根目录
具体实现:
因本人电脑已经安装有VirtualBox,且已安装好Centos 6.8系统(VirtualBox如何安装系统略),这里就基于已安装好的系统做配置。
添加EPEL 库,安装cloud-init:
yuminstall-yhttp://dl.fedoraproject.org/pub/epel/6Server/x86_64/epel-release-6-8.noarch.rpm
安装cloud-init 软件包及其他所需包:
yuminstall-ycloud-initcloud-utilscloud-utils-growpartacpidgitparted
安装linux rootfs resize:
gitclone
cdlinux-rootfs-resize
./install
将启动日志打印到Dashboard 控制台,修改内核引导参数:
vim/boot/grub/menu.lst
在kernel 行尾增加
console=tty0console=ttyS0,115200n8
在同一行上的同一文件中删除对以下参数的任何引用:
rhgbquiet
删除网络配置中对UUID和MAC地址的硬编码:
rm-f/etc/udev/rules.d/70-persistent-net.rules
PRIMARY_INTERFACE=$(iproutelistmatch0.0.0.0|awk'NR==1{print$5}')
sed-i'/UUID/d'/etc/sysconfig/network-scripts/ifcfg-$PRIMARY_INTERFACE
sed-i'/HWADDR/d'/etc/sysconfig/network-scripts/ifcfg-$PRIMARY_INTERFACE
为了是openstack实例能与元数据服务通行,修改网络配置:
echo"NOZEROCONF=yes">>/etc/sysconfig/network
关闭iptables、selinux:
sed-i's/^SELINUX=.*/SELINUX=disabled/g'/etc/selinux/config
serviceiptablesstop&&chkconfigiptablesoff
serviceip6tablessotp&&chkconfigiptablesoff
安装相关应用或应用源(可选)
清理yum:
yumcleanall
删除/tmp 目录中的所有内容:
rm-rf/tmp/*
清理最后的登录用户日志:
rm-f/var/log/wtmp/var/log/btmp
清理命令历史记录:
history-c
关闭虚拟机:
poweroff
转换格式:
先将vdi转为raw裸格式,在转换为qcow2
VirtualBox支持格式转换,命令如下
VBoxManageclonemedium[disk|dvd|floppy]<uuid|inputfile><uuid|outputfile>
[--formatVDI|VMDK|VHD|RAW|<other>]
[--variantStandard,Fixed,Split2G,Stream,ESX]
[--existing]
VBoxManageclonehd"centos.vdi"centos.img--formatraw--variantstandard
raw转为qcow2格式需要借用qemu-img完成
qemu-imgconvert-cfrawcentos-6.8.img-Oqcow2centos-6.8.qcow2
参数说明:
-f 指定需要转换文件的文件格式,既输入镜像格式(可省略)
-c 压缩
-O指定要转换的目标格式,既输出镜像格式
将镜像上传到glance Repository
openstackimagecreate"centos6.8"--filecentos-6.8.qcow2--disk-formatqcow2--container-formatbare--public
注意:
安装操作系统时只分一个根(/)目录,否则自扩容会失败。
网卡是DHCP自动获取方式,且已处于激活状态
关闭系统自带防火墙,使用openstack安全组
 Centos 7 install VirtualBox guest additions")
(1) Centos 7 install VirtualBox guest additions
1. DKMS package 在 Extra Packages for Enterprise Linux (EPEL) 中,所以需要先安装这个 repository
yum install epel-release2. 安装完后就可以使用 yum 来安装 DKMS,优化虚拟机的体验
yum install dkms
yum groupinstall "Development Tools"
yum install kernel-devel
3. 最后挂载 VBoxGuestAdditions.iso ,安装完成即可。

centos 6.5 双网卡 上网 virtualbox nat hostonly
虚拟机两张网卡:分别调成 NAT (eth0) 和 host only (eht1) 模式.
nat 的网卡不用设置,host only 网卡调为 (vi /etc/sysconfig/network-scripts/ifcfg-eth1):
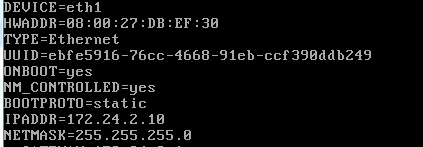
注意:一定不要设置 gateway, 不然会无法上网!!!
原因:
linux 在加载网卡配置文件的时候是先加载 eth0, 再加载 eht1 的.
这样,如果 eth1 设置了 gateway 项,则会覆盖掉 eth0 中的 gateway 设置,因此解决方法就是删除 eth1 的 gateway 设置.
为了使更改生效:service network restart
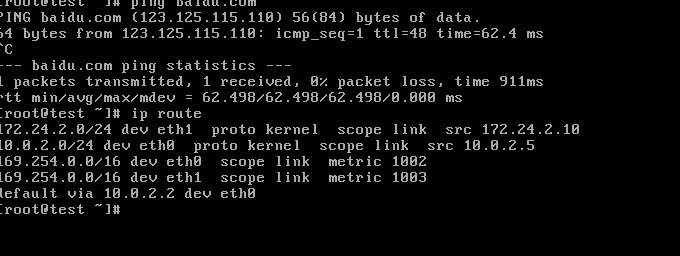
此外,还需要设置路由:
ip route add default via 10.0.2.1
最后,路由设置应该类似如下:
参考:
https://www.cnblogs.com/panblack/p/Centos7_Static_Routes.html
https://my.oschina.net/on0926/blog/646570
https://blog.csdn.net/u012592062/article/details/51188401

CentOS 6.6 Minimal设置VirtualBox的共享文件夹
主机系统:Win7 64-bit 旗舰版
虚拟系统:CentOS 6.6 Minimal 64-bit
功能需求:CentOS 6.6 Minimal 设置 VirtualBox(版本号:4.3.20) 共享文件夹
写在这里,主要记录一下遇到的问题,解决方案,以及相关的操作命令,供自己日后回忆,也供有需要者参考。
CentOS 6.6 Minimal 版本默认是没有桌面的,装好之后就是直接的命令行。按照习惯,我一般会对刚装好的 Linux 系统进行一下软件包更新:yum -y update。
【问题一】等了一会儿发现无法连接到镜像站点,而我的主机 Windows 是连了网络的,于是就查看了一下 CentOS 的 IP 地址:ifconfig,结果发现只有本地地址127.0.0.1,怎么回事?
【原因】CentOS 6.6 Minimal 安装完成后默认是没有开启网卡的,故还没连接到网络。
【解决】vi /etc/sysconfig/network-scripts/ifcfg-eth0,将里面的ONBOOT=no修改为ONBOOT=yes,保存退出,重启系统即可解决网络问题。
【安装增强功能】连上网以后,重新对系统进行更新,然后在 VirtualBox 的菜单中选择"安装增强功能",会发现虚拟机右下角"光驱活动状态"那里有新增盘片,鼠标右键单击那个磁盘小图标,并选择进入到 VirtualBox 的安装目录,选中 VBoxGuestAdditions.iso 这个文件,点击确定或打开。然后,将这个 ISO 文件挂载到文件系统,我这里临时挂载到了 mnt 目录下,命令如下:mount /dev/cdrom /mnt,再进入到 mnt 目录下,执行对应的安装文件,Linux 的增强包安装文件应该是:./VBoxLinuxAdditions.run。
【问题二】但是,等了一会儿过后,居然安装失败了,如下图这个情况,怎么回事?

首先,第一个红色框内给出的信息提示为:没有找到 gcc 工具包,如果接下来有模块编译失败的话,可能这会是一个原因,你应该试着先安装它;
其次,第二个红色框内给出的信息提示为:没有找到与当前运行内核对应的头信息,如果接下来有模块编译失败的话,可能这会是一个原因;
最后,第三个红色框内给出的信息提示为:丢失的包有可能是用下面这条命令来安装的:yum install kernel-devel-2.6.32-504.3.3.el6.x86_64
【解决】OK,既然人家已经交待得这么清楚了:1. 你没安装 gcc;2. 你没安装对应的 kernel-devel-2.6.32-504.3.3.el6.x86_64 这个软件包,那么问题就简单了,照着安装上就是了:yum install gcc
......yum install kernel-devel
此时(最好重启下系统),再重新执行 ./VBoxLinuxAdditions.run 即可将增强包安装成功!
【设置共享文件夹】打开 VirtualBox 界面,选择对应的虚拟系统进行"设置",选中设置窗口中的最后一项"共享文件夹",再选中"固定分配",右键单击并确定共享文件夹的路径,下面的复选框一个都不用勾选,最后"确定"。启动虚拟系统,进入系统以后,执行以下命令来挂载共享文件夹:mount -t vboxsf shared /mnt,其中 shared 为共享文件夹的名字,/mnt 表示当前挂载到 mnt 目录下。如果需要取消挂载,可以直接使用命令:umount -f /mnt。
【注意事项】1. 共享文件夹千万不能和挂载目录同名;2. 以上方法只适用于临时挂载,系统重启后不会自动挂载(下面会继续介绍如何实现每次开机时自动挂载共享文件夹);3. 以上操作若需要 root 权限,请自行切换即可。
【设置开机自动挂载】上述挂载方法只能起到临时挂载的效果,无法做到每次开机自动挂载,如果想要实现自动挂载,可以在开机时执行挂载脚本:vi /etc/rc.d/rc.local,在文件的最后面加上挂载命令:mount -t vboxsf shared /mnt,这样就可以实现每次开机时自动挂载共享文件夹了。
感谢您阅读这篇文章,希望它对您已经有了帮助!若文中有任何错误,烦劳您指正,谢谢!
★ 转载请注明本文原地址

centos 7 install VirtualBox
1. set the yum repository.
[root@localhost ~]# wget -P /etc/yum.repos.d http://download.virtualBox.org/virtualBox/rpm/el/virtualBox.repo
--2017-02-14 11:40:21--  http://download.virtualBox.org/virtualBox/rpm/el/virtualBox.repo
正在解析主机 download.virtualBox.org (download.virtualBox.org)... 65.200.22.33,65.200.22.48
正在连接 download.virtualBox.org (download.virtualBox.org)|65.200.22.33|:80... 已连接。
已发出 HTTP 请求,正在等待回应... 200 OK
长度:259 [text/plain]
正在保存至: “/etc/yum.repos.d/virtualBox.repo”

100%[=========================================================================================================================================================================>] 259         --.-K/s 用时 0s

2017-02-14 11:40:22 (32.0 MB/s) - 已保存 “/etc/yum.repos.d/virtualBox.repo” [259/259])
2. search the available version of VirtualBox
[root@localhost ~]# yum search VirtualBox
已加载插件:fastestmirror,langpacks
Loading mirror speeds from cached hostfile
 * base: mirrors.btte.net
 * elrepo: mirrors.tuna.tsinghua.edu.cn
 * extras: mirrors.btte.net
 * updates: mirrors.btte.net
============================================================================================= N/S matched: VirtualBox =============================================================================================
VirtualBox-4.3.x86_64 : Oracle VM VirtualBox
VirtualBox-5.0.x86_64 : Oracle VM VirtualBox
VirtualBox-5.1.x86_64 : Oracle VM VirtualBox
3. install the specific version.
[root@localhost ~]# yum install VirtualBox-5.1
已加载插件:fastestmirror,langpacks
Loading mirror speeds from cached hostfile
 * base: mirrors.btte.net
 * elrepo: mirrors.tuna.tsinghua.edu.cn
 * extras: mirrors.btte.net
 * updates: mirrors.btte.net
正在解决依赖关系
--> 正在检查事务
---> 软件包 VirtualBox-5.1.x86_64.0.5.1.14_112924_el7-1 将被 安装
--> 正在处理依赖关系 libSDL-1.2.so.0()(64bit),它被软件包 VirtualBox-5.1-5.1.14_112924_el7-1.x86_64 需要
--> 正在检查事务
---> 软件包 SDL.x86_64.0.1.2.15-14.el7 将被 安装
--> 解决依赖关系完成

依赖关系解决

===================================================================================================================================================================================================================
 Package                                             架构                                        版本                                                        源                                               大小
===================================================================================================================================================================================================================
正在安装:
 VirtualBox-5.1                                      x86_64                                      5.1.14_112924_el7-1                                         virtualBox                                       75 M
为依赖而安装:
 SDL                                                 x86_64                                      1.2.15-14.el7                                               base                                            204 k

事务概要
===================================================================================================================================================================================================================
安装  1 软件包 (+1 依赖软件包)

总下载量:75 M
安装大小:168 M
Is this ok [y/d/N]: y
run config procedure,there will be message if there are errors.
[root@localhost ~]# /sbin/vBoxconfig
vBoxdrv.sh: Building VirtualBox kernel modules.
This system is not currently set up to build kernel modules (system extensions).
Running the following commands should set the system up correctly:

  yum install kernel-devel-3.10.0-327.36.2.el7.x86_64
(The last command may fail if your system is not fully updated.)
  yum install kernel-devel
vBoxdrv.sh: Failed: Look at /var/log/vBox-install.log to find out what went wrong.
This system is not currently set up to build kernel modules (system extensions).
Running the following commands should set the system up correctly:

  yum install kernel-devel-3.10.0-327.36.2.el7.x86_64
(The last command may fail if your system is not fully updated.)
  yum install kernel-devel

There were problems setting up VirtualBox.  To re-start the set-up process,run
  /sbin/vBoxconfig
as root.
install kernel
yum install kernel-devel
今天关于Create a virtualbox Based CentOS 6 OpenStack Cloud Image的讲解已经结束,谢谢您的阅读,如果想了解更多关于(1) Centos 7 install VirtualBox guest additions、centos 6.5 双网卡 上网 virtualbox nat hostonly、CentOS 6.6 Minimal设置VirtualBox的共享文件夹、centos 7 install VirtualBox的相关知识,请在本站搜索。
本文标签:


![[转帖]Ubuntu 安装 Wine方法(ubuntu如何安装wine)](https://www.gvkun.com/zb_users/cache/thumbs/4c83df0e2303284d68480d1b1378581d-180-120-1.jpg)

