以上就是给各位分享c–使用boost::tokenizer与字符串分隔符,其中也会对c++boostsplit进行解释,同时本文还将给你拓展问题、AG百家家乐最新官网《787977.tv飞机@gb56
以上就是给各位分享c – 使用boost :: tokenizer与字符串分隔符,其中也会对c++ boost split进行解释,同时本文还将给你拓展
- c – 使用boost :: tokenizer与字符串分隔符(c++ boost split)
问题 - AG 百家家乐最新官网《 787977.tv 飞机 @gb560 》stringtokenizer java,Java 中的 StringTokenizer「建议收藏」
- c – 使用boost :: spirit :: qi用分隔符解析数字
- How to Use Cognito Pre Token Generators to Customize Claims In ID Tokens
")
c – 使用boost :: tokenizer与字符串分隔符(c++ boost split)
解决方法

问题
TweetTokenizer() 是 TweetTokenizer 类的构造函数,因此返回一个标记器对象。然后你应该调用 tokenizer.tokenize(sentence):
tokenizer=TweetTokenizer()
for uni in text_sents:
    tok = tokenizer.tokenize(uni)
    tokens.append(tok)

print(tokens)

AG 百家家乐最新官网《 787977.tv 飞机 @gb560 》stringtokenizer java,Java 中的 StringTokenizer「建议收藏」
大家好,又见面了,我是你们的朋友全栈君。
Java 中的 StringTokenizer
java.util.StringTokenizer 类允许您将字符串分成令牌。这是打破字符串的简单方法。
它没有提供区分数字,带引号的字符串,标识符等的功能,例如 StreamTokenizer 类。我们将在 I/O 一章中讨论 StreamTokenizer 类。
StringTokenizer 类的构造方法
StringTokenizer 类中定义了 3 个构造函数。
Constructor
Description
StringTokenizer(String str)
creates StringTokenizer with specified string.
StringTokenizer(String str, String delim)
creates StringTokenizer with specified string and delimeter.
StringTokenizer(String str, String delim, boolean returnValue)
creates StringTokenizer with specified string, delimeter and returnValue. If return value is true, delimiter characters are considered to be tokens. If it is false, delimiter characters serve to separate tokens.
StringTokenizer 类的方法
StringTokenizer 类的 6 个有用方法如下:
Public method
Description
boolean hasMoreTokens()
checks if there is more tokens available.
String nextToken()
returns the next token from the StringTokenizer object.
String nextToken(String delim)
returns the next token based on the delimeter.
boolean hasMoreElements()
same as hasMoreTokens() method.
Object nextElement()
same as nextToken() but its return type is Object.
int countTokens()
returns the total number of tokens.
StringTokenizer 类的简单示例
让我们看一下 StringTokenizer 类的简单示例,该类在空格的基础上标记字符串 “我的名字是可汗”。
StringTokenizer 类的 nextToken (String delim) 方法的示例
现在不建议使用 StringTokenizer 类。建议使用 String 类或 regex (正则表达式) 的 split () 方法。
0
相关文章:Java 中的 JVM 的关闭挂钩 关闭挂钩是一种特殊的结构,允许开发人员插入要在 JVM 关闭时执行的代码。这在需要关闭 VM 的情况下需要执行特殊清理 […]…
Java 中的 for-each 循环 For-each 是 Java5 中引入的另一种数组遍历技术,例如 for 循环,while 循环,do-while 循环。 […]…
在 Java 中使用_(下划线) 作为变量名 Java 9 对 Java 语言的功能进行了更改,而从合法名称中删除下划线是甲骨文 Oracle 的一项重大更改: 绝不 […]…
了解 Java 中 “public static void main” 中的 “ static” 以下几点解释了 main () 方法中的 “static”: main () 方法:Java 中的 main () 方 […]…
Java 中的按位运算符 按位运算符用于对数字的各个位进行操作。它们可以与任何整数类型 (char,short,int 等) 一起使用。在执行 […]…
修剪 Java 中的字符串 (删除前导和尾随空格) 给定字符串,请从字符串中删除所有前导和尾随空格,然后将其返回。 例子: Input : str = ” Hel […]…
Java 中的 volatile 关键字 使用 volatile 是使类线程安全的另一种方式 (如同步的原子包装)。线程安全意味着一个方法或类实例可以被多个线 […]…
Java 中的构造函数链接 (带示例) 先决条件: Java 中的构造函数 构造函数链接是相对于当前对象从另一个构造函数调用一个构造函数的过程。 构造函 […]…

c – 使用boost :: spirit :: qi用分隔符解析数字
然后我想添加允许完全忽略的分隔符的功能,以允许解析123_456或1101_0011b之类的值.我尝试使用跳过解析器,但我非常怀疑我完全误解了它是如何被使用的.它编译得很好,但我试图让它忽略下划线完全没有任何意义.任何关于如何使这做我想做的建议将不胜感激.我的测试代码包含在下面:
#include <boost/spirit/include/qi.hpp>
#include <boost/spirit/include/phoenix.hpp>

namespace qi = boost::spirit::qi;
namespace ascii = boost::spirit::ascii;
using qi::_val;
using qi::_1;
using qi::skip;
using qi::uint_parser;
using ascii::char_;

template <typename Iterator>
struct unsigned_parser : qi::grammar<Iterator,uint64_t()> {

    unsigned_parser() : unsigned_parser::base_type(start) {
        uint_parser<uint64_t,10> dec_parser;
        uint_parser<uint64_t,16> hex_parser;
        uint_parser<uint64_t,8> oct_parser;
        uint_parser<uint64_t,2> bin_parser;

        start = skip(char_('_'))[
            /* binary with suffix */
            (bin_parser[_val=_1] >> char_("bByY"))
            /* octal with suffix */
            | (oct_parser[_val=_1] >> char_("qQoO"))
            /* hexadecimal with suffix */
            | (hex_parser[_val=_1] >> char_("hHxX"))
            /* decimal with optional suffix */
            | (dec_parser[_val=_1] >> -char_("dDtT"))
            ];
    }

    qi::rule<Iterator,uint64_t()> start;
};

int main(int argv,const char *argc[]) {
    typedef std::string::const_iterator iter;
    unsigned_parser<iter> up;
    uint64_t val;
    if (argv != 2) {
        std::cerr << "Usage: " << argc[0] << " <input>" << std::endl;
        return 1;
    }
    std::string test(argc[1]);
    iter i = test.begin();
    iter end = test.end();
    bool rv = parse(i,end,up,val);
    if (rv && i == end) {
        std::cout << "Succeeded: " << val << std::endl;
        return 0;
    }
    if (rv) {
        std::cout << "Failed partial parse: " << val << std::endl;
        return 1;
    }
    std::cout << "Failed." << std::endl;
    return 1;
}
解决方法
直到那个时候,phoenix :: function<>,phoenix :: bind甚至BOOST_PHOENIX_ADAPT_FUNCTION都应该适合任何人.
以下是您的问题的两种方法,没有任何补丁库.
>直截了当地解析Live On Coliru
这可以被视为使用Qi和简单语义动作解析不同样式的整数的“天真”方式:
start =
      eps [_val=0] >> +(char_("0-9a-fA-F") [ _val = _val*16 + _decode(_1) ] | '_')>>  char_("hHxX") /* hexadecimal with suffix */
    | eps [_val=0] >> +(char_("0-7")       [ _val = _val* 8 + _decode(_1) ] | '_')>>  char_("qQoO") /* octal       with suffix */
    | eps [_val=0] >> +(char_("01")        [ _val = _val* 2 + _decode(_1) ] | '_')>>  char_("bByY") /* binary      with suffix */
    | eps [_val=0] >> +(char_("0-9")       [ _val = _val*10 + _decode(_1) ] | '_')>> -char_("dDtT") /* decimal     with optional suffix */
    ;
当然,你会想知道_decode是什么样的.那么你自己定义:
struct decode {
    template <typename> struct result { typedef int type; };
    template <typename Ch> int operator()(Ch ch) const {
        if (ch>='0' && ch<='9') return ch - '0';
        if (ch>='a' && ch<='z') return ch - 'a' + 10;
        if (ch>='A' && ch<='Z') return ch - 'A' + 10;
        assert(false);
    }
};
boost::phoenix::function<decode> _decode;
>使用BOOST_PHOENIX_ADAPT_FUNCTION宏Live On Coliru
您可以使用宏来代替定义函数对象
int decode(char ch) {
    if (ch>='0' && ch<='9') return ch - '0';
    if (ch>='a' && ch<='z') return ch - 'a' + 10;
    if (ch>='A' && ch<='Z') return ch - 'A' + 10;
    assert(false);
}

BOOST_PHOENIX_ADAPT_FUNCTION(int,_decode,decode,1)
>使用std :: strtoul Live On Coliru
当然,上面可能有点“复杂”,因为它需要你处理整数算术和数字解码的细节.
此外,如果文字是十进制值,如“101_101”,“天真”方法会做一些重复的工作.它将计算十六进制,八进制和二进制分支的子结果,然后才能实现它是小数.
所以我们可以改变顺序:
start =
        (raw[+char_("_0-9a-fA-F")] >>  char_("hHxX")) [ _val = _strtoul(_1,16) ] /* hexadecimal with suffix */
      | (raw[+char_("_0-7")]       >>  char_("qQoO")) [ _val = _strtoul(_1,8) ] /* octal       with suffix */
      | (raw[+char_("_01")]        >>  char_("bByY")) [ _val = _strtoul(_1,2) ] /* binary      with suffix */
      | (raw[+char_("_0-9")]       >> -char_("dDtT")) [ _val = _strtoul(_1,10) ] /* decimal     with optional suffix */
      ;
你会很好奇我们如何实施_evaluate?它是一个函数,它从raw(它是一个迭代器范围)和base获取合成属性,然后明确知道它:
struct strtoul_f {
    template <typename,typename> struct result { typedef uint64_t type; };
    template <typename Raw,typename Int> uint64_t operator()(Raw raw,Int base) const {
        std::string s(raw.begin(),raw.end());
        s.erase(std::remove(s.begin(),s.end(),'_'),s.end());
        char *f(&s[0]),*l(f+s.size());
        return std::strtoul(f,&l,base);
    }
};
boost::phoenix::function<strtoul_f> _strtoul;
如您所见,唯一的复杂性是首先从范围中删除_.

How to Use Cognito Pre Token Generators to Customize Claims In ID Tokens
https://amazonaws-china.com/blogs/mobile/how-to-use-cognito-pre-token-generators-to-customize-claims-in-id-tokens/
This article was written by Matt Noyce, Cloud Application Architect at AWS, & Srihari Prabaharan, Cloud Application Architect at AWS
Amazon Cognito is a fully managed AWS service which lets you add user sign-up, sign-in, and access control to your web and mobile apps quickly and easily. Amazon Cognito scales to millions of users and supports sign-in with social identity providers, such as Facebook, Google, and Amazon, and enterprise identity providers via SAML 2.0. Cognito User Pool manages the overhead of handling the tokens that are returned from social sign-in through Facebook, Google, and Amazon, and from OpenID Connect (OIDC) and SAML IdPs. After successful authentication, Amazon Cognito returns user pool tokens to your app. You can use the tokens to grant your users access to your own server-side resources, or to the Amazon API Gateway. Or, you can exchange them for AWS credentials to access other AWS services.
Amazon Cognito user pools implements ID, access, and refresh tokens as defined by the OpenID Connect (OIDC) open standard:
- The ID Token contains claims about the identity of the authenticated user such as
name,email, andphone_number. - The Access Token grants access to authorized resources.
- The Refresh Token contains the information necessary to obtain a new ID or access token.
Using Cognito Pre Token Generator Lambda Trigger to add custom claims in ID Tokens
In this post we will talk about how to add custom JWT claims to an ID Token generated by a Cognito User Pool using the Pre token Generation Lambda Trigger. This Lambda trigger allows you to customize an identity token before it is generated. You can use this trigger to add new claims, update claims, or suppress claims in the identity token. In the below example, we will use Cognito Pre-token Generator Lambda Trigger to add a custom JWT claim called pet_preference to all incoming ID Token requests.

- User is redirected to AWS Cognito User Pool to perform authentication (AuthN).
- Lambda Pre Token Generator trigger is invoked
- Custom JWT claim pet_preference is added to ID Token.
- ID and Access Tokens are returned to the end-user for consumption.
Getting Started
To build the architecture described above, we will need a Cognito User Pool, Cognito App Client and a Pre Token Generation Lambda Trigger to add custom claims to Id Token.
Solution Overview:
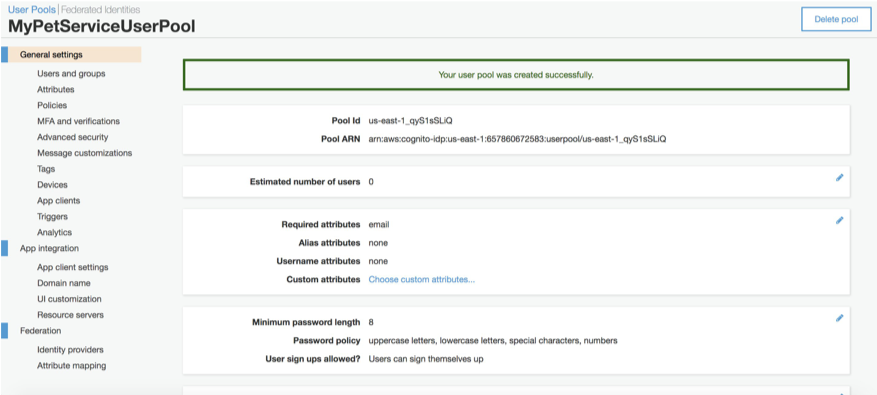
Cognito User Pool
A user pool is a user directory in Amazon Cognito. With a user pool, your users can sign in to your web or mobile app through Amazon Cognito. Create a new Cognito User pool using the steps mentioned in the link. Note down the User Pool Id.
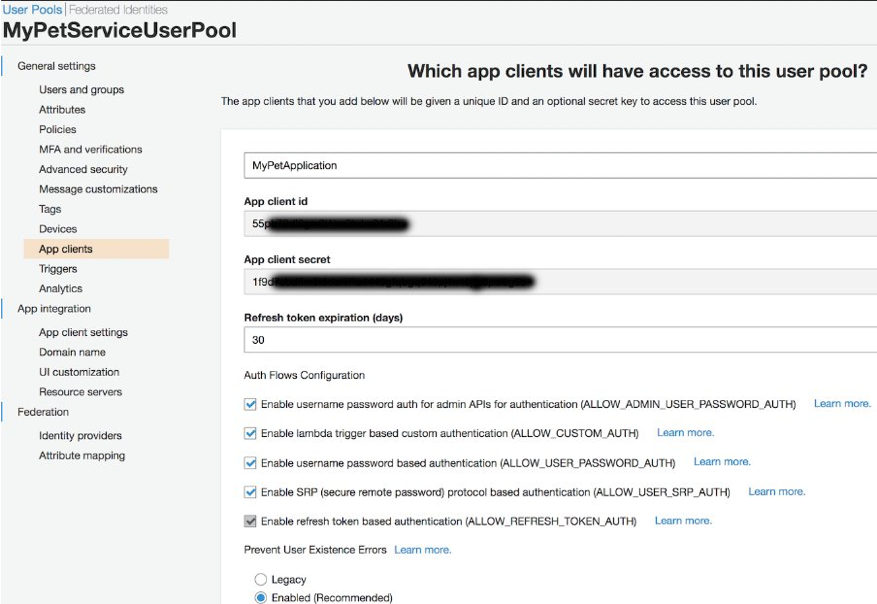
Cognito User Pool App Client
An App Client is a way to grant applications access to authenticate against a user pool and to generate ID and Access Tokens appropriately for end users. Create an App Client in your newly-created Cognito User Pool like the screenshot below. Note down the App Client id and App client secret.
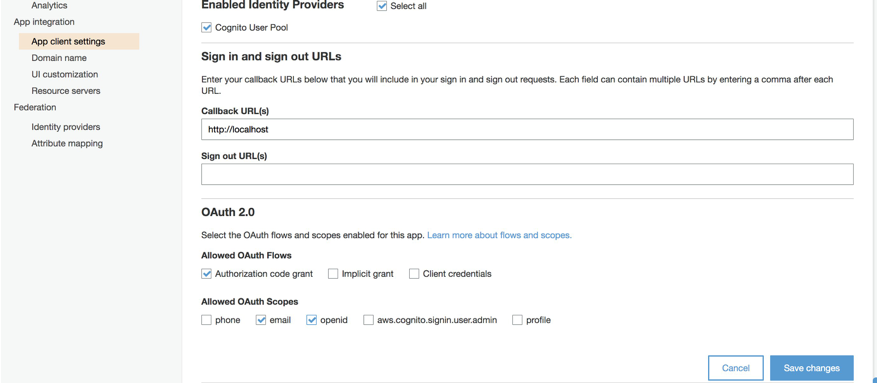
App Client Settings
Configure your app client in the App Client settings:
- Enable Cognito User Pool as an Identity Provider (IdP)
- Configure Callback URL’s and signout URL as per your app requirements. In this example, we have added a callback URL of localhost for application testing purposes.
- Enable Authorization Code Grant Flow with OAuth scopes as email and openid
- Save the changes
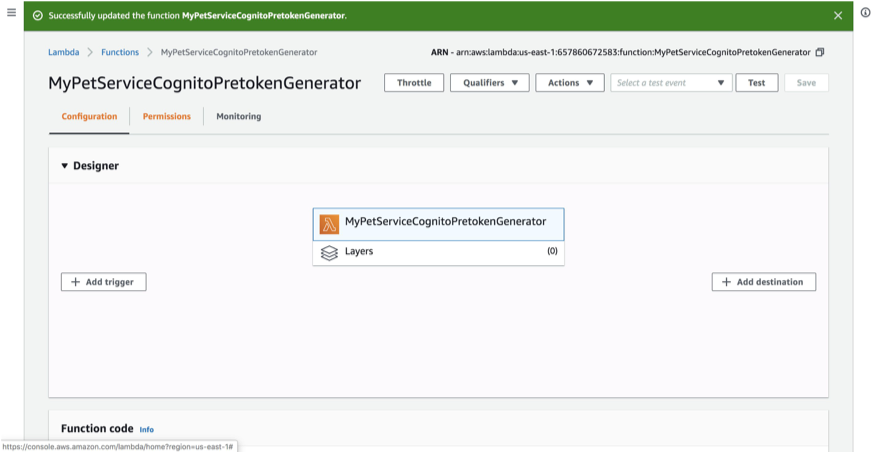
Pre token Lambda Function
Before we add the Pretoken generator trigger in Cognito User Pool, we would need to Create a Lambda Function for customizing the token. The below example lambda function uses Python 3.8 runtime.
Python Lambda Source:
Copy the following code to the Lambda function body.
def lambda_handler(event, context):
    """
    This function handles adding a custom claim to the cognito ID token.
    """

    # grab requestor''s email address
    email = event[''request''][''userAttributes''][''email'']

    # placeholder variable
    pet_preference = ''''

    # set preference to ''dogs'' if email contains @amazon.com
    # otherwise preference is ''cats''
    if "@amazon.com" in email:
        pet_preference = ''dogs''
    else:
        pet_preference = ''cats''

    # this allows us to override claims in the id token
    # "claimsToAddOrOverride" is the important part
    event["response"]["claimsOverrideDetails"] = {
        "claimsToAddOrOverride": {
            "pet_preference": pet_preference
            }
        }

    # return modified ID token to Amazon Cognito
    return event
Code Walkthrough
- In the above example, The lambda handler event captures User Attribute Email.
- If the user has an email address from “amazon.com” then we set the pet_preference to ‘dogs’ .
- If the email address is not from “amazon.com”, we set the pet_preference to ‘cats’ .
- Through the event[‘response’][‘claimsOverrideDetails’] key, we can override or add custom ID token claims to the JWT token in this case pet_preference.
- Return the modified token back.
IAM Lambda Execution Role Trust Relationship Policy:
In order for Cognito to Trigger the Lambda function, the IAM Lambda Execution Role’s Trust Relationship must be updated to include the cognito-idp.amazonaws.com service principal. This allows Cognito the access to assume the Lambda Role so that it can invoke the Pre Token generator.
{
  "Version": "2012-10-17",
  "Statement": [
    {
      "Effect": "Allow",
      "Principal": {
        "Service": "lambda.amazonaws.com"
      },
      "Action": "sts:AssumeRole"
    },
    {
      "Effect": "Allow",
      "Principal": {
        "Service": "cognito-idp.amazonaws.com"
      },
      "Action": "sts:AssumeRole"
    }
  ]
}
Cognito Pre token Generation Trigger
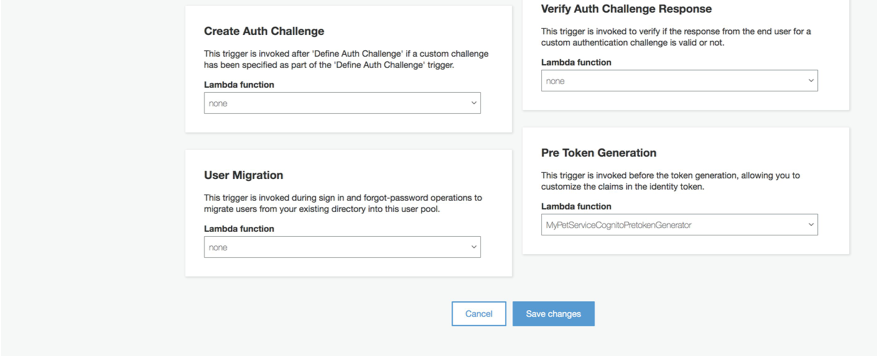
After creating the above Lambda function, Add a Trigger in the Cognito User Pool
- Navigate to Triggers under the newly-created Cognito User Pool (this is found on the left side of the screen).
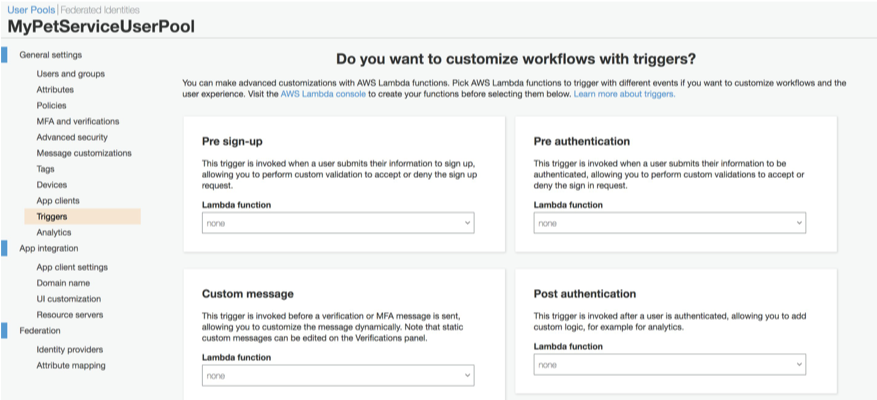
- Scroll down on this page and choose Pre Token Generation as a Trigger option.
- Select the Lambda function created in the previous step and save the changes.
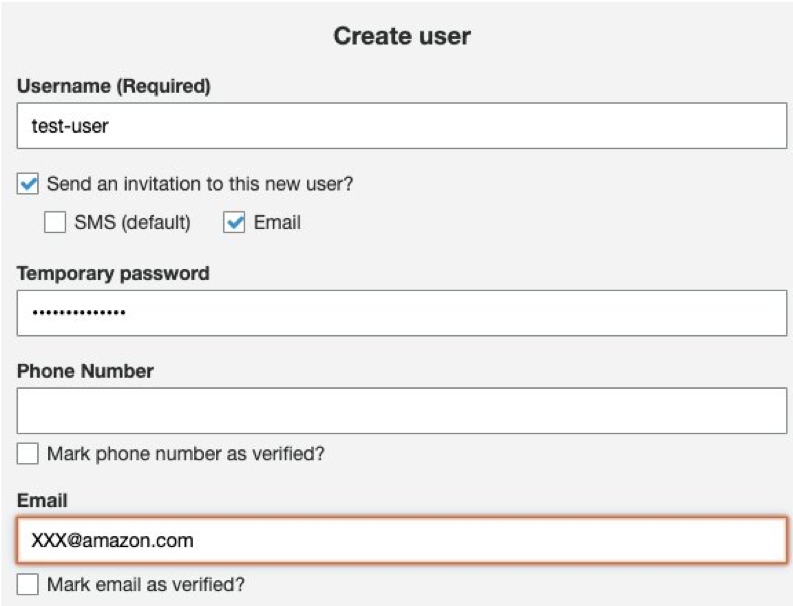
Creating user accounts
Create a test-user in Cognito User Pool like below and verify the user email address
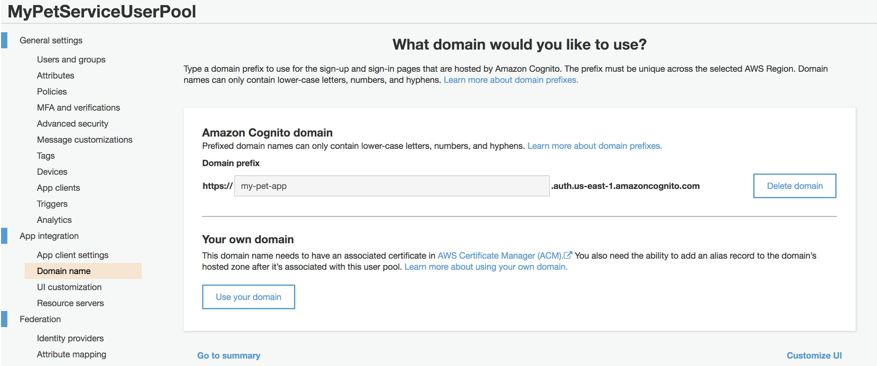
Configuring User Pool Domain(optional)
Create a custom Cognito domain for our application to redirect our users for performing authentication.
OpenID Connect Discovery URL:
After you configure a domain for the user pool, Amazon Cognito automatically provisions a hosted UI that enables you to easily add a federated, single sign-on experience to your website. Behind the scenes, the hosted UI accesses HTTPS endpoints (also provisioned by Amazon Cognito) that implement parts of the OAuth 2.0 framework. You can use the following OpenID Connect Discovery URL endpoint for more information about which endpoints to call:
https://cognito-idp.<AWS-Region>.amazonaws.com/<Cognito-User-PoolId>/.well-known/openid-configuration
This is an example output of the OPENID CONNECT DISCOVERY URL ENDPOINT. The Discovery URL will provide the necessary URLs required to perform OIDC Auth Code Grant.
{
"authorization_endpoint": "https://my-pet-app.auth.us-east-1.amazoncognito.com/oauth2/authorize",
"id_token_signing_alg_values_supported": ["RS256"],
"issuer": "https://cognito-idp.us-east-1.amazonaws.com/us-east-1_*****",
"jwks_uri": "https://cognito-idp.us-east-1.amazonaws.com/us-east-1_*****/.well-known/jwks.json",
"response_types_supported": ["code", "token", "token id_token"],
"scopes_supported": ["openid", "email", "phone", "profile"],
"subject_types_supported": ["public"],
"token_endpoint": "https://my-pet-app.auth.us-east-1.amazoncognito.com/oauth2/token",
"token_endpoint_auth_methods_supported": ["client_secret_basic", "client_secret_post"],
"userinfo_endpoint": "https://my-pet-app.auth.us-east-1.amazoncognito.com/oauth2/userInfo“
}
Validating custom JWT Claims In ID Tokens
The below steps detail how to use Authorization Code grant method for authorizing end users. Authorization Code grant method does not provide user pool tokens directly to an end user upon authentication, instead an authorization code is provided. This code is then sent to a custom application that can exchange it for the desired tokens.
Step 1: Building the Authentication endpoint
Build the following HTTP GET request by providing Cognito User Pool Id and App client Id created above to retrieve authorization code.
# HTTP GET request (in browser)
https://<Cognito User Pool Domain>/login?response_type=code&scope=openid%email&client_id=<Cognito App Client ID>&redirect_uri=http://localhost
Step 2: Getting the Authorization Code
Paste the URL formed above in a browser, you should see the sign in page like below.
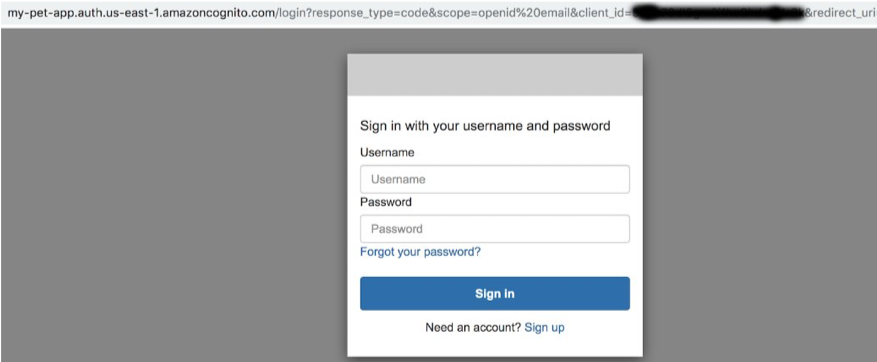
Provide the test-user username, password created above and sign in. After Amazon Cognito verifies the user pool credentials it receives, the user is redirected to the URL that was specified in the original redirect_uri query parameter. The redirect also sets a code query parameter that specifies the authorization code that was vended to the user by Amazon Cognito.
Example:

Step 3: Getting the user Pool Tokens
Now that we have authenticated the user and got the authorization code Query parameter, the next step is to exchange it for user pool tokens. The exchange occurs by submitting a POST request with code Query parameter, client Id and Authorization Header like below.
# HTTP Request (including valid token with "email" scope)
$ curl -X POST \
  ''https://<Cognito User Pool Domain>/oauth2/token?
  grant_type=authorization_code&
  code=8a24d2df-07b9-41e1-bb5c-c269e87838df&
  redirect_uri=http://localhost&
  client_id=55pb79dl8gm0i1ho9hdrXXXXXX&scope=openid%20email'' \
  -H ''Accept-Encoding: gzip, deflate'' \
  -H ''Authorization: Basic NTVwYj......HNXXXXXXX'' \
  -H ''Content-Type: application/x-www-form-urlencoded''
We would need to set the Authorization header for this request as Basic BASE64(CLIENT_ID:CLIENT_SECRET), where BASE64(CLIENT_ID:CLIENT_SECRET) is the base64 representation of the app client ID and app client secret, concatenated with a colon.
Once the POST Request is successful we should get a response with id_token, access_token and refresh_token.
{
    "id_token":"XXXXXXx.....XXXXXXX",
    "access_token":"XXXXXXx.....XXXXXXX",
    "refresh_token":"XXXXXXx.....XXXXXXX",
    "expires_in": 3600,
    "token_type": "Bearer"
}
Decoding the JWT ID Token will yield the following results with custom claim pet_preference added to the Id Token.
{
    "at_hash": "4FNVgmQsm5m_h9VC_OFFuQ",
    "sub": "472ff4cd-9b09-46b5-8680-e8c5d6025d38",
    "aud": "55pb79dl8gm0i1ho9hdre91r3k",
    "token_use": "id",
    "auth_time": 1576816174,
    "iss": "https://cognito-idp.us-east-1.amazonaws.com/us-east-1_qyS1sSLiQ",
    "pet_preference": "dogs",
    "cognito:username": "test-user",
    "exp": 1576819774,
    "iat": 1576816174,
    "email": "test-user@amazon.com“
}
You can see that the pet_preference has been set to dogs since the email address of the requestor contains “amazon.com”
This example can be extended to various other use-cases where you may need non-standard JWT claims included in the requestor’s ID Token.
关于c – 使用boost :: tokenizer与字符串分隔符和c++ boost split的介绍现已完结,谢谢您的耐心阅读,如果想了解更多关于
本文标签:


![[转帖]Ubuntu 安装 Wine方法(ubuntu如何安装wine)](https://www.gvkun.com/zb_users/cache/thumbs/4c83df0e2303284d68480d1b1378581d-180-120-1.jpg)

