本文将分享Android仿Boss直聘文本日期混合滚轮选择器示例的详细内容,此外,我们还将为大家带来关于AndroidStudio日期选择器及日期对话框、android–仍然能够选择日期选择器中的禁用
本文将分享Android仿Boss直聘文本日期混合滚轮选择器示例的详细内容,此外,我们还将为大家带来关于Android Studio 日期选择器 及日期对话框、android – 仍然能够选择日期选择器中的禁用日期、android – 具有默认日期的日期选择器、android – 日期选择器对话框显示编辑文本双击的相关知识,希望对你有所帮助。
本文目录一览:- Android仿Boss直聘文本日期混合滚轮选择器示例
- Android Studio 日期选择器 及日期对话框
- android – 仍然能够选择日期选择器中的禁用日期
- android – 具有默认日期的日期选择器
- android – 日期选择器对话框显示编辑文本双击

Android仿Boss直聘文本日期混合滚轮选择器示例
1、需求分析
GitHub上面有一款iOS风格的滚轮选择器Android-PickerView,它分为时间选择器代码TimePickerView和选项选择器OptionsPickerView,不但可以选择时间日期,可以选择我们自定义的数据,比如性别、年龄等。我一直都用它。直到最近遇到了一个需求,它的选项里面既有文字也有时间,大体效果如Boss直聘添加项目经验中的时间选择功能:

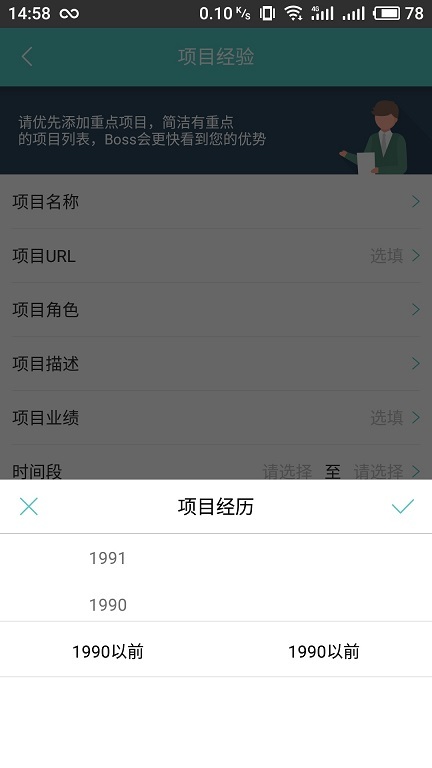
从图中我们可以看出,除了常规的年份和月份的选择,选项中还包含了文本。其中,最新的时间是“至今”,而最早可供选择的时间则是“1900以前”。所以看起来似乎TimePickerView和OptionsPickerView都无法实现这个功能。我们都沮丧地认为这下要么得自定义控件,要么得修改Android-PickerView这个库了。但我转念一想,为什么要把“时间选择”和“选项选择”分得那么开呢?时间选择其实也是选项选择的一种嘛。比如我要选择2017年12月,那就是从年份中选择2017,从月份中选择12。只要设置好一级选项和二级选项就可以了。
2、选项结构分析
有了思路之后,我们来分析一下选项的数据结构。年份可以分为3种情况:
- 最新年份,其实也是最新的时间:“至今”;
- 常规的年份:1990~当前年份(2018);
- 最早的年份,也就是最早的时间:“1990以前”。
我在Boss直聘的基础上加了一些限制:当前年份下对应的可供选择的月份范围只能是从月到当前月份,比如现在是2018年2月,那么选好年份为2018后,月份就只能选择1和2。这样一来,月份就有四种情况了:
- 最新月份:“至今”;
- 当前年份下对应的月份范围:1~当前月份;
- 完整的月份,即1~12;
- 最早月份:“1990以前”。
可以总结为如下的表格:
| 年份 | 月份 |
|---|---|
| 最新年份“至今” | 最新年份“至今” |
| 当前年份 | 1~当前月份 |
| 1990~当前年份-1 | 月份1~12 |
| 最早年份“1990以前” | 最早月份“1990以前” |
3、书写代码
在开始写代码之前,我建议你先去GitHub上看看Android-PickerView的使用用法,它使用了构造者模式,用起来很简单。
现在,就开始写我们的代码了。
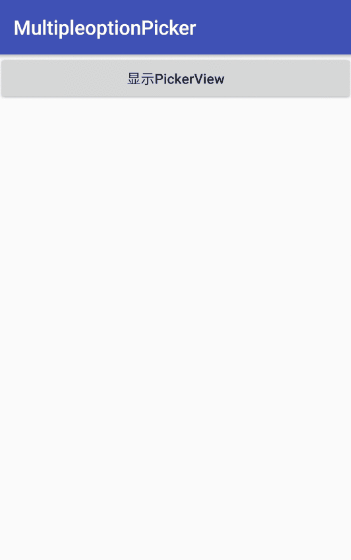
3.1 界面布局
布局就是一个按钮,点击后弹出滚轮选择器,选好后点击确认即将数据在TextView上显示出来。
<?xml version="1.0" encoding="utf-8"?>
<LinearLayout
  xmlns:android="http://schemas.android.com/apk/res/android"
  xmlns:app="http://schemas.android.com/apk/res-auto"
  android:orientation="vertical"
  android:layout_width="match_parent"
  android:layout_height="match_parent">

  <Button
    android:textAllCaps="false"
    android:text="显示PickerView"
    android:onClick="showPickerView"
    android:layout_width="match_parent"
    android:layout_height="wrap_content" />

  <TextView
    android:id="@+id/tv_time"
    android:textSize="16sp"
    android:gravity="center"
    android:layout_width="match_parent"
    android:layout_height="wrap_content" />
</LinearLayout>
3.2 Activity代码
借助强大的PickerView,我们实现起来很简单,请看如下的代码:
public class MultipleOptionActivity extends AppCompatActivity {

  private TextView tvTime;

  /**
   * 完整的月份数据1~12
   */
  private List<String> monthList = new ArrayList<>();
  /**
   * 滚轮选择器中年份的选项数据
   */
  private List<String> optionYears = new ArrayList<>();
  /**
   * 滚轮选择器中月份的选项数据
   */
  private List<List<String>> optionMonths = new ArrayList<>();

  @Override
  protected void onCreate(Bundle savedInstanceState) {
    super.onCreate(savedInstanceState);
    setContentView(R.layout.activity_multiple_option);
    tvTime = (TextView) findViewById(R.id.tv_time);
    initData();
  }

  /**
   * 初始化数据
   */
  private void initData() {
    //设置完整的月份数据,即1~12
    for (int i = 1; i <= 12; i++) {
      monthList.add(String.valueOf(i));
    }
    Calendar calendar = Calendar.getInstance();
    int curYear = calendar.get(Calendar.YEAR);
    //月份获取到的数据是0~11,所以要加1
    int curMonth = calendar.get(Calendar.MONTH) + 1;
    for (int i = curYear + 1; i >= 1989; i--) {
      //对应年份的月份数据集合
      List<String> tempMonths = new ArrayList<>();
      if (i == curYear + 1) {
        //设置最新时间“至今”
        optionYears.add("至今");
        tempMonths.add("至今");
        optionMonths.add(tempMonths);
      } else if (i == curYear) {
        //设置当前年份及其对应的月份
        optionYears.add(String.valueOf(i));
        for (int j = 1; j <= curMonth; j++) {
          tempMonths.add(String.valueOf(j));
        }
        optionMonths.add(tempMonths);
      } else if (i == 1989) {
        //设置最早时间“1900以前”
        optionYears.add("1990以前");
        tempMonths.add("1990以前");
        optionMonths.add(tempMonths);
      } else {
        //设置常规时间
        optionYears.add(String.valueOf(i));
        optionMonths.add(monthList);
      }
    }
  }
  /**
   * 显示滚轮
   *
   * @param view
   */
  public void showPickerView(View view) {
    OptionsPickerView multipleOp = new OptionsPickerView.Builder(this,new OptionsPickerView.OnoptionsSelectListener() {
      @Override
      public void onoptionsSelect(int options1,int options2,int options3,View v) {
        if (options1 == 0 || options1 == optionYears.size() - 1) {
          //选中最新和最早时间时直接显示文字,不需要拼接月份
          tvTime.setText(optionYears.get(options1));
        } else {
          //常规的时间,需要拼接年份和月份
          tvTime.setText(new StringBuffer(optionYears.get(options1)).append("―").append(monthList.get(options2)));
        }
      }
    }).setTitleText("请选择时间")
        .build();
    multipleOp.setPicker(optionYears,optionMonths);
    multipleOp.show();
  }
}
代码很少,注释我也写得很清楚了,相信大家很容易理解。我们重点关注OptionsPickerView的setPicker方法,它可以传入三个参数,每个参数都是集合,但每个参数的类型都不同。第一个参数是List,第二个参数是List<List>,第三个参数是List<List<list>>。看到这里你就明白了,我们每个年份对应的月份数据就是一个集合(当然,集合大小不相同),比如年份2017,对应的月份就是有着12个元素的集合。理清楚这一点之后,也就理解initData方法里面对数据的设置了。
最后在TextView中显示数据时自然也要分类了,对于“至今”和“1990以前”我们至今显示文本,其他的再拼接一下,看起来像是时间就行了。
看看我们最后实现的效果图:
4、总结
在项目中使用一些好的第三方库是可以大大节省我们的开发时间的,但是在使用过程中也要灵活一点。比如我们在一个页面中需要多次用到滚轮选择器(比如选择开始时间和结束时间),那么每次都要设置一遍滚轮的样式和写一次点击事件也太麻烦了。这时,我们就可以将滚轮样式的设置代码抽取出来:
  /**
  * 设置滚轮样式
  * @return
  */
  private OptionsPickerView.Builder createBuilder(){
    OptionsPickerView.Builder builder = new OptionsPickerView.Builder(MultipleOptionActivity.this,this)
        .setBgColor(ContextCompat.getColor(this,R.color.colorAccent))
        .setSubmitText("确定")
        .setCancelText("取消");
    //下面可以继续设置样式
    return builder;
  }
然后显示滚轮的时候只要这样写:
OptionsPickerView op = createBuilder().build();
op.setPicker(数据1,数据2);
op.show();
点击事件也可以封装起来,让我们的Activity继承OptionsPickerView.OnoptionsSelectListener,然后实现点击事件:
  /**
   * 滚轮的监听事件
   * @param options1
   * @param options2
   * @param options3
   * @param v
   */
  @Override
  public void onoptionsSelect(int options1,View v) {
    switch (v.getId()){
      //根据所点击的控件Id来区分点击事件
      case R.id.btn_show:
        break;
      default:
        break;
    }
  }
那么OptionsPickerView怎么获取到点击View的id的呢?我们在调用show方法的时候传入点击View的对象就可以了。以上是我个人的一点心得,希望对大家有所帮助。
最后给一下源码吧:源码
以上就是本文的全部内容,希望对大家的学习有所帮助,也希望大家多多支持编程小技巧。
您可能感兴趣的文章:
- Android selector背景选择器的使用详解
- Android时间选择器、日期选择器实现代码
- 浅谈谈Android 图片选择器
- android 字体颜色选择器(ColorPicker)介绍
- Android自定义可循环的滚动选择器CycleWheelView
- Android仿微信照片选择器实现预览查看图片
- 基于android背景选择器selector的用法汇总
- Android开发中实现IOS风格底部选择器(支持时间 日期 自定义)

Android Studio 日期选择器 及日期对话框
Android Studio 日期选择器 及日期对话框
activity_main.xml
<?xml version="1.0" encoding="utf-8"?>
<LinearLayout

    xmlns:android="http://schemas.android.com/apk/res/android"
    android:layout_width="match_parent"
    android:layout_height="match_parent"
    android:orientation="vertical"
    >

    <TextView
        android:text="Hello World!"
        android:layout_gravity="center"
        android:id="@+id/tv"
        android:layout_width="wrap_content"
        android:layout_height="wrap_content"/>

    <DatePicker
        android:layout_marginTop="50dp"
        android:layout_gravity="center"
        android:layout_width="wrap_content"
        android:layout_height="wrap_content"/>

    <Button
        android:layout_gravity="center"
        android:layout_marginTop="10dp"
        android:text="按钮"
        android:id="@+id/bt"
        android:layout_width="wrap_content"
        android:layout_height="wrap_content"/>

</LinearLayout>
MainActivity.java
package com.easybooks.myapplication;

import androidx.appcompat.app.AlertDialog;
import androidx.appcompat.app.AppCompatActivity;

import android.app.DatePickerDialog;
import android.content.DialogInterface;
import android.os.Bundle;
import android.view.View;
import android.widget.Button;
import android.widget.DatePicker;
import android.widget.TextView;

import java.util.Calendar;

public class MainActivity extends AppCompatActivity {

    private TextView textView;
    private Button button;
    private String decs;

    @Override
    protected void onCreate(Bundle savedInstanceState) {
        super.onCreate(savedInstanceState);
        setContentView(R.layout.activity_main);

        textView = findViewById(R.id.tv);
        button = findViewById(R.id.bt);

        button.setonClickListener(new View.OnClickListener() {
            @Override
            public void onClick(View v) {
                Calendar calendar = Calendar.getInstance();

                DatePickerDialog dialog = new DatePickerDialog(MainActivity.this,
                        new DatePickerDialog.OnDateSetListener() {
                            @Override
                            public void onDateSet(DatePicker view, int year, int month, int dayOfMonth) {

                                 decs = String.format("%d %d %d", year, month, dayOfMonth);

                            }
                        },
                        calendar.get(Calendar.YEAR),
                        calendar.get(Calendar.MONTH),
                        calendar.get(Calendar.DAY_OF_MONTH));

                dialog.show();
                textView.setText(decs);

            }
        });


        AlertDialog.Builder builder = new AlertDialog.Builder(this);
        builder.setTitle("hello world");
        builder.setMessage("hello world");
        builder.setPositiveButton("确定", new DialogInterface.OnClickListener() {
            @Override
            public void onClick(DialogInterface dialog, int which) {

            }
        });

        AlertDialog alter = builder.create();
        alter.show();


    }
}


android – 仍然能够选择日期选择器中的禁用日期
我可以用它来做
dialog.getDatePicker().setMinDate(System.currentTimeMillis() - 1000);
这是正常的,日期选择器中的过去日期看起来是禁用的.但是我仍然可以点击上一个日期并选择它.
怎么不让这种情况发生?
下面是我的日期选择器的截图:
这里是我的代码,我禁用过去的日期:
@Override
    public Dialog onCreateDialog(Bundle savedInstanceState) {
        // Use the current date as the default date in the picker
        final Calendar c = Calendar.getInstance();
        int year = c.get(Calendar.YEAR);
        int month = c.get(Calendar.MONTH);
        int day = c.get(Calendar.DAY_OF_MONTH);
        mActivity = new WeakReference<CreateEvent>(
                (CreateEvent) getActivity());

        DatePickerDialog dialog = new DatePickerDialog(getActivity(),this,year,month,day);

        if(callingView==fromDate){
            dialog.getDatePicker().setMinDate(System.currentTimeMillis() - 1000);
        }else if (callingView==toDate){
            dialog.getDatePicker().setMinDate(fromD);
        }

        // Create a new instance of DatePickerDialog and return it
        return dialog;
    }
解决方法
所有您需要做的是检查所选日期与最小日期设置.

android – 具有默认日期的日期选择器
在我的应用程序中,我使用日期选择器为用户选择日期.所以我在我的应用程序中使用数据库,如果用户选择1个特定项目意味着我将获取与该项目相关的数据,我将在另一个屏幕中显示它,因为它将有1个开始日期,我必须将该日期作为日期选择器中的默认日期加载..但是它将当前日期作为默认日期加载而不是从数据库中提取的日期..请帮助我..提前谢谢.
我的代码:
 c = Calendar.getInstance();
               SimpleDateFormat sdf=new SimpleDateFormat("yyyy/MM/dd");
               System.out.println("After format");
               Date pickdefdate=null;
//             String pickdefdatepar=null;
               try {
                   System.out.println("Inside try="+date);
              pickdefdate=sdf.parse(date);              ----------->date which is fetched from database.
              System.out.println("dddddddd="+pickdefdate);

              c.setTime(pickdefdate);    --------------------->Setting this date as current date..
              System.out.println("After parse");
            } catch (ParseException e) {
                // Todo Auto-generated catch block
                e.printstacktrace();
            }
               mYear = c.get(Calendar.YEAR);             ----------as u said i am setting this value before dialog.
               mMonth = c.get(Calendar.MONTH);
               mDay = c.get(Calendar.DAY_OF_MONTH);
               showDialog(DATE_DIALOG_ID);


 protected Dialog onCreateDialog(int id)
     {
            switch (id) {
            case DATE_DIALOG_ID:
                System.out.println("in dia="+mDay);
                return new DatePickerDialog(this, mDateSetListener, mYear, mMonth, mDay);
            }
            return null;
        }

     private DatePickerDialog.OnDateSetListener mDateSetListener =
                new DatePickerDialog.OnDateSetListener() {
                    public void onDateSet(DatePicker view, int year, int monthOfYear, int dayOfMonth) {
                        System.out.println("Inside dia");
                        mYear = year;
                        mMonth = monthOfYear;
                        mDay = dayOfMonth;
                    }
            };
解决方法:
采用
date_picker_dialog.updateDate(year, month - 1, date);
每当您想将现有日期更新为日期选择器时.
如果要在创建日期选择器时设置任何日期,则可以覆盖oncreatedialog
    @Override
    protected Dialog onCreateDialog(int id)
    {
        switch (id) {
            case DATE_DIALOG_ID:
                date_picker_dialog = new DatePickerDialog(this, get_date, year, month - 1, date);
                return date_picker_dialog;
        }
    }
希望它会对你有所帮助.如果你遇到任何问题,你可以问.

android – 日期选择器对话框显示编辑文本双击
这是活动代码
package com.example.firstdemoapp.activities;

import java.text.SimpleDateFormat;
import java.util.Calendar;
import java.util.Locale;

import com.example.firstdemoapp.R;
import com.example.firstdemoapp.model.StatusDK;

import android.app.Activity;
import android.app.DatePickerDialog;
import android.os.Bundle;
import android.view.View;
import android.view.View.OnClickListener;
import android.widget.AdapterView;
import android.widget.AdapterView.OnItemSelectedListener;
import android.widget.ArrayAdapter;
import android.widget.DatePicker;
import android.widget.EditText;
import android.widget.Spinner;

public class SearchingTaxActivity extends Activity implements OnClickListener,DatePickerDialog.OnDateSetListener,OnItemSelectedListener {

private Calendar calendarFrom;
private Calendar calendarTo;
private String myFormat;
private SimpleDateFormat sdf;
private EditText dateFrom;
private EditText dateto;

private EditText activeEditText;
private Calendar activeCalendar;

private Spinner spinnerStatusDK;
private ArrayAdapter spinnerArrayAdapter;

@Override
protected void onCreate(Bundle savedInstanceState) {
    super.onCreate(savedInstanceState);
    setContentView(R.layout.activity_search_tax);

    calendarFrom = Calendar.getInstance();
    calendarTo = Calendar.getInstance();
    myFormat="dd/MM/yyyy";
    sdf = new SimpleDateFormat(myFormat,Locale.US);

    dateFrom = (EditText) findViewById(R.id.dateFrom);
    dateto = (EditText) findViewById(R.id.dateto);
    spinnerStatusDK=(Spinner)findViewById(R.id.spinnerStatusDK);
    spinnerArrayAdapter = new ArrayAdapter(this,android.R.layout.simple_spinner_item,new StatusDK[] {
                    new StatusDK( 0,"0" ),new StatusDK( 1,"1" ),new StatusDK( 2,"2" ),});

    spinnerStatusDK.setAdapter(spinnerArrayAdapter);
    spinnerStatusDK.setonItemSelectedListener(this);
    dateFrom.setonClickListener(this);
    dateto.setonClickListener(this);
}

@Override
public void onClick(View v) {
    // Todo Auto-generated method stub
    if (v == dateFrom) {
        activeCalendar = calendarFrom;
        activeEditText = dateFrom;
    } else if (v == dateto) {
        activeCalendar = calendarTo;
        activeEditText = dateto;
    }
    new DatePickerDialog(SearchingTaxActivity.this,this,activeCalendar.get(Calendar.YEAR),activeCalendar.get(Calendar.MONTH),activeCalendar.get(Calendar.DAY_OF_MONTH)).show();


}

@Override
public void onDateSet(DatePicker view,int year,int monthOfYear,int dayOfMonth) {
    // Todo Auto-generated method stub
    activeCalendar.set(Calendar.YEAR,year);
    activeCalendar.set(Calendar.MONTH,monthOfYear);
    activeCalendar.set(Calendar.DAY_OF_MONTH,dayOfMonth);

    if (activeEditText != null) {
        activeEditText.setText(sdf.format(activeCalendar.getTime()));
    }

}

@Override
public void onItemSelected(AdapterView<?> arg0,View arg1,int arg2,long arg3) {
    // Todo Auto-generated method stub

}

@Override
public void onnothingSelected(AdapterView<?> arg0) {
    // Todo Auto-generated method stub

}
}
并且活动的布局是:
<LinearLayout xmlns:android="http://schemas.android.com/apk/res/android"
xmlns:tools="http://schemas.android.com/tools"
android:layout_width="match_parent"
android:layout_height="match_parent"
android:orientation="vertical"
tools:context="${relativePackage}.${activityClass}" >

<TextView android:layout_width="match_parent"
          android:layout_height="wrap_content"
          android:text="@string/dateFromTextView"
            />
<EditText
    android:id="@+id/dateFrom"
    android:layout_width="match_parent"
    android:layout_height="wrap_content"
    android:ems="10"
    android:hint="@string/edit_datefrom"
     />

<TextView android:layout_width="match_parent"
          android:layout_height="wrap_content"
          android:text="@string/datetoTextView"
            />
<EditText
    android:id="@+id/dateto"
    android:layout_width="match_parent"
    android:layout_height="wrap_content"
    android:ems="10"
    android:hint="@string/edit_dateto"
     />

<Spinner
    android:id="@+id/spinnerStatusDK"
    android:layout_width="match_parent"
    android:layout_height="wrap_content" />
解决方法
我们今天的关于Android仿Boss直聘文本日期混合滚轮选择器示例的分享已经告一段落,感谢您的关注,如果您想了解更多关于Android Studio 日期选择器 及日期对话框、android – 仍然能够选择日期选择器中的禁用日期、android – 具有默认日期的日期选择器、android – 日期选择器对话框显示编辑文本双击的相关信息,请在本站查询。
本文标签:


![[转帖]Ubuntu 安装 Wine方法(ubuntu如何安装wine)](https://www.gvkun.com/zb_users/cache/thumbs/4c83df0e2303284d68480d1b1378581d-180-120-1.jpg)

