在本文中,我们将为您详细介绍CentOS7系列的相关知识,并且为您解答关于一系统服务systemd的疑问,此外,我们还会提供一些关于CentOS7/RHEL7systemd指令、CentOS7Syst
在本文中,我们将为您详细介绍CentOS 7 系列的相关知识,并且为您解答关于一系统服务 systemd的疑问,此外,我们还会提供一些关于CentOS 7 / RHEL 7 systemd 指令、CentOS 7 Systemd 入门、CentOS 7 Systemd介绍、CentOS 7 systemd添加自定义系统服务的有用信息。
本文目录一览:- CentOS 7 系列(一)系统服务 systemd(centos7服务管理)
- CentOS 7 / RHEL 7 systemd 指令
- CentOS 7 Systemd 入门
- CentOS 7 Systemd介绍
- CentOS 7 systemd添加自定义系统服务
系统服务 systemd(centos7服务管理)")
CentOS 7 系列(一)系统服务 systemd(centos7服务管理)
Systemd:
在CentOS 7中开始使用了Systemd,它取代了原来的SysVinit,我们在系统中查看,你会发现systemd这个进程的PID为1,而不是原来的init进程。systemd进程将作为所有进程的父进程运行,这就是在CentOS 7中的新的进程管理程序。

Systemd是Linux内核发起的第一个程序,通过上面的截图也可以印证这一点,而且它还扮演很多角色,它会启动系统服务、处理用户登陆、执行一些定时任务等。它变成了Linux的的一种基础系统。在启动过程中内核检查完硬件加载完基础驱动,就会运行systemd这个程序(原来是/sbin/init),这个程序会加载文件系统、其他驱动以及运行各种系统服务。
Systemd与之前的init最大的不同是引入了并行启动概念,之前的init进程是一个一个的启动其他进程的。Systemd会为每一个需要启动的守护进行建立一个套接字,这样不同进程就可以相互通信。Systemd创建进程并为每个进程分配一个控制组也就是CGroup,通过这个组来追踪进程。
日志文件:
另外在systemd中的一个变化就是日志变成二进制格式,它实际上是一个日志系统,它产生的日志你无法用文本编辑器查看,不过好处是记录的信息更全带有很多的元数据,可以很容易的进行内容过滤。比如查看日志可以用下面的命令
journalctl
默认将命令输出管道给了less程序,这样方便查看,不过它会输出所有日志。如果仅仅想看本次系统启动的日志呢:
journalctl-b
如果是上一次启动的日志呢:
journalctl-b-1
以此类推,-2就是上上次的。如果想看某一个时刻到现在的启动信息呢?
journalctl-b--since="2017-03-3117:00"
如何根据特定程序查看日志呢?
journalctl-uNginx.service

CentOS 7 / RHEL 7 systemd 指令
CentOS 7已经切换到 systemd,系统指令也有所变化。之前用于启动、重启、停止各种服务的service作为向后兼容的指令还能使用,但是将来可能会消失。同时,chkconfig也改成了systemctl了。这里列举了一些常用的对应于service和chkconfig的新的systemctl指令。
在目前的 CentOS 7(或 RHEL 7)系统中,依然可以使用service指令。例如,
[root@localhost ~]# service network restart
Restarting network (via systemctl):                        [  OK  ]

[root@localhost ~]# service httpd restart
Redirecting to /bin/systemctl restart  httpd.service

[root@localhost ~]# service sshd restart
Redirecting to /bin/systemctl restart  sshd.service
但是系统会自动重定向该指令到新的指令/bin/systemctl来执行,并给出提示。
是时候切换到新的指令格式了,直接使用systemctl吧。这个指令的意思就是 system contrl。下面是一些常用的例子:
启动服务:
systemctl start httpd
停止服务:
systemctl stop httpd
重启服务(先停止,后启动):
systemctl restart httpd
重新加载(使用新的配置文件):
systemctl reload httpd
显示服务状态:
systemctl status httpd
与此同时,之前用于设定系统启动时自动运行某服务的指令chkconfig也改了,还是用systemctl。
chkconfig service on
改成了,
systemctl enable httpd
chkconfig service off
改成了,
systemctl disable httpd
检查服务状态的
chkconfig service
改成了,
systemctl is-enabled httpd
列举出所有服务的指令,
chkconfig –list
改成了,
systemctl list-unit-files --type=service
以前能指定服务 runlevel 的 –levels 也没有了。慢慢适应吧。©
本文发表于水景一页。永久链接:<https://cnzhx.net/blog/centos-7-rhel-7-systemd-commands/>。转载请保留此信息及相应链接。

CentOS 7 Systemd 入门
在 CentOS 7 之前,系统以 System V 来作为系统管理器。
System V 有一个致命的缺点就是过度依赖于脚本来实现服务管理,从而导致服务几乎没办法并行启动,最终导致系统启动效率较为低下。
从 CentOS 7 开始,Systemd 成为新的系统管理器。我认为它最大的优点就是支持进服务并行启动,从而使效率大大提高;同时它还具有日志管理、快照备份与恢复、挂载点管理等多种实用功能,功能甩 System V 几条街!
而且 systemd 进程的 PID 是 1 ,也就是说 Systemd 掌管着一切进程!
当然了 Systemd 是向下兼容 System V 的。
以下只介绍 Systemd 的服务、启动项和日志管理这三项功能,其他功能不涉及。
说明
1. 下文提到的服务项名称后面的.service可以省略不写,系统会自动补全。
2. Systemd 不仅仅管理系统的服务项,还能管理着挂载点、套接字等。每一个 Systemd 管理项称为unit,unit可以有很多类型。本文仅介绍.service类型和.target的 unit 。
3. 本文适用于所有使用 Systemd 的操作系统,不局限于 CentOS 7。
二、服务、系统状态的查看
2.1 查看系统所有安装的服务项
systemctl list-unit-files --type=service使用 PageUp 或 PageDown 翻页,查看完毕后按 q 退出。
2.2 查看系统所有运行的服务项
systemctl list-units --type=service如果看到某个服务项前面有一个红点,说明该服务存在问题,请进行排查。
使用 PageUp 或 PageDown 翻页,查看完毕后按 q 退出。
2.3 查看系统所有开机自启动的服务项
systemctl list-unit-files --type=service | grep enabled2.4 查看指定服务项状态
systemctl status <服务项名称>执行命令之后,系统会显示该服务项的状态、是否已激活、描述以及最后十条日志。
如果服务项前面有一个红点,说明该服务存在问题,请根据日志进行排查。
例如
查看 Nginx 服务状态
[root: ~]# systemctl status nginx.service

● nginx.service - nginx - high performance web server

 Loaded: loaded (/usr/lib/systemd/system/nginx.service; disabled; vendor preset: disabled)

 Active: inactive (dead)

 Docs: http://nginx.org/en/docs/

9月 05 09:24:07 CentOS_VM systemd[1]: nginx.service: control process exited, code=exited status=1

9月 05 09:24:07 CentOS_VM systemd[1]: Failed to start nginx - high performance web server.

9月 05 09:24:07 CentOS_VM systemd[1]: Unit nginx.service entered failed state.

9月 05 09:24:07 CentOS_VM systemd[1]: nginx.service failed.

9月 05 09:28:39 CentOS_VM systemd[1]: Starting nginx - high performance web server...

9月 05 09:28:39 CentOS_VM nginx[5566]: nginx: the configuration file /etc/nginx/nginx.conf syntax is ok

9月 05 09:28:39 CentOS_VM nginx[5566]: nginx: configuration file /etc/nginx/nginx.conf test is successful

9月 05 09:28:39 CentOS_VM systemd[1]: Started nginx - high performance web server.

9月 05 09:28:49 CentOS_VM systemd[1]: Stopping nginx - high performance web server...

9月 05 09:28:49 CentOS_VM systemd[1]: Stopped nginx - high performance web server.
2.5 查看服务项的依赖关系
systemctl list-dependencies <服务项名称>2.6 查看出错的服务
systemctl list-units --type=service --state=failed2.7 清除服务项的错误状态
systemctl reset-failed <服务项名称>2.8 查看系统启动耗时
systemd-analyze2.9 查看各项服务启动耗时
systemd-analyze blame | grep .service三、服务的管理
3.1 启动服务
systemctl start <服务项名称>3.2 停止服务
systemctl stop <服务项名称>3.3 重启服务
systemctl restart <服务项名称>3.4 重新读取配置文件
如果该服务不能重启,但又必须使用新的配置,这条命令会很有用。
systemctl reload <服务项名称>3.5 使服务开机自启动
systemctl enable <服务项名称>3.6 使服务不要开机自启动
systemctl disable <服务项名称>3.7 禁用服务
这可以防止服务被其他服务间接启动,也无法通过 start 或 restart 命令来启动服务。
systemctl mask <服务项名称>3.8 启用服务
仅针对于已禁用的服务。
systemctl unmask <服务项名称>3.9 重新读取所有服务项
修改、添加、删除服务项之后需要执行以下命令。
systemctl daemon-reload四、简单服务文件的创建
4.1 服务文件的位置
我们自己建立的服务文件直接放在 /etc/systemd/system/ 里面就好了。服务文件要使用 .service 后缀名。
如需修改软件包或系统自带的服务文件,请先将原版服务文件从 /lib/systemd/system/ 拷贝到 /etc/systemd/system/ 再进行修改。
4.2 服务文件的模版
以下是最简单的配置模版,直接根据提示或注释修改参数值,然后去掉所有注释即可。
[Unit]
Description=<服务描述>
After=<在哪个模块(服务)之后启动(可选)>

[Service]
Type=<simple|forking|oneshot>
ExecStart=<程序或命令参数>
# 如果 "ExecStart=" 后面的程序或命令是在前台持续运行的,那么 "Type=" 后面应填写 "simple"。
# 如果 "ExecStart=" 后面的程序或命令是在后台持续运行的,那么 "Type=" 后面应填写 "forking"。
# 如果 "ExecStart=" 后面的程序或命令是在前台运行一下就退出的,那么 "Type=" 后面应填写 "oneshot"。
ExecReload=<重新读取配置文件的命令(可选)>
KillSignal=SIGTERM
KillMode=mixed

[Install]
WantedBy=multi-user.target
说明
• 创建服务文件之后,最好执行一下systemctl daemon-reload再启用。
五、Target & Runlevel
5.1 基本概念
Systemd 中的 target 可以理解为系统的“状态点”。
一个 target 里面一般包含多个 unit ,简单点说就是包含需要启动的服务组。
启动了某个 target 就意味将系统置于某个“状态点”。
Target 可以与传统的 Runlevel 相对应,它们的映射关系如下表:
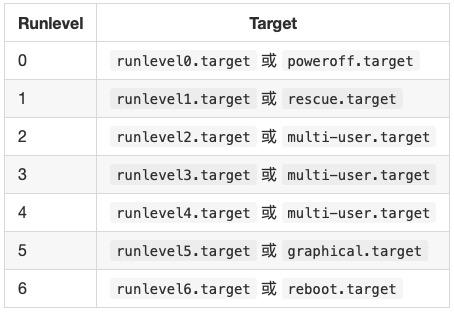
需要注意的是,与 Runlevel 相对应的 Target 一定不能够同时启动。
当设置了某个服务自启动的时候,其实就是在往某个 target 的 .wants 目录中添加服务项的符号链接而已(默认添加到 /etc/systemd/system/multi-user.target.wants )。
表达能力真心有限……以下只介绍与 Runlevel 有关的命令。
5.2 查看系统默认的启动级别
systemctl get-default5.3 切换到某个启动级别
systemctl isolate <启动级别对应的 target 名>例如
切换到图形界面
[root: ~]# systemctl isolate graphical.target5.4 设置系统默认的启动级别
systemctl set-default <启动级别对应的 target 名>六、日志管理
6.1 开启日志持久化存储
说明
• Systemd 默认只会把日志存储在内存中,一旦重启系统日志将全部丢失。所以强烈建议打开该功能。
去掉 /etc/systemd/journald.conf 这个文件内 Storage= 这一行前面的 # 号,然后将等号后面的内容改为 persistent。
保存配置文件之后重启一下日志记录服务即可。
systemctl restart systemd-journald.service6.2 查看自从本次开机后所有的日志信息
journalctl [-e] [-f]-e 表示输出之后跳转到末行,下同。
-f 表示实时滚动显示,下同。
当没有使用 -f 时,使用 PageUp 或 PageDown 翻页,查看完毕后按 q 退出。
6.3 查看特定 Unit (服务)所有的日志信息
journalctl [-e] [-f] -u <Unit 名>当没有使用 -f 时,使用 PageUp 或 PageDown 翻页,查看完毕后按 q 退出。
6.4 查看特定时间点内所有的日志信息
journalctl --since="yyyy-MM-dd hh:mm:ss" --until="yyyy-MM-dd hh:mm:ss"使用 PageUp 或 PageDown 翻页,查看完毕后按 q 退出。
例如
查看 2017 年 9 月 6 日 08:00:00 至 2017 年 9 月 6 日 08:20:00 之间的所有日志
[root: ~]# journalctl --since="2017-09-06 08:00:00" --until="2017-09-06 08:20:00"6.5 查看日志当前占用的磁盘空间
journalctl --disk-usage6.6 修改日志最大占用的磁盘空间
去掉 /etc/systemd/journald.conf 这个文件内 SystemMaxUse= 这一行前面的 # 号,然后在等号后面填上数值即可。
例如
修改日志最大占用的磁盘空间为 50M
SystemMaxUse=50M保存配置文件之后重启一下日志记录服务即可。
systemctl restart systemd-journald.service
CentOS 7 Systemd介绍
centos7 中init程序使用的是Systemd,它是系统启动和服务器守护进程管理器,负责系统启动或运行时,激活系统资源,服务器进程和其他进程。
systemd关键特性
基于socket的激活机制:socket与服务程序分离
基于bus的激活机制
基于device的激活机制
基于path的激活机制
系统快照:保存各unit的当前状态信息于持久存储设备中
向后兼容sysv init脚本
Systemd核心单元
核心概念:unit unit表示不同类型的systemd对象,通过配置文件进行标识和配置;文件中 主要包含了系统服务、监听socket、保存的系统快照以及其它与init相关的信息
配置文件:
/usr/lib/systemd/system:每个服务最主要的启动脚本设置,类似于之前的/etc/init.d/
/run/systemd/system:系统执行过程中所产生的服务脚本,比上面目录优先运行
/etc/systemd/system:管理员建立的执行脚本,类似于/etc/rc.d/rcN.d/Sxx类的功能,比上面目录优先运行
Unit的单元类型:
Service unit:文件扩展名为.service 用于定义系统服务;
Target unit:文件扩展名为.target 用于模拟实现“运行级别”
Device unit:.device 用于定义内核识别的设备
Mount unit:.mount 定义文件系统挂载点
Socket unit:.socket,用于标识进程间通信用的socket文件
Snapshot unit:.snapshot 管理系统快照
Swap unit:.swap 用于表示swap设备
Automount unit:.automount 文件系统的自动挂载点
Path unit:.path 用于定义文件系统中的一个文件或者目录
system解决服务依赖性
例如,rpcbind服务和nfs服务,在centos6上需要先启动rpcbind才能使用nfs
在centos7上直接启动nfs时,systemd会自动启动依赖服务rpcbind
管理系统服务:
centos 7 : service unit
注意能兼容早期的服务脚本
命令:system COMMAND name.service
启动:service name start ===> systemctl start name.service
停止:service name stop ===> systemctl stop name.servcie
重启:service name restart ===> systemctl restart name.service
状态:service name status ===> systemctl status name.service
重载或重启服务:systemctl reload-or-restart name.service
重载或条件重启:systemctl reload-or-try-restart name.service
条件式重启:service name condrestart ===> systemctl try-restart name.service
查看某服务当前激活与否的状态: systemctl is-active name.service
查看所有已激活服务:systemctl list-units --type service
查看所有服务:systemctl list-units --type service --all
chkconfig命令的对应关系:
设定某服务开机自启:chkconfig name on ===> systemctl enable name.service
禁止:chkconfig name off ===> systemctl disable name.service
查看所有服务的开机自启状态:
chkconfig --list ===> systemctl list-unit-files --type service
其他命令:
查看服务依赖关系:systemctl list-dependencies name.service
禁止服务开机自启(假设已经enable):systemctl mask name.service
去标记:systemctl umask name.service
target units:
unit配置文件:.target
运行级别:
0 ==> runlevel0.target,powerof.target
1 ==> runlevel1.target,rescue.target
2 ==> runlevel2.target,multiuser.target
3 ==> runlevel3.target,multiuser.target
4 ==> runlevel4.target,multiuser.target
5 ==> runlevel5.target,graphical.target
6 ==> runlevel6.target,reboot.target
切换级别:
init N ==> systemctl isolate name.target 前提是name.target已经激活
获取默认运行级别:
/etc/inittab ==> systemctl get-default
修改默认级别:
/etc/inittab ==> systemctl set-default name.target
切换至紧急模式
systemctl rescue
切换值emergency模式
systemctl emergency
其他常用命令:
关机:systemctl halt,systemctl poweroff
重启:systemctl reboot
挂起:systemctl suspend
快照:systemctl hiberate
快照并挂起:systemctl hybrid-sleep
systemd代替xinetd守护进程
centos7安装telnet时不安装xinetd
systemctl start telnet.socket
ss -ntl
ss -ntlpe 可以看到是systemd在监听23端口,实际上telnet服务还没启动

CentOS 7 systemd添加自定义系统服务
systemd:
CentOS 7的服务systemctl脚本存放在:/usr/lib/systemd/,有系统(system)和用户(user)之分,即:/usr/lib/systemd/system ,/usr/lib/systemd/user每一个服务以.service结尾,一般会分为3部分:[Unit]、[Service]和[Install],就以Nginx为例吧,具体内容如下:
创建service:
在/usr/lib/systemd/system下创建Nginx.service文件内容如下(看应用需求也可以在 /usr/lib/systemd/usr下创建):[Unit] Description=Nginx - high performance web server Documentation=http://Nginx.org/en/docs/ After=network.target remote-fs.target nss-lookup.target [Service] Type=forking PIDFile=/run/Nginx.pid ExecStartPre=/usr/sbin/Nginx -t -c /etc/Nginx/Nginx.conf ExecStart=/usr/sbin/Nginx -c /etc/Nginx/Nginx.conf ExecReload=/bin/kill -s HUP $MAINPID ExecStop=/bin/kill -s QUIT $MAINPID PrivateTmp=true [Install] WantedBy=multi-user.target
[Unit]
Description : 服务的简单描述Documentation : 服务文档
After= : 依赖,仅当依赖的服务启动之后再启动自定义的服务单元
[Service]
Type : 启动类型simple、forking、oneshot、notify、dbusType=simple(默认值):systemd认为该服务将立即启动。服务进程不会fork。如果该服务要启动其他服务,不要使用此类型启动,除非该服务是socket激活型。
Type=forking:systemd认为当该服务进程fork,且父进程退出后服务启动成功。对于常规的守护进程(daemon),除非你确定此启动方式无法满足需求,使用此类型启动即可。使用此启动类型应同时指定 PIDFile=,以便systemd能够跟踪服务的主进程。
Type=oneshot:这一选项适用于只执行一项任务、随后立即退出的服务。可能需要同时设置 RemainAfterExit=yes 使得 systemd 在服务进程退出之后仍然认为服务处于激活状态。
Type=notify:与 Type=simple 相同,但约定服务会在就绪后向 systemd 发送一个信号。这一通知的实现由 libsystemd-daemon.so 提供。
Type=dbus:若以此方式启动,当指定的 BusName 出现在DBus系统总线上时,systemd认为服务就绪。
PIDFile : pid文件路径
ExecStartPre :启动前要做什么,上文中是测试配置文件 -t
ExecStart:启动
ExecReload:重载
ExecStop:停止
PrivateTmp:True表示给服务分配独立的临时空间
[Install]
WantedBy:服务安装的用户模式,从字面上看,就是想要使用这个服务的有是谁?上文中使用的是:multi-user.target ,就是指想要使用这个服务的目录是多用户。
科普1:浅析 Linux 初始化 init 系统,Systemd
科普2:Getting Started with systemd
今天关于CentOS 7 系列和一系统服务 systemd的讲解已经结束,谢谢您的阅读,如果想了解更多关于CentOS 7 / RHEL 7 systemd 指令、CentOS 7 Systemd 入门、CentOS 7 Systemd介绍、CentOS 7 systemd添加自定义系统服务的相关知识,请在本站搜索。
本文标签:


![[转帖]Ubuntu 安装 Wine方法(ubuntu如何安装wine)](https://www.gvkun.com/zb_users/cache/thumbs/4c83df0e2303284d68480d1b1378581d-180-120-1.jpg)

