对于IOS开发步骤&UI框架简介感兴趣的读者,本文将提供您所需要的所有信息,我们将详细讲解ios开发框架介绍,并且为您提供关于AirtestIDE自动化测试1-框架简介、Android框架简介、Apa
对于IOS 开发步骤 & UI 框架简介感兴趣的读者,本文将提供您所需要的所有信息,我们将详细讲解ios开发框架介绍,并且为您提供关于Airtest IDE 自动化测试1-框架简介、Android 框架简介、Apache Shiro 框架简介、Cocos2d-js中的简易MVC框架(一)框架简介的宝贵知识。
本文目录一览:")
IOS 开发步骤 & UI 框架简介(ios开发框架介绍)
一 IOS开发步骤
1 搭建工程

2.选择项目模板

3.配置项目属性
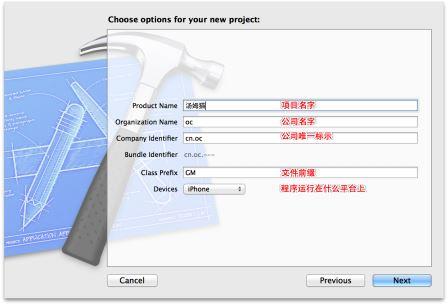
4.工程介绍

5运行编写号的UI程序

二 UI框架简介
为了方便开发,苹果公司提供了很多框架,做简单介绍
| 框架名字 |
作用
|
| UIKit(重要) |
创建和管理运用程序的用户界面 |
QuartzCore
|
提供动画特效以及通过硬件渲染能力 |
MapKit
|
为运用程序提供内嵌的地图接口 |
AVFoundation
|
音频处理 |
CoreGraphice
|
提供2d绘制基于C的API |
CoreLocation
|
使用GPS 和WIFI 获取位置信息 (可做LBS服务) |
UIKit 提供了很多可视化界面元素,例如 UIButton UILable UIImageView ... 通过各种可视化组件对象,组成美观的UI界面。

Airtest IDE 自动化测试1-框架简介
前言
如何让 0 基础的测试人员快速掌握自动化测试?这就是 Airtest 团队五年来一直在努力:不断改进工具链,以使用户能够以非常低的门槛执行自动化测试。
无论您是测试新手还是刚开始学习自动化的测试工程师,我都相信本教程可以帮助您阐明自动化测试的背景并掌握自动化测试的学习路径。我们也希望通过Airtest的动手教程来帮助您开始自动测试。
学习后,我们希望您能掌握以下内容:
- 了解自动化的主流框架和工具
- Airtest和Poco入门教学
- 在Android设备上执行自动化测试
- 在IOS设备上执行自动化测试
- 微信小程序和游戏的自动化测试
- 如何编写强大的兼容性自动化脚本
......
需要说明的是,本教程中的测试和自动化,均指软件测试和软件自动化,硬件和工业方面的测试与自动化均不包含在本教程范畴内。
准备好了吗?一起开始吧。
转自官方文档地址https://airtest.doc.io.netease.com/tutorial/0_automated_testing/
Airtest 框架简介
Airtest Project是网易开发的一个开源自动化测试框架。与其他自动化测试框架相比,Airtest项目具有以下两个优点:
- 大大降低了编写和维护自动化脚本的成本
Airtest 希望以所见即所得的方式完成脚本的录制。即使测试人员不知道脚本,他们也可以通过正常的单击和拖动操作自动记录脚本,这可以大大降低企业和项目的自动维护成本。
- 解决游戏测试的痛点
Airtest Project希望通过支持不同的游戏引擎,成为一个真正的跨引擎和跨平台的自动化测试平台。

如您所见,底部的主要测试框架是Airtest和Poco。两者之间的区别是:
Airtest:这是基于图像识别原理的基于Python的跨平台UI自动化测试框架,适用于游戏和应用程序。
Poco:基于UI控件搜索的自动化测试框架。它的核心优势在于,它不仅支持Android和IOS,还支持游戏。它还支持微信小程序,微信小游戏和H5应用程序。
谈谈测试
软件测试可以理解成为一个用来鉴定软件是否符合需求以及是否有缺陷的过程。根据不同的维度,软件测试又可以细分成为不同的测试类型。
如果按照测试方法划分,则可以分为:
- 黑盒测试:最基本的功能测试,它不关心内部代码的实现,而仅验证输入和输出的正确性。
- 白盒测试:基于逻辑驱动或者基于代码测试,打开代码内部的实现,去研究源代码中的接口或者具体实现的正确性。
- 灰盒测试:上述两个测试之间的测试。
根据测试目的,可以分为:
- 功能测试:对产品和模块的各个功能进行测试
- 性能测试:对系统的各项性能指标进行测试
- 压力测试:测试软件或系统的负载能力,挖掘隐患
- 兼容性测试:对产品和软硬件之间的兼容性进行测试,比如软件在各种不同安卓机型上的兼容性。
- 安全性测试:通过不同方法发现软件的安全性问题,比如信息泄露、非法使用、恶意破坏等等。
- 其他专项测试:比如弱网络测试、耗电量测试、流畅度测试等等
最后,如果根据软件开发阶段来划分,每个阶段又可以做:
- 单元测试:对程序中的独立模块进行白盒测试,目的是检验软件基本组成单位的正确性
- 集成测试:通过对单元模块进行组合测试,目的是验证单元模块之间的接口是否正确
- 系统测试:对整个系统进行完整测试,验证整个系统的正确性与合规性
- 回归测试:当软件发生变更的时候,对这次变更可能受影响的功能模块进行验证
- 验收测试:测试的最后一个阶段,软件发布或者上线前确保软件质量
其他常用测试概念:
讲了这么多,所有的测试,通过手工完成是一种简单而原始的方式,但是由于测试过程中会存在大量的重复性工作,比如每次变更之后都要执行一次的回归测试,比如要在几百台手机上执行相同用例的兼容性测试,所以在工作过程中,我们希望能够不断的用代码来帮助我们完成测试,也就是自动化测试。
主流自动化测试框架介绍
软件测试的自动化一般可以分为3层 * 代码层的单元测试 * 接口层的集成测试 * UI 层的测试
代码级自动化
代码层的自动化一般指针对代码进行的单元测试,比较常用的单元测试框架比如Java的Junit, Python的PyUnit等等,由于这部分并非本教程重点,这里就不详细展开,需要的同学可以自行学习。
接口层自动化
接口层的自动化测试主要是对系统和组建之间的接口进行测试,主要目标是校验数据的交换和业务的流程,接口测试可以测试功能、也可以测试性能、测试压力、测试安全等等。由于接口比代码单元要稳定的很多,所以自动化脚本维护成本更低、收益也更大,具有不错的性价比。常用的测试工具有以下:
Jmeter:由Apache组织开发的基于Java的接口测试、压力测试和性能测试工具,起初为Web测试而设计,后来逐步扩展到其他领域,可以用来测试静态或者动态的资源。
LoadRunner:HP公司提供的一款性能测试和压力测试工具,可以通过模拟成千上万用户实施并发操作来测试系统性能,并且有详细的测试结果分析,是性能测试和压测的不错选择。
Robot Framework: 一款开源的自动化测试框架,具有很好的可扩展性。框架用python编写,同时也提供跨平台支持。
Postman:简单方便且功能强大的接口调试工具,API调试首选。
UI层自动化
基于UI层的自动化测试框架要复杂很多,从平台种类来讲,有Windows,Linux,Android,Ios,Web,还有最新的小程序等等,下面会简单的和大家捋一遍主流UI层自动化框架的原理、架构以及跨平台能力。
Appium
Appium是一个开源的自动化测试工具,支持IOS,Android,Windows和Mac应用程序。
跨平台
Appium可以在OSX,Windows和Linux桌面上运行。
跨语言
appium采用了C/S的设计模式,扩展了WebDriver协议,因此Client用Python、Java、Js/Nodejs、Ruby、OC、C#等各种语言来实现。
原理介绍
Appium的核心是一个遵守REST设计风格的Web服务器,他会用来接受客户端的连接和指令。由于统一的接口设计,客户端便可以用多种语言来实现,从而用自己喜欢的语言来实现测试用例。
服务端收到测试指令后会发送给设备,在设备层则使用了设备商提供的原生测试框架,比如IOS的XCUITest Driver和UIAutomation Driver, 安卓的UIAutomator和UIAutomator2等等。

Appium的官方网站:[http://appium.io/]
Appium Github主页:[https://github.com/appium/appium]
Selenium
Selenium是一款开源的Web应用自动化测试工具,可以直接运行在多种浏览器平台中,就像用户真实操作一样。
跨平台
同样,Selenium也可以在OSX,Windows以及Linux桌面上运行。
浏览器支持
Firefox,Chrome,IE,Edge,Opera,Safari
原理介绍

Selenium的官方网站:[http://seleniumhq.org/]
Selenium Github主页:[https://github.com/SeleniumHQ/selenium]
演示视频
整个框架都配备了非常实用的IDE。借助AirtestIDE,您可以轻松完成脚本的录制,测试任务的执行以及最终测试报告的生成。
有关完整过程,请观看演示视频:
转自官方文档地址https://airtest.doc.io.netease.com/tutorial/0_automated_testing/

Android 框架简介
Android 框架简介
这篇文章写的挺好的,适合有一定编程基础的人学习 Android,遂转之!
======================= 第一节 ===========================
这里简单的介绍了 Android 的 java 环境基础,在后面一节中会结合具体的实例来理解这一节的内容。
一、Dalvik 虚拟机
Dalvik 是 Android 的程序的 java 虚拟机,代码在 dalvik / 下,
./
|-- Android.mk
|-- CleanSpec.mk
|-- MODULE_LICENSE_APACHE2
|-- NOTICE
|-- README.txt
|-- dalvikvm 虚拟机的实现库
|-- dexdump
|-- dexlist
|-- dexopt
|-- docs
|-- dvz
|-- dx
|-- hit
|-- libcore
|-- libcore-disabled
|-- libdex
|-- libnativehelper 使用 JNI 调用本地代码时用到这个库
|-- run-core-tests.sh
|-- tests
|-- tools
`-- vm
二、Android 的 java 框架
Android 层次中第 3 层是 java 框架,第四层就是 java 应用程序。
Android 的 java 类代码,主要是在 frameworks/base/core/java/ 下,
./
|-- Android
|-- com
|-- jarjar-rules.txt
`-- overview.html
我们再看一下 frameworks/base/ 目录
./
|-- Android.mk
|-- CleanSpec.mk
|-- MODULE_LICENSE_APACHE2
|-- NOTICE
|-- api
|-- awt
|-- build
|-- camera
|-- cmds
|-- common
|-- core
|-- data
|-- docs
|-- graphics
|-- include
|-- keystore
|-- libs
|-- location
|-- media
|-- native
|-- obex
|-- opengl
|-- packages
|-- preloaded-classes
|-- sax
|-- services
|-- telephony
|-- test-runner
|-- tests
|-- tools
|-- vpn
`-- wifi
这里也有 Android 的 java 框架代码。
三、JNI
在 Android 中,通过 JNI,java 可以调用 C 写的代码,主要的实现是在 frameworks/base/core/jni,通过查看 Android.mk,我们可以看到最后生成了 libandroid_runtime.so,具体实现 JNI 功能需要上面我们介绍的 libnativehelper.so,
四、系统服务之 java
1、binder,提供 Android 的 IPC 功能
2、servicemanager,服务管理的服务器端
3、系统进程 zygote,负责孵化所有的新应用
======================= 第二节 ==========================
在我平时工作中主要是进行 linux 网络子系统的模块开发、linux 应用程序(C/C++)开发。在学习和从事驱动模块开发的过程中,如果你对 linux 系统本身,包括应用程序开发都不了解,那么读内核代码就如同天书,毫无意义,所以我分析框架也是从基本系统 api 开始的,当然也不会太多涉及到 应用程序开发。
好,开始这节主要是讲一个简单的 adnroid 应用程序,从应用程序出发,到框架代码。
分析的应用程序我们也奉行拿来主义:froyo/development/samples/HelloActivity
./
|-- Android.mk
|-- AndroidManifest.xml
|-- res
|-- src
`-- tests
其他的就多说了,看代码
02 |
* Copyright (C) 2007 The Android Open Source Project |
04 |
* Licensed under the Apache License, Version 2.0 (the "License"); |
05 |
* you may not use this file except in compliance with the License. |
06 |
* You may obtain a copy of the License at |
08 |
* http://www.apache.org/licenses/LICENSE-2.0 |
10 |
* Unless required by applicable law or agreed to in writing, software |
11 |
* distributed under the License is distributed on an "AS IS" BASIS, |
12 |
* WITHOUT WARRANTIES OR CONDITIONS OF ANY KIND, either express or implied. |
13 |
* See the License for the specific language governing permissions and |
14 |
* limitations under the License. |
16 |
package com.example.Android.helloactivity; |
17 |
import Android.app.Activity; |
18 |
import Android.os.Bundle; |
20 |
* A minimal "Hello, World!" application. |
22 |
public class HelloActivity extends Activity { |
23 |
public HelloActivity() { |
26 |
* Called with the activity is first created. |
29 |
public void onCreate(Bundle savedInstanceState) { |
30 |
super.onCreate(savedInstanceState); |
31 |
// Set the layout for this activity. You can find it |
32 |
// in res/layout/hello_activity.xml |
33 |
setContentView(R.layout.hello_activity); |
每一个写过 Android 程序的人都应该是从这个代码起步的吧?那好,那么我们研究 android 框架也从这里启航。
首先是
1 |
import Android.app.Activity; |
2 |
import Android.os.Bundle; |
记住,我们这里不是讲 JAVA,我们要讲的是 Android.app.Activity,回顾上节的内容,android 的 JAVA 框架代码放在 froyo/frameworks/base/,
其中 Activity 的代码放在框架代码的 core/java/Android/app/Activity.java,大概看一下
01 |
public class Activity extends ContextThemeWrapper |
02 |
implements LayoutInflater.Factory, |
03 |
Window.Callback, KeyEvent.Callback, |
04 |
OnCreateContextMenuListener, ComponentCallbacks { |
05 |
private static final String TAG = "Activity"; |
06 |
/** Standard activity result: operation canceled. */ |
07 |
public static final int RESULT_CANCELED = 0; |
08 |
/** Standard activity result: operation succeeded. */ |
09 |
public static final int RESULT_OK = -1; |
10 |
/** Start of user-defined activity results. */ |
11 |
public static final int RESULT_FIRST_USER = 1; |
12 |
private static long sInstanceCount = 0; |
同样的 Bundle 的代码 core/java/Android/os/Bundle.java
1 |
public final class Bundle implements Parcelable, Cloneable { |
2 |
private static final String LOG_TAG = "Bundle"; |
3 |
public static final Bundle EMPTY; |
呵呵,其实写多应用程序,然后看看这些代码,会有更加豁然开朗的感觉,所以列出以上目录给大家参考,所有的 java 框架代码都在那个目录下,到这里今天要讨论的第一个问题就到这里了。
我所在的公司是网络设备供应商,其实和 Android 本身不搭边,android 只是平时的爱好而已,所以很多地方如果写错了敬请原谅,当然也计划去做做 android 系统开发,例如驱动或者是框架开发,这是后话。
======================== 第三节 ========================
上节讲到了 JAVA 框架代码和应用程序的关系,那么框架代码和驱动层是怎么联系的呢?这就是这一节的内容:JNI
java 使用一种叫做 jni 的技术来支持对 C/C++ 代码的调用,在 anroid 中 jni 的代码放在 froyo/frameworks/base/core/jni 下,当然在 java 框架代码的目录下还有其他地方也多多少少放了 jni 代码,大家可以打开源码来看看。
整体关系如下图:
| java 应用程序
--------------------------------------- Android 系统 api
| java 框架
|本地接口声明
--------------------------------------
| JNI
--------------------------------------
| C/C++ 代码
继续拿来主义,C/C++ 中调试用 printf,内核调试用 printk,呵呵,Android 调试用 log,那么我们就分析 log 的实现。
log 的 java 代码 froyo/frameworks/base/core/java/Android/util/Log.java,
002 |
* Copyright (C) 2006 The Android Open Source Project |
004 |
* Licensed under the Apache License, Version 2.0 (the "License"); |
005 |
* you may not use this file except in compliance with the License. |
006 |
* You may obtain a copy of the License at |
008 |
* http://www.apache.org/licenses/LICENSE-2.0 |
010 |
* Unless required by applicable law or agreed to in writing, software |
011 |
* distributed under the License is distributed on an "AS IS" BASIS, |
012 |
* WITHOUT WARRANTIES OR CONDITIONS OF ANY KIND, either express or implied. |
013 |
* See the License for the specific language governing permissions and |
014 |
* limitations under the License. |
016 |
package Android.util; |
017 |
import com.Android.internal.os.RuntimeInit; |
018 |
import java.io.PrintWriter; |
019 |
import java.io.StringWriter; |
021 |
* API for sending log output. |
023 |
* <p>Generally, use the Log.v() Log.d() Log.i() Log.w() and Log.e() |
026 |
* <p>The order in terms of verbosity, from least to most is |
027 |
* ERROR, WARN, INFO, DEBUG, VERBOSE. Verbose should never be compiled |
028 |
* into an application except during development. Debug logs are compiled |
029 |
* in but stripped at runtime. Error, warning and info logs are always kept. |
031 |
* <p><b>Tip:</b> A good convention is to declare a <code>TAG</code> constant |
034 |
* <pre>private static final String TAG = "MyActivity";</pre> |
036 |
* and use that in subsequent calls to the log methods. |
039 |
* <p><b>Tip:</b> Don''t forget that when you make a call like |
040 |
* <pre>Log.v(TAG, "index=" + i);</pre> |
041 |
* that when you''re building the string to pass into Log.d, the compiler uses a |
042 |
* StringBuilder and at least three allocations occur: the StringBuilder |
043 |
* itself, the buffer, and the String object. Realistically, there is also |
044 |
* another buffer allocation and copy, and even more pressure on the gc. |
045 |
* That means that if your log message is filtered out, you might be doing |
046 |
* significant work and incurring significant overhead. |
048 |
public final class Log { |
050 |
* Priority constant for the println method; use Log.v. |
052 |
public static final int VERBOSE = 2; |
054 |
* Priority constant for the println method; use Log.d. |
056 |
public static final int DEBUG = 3; |
058 |
* Priority constant for the println method; use Log.i. |
060 |
public static final int INFO = 4; |
062 |
* Priority constant for the println method; use Log.w. |
064 |
public static final int WARN = 5; |
066 |
* Priority constant for the println method; use Log.e. |
068 |
public static final int ERROR = 6; |
070 |
* Priority constant for the println method. |
072 |
public static final int ASSERT = 7; |
074 |
* Exception class used to capture a stack trace in {@link #wtf()}. |
076 |
private static class TerribleFailure extends Exception { |
077 |
TerribleFailure(String msg, Throwable cause) { super(msg, cause); } |
082 |
* Send a {@link #VERBOSE} log message. |
083 |
* @param tag Used to identify the source of a log message. It usually identifies |
084 |
* the class or activity where the log call occurs. |
085 |
* @param msg The message you would like logged. |
087 |
public static int v(String tag, String msg) { |
088 |
return println_native(LOG_ID_MAIN, VERBOSE, tag, msg); |
091 |
* Send a {@link #VERBOSE} log message and log the exception. |
092 |
* @param tag Used to identify the source of a log message. It usually identifies |
093 |
* the class or activity where the log call occurs. |
094 |
* @param msg The message you would like logged. |
095 |
* @param tr An exception to log |
097 |
public static int v(String tag, String msg, Throwable tr) { |
098 |
return println_native(LOG_ID_MAIN, VERBOSE, tag, msg + ''/n'' + getStackTraceString(tr)); |
101 |
* Send a {@link #DEBUG} log message. |
102 |
* @param tag Used to identify the source of a log message. It usually identifies |
103 |
* the class or activity where the log call occurs. |
104 |
* @param msg The message you would like logged. |
106 |
public static int d(String tag, String msg) { |
107 |
return println_native(LOG_ID_MAIN, DEBUG, tag, msg); |
110 |
* Send a {@link #DEBUG} log message and log the exception. |
111 |
* @param tag Used to identify the source of a log message. It usually identifies |
112 |
* the class or activity where the log call occurs. |
113 |
* @param msg The message you would like logged. |
114 |
* @param tr An exception to log |
116 |
public static int d(String tag, String msg, Throwable tr) { |
117 |
return println_native(LOG_ID_MAIN, DEBUG, tag, msg + ''/n'' + getStackTraceString(tr)); |
120 |
* Send an {@link #INFO} log message. |
121 |
* @param tag Used to identify the source of a log message. It usually identifies |
122 |
* the class or activity where the log call occurs. |
123 |
* @param msg The message you would like logged. |
125 |
public static int i(String tag, String msg) { |
126 |
return println_native(LOG_ID_MAIN, INFO, tag, msg); |
129 |
* Send a {@link #INFO} log message and log the exception. |
130 |
* @param tag Used to identify the source of a log message. It usually identifies |
131 |
* the class or activity where the log call occurs. |
132 |
* @param msg The message you would like logged. |
133 |
* @param tr An exception to log |
135 |
public static int i(String tag, String msg, Throwable tr) { |
136 |
return println_native(LOG_ID_MAIN, INFO, tag, msg + ''/n'' + getStackTraceString(tr)); |
139 |
* Send a {@link #WARN} log message. |
140 |
* @param tag Used to identify the source of a log message. It usually identifies |
141 |
* the class or activity where the log call occurs. |
142 |
* @param msg The message you would like logged. |
144 |
public static int w(String tag, String msg) { |
145 |
return println_native(LOG_ID_MAIN, WARN, tag, msg); |
148 |
* Send a {@link #WARN} log message and log the exception. |
149 |
* @param tag Used to identify the source of a log message. It usually identifies |
150 |
* the class or activity where the log call occurs. |
151 |
* @param msg The message you would like logged. |
152 |
* @param tr An exception to log |
154 |
public static int w(String tag, String msg, Throwable tr) { |
155 |
return println_native(LOG_ID_MAIN, WARN, tag, msg + ''/n'' + getStackTraceString(tr)); |
158 |
* Checks to see whether or not a log for the specified tag is loggable at the specified level. |
160 |
* The default level of any tag is set to INFO. This means that any level above and including |
161 |
* INFO will be logged. Before you make any calls to a logging method you should check to see |
162 |
* if your tag should be logged. You can change the default level by setting a system property: |
163 |
* ''setprop log.tag.<YOUR_LOG_TAG> <LEVEL>'' |
164 |
* Where level is either VERBOSE, DEBUG, INFO, WARN, ERROR, ASSERT, or SUPPRESS. SUPPRESS will |
165 |
* turn off all logging for your tag. You can also create a local.prop file that with the |
167 |
* ''log.tag.<YOUR_LOG_TAG>=<LEVEL>'' |
168 |
* and place that in /data/local.prop. |
170 |
* @param tag The tag to check. |
171 |
* @param level The level to check. |
172 |
* @return Whether or not that this is allowed to be logged. |
173 |
* @throws IllegalArgumentException is thrown if the tag.length() > 23. |
175 |
public static native boolean isLoggable(String tag, int level); |
177 |
* Send a {@link #WARN} log message and log the exception. |
178 |
* @param tag Used to identify the source of a log message. It usually identifies |
179 |
* the class or activity where the log call occurs. |
180 |
* @param tr An exception to log |
182 |
public static int w(String tag, Throwable tr) { |
183 |
return println_native(LOG_ID_MAIN, WARN, tag, getStackTraceString(tr)); |
186 |
* Send an {@link #ERROR} log message. |
187 |
* @param tag Used to identify the source of a log message. It usually identifies |
188 |
* the class or activity where the log call occurs. |
189 |
* @param msg The message you would like logged. |
191 |
public static int e(String tag, String msg) { |
192 |
return println_native(LOG_ID_MAIN, ERROR, tag, msg); |
195 |
* Send a {@link #ERROR} log message and log the exception. |
196 |
* @param tag Used to identify the source of a log message. It usually identifies |
197 |
* the class or activity where the log call occurs. |
198 |
* @param msg The message you would like logged. |
199 |
* @param tr An exception to log |
201 |
public static int e(String tag, String msg, Throwable tr) { |
202 |
return println_native(LOG_ID_MAIN, ERROR, tag, msg + ''/n'' + getStackTraceString(tr)); |
205 |
* What a Terrible Failure: Report a condition that should never happen. |
206 |
* The error will always be logged at level ASSERT with the call stack. |
207 |
* Depending on system configuration, a report may be added to the |
208 |
* {@link Android.os.DropBoxManager} and/or the process may be terminated |
209 |
* immediately with an error dialog. |
210 |
* @param tag Used to identify the source of a log message. |
211 |
* @param msg The message you would like logged. |
213 |
public static int wtf(String tag, String msg) { |
214 |
return wtf(tag, msg, null); |
217 |
* What a Terrible Failure: Report an exception that should never happen. |
218 |
* Similar to {@link #wtf(String, String)}, with an exception to log. |
219 |
* @param tag Used to identify the source of a log message. |
220 |
* @param tr An exception to log. |
222 |
public static int wtf(String tag, Throwable tr) { |
223 |
return wtf(tag, tr.getMessage(), tr); |
226 |
* What a Terrible Failure: Report an exception that should never happen. |
227 |
* Similar to {@link #wtf(String, Throwable)}, with a message as well. |
228 |
* @param tag Used to identify the source of a log message. |
229 |
* @param msg The message you would like logged. |
230 |
* @param tr An exception to log. May be null. |
232 |
public static int wtf(String tag, String msg, Throwable tr) { |
233 |
tr = new TerribleFailure(msg, tr); |
234 |
int bytes = println_native(LOG_ID_MAIN, ASSERT, tag, getStackTraceString(tr)); |
235 |
RuntimeInit.wtf(tag, tr); |
239 |
* Handy function to get a loggable stack trace from a Throwable |
240 |
* @param tr An exception to log |
242 |
public static String getStackTraceString(Throwable tr) { |
246 |
StringWriter sw = new StringWriter(); |
247 |
PrintWriter pw = new PrintWriter(sw); |
248 |
tr.printStackTrace(pw); |
249 |
return sw.toString(); |
252 |
* Low-level logging call. |
253 |
* @param priority The priority/type of this log message |
254 |
* @param tag Used to identify the source of a log message. It usually identifies |
255 |
* the class or activity where the log call occurs. |
256 |
* @param msg The message you would like logged. |
257 |
* @return The number of bytes written. |
259 |
public static int println(int priority, String tag, String msg) { |
260 |
return println_native(LOG_ID_MAIN, priority, tag, msg); |
262 |
/** @hide */ public static final int LOG_ID_MAIN = 0; |
263 |
/** @hide */ public static final int LOG_ID_RADIO = 1; |
264 |
/** @hide */ public static final int LOG_ID_EVENTS = 2; |
265 |
/** @hide */ public static final int LOG_ID_SYSTEM = 3; |
266 |
/** @hide */ public static native int println_native(int bufID, |
267 |
int priority, String tag, String msg); |
我们看到所有代码都是调用 public static native int println_native (int bufID,
int priority, String tag, String msg); 来实现输出的,这个函数的实现就是 C++,调用的方式就是 JNI
我们看一下对应的 jni 代码 froyo/frameworks/base/core/jni/Android_util_Log.cpp,最终调用的输出函数是
02 |
* In class Android.util.Log: |
03 |
* public static native int println_native(int buffer, int priority, String tag, String msg) |
05 |
static jint Android_util_Log_println_native(JNIEnv* env, jobject clazz, |
06 |
jint bufID, jint priority, jstring tagObj, jstring msgObj) |
08 |
const char* tag = NULL; |
09 |
const char* msg = NULL; |
12 |
npeClazz = env->FindClass("java/lang/NullPointerException"); |
13 |
assert(npeClazz != NULL); |
14 |
env->ThrowNew(npeClazz, "println needs a message"); |
17 |
if (bufID < 0 || bufID >= LOG_ID_MAX) { |
19 |
npeClazz = env->FindClass("java/lang/NullPointerException"); |
20 |
assert(npeClazz != NULL); |
21 |
env->ThrowNew(npeClazz, "bad bufID"); |
25 |
tag = env->GetStringUTFChars(tagObj, NULL); |
26 |
msg = env->GetStringUTFChars(msgObj, NULL); |
27 |
int res = __Android_log_buf_write(bufID, (android_LogPriority)priority, tag, msg); |
29 |
env->ReleaseStringUTFChars(tagObj, tag); |
30 |
env->ReleaseStringUTFChars(msgObj, msg); |
当然我们发现最终输出是
1 |
int res = __Android_log_buf_write(bufID, (android_LogPriority)priority, tag, msg); |
用力 grep 了一下代码,结果如下
1 |
./system/core/include/cutils/log.h:int __Android_log_buf_write(int bufID, int prio, const char *tag, const char *text); |
2 |
./system/core/liblog/logd_write.c:int __Android_log_buf_write(int bufID, int prio, const char *tag, const char *msg) |
3 |
./system/core/liblog/logd_write.c: return __Android_log_buf_write(bufID, prio, tag, buf); |
这个就是和 Android 专用驱动进行通信的方式,这个分析下去就有点深了,后面分析。
以上三个小节分析了 Android 的 JAVA 环境,我这里都是简单的抛砖引玉,希望能给大家一点大体的指引,其他修行靠大家了,能成为是一个 android 程序员是多么幸福的事情,各位已经在幸福中了,我什么时候也可以幸福一把??
转载自:http://www.linuxidc.com/Linux/2011-10/44959p3.htm

Apache Shiro 框架简介
一、什么是Shiro
Apache Shiro是一个强大易用的Java安全框架,提供了认证、授权、加密和会话管理等功能:
- 认证 - 用户身份识别,常被称为用户“登录”;
- 授权 - 访问控制;
- 密码加密 - 保护或隐藏数据防止被偷窥;
- 会话管理 - 每用户相关的时间敏感的状态。
对于任何一个应用程序,Shiro都可以提供全面的安全管理服务。并且相对于其他安全框架,Shiro要简单的多。
二、Shiro的架构介绍
首先,来了解一下Shiro的三个核心组件:Subject,SecurityManager 和 Realms. 如下图:

Subject:即“当前操作用户”。但是,在Shiro中,Subject这一概念并不仅仅指人,也可以是第三方进程、后台帐户(Daemon Account)或其他类似事物。它仅仅意味着“当前跟软件交互的东西”。但考虑到大多数目的和用途,你可以把它认为是Shiro的“用户”概念。
Subject代表了当前用户的安全操作,SecurityManager则管理所有用户的安全操作。
SecurityManager:它是Shiro框架的核心,典型的Facade模式,Shiro通过SecurityManager来管理内部组件实例,并通过它来提供安全管理的各种服务。
Realm: Realm充当了Shiro与应用安全数据间的“桥梁”或者“连接器”。也就是说,当对用户执行认证(登录)和授权(访问控制)验证时,Shiro会从应用配置的Realm中查找用户及其权限信息。
从这个意义上讲,Realm实质上是一个安全相关的DAO:它封装了数据源的连接细节,并在需要时将相关数据提供给Shiro。当配置Shiro时,你必须至少指定一个Realm,用于认证和(或)授权。配置多个Realm是可以的,但是至少需要一个。
Shiro内置了可以连接大量安全数据源(又名目录)的Realm,如LDAP、关系数据库(JDBC)、类似INI的文本配置资源以及属性文件等。如果缺省的Realm不能满足需求,你还可以插入代表自定义数据源的自己的Realm实现。
Shiro完整架构图:

除前文所讲Subject、SecurityManager 、Realm三个核心组件外,Shiro主要组件还包括:
Authenticator :认证就是核实用户身份的过程。这个过程的常见例子是大家都熟悉的“用户/密码”组合。多数用户在登录软件系统时,通常提供自己的用户名(当事人)和支持他们的密码(证书)。如果存储在系统中的密码(或密码表示)与用户提供的匹配,他们就被认为通过认证。
Authorizer :授权实质上就是访问控制 - 控制用户能够访问应用中的哪些内容,比如资源、Web页面等等。
SessionManager :在安全框架领域,Apache Shiro提供了一些独特的东西:可在任何应用或架构层一致地使用Session API。即,Shiro为任何应用提供了一个会话编程范式 - 从小型后台独立应用到大型集群Web应用。这意味着,那些希望使用会话的应用开发者,不必被迫使用Servlet或EJB容器了。或者,如果正在使用这些容器,开发者现在也可以选择使用在任何层统一一致的会话API,取代Servlet或EJB机制。
CacheManager :对Shiro的其他组件提供缓存支持。
总结
以上所述是小编给大家介绍的Apache Shiro 框架简介,希望对大家有所帮助,如果大家有任何疑问请给我留言,小编会及时回复大家的。在此也非常感谢大家对编程小技巧网站的支持!
框架简介")
Cocos2d-js中的简易MVC框架(一)框架简介
一、框架简介
今天我将把我写的一套适用于Cocos2d-JS的一套MVC框架分享给大家。首先我先简单介绍一下MVC,然后再逐步的介绍我写的mvc框架和在游戏中的具体应用。
MVC借用百度百科的解释: MVC全名是Model View Controller,是模型(model)-视图(view)-控制器(controller)的缩写,一种软件设计典范,用一种业务逻辑、数据、界面显示分离的方法组织代码,将业务逻辑聚集到一个部件里面,在改进和个性化定制界面及用户交互的同时,不需要重新编写业务逻辑。MVC被独特的发展起来用于映射传统的输入、处理和输出功能在一个逻辑的图形化用户界面的结构中。
这里实现的MVC比较简单明了,关系图如下:
节点功能
1.View:包括Scene和Layer,负责显示和接收用户反馈,将用户操作反馈通过消息发送给Mediator处理。
2.Mediator:包括DirectorMediator、SceneMediator和LayerMediator,持有View对象,负责接收消息进行处理,更新UI和数据。DirectorMediator负责维护场景间的关系和切换;SceneMediator负责当前场景的UI关系和切换;LayerMediator负责当前UI的管理。
3.Model:数据管理模型,负责维护客户端数据,监听服务器消息,将消息发送给Mediator进行处理再跟新View。
4.Facade:持有Model和Mediator对象。Fa?ade负责初始化框架,Facade会自动维护UI调用关系。
5.部分节点之间使用Notification进行消息派发。
框架的简单介绍就到这里,接下来我会详细介绍Cocos2d-JS中简易MVC各个模块的实现和应用。
如果你喜欢我的文章就关注我吧:
今天的关于IOS 开发步骤 & UI 框架简介和ios开发框架介绍的分享已经结束,谢谢您的关注,如果想了解更多关于Airtest IDE 自动化测试1-框架简介、Android 框架简介、Apache Shiro 框架简介、Cocos2d-js中的简易MVC框架(一)框架简介的相关知识,请在本站进行查询。


![[转帖]Ubuntu 安装 Wine方法(ubuntu如何安装wine)](https://www.gvkun.com/zb_users/cache/thumbs/4c83df0e2303284d68480d1b1378581d-180-120-1.jpg)

