这篇文章主要围绕javaSpring之IOC依赖注入和springioc依赖注入原理展开,旨在为您提供一份详细的参考资料。我们将全面介绍javaSpring之IOC依赖注入的优缺点,解答springi
这篇文章主要围绕java Spring 之IOC依赖注入和spring ioc依赖注入原理展开,旨在为您提供一份详细的参考资料。我们将全面介绍java Spring 之IOC依赖注入的优缺点,解答spring ioc依赖注入原理的相关问题,同时也会为您带来004-spring ioc 依赖注入、IoC依赖注入分析、IoC依赖注入过程、Java Spring 依赖注入的几种方式详解的实用方法。
本文目录一览:")
java Spring 之IOC依赖注入(spring ioc依赖注入原理)
内容简介
- spring ioc和xml配置文件实现注入
- spring 注解模式实现注入
Java使用框架都需要导入jar包,xml配置需要导入4个核心包,java核心包基本都不提供日记功能,需要导入2个额外日记包,我的spring是4.x版本.导入包如下(下载地址不在这里发了,百度下载)
- spring-beans-4.3.8.RELEASE.jar
- spring-context-4.3.8.RELEASE.jar
- spring-core-4.3.8.RELEASE.jar
- spring-expression-4.3.8.RELEASE.jar
- commons-logging-1.2.jar
- log4j-1.2.17.jar
bean包是标签包,core是核心包,expression应该是验证表达式包,context我估计是根据提供的路径反射生成对象的包,(我学历不够,才小学毕业自学的java,自学理解的spring ioc注入,非程序员).
spring 包导入后,需要一个xml配置表,配置表第一步是导入约束,我下面是一个完整的配置文件,比较常用的几个配置....
<?xml version="1.0" encoding="UTF-8"?>
<beans xmlns="http://www.springframework.org/schema/beans"
    xmlns:xsi="http://www.w3.org/2001/XMLSchema-instance"
    xsi:schemaLocation="http://www.springframework.org/schema/beans
        http://www.springframework.org/schema/beans/spring-beans.xsd">

     <bean id="user">
        <constructor-arg ref="book"/>
        <constructor-arg type="int" value="21"/>
     <bean>
     <bean id="book">
         <property name="bookname" value="西游记"/>
     </bean>
</beans>
在一一介绍 bean标签的关键词
id是一个唯一名称.命名要规范,前面不能已特殊符号开头,中间不能有空格这些特殊符号,我一般是用骆驼(UserName)命名法,不知道帕斯卡命名(user_name)行不行.
class 是需要生成的对象的全路径(cn.panda.userDao)
scope 是生成对象保存在哪里对象.总共7个属性,基本用的最多是2个,singleton 单列模式(默认),每次获取对象都是同一个对象内存地址是同一个. prototype是多列模式,每次生成都是新的对象. session. request ,globalssion,application 这几个是关于HTTP有关的对象(不是很重要,基本很少用或者不用)最后只要知道就可以了websocket.
name 属性好像是为了兼容strut1.x版本和老版本.还有可以使用一些特殊符号的名称,总体和ID关键词差不多的功能
constructor-arg是对象构造函数注入参数.是bean子节点(可以多个参数节点),里面有3个比较常用的属性,ref对应是需要注入的对象id, type 是注入变量名称如Int,java.lang.String这些, value指定的值.
property 是bean对象子节点的,里面有个name属性对应对象的属性名称,ref 需要赋值的bean 的ID值,value是指定的值...
下面是复杂的属性注入list,map,properties,set (复制官方文档了)
<bean id="moreComplexObject" class="example.ComplexObject">
    <!-- results in a setAdminEmails(java.util.Properties) call -->
    <property name="adminEmails">
        <props>
            <prop key="administrator">administrator@example.org</prop>
            <prop key="support">support@example.org</prop>
            <prop key="development">development@example.org</prop>
        </props>
    </property>
    <!-- results in a setSomeList(java.util.List) call -->
    <property name="someList">
        <list>
            <value>a list element followed by a reference</value>
            <ref bean="myDataSource" />
        </list>
    </property>
    <!-- results in a setSomeMap(java.util.Map) call -->
    <property name="someMap">
        <map>
            <entry key="an entry" value="just some string"/>
            <entry key ="a ref" value-ref="myDataSource"/>
        </map>
    </property>
    <!-- results in a setSomeSet(java.util.Set) call -->
    <property name="someSet">
        <set>
            <value>just some string</value>
            <ref bean="myDataSource" />
        </set>
    </property>
</bean>
这里介绍如何静态方法和工厂方法生成对象.....先写一段代码(代码命名对于java程序员来说不是很规范,以前自学c#,所以有些命名用c#方式命名了)


 1 public class A{
 2    public void Hello(){
 3         system.out.println("Hello world");
 4    }
 5 }
 6
 7
 8 public class FactoryA{
 9
10        public static A GetA(){
11               A a=new A();
12               return a;
13       }
14 }
15
16 public class  FactoryB{
17        public A GetA(){
18              A a=new A();
19               return a;
20        }
21 }如上代码我们如何获取A的对象.bean也提供了几个关键词,我还是在代码里写注解和解释
<!--静态方法获取的A的注入生成的对象...class是工厂类的全路径 ,factory-method是方法名称-->
<bean id="A" class="factoryA" factory-method="GetA"/>

<!--IOC注入生成A的对象我们先配置A和需要生成的A的对象factoryB的配置-->
<!--factory-bean对应实列工厂的bean名称-->
<bean id="A"  factory-bean="factoryB"  factory-method="GetA"/>
<bean id="factoryB" class="factoryB"/>
最后一个多xml文件引入,因为一个项目不同人开发不同的模块,可以引入多个xml配置文件
<beans>
    <import resource="xml文件的路径"/>
    <bean id=".." class="..."/>
</beans>
spring IOC依赖注入的xml文件比较常用都写完了,下面是注解模式.注解模式需要一个引入一个核心包 spring-aop-4.3.8.RELEASE.jar
在配置文件重新编辑约束包,我只写一些比较常用的注解模式比较全建议看官方文档.都是英文版
<?xml version="1.0" encoding="UTF-8"?>
<beans xmlns="http://www.springframework.org/schema/beans"
    xmlns:xsi="http://www.w3.org/2001/XMLSchema-instance"
    xmlns:context="http://www.springframework.org/schema/context"
    xsi:schemaLocation="http://www.springframework.org/schema/beans
        http://www.springframework.org/schema/beans/spring-beans.xsd
        http://www.springframework.org/schema/context
        http://www.springframework.org/schema/context/spring-context.xsd">
   <context:component-scan base-package="cn.panda.*"/>
</beans>
可以看到此约束比xml约束多了一个xmlns:context约束和<context:component-scan base-package="cn.panda.*"/> 这个就是表示开启注解模式...
base-package扫描那个包的注解,多个包可以用,分开如(cn.panda.model,cn.panda.dao)也可以用cn.panda.*表示扫描是cn.panda的包,后面所有的意思.不管你后面是啥都会扫描.
注解4个功能一样注解的. @Component(实体层),@Service(逻辑处理层),@Controller(web层),@Repository(Dao层).不知道以后spring官方会不会给他们不同的功能,现在功能都差不多.
下面用一段代码+加注解可以更好讲解比较常用的注解模式.
pakeage cn.panda.model;
/*实体层代码,映射层*/
@Component(value="user")
/*scope("singleton") 这里可以加singelton或者prototye,反正scope的7个不写默认singelton*/
public class user{

}

pakeage cn.panda.dao;
/*数据访问层*/
@Repository(value="userdao")
public class userdao(){
       public int add(user user){
             /*代码处理逻辑代码*/
       }
}


pakeage cn.panda.service;
@Service(value="userservice")
public class userservice{
   private cn.panda.dao.userdao userdao;
   /*@Autowired就是自动注入跟userdao字段一样名称对象,如果不存在userdao就会报错*/
   /*@Resource(name="userdao")  就是指定注入ID的对象.*/
   public void  cn.panda.dao.userdao setUserdao(cn.panda.dao.userdao userdao){
       this.userdao=userdao;
   }
   public  int add(cn.panda.user user){
    return   this.userdao.add(user);
  }
}


/*这里介绍@controller 这个注解,一般这个注解是用于web层.词义是控制器意思*/
@controller
/*ActionSuport是stucts2的一个类,我现在木有学到这里整合对象这些,以后会介绍stucts2*/
public class Index extends ActionSuport{

}
注解还有很多,还有configuration配置.还有引入过滤一些注解.这些暂时不写了,我感觉作用不怎么大,所以木有怎么自学过.
混合模式就是xml加注解模式注入的注意事项,我也不知道正不正确验证,我也是自学的.注解中指定ID不知道跟xml配置ID不能重复.第二,xml配置ID可以指定给注解中.

004-spring ioc 依赖注入
private static BeanDefinition createUserHolderBeanDefinition() {
BeanDefinitionBuilder definitionBuilder = BeanDefinitionBuilder.genericBeanDefinition(UserHolder.class);
definitionBuilder.addPropertyReference("user", "superUser");
return definitionBuilder.getBeanDefinition();
}
// 生成 UserHolder 的 BeanDefinition
BeanDefinition userHolderBeanDefinition = createUserHolderBeanDefinition();
// 注册 UserHolder 的 BeanDefinition
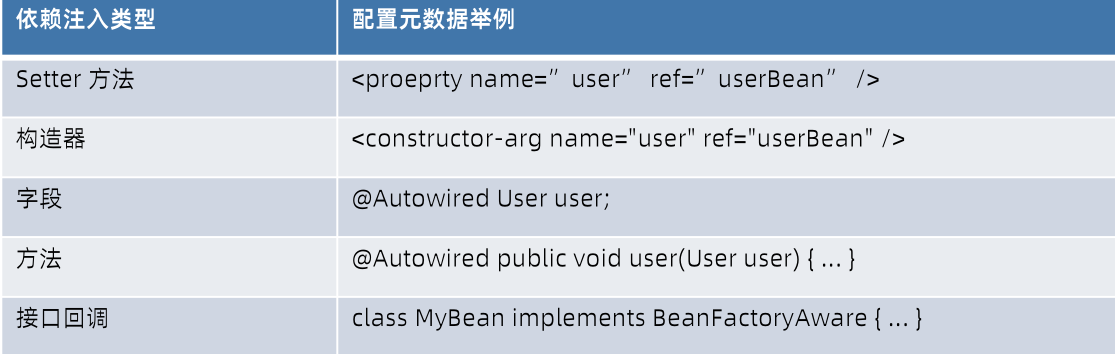
applicationContext.registerBeanDefinition("userHolder", userHolderBeanDefinition);• 自动模式
private UserHolder userHolder;
private UserHolder userHolder2;
@Autowired
public void init1(UserHolder userHolder) {
    this.userHolder = userHolder;
}
@Resource
public void init2(UserHolder userHolder2) {
    this.userHolder2 = userHolder2;
}
@Bean
public UserHolder userHolder(User user) {
    return new UserHolder(user);
}

setter方法注入,缺点:依赖属性存在前后依赖关系,可能会存在问题。推荐构造器注入。@Bean 的方式通常属于半自动方式,许多关联 Bean 需要手动关联。
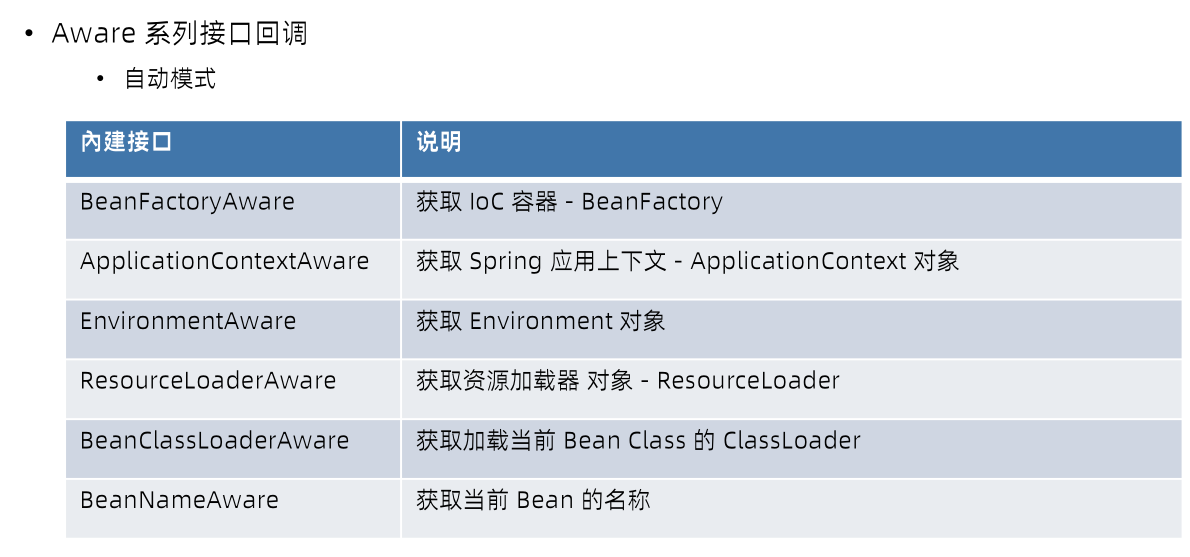
public class AwareInterfaceDependencyInjectionDemo implements BeanFactoryAware, ApplicationContextAware

@Override
public void setBeanFactory(BeanFactory beanFactory) throws BeansException {
    AwareInterfaceDependencyInjectionDemo.beanFactory = beanFactory;
}

@Override
public void setApplicationContext(ApplicationContext applicationContext) throws BeansException {
    AwareInterfaceDependencyInjectionDemo.applicationContext = applicationContext;
}
<property name="city" value="HANGZHOU"/>
<property name="workCities" value="BEIJING,HANGZHOU"/>
<property name="lifeCities">
    <list>
        <value>BEIJING</value>
        <value>SHANGHAI</value>
    </list>
</property>
<property name="configFileLocation" value="classpath:/META-INF/user-config.properties"/>
@Autowired
private User user; // superUser -> primary =true


@Autowired
@Qualifier("user") // 指定 Bean 名称或 ID
private User namedUser;


// 整体应用上下文存在 4 个 User 类型的 Bean:
// superUser
// user
// user1 -> @Qualifier
// user2 -> @Qualifier
@Autowired
private Collection<User> allUsers; // 2 Beans = user + superUser
// 没打印出来是因为本身注解配置类中使用"@Bean"添加的那几个User在配置类应用属性注入的时候还还有实例化到容器中
// 将其申明放到其他配置类即可生效。

@Autowired
@Qualifier
private Collection<User> qualifiedUsers; // 2 Beans = user1 + user2 -> 4 Beans = user1 + user2 + user3 + user4

@Autowired
@UserGroup
private Collection<User> groupedUsers; // 2 Beans = user3 + user4

@Bean
@Qualifier // 进行逻辑分组
public User user1() {
    return createUser(7L);
}

@Bean
@Qualifier // 进行逻辑分组
public User user2() {
    return createUser(8L);
}

@Bean
@UserGroup
public User user3() {
    return createUser(9L);
}

@Bean
@UserGroup
public User user4() {
    return createUser(10L);
}

@Target({ElementType.FIELD, ElementType.METHOD, ElementType.PARAMETER, ElementType.TYPE, ElementType.ANNOTATION_TYPE})
@Retention(RetentionPolicy.RUNTIME)
@Inherited
@Documented
@Qualifier
public @interface UserGroup {
}
@Autowired
private ObjectProvider<User> userObjectProvider; // 延迟注入

@Autowired
private ObjectFactory<Set<User>> usersObjectFactory;
// 期待输出 superUser Bean
System.out.println("demo.userObjectProvider = " + demo.userObjectProvider.getObject()); // 继承 ObjectFactory
// 期待输出 superUser user Beans
System.out.println("demo.usersObjectFactory = " + demo.usersObjectFactory.getObject());
demo.userObjectProvider.forEach(System.out::println);
@Autowired          // 依赖查找(处理) + 延迟
@Lazy
private User lazyUser;

// DependencyDescriptor ->
// 必须(required=true)
// 实时注入(eager=true)
// 通过类型(User.class)
// 字段名称("user")
// 是否首要(primary = true)
@Autowired          // 依赖查找(处理)
private User user;

@Autowired          // 集合类型依赖注入
private Map<String, User> users; // user superUser

@MyAutowired
private Optional<User> userOptional; // superUser

@Inject
private User injectedUser;

@InjectedUser
private User myInjectedUser;
public AutowiredAnnotationBeanPostProcessor() {
   this.autowiredAnnotationTypes.add(Autowired.class);
   this.autowiredAnnotationTypes.add(Value.class);
   try {
      this.autowiredAnnotationTypes.add((Class<? extends Annotation>)
            ClassUtils.forName("javax.inject.Inject", AutowiredAnnotationBeanPostProcessor.class.getClassLoader()));
      logger.trace("JSR-330 ''javax.inject.Inject'' annotation found and supported for autowiring");
   }
   catch (ClassNotFoundException ex) {
      // JSR-330 API not available - simply skip.
   }
}

private MergedAnnotation<?> findAutowiredAnnotation(AccessibleObject ao) {
   MergedAnnotations annotations = MergedAnnotations.from(ao);
   for (Class<? extends Annotation> type : this.autowiredAnnotationTypes) {
      MergedAnnotation<?> annotation = annotations.get(type);
      if (annotation.isPresent()) {
         return annotation;
      }
   }
   return null;
}
三个注解都可以用。找到其中一个就返回。
@Bean
@Order(Ordered.LOWEST_PRECEDENCE - 3)
@Scope
public static AutowiredAnnotationBeanPostProcessor beanPostProcessor() {
    AutowiredAnnotationBeanPostProcessor beanPostProcessor = new AutowiredAnnotationBeanPostProcessor();
    beanPostProcessor.setAutowiredAnnotationType(InjectedUser.class);
    return beanPostProcessor;
}

//    @Bean(name = AUTOWIRED_ANNOTATION_PROCESSOR_BEAN_NAME)
//    public static AutowiredAnnotationBeanPostProcessor beanPostProcessor() {
//        AutowiredAnnotationBeanPostProcessor beanPostProcessor = new AutowiredAnnotationBeanPostProcessor();
//        // @Autowired + @Inject +  新注解 @InjectedUser
//        Set<Class<? extends Annotation>> autowiredAnnotationTypes =
//                new LinkedHashSet<>(asList(Autowired.class, Inject.class, InjectedUser.class));
//        beanPostProcessor.setAutowiredAnnotationTypes(autowiredAnnotationTypes);
//        return beanPostProcessor;
//    }
AnnotationConfigUtils有很多内建bean,static让@bean 提早注册。

IoC依赖注入分析
IOC技术已经出来很久了,这里不过多讲解,有一篇文章讲得特别好可以看看
https://blog.csdn.net/ivan820819/article/details/79744797
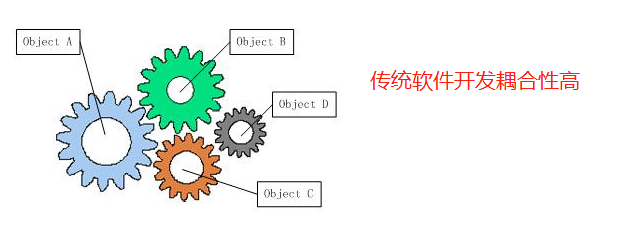
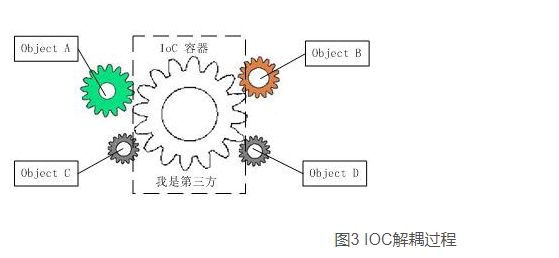
上面两个图就是理解的关键了,Ioc这个容器就能做到很好的分离作用,也是各个对象之间的粘合剂
下面还是写一个小代码来看看Ioc到底能起到什么作用。这里我还是用C#来做例子
使用的是Autofac 依赖注入容器
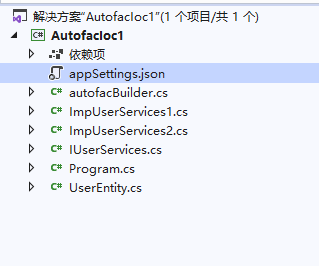
实体类

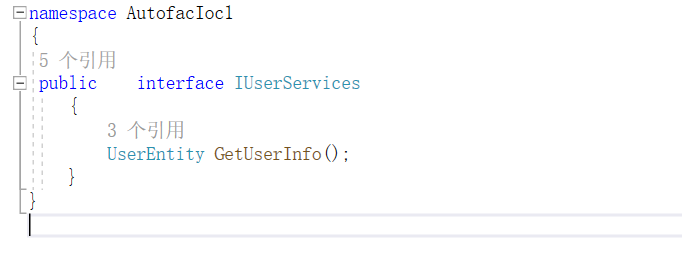
新建一个接口.
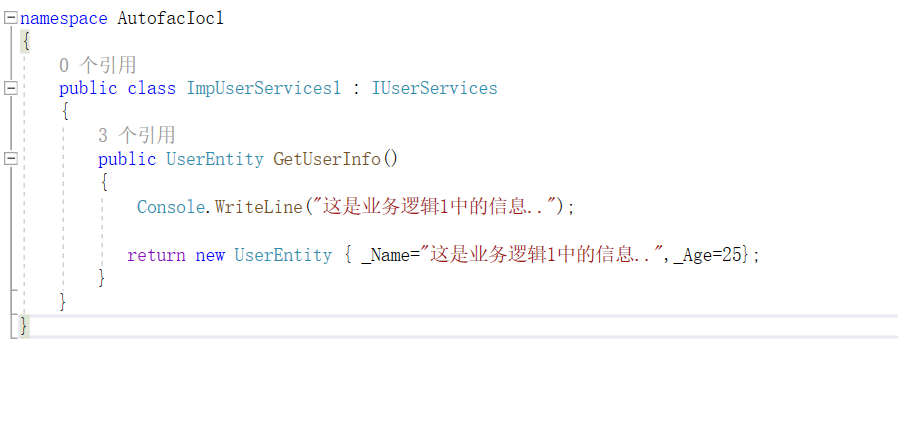
做两个实现类

IoC依赖注入过程
上一节是Ioc容器初始化过程,初始化过程基本就是做了一件大事:在IoC容器中构建出了BeanDeFinition数据结构映射.构建出数据结构映射后,却没有看到依赖注入,下面就看看是怎么依赖注入的.
首先,注意到依赖注入的过程是用户第一次向IoC容器索要Bean时触发的,在基本的IoC容器接口beanfactory中,有一个getBean的接口定义,这个接口的实现就是触发依赖注入发生的地方.当然也有例外,也就是我们可以在BeanDeFinition信息中通过控制lazy-init属性来控制容器完成对Bean的预实例化。这个预实例化实际上也是一个完成依赖注入的过程,但它是在初始化的过程中完成的,
以DefaultListablebeanfactory容器为例,简短的描述下.
整个过程的图示为:
从图上看,getBean是依赖注入的起点,之后会调用createBean,下面从DefaultListablebeanfactory的基类Abstractbeanfactory中的getBean的实现来了解这个过程。
DefaultListablebeanfactory容器的getBean整个过程步骤如下:
1.从缓存获取当前beanName,看当前类型的bean是否已经被创建过,如果没有创建过,就创建一个bean。
2.如果创建过,就从当前beanfactory中获取bean,如果当前工厂取不到,就从双亲beanfactory中取,一直进行迭代查找。
3.如果是需要标记,并且还没有创建过,就进行标记。
4.获取当前bean的所有依赖的bean,需要对当依赖的bean进行getBean递归调用,知道依赖的bean都创建为止。
5.根据protype调用createBean创建单例,原型模式实例,或者根据自定义scope创建实例
6.对创建的bean进行类型检查,如果没问题就返回.
代码如下:
protected <T> T doGetBean(
			final String name,final Class<T> requiredType,final Object[] args,boolean typeCheckOnly)
			throws BeansException {

		final String beanName = transformedBeanName(name);
		Object bean;

		// Eagerly check singleton cache for manually registered singletons.
		Object sharedInstance = getSingleton(beanName);
		if (sharedInstance != null && args == null) {
			if (logger.isDebugEnabled()) {
				if (isSingletonCurrentlyInCreation(beanName)) {
					logger.debug("Returning eagerly cached instance of singleton bean '" + beanName +
							"' that is not fully initialized yet - a consequence of a circular reference");
				}
				else {
					logger.debug("Returning cached instance of singleton bean '" + beanName + "'");
				}
			}
			bean = getobjectForBeanInstance(sharedInstance,name,beanName,null);
		}

		else {
			// Fail if we're already creating this bean instance:
			// We're assumably within a circular reference.
			if (isPrototypeCurrentlyInCreation(beanName)) {
				throw new BeanCurrentlyInCreationException(beanName);
			}

			// Check if bean deFinition exists in this factory.
			beanfactory parentbeanfactory = getParentbeanfactory();
			if (parentbeanfactory != null && !containsBeanDeFinition(beanName)) {
				// Not found -> check parent.
				String nametoLookup = originalBeanName(name);
				if (args != null) {
					// Delegation to parent with explicit args.
					return (T) parentbeanfactory.getBean(nametoLookup,args);
				}
				else {
					// No args -> delegate to standard getBean method.
					return parentbeanfactory.getBean(nametoLookup,requiredType);
				}
			}

			if (!typeCheckOnly) {
				markBeanAsCreated(beanName);
			}

			try {
				final RootBeanDeFinition mbd = getMergedLocalBeanDeFinition(beanName);
				checkMergedBeanDeFinition(mbd,args);

				// Guarantee initialization of beans that the current bean depends on.
				String[] dependsOn = mbd.getDependsOn();
				if (dependsOn != null) {
					for (String dependsOnBean : dependsOn) {
						if (isDependent(beanName,dependsOnBean)) {
							throw new BeanCreationException(mbd.getResourceDescription(),"Circular depends-on relationship between '" + beanName + "' and '" + dependsOnBean + "'");
						}
						registerDependentBean(dependsOnBean,beanName);
						getBean(dependsOnBean);
					}
				}

				// Create bean instance.
				if (mbd.isSingleton()) {
					sharedInstance = getSingleton(beanName,new ObjectFactory<Object>() {
						@Override
						public Object getobject() throws BeansException {
							try {
								return createBean(beanName,mbd,args);
							}
							catch (BeansException ex) {
								// Explicitly remove instance from singleton cache: It might have been put there
								// eagerly by the creation process,to allow for circular reference resolution.
								// Also remove any beans that received a temporary reference to the bean.
								destroySingleton(beanName);
								throw ex;
							}
						}
					});
					bean = getobjectForBeanInstance(sharedInstance,mbd);
				}

				else if (mbd.isPrototype()) {
					// It's a prototype -> create a new instance.
					Object prototypeInstance = null;
					try {
						beforePrototypeCreation(beanName);
						prototypeInstance = createBean(beanName,args);
					}
					finally {
						afterPrototypeCreation(beanName);
					}
					bean = getobjectForBeanInstance(prototypeInstance,mbd);
				}

				else {
					String scopeName = mbd.getScope();
					final Scope scope = this.scopes.get(scopeName);
					if (scope == null) {
						throw new IllegalStateException("No Scope registered for scope name '" + scopeName + "'");
					}
					try {
						Object scopedInstance = scope.get(beanName,new ObjectFactory<Object>() {
							@Override
							public Object getobject() throws BeansException {
								beforePrototypeCreation(beanName);
								try {
									return createBean(beanName,args);
								}
								finally {
									afterPrototypeCreation(beanName);
								}
							}
						});
						bean = getobjectForBeanInstance(scopedInstance,mbd);
					}
					catch (IllegalStateException ex) {
						throw new BeanCreationException(beanName,"Scope '" + scopeName + "' is not active for the current thread; consider " +
								"defining a scoped proxy for this bean if you intend to refer to it from a singleton",ex);
					}
				}
			}
			catch (BeansException ex) {
				cleanupAfterBeanCreationFailure(beanName);
				throw ex;
			}
		}
这个过程简要概括为,getBean是依赖注入的起点,之后会调用create-Bean,下面通过createBean代码来了解这个实现过程。在这个过程中,Bean对象会依据BeanDeFinition定义的要求生成。在AbstractAutowireCapablebeanfactory中实现了这个createBean,createBean不但生成了需要的Bean,还对Bean初始化进行了处理.注入过程如下图:
createBean方法如下:
/**
 * Central method of this class: creates a bean instance,* populates the bean instance,applies post-processors,etc.
 * @see #doCreateBean
*/
protected Object createBean(String beanName,RootBeanDeFinition mbd,Object[] args) throws BeanCreationException {
		if (logger.isDebugEnabled()) {
			logger.debug("Creating instance of bean '" + beanName + "'");
		}
		RootBeanDeFinition mbdToUse = mbd;

		// Make sure bean class is actually resolved at this point,and
		// clone the bean deFinition in case of a dynamically resolved Class
		// which cannot be stored in the shared merged bean deFinition.
     //确认需要创建的Bean实例的类是否可以实例化
		Class<?> resolvedClass = resolveBeanClass(mbd,beanName);
		if (resolvedClass != null && !mbd.hasBeanClass() && mbd.getBeanClassName() != null) {
			mbdToUse = new RootBeanDeFinition(mbd);
			mbdToUse.setBeanClass(resolvedClass);
		}

		// Prepare method overrides.
		try {
			mbdToUse.prepareMethodoverrides();
		}
		catch (BeanDeFinitionValidationException ex) {
			throw new BeanDeFinitionStoreException(mbdToUse.getResourceDescription(),"Validation of method overrides Failed",ex);
		}

		try {
			// Give BeanPostProcessors a chance to return a proxy instead of the target bean instance.
       //如果bean配置了PostProcessor 那么会返回proxy
			Object bean = resolveBeforeInstantiation(beanName,mbdToUse);
			if (bean != null) {
				return bean;
			}
		}
		catch (Throwable ex) {
			throw new BeanCreationException(mbdToUse.getResourceDescription(),"BeanPostProcessor before instantiation of bean Failed",ex);
		}
        //创建bean
		Object beanInstance = doCreateBean(beanName,mbdToUse,args);
		if (logger.isDebugEnabled()) {
			logger.debug("Finished creating instance of bean '" + beanName + "'");
		}
		return beanInstance;
	}
从上面接着看doCreateBean方法:
/**
 * Actually create the specified bean. Pre-creation processing has already happened
 * at this point,e.g. checking {@code postProcessBeforeInstantiation} callbacks.
 * <p>Differentiates between default bean instantiation,use of a
 * factory method,and autowiring a constructor.
 * @param beanName the name of the bean
 * @param mbd the merged bean deFinition for the bean
 * @param args explicit arguments to use for constructor or factory method invocation
 * @return a new instance of the bean
 * @throws BeanCreationException if the bean Could not be created
 * @see #instantiateBean
 * @see #instantiateUsingFactoryMethod
 * @see #autowireConstructor
*/
	protected Object doCreateBean(final String beanName,final RootBeanDeFinition mbd,final Object[] args) {
		// Instantiate the bean.
		BeanWrapper instanceWrapper = null;
        //如果是单例,仙踪缓存中把同名bean移除
		if (mbd.isSingleton()) {
			instanceWrapper = this.factorybeanInstanceCache.remove(beanName);
		}
     //createBeanInstance创建实例
		if (instanceWrapper == null) {
			instanceWrapper = createBeanInstance(beanName,args);
		}
		final Object bean = (instanceWrapper != null ? instanceWrapper.getWrappedInstance() : null);
		Class<?> beanType = (instanceWrapper != null ? instanceWrapper.getWrappedClass() : null);

		// Allow post-processors to modify the merged bean deFinition.
		synchronized (mbd.postProcessingLock) {
			if (!mbd.postProcessed) {
				applyMergedBeanDeFinitionPostProcessors(mbd,beanType,beanName);
				mbd.postProcessed = true;
			}
		}

		// Eagerly cache singletons to be able to resolve circular references
		// even when triggered by lifecycle interfaces like beanfactoryAware.
		boolean earlySingletonExposure = (mbd.isSingleton() && this.allowCircularReferences &&
				isSingletonCurrentlyInCreation(beanName));
		if (earlySingletonExposure) {
			if (logger.isDebugEnabled()) {
				logger.debug("Eagerly caching bean '" + beanName +
						"' to allow for resolving potential circular references");
			}
			addSingletonFactory(beanName,new ObjectFactory<Object>() {
				@Override
				public Object getobject() throws BeansException {
					return getEarlyBeanReference(beanName,bean);
				}
			});
		}

		// Initialize the bean instance.
		Object exposedobject = bean;
		try {
        //开始依赖注入
			populateBean(beanName,instanceWrapper);
			if (exposedobject != null) {
				exposedobject = initializeBean(beanName,exposedobject,mbd);
			}
		}
		catch (Throwable ex) {
			if (ex instanceof BeanCreationException && beanName.equals(((BeanCreationException) ex).getBeanName())) {
				throw (BeanCreationException) ex;
			}
			else {
				throw new BeanCreationException(mbd.getResourceDescription(),"Initialization of bean Failed",ex);
			}
		}

		if (earlySingletonExposure) {
			Object earlySingletonReference = getSingleton(beanName,false);
			if (earlySingletonReference != null) {
				if (exposedobject == bean) {
					exposedobject = earlySingletonReference;
				}
				else if (!this.allowRawInjectionDespiteWrapping && hasDependentBean(beanName)) {
					String[] dependentBeans = getDependentBeans(beanName);
					Set<String> actualDependentBeans = new LinkedHashSet<>(dependentBeans.length);
					for (String dependentBean : dependentBeans) {
						if (!removeSingletonIfCreatedForTypeCheckOnly(dependentBean)) {
							actualDependentBeans.add(dependentBean);
						}
					}
					if (!actualDependentBeans.isEmpty()) {
						throw new BeanCurrentlyInCreationException(beanName,"Bean with name '" + beanName + "' has been injected into other beans [" +
								StringUtils.collectionToCommaDelimitedString(actualDependentBeans) +
								"] in its raw version as part of a circular reference,but has eventually been " +
								"wrapped. This means that said other beans do not use the final version of the " +
								"bean. This is often the result of over-eager type matching - consider using " +
								"'getBeanNamesOfType' with the 'allowEagerInit' flag turned off,for example.");
					}
				}
			}
		}

		// Register bean as disposable.
		try {
			registerdisposableBeanIfNecessary(beanName,bean,mbd);
		}
		catch (BeanDeFinitionValidationException ex) {
			throw new BeanCreationException(mbd.getResourceDescription(),"Invalid destruction signature",ex);
		}

		return exposedobject;
	}
从doCreateBean方法可以看出,与依赖注入关系特别密切的方法有createBeanInstance和populateBean,下面分别介绍这两个方法。在createBeanInstance中生成了Bean所包含的Java对象,这个对象的生成有很多种不同的方式,可以通过工厂方法生成,也可以通过容器的autowire特性生成,这些生成方式都是由相关的BeanDeFinition来指定的。
createBeanInstance方法如下:
/**
 * Create a new instance for the specified bean,using an appropriate instantiation strategy:
 * factory method,constructor autowiring,or simple instantiation.
 * @param beanName the name of the bean
 * @param mbd the bean deFinition for the bean
 * @param args explicit arguments to use for constructor or factory method invocation
 * @return BeanWrapper for the new instance
 * @see #instantiateUsingFactoryMethod
 * @see #autowireConstructor
 * @see #instantiateBean
*/
	protected BeanWrapper createBeanInstance(String beanName,Object[] args) {
		// Make sure bean class is actually resolved at this point.
		Class<?> beanClass = resolveBeanClass(mbd,beanName);

		if (beanClass != null && !Modifier.isPublic(beanClass.getModifiers()) && !mbd.isNonPublicAccessAllowed()) {
			throw new BeanCreationException(mbd.getResourceDescription(),"Bean class isn't public,and non-public access not allowed: " + beanClass.getName());
		}
     //使用工厂方法对bean进行实例化
		if (mbd.getFactoryMethodName() != null)  {
			return instantiateUsingFactoryMethod(beanName,args);
		}

		// Shortcut when re-creating the same bean...
		boolean resolved = false;
		boolean autowireNecessary = false;
		if (args == null) {
			synchronized (mbd.constructorargumentLock) {
				if (mbd.resolvedConstructorOrFactoryMethod != null) {
					resolved = true;
					autowireNecessary = mbd.constructorargumentsResolved;
				}
			}
		}
		if (resolved) {
			if (autowireNecessary) {
				return autowireConstructor(beanName,null,null);
			}
			else {
				return instantiateBean(beanName,mbd);
			}
		}

		// Need to determine the constructor...
     //使用构造函数进行实例化,前提是有构造函数
		Constructor<?>[] ctors = determineConstructorsFromBeanPostProcessors(beanClass,beanName);
		if (ctors != null ||
				mbd.getResolvedAutowireMode() == RootBeanDeFinition.AUTOWIRE_CONSTRUCTOR ||
				mbd.hasconstructorargumentValues() || !ObjectUtils.isEmpty(args))  {
			return autowireConstructor(beanName,ctors,args);
		}

		// No special handling: simply use no-arg constructor.
     //使用默认的构造方法
		return instantiateBean(beanName,mbd);
	}
populateBean方法如下:
/**
* Populate the bean instance in the given BeanWrapper with the property values
* from the bean deFinition.
* @param beanName the name of the bean
* @param mbd the bean deFinition for the bean
* @param bw BeanWrapper with bean instance
*/
protected void populateBean(String beanName,BeanWrapper bw) {
PropertyValues pvs = mbd.getPropertyValues();
if (bw == null) {
if (!pvs.isEmpty()) {
throw new BeanCreationException(
mbd.getResourceDescription(),"Cannot apply property values to null instance");
}
else {
// Skip property population phase for null instance.
return;
}
}
// Give any InstantiationAwareBeanPostProcessors the opportunity to modify the
// state of the bean before properties are set. This can be used,for example,// to support styles of field injection.
boolean continueWithPropertyPopulation = true;
if (!mbd.isSynthetic() && hasInstantiationAwareBeanPostProcessors()) {
for (BeanPostProcessor bp : getBeanPostProcessors()) {
if (bp instanceof InstantiationAwareBeanPostProcessor) {
InstantiationAwareBeanPostProcessor ibp = (InstantiationAwareBeanPostProcessor) bp;
if (!ibp.postProcessAfterInstantiation(bw.getWrappedInstance(),beanName)) {
continueWithPropertyPopulation = false;
break;
}
}
}
}
if (!continueWithPropertyPopulation) {
return;
}
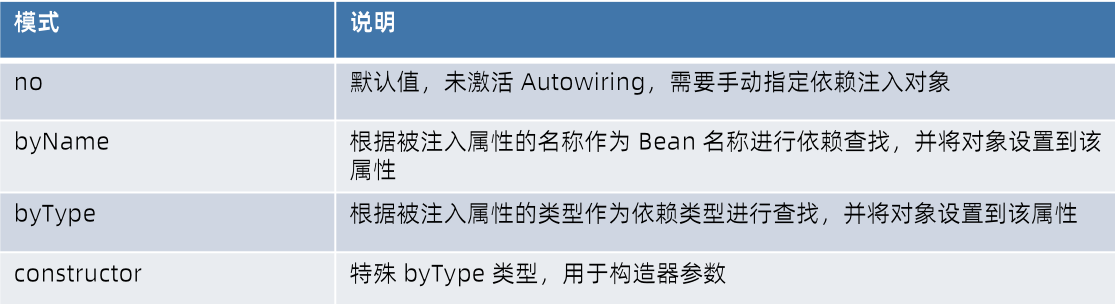
//开始处理autowire类型的注入,支持按bean的名字和类型
if (mbd.getResolvedAutowireMode() == RootBeanDeFinition.AUTOWIRE_BY_NAME ||
mbd.getResolvedAutowireMode() == RootBeanDeFinition.AUTOWIRE_BY_TYPE) {
MutablePropertyValues newPvs = new MutablePropertyValues(pvs);
// Add property values based on autowire by name if applicable.
if (mbd.getResolvedAutowireMode() == RootBeanDeFinition.AUTOWIRE_BY_NAME) {
autowireByName(beanName,bw,newPvs);
}
// Add property values based on autowire by type if applicable.
if (mbd.getResolvedAutowireMode() == RootBeanDeFinition.AUTOWIRE_BY_TYPE) {
autowireByType(beanName,newPvs);
}
pvs = newPvs;
}
boolean hasInstAwareBpps = hasInstantiationAwareBeanPostProcessors();
boolean needsDepCheck = (mbd.getDependencyCheck() != RootBeanDeFinition.DEPENDENCY_CHECK_NONE);
if (hasInstAwareBpps || needsDepCheck) {
PropertyDescriptor[] filteredPds = filterPropertyDescriptorsForDependencyCheck(bw,mbd.allowCaching);
if (hasInstAwareBpps) {
for (BeanPostProcessor bp : getBeanPostProcessors()) {
if (bp instanceof InstantiationAwareBeanPostProcessor) {
InstantiationAwareBeanPostProcessor ibp = (InstantiationAwareBeanPostProcessor) bp;
pvs = ibp.postProcesspropertyValues(pvs,filteredPds,bw.getWrappedInstance(),beanName);
if (pvs == null) {
return;
}
}
}
}
if (needsDepCheck) {
checkDependencies(beanName,pvs);
}
}
//对bean的属性进行注入
applyPropertyValues(beanName,pvs);
}
注入过程的其他细节就不再赘述了.
在Bean的创建和对象依赖注入的过程中,需要依据载入的BeanDeFinition中的信息来递归地完成依赖注入。从上面的几个递归过程中可以看到,这些递归都是以getBean为入口的。一个递归是在上下文体系中查找需要的Bean和创建Bean的递归调用;另一个递归是在依赖注入时,通过递归调用容器的getBean方法,得到当前Bean的依赖Bean,同时也触发对依赖Bean的创建和注入。在对Bean的属性进行依赖注入时,解析的过程也是一个递归的过程。这样,根据依赖关系,一层一层地完成Bean的创建和注入,直到最后完成当前Bean的创建。有了这个顶层Bean的创建和对它的属性依赖注入的完成,意味着和当前Bean相关的整个依赖链的注入也完成了。
在Bean创建和依赖注入完成以后,在IoC容器中建立起一系列依靠依赖关系联系起来的Bean,这个Bean已经不是简单的Java对象了。该Bean系列以及Bean之间的依赖关系建立完成以后,通过IoC容器的相关接口方法,就可以非常方便地供上层应用使用了。继续以水桶为例,到这里,我们不但找到了水源,而且成功地把水装到了水桶中,同时对水桶里的水完成了一系列的处理,比如消毒、煮沸……尽管还是水,但经过一系列的处理以后,这些水已经是开水了,可以直接饮用了。
参考:
1.https://github.com/spring-projects/spring-framework.
2.<<Spring技术内幕>>

Java Spring 依赖注入的几种方式详解
本篇文章主要介绍了spring 依赖注入的几种方式详解,小编觉得挺不错的,现在分享给大家,也给大家做个参考。一起跟随小编过来看看吧
IoC 简介
平常的Java开发中,程序员在某个类中需要依赖其它类的方法。
通常是new一个依赖类再调用类实例的方法,这种开发存在的问题是new的类实例不好统一管理。
Spring提出了依赖注入的思想,即依赖类不由程序员实例化,而是通过Spring容器帮我们new指定实例并且将实例注入到需要该对象的类中。
立即学习“Java免费学习笔记(深入)”;
依赖注入的另一种说法是"控制反转"。通俗的理解是:平常我们new一个实例,这个实例的控制权是我们程序员。
而控制反转是指new实例工作不由我们程序员来做而是交给Spring容器来做。
Spring有多种依赖注入的形式,本篇文章仅介绍Spring通过xml进行IOC配置的方式。
1.Set注入
这是最简单的注入方式,假设有一个SpringAction,类中需要实例化一个SpringDao对象,那么就可以定义一个private的SpringDao成员变量,然后创建SpringDao的set方法(这是ioc的注入入口):
随后编写spring的xml文件,
<!--配置bean,配置后该类由spring管理-->
<bean name="springAction">
<!--(1)依赖注入,配置当前类中相应的属性-->
<property name="springDao" ref="springDao"></property>
</bean>
<bean name="springDao"></bean>
2.构造器注入
这种方式的注入是指带有参数的构造函数注入,看下面的例子,我创建了两个成员变量SpringDao和User,但是并未设置对象的set方法,所以就不能支持第一种注入方式,这里的注入方式是在SpringAction的构造函数中注入,也就是说在创建SpringAction对象时要将SpringDao和User两个参数值传进来:
public class SpringAction {
//注入对象springDao
private SpringDao springDao;
private User user;

public SpringAction(SpringDao springDao,User user){
this.springDao = springDao;
this.user = user;
System.out.println("构造方法调用springDao和user");
}

public void save(){
user.setName("卡卡");
springDao.save(user);
}
}在XML文件中同样不用
<!--配置bean,配置后该类由spring管理-->
<bean name="springAction">
<!--(2)创建构造器注入,如果主类有带参的构造方法则需添加此配置-->
<constructor-arg ref="springDao"></constructor-arg>
<constructor-arg ref="user"></constructor-arg>
</bean>
<bean name="springDao"></bean>
<bean name="user"></bean>
解决构造方法参数的不确定性,你可能会遇到构造方法传入的两参数都是同类型的,为了分清哪个该赋对应值,则需要进行一些小处理:
下面是设置index,就是参数位置:
<bean name="springAction">
<constructor-arg index="0" ref="springDao"></constructor-arg>
<constructor-arg index="1" ref="user"></constructor-arg>
</bean>
另一种是设置参数类型:
<constructor-arg type="java.lang.String" ref=""/>
3.静态工厂的方法注入
静态工厂顾名思义,就是通过调用静态工厂的方法来获取自己需要的对象,为了让spring管理所有对象,我们不能直接通过"工程类.静态方法()"来获取对象,而是依然通过spring注入的形式获取:
package com.bless.springdemo.factory;

import com.bless.springdemo.dao.FactoryDao;
import com.bless.springdemo.dao.impl.FactoryDaoImpl;
import com.bless.springdemo.dao.impl.StaticFacotryDaoImpl;

public class DaoFactory {
//静态工厂
public static final FactoryDao getStaticFactoryDaoImpl(){
return new StaticFacotryDaoImpl();
}
}同样看关键类,这里我需要注入一个FactoryDao对象,这里看起来跟第一种注入一模一样,但是看随后的xml会发现有很大差别:
public class SpringAction {
//注入对象
private FactoryDao staticFactoryDao;

public void staticFactoryOk(){
staticFactoryDao.saveFactory();
}
//注入对象的set方法
public void setStaticFactoryDao(FactoryDao staticFactoryDao) {
this.staticFactoryDao = staticFactoryDao;
}
}Spring的IOC配置文件,注意看
<!--配置bean,配置后该类由spring管理-->
<bean name="springAction">
<!--(3)使用静态工厂的方法注入对象,对应下面的配置文件(3)-->
<property name="staticFactoryDao" ref="staticFactoryDao"></property>
</property>
</bean>
<!--(3)此处获取对象的方式是从工厂类中获取静态方法-->
<bean name="staticFactoryDao"factory-method="getStaticFactoryDaoImpl"></bean>
4.实例工厂的方法注入
实例工厂的意思是获取对象实例的方法不是静态的,所以你需要首先new工厂类,再调用普通的实例方法:
public class DaoFactory {
//实例工厂
public FactoryDao getFactoryDaoImpl(){
return new FactoryDaoImpl();
}
}那么下面这个类没什么说的,跟前面也很相似,但是我们需要通过实例工厂类创建FactoryDao对象:
public class SpringAction {
//注入对象
private FactoryDao factoryDao;

public void factoryOk(){
factoryDao.saveFactory();
}

public void setFactoryDao(FactoryDao factoryDao) {
this.factoryDao = factoryDao;
}
}最后看spring配置文件:
<!--配置bean,配置后该类由spring管理-->
<bean name="springAction">
<!--(4)使用实例工厂的方法注入对象,对应下面的配置文件(4)-->
<property name="factoryDao" ref="factoryDao"></property>
</bean>

<!--(4)此处获取对象的方式是从工厂类中获取实例方法-->
<bean name="daoFactory"></bean>
<bean name="factoryDao" factory-bean="daoFactory" factory-method="getFactoryDaoImpl"></bean>
5.总结
Spring IOC注入方式用得最多的是(1)(2)种,多写多练就会非常熟练。
另外注意:通过Spring创建的对象默认是单例的,如果需要创建多实例对象可以在
<bean name="..."scope="prototype">
以上就是Java Spring 依赖注入的几种方式详解的内容。
今天关于java Spring 之IOC依赖注入和spring ioc依赖注入原理的分享就到这里,希望大家有所收获,若想了解更多关于004-spring ioc 依赖注入、IoC依赖注入分析、IoC依赖注入过程、Java Spring 依赖注入的几种方式详解等相关知识,可以在本站进行查询。
本文标签:


![[转帖]Ubuntu 安装 Wine方法(ubuntu如何安装wine)](https://www.gvkun.com/zb_users/cache/thumbs/4c83df0e2303284d68480d1b1378581d-180-120-1.jpg)

