Enter username to boot WebLogic server:weblogic Enter password to boot WebLogic server: 需要输入用户名密码(以上方式启动,当前窗口会挂起)
在目录/usr/local/weblogic//user_projects/domains/weblogic10mss下
新增文件boot.properties
编辑该文件,文件内容为:
username=weblogic
password=weblogic
以服务形式启动,不挂在当前shell进程下
nohup ./startWebLogic.sh &
1.5登录weblogic控制台
http://222.222.222.33:7001/console/

密码验证成功后,登录到控制台

1.6停止WebLogic服务
通过”http://服务地址:7001/console”,shutdownserver
利用脚本停止服务:
在#/usr/local/weblogic//user_projects/domains/weblogic10mss 路径下,有一个stopWebLogic.sh文件,执行即可。
您可能感兴趣的文章:- Oracle WebLogic Server 12.2.1.2安装部署教程
- Red Hat Linux,Apache2.0+Weblogic9.2负载均衡集群安装配置
- weblogic的集群与配置图文方法

CentOS 6通过bin安装包安装Weblogic
1、安装这边
groupadd -g 900 weblogic
useradd -u 900 -g weblogic weblogic
mkdir /usr/local/weblogic
chown -R weblogic.weblogic /usr/local/weblogic/
yum install -y glibc.i686 libstdc++.so.6
2、安装weblogic
./oepe-wls-indigo-installer-11.1.1.8.0.201110211138-10.3.6-linux32.bin
Extracting 0%....................................................................................................100%
Unable to instantiate GUI,defaulting to console mode.
<-------------------------------------- Oracle Installer - Oracle Enterprise Pack for Eclipse ------------------------------------->
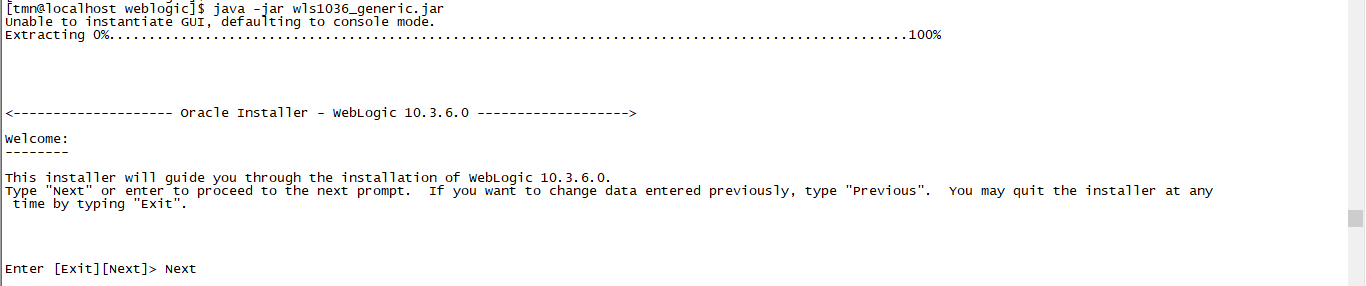
Welcome:
--------
This installer will guide you through the installation of Oracle Enterprise Pack for Eclipse. Type "Next" or enter to proceed to the next prompt. If you want to change data entered prevIoUsly,type "PrevIoUs". You may quit the installer at any time by typing
"Exit".
Enter [Exit][Next]> Next
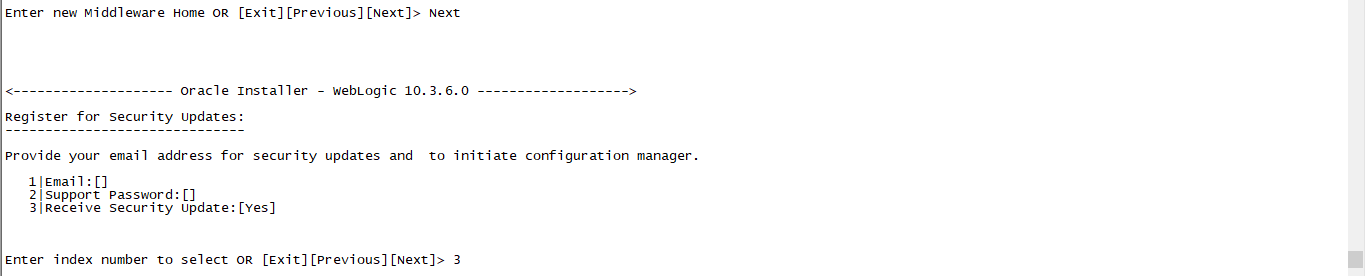
Choose Middleware Home Directory:
---------------------------------
"Middleware Home" = [Enter new value or use default "/home/weblogic/Oracle/Middleware"]
Enter new Middleware Home OR [Exit][PrevIoUs][Next]> /usr/local/weblogic
"Middleware Home" = [/usr/local/weblogic]
Use above value or select another option:
1 - Enter new Middleware Home
2 - Change to default [/home/weblogic/Oracle/Middleware]
Enter option number to select OR [Exit][PrevIoUs][Next]> Next
Register for Security Updates:
------------------------------
Provide your email address for security updates and to initiate configuration manager.
1|Email:[]
2|Support Password:[]
3|Receive Security Update:[Yes]
Enter index number to select OR [Exit][PrevIoUs][Next]> 3
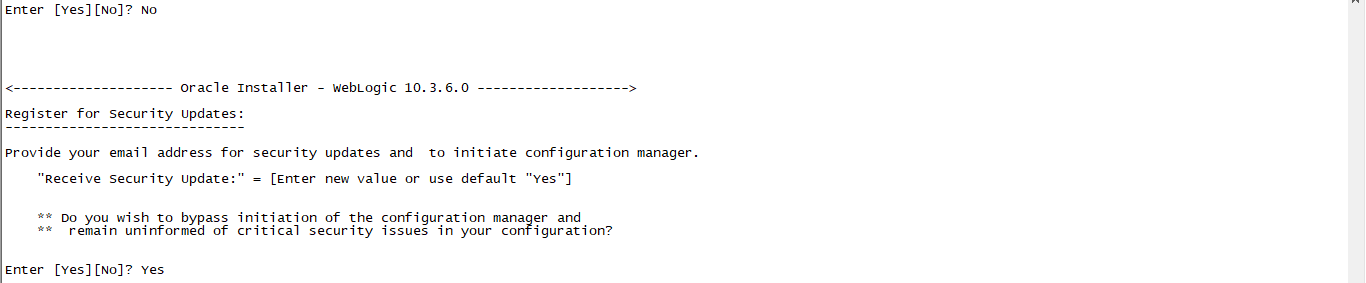
"Receive Security Update:" = [Enter new value or use default "Yes"]
Enter [Yes][No]? No
"Receive Security Update:" = [Enter new value or use default "Yes"]
** Do you wish to bypass initiation of the configuration manager and
** remain uninformed of critical security issues in your configuration?
Enter [Yes][No]? Yes
3|Receive Security Update:[No]
Enter index number to select OR [Exit][PrevIoUs][Next]>
Enter index number to select OR [Exit][PrevIoUs][Next]> Next
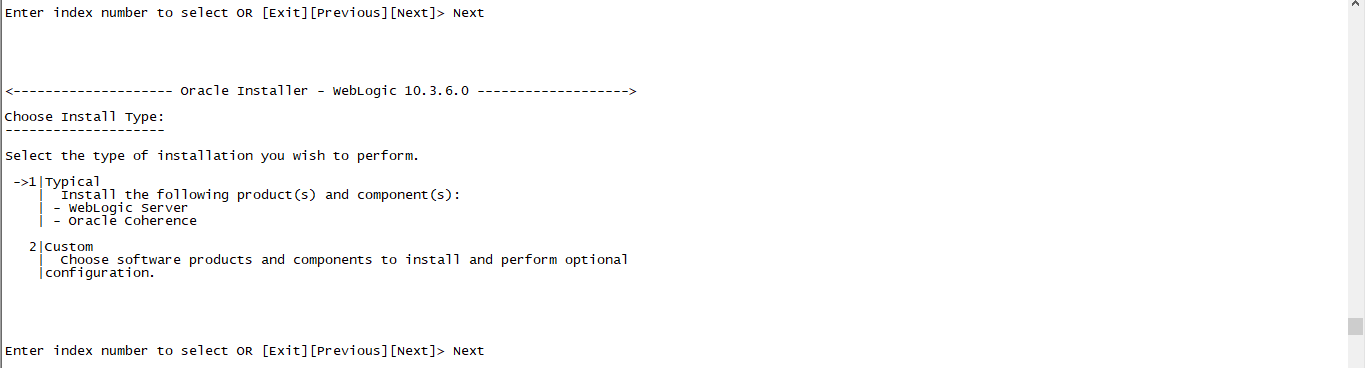
Choose Install Type:
--------------------
Select the type of installation you wish to perform.
->1|Typical
| Install the following product(s) and component(s):
| - WebLogic Server
| - Oracle Coherence
| - Oracle Application Development Framework
| - Oracle Enterprise Pack for Eclipse
2|Custom
| Choose software products and components to install and perform optional configuration.
Enter index number to select OR [Exit][PrevIoUs][Next]> 1
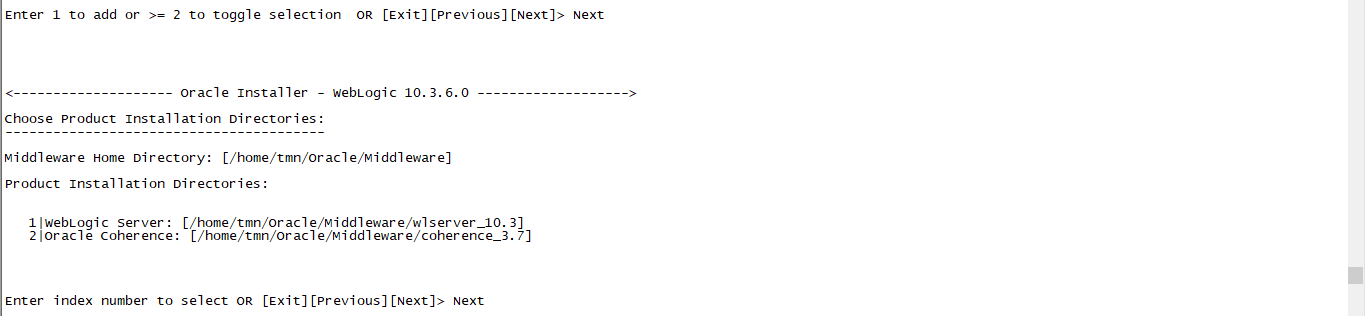
Choose Product Installation Directories:
----------------------------------------
Middleware Home Directory: [/usr/local/weblogic]
Product Installation Directories:
1|WebLogic Server: [/usr/local/weblogic/wlserver_10.3]
2|Oracle Coherence: [/usr/local/weblogic/coherence_3.7]
3|Oracle Enterprise Pack for Eclipse: [/usr/local/weblogic/oepe_11.1.1.8.0]
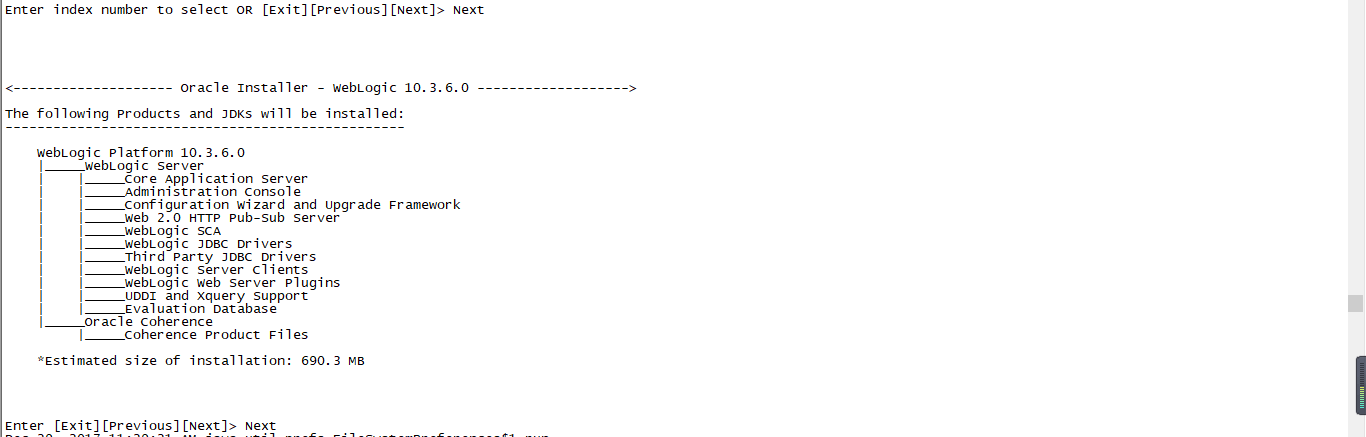
The following Products and JDKs will be installed:
--------------------------------------------------
Oracle Enterprise Pack for Eclipse 1.8.0.20111021
|_____WebLogic Server
| |_____Core Application Server
| |_____Administration Console
| |_____Configuration Wizard and Upgrade Framework
| |_____Web 2.0 HTTP Pub-Sub Server
| |_____WebLogic SCA
| |_____WebLogic JDBC Drivers
| |_____Third Party JDBC Drivers
| |_____WebLogic Server Clients
| |_____WebLogic Web Server Plugins
| |_____uddi and Xquery Support
| |_____Evaluation Database
|_____Oracle Coherence
| |_____Coherence Product Files
|_____Oracle Application Development Framework
| |_____Application Development Framework Runtime
|_____Oracle Enterprise Pack for Eclipse
| |_____Common Files
|_____JDKs
|_____SUN SDK 1.6.0_29
*Estimated size of installation: 1,958.0 MB
Enter [Exit][PrevIoUs][Next]> Next
Aug 19,2017 2:37:12 PM java.util.prefs.FileSystemPreferences$2 run
INFO: Created user preferences directory.
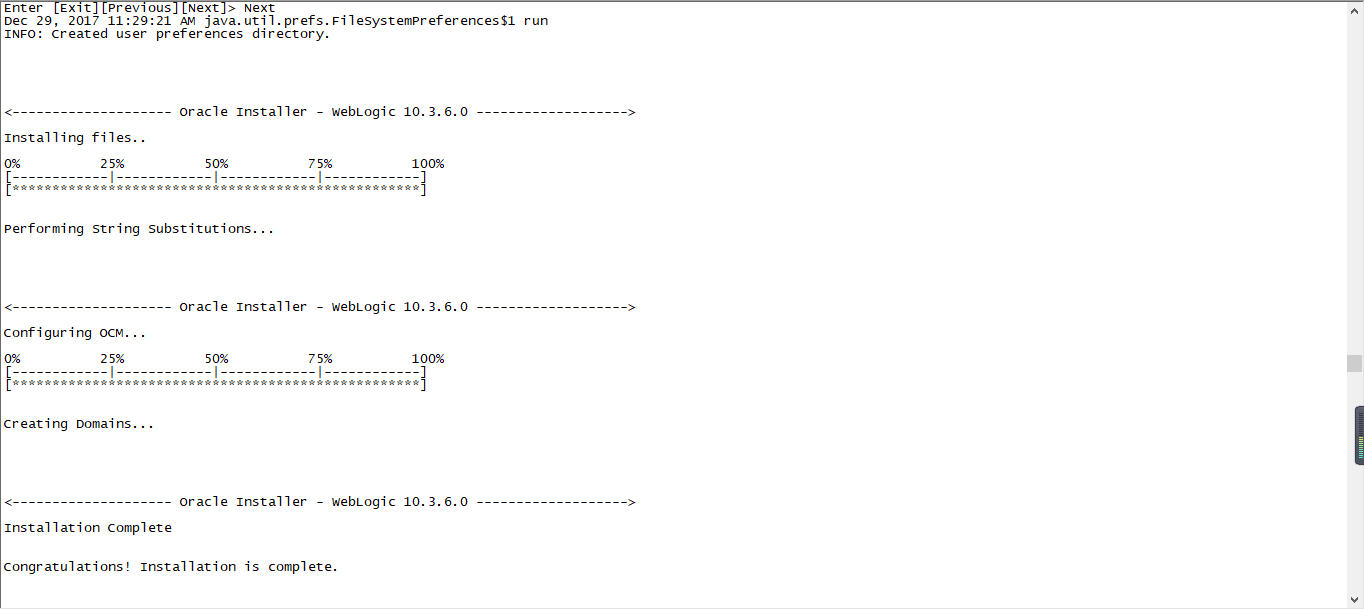
Installing files..
0% 25% 50% 75% 100%
[------------|------------|------------|------------]
[***************************************************]
Installing JDK....
[***************************************************]
Performing String Substitutions...
Configuring OCM...
Creating Domains...
Installation Complete
Congratulations! Installation is complete.
Press [Enter] to continue or type [Exit]>
3、创建域
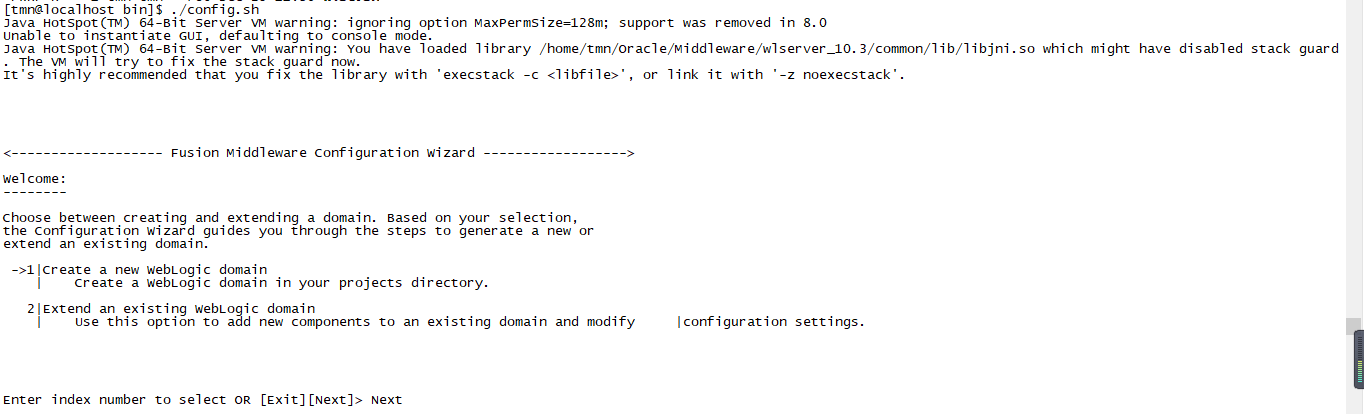
cd /usr/local/weblogic/wlserver_10.3/common/bin/
./config.sh
<--------------------------------------------- Fusion Middleware Configuration Wizard --------------------------------------------->
Choose between creating and extending a domain. Based on your selection,the Configuration Wizard guides you through the steps
to generate a new or extend an existing domain.
->1|Create a new WebLogic domain
| Create a WebLogic domain in your projects directory.
2|Extend an existing WebLogic domain
| Use this option to add new components to an existing domain and modify configuration settings.
Enter index number to select OR [Exit][Next]> 1
Select Domain Source:
---------------------
Select the source from which the domain will be created. You can create the domain by selecting from the required components or
by selecting from a list of existing domain templates.
->1|Choose Weblogic Platform components
| You can choose the Weblogic component(s) that you want supported in your domain.
2|Choose custom template
| Choose this option if you want to use an existing template. This Could be a custom created template using the Template
|Builder.
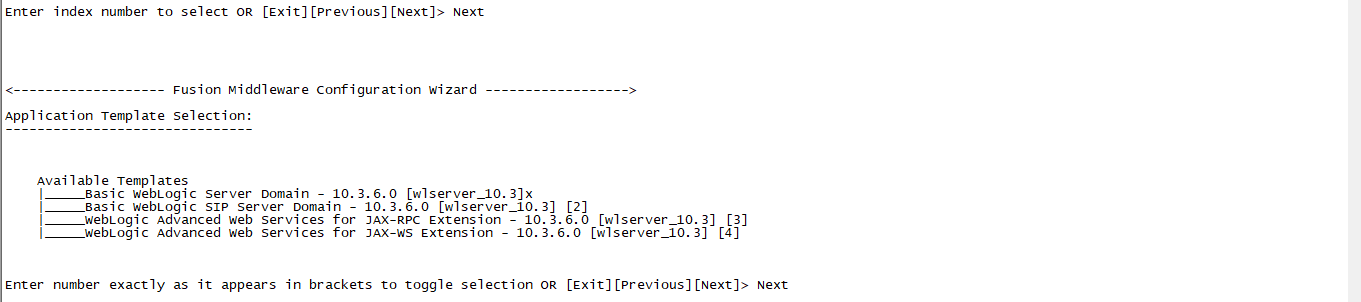
Application Template Selection:
-------------------------------
Available Templates
|_____Basic WebLogic Server Domain - 10.3.6.0 [wlserver_10.3]x
|_____Oracle WSM Policy Manager - 11.1.1.0 [oracle_common] [2]
|_____Oracle JRF WebServices Asynchronous services - 11.1.1.0 [oracle_common] [3]
|_____Oracle JRF - 11.1.1.0 [oracle_common] [4]
|_____Basic WebLogic SIP Server Domain - 10.3.6.0 [wlserver_10.3] [5]
|_____WebLogic Advanced Web Services for JAX-RPC Extension - 10.3.6.0 [wlserver_10.3] [6]
|_____WebLogic Advanced Web Services for JAX-WS Extension - 10.3.6.0 [wlserver_10.3] [7]
Enter number exactly as it appears in brackets to toggle selection OR [Exit][PrevIoUs][Next]> Next
Edit Domain information:
------------------------
| Name | Value |
_|________|_____________|
1| *Name: | base_domain |
Enter value for "Name" OR [Exit][PrevIoUs][Next]> Next
Select the target domain directory for this domain:
---------------------------------------------------
"Target Location" = [Enter new value or use default "/usr/local/weblogic/user_projects/domains"]
Enter new Target Location OR [Exit][PrevIoUs][Next]> Next
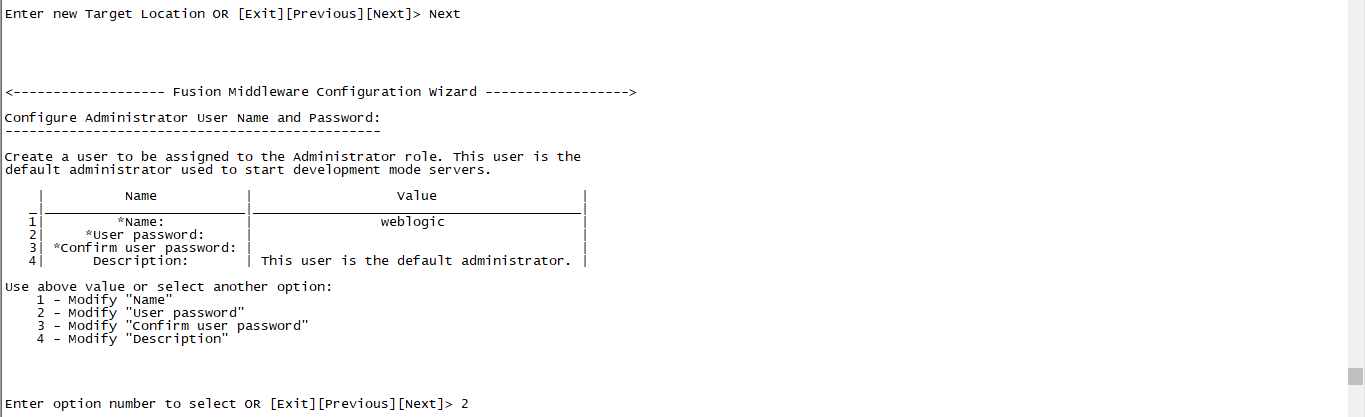
Configure Administrator User Name and Password:
-----------------------------------------------
Create a user to be assigned to the Administrator role. This user is the default administrator used to start development mode
servers.
| Name | Value |
_|_________________________|_________________________________________|
1| *Name: | weblogic |
2| *User password: | |
3| *Confirm user password: | |
4| Description: | This user is the default administrator. |
1 - Modify "Name"
2 - Modify "User password"
3 - Modify "Confirm user password"
4 - Modify "Description"
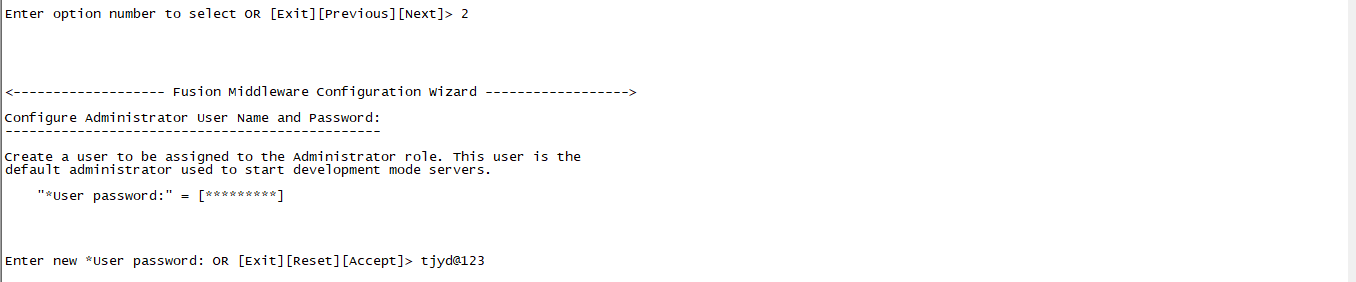
Enter option number to select OR [Exit][PrevIoUs][Next]> 2
"*User password:" = []
Enter new *User password: OR [Exit][Reset][Accept]>
2| *User password: | *********** |
4 - Modify "Description"
5 - discard Changes
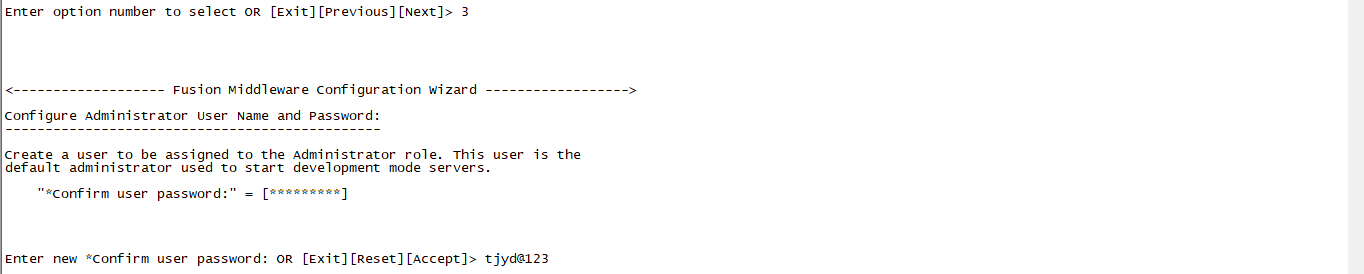
Enter option number to select OR [Exit][PrevIoUs][Next]> 3
"*Confirm user password:" = []
Enter new *Confirm user password: OR [Exit][Reset][Accept]>
3| *Confirm user password: | *********** |
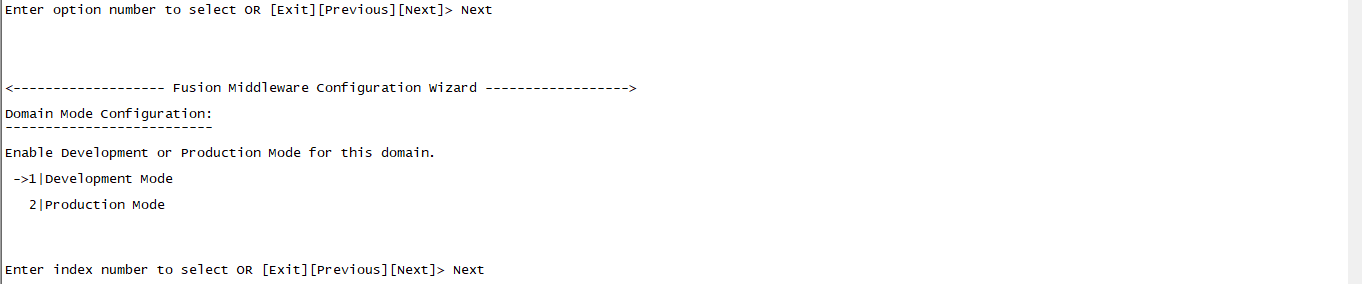
Domain Mode Configuration:
--------------------------
Enable Development or Production Mode for this domain.
->1|Development Mode
2|Production Mode
Enter index number to select OR [Exit][PrevIoUs][Next]> 2
Java SDK Selection:
-------------------
->1|Sun SDK 1.6.0_29 @ /usr/local/weblogic/jdk160_29
2|Other Java SDK
Select Optional Configuration:
1|Administration Server [ ]
2|Managed Servers,Clusters and Machines [ ]
3|RDBMS Security Store [ ]
1|Administration Server [x]
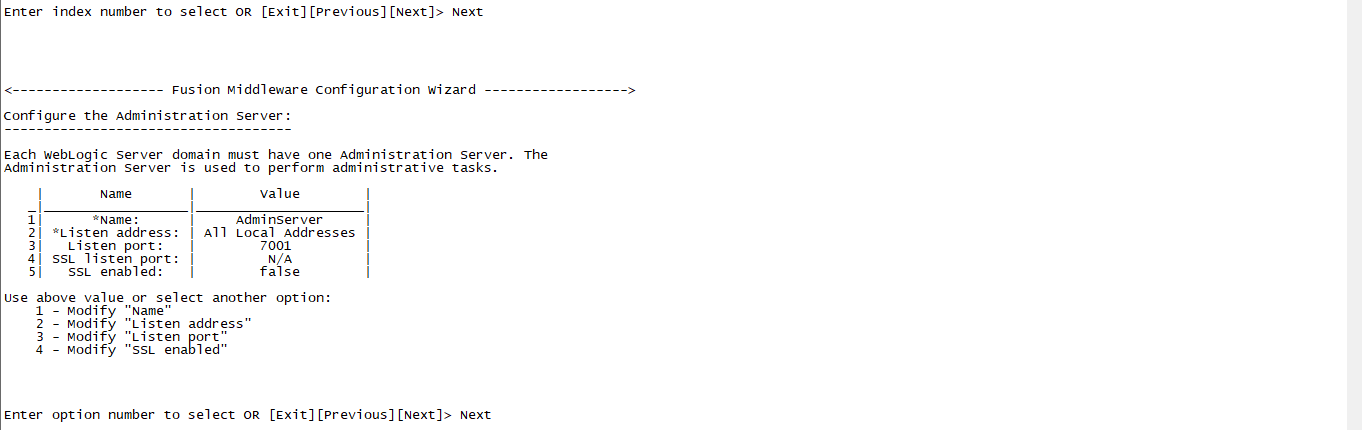
Configure the Administration Server:
------------------------------------
Each WebLogic Server domain must have one Administration Server. The Administration Server is used to perform administrative
tasks.
| Name | Value |
_|__________________|_____________________|
1| *Name: | AdminServer |
2| *Listen address: | All Local Addresses |
3| Listen port: | 7001 |
4| SSL listen port: | N/A |
5| SSL enabled: | false |
2 - Modify "Listen address"
3 - Modify "Listen port"
4 - Modify "SSL enabled"
Creating Domain...
**** Domain Created Successfully! ****
4、设置免密码启动
cd /usr/local/weblogic/user_projects/domains/base_domain/servers/AdminServer/
mkdir security
vim security/boot.properties
username=weblogic
password=weblogic123
5、启动
cd /usr/local/weblogic/user_projects/domains/base_domain/bin/
nohup ./startWebLogic.sh >/dev/null 2>&1 &

centos 安装 weblogic,启动报错
我在虚拟机的 centos 上安装了 weblogic, 并新建的域,都成功了,但启动的时候有报错。我的 weblogic 版本是 10.3.5 ,jdk 是 1.7. 哪位大神遇到过,求解答!!!
JAVA Memory arguments: -Xms512m -Xmx512m
.
WLS Start Mode=Development
.
CLASSPATH=/home/weblogic/Oracle/Middleware/patch_wls1035/profiles/default/sys_manifest_classpath/weblogic_patch.jar:/home/weblogic/Oracle/Middleware/patch_ocp360/profiles/default/sys_manifest_classpath/weblogic_patch.jar:/usr/java/jdk1.7.0_79/lib/tools.jar:/home/weblogic/Oracle/Middleware/wlserver_10.3/server/lib/weblogic_sp.jar:/home/weblogic/Oracle/Middleware/wlserver_10.3/server/lib/weblogic.jar:/home/weblogic/Oracle/Middleware/modules/features/weblogic.server.modules_10.3.5.0.jar:/home/weblogic/Oracle/Middleware/wlserver_10.3/server/lib/webservices.jar:/home/weblogic/Oracle/Middleware/modules/org.apache.ant_1.7.1/lib/ant-all.jar:/home/weblogic/Oracle/Middleware/modules/net.sf.antcontrib_1.1.0.0_1-0b2/lib/ant-contrib.jar:/home/weblogic/Oracle/Middleware/wlserver_10.3/common/derby/lib/derbyclient.jar:/home/weblogic/Oracle/Middleware/wlserver_10.3/server/lib/xqrl.jar
.
PATH=/home/weblogic/Oracle/Middleware/wlserver_10.3/server/bin:/home/weblogic/Oracle/Middleware/modules/org.apache.ant_1.7.1/bin:/usr/java/jdk1.7.0_79/jre/bin:/usr/java/jdk1.7.0_79/bin:/usr/lib64/qt-3.3/bin:/usr/local/bin:/bin:/usr/bin:/usr/local/sbin:/usr/sbin:/sbin:/home/weblogic/bin
.
***************************************************
* To start WebLogic Server, use a username and *
* password assigned to an admin-level user. For *
* server administration, use the WebLogic Server *
* console at http://hostname:port/console *
***************************************************
starting weblogic with Java version:
Unrecognized option: -jrockit
Error: Could not create the Java Virtual Machine.
Error: A fatal exception has occurred. Program will exit.
Starting WLS with line:
/usr/java/jdk1.7.0_79/bin/java -jrockit -Xms512m -Xmx512m -Dweblogic.Name=AdminServer -Djava.security.policy=/home/weblogic/Oracle/Middleware/wlserver_10.3/server/lib/weblogic.policy -Xverify:none -da -Dplatform.home=/home/weblogic/Oracle/Middleware/wlserver_10.3 -Dwls.home=/home/weblogic/Oracle/Middleware/wlserver_10.3/server -Dweblogic.home=/home/weblogic/Oracle/Middleware/wlserver_10.3/server -Dweblogic.management.discover=true -Dwlw.iterativeDev= -Dwlw.testConsole= -Dwlw.logErrorsToConsole= -Dweblogic.ext.dirs=/home/weblogic/Oracle/Middleware/patch_wls1035/profiles/default/sysext_manifest_classpath:/home/weblogic/Oracle/Middleware/patch_ocp360/profiles/default/sysext_manifest_classpath weblogic.Server
Unrecognized option: -jrockit
Error: Could not create the Java Virtual Machine.
Error: A fatal exception has occurred. Program will exit.

centos 解压安装nginx,并配置多个tomcat
环境说明:
VMware虚拟机,部署免安装版的Nginx-1.18.0.tar.gz
|
项目
|
版本
|
说明
|
|
操作系统
|
CentOS Linux release 7.5.1804 (Core)
|
最小化安装
|
|
Nginx
|
Nginx-1.18.0.tar.gz
|
压缩包
|
一、安装依赖
首先要安装几个依赖环境
1.gcc
Nginx是C语言开发,建议在linux上运行。
安装Nginx需要先将官网下载的源码进行编译,编译依赖gcc环境,如果没有gcc环境,需要安装gcc
[root@localhost ~]# yum install gcc-c++
2.PCRE
PCRE(Perl Compatible Regular Expressions)是一个Perl库,包括 perl 兼容的正则表达式库。Nginx的http模块使用pcre来解析正则表达式,所以需要在linux上安装pcre库。
#注:pcre-devel是使用pcre开发的一个二次开发库。Nginx也需要此库。
[root@localhost ~]# yum install -y pcre pcre-devel
3.zlib
zlib库提供了很多种压缩和解压缩的方式,Nginx使用zlib对Http包的内容进行gzip,所以需要在linux上安装zlib库。
[root@localhost ~]# yum install -y zlib zlib-devel
4.openssl
OpenSSL 是一个强大的安全套接字层密码库,囊括主要的密码算法、常用的密钥和证书封装管理功能及SSL协议,并提供丰富的应用程序供测试或其它目的使用。
Nginx不仅支持http协议,还支持https(即在ssl协议上传输http),所以需要在linux安装openssl库。
[root@localhost ~]# yum install -y openssl openssl-devel
二、下载解压
1、官网地址:http://nginx.org/en/download.html

2、上传解压
下载之后,用ssh工具上传到centos目录
#进入到当前文件夹解压
[root@localhost Nginx]# tar -zxvf Nginx-1.18.0.tar.gz
这是我这里的目录,我这里已经解压完毕了

三、安装
cd进入解压Nginx之后目录,也就是Nginx-1.18.0
1、configure
###复制下面的./configure一直到最后,所有的,包括 \,执行即可
#--prefix 指定安装路径,【注意修改】,这是要安装在哪个文件夹下
#--with-http_stub_status_module 允许查看Nginx状态的模块
# --with-http_ssl_module 支持https的模块
我这里的安装目录
/root/Nginx
[root@localhost Nginx-1.18.0]#
./configure \
--prefix=/root/Nginx \
--pid-path=/var/run/Nginx/Nginx.pid \
--lock-path=/var/lock/Nginx.lock \
--error-log-path=/var/log/Nginx/error.log \
--http-log-path=/var/log/Nginx/access.log \
--with-http_gzip_static_module \
--http-client-body-temp-path=/var/temp/Nginx/client \
--http-proxy-temp-path=/var/temp/Nginx/proxy \
--http-fastcgi-temp-path=/var/temp/Nginx/fastcgi \
--http-uwsgi-temp-path=/var/temp/Nginx/uwsgi \
--http-scgi-temp-path=/var/temp/Nginx/scgi \
--with-http_stub_status_module \
--with-http_ssl_module
2、编译并安装
(都是在解压之后的目录执行)
[root@centos8 Nginx-1.18.0]# make && make install
3、启动
#第三行启动不起来,是因为少了文件夹,第四行命令创建就可以了
[root@localhost Nginx-1.18.0]# cd /root/Nginx/sbin
[root@localhost sbin]# ./Nginx
Nginx: [emerg] mkdir() "/var/temp/Nginx/client" Failed (2: No such file or directory)
[root@localhost sbin]# sudo mkdir -p /var/temp/Nginx
[root@localhost sbin]# ./Nginx
4、访问
http://ip:80/

4、Nginx命令
#查询Nginx主进程号
ps -ef | grep Nginx
#停止进程
kill -QUIT 主进程号
#快速停止
kill -TERM 主进程号
#强制停止
pkill -9 Nginx

#修改配置文件后重新加载Nginx,免重启
./Nginx -s reload
四、配置多个tomcat
1、启动tomcat
首先分别启动两个或者多个tomcat,我这里的端口号为8081和8082,这里不讲解,自行百度
2、修改Nginx配置文件
路径为 /root/Nginx/conf/Nginx.conf
添加1:
在http里面添加
	upstream ng {
        ip_hash;
        #配置多个tomcat地址和端口
        server 127.0.0.1:8081;#服务器地址1
        server 127.0.0.1:8082;#服务器地址2
	}
添加二:
location / {
            root   html;
            index  index.html index.htm;

	  proxy_pass http://ng; #配置方向代理地址,对应upstream后面的名称
        }
如图:

3、访问
http://192.168.12.72:8080/street/
后面这个street是项目名还是spstream我也不太清楚,我用的是tomcat项目名是street,可以访问,按道理来说应该是,spstream的。待测试...
到现在的话,就可以根据不同的客户端,根据ip_hash访问到不同的tomcat了
我们今天的关于Centos7 - 安装 Weblogic 并配置 domain和centos7安装weblogic12c的分享已经告一段落,感谢您的关注,如果您想了解更多关于CentOS 6.3安装配置Weblogic-10方法、CentOS 6通过bin安装包安装Weblogic、centos 安装 weblogic,启动报错、centos 解压安装nginx,并配置多个tomcat的相关信息,请在本站查询。
")