对于想了解CentOS5.6下配置rsync内网同步数据到外网的读者,本文将提供新的信息,我们将详细介绍centosrsync,并且为您提供关于centos5.4使用rsync怎么同步文件?、Cent
对于想了解CentOS5.6下配置rsync内网同步数据到外网的读者,本文将提供新的信息,我们将详细介绍centos rsync,并且为您提供关于centos 5.4 使用 rsync 怎么同步文件?、CentOS 6 rsync 文件同步、CentOS 6.3 Rsync客户端与Win2003 cwRsyncServer服务端实现数据同步、CentOS 6.3 Rsync服务端与Debian 6.0.5 Rsync客户端实现数据同步的有价值信息。
本文目录一览:- CentOS5.6下配置rsync内网同步数据到外网(centos rsync)
- centos 5.4 使用 rsync 怎么同步文件?
- CentOS 6 rsync 文件同步
- CentOS 6.3 Rsync客户端与Win2003 cwRsyncServer服务端实现数据同步
- CentOS 6.3 Rsync服务端与Debian 6.0.5 Rsync客户端实现数据同步
")
CentOS5.6下配置rsync内网同步数据到外网(centos rsync)
一、需求
卫士那边有一个需求,就是要把一台内网服务器的数据同步到外网的一台服务器上,之前我用的是rsync+intify-tool+ssh实现的实时同步更新,前几天我还在东莞出差,开发的人给我打电话说这两台服务器的数据不同步了,我上去检查一遍,原来是用来同步数据的这个系统账号被北京的同事修改,ssh免密码登陆失败了,所以数据同步不了,后来想想这样在系统开着个单用户用来同步数据确实是存在安全风险,我有具体和开发的沟通了一下,这个项目的数据同步也不是那么的需要实时同步,所以现在我要改成单用rsync同步,具体步骤如下:
二、环境
内网:10.20.220.247
同步目录1:/data/appsdata/softmgr-v3/static-file/update
同步目录2:/data/appsdata/softmgr-v3/static-file/v1_0
外网:114.112.36.X
同步目录1:/data/apps/ksoftmgr/ksafe/client/update
同步目录2:/data/apps/ksoftmgr/ksafe/client/v1_0
三、安装配置
1.服务器端(114.112.36.69)
A、[root@localhost ~]# yum -y install rsync xinetd
B、[root@localhost ~]# vi /etc/xinetd.d/rsync
将disable = no 改成yes
[root@localhost ~]# /etc/init.d/xinetd start
C、撰写rsync的配置文件
[root@localhost ~]# vi /etc/rsyncd.conf
uid = root
gid = root
use chroot = no
max connections = 10
strict modes = yes
pid file = /var/run/rsyncd.pid
lock file = /var/run/rsync.lock
log file = /var/log/rsyncd.log
[update]
path = /data/apps/ksoftmgr/ksafe/client/update
comment = update file
ignore errors
read only = no
write only = no
hosts allow = 125.89.65.194
hosts deny = *
uid = root
auth users = wcm
secrets file = /etc/web.pass
[v1_0]
path = /data/apps/ksoftmgr/ksafe/client/v1_0
comment = v1_0 file
ignore errors
read only = no
write only = no
hosts allow = 125.89.65.194
hosts deny = *
uid = root
auth users = wcm
secrets file = /etc/web.pass
D、撰写密码文件
[root@localhost ~]# vi /etc/web.pass (格式 账号:密码)
wcm:8888888
[root@localhost ~]# chown root:root /etc/web.pass
[root@localhost ~]# chmod 600 /etc/web.pass
E、启动rsync
[root@localhost ~]# rsync --daemon
[root@localhost ~]# echo "rsync --daemon" >> /etc/rc.local
2、客户端(10.20.220.247)
A、[root@localhost ~]# yum -y install rsync
B、撰写密码文件
[root@localhost ~]# vi /etc/web.pass (主要:只写用来同步的账号的密码)
8888888
[root@localhost ~]# chown root:root /etc/web.pass
[root@localhost ~]# chmod 600 /etc/web.pass
C、撰写crontab,没一分钟同步一次
[root@localhost v1_0]# crontab -e
*/1 * * * * /usr/bin/rsync -avz --progress --delete /data/appsdata/softmgr-v3/static-file/update/ wcm@114.112.36.x::update --password-file=/etc/web.pass
*/1 * * * * /usr/bin/rsync -avz --progress --delete /data/appsdata/softmgr-v3/static-file/v1_0/ wcm@114.112.36.X::v1_0 --password-file=/etc/web.pass
四、测试
在内网的update和v1_0下面删除或者新建文件,看对应外网的机器上是否也是做了相应的操作,如果是,说明OK,我的肯定是撒,线上的不同步就悲剧了。

centos 5.4 使用 rsync 怎么同步文件?
我没有使用过 rsync
谁有具体的配置步骤文档啊?

CentOS 6 rsync 文件同步
生产机(192.168.1.101)rsync 安装
检查系统是否已经安装了rsync
rpm -qa|grep rsync
如果有并且版本比较老,把老的卸载掉
rpm -e rsync
下载新的rsync的rpm源(我的系统是32位)
wget http://pkgs.repoforge.org/rsync/rsync-3.1.1-1.el6.rfx.i686.rpm
cd到相应的目录安装rsync
rpm -ivh rsync-3.1.1-1.el6.rfx.i686.rpm
安装完成后设置rsync开机启动
chkconfig rsync on
在CentOS里面,rsync使用xinetd运行方式,重启xinetd
service xinetd restart
发现 xinetd: unrecognized service 则说明未安装xinetd服务,安装xinetd
yum install xinetd
安装之后启动 xinetd服务
service xinetd start
创建rsync服务配置文件目录
mkdir /etc/rsyncd
创建配置文件
touch /etc/rsyncd/rsyncd.conf
配置文件配置详情
uid = root
gid = root
use chroot = no
read only = yeshosts allow=172.16.0.0/255.255.0.0 192.168.1.0/255.255.255.0
10.0.1.0/255.255.255.0
hosts deny=*
max connections = 5pid file = /var/run/rsyncd.pid
secrets file =/etc/rsyncd/rsyncd.secrets
log file = /etc/rsyncd/rsyncd.log
transfer logging = yes
syslog facility = local3
timeout = 300[host1]
path = /home/host1/
list=yes
ignore errors
auth users = test
comment = host1’s file
exclude = important/[host2]
path = /home/host2/
list=no
ignore errors
auth users = test
comment = host2’s file
创建密码文件
touch /etc/rsyncd/rsyncd.secrets
在密码文件里写入账户密码
vi /etc/rsyncd/rsyncd.secrets
test:test
改变密码文件的权限为600
chmod 600 /etc/rsyncd/rsyncd.secrets
配置完成了,启动生产机的rsync
/usr/bin/rsync –daemon –config=/etc/rsyncd/rsyncd.conf
查看生产机873端口,若有,则启动成功
netstat -tunl
同步机(192.168.1.102)安装rsync
安装rsync
yum -y install rsync
使用命令同步生产机的文件
rsync -avzP test@192.168.1.101::host1 /host1temp
输入密码即可开始同步

CentOS 6.3 Rsync客户端与Win2003 cwRsyncServer服务端实现数据同步
说明:
1、cwRsyncServer服务端
系统:Windows Server 2003
IP地址:192.168.21.134
数据存放目录:D:\osyunwei
2、Rsync客户端
系统:CentOS 6.3
IP地址:192.168.21.132
同步的目录:/osyunwei
实现目的:
Rsync客户端每天凌晨3:00自动同步cwRsyncServer服务端D:\osyunwei目录中的数到/osyunwei目录
一、cwRsyncServer服务端配置
附件:
cwRsyncServer下载地址:
https://www.jb51.net/softs/55933.html
解压cwRsyncServer_4.0.3_Installer.zip,双击cwRsyncServer_4.0.3_Installer.exe

Next
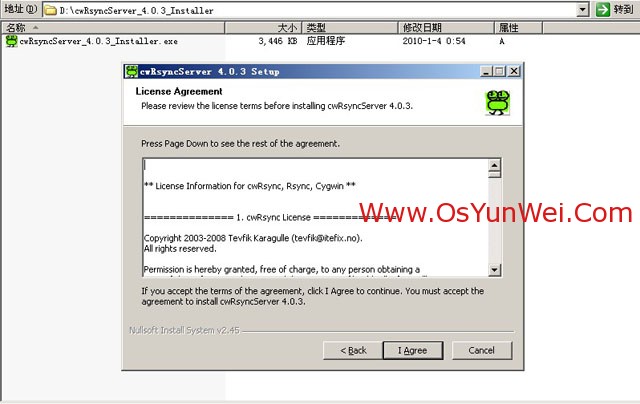
I Agre(同意)

安装路径,默认即可
Next

Service account:SvcCWRSYNC (新建的一个系统账户)
Type password:密码
Confirm password:密码
备注:系统会自动创建一个账户:SvcCWRSYNC来运行cwRsyncServer服务端程序
以上信息默认即可
Install (安装)

Close(关闭),安装完成
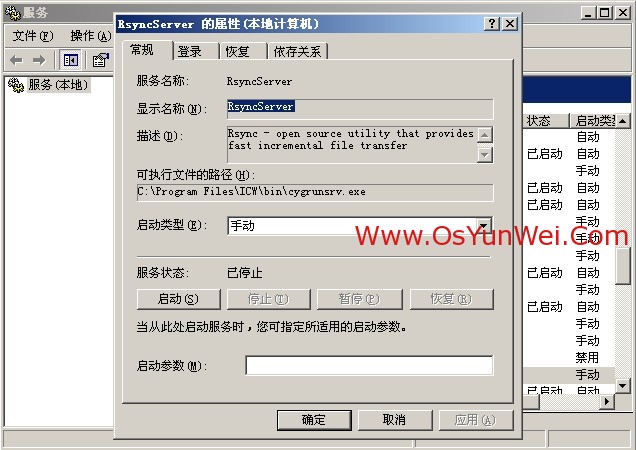
开始-设置-控制面板-管理工具-服务
找到RsyncSever选项,双击打开
启动类型:自动
点“启动”

应用-确定

打开D盘,右键单击osyunwei文件夹,选择属性,切换到安全选项,点添加
输入:SvcCWRSYNC
确定

允许所有权限
应用,确定
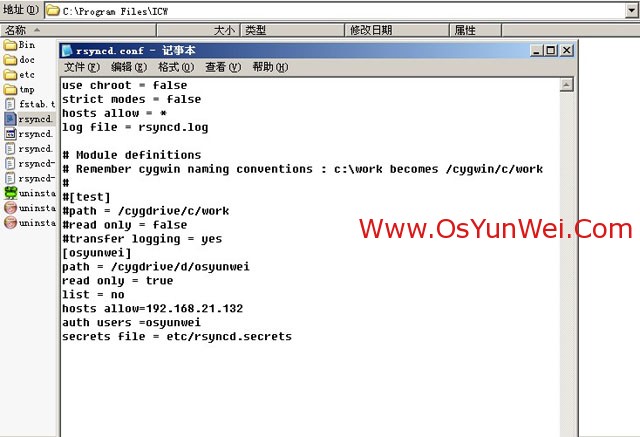
打开C:\Program Files\ICW目录
用记事本打开rsyncd.conf,修改添加以下内容(修改之前先备份文件为rsyncd.confbak)
use chroot = false
strict modes = false
hosts allow = *
log file = rsyncd.log
# Module definitions
# Remember cygwin naming conventions : c:\work becomes /cygwin/c/work
#
#[test]
#path = /cygdrive/c/work
#read only = false
#transfer logging = yes
[osyunwei]
path = /cygdrive/d/osyunwei
read only = true #客户端只读
list = no #不允许列出文件
hosts allow=192.168.21.132 #允许连接IP,多个IP中间用英文状态下逗号隔,不限制IP填写 *即可
auth users =osyunwei #允许连接的用户名
secrets file = etc/rsyncd.secrets #存放用户名密码的认证文件路径
修好完成之后,保存退出
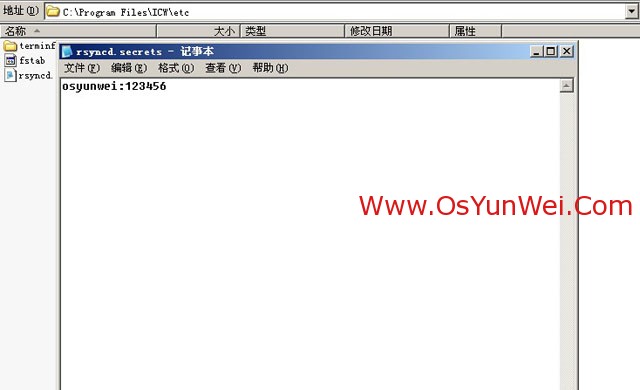
在C:\Program Files\ICW\etc目录下面新建rsyncd.secrets文件
用记事本打开,输入以下内容
osyunwei:123456 #用户名:密码
最后保存退出
cwRsyncServer服务端安装设置完成
二、Rsync客户端配置
1、关闭SELINUX
vi /etc/selinux/config
#SELINUX=enforcing #注释掉
#SELINUXTYPE=targeted #注释掉
SELINUX=disabled #增加
:wq #保存,退出
shutdown -r now #重启系统
2、开启防火墙tcp 873端口(Rsync默认端口,Rsync作为客户端是不需要开启防火墙端口的,这里开启,方便以后扩展作为服务端)
vi /etc/sysconfig/iptables #编辑防火墙配置文件
-A INPUT -m state --state NEW -m tcp -p tcp --dport 873 -j ACCEPT
:wq! #保存,退出
/etc/init.d/iptables restart #最后重启防火墙使配置生效
3、安装Rsync客户端软件
yum install rsync xinetd #安装,如下图所示,输入y安装

vi /etc/xinetd.d/rsync #编辑配置文件,设置开机启动rsync
把disable = yes 修改为
disable = no
:wq! #保存,退出
/etc/init.d/xinetd start #启动(CentOS中,Rsync是以xinetd来管理的)
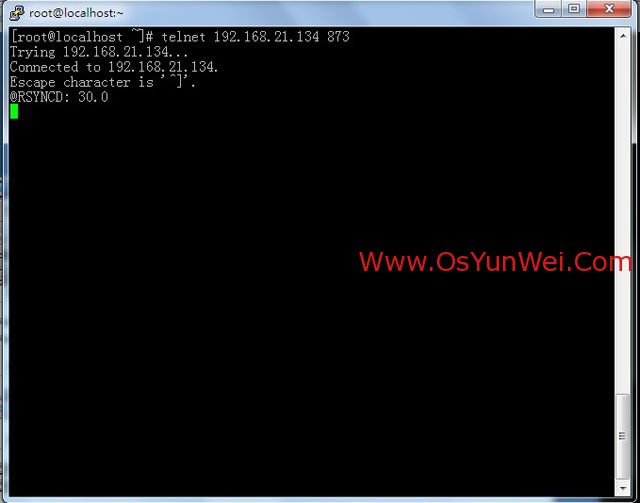
4、测试Rsync客户端是否与cwRsyncServer服务端通信成功(cwRsyncServer服务端防火墙需要开启tcp 873端口)
yum install telnet #安装telnet测试工具
telnet 192.168.21.134 873 #输入命令后回车,如下图所示,表示通信成功
Rsync客户端安装设置完成
三、设置Rsync客户端与cwRsyncServer服务端同步数据(以下操作在Rsync客户端进行)
1、测试数据同步
在终端命令行输入
rsync -vzrtopg --port=873 --progress --delete

提示输入密码:123456
注意:此处的密码为cwRsyncServer服务端C:\Program Files\ICW\etc\rsyncd.secrets文件配置的密码
回车之后,图下图所示,表示数据同步成功


cd /osyunwei #进入数据同步目录
ls #显示文件信息
可以看到数据已经存在了
2、添加计划任务,每天自动执行数据同步脚本
vi /etc/passwd.txt #配置文件,添加以下内容
123456 #密码
:wq! #保存退出
chmod 600 /etc/passwd.txt #设置文件权限,只设置文件所有者具有读取、写入权限即可
cd /home
vi osyunweibak.sh #编辑,添加以下内容
#!/bin/sh
rsync -vzrtopg --port=873 --progress --delete
:wq! #保存,退出
chmod +x /home/osyunweibak.sh #添加脚本直接权限
yum install vixie-cron #安装计划任务,某些系统上可能没有预装
vi /etc/crontab #编辑,在最后添加以下内容
0 3 * * * root /home/osyunweibak.sh 表示每天凌晨3点执行备份
:wq! #保存,退出
chkconfig crond on #设为开机启动
service crond start #启动
/etc/rc.d/init.d/crond restart #重启
设置完成之后,
每天凌晨3点,Rsync客户端会自动同步cwRsyncServer服务端D:\osyunwei目录数据到自己的/osyunwei目录中
至此,CentOS 6.3 Rsync客户端与Windows Server 2003 cwRsyncServer服务端实现数据同步设设置完成
- CentOS6.5平台上rsync服务器安装配置方法简述
- CentOS6.5环境下使用rsync增量同步备份文件的方法
- CentOS Rsync服务端与Windows cwRsync客户端实现数据同步配置方法
- Centos rsync文件同步配置步骤分享
- CentOS5 + rsync 同步2台服务器的文件
- centos下mysql主从同步快速设置步骤分享
- Mysql 主从数据库同步(centos篇)
- CentOS服务器平台搭建mysql主从复制与读写分离的方法
- CentOS6.5系统简单安装与配置Nginx服务器的方法
- CentOS平台实现搭建rsync远程同步服务器的方法

CentOS 6.3 Rsync服务端与Debian 6.0.5 Rsync客户端实现数据同步
说明:
1、Rsync服务端
系统:CentOS 6.3
IP地址:192.168.21.132
数据存放目录:/data/osyunwei
2、Rsync客户端
系统:Debian 6.0.5
IP地址:192.168.21.144
同步的目录:/data/osyunwei
实现目的:
Rsync客户端每天凌晨3:00自动同步Rsync服务端/data/osyunwei目录中的数据到自己的/data/osyunwei目录
一、Rsync服务端配置
1、关闭SELINUX
vi /etc/selinux/config #编辑防火墙配置文件
#SELINUX=enforcing #注释掉
#SELINUXTYPE=targeted #注释掉
SELINUX=disabled #增加
:wq! #保存,关闭
shutdown -r Now #重启系统
2、开启防火墙tcp 873端口(Rsync默认端口)
vi /etc/sysconfig/iptables #编辑防火墙配置文件
-A RH-Firewall-1-INPUT -m state --state NEW -m tcp -p tcp --dport 873 -j ACCEPT
:wq! #保存
/etc/init.d/iptables restart #最后重启防火墙使配置生效
3、安装Rsync服务端软件
yum install rsync xinetd #安装
vi /etc/xinetd.d/rsync #编辑配置文件,设置开机启动rsync
disable = no #修改为
/etc/init.d/xinetd start #启动(CentOS中是以xinetd来管理Rsync服务的)
系统运维 www.osyunwei.com 温馨提醒:qihang01原创内容©版权所有,转载请注明出处及原文链接
4、创建rsyncd.conf配置文件
vi /etc/rsyncd.conf #创建配置文件,添加以下代码
log file = /var/log/rsyncd.log #日志文件位置,启动rsync后自动产生这个文件,无需提前创建
[osyunwei] #自定义名称
path = /data/osyunwei #Rsync服务端数据目录路径
comment = osyunwei #模块名称与[osyunwei]自定义名称相同
uid = root #设置rsync运行权限为root
gid = root #设置rsync运行权限为root
port=873 #默认端口
read only =yes #设置Rsync服务端文件为只读
auth users = osyunweibakuser #执行数据同步的用户名,可以设置多个,用英文状态下逗号隔开
secrets file = /etc/rsync.pass #用户认证配置文件,里面保存用户名称和密码,后面会创建这个文件
hosts allow = 192.168.21.144 #允许进行数据同步的客户端IP地址,可以设置多个,用英文状态下逗号隔开
hosts deny = 192.168.21.254 #禁止数据同步的客户端IP地址,可以设置多个,用英文状态下逗号隔开
list = yes #显示Rsync服务端资源列表
:wq! #保存,退出
5、创建用户认证文件
vi /etc/rsync.pass #配置文件,添加以下内容
osyunweibakuser:123456 #格式,用户名:密码,可以设置多个,每行一个用户名:密码
:wq! #保存,退出
6、设置文件权限
chmod 600 /etc/rsyncd.conf #设置文件所有者读取、写入权限
chmod 600 /etc/rsync.pass #设置文件所有者读取、写入权限
7、启动rsync
/etc/init.d/xinetd start #启动
service xinetd stop #停止
service xinetd restart #重新启动
二、Rsync客户端安装
1、开启防火墙tcp 873端口(Rsync客户端不需要开启873端口,这里开启是为了方便以后作为Rsync服务端)
说明:Debian默认安装是没有开启任何防火墙的
为了服务器的安全,建议大家安装启用防火墙设置,这里推荐使用iptables防火墙
whereis iptables #查看系统是否安装防火墙
iptables: /sbin/iptables /usr/share/iptables /usr/share/man/man8/iptables.8.gz #表示已经安装iptables防火墙
apt-get install iptables #如果默认没有安装,请运行此命令安装防火墙
iptables -L #查看防火墙配置信息,显示如下:
#####################################################
Chain INPUT (policy ACCEPT)
target prot opt source destination
Chain FORWARD (policy ACCEPT)
target prot opt source destination
Chain OUTPUT (policy ACCEPT)
target prot opt source destination
#####################################################
nano /etc/iptables.default.rules #设置防火墙规则,添加以下内容
###############################################################################
*filter
# Allows all loopback (lo0) traffic and drop all traffic to 127/8 that doesn't use lo0
-A INPUT -i lo -j ACCEPT
# Accepts all established inbound connections
-A INPUT -m state --state ESTABLISHED,RELATED -j ACCEPT
# Allows all outbound traffic
# You Could modify this to only allow certain traffic
-A OUTPUT -j ACCEPT
# Allows HTTP and MysqLconnections from anywhere (the normal ports for websites)
-A INPUT -p tcp --dport 80 -j ACCEPT
-A INPUT -p tcp --dport 3306 -j ACCEPT
-A INPUT -p tcp --dport 873 -j ACCEPT
# Allows SSH connections for script kiddies
# THE -dport NUMBER IS THE SAME ONE YOU SET UP IN THE SSHD_CONfig FILE
-A INPUT -p tcp -m state --state NEW --dport 22 -j ACCEPT
# Now you should read up on iptables rules and consider whether ssh access
# for everyone is really desired. Most likely you will only allow access from certain IPs.
# Allow ping
-A INPUT -p icmp -m icmp --icmp-type 8 -j ACCEPT
# log iptables denied calls (access via 'dmesg' command)
-A INPUT -m limit --limit 5/min -j LOG --log-prefix "iptables denied: " --log-level 7
# Reject all other inbound - default deny unless explicitly allowed policy:
-A INPUT -j REJECT
-A FORWARD -j REJECT
COMMIT
###############################################################################
ctrl+o #保存
ctrl+x #退出
备注:873是Rsync端口
iptables-restore < /etc/iptables.default.rules #使防火墙规则生效
nano /etc/network/if-pre-up.d/iptables #创建文件,添加以下内容,使防火墙开机启动
#!/bin/bash
/sbin/iptables-restore </etc/iptables.default.rules
ctrl+o #保存
ctrl+x #退出
chmod +x /etc/network/if-pre-up.d/iptables #添加执行权限
2、安装Rsync客户端软件
whereis rsync #查看系统是否已安装rsync,出现下面的提示,说明已经安装
rsync: /usr/bin/rsync /usr/share/man/man1/rsync.1.gz
apt-get install rsync #如果没有安装,请执行这行命令来安装rsync
nano /etc/default/rsync #编辑配置文件
RSYNC_ENABLE=true #把false改为true,设置开机启动rsync
ctrl+o #保存
ctrl+x #退出
/etc/init.d/rsync start #启动
service rsync stop #停止
service rsync restart #重新启动
3、测试Rsync客户端是否与Rsync服务端通信成功
apt-get install telnet #安装telnet工具
telnet 192.168.21.132 873 #输入命令后回车,如下图所示,表示通信成功
三、设置Rsync客户端与Rsync服务端同步数据(以下操作在Rsync客户端进行)
1、测试数据同步,在终端命令行输入
rsync -vzrtopg --port=873 --progress --delete osyunweibakuser@192.168.21.132::osyunwei /data/osyunwei
提示输入密码:123456
注意:此处的密码为Rsync服务端/etc/rsync.pass文件配置的密码
回车之后,图下图所示,表示数据同步成功
系统运维 www.osyunwei.com 温馨提醒:qihang01原创内容©版权所有,转载请注明出处及原文链接
cd /data/osyunwei #进入数据同步目录
ls #显示文件信息
可以看到数据已经存在了
2、添加计划任务,每天自动执行数据同步脚本
nano /etc/passwd.txt #配置文件,添加以下内容
123456 #密码
ctrl+o #保存
ctrl+x #退出
chmod 600 /etc/passwd.txt #设置文件权限,只设置文件所有者具有读取、写入权限即可
cd /home
nano osyunweibak.sh #编辑,添加以下内容
#!/bin/sh
rsync -vzrtopg --port=873 --progress --delete osyunweibakuser@192.168.21.132::osyunwei /data/osyunwei --password-file=/etc/passwd.txt
ctrl+o #保存
ctrl+x #退出
chmod +x /home/osyunweibak.sh #添加脚本直接权限
3、添加计划任务
系统运维 www.osyunwei.com 温馨提醒:qihang01原创内容©版权所有,转载请注明出处及原文链接
修改/etc/crontab
nano /etc/crontab #在下面添加
0 3 * * * root /home/osyunweibak.sh #表示每天凌晨3点执行备份
ctrl+o #保存
ctrl+x #退出
6、重新启动crond使设置生效
service cron stop #停止
service cron start #启动
/etc/init.d/cron restart #重启
chkconfig cron on #设为开机启动,先要安装chkconfig(apt-get install chkconfig)
至此,CentOS 6.3 Rsync服务端与Debian 6.0.5 Rsync客户端实现数据同步完成
今天的关于CentOS5.6下配置rsync内网同步数据到外网和centos rsync的分享已经结束,谢谢您的关注,如果想了解更多关于centos 5.4 使用 rsync 怎么同步文件?、CentOS 6 rsync 文件同步、CentOS 6.3 Rsync客户端与Win2003 cwRsyncServer服务端实现数据同步、CentOS 6.3 Rsync服务端与Debian 6.0.5 Rsync客户端实现数据同步的相关知识,请在本站进行查询。
本文标签:


![[转帖]Ubuntu 安装 Wine方法(ubuntu如何安装wine)](https://www.gvkun.com/zb_users/cache/thumbs/4c83df0e2303284d68480d1b1378581d-180-120-1.jpg)

