在本文中,您将会了解到关于asp.net-core–Microsoft.AspNet.Identityvnext中的UserValidator的新资讯,同时我们还将为您解释netusersmile/a
在本文中,您将会了解到关于asp.net-core – Microsoft.AspNet.Identity vnext中的UserValidator的新资讯,同时我们还将为您解释net user smile / add的相关在本文中,我们将带你探索asp.net-core – Microsoft.AspNet.Identity vnext中的UserValidator的奥秘,分析net user smile / add的特点,并给出一些关于.NET Core 3.0或3.1 类库项目中引用 Microsoft.AspNetCore.App、.net core 修改 Identity/AspNetUsers 数据库、asp.net core IdentityServer4 实现 resource owner password credentials(密码凭证)、ASP.NET Core 中 HttpContext 详解与使用 | Microsoft.AspNetCore.Http 详解的实用技巧。
本文目录一览:- asp.net-core – Microsoft.AspNet.Identity vnext中的UserValidator(net user smile / add)
- .NET Core 3.0或3.1 类库项目中引用 Microsoft.AspNetCore.App
- .net core 修改 Identity/AspNetUsers 数据库
- asp.net core IdentityServer4 实现 resource owner password credentials(密码凭证)
- ASP.NET Core 中 HttpContext 详解与使用 | Microsoft.AspNetCore.Http 详解
")
asp.net-core – Microsoft.AspNet.Identity vnext中的UserValidator(net user smile / add)
UserManager.UserValidator = new UserValidator<ApplicationUser>(UserManager) { AllowOnlyAlphanumericUserNames = false };
但是在新版本的asp.net身份中,UserManager似乎没有一个名为UserValidator的属性. “UserValidator”已被识别,但我想它现在以不同的方式添加到UserManager中.我无法在UserManager上看到任何相关属性.
编辑:
github repo中的单元测试“Identity”对此案例进行了测试.它目前是此文件中的最后一个:
https://github.com/aspnet/Identity/blob/dev/test/Microsoft.AspNet.Identity.Test/UserValidatorTest.cs
我想这应该给出答案的线索,但我不知道我的代码会在哪里.
[Theory]
    [InlineData("test_email@foo.com",true)]
    [InlineData("hao",true)]
    [InlineData("test123",true)]
    [InlineData("!Noway",true)]
    [InlineData("foo@boz#.com",true)]
    public async Task CanAllowNonAlphaNumericUserName(string userName,bool expectSuccess)
    {
        // Setup
        var manager = MockHelpers.TestUserManager(new NoopUserStore());
        manager.Options.User.UserNameValidationRegex = null;
        var validator = new UserValidator<TestUser>();
        var user = new TestUser {UserName = userName};

        // Act
        var result = await validator.ValidateAsync(manager,user);

        // Assert
        if (expectSuccess)
        {
            IdentityResultAssert.IsSuccess(result);
        }
        else
        {
            IdentityResultAssert.IsFailure(result);
        }
    }
解决方法
// Add Identity services to the services container.
services.AddIdentity<ApplicationUser,IdentityRole>()
    .AddEntityFrameworkStores<ApplicationDbContext>()
    .AddDefaultTokenProviders();
将其更改为以下允许将电子邮件地址用于用户名.
// Add Identity services to the services container.
services.AddIdentity<ApplicationUser,IdentityRole>(options => { options.User.UserNameValidationRegex = null; })
    .AddEntityFrameworkStores<ApplicationDbContext>()
    .AddDefaultTokenProviders();

.NET Core 3.0或3.1 类库项目中引用 Microsoft.AspNetCore.App
本文为原创文章.首发:http://www.zyiz.net/
在 ASP.NET Core 3.0+ web 项目中已经不需要在 .csproj 中添加对 Microsoft.AspNetCore.App 的引用
<PackageReference Include="Microsoft.AspNetCore.App" />
但是在 .NET Core 3.0+ 类库项目中如果不引用 Microsoft.AspNetCore.App ,就无法使用 ASP.NET Core 3.0 的程序集。在类库项目的 .csproj 中将 <Project Sdk="Microsoft.NET.Sdk"> 改为 <Project Sdk="Microsoft.NET.Sdk.Web"> 可以解决这个问题,但是会出现新的问题,build 时会出现下面的错误提示:
Program does not contain a static ''Main'' method suitable for an entry point
请问如何解决?
在 github 上找到了答案 Using Microsoft.NET.Sdk.Web on a class library prevents the app to start
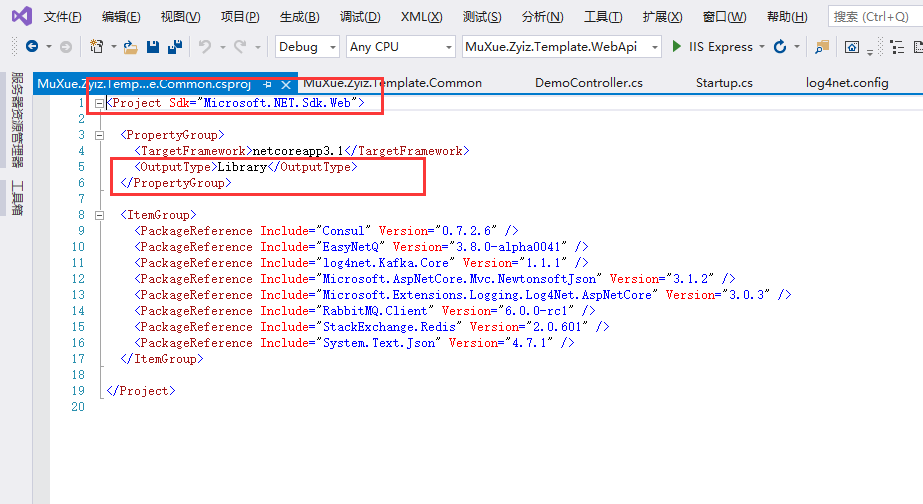
原来使用 Microsoft.NET.Sdk.Web 时 OutputType 默认会被设置为 Exe ,改为 Library 就能解决
<Project Sdk="Microsoft.NET.Sdk.Web">
<PropertyGroup>
<TargetFramework>netcoreapp3.0</TargetFramework>
<OutputType>Library</OutputType>
</PropertyGroup>
</Project>
双击 类库的项目名称:修改如下:

.net core 修改 Identity/AspNetUsers 数据库
众所周知,.net core有一套完整的用户管理功能。使用它就能实现用户的管理及登录登出功能。现在问题来了,我们有时候需要添加一些字段,该怎么办呢?当然是修改他呀。修改方法参考链接:https://medium.com/@nativoplus/asp-net-core-identity-3-0-6018fc151b4
总结来说,第一步是创建Entity,并继承 IdentityUser 。
第二步,修改Startup,在ConfigureServices中修改Identity使用到的用户对象 (ApplicationUser),角色我没有改,就不修改了:
services.AddIdentity<ApplicationUser, IdentityRole>()
                .AddEntityFrameworkStores<ApplicationDbContext>()
                .AddDefaultTokenProviders();
第三步,修改 数据库上下文对象,在OnModelCreating方法中指定 ApplicationUser 对应的用户表
//上下文继承自 IdentityDbContext
public class ApplicationDbContext : IdentityDbContext<ApplicationUser>
//修改OnModelCreating 方法
modelBuilder.Entity<ApplicationUser>(entity =>
            {
                entity.ToTable("AspNetUsers", "dbo");
            }
到这一步就可以了。以后修改字段就可以使用 EF 的迁移命令来更新数据库了,也可以手动修改数据库后再修改ApplicationUser对象,这适用于db first的项目结构
")
asp.net core IdentityServer4 实现 resource owner password credentials(密码凭证)
前言
OAuth 2.0默认四种授权模式(GrantType)
- 授权码模式(authorization_code)
- 简化模式(implicit)
- 密码模式(resource owner password credentials)
- 客户端模式(client_credentials)
本章主要介绍密码模式(resource owner password credentials),OAuth2.0资源所有者密码授权功能允许客户端将用户名和密码发送到令牌服务,并获得该用户的访问令牌.
认证步骤:
- 用户将用户名密码提供给客户端
- 客户端再将用户名密码发送给授权服务器,请求令牌
- 授权服务器确定判断信息是否有误,返回给客户端令牌
创建授权服务器
创建一个API项目工程,我这边以端口5000的形式进行后面的讲解.
Package
PM> Install-package IdentityServer4 -version 2.5.3
创建一个类Config(配置要保护的资源,和可以访问的API的客户端服务器)
   public class Config
    {
        /// <summary>
        ///     定义要保护的资源
        /// </summary>
        /// <returns></returns>
        public static IEnumerable<ApiResource> GetApiResources() {
            return new List<ApiResource>
            {
               new ApiResource("api1","MyApi")
            };
        }
        /// <summary>
        ///     定义授权客户端
        /// </summary>
        /// <returns></returns>
        public static IEnumerable<Client> GetClients() {
            return new List<Client>
            {
                new Client(){
                    ClientId="client",
                    AllowedGrantTypes=GrantTypes.ResourceOwnerPassword,
                    ClientSecrets=
                    {
                      new Secret("secret".Sha256())
                    },
                    AllowedScopes={ "api1",IdentityServerConstants.StandardScopes.OfflineAccess //如果要获取refresh_tokens ,必须在scopes中加上OfflineAccess
                    },
                    AllowOfflineAccess=true// 主要刷新refresh_token,

                }
            };
        }
    }
此处AllowedGrantTypes需要设置为ResourceOwnerPassword(密码凭证).
配置Startup
再走到ConfigureServices方法注入IdentityServer4服务
   public void ConfigureServices(IServiceCollection services)
        {
            services.AddMvc().SetCompatibilityVersion(CompatibilityVersion.Version_2_2);
            services.AddIdentityServer()
                .AddDeveloperSigningCredential()
                .AddInMemoryApiResources(Config.GetApiResources())
                .AddInMemoryClients(Config.GetClients())
                .AddResourceOwnerValidator<ResourceOwnerPasswordValidator>();//注入自定义登录验证

        }
IdentityServer4默认提供了两种证书加密配置 AddDeveloperSigningCredential AddTemporarySigningCredential 添加内存ApiResourceAddInMemoryApiResources 添加内存Client AddInMemoryClients 添加自定义登录验证AddResourceOwnerValidator
自定义用户验证
    public class ResourceOwnerPasswordValidator : IResourceOwnerPasswordValidator
    {
        public Task ValidateAsync(ResourceOwnerPasswordValidationContext context)
        {
            if (context.UserName == "test" && context.Password == "test")
            {
                context.Result = new GrantValidationResult(
                 subject: context.UserName,
                 authenticationMethod: OidcConstants.AuthenticationMethods.Password);
            }
            else
            {
                //验证失败
                context.Result = new GrantValidationResult(
                    TokenRequestErrors.InvalidGrant,
                    "invalid custom credential"
                    );
            }
            return Task.FromResult(0);
        }
    }
在Configure方法中添加IdentityServer4服务中间件
app.UseIdentityServer();
创建ApiResource
创建一个客户端项目,这边我将端口设置为5001
Package
PM> Install-package IdentityServer4 -version 2.5.3
配置Startup
在ConfigureServices添加认证服务器地址
      public void ConfigureServices(IServiceCollection services)
        {
            services.AddMvc().SetCompatibilityVersion(CompatibilityVersion.Version_2_2);
            services.AddAuthentication("Bearer")
              .AddIdentityServerAuthentication(options =>
              {
                  options.Authority = "http://localhost:5000";//授权服务器地址
                   options.RequireHttpsMetadata = false;//不需要https
                   options.ApiName = "api1";
              });
        }
在Configure方法中添加认证服务中间件
app.UseAuthentication();
Run
在客户端程序values控制器上面增加[Authorize]
直接访问资源服务器http://localhost:5001/api/values
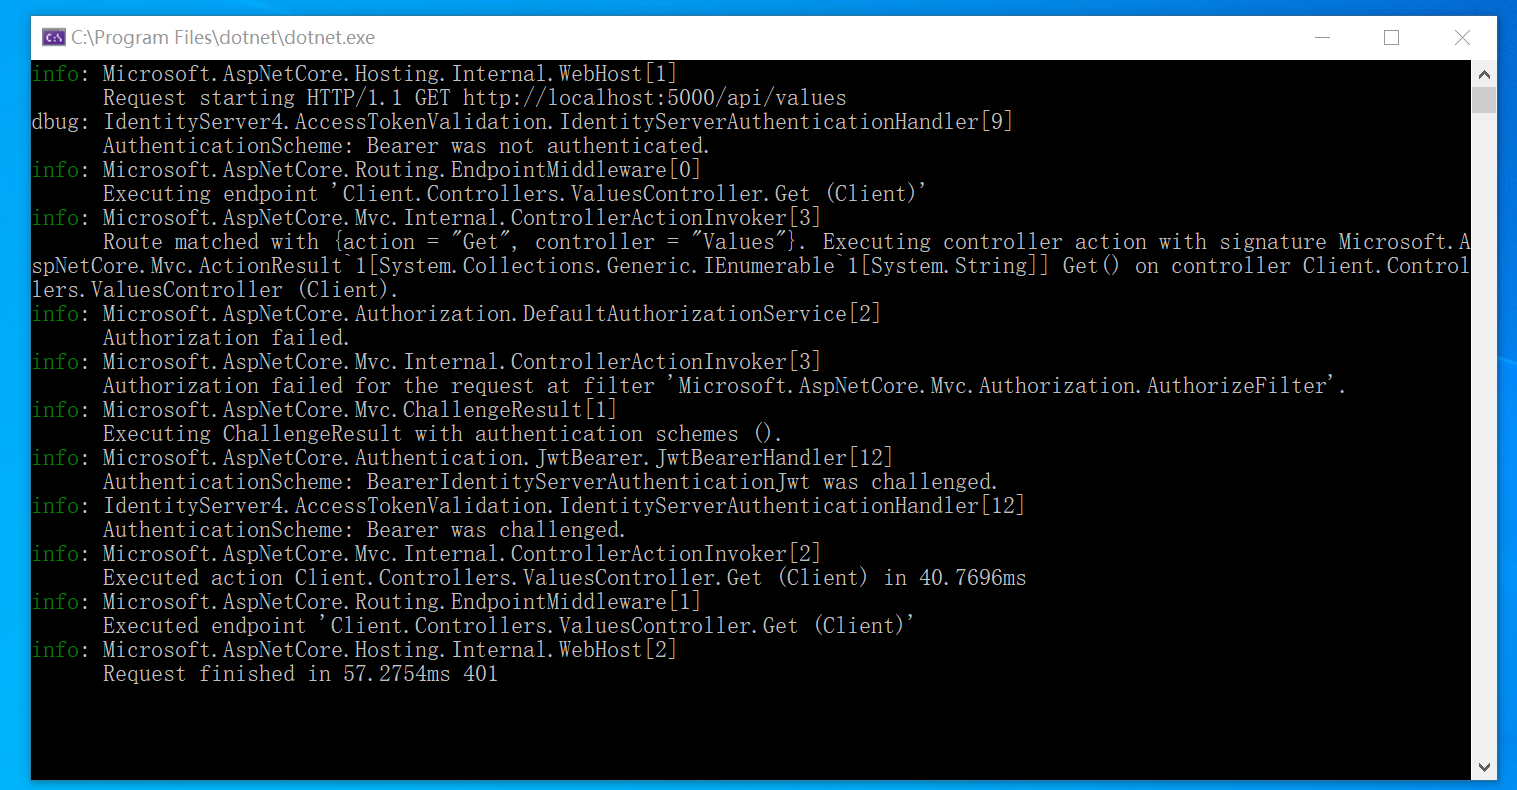
code 401
启动授权服务器
http://localhost:5000/.well-known/openid-configuration
发现端点可通过/.well-known/openid-configuration

获取token
这边我用postman进行测试
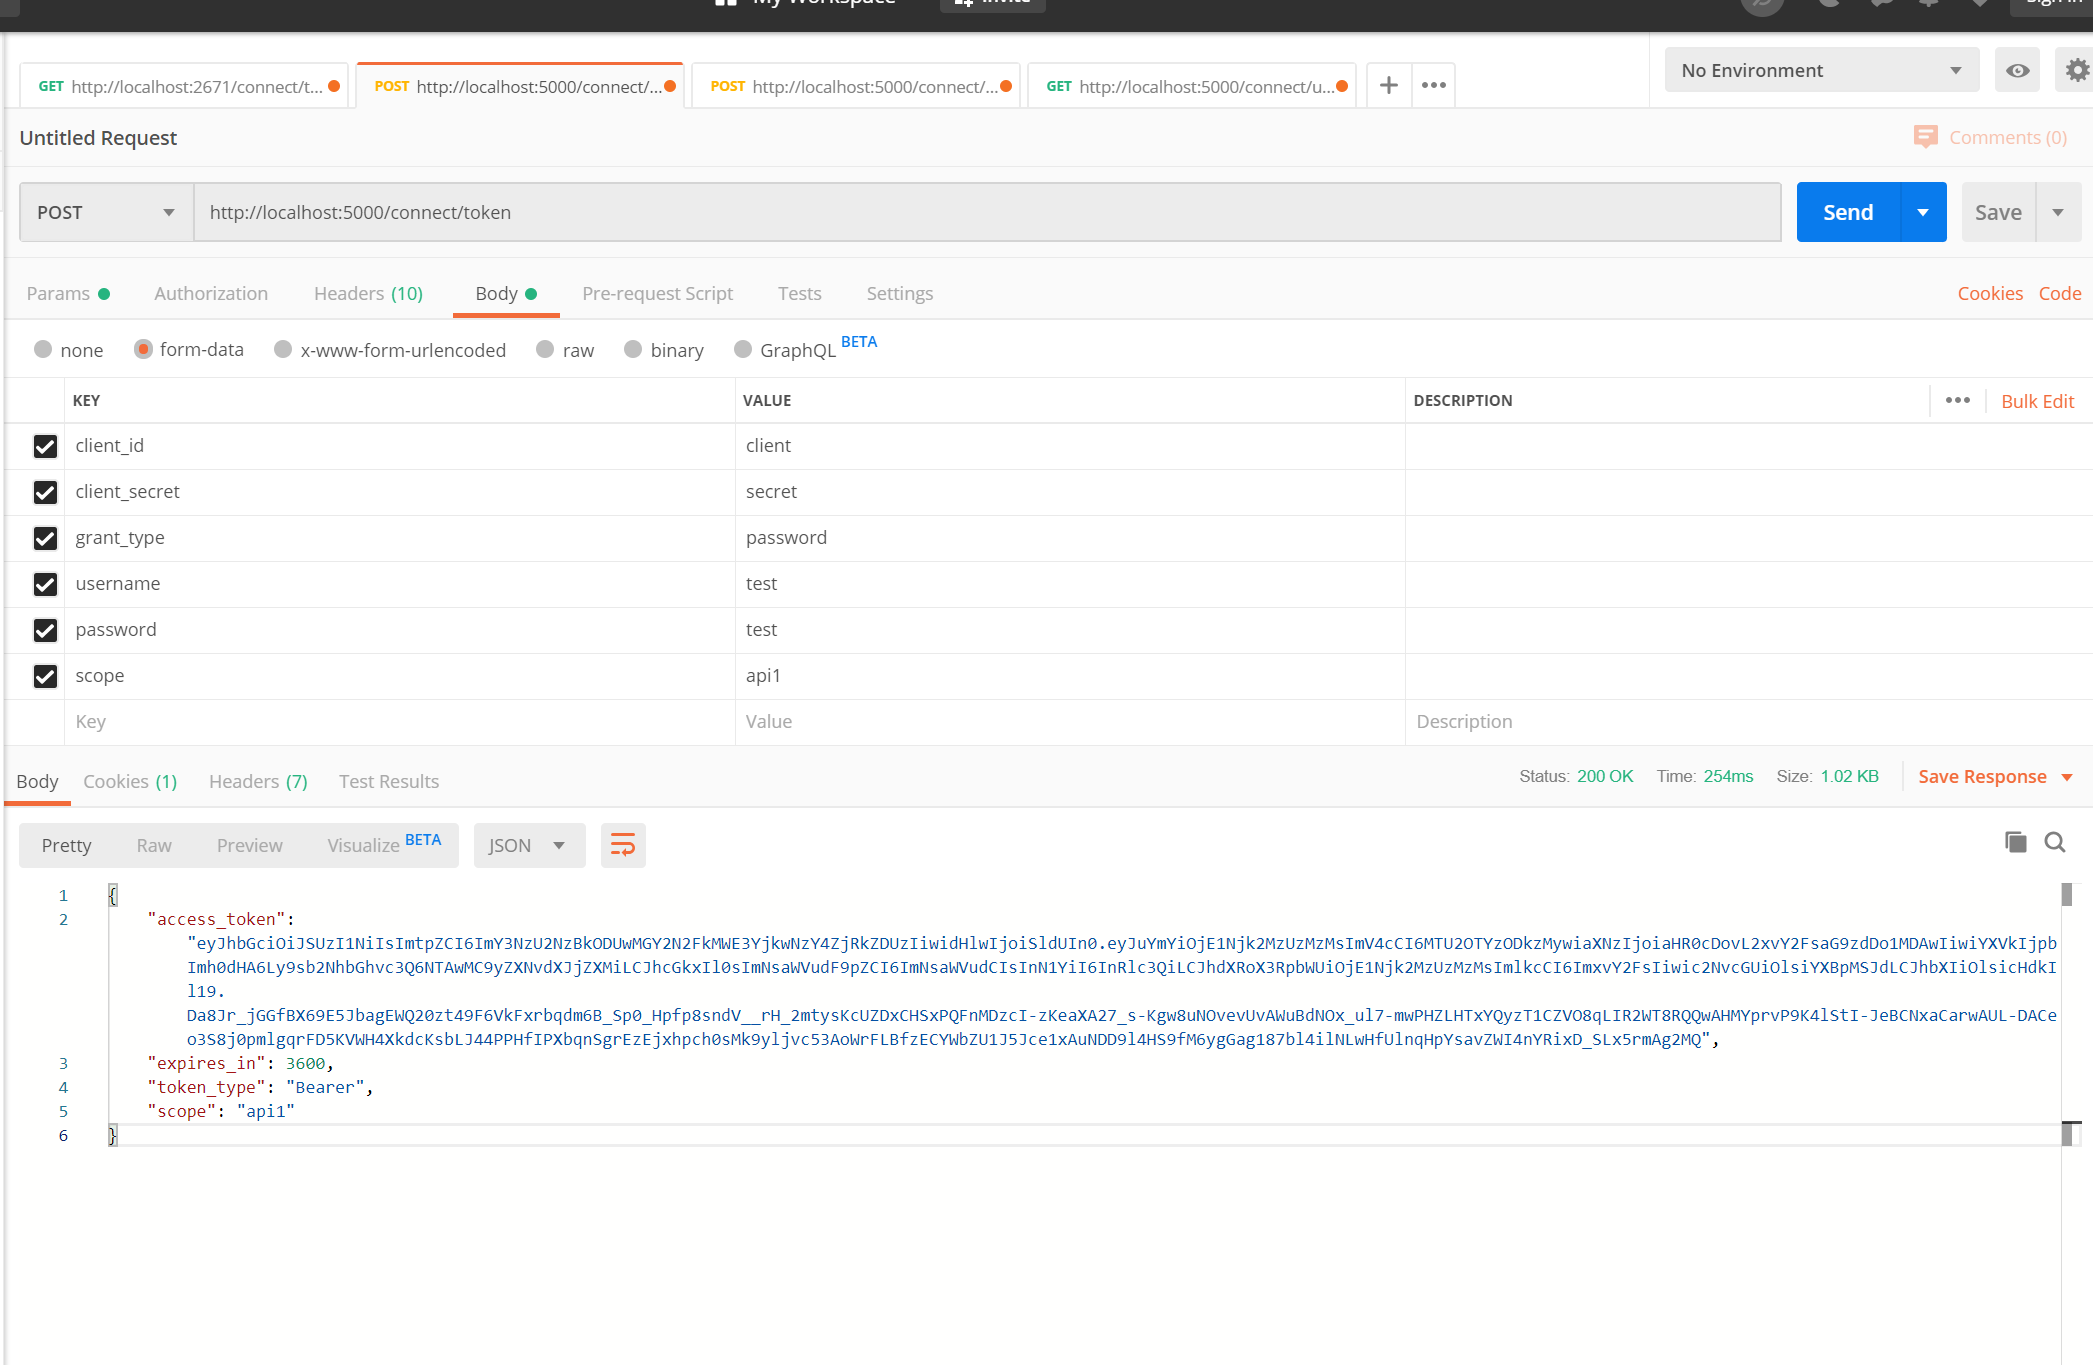
code 200
access_token我们获取到了,再拿着token通过postman请求资源程序,

code 200 成功了
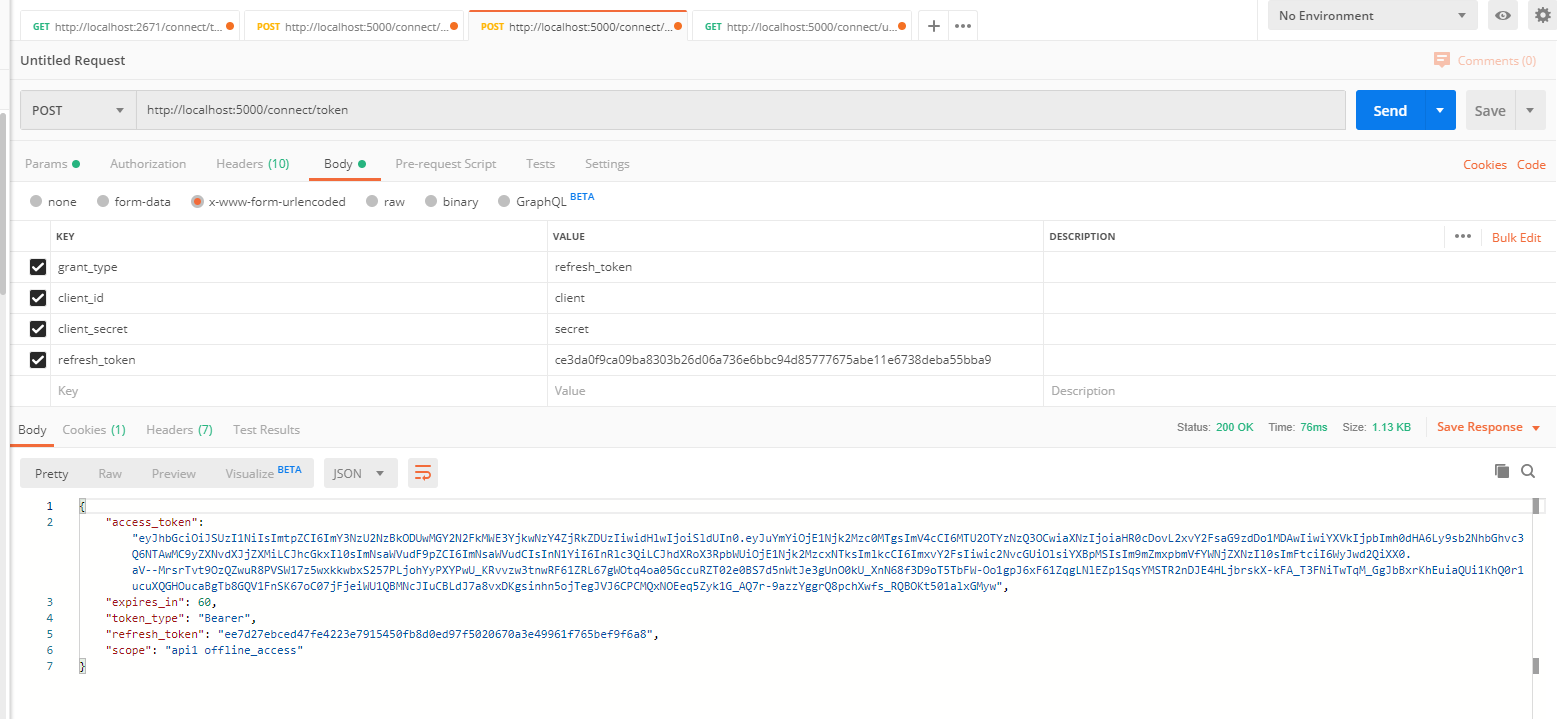
refresh_token
获取请求授权接口后会返回access_token expires _in 等内容,expires_in是有效期(s),当然我们可以自定义有效期,access_token失效后用户需要重新授权,client才能拿到新的access_token.但是有了refresh_token后,client检测到token失效后可以直接通过refresh_token向授权服务器申请新的token,当然refresh_token也是有有效期的。 AbsoluteRefreshTokenLifetime的默认有效期为2592000秒/30天。SlidingRefreshTokenLifetime的默认有效期为1296000秒/15天。
在认证服务器中我再scopes加上了OfflineAccess IdentityServerConstants.StandardScopes.OfflineAccess //如果要获取refresh_tokens ,必须在scopes中加上OfflineAccess
获取refresh_token

通过refresh_token再去获取access_token
通过postman请求获取资源

概要
示例地址https://github.com/fhcodegit/IdentityServer4.Samples
原文出处:https://www.cnblogs.com/yyfh/p/11601903.html

ASP.NET Core 中 HttpContext 详解与使用 | Microsoft.AspNetCore.Http 详解
笔者没有学 ASP.NET,直接学 ASP.NET Core ,学完 ASP.NET Core MVC 基础后,开始学习 ASP.NET Core 的运行原理。发现应用程序有一个非常主要的 “传导体” HttpContext 。
赶忙写一下笔记先。
目录
“传导体” HttpContext
操作 HttpContext 前期准备
HttpContext 类型的属性和方法
HttpContext 对象实践与测试
- Request
- Response
- Item
“传导体” HttpContext
要理解 HttpContext 是干嘛的,首先,看图
图一 内网访问程序

图二 反向代理访问程序

ASP.NET Core 程序中,Kestrel 是一个基于 libuv 的跨平台 ASP.NET Core web 服务器。不清楚 Kerstrel 没关系,以后慢慢了解。
我们可以理解成,外部访问我们的程序,通过 Http 或者 Https 访问,例如 https://localhost:44337/Home/Index,需要通过一个网址,来寻向访问特定的页面。
访问页面时,会产生 Cookie、Seesion、提交表单、上传数据、身份认证等,外部与应用程序之间传导的导体就是 HttpContext。
总之,客户端跟 Web应用程序交互 是通过 HttpContext 传导的。
原理
ASP.NET Core 本质是一个控制台程序!ASP.NET Core 程序并不直接监听请求,而是通过依赖 HTTP Server ,来实现把各自请求转发到应用程序中。这个被转发的请求相当于我们日常浏览网页、上传文件、提交表单等的网络请求,这些请求会被包装,然后组合到 HttpContext 中。
就好像顾客到餐厅吃饭
- 需要先点菜、提出服务要求
- 服务员把你的菜单、需求送到厨房
- 厨师在加工好食品
- 服务员再把食品递给你
HttpContext 相当于这个服务员,她在前、后传递信息。
操作 HttpContext 前期准备
一般来说,我们主要写好Web程序,而无需理会 数据是怎么传导的。就好像两台电脑能够发送资料,我们用不着知道他们是通过无线Wifi、光纤还是铜线电缆传输的。
当有需要时,自然需要用~ 废话少说,先简单操作 HttpContext 了解下。后面接着解析这个对象。
如果你不需要练习,请直接跳过这一节内容。
- 打开 VS(2017)
- 新建项目
- ASP.NET Core Web 应用程序
- Web应用程序(模型视图控制器)
- 打开 Startup.cs ,在 ConfigureServices 中,加上
services.AddSingleton<IHttpContextAccessor, HttpContextAccessor>(); //先不用管这个是干嘛的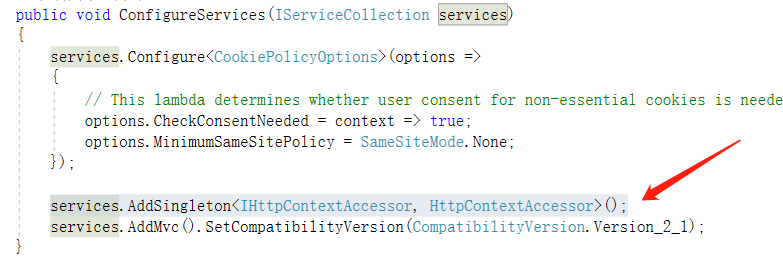
- 打开 HomeController.cs ,在顶部 using Microsoft.AspNetCore.Http; 把 HomeController 类替换成以下代码
public class HomeController : Controller { private IHttpContextAccessor _accessor; public HomeController(IHttpContextAccessor accessor) { _accessor = accessor; } [HttpGet] public IActionResult Index(int? id) { var httpcontext = _accessor.HttpContext; return View(httpcontext); } } -
打开 Views/Home 目录,删除除 Index.cshtml 外的其它视图
- 把 Index.cshtml 的代码改成
@model Microsoft.AspNetCore.Http.HttpContext
@{
    Layout = null;
}
到这里,准备已经完成。
以上代码的作用是把 HttpContext 对象 传递到 视图 中,直接在视图中使用。这样我们在理解时,只需在视图测试即可。
HttpContext 类型的属性和方法
在 ASP.NET Core 中,系统为每一个请求分配一个线程,HttpContext 针对的,就是一个线程。所以它的类、方法、属性等,都是针对当前请求起作用。
Properties(特性)
| Authentication | 这个已经用不到了,这里只是列一下表。 用于身份认证(ASP.NET中用到),官方不建议在ASP.NT Core中使用。替代方案 Microsoft.AspNetCore.Authentication.AuthenticationHttpContextExtensions |
| Connection | 获取有关此请求的基础连接的信息 |
| Features | 获取此请求上可用的服务器和中间件提供的HTTP特性的集合 |
| Items | 获取或设置可用于在该请求范围内共享数据的键/值集合 |
| Request | 请求 |
| RequestAborted | 通知此请求基础的连接何时中止,因此请求操作应取消 |
| RequestServices | 获取或设置 IServiceProvider 集合,提供访问的请求的服务容器 |
| Response | 响应 |
| Session | 获取或设置用于管理此请求的用户会话数据的对象 |
| TraceIdentifier | 获取或设置用于在跟踪日志中表示此请求的唯一标识符 |
| User | 获取或设置此请求的用户 |
| WebSockets | 获取一个对象,该对象管理此请求的WebSu套连接的建立 |
Item、Session、Response 等对象都是需要经常使用到的,下面笔者会详细实践。
HttpContext 对象实践与测试
Request
用于获取用户请求的对象,浏览器向Web程序提交表单、访问的URL、URL中包含的查询字符串、报文请求头等等。
| Body | 获取或设置 RequestBody 流 |
| ContentLength | 获取或设置 Content-Length 头 |
| ContentType | 获取或设置Content-Type 头 |
| Cookies | 获取或设置 Cookies |
| Form | 获取或设置 表单内容 |
| HasFormContentType | Checks the Content-Type header for form types. |
| Headers | Gets the request headers. |
| Host | 获取或设置主机头。可以包括端口 |
| HttpContext | 获取或设置请求上下文 |
| IsHttps | 检测当前是否HTTPS连接 |
| Method | 获取或设置HTTP方法 |
| Path | 获取或设置当前请求的路径,即URL |
| PathBase | 获取或设置 RequestPathBase,就是URL前面那一段,如https://docs.microsoft.com |
| Protocol | Gets or sets the RequestProtocol. |
| Query | 查询字符串的集合 |
| QueryString | 获取或设置用于在Request.Query中创建查询集合的原始查询字符串 |
| Scheme | 获取或设置HTTP请求方案 |
试一试
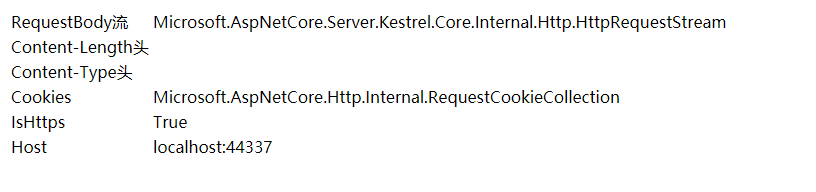
打开 Index.Cshtml ,把以下代码加上去
(为了看得清楚一点,我加了表格)
<table>
    <tr>
        <td>RequestBody流</td>
        <td> @Model.Request.Body</td>
    </tr>
    <tr>
        <td>Content-Length头</td>
        <td>@Model.Request.ContentLength</td>
    </tr>
    <tr>
        <td>Content-Type头</td>
        <td> @Model.Request.ContentType</td>
    <tr>
        <td>Cookies </td>
        <td>@Model.Request.Cookies</td>
        </tr>
    <tr>
        <td>IsHttps</td>
        <td>@Model.Request.IsHttps</td>
        </tr>
    <tr>
        <td>Host </td>
        <td>@Model.Request.Host</td>
    </tr>

</table>
运行Web程序,结果如下
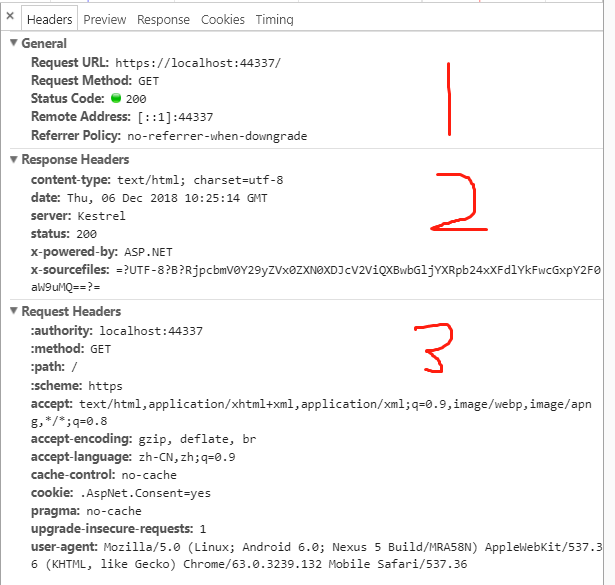
在浏览器 F12 后,可以看到控制台的内容。请查看 下图的 1、3部分

Request 的其它使用方法,就不再赘述,你可以在视图中 @Model.Request. 加上需要测试的属性即可。
推荐别人关于 Request 的文章 https://www.cnblogs.com/Sea1ee/p/7240943.html
Response
Request 是 客户端向 Web 发送请求,而 Response 则是 Web 响应 客户端 的请求。这里笔者就不全部翻译了
使用Response可以直接影响服务器响应,设置响应内容、响应类型(发送网页、文件、图片等)、视图响应前重定向。
Response 应该在控制器中使用。具体使用方法笔者这里就不赘述。
| Body | 获取或设置响应体流 |
| ContentLength | Gets or sets the value for the |
| ContentType | 获取或设置内容类型响应标头的值 |
| Cookies | 获取一个对象,该对象可用于管理此响应的Cookie |
| HasStarted | Gets a value indicating whether response headers have been sent to the client. |
| Headers | Gets the response headers. |
| HttpContext | Gets the HttpContext for this response. |
| StatusCode | Gets or sets the HTTP response code. |
Response 的方法
| OnCompleted(Func<Task>) |
在响应已发送到客户端之后添加要调用的委托 |
| OnCompleted(Func<Object,Task>, Object) | 响应已发送到客户端之后添加要调用的委托 |
| OnStarting(Func<Task>) | 在响应头将被发送到客户端之前添加要调用的委托 |
| OnStarting(Func<Object,Task>, Object) | 在响应头将被发送到客户端之前添加要调用的委托 |
| Redirect(String) | 向客户端返回一个临时重定向响应(HTTP 302) |
| Redirect(String, Boolean) | 向客户端返回重定向响应(HTTP 301或HTTP 302) |
| RegisterForDispose(IDisposable) | 处置(不可分)在请求完成处理后,注册主机处理的对象 |
Response 拓展方法
| GetTypedHeaders(HttpResponse) | |
| WriteAsync(HttpResponse, String, Encoding, CancellationToken) | 取消令牌使用给定的编码将给定文本写入响应体 |
| WriteAsync(HttpResponse, String, CancellationToken) | 将给定文本写入响应体。UTF-8编码将被使用 |
| Clear(HttpResponse) | |
| SendFileAsync(HttpResponse, IFileInfo, Int64, Nullable<Int64>, CancellationToken) | 使用Sendfile 扩展发送给定的文件 |
| SendFileAsync(HttpResponse, IFileInfo, CancellationToken) | Sends the given file using the SendFile extension. |
| SendFileAsync(HttpResponse, String, Int64, Nullable<Int64>, CancellationToken) | Sends the given file using the SendFile extension. |
| SendFileAsync(HttpResponse, String, CancellationToken) | Sends the given file using the SendFile extension. |
Item
如果你使用过 ViewData,就不难理解 HttpContext.Item
HttpContext.Item 是一个字典集合类型,具体类型为 IDictionary<TModel,TModel>。它的使用方法像 ViewData。(不要跟我说说你不知道 ViewBag、ViewData 是什么~)
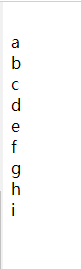
打开 Index.Cshtml ,用下面代码复制替换
@model Microsoft.AspNetCore.Http.HttpContext
@{
    Layout = null;
}
@{
    List<string> i = new List<string>();
    i.Add("a");
    i.Add("b");
    i.Add("c");
    i.Add("d");
    i.Add("e");
    i.Add("f");
    i.Add("g");
    i.Add("h");
    i.Add("i");

    Model.Items["Test"] = i;
    /*
        Model.Items 是字典类型
        这里设置 键 Test
                 值 i ,它的值是 List<string> 类型
    */

foreach(var item in Model.Items["Test"] as List<string>) //字典类型,必须先用 as 转为对应类型
{
    <br> @item

}
}
结果
可以用 HttpContext.Item 来存储当前请求的意向有用的数据。
HttpContext 的其它方法使用这里不再赘述,需要注意的是,HttpContext 是针对一个请求的而产生的。
关于asp.net-core – Microsoft.AspNet.Identity vnext中的UserValidator和net user smile / add的问题我们已经讲解完毕,感谢您的阅读,如果还想了解更多关于.NET Core 3.0或3.1 类库项目中引用 Microsoft.AspNetCore.App、.net core 修改 Identity/AspNetUsers 数据库、asp.net core IdentityServer4 实现 resource owner password credentials(密码凭证)、ASP.NET Core 中 HttpContext 详解与使用 | Microsoft.AspNetCore.Http 详解等相关内容,可以在本站寻找。
本文标签:


![[转帖]Ubuntu 安装 Wine方法(ubuntu如何安装wine)](https://www.gvkun.com/zb_users/cache/thumbs/4c83df0e2303284d68480d1b1378581d-180-120-1.jpg)

