在本文中,我们将详细介绍jinja2模板,用于根据条件更新值的各个方面,同时,我们也将为您带来关于05-jinja2模板、2.Flaskjinjia2模板、ansible-jinja2模板、Ansib
在本文中,我们将详细介绍jinja2 模板,用于根据条件更新值的各个方面,同时,我们也将为您带来关于05-jinja2模板、2.Flask jinjia2模板、ansible - jinja2模板、Ansible Jinja2 模板的有用知识。
本文目录一览:
jinja2 模板,用于根据条件更新值
如何解决jinja2 模板,用于根据条件更新值?
我有一个 test.j2 模板文件,其中包含这一行:
listener={{ protocol }}://localhost:9094
和 vars.yml 文件来处理变量
---
sasl:
  enabled: true
  realm:
    admin_server: test.dev.com
ssl:
  enabled: true
  pwd: PASS
protocol: >
  {% if sasl.enabled or ssl.enabled %}
  SASL_SSL
  {% else %}
  PLAIN_TEXT
  {% endif %}
现在我想像这样更新j2文件:
如果 sasl.anabled 和 ssl.enabled 是 true
listener=sasl_ssl://localhost:9094,ssl://loclhost:9093
或者如果只有 ssl.enabled 是 true
listener=ssl://localhost:9093
否则
listener=PLAIN_TEXT://localhost:9094
注意:我只能更改 vars.yml 文件中的条件。
如何满足条件并更新test.j2?
解决方法
因此,如果我理解正确,则不允许您更改 test.j2,这是一种耻辱,因为实际上是这样做的地方。只是为了记录,这就是你应该在你的 test.j2 中拥有的,你应该放弃你的 protocol 变量:
{% if sasl.enabled and ssl.enabled %}
listener=sasl_ssl://localhost:9094,ssl://loclhost:9093
{% elif (not sasl.enabled) and ssl.enabled %}
listener=ssl://loclhost:9093
{% else $}
listener=PLAIN_TEXT://loclhost:9094
{% endif %}
如果您想在 vars.yaml 中执行此操作,则需要将所有内容都放在 protocol 变量中,以防同时启用 ssl 和 sasl,女巫很善良哈奇:
protocol: >
  {% if sasl.enabled and ssl.enabled %}
  sasl_ssl://localhost:9094,ssl
  {% elif (not sasl.enabled) and ssl.enabled %}
  ssl
  {% else %}
  PLAIN_TEXT
  {% endif %}

05-jinja2模板
⼀、Ansible Jinja2模板背景介绍
⽬前Nginx的配置⽂件在所有的服务器上都是相同的,但我希望能根据每⼀台服务器的性能去定制服务的启动进程。
同时定制每⼀台Nginx服务的响应头,以便于当某台服务出现问题时能快速定位到具体的服务器。
要做这样的定制势必会导致⼀个问题,Nginx 在每台物理服务器上的配置⽂件都不⼀样,
这样的配置⽂件如何管理呢? 再使⽤copy 模块去做管理显然已经不合适。
此时使⽤Ansible 提供的另⼀个模板(template) 功能,它可以帮助我们完美的解决问题。
⼆、 JinJa2 模板
要学会Ansible 中的模板(template)使⽤,前提我们必须要学会JinJa2模板。学会了它,就相当于我们学会了Ansible 模板。
JinJa2 是什么
Jinja2是基于Python书写的模板引擎。功能⽐较类似于PHP的smarty模板。
JinJa2 必知必会
1、jinja2 ⽂件以 .j2 为后缀, 也可以不写后缀。
2、jinja2 中存在 三种定界符
- 注释: {# 注释内容 #}
- 变量引⽤: {{ var }}
- 逻辑表达: {% %}
JinJa2 逻辑控制
条件表达
{% if %}
...
{% elif %}
...
{% else %}
...
{% endif %}
Example
{# 如果定义了 idc 变量, 则输出 #}
{% if idc is defined %}
{{ idc }}
{% elif %}
 没有定义
{% endif %}
循环控制
{% for %}
...
...
{% endfor %}
Example
{# 列举出 dbservers 这个 group 中的所有主机 #}
{% for host in groups[''dbservers''] %}
{{ host }}
{% endfor %}

{#与Python 语法不通,模板中的循环内不能break或continue。但你可以在迭代中过滤序列来跳过某些项#}
{#打印dbservers 组中的所有主机,但是不打印1.1.1.1 这台主机#}
{% for host in groups[''dbservers''] if host !="1.1.1.1" %}
{{host}}
{% endfor %}
三、如何使用模板
⼀个基于Facts的Jinja2 实例
# cat config.j2
{# use variable example #}
{# 都是内置变量 #}
wlecome host {{ ansible_hostname }}, os is {{ ansible_os_family }}
today is {{ ansible_date_time.date }}
cpucore numbers {{ ansible_processor_vcpus }}
{# use condition example #}
{% if ansible_processor_vcpus > 1 %}
OS cpu more than one core
{% endif %}
{% for m in ansible_mounts if m[''mount''] != "/" %}
mount {{ m[''mount''] }}, total size is
{{m[''size_total'']}}, free size is
{{m[''size_available'']}}
{% endfor %}
在Ansible 中使⽤模板
---
- name: a template example
  hosts: all
  remote_user: root
  tasks:
   - name: update jinja2 config
     template: src=config.j2 dest=/tmp/config.conf
四、 实例演示
Jinja2 模板以及如何在Ansible中使⽤模板,已经介绍完了。那么如何去实现我们的需求呢?
# cat Nginx.conf.j2
user Nginx;
{# start process equal cpu cores #}
worker_processes {{ ansible_processor_vcpus }};
error_log /var/log/Nginx/error.log;
pid /var/run/Nginx.pid;
events {
 worker_connections 1024;
}
http {
include /etc/Nginx/mime.types;
 default_type application/octet-stream;
 log_format main ''$remote_addr - $remote_user
[$time_local] "$request" ''
 ''$status $body_bytes_sent
"$http_referer" ''
 ''"$http_user_agent"
"$http_x_forwarded_for"'';
 sendfile on;
 tcp_nopush on;
 keepalive_timeout 0;
 gzip on;
 gzip_min_length 1k;
 gzip_buffers 8 64k;
 gzip_http_version 1.0;
 gzip_comp_level 5;
 gzip_types text/plain application/x-javascript
text/css application/json application/xml
application/x-shockwave-flash application/javascript
image/svg+xml image/x-icon;
 gzip_vary on;
 {# add_header {{ ansible_hostname }}; #}
 add_header x-hostname {{ ansible_hostname }};
 include /etc/Nginx/conf.d/*.conf;
}
继续优化我们的PlayBook, 让它⽀持模板
 vars:
 createuser:
 - tomcat
 - www
 - MysqL
 tasks:
 - name: create user
 user: name={{ item }} state=present
 with_items: "{{ createuser }}"
 - name: yum Nginx webserver
 yum: name=Nginx state=present
 # use ansible template
 - name: update Nginx main config
 template:
 src: Nginx.conf.j2
 dest: /etc/Nginx/Nginx.conf
 tags: updateconfig
 notify: reload Nginx server

 - name: add virtualhost config
 copy:
 src: www.qfedu.com.conf
 dest: /etc/Nginx/conf.d/
 tags: updateconfig
 notify: reload Nginx server

 - name: check Nginx Syntax
 shell: /usr/sbin/Nginx -t
 register: NginxSyntax
 tags: updateconfig

 - name: check Nginx running
 stat: path=/var/run/Nginx.pid

  register: Nginxrunning
 tags: updateconfig

 - name: print Nginx Syntax
 debug: var=NginxSyntax

 - name: start Nginx server
 service: name=Nginx state=started
 when:
 - NginxSyntax.rc == 0
 - Nginxrunning.stat.exists == false
 handlers:
 - name: reload Nginx server
 service: name=Nginx state=started
 when:
 - NginxSyntax.rc == 0
 - Nginxrunning.stat.exists == true
执⾏还是按照原来的⽅式执⾏即可
ansible-playbook -i hosts site.yml
1
总结
以上是小编为你收集整理的05-jinja2模板全部内容。
如果觉得小编网站内容还不错,欢迎将小编网站推荐给好友。
原文地址:https://www.cnblogs.com/yzgblogs/p/15201025.html

2.Flask jinjia2模板
1.1.模板传参
(1)主程序
from flask import Flask,render_template

app = Flask(__name__)

@app.route(''/'')
def hello_world():

    context = {
        ''username'':''derek'',
        ''age'':18,
        ''gf'':{
            ''name'':''xxx'',
            ''height'':160
        }
    }
    return render_template(''index.html'',**context)    #加双下划綫,就可以直接获取key和value了

if __name__ == ''__main__'':

    app.run(debug=True)
(2)index.html
<h2>模板中渲染数据</h2>
    <p>{{ username }}</p>
    <p>{{ age }}</p>
    <p>{{ gf.name }}</p>
    <p>{{ gf[''height''] }}</p>
1.2.过滤器
常用的过滤器
- abs:绝对值
- default:如果当前变量没有值,则会使用参数中的值来替代
- escape:转义字符
- first:返回一个序列的第一个元素
- format:格式化字符串
- last:返回一个序列的最后一个元素
- length:返回一个序列的长度
- join:拼接字符串
- safe:关掉转义
- int:转为int类型
- float:转为浮点类型
- lower:转换为小写
- upper:转换为答谢
- replace:替换
- truncate:截取length长度的字符串
- striptags:删除字符串中所有的html标签,如果出现多个空格,将替换成一个空格
default过滤器的使用
主程序
from flask import Flask,render_template
app = Flask(__name__)

@app.route(''/'')
def hello_world():

    context = {
       ''position'':-9,
       ''signature'':None   #个性签名
    }
    return render_template(''index.html'',**context)

if __name__ == ''__main__'':
    app.run(debug=True)
index.html
  <h2>过滤器</h2>
    <p>{{ position|abs }}</p>
    <p>个性签名:{{ signature|default(''此人很懒,没有留下任何说明'',boolean=True) }}</p>
也可以用or的方式
<h2>过滤器</h2>
    <p>{{ position|abs }}</p>
{#    <p>个性签名:{{ signature|default(''此人很懒,没有留下任何说明'',boolean=True) }}</p>#}
    <p>个性签名:{{ signature or ''此人很懒,没有留下任何说明'' }}</p>
1.3.自定义过滤器
过滤器本质上就是一个函数,如果在模板中调用这个过滤器,那么就会将这个变量的值作为第一个参数传给过滤器这个函数,
然后函数的返回值会作为这个过滤器的返回值。需要使用一个装饰器:@app.template_filter(''args'')
实例:自定义时间处理过滤器
主程序
from flask import Flask,render_template
from datetime import datetime
app = Flask(__name__)

@app.route(''/'')
def hello_world():
    context = {
        ''create_time'':datetime(2018,5,25,17,52,10)
    }
    return render_template(''index.html'',**context)

@app.template_filter(''handle_time'')  #括号里面是自己给过滤器起的名字
def handle_time(time):
    ''''''
    1.如果时间间隔小与1分钟以内,就显示“刚刚”
    2.如果是1小时以内,显示“xx分钟”
    3.如果24h以内,显示“xx小时前”
    4.如果大于24小时小与30天,显示“xx天前”
    5.大于一个月,显示具体的时间
    :param time:
    :return:
    ''''''
    if isinstance(time,datetime):
        now = datetime.now()
        timestamp = (now-time).total_seconds()  #当前时间离创建时间的秒数
        if timestamp < 60:     #60s以内
            return "刚刚"
        elif timestamp >= 60 and timestamp < 60*60:
            minutes = timestamp / 60
            return "%s分钟前"%int(minutes)
        elif timestamp >= 60*60 and timestamp < 60*60*24:
            hours = timestamp / (60*60)
            return ''%s小时前''%int(hours)
        elif timestamp >= 60*60*24 and timestamp < 60*60*24*30:
            days = timestamp / (60*60*24)
            return ''%s天前''%int(days)
        else:
            return time.strftime(''%Y/%m/%d %H:%M'')
    else:
        return time

if __name__ == ''__main__'':
    app.run(debug=True)
index.html
 <h2>自定义时间过滤器</h2>
    {{ create_time|handle_time }}
1.4.if和for的使用
for中包含以下变量,可以用来获取当前的遍历状态
- loop.index
- loop.index0
- loop.first
- loop.last
- loop.length
if和for简单用法
from flask import Flask,render_template

app = Flask(__name__)
app.config.update({
    ''DEBUG'':True,
    ''TEMPLATES_AUTO_RELOAD'':True
})

@app.route(''/'')
def hello_world():
    context = {
        ''age'':20,
        ''users'':[''tom'',''jack'',''alice''],
        ''person'':{
            ''name'':''derek'',
            ''age'':18
        }
    }
    return render_template(''index.html'',**context)

if __name__ == ''__main__'':
    app.run(debug=True)
index.html
<!DOCTYPE html>
<html lang="en">
<head>
    <meta charset="UTF-8">
    <title>Title</title>
</head>
<body>

    {% if age >= 18 %}
        欢迎
    {% else %}
        无权限
    {% endif %}

    <ul>
    {% for user in users %}
        <li>{{ user }}</li>
    {% endfor %}
    </ul>

    <table>
        <thead>
            <tr>
                <th>用户名</th>
                <th>年龄</th>
            </tr>
        </thead>
        <tbody>
            <tr>
                {% for key,value in person.items() %}
                    <td>{{ value }}</td>
                {% endfor %}
            </tr>
        </tbody>
    </table>

</body>
</html>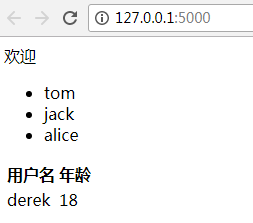
1.5.宏的使用和导入
模板的宏跟python中的函数类似,可以传递参数,但是不能有返回值,可以将一些经常用到的代码片段放到宏中,然后把一些
不固定的值抽取出来当成一个变量。
(1)简单使用实例
{#    定义一个宏,input是宏的名字,里面三个参数,可以指定默认参数值,也可以调用的传参#}
    {% macro input(name="",value="",type="text") %}
        <input name="{{ name }}" value="{{ value }}" type="{{ type }}">
    {% endmacro %}

    <form>
        <p>用户名:{{ input(''username'') }}</p>
        <p>密码:{{ input(''password'',type="password" )}}</p>
        <p> {{ input(value="提交",type="submit" )}}</p>

    </form>
(2)宏的两种导入方式
新建macros.html
 {% macro input(name="",value="",type="text") %}
        <input name="{{ name }}" value="{{ value }}" type="{{ type }}">
    {% endmacro %}
index.html中导入使用宏
{#第一种#}
{# with context可以把后端传到当前模板的变量传到定义的宏里面#}
{% import "macros.html" as macro with context %}
{#第二种#}
{% from "macros.html" import input as input_field %}


<!DOCTYPE html>
<html lang="en">
<head>
    <meta charset="UTF-8">
    <title>Title</title>
</head>
<body>
{#    第一种#}
    <form>
        <p>用户名:{{ macro.input(''username'') }}</p>
        <p>密码:{{ macro.input(''password'',type="password" )}}</p>
        <p> {{ macro.input(value="提交",type="submit" )}}</p>
    </form>

{#    第二种#}
     <form>
        <p>用户名:{{ input_field(''username'') }}</p>
        <p>密码:{{ input_field(''password'',type="password" )}}</p>
        <p> {{ input_field(value="提交",type="submit" )}}</p>
    </form>

</body>
</html>
1.6.set、with在模板中自定义变量
(1)set
在模板中可以使用set来定义变量,一旦定义了这个变量,在后面的代码中都可以使用,index.html
{% set usernmae=''derek'' %}

    <p>用户名:{{ usernmae }}</p>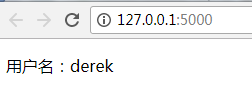
(2)with
with语句定义的变量,只能在with语句代码块(endwith)里面使用,超过代码块,就不能再使用了,set语句没有end,全局使用
{% with age=18  %}
        <p>年龄:{{ age }}</p>
    {% endwith %}
1.7.蓝图的使用
目录如下:
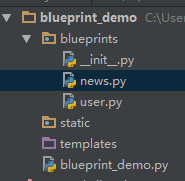
(1)news.py
from flask import Blueprint


news_bp = Blueprint(''new'',__name__,url_prefix=''/news'') @news_bp.route(''/list/'') def news_list(): return ''新闻列表''
(2)user.py
from flask import Blueprint

# 1.定义一个蓝图,''user'':蓝图的名字,url_prefix=''/user'':给url加一个前缀,注意后面不要加''/'' user_bp = Blueprint(''user'',__name__,url_prefix=''/user'') @user_bp.route(''/profile/'') def profile(): return ''个人中心''
(3)bluepoint_demo.py
from flask import Flask,url_for
# 2.导入 from blueprints.user import user_bp from blueprints.news import news_bp app = Flask(__name__) # 3.注册蓝图 app.register_blueprint(user_bp) app.register_blueprint(news_bp) @app.route(''/'') def hello_world(): return ''Hello World!'' with app.test_request_context(): print(url_for(''new.news_list'')) # /news/list/ 通过url_for反转url的时候要加蓝图的名字 print(url_for(''user.profile'')) # /user/profile/ if __name__ == ''__main__'': app.run(debug=True) 


ansible - jinja2模板
ansible - jinja2模板
什么是jinja模板
jinja2是python的全功能模板引擎
jinja2模板和ansible的关系
ansible通常会使用jinja2模板来修改被管理主机配置文件等 在sltstack中同样会使用到jinja2,模板
如果在100台主机上安装Nginx,每台Nginx的端口都不一样,怎么解决
ansible如何使用jinja2
使用ansible的jinja2模板也就是使用template模块,该模块和copy模块一样,都是将文件复制到远端主机上去,但是区别在于,template模块可以获取到文件中的变量,而copy则是将原封不动的文件内容复制过去。
之前我们在推送rsync的backup脚本是,想着吧脚本的变量名改成主机名,如果使用copy模块则推送过去就是{{ ansible_fdpn }},不变,如果使用template,则会变成对应的主机名
ansible使用jinja2注意事项
Ansible允许jinja2模板中使用条件判断和循环,但是不允许在playbook中使用

# 注意:不是每个管理员都需要这个特性,但是有些时候jinja2模块能大大提高效率
jinja2模板基础语法
# 调用变量
{{ 变量名 }}
{# 注释 #}
jinja2判断语法
# shell 判断
if [ 条件 ];then
xxx
elif [ 条件 ];then
aaa
else
bbb
fi

# python判断
if 条件:
  xxx
elif 条件:
  aaa
else:
  bbb
xxxx

# jinja2判断
{% if 提条件 %}
xxx
{% elif 条件 %}
aaa
{% else %}
bbb
{% endif %}
jinja2循环
{% for n in 条件 %}
xxx
{% endfor %}
jinja2实战部署keepalived
global_defs {
        router_id {{ ansible_hostname }}
}
{% if ansible_hostname == "lb01" %}
vrrp_script check_web_zh {
     script "/root/check_web.sh"
     interval 5
}
vrrp_instance VI_1 {
        track_script {
                check_web_zh
        }
        state MASTER
        priority 150
{% else %}
vrrp_instance VI_1 {
        state BACKUP
        priority 100
{% endif %}
        interface eth0
        virtual_router_id 50
        advert_int 1
        authentication {
                auth_type PASS
                auth_pass 1111
        }
        virtual_ipaddress {
                10.0.0.3
        }
}
jinja2实战部署负载均衡
# Nginx配置文件
upstream www.zh.com {
{% for num in range(7,9) %}
    server 172.16.1.{{ num }};
{% endfor %}

}
server{
        listen 80;
        server_name www.zh.com;

        location /{
                proxy_pass http://www.zh.com;
        }
}
作业
# 创建www用户
- hosts: all
  tasks:
    - include: /root/ansible/ansible2/usadd.yml
    # 客户端下载nfs服务端下载nfs和rsync
    - include: /root/ansible/ansible2/yum_nfs_rsync.yml
    # 配置nfs服务
    - include: /root/ansible/ansible2/nfs_conf.yml
    - include: /root/ansible/ansible2/nfs_dir.yml
    - include: /root/ansible/ansible2/start_nfs.yml
# 部署rsync配置
    - include: /root/ansible/ansible2/rsync_conf.yml
    - include: /root/ansible/ansible2/rsync_pass.yml
    - include: /root/ansible/ansible2/rsync_dir.yml
    - include: /root/ansible/ansible2/rsy_start.yml
# 部署wordpress
    - include: /root/ansible/ansible2/PHP_Nginx_zip.yml
    - include: /root/ansible/ansible2/Nginx_PHP_yes_no_install.yml
    - include: /root/ansible/ansible2/Nginx_Nginxconf_PHP_conf.yml
    - include: /root/ansible/ansible2/Nginx_dir.yml
    - include: /root/ansible/ansible2/wordpress_unzip.yml
    - include: /root/ansible/ansible2/Nginx_start.yml
# 部署数据库
    - include: /root/ansible/ansible2/MysqL_install.yml
    - include: /root/ansible/ansible2/MysqL_start.yml
    - include: /root/ansible/ansible2/MysqL_conf.yml
    - include: /root/ansible/ansible2/MysqLpython_install.yml
    - include: /root/ansible/ansible2/MysqL_useradd.yml
    - include: /root/ansible/ansible2/MysqL_wordpress_ku.yml
    - include: /root/ansible/ansible2/MysqL_cp_sql.yml
    - include: /root/ansible/ansible2/MysqL_sql_init.yml
    - include: /root/ansible/ansible2/webs_mount_nfs.yml
    - include: /root/ansible/ansible2/lb/yum_Nginx.yml
    - include: /root/ansible/sersync/yum_inot_sersync.yml
      when: ansible_hostname == "nfs"
    - include: /root/ansible/ansible2/lb/Nginx_youhua.yml
      when: ansible_hostname is match "lb*"
    - include: /root/ansible/ansible2/lb/Nginx_conf.yml
      when: ansible_hostname is match "lb*"
    - include: /root/ansible/ansible2/lb/yum_kep.yml
    - include: /root/ansible/ansible2/lb/kep_conf.yml
      when: ansible_hostname is match "lb*"
    - include: /root/ansible/ansible2/lb/keep_sh.yml
      when: ansible_hostname == "lb01"
    - include: /root/ansible/ansible2/lb/start_Nginx.yml
      when: ansible_hostname is match "lb*"
    - include: /root/ansible/sersync/sersync_dir.yml
      when: ansible_hostname == "nfs"
    - include: /root/ansible/sersync/unzip_sersync.yml
      when: ansible_hostname == "nfs"
    - include: /root/ansible/sersync/sersync_conf.yml
      when: ansible_hostname == "nfs"
    - include: /root/ansible/sersync/pass_sersync.yml
      when: ansible_hostname == "nfs"
    - include: /root/ansible/sersync/sersync_data_dir.yml
      when: ansible_hostname == "backup"
    - include: /root/ansible/sersync/start_sersync.yml
      when: ansible_hostname == "nfs"

  handlers:
    - name: Nginx_start
      service:
        name: Nginx
        state: restarted
    - name: Nginx_conf_start
      service:
        name: Nginx
        state: restarted
    - name: PHP_start
      service:
        name: PHP-fpm
        state: restarted
    - name: lb_Nginx
      service:
        name: Nginx
        state: restarted
    - name: lb_keep
      service:
        name: keepalived
        state: restarted


# 目录结构
[root@m01 ~]# tree
.
├── anaconda-ks.cfg
├── ansible
│   ├── 1.yml
│   ├── ansible2
│   │   ├── group_vars
│   │   │   └── all
│   │   ├── host_vars
│   │   ├── install_nfs_rsync.yml
│   │   ├── lb
│   │   │   ├── check_web.sh
│   │   │   ├── keepalived.conf
│   │   │   ├── keep_sh.yml
│   │   │   ├── kep_conf.yml
│   │   │   ├── Nginx_conf.yml
│   │   │   ├── Nginx_youhua
│   │   │   ├── Nginx_youhua.yml
│   │   │   ├── start_Nginx.yml
│   │   │   ├── www.zh.conf
│   │   │   ├── yum_kep.yml
│   │   │   └── yum_Nginx.yml
│   │   ├── MysqL_conf.yml
│   │   ├── MysqL_cp_sql.yml
│   │   ├── MysqL_install.yml
│   │   ├── MysqLpython_install.yml
│   │   ├── MysqL_sql_init.yml
│   │   ├── MysqL_start.yml
│   │   ├── MysqL_useradd.yml
│   │   ├── MysqL_wordpress_ku.yml
│   │   ├── nfs_conf.yml
│   │   ├── nfs_dir.yml
│   │   ├── Nginx_dir.yml
│   │   ├── Nginx_Nginxconf_PHP_conf.yml
│   │   ├── Nginx_PHP_yes_no_install.yml
│   │   ├── Nginx_start.yml
│   │   ├── PHP_Nginx_zip.yml
│   │   ├── rsync_conf.yml
│   │   ├── rsync_dir.yml
│   │   ├── rsync_pass.yml
│   │   ├── rsy_start.yml
│   │   ├── start_nfs.yml
│   │   ├── test.yml
│   │   ├── usadd.yml
│   │   ├── webs_mount_nfs.yml
│   │   ├── wordpress_unzip.yml
│   │   └── yum_nfs_rsync.yml
│   ├── group_vars
│   │   └── all
│   ├── host_vars
│   ├── httpd.yml
│   ├── sersync
│   │   ├── GNU-Linux-x86
│   │   │   ├── confxml.xml
│   │   │   └── sersync2
│   │   ├── pass_sersync.yml
│   │   ├── sersync2.5.4_64bit_binary_stable_final.tar.gz
│   │   ├── sersync_conf.yml
│   │   ├── sersync_data_dir.yml
│   │   ├── sersync_dir.yml
│   │   ├── start_sersync.yml
│   │   ├── unzip_sersync.yml
│   │   └── yum_inot_sersync.yml
│   └── zuoye.yml
├── group_vars
│   └── webs
├── host_ip.sh
├── host_vars
│   ├── web01
│   └── web02
├── http.yml
├── kaoshi_modify.zip
├── key.sh
├── latest-zh_CN.tar.gz
├── latest-zh_CN.tar.gz.1
├── nfs.sh
├── PHPNginx
│   ├── autoconf-2.69-11.el7.noarch.rpm
│   ├── automake-1.13.4-3.el7.noarch.rpm
│   ├── libjpeg-turbo-1.2.90-8.el7.x86_64.rpm
│   ├── libmcrypt-2.5.8-13.el7.x86_64.rpm
│   ├── libmemcached-1.0.16-5.el7.x86_64.rpm
│   ├── libX11-1.6.7-4.el7_9.x86_64.rpm
│   ├── libX11-common-1.6.7-4.el7_9.noarch.rpm
│   ├── libXau-1.0.8-2.1.el7.x86_64.rpm
│   ├── libxcb-1.13-1.el7.x86_64.rpm
│   ├── libXpm-3.5.12-1.el7.x86_64.rpm
│   ├── m4-1.4.16-10.el7.x86_64.rpm
│   ├── mod_PHP71w-7.1.33-1.w7.x86_64.rpm
│   ├── Nginx-1.22.0-1.el7.ngx.x86_64.rpm
│   ├── Nginx_PHP.tgz
│   ├── pcre2-10.23-2.el7.x86_64.rpm
│   ├── pcre-devel-8.32-17.el7.x86_64.rpm
│   ├── perl-Data-Dumper-2.145-3.el7.x86_64.rpm
│   ├── perl-Test-Harness-3.28-3.el7.noarch.rpm
│   ├── perl-Thread-Queue-3.02-2.el7.noarch.rpm
│   ├── PHP71w-cli-7.1.33-1.w7.x86_64.rpm
│   ├── PHP71w-common-7.1.33-1.w7.x86_64.rpm
│   ├── PHP71w-devel-7.1.33-1.w7.x86_64.rpm
│   ├── PHP71w-embedded-7.1.33-1.w7.x86_64.rpm
│   ├── PHP71w-fpm-7.1.33-1.w7.x86_64.rpm
│   ├── PHP71w-gd-7.1.33-1.w7.x86_64.rpm
│   ├── PHP71w-mbstring-7.1.33-1.w7.x86_64.rpm
│   ├── PHP71w-mcrypt-7.1.33-1.w7.x86_64.rpm
│   ├── PHP71w-MysqLnd-7.1.33-1.w7.x86_64.rpm
│   ├── PHP71w-opcache-7.1.33-1.w7.x86_64.rpm
│   ├── PHP71w-pdo-7.1.33-1.w7.x86_64.rpm
│   ├── PHP71w-pear-1.10.4-1.w7.noarch.rpm
│   ├── PHP71w-pecl-igbinary-2.0.5-1.w7.x86_64.rpm
│   ├── PHP71w-pecl-memcached-3.0.4-1.w7.x86_64.rpm
│   ├── PHP71w-pecl-mongodb-1.5.3-1.w7.x86_64.rpm
│   ├── PHP71w-pecl-redis-3.1.6-1.w7.x86_64.rpm
│   ├── PHP71w-process-7.1.33-1.w7.x86_64.rpm
│   └── PHP71w-xml-7.1.33-1.w7.x86_64.rpm
├── rsyncd.conf
├── rsync.sh
├── test.yml
├── wordpress
│   ├── wordpress.sql
│   └── wordpress.tgz
├── zh_var.yml
└── zuoye.sh
总结
以上是小编为你收集整理的ansible - jinja2模板全部内容。
如果觉得小编网站内容还不错,欢迎将小编网站推荐给好友。
原文地址:https://www.cnblogs.com/ghjhkj/p/16441311.html

Ansible Jinja2 模板
###1.jinja2渲染NginxProxy配置文件
jinja2
    房屋建筑设计固定的?

jinja2模板与Ansible关系
Ansible如何使用jinja2模板
    template模块     拷贝文件?
    template copy  区别?
        template会解析配置文件中的变量
        copy  不会解析任何的变量,只会拷贝文件

Ansible允许jinja2模板中使用判断  循环,但是jinja判断循环语法不允许在playbook中使用。

注意: 不是每个管理员都需要这个特性,但是有些时候jinja2模板能大大提高效率。
###1.jinja模板基本语法
1)要想在配置文件中使用jinj2,playbook中的tasks 必须使用template模块

2)模板配置文件里面使用变量,比如 {{ PORT }} 或使用 {{ facts 变量 }}
###2.jinja模板逻辑关系
{% for i in EXPR %}...{% endfor%} 作为循环表达式*

*{% if EXPR %}...{% elif EXPR %}...{% endif%} 作为条件判断*

*{# COMMENT #} 表示注释
-------------------------------------------------------------------------

{% for i in range(1,10)%}
        server 172.16.1.{{i}};
{% endfor %}


#判断
{% if ansible_fqdn == "web01" %}
        echo 123
{% elif ansible_fqdn == "web02" %}
        echo 456
{% else %}
        echo 789
{% endif %}
###nginxproxy配置文件
[root@manager jinja2]# cat j_nginx.yml
- hosts: lbservers
  tasks:

        #安装nginx
    - name: Installed nginx Server
      yum:
        name: nginx
        state: present

        #配置nginx vhosts
    - name: Configure nginx Server
      template:
        src: ./file/proxy_kod.oldxu.com.conf.j2
        dest: /etc/nginx/conf.d/proxy_kod.oldxu.com.conf
      notify: Restart Nginx Server


        #启动Nginx
    - name: Systemd Nginx Server
      systemd:
        name: nginx
        state: started
        enabled: yes


  handlers:
    - name: Restart Nginx Server
      systemd:
        name: nginx
        state: restarted


# nginx组变量
[root@manager jinja2]# cat group_vars/all
kod_http_port: 80
kod_server_name: kod.oldxu.com
kod_web_site: /code/kod


#nginx proxy配置文件渲染
[root@manager jinja2]# cat file/proxy_kod.oldxu.com.conf.j2
upstream {{ kod_server_name }} {
    {% for host in groups[''webservers''] %}
	server {{host}}:{{kod_http_port}};
    {% endfor %}
}

server {
	listen {{ kod_http_port }};
	server_name  {{ kod_server_name }};

	location / {
		proxy_pass http://{{ kod_server_name }};
		proxy_set_header Host $http_hosts;
	}
}

[root@manager jinja2]# cat ../hosts
[webservers]
172.16.1.7
172.16.1.8
###2.Keepalived配置文件 master slave ###2.1:准备多个配置文件 master backup
[root@manager jinja2]# cat j_keepalived.yml
- hosts: lbservers
  tasks:
    - name: Installed Keepalived Server
      yum:
        name: keepalived
        state: present

    - name: Configure Keepalived Master
      copy:
        src: ./file/keepalived-master.conf.j2
        dest: /etc/keepalived/keepalived.conf
      when: ( ansible_hostname == "lb01" )
      notify: Restart Keepalived Server

    - name: Configure Keepalived Backup
      copy:
        src: ./file/keepalived-backup.conf.j2
        dest: /etc/keepalived/keepalived.conf
      when: ( ansible_hostname == "lb02" )
      notify: Restart Keepalived Server

    - name: Systemd Keepalived Server
      systemd:
        name: keepalived
        state: started
        enabled: yes

  handlers:
    - name: Restart Keepalived Server
      systemd:
        name: keepalived
        state: restarted
###2.2:设定host_vars变量 5和6设定相同的变量,不同的值
#1.准备一份keepalived配置文件
#2.需要在keepalived配置文件中使用变量方式  ---> jinja

[root@manager jinja2]# cat ./file/keepalived-vars.conf.j2
global_defs {
    router_id {{ ansible_hostname }}
}

vrrp_instance VI_1 {
    state  {{ state }}
    priority {{ priority }}

    interface eth0
    virtual_router_id 50
    advert_int 1
    authentication {
        auth_type PASS
        auth_pass 1111
}
    virtual_ipaddress {
        10.0.0.3
    }
}


[root@manager jinja2]# cat host_vars/172.16.1.5
state: MASTER
priority: 200
[root@manager jinja2]# cat host_vars/172.16.1.6
state: BACKUP
priority: 99

[root@manager jinja2]# cat var_keepalived.yml
- hosts: lbservers
  tasks:

    - name: Installed Keepalived Server
      yum:
        name: keepalived
        state: present


    - name: Configure Keepalived Master
      template:
        src: ./file/keepalived-vars.conf.j2
        dest: /etc/keepalived/keepalived.conf
      notify: Restart Keepalived Server

    - name: Systemd Keepalived Server
      systemd:
        name: keepalived
        state: started
        enabled: yes

  handlers:
    - name: Restart Keepalived Server
      systemd:
        name: keepalived
        state: restarted


#为不同的主机设定相同的变量,  只不过值不一样.
###3.jinja2判断方式
[root@manager jinja2]# cat jinja_keepalived.yml
- hosts: lbservers
  tasks:

    - name: Installed Keepalived Server
      yum:
        name: keepalived
        state: present


    - name: Configure Keepalived Master
      template:
        src: ./file/keepalived.conf.j2
        dest: /etc/keepalived/keepalived.conf
      notify: Restart Keepalived Server

    - name: Systemd Keepalived Server
      systemd:
        name: keepalived
        state: started
        enabled: yes

  handlers:
    - name: Restart Keepalived Server
      systemd:
        name: keepalived
        state: restarted


[root@manager jinja2]# cat file/keepalived.conf.j2
global_defs {
    router_id {{ ansible_hostname }}
}

vrrp_instance VI_1 {
{% if ansible_hostname == "lb01" %}
    state  MASTER
    priority 150
{% elif ansible_hostname == "lb02" %}
    state  BACKUP
    priority 100
{% endif %}
#########################相同的内容
    interface eth0
    virtual_router_id 50
    advert_int 1
    authentication {
        auth_type PASS
        auth_pass 1111
}
    virtual_ipaddress {
        10.0.0.3
    }
}
##Ansible Roles角色
Roles小技巧:*

1.创建roles目录结构,手动或使用ansible-galaxy init test roles

2.编写roles的功能,也就是tasks。  nginx  rsyncd memcached

3.最后playbook引用roles编写好的tasks


mkdir /root/roles/nginx/{tasks,templates,handlers}

##tasks
[root@manager ~]# cat /root/roles/nginx/tasks/main.yml
- name: Install Nginx Server
  yum:
    name: nginx
    state: present

- name: Configure Nginx Server
  template:
    src: nginx.conf.j2
    dest: /etc/nginx/nginx.conf
  notify: Restart Nginx Server


- name: Systemd Nginx Server
  systemd:
    name: nginx
    state: started
    enabled: yes

##template
[root@manager roles]# cat /root/roles/nginx/templates/nginx.conf.j2
user www;
worker_processes  {{ ansible_processor_vcpus }};

error_log  /var/log/nginx/error.log notice;
pid        /var/run/nginx.pid;

events {
    worker_connections  {{ ansible_processor_vcpus * 1024 }};
}
http {
    include       /etc/nginx/mime.types;
    default_type  application/octet-stream;
    log_format  main  ''$remote_addr - $remote_user [$time_local] "$request" ''
                      ''$status $body_bytes_sent "$http_referer" ''
                      ''"$http_user_agent" "$http_x_forwarded_for"'';
	access_log /var/log/nginx/access.log main;

    sendfile        on;
    #tcp_nopush     on;
    keepalive_timeout  65;
    #gzip  on;
    include /etc/nginx/conf.d/*.conf;
}

###handlers
[root@manager ~]# cat /root/roles/nginx/handlers/main.yml
- name: Restart Nginx Server
  systemd:
    name: nginx
    state: restarted


#调用playbook
[root@manager roles]# cat /root/roles/site.yml
- hosts: webservers
  roles:
    - nginx

##hosts ansible.cfg  自备
###memcached roles
#安装
#配置
#启动

#1.创建roles的目录结构
[root@manager roles]# mkdir memcached/{tasks,templates,handlers} -p

#2.编写对应的tasks  (1.安装  2配置(templates)  3.启动  4.重启(handlers) )
[root@manager roles]# cat memcached/tasks/main.yml
- name: Installed Memecached Server
  yum:
    name: memcached
    state: present

- name: Configure Memcached Server
  template:
    src: memcached.j2
    dest: /etc/sysconfig/memcached
  notify: Restart Memcached Server


- name: System Memcached Server
  systemd:
    name: memcached
    state: started
    enabled: yes

[root@manager roles]# cat memcached/templates/memcached.j2
PORT="11211"
USER="memcached"
MAXCONN="1024"
CACHESIZE="{{ ansible_memtotal_mb //2 }}"
OPTIONS=""

[root@manager roles]# cat memcached/handlers/main.yml
- name: Restart Memcached Server
  systemd:
    name: memcached
    state: restarted


#3.playbook调用roles
[root@manager roles]# cat site.yml
- hosts: webservers
  roles:
    - { role: nginx, tags: web }
    - { role: memcached, tags: cache }
###NFS服务
#1.创建项目目录结构   --->
[root@manager roles]# mkdir nfs/{tasks,templates,handlers} -p

#2.编写task任务

#3.playbook调用roles项目

roles:
    1.nginxProxy+keepalived  10.0.0.5  10.0.0.6      10.0.0.3
    2.nginx静态网站                             172.16.1.7 172.16.1.8
关于jinja2 模板,用于根据条件更新值的介绍现已完结,谢谢您的耐心阅读,如果想了解更多关于05-jinja2模板、2.Flask jinjia2模板、ansible - jinja2模板、Ansible Jinja2 模板的相关知识,请在本站寻找。
本文标签:


![[转帖]Ubuntu 安装 Wine方法(ubuntu如何安装wine)](https://www.gvkun.com/zb_users/cache/thumbs/4c83df0e2303284d68480d1b1378581d-180-120-1.jpg)

