本文将为您提供关于javaconcurrencyinpractice-札记2的详细介绍,我们还将为您解释javaconcurrencyinpractice中文的相关知识,同时,我们还将为您提供关于Ja
本文将为您提供关于java concurrency in practice - 札记2的详细介绍,我们还将为您解释java concurrency in practice中文的相关知识,同时,我们还将为您提供关于Java 8 Concurrency Tutorial--转、Java Concurrency、JAVA concurrency -- AQS 源码详解、JAVA concurrency -- CyclicBarrier 与 CountDownLatch 源码详解的实用信息。
本文目录一览:- java concurrency in practice - 札记2(java concurrency in practice中文)
- Java 8 Concurrency Tutorial--转
- Java Concurrency
- JAVA concurrency -- AQS 源码详解
- JAVA concurrency -- CyclicBarrier 与 CountDownLatch 源码详解
")
java concurrency in practice - 札记2(java concurrency in practice中文)
Avoid holding locks during lengthy computations or operations at risk of not completing quickly such as network or consoleI/O.
Even if you don''t care about stale values,it is not safe to use shared mutable long and double variables in multithreaded programs unless they are declared volatile or guarded by a lock.
Locking can guarantee both visibility and atomicity; volatile variables can only guarantee visibility.

Java 8 Concurrency Tutorial--转
<h1>Threads and Executors
Welcome to the first part of my Java 8 Concurrency tutorial. This guide teaches you in Java 8 with easily understood code examples. It's the first part out of a series of tutorials covering the Java Concurrency API. In the next 15 min you learn how to execute code in parallel via threads,tasks and executor services.
- Part 1: Threads and Executors
- Part 2:
- Part 3:
The was first introduced with the release of Java 5 and then progressively enhanced with every new Java release. The majority of concepts shown in this article also work in older versions of Java. However my code samples focus on Java 8 and make heavy use of lambda expressions and other new features. If you're not yet familiar with lambdas I recommend reading my first.
Threads and Runnables
All modern operating systems support concurrency both via and . Processes are instances of programs which typically run independent to each other,e.g. if you start a java program the operating system spawns a new process which runs in parallel to other programs. Inside those processes we can utilize threads to execute code concurrently,so we can make the most out of the available cores of the CPU.
Java supports since JDK 1.0. Before starting a new thread you have to specify the code to be executed by this thread,often called the task. This is done by implementing Runnable - a functional interface defining a single void no-args method run() as demonstrated in the following example:
Thread thread <span>= <span>new <span>Thread<span>(task<span>)<span>;
thread<span>.<span>start<span>(<span>)<span>;
System<span>.out<span>.<span>println<span>(<span>"Done!"<span>)<span>;
Since Runnable is a functional interface we can utilize Java 8 lambda expressions to print the current threads name to the console. First we execute the runnable directly on the main thread before starting a new thread.
The result on the console might look like this:
Or that:
Due to concurrent execution we cannot predict if the runnable will be invoked before or after printing 'done'. The order is non-deterministic,thus making concurrent programming a complex task in larger applications.
Threads can be put to sleep for a certain duration. This is quite handy to simulate long running tasks in the subsequent code samples of this article:
thread<span>.<span>start<span>(<span>)<span>;
When you run the above code you'll notice the one second delay between the first and the second print statement. TimeUnit is a useful enum for working with units of time. Alternatively you can achieve the same by calling Thread.sleep(1000).
Working with the Thread class can be very tedious and error-prone. Due to that reason the Concurrency API has been introduced back in 2004 with the release of Java 5. The API is located in package java.util.concurrent and contains many useful classes for handling concurrent programming. Since that time the Concurrency API has been enhanced with every new Java release and even Java 8 provides new classes and methods for dealing with concurrency.
Now let's take a deeper look at one of the most important parts of the Concurrency API - the executor services.
Executors
The Concurrency API introduces the concept of an ExecutorService as a higher level replacement for working with threads directly. Executors are capable of running asynchronous tasks and typically manage a pool of threads,so we don't have to create new threads manually. All threads of the internal pool will be reused under the hood for revenant tasks,so we can run as many concurrent tasks as we want throughout the life-cycle of our application with a single executor service.
This is how the first thread-example looks like using executors:
The class Executors provides convenient factory methods for creating different kinds of executor services. In this sample we use an executor with a thread pool of size one.
The result looks similar to the above sample but when running the code you'll notice an important difference: the java process never stops! Executors have to be stopped explicitly - otherwise they keep listening for new tasks.
An ExecutorService provides two methods for that purpose: shutdown() waits for currently running tasks to finish while shutdownNow() interrupts all running tasks and shut the executor down immediately.
This is the preferred way how I typically shutdown executors:
The executor shuts down softly by waiting a certain amount of time for termination of currently running tasks. After a maximum of five seconds the executor finally shuts down by interrupting all running tasks.
Callables and Futures@H_912_301@
In addition to Runnable executors support another kind of task named Callable. Callables are functional interfaces just like runnables but instead of being void they return a value.
This lambda expression defines a callable returning an integer after sleeping for one second:
Callables can be submitted to executor services just like runnables. But what about the callables result? Since submit() doesn't wait until the task completes,the executor service cannot return the result of the callable directly. Instead the executor returns a special result of type Future which can be used to retrieve the actual result at a later point in time.
Integer result <span>= future<span>.<span>get<span>(<span>)<span>;
System<span>.out<span>.<span>println<span>(<span>"future done? " <span>+ future<span>.<span>isDone<span>(<span>)<span>)<span>;
System<span>.out<span>.<span>print<span>(<span>"result: " <span>+ result<span>)<span>;
After submitting the callable to the executor we first check if the future has already been finished execution via isDone(). I'm pretty sure this isn't the case since the above callable sleeps for one second before returning the integer.
Calling the method get() blocks the current thread and waits until the callable completes before returning the actual result 123. Now the future is finally done and we see the following result on the console:
Futures are tightly coupled to the underlying executor service. Keep in mind that every non-terminated future will throw exceptions if you shutdown the executor:
You might have noticed that the creation of the executor slightly differs from the prevIoUs example. We use newFixedThreadPool(1) to create an executor service backed by a thread-pool of size one. This is equivalent to newSingleThreadExecutor() but we Could later increase the pool size by simply passing a value larger than one.
Timeouts@H_912_301@
Any call to future.get() will block and wait until the underlying callable has been terminated. In the worst case a callable runs forever - thus making your application unresponsive. You can simply counteract those scenarios by passing a timeout:
<span>try <span>{
TimeUnit<span>.SECONDS<span>.<span>sleep<span>(<span>2<span>)<span>;
<span>return <span>123<span>;
<span>}
<span>catch <span>(<span>InterruptedException e<span>) <span>{
<span>throw <span>new <span>IllegalStateException<span>(<span>"task interrupted"<span>,e<span>)<span>;
<span>}
<span>}<span>)<span>;
future<span>.<span>get<span>(<span>1<span>,TimeUnit<span>.SECONDS<span>)<span>;
Executing the above code results in a TimeoutException:
You might already have guessed why this exception is thrown: We specified a maximum wait time of one second but the callable actually needs two seconds before returning the result.
InvokeAll@H_912_301@
Executors support batch submitting of multiple callables at once via invokeAll(). This method accepts a collection of callables and returns a list of futures.
<span>(<span>) <span>-<span>> <span>"task1"<span>,<span>(<span>) <span>-<span>> <span>"task2"<span>,<span>(<span>) <span>-<span>> <span>"task3"<span>)<span>;
executor<span>.<span>invokeAll<span>(callables<span>)
<span>.<span>stream<span>(<span>)
<span>.<span>map<span>(future <span>-<span>> <span>{
<span>try <span>{
<span>return future<span>.<span>get<span>(<span>)<span>;
<span>}
<span>catch <span>(<span>Exception e<span>) <span>{
<span>throw <span>new <span>IllegalStateException<span>(e<span>)<span>;
<span>}
<span>}<span>)
<span>.<span>forEach<span>(System<span>.out<span>:<span>:println<span>)<span>;
In this example we utilize Java 8 functional streams in order to process all futures returned by the invocation of invokeAll. We first map each future to its return value and then print each value to the console. If you're not yet familiar with streams read my .
InvokeAny
Another way of batch-submitting callables is the method invokeAny() which works slightly different to invokeAll(). Instead of returning future objects this method blocks until the first callable terminates and returns the result of that callable.
In order to test this behavior we use this helper method to simulate callables with different durations. The method returns a callable that sleeps for a certain amount of time until returning the given result:
We use this method to create a bunch of callables with different durations from one to three seconds. Submitting those callables to an executor via invokeAny() returns the string result of the fastest callable - in that case task2:
<span>callable<span>(<span>"task1"<span>,<span>2<span>)<span>,<span>callable<span>(<span>"task2"<span>,<span>1<span>)<span>,<span>callable<span>(<span>"task3"<span>,<span>3<span>)<span>)<span>;
String result <span>= executor<span>.<span>invokeAny<span>(callables<span>)<span>;
System<span>.out<span>.<span>println<span>(result<span>)<span>;
<span>// => task2
The above example uses yet another type of executor created via newWorkStealingPool(). This factory method is part of Java 8 and returns an executor of type ForkJoinPool which works slightly different than normal executors. Instead of using a fixed size thread-pool are created for a given parallelism size which per default is the number of available cores of the hosts cpu.
ForkJoinPools exist since Java 7 and will be covered in detail in a later tutorial of this series. Let's finish this tutorial by taking a deeper look at scheduled executors.
Scheduled Executors
We've already learned how to submit and run tasks once on an executor. In order to periodically run common tasks multiple times,we can utilize scheduled thread pools.
A scheduledexecutorservice is capable of scheduling tasks to run either periodically or once after a certain amount of time has elapsed.
This code sample schedules a task to run after an initial delay of three seconds has passed:
ScheduledFuture<span><<span>?<span>> future <span>= executor<span>.<span>schedule<span>(task<span>,<span>3<span>,TimeUnit<span>.SECONDS<span>)<span>;
TimeUnit<span>.MILLISECONDS<span>.<span>sleep<span>(<span>1337<span>)<span>;
<span>long remainingDelay <span>= future<span>.<span>getDelay<span>(TimeUnit<span>.MILLISECONDS<span>)<span>;
System<span>.out<span>.<span>printf<span>(<span>"Remaining Delay: %sms"<span>,remainingDelay<span>)<span>;
Scheduling a task produces a specialized future of type ScheduledFuture which - in addition to Future - provides the method getDelay() to retrieve the remaining delay. After this delay has elapsed the task will be executed concurrently.
In order to schedule tasks to be executed periodically,executors provide the two methods scheduleAtFixedrate() and scheduleWithFixedDelay(). The first method is capable of executing tasks with a fixed time rate,e.g. once every second as demonstrated in this example:
<span>int initialDelay <span>= <span>0<span>;
<span>int period <span>= <span>1<span>;
executor<span>.<span>scheduleAtFixedrate<span>(task<span>,initialDelay<span>,period<span>,TimeUnit<span>.SECONDS<span>)<span>;
Additionally this method accepts an initial delay which describes the leading wait time before the task will be executed for the first time.
Please keep in mind that scheduleAtFixedrate() doesn't take into account the actual duration of the task. So if you specify a period of one second but the task needs 2 seconds to be executed then the thread pool will working to capacity very soon.
In that case you should consider using scheduleWithFixedDelay() instead. This method works just like the counterpart described above. The difference is that the wait time period applies between the end of a task and the start of the next task. For example:
<span>try <span>{
TimeUnit<span>.SECONDS<span>.<span>sleep<span>(<span>2<span>)<span>;
System<span>.out<span>.<span>println<span>(<span>"Scheduling: " <span>+ System<span>.<span>nanoTime<span>(<span>)<span>)<span>;
<span>}
<span>catch <span>(<span>InterruptedException e<span>) <span>{
System<span>.err<span>.<span>println<span>(<span>"task interrupted"<span>)<span>;
<span>}
<span>}<span>;
executor<span>.<span>scheduleWithFixedDelay<span>(task<span>,<span>0<span>,<span>1<span>,TimeUnit<span>.SECONDS<span>)<span>;
This example schedules a task with a fixed delay of one second between the end of an execution and the start of the next execution. The initial delay is zero and the tasks duration is two seconds. So we end up with an execution interval of 0s,3s,6s,9s and so on. As you can see scheduleWithFixedDelay() is handy if you cannot predict the duration of the scheduled tasks.
This was the first part out of a series of concurrency tutorials. I recommend practicing the shown code samples by your own. You find all code samples from this article on ,so feel free to fork the repo and .
<h1>Synchronization and Locks
Welcome to the second part of my Java 8 Concurrency Tutorial out of a series of guides teaching multi-threaded programming in Java 8 with easily understood code examples. In the next 15 min you learn how to synchronize access to mutable shared variables via the synchronized keyword,locks and semaphores.
- Part 1:
- Part 2: Synchronization and Locks
- Part 3:
The majority of concepts shown in this article also work in older versions of Java. However the code samples focus on Java 8 and make heavy use of lambda expressions and new concurrency features. If you're not yet familiar with lambdas I recommend reading my first.
For simplicity the code samples of this tutorial make use of the two helper methods sleep(seconds) and stop(executor) as defined .
Synchronized
In the we've learned how to execute code in parallel via executor services. When writing such multi-threaded code you have to pay particular attention when accessing shared mutable variables concurrently from multiple threads. Let's just say we want to increment an integer which is accessible simultaneously from multiple threads.
We define a field count with a method increment() to increase count by one:
count <span>= count <span>+ <span>1<span>;
<span>}
When calling this method concurrently from multiple threads we're in serious trouble:
<span>.<span>forEach<span>(i <span>-<span>> executor<span>.<span>submit<span>(<span>this<span>:<span>:increment<span>)<span>)<span>;
<span>stop<span>(executor<span>)<span>;
System<span>.out<span>.<span>println<span>(count<span>)<span>; <span>// 9965
Instead of seeing a constant result count of 10000 the actual result varies with every execution of the above code. The reason is that we share a mutable variable upon different threads without synchronizing the access to this variable which results in a .
Three steps have to be performed in order to increment the number: (i) read the current value,(ii) increase this value by one and (iii) write the new value to the variable. If two threads perform these steps in parallel it's possible that both threads perform step 1 simultaneously thus reading the same current value. This results in lost writes so the actual result is lower. In the above sample 35 increments got lost due to concurrent unsynchronized access to count but you may see different results when executing the code by yourself.
Luckily Java supports thread-synchronization since the early days via the synchronizedkeyword. We can utilize synchronized to fix the above race conditions when incrementing the count:
When using incrementSync() concurrently we get the desired result count of 10000. No race conditions occur any longer and the result is stable with every execution of the code:
<span>.<span>forEach<span>(i <span>-<span>> executor<span>.<span>submit<span>(<span>this<span>:<span>:incrementSync<span>)<span>)<span>;
<span>stop<span>(executor<span>)<span>;
System<span>.out<span>.<span>println<span>(count<span>)<span>; <span>// 10000
The synchronized keyword is also available as a block statement.
Internally Java uses a so called monitor also kNown as in order to manage synchronization. This monitor is bound to an object,e.g. when using synchronized methods each method share the same monitor of the corresponding object.
All implicit monitors implement the reentrant characteristics. Reentrant means that locks are bound to the current thread. A thread can safely acquire the same lock multiple times without running into deadlocks (e.g. a synchronized method calls another synchronized method on the same object).
Locks
Instead of using implicit locking via the synchronized keyword the Concurrency API supports various explicit locks specified by the Lock interface. Locks support various methods for finer grained lock control thus are more expressive than implicit monitors.
Multiple lock implementations are available in the standard JDK which will be demonstrated in the following sections.
ReentrantLock
The class ReentrantLock is a mutual exclusion lock with the same basic behavior as the implicit monitors accessed via the synchronized keyword but with extended capabilities. As the name suggests this lock implements reentrant characteristics just as implicit monitors.
Let's see how the above sample looks like using ReentrantLock:
lock<span>.<span>lock<span>(<span>)<span>;
<span>try <span>{
count<span>++<span>;
<span>} <span>finally <span>{
lock<span>.<span>unlock<span>(<span>)<span>;
<span>}
<span>}
A lock is acquired via lock() and released via unlock(). It's important to wrap your code into a try/finally block to ensure unlocking in case of exceptions. This method is thread-safe just like the synchronized counterpart. If another thread has already acquired the lock subsequent calls to lock() pause the current thread until the lock has been unlocked. Only one thread can hold the lock at any given time.
Locks support various methods for fine grained control as seen in the next sample:
lock<span>.<span>lock<span>(<span>)<span>;
<span>try <span>{
<span>sleep<span>(<span>1<span>)<span>;
<span>} <span>finally <span>{
lock<span>.<span>unlock<span>(<span>)<span>;
<span>}
<span>}<span>)<span>;
executor<span>.<span>submit<span>(<span>(<span>) <span>-<span>> <span>{
System<span>.out<span>.<span>println<span>(<span>"Locked: " <span>+ lock<span>.<span>isLocked<span>(<span>)<span>)<span>;
System<span>.out<span>.<span>println<span>(<span>"Held by me: " <span>+ lock<span>.<span>isHeldByCurrentThread<span>(<span>)<span>)<span>;
<span>boolean locked <span>= lock<span>.<span>tryLock<span>(<span>)<span>;
System<span>.out<span>.<span>println<span>(<span>"Lock acquired: " <span>+ locked<span>)<span>;
<span>}<span>)<span>;
<span>stop<span>(executor<span>)<span>;
While the first task holds the lock for one second the second task obtains different information about the current state of the lock:
The method tryLock() as an alternative to lock() tries to acquire the lock without pausing the current thread. The boolean result must be used to check if the lock has actually been acquired before accessing any shared mutable variables.
ReadWriteLock
The interface ReadWriteLock specifies another type of lock maintaining a pair of locks for read and write access. The idea behind read-write locks is that it's usually safe to read mutable variables concurrently as long as nobody is writing to this variable. So the read-lock can be held simultaneously by multiple threads as long as no threads hold the write-lock. This can improve performance and throughput in case that reads are more frequent than writes.
lock<span>.<span>writeLock<span>(<span>)<span>.<span>lock<span>(<span>)<span>;
<span>try <span>{
<span>sleep<span>(<span>1<span>)<span>;
map<span>.<span>put<span>(<span>"foo"<span>,<span>"bar"<span>)<span>;
<span>} <span>finally <span>{
lock<span>.<span>writeLock<span>(<span>)<span>.<span>unlock<span>(<span>)<span>;
<span>}
<span>}<span>)<span>;
The above example first acquires a write-lock in order to put a new value to the map after sleeping for one second. Before this task has finished two other tasks are being submitted trying to read the entry from the map and sleep for one second:
executor<span>.<span>submit<span>(readTask<span>)<span>;
<span>stop<span>(executor<span>)<span>;
When you execute this code sample you'll notice that both read tasks have to wait the whole second until the write task has finished. After the write lock has been released both read tasks are executed in parallel and print the result simultaneously to the console. They don't have to wait for each other to finish because read-locks can safely be acquired concurrently as long as no write-lock is held by another thread.
StampedLock
Java 8 ships with a new kind of lock called StampedLock which also support read and write locks just like in the example above. In contrast to ReadWriteLock the locking methods of a StampedLock return a stamp represented by a long value. You can use these stamps to either release a lock or to check if the lock is still valid. Additionally stamped locks support another lock mode called optimistic locking.
Let's rewrite the last example code to use StampedLock instead of ReadWriteLock:
<span>long stamp <span>= lock<span>.<span>writeLock<span>(<span>)<span>;
<span>try <span>{
<span>sleep<span>(<span>1<span>)<span>;
map<span>.<span>put<span>(<span>"foo"<span>,<span>"bar"<span>)<span>;
<span>} <span>finally <span>{
lock<span>.<span>unlockWrite<span>(stamp<span>)<span>;
<span>}
<span>}<span>)<span>;
Runnable readTask <span>= <span>(<span>) <span>-<span>> <span>{
<span>long stamp <span>= lock<span>.<span>readLock<span>(<span>)<span>;
<span>try <span>{
System<span>.out<span>.<span>println<span>(map<span>.<span>get<span>(<span>"foo"<span>)<span>)<span>;
<span>sleep<span>(<span>1<span>)<span>;
<span>} <span>finally <span>{
lock<span>.<span>unlockRead<span>(stamp<span>)<span>;
<span>}
<span>}<span>;
executor<span>.<span>submit<span>(readTask<span>)<span>;
executor<span>.<span>submit<span>(readTask<span>)<span>;
<span>stop<span>(executor<span>)<span>;
Obtaining a read or write lock via readLock() or writeLock() returns a stamp which is later used for unlocking within the finally block. Keep in mind that stamped locks don't implement reentrant characteristics. Each call to lock returns a new stamp and blocks if no lock is available even if the same thread already holds a lock. So you have to pay particular attention not to run into deadlocks.
Just like in the previous ReadWriteLock example both read tasks have to wait until the write lock has been released. Then both read tasks print to the console simultaneously because multiple reads doesn't block each other as long as no write-lock is held.
The next example demonstrates optimistic locking:
<span>long stamp <span>= lock<span>.<span>tryOptimisticRead<span>(<span>)<span>;
<span>try <span>{
System<span>.out<span>.<span>println<span>(<span>"Optimistic Lock Valid: " <span>+ lock<span>.<span>validate<span>(stamp<span>)<span>)<span>;
<span>sleep<span>(<span>1<span>)<span>;
System<span>.out<span>.<span>println<span>(<span>"Optimistic Lock Valid: " <span>+ lock<span>.<span>validate<span>(stamp<span>)<span>)<span>;
<span>sleep<span>(<span>2<span>)<span>;
System<span>.out<span>.<span>println<span>(<span>"Optimistic Lock Valid: " <span>+ lock<span>.<span>validate<span>(stamp<span>)<span>)<span>;
<span>} <span>finally <span>{
lock<span>.<span>unlock<span>(stamp<span>)<span>;
<span>}
<span>}<span>)<span>;
executor<span>.<span>submit<span>(<span>(<span>) <span>-<span>> <span>{
<span>long stamp <span>= lock<span>.<span>writeLock<span>(<span>)<span>;
<span>try <span>{
System<span>.out<span>.<span>println<span>(<span>"Write Lock acquired"<span>)<span>;
<span>sleep<span>(<span>2<span>)<span>;
<span>} <span>finally <span>{
lock<span>.<span>unlock<span>(stamp<span>)<span>;
System<span>.out<span>.<span>println<span>(<span>"Write done"<span>)<span>;
<span>}
<span>}<span>)<span>;
<span>stop<span>(executor<span>)<span>;
An optimistic read lock is acquired by calling tryOptimisticRead() which always returns a stamp without blocking the current thread,no matter if the lock is actually available. If there's already a write lock active the returned stamp equals zero. You can always check if a stamp is valid by calling lock.validate(stamp).
Executing the above code results in the following output:
The optimistic lock is valid right after acquiring the lock. In contrast to normal read locks an optimistic lock doesn't prevent other threads to obtain a write lock instantaneously. After sending the first thread to sleep for one second the second thread obtains a write lock without waiting for the optimistic read lock to be released. From this point the optimistic read lock is no longer valid. Even when the write lock is released the optimistic read locks stays invalid.
So when working with optimistic locks you have to validate the lock every time after accessing any shared mutable variable to make sure the read was still valid.
Sometimes it's useful to convert a read lock into a write lock without unlocking and locking again. StampedLock provides the method tryConvertToWriteLock() for that purpose as seen in the next sample:
<span>long stamp <span>= lock<span>.<span>readLock<span>(<span>)<span>;
<span>try <span>{
<span>if <span>(count <span>== <span>0<span>) <span>{
stamp <span>= lock<span>.<span>tryConvertToWriteLock<span>(stamp<span>)<span>;
<span>if <span>(stamp <span>== 0L<span>) <span>{
System<span>.out<span>.<span>println<span>(<span>"Could not convert to write lock"<span>)<span>;
stamp <span>= lock<span>.<span>writeLock<span>(<span>)<span>;
<span>}
count <span>= <span>23<span>;
<span>}
System<span>.out<span>.<span>println<span>(count<span>)<span>;
<span>} <span>finally <span>{
lock<span>.<span>unlock<span>(stamp<span>)<span>;
<span>}
<span>}<span>)<span>;
<span>stop<span>(executor<span>)<span>;
The task first obtains a read lock and prints the current value of field count to the console. But if the current value is zero we want to assign a new value of 23. We first have to convert the read lock into a write lock to not break potential concurrent access by other threads. Calling tryConvertToWriteLock() doesn't block but may return a zero stamp indicating that no write lock is currently available. In that case we call writeLock() to block the current thread until a write lock is available.
Semaphores
In addition to locks the Concurrency API also supports counting semaphores. Whereas locks usually grant exclusive access to variables or resources,a semaphore is capable of maintaining whole sets of permits. This is useful in different scenarios where you have to limit the amount concurrent access to certain parts of your application.
Here's an example how to limit access to a long running task simulated by sleep(5):
Runnable longRunningTask <span>= <span>(<span>) <span>-<span>> <span>{
<span>boolean permit <span>= <span>false<span>;
<span>try <span>{
permit <span>= semaphore<span>.<span>tryAcquire<span>(<span>1<span>,TimeUnit<span>.SECONDS<span>)<span>;
<span>if <span>(permit<span>) <span>{
System<span>.out<span>.<span>println<span>(<span>"Semaphore acquired"<span>)<span>;
<span>sleep<span>(<span>5<span>)<span>;
<span>} <span>else <span>{
System<span>.out<span>.<span>println<span>(<span>"Could not acquire semaphore"<span>)<span>;
<span>}
<span>} <span>catch <span>(<span>InterruptedException e<span>) <span>{
<span>throw <span>new <span>IllegalStateException<span>(e<span>)<span>;
<span>} <span>finally <span>{
<span>if <span>(permit<span>) <span>{
semaphore<span>.<span>release<span>(<span>)<span>;
<span>}
<span>}
<span>}
IntStream<span>.<span>range<span>(<span>0<span>,<span>10<span>)
<span>.<span>forEach<span>(i <span>-<span>> executor<span>.<span>submit<span>(longRunningTask<span>)<span>)<span>;
<span>stop<span>(executor<span>)<span>;
The executor can potentially run 10 tasks concurrently but we use a semaphore of size 5,thus limiting concurrent access to 5. It's important to use a try/finally block to properly release the semaphore even in case of exceptions.
Executing the above code results in the following output:
The semaphores permits access to the actual long running operation simulated by sleep(5)up to a maximum of 5. Every subsequent call to tryAcquire() elapses the maximum wait timeout of one second,resulting in the appropriate console output that no semaphore could be acquired.
This was the second part out of a series of concurrency tutorials. More parts will be released in the near future,so stay tuned. As usual you find all code samples from this article on ,so feel free to fork the repo and try it by your own.
I hope you've enjoyed this article. If you have any further questions send me your Feedback in the comments below. You should also for more dev-related stuff!
- Part 1:
- Part 2: Synchronization and Locks
- Part 3:
Welcome to the third part of my tutorial series about multi-threaded programming in Java 8. This tutorial covers two important parts of the Concurrency API: Atomic Variables and Concurrent Maps. Both have been greatly improved with the introduction of lambda expressions and functional programming in the latest Java 8 release. All those new features are described with a bunch of easily understood code samples. Enjoy!
- Part 1:
- Part 2:
- Part 3: Atomic Variables and ConcurrentMap
For simplicity the code samples of this tutorial make use of the two helper methods sleep(seconds) and stop(executor) as defined .
AtomicInteger
The package java.concurrent.atomic contains many useful classes to perform atomic operations. An operation is atomic when you can safely perform the operation in parallel on multiple threads without using the synchronized keyword or locks as shown in my .
Internally,the atomic classes make heavy use of (CAS),an atomic instruction directly supported by most modern cpus. Those instructions usually are much faster than synchronizing via locks. So my advice is to prefer atomic classes over locks in case you just have to change a single mutable variable concurrently.
Now let's pick one of the atomic classes for a few examples: AtomicInteger
IntStream<span>.<span>range<span>(<span>0<span>,<span>1000<span>)
<span>.<span>forEach<span>(i <span>-<span>> executor<span>.<span>submit<span>(atomicInt<span>:<span>:incrementAndGet<span>)<span>)<span>;
<span>stop<span>(executor<span>)<span>;
System<span>.out<span>.<span>println<span>(atomicInt<span>.<span>get<span>(<span>)<span>)<span>; <span>// => 1000
By using AtomicInteger as a replacement for Integer we're able to increment the number concurrently in a thread-safe manor without synchronizing the access to the variable. The method incrementAndGet() is an atomic operation so we can safely call this method from multiple threads.
AtomicInteger supports varIoUs kinds of atomic operations. The method updateAndGet()accepts a lambda expression in order to perform arbitrary arithmetic operations upon the integer:
IntStream<span>.<span>range<span>(<span>0<span>,<span>1000<span>)
<span>.<span>forEach<span>(i <span>-<span>> <span>{
Runnable task <span>= <span>(<span>) <span>-<span>>
atomicInt<span>.<span>updateAndGet<span>(n <span>-<span>> n <span>+ <span>2<span>)<span>;
executor<span>.<span>submit<span>(task<span>)<span>;
<span>}<span>)<span>;
<span>stop<span>(executor<span>)<span>;
System<span>.out<span>.<span>println<span>(atomicInt<span>.<span>get<span>(<span>)<span>)<span>; <span>// => 2000
The method accumulateAndGet() accepts another kind of lambda expression of type IntBinaryOperator. We use this method to sum up all values from 0 to 1000 concurrently in the next sample:
IntStream<span>.<span>range<span>(<span>0<span>,<span>1000<span>)
<span>.<span>forEach<span>(i <span>-<span>> <span>{
Runnable task <span>= <span>(<span>) <span>-<span>>
atomicInt<span>.<span>accumulateAndGet<span>(i<span>,<span>(n<span>,m<span>) <span>-<span>> n <span>+ m<span>)<span>;
executor<span>.<span>submit<span>(task<span>)<span>;
<span>}<span>)<span>;
<span>stop<span>(executor<span>)<span>;
System<span>.out<span>.<span>println<span>(atomicInt<span>.<span>get<span>(<span>)<span>)<span>; <span>// => 499500
Other useful atomic classes are , and .
LongAdder
The class LongAdder as an alternative to AtomicLong can be used to consecutively add values to a number.
<span>.<span>forEach<span>(i <span>-<span>> executor<span>.<span>submit<span>(adder<span>:<span>:increment<span>)<span>)<span>;
<span>stop<span>(executor<span>)<span>;
System<span>.out<span>.<span>println<span>(adder<span>.<span>sumThenReset<span>(<span>)<span>)<span>; <span>// => 1000
LongAdder provides methods add() and increment() just like the atomic number classes and is also thread-safe. But instead of summing up a single result this class maintains a set of variables internally to reduce contention over threads. The actual result can be retrieved by calling sum() or sumThenReset().
This class is usually preferable over atomic numbers when updates from multiple threads are more common than reads. This is often the case when capturing statistical data,e.g. you want to count the number of requests served on a web server. The drawback of LongAdder is higher memory consumption because a set of variables is held in-memory.
LongAccumulator
LongAccumulator is a more generalized version of LongAdder. Instead of performing simple add operations the class LongAccumulator builds around a lambda expression of type LongBinaryOperator as demonstrated in this code sample:
IntStream<span>.<span>range<span>(<span>0<span>,<span>10<span>)
<span>.<span>forEach<span>(i <span>-<span>> executor<span>.<span>submit<span>(<span>(<span>) <span>-<span>> accumulator<span>.<span>accumulate<span>(i<span>)<span>)<span>)<span>;
<span>stop<span>(executor<span>)<span>;
System<span>.out<span>.<span>println<span>(accumulator<span>.<span>getThenReset<span>(<span>)<span>)<span>; <span>// => 2539
We create a LongAccumulator with the function 2 * x + y and an initial value of one. With every call to accumulate(i) both the current result and the value i are passed as parameters to the lambda expression.
A LongAccumulator just like LongAdder maintains a set of variables internally to reduce contention over threads.
ConcurrentMap
The interface ConcurrentMap extends the map interface and defines one of the most useful concurrent collection types. Java 8 introduces functional programming by adding new methods to this interface.
In the next code snippets we use the following sample map to demonstrates those new methods:
The method forEach() accepts a lambda expression of type BiConsumer with both the key and value of the map passed as parameters. It can be used as a replacement to for-each loops to iterate over the entries of the concurrent map. The iteration is performed sequentially on the current thread.
The method putIfAbsent() puts a new value into the map only if no value exists for the given key. At least for the ConcurrentHashMap implementation of this method is thread-safe just like put() so you don't have to synchronize when accessing the map concurrently from different threads:
The method getOrDefault() returns the value for the given key. In case no entry exists for this key the passed default value is returned:
The method replaceAll() accepts a lambda expression of type BiFunction. BiFunctions take two parameters and return a single value. In this case the function is called with the key and the value of each map entry and returns a new value to be assigned for the current key:
Instead of replacing all values of the map compute() let's us transform a single entry. The method accepts both the key to be computed and a bi-function to specify the transformation of the value.
In addition to compute() two variants exist: computeIfAbsent() and computeIfPresent(). The functional parameters of these methods only get called if the key is absent or present respectively.
Finally,the method merge() can be utilized to unify a new value with an existing value in the map. Merge accepts a key,the new value to be merged into the existing entry and a bi-function to specify the merging behavior of both values:
ConcurrentHashMap
All those methods above are part of the ConcurrentMap interface,thereby available to all implementations of that interface. In addition the most important implementationConcurrentHashMap has been further enhanced with a couple of new methods to perform parallel operations upon the map.
Just like parallel streams those methods use a special ForkJoinPool available via ForkJoinPool.commonPool() in Java 8. This pool uses a preset parallelism which depends on the number of available cores. Four CPU cores are available on my machine which results in a parallelism of three:
This value can be decreased or increased by setting the following JVM parameter:
We use the same example map for demonstrating purposes but this time we work upon the concrete implementation ConcurrentHashMap instead of the interface ConcurrentMap,so we can access all public methods from this class:
Java 8 introduces three kinds of parallel operations: forEach, search and reduce. Each of those operations are available in four forms accepting functions with keys,values,entries and key-value pair arguments.
All of those methods use a common first argument called parallelismThreshold. This threshold indicates the minimum collection size when the operation should be executed in parallel. E.g. if you pass a threshold of 500 and the actual size of the map is 499 the operation will be performed sequentially on a single thread. In the next examples we use a threshold of one to always force parallel execution for demonstrating purposes.
ForEach
The method forEach() is capable of iterating over the key-value pairs of the map in parallel. The lambda expression of type BiConsumer is called with the key and value of the current iteration step. In order to visualize parallel execution we print the current threads name to the console. Keep in mind that in my case the underlying ForkJoinPool uses up to a maximum of three threads.
<span>// key: foo; value: bar; thread: ForkJoinPool.commonPool-worker-1
<span>// key: han; value: solo; thread: ForkJoinPool.commonPool-worker-2
<span>// key: c3; value: p0; thread: main
Search
The method search() accepts a BiFunction returning a non-null search result for the current key-value pair or null if the current iteration doesn't match the desired search criteria. As soon as a non-null result is returned further processing is suppressed. Keep in mind that ConcurrentHashMap is unordered. The search function should not depend on the actual processing order of the map. If multiple entries of the map match the given search function the result may be non-deterministic.
<span>// main
<span>// ForkJoinPool.commonPool-worker-3
<span>// Result: bar
Here's another example searching solely on the values of the map:
<span>// ForkJoinPool.commonPool-worker-2
<span>// main
<span>// main
<span>// ForkJoinPool.commonPool-worker-1
<span>// Result: solo
Reduce
The method reduce() already known from Java 8 Streams accepts two lambda expressions of type BiFunction. The first function transforms each key-value pair into a single value of any type. The second function combines all those transformed values into a single result,ignoring any possible null values.
<span>// Transform: ForkJoinPool.commonPool-worker-2
<span>// Transform: main
<span>// Transform: ForkJoinPool.commonPool-worker-3
<span>// Reduce: ForkJoinPool.commonPool-worker-3
<span>// Transform: main
<span>// Reduce: main
<span>// Reduce: main
<span>// Result: r2=d2,c3=p0,han=solo,foo=bar
I hope you've enjoyed reading the third part of my tutorial series about Java 8 Concurrency. The code samples from this tutorial are along with many other Java 8 code snippets. You're welcome to fork the repo and try it by your own.
If you want to support my work,please share this tutorial with your friends. You should also as I constantly tweet about Java and programming related stuff.
- Part 1:
- Part 2:
- Part 3: Atomic Variables and ConcurrentMap

Java Concurrency
- 1.简介
- 2.线程安全性
- 2.1什么是线程安全性
- 3.对象的共享
- 4.对象的组合
- 4.1设计线程安全的类
- 4.2实例封闭
本文参考《Java Concurrency in Practice》。
1.简介
编写正确的进程很难,而编写正确的并发进程则难上加难。
2.线程安全性
要编写线程安全的代码,核心在于要对状态访问操作进行管理,特别是对共享(Shared)和可变(Mutable)状态的访问。从非正式意义上来说,对象的状态是指存储在状态变量(例如实例或静态域)中的数据。对象的状态可能包括其他依赖对象的域。
在对象的状态中包含了任何可能影响其外部可见行为的数据。共享意味着变量可以由多个线程同时访问,而可变则意味着变量的值在其生命周期内可以发生变化。一个对象是否需要是线程安全的,取决于它是否被多个线程访问。要使得对象是线程安全的,需要采用同步机制来协同对对象可变状态的访问。如果无法实现协同,那么可能会导致数据破坏以及其他不该出现的结果。
当多个线程访问某个状态变量并且其中有一个线程执行写入操作时,必须采用同步机制来协同这些线程对变量的访问。Java中的主要同步机制是关键字synchronized,它提供了一种独占的加锁方式,但“同步”这个术语还包括volatile类型的变量,显示锁(Explicit Lock)以及原子变量。
如果当多个线程访问同一个可变的状态变量时没有使用合适的同步,那么进程就会出现错误。以下三种方式可以修复这个问题:
- 不在线程之间共享该状态变量。
- 将状态变量修改为不可变的变量。
- 在访问状态变量时使用同步。
如果在设计类的时候没有考虑并发访问的情况,那么在采用上述方法时可能需要对设计进行重大修改,因此要修复这个问题可谓是知易行难。如果从一开始就设计一个线程安全的类,那么比在以后再将这些修改为线程安全要容易的多。
在一些大型进程中,要找出多个线程在哪些位置上将访问一个变量是非常复杂的。幸运的是,面向对象这种技术不仅有助于编写出结构优雅、可维护性高的类,还有助于编写出线程安全的类。访问某个变量的代码越少,就越容易确保对变量的所有访问都实现正确同步,同时也更容易找出变量在哪些条件下被访问。Java并没有强制要求将状态都封装在类中,可以将状态保存在某个公开的域(甚至公开的静态域)中,或者提供一个对内部对象的公开引用。然而,进程状态的封装性越好,就越容易实现进程的线程安全性,并且代码的维护人员也越容易保持这种方式。
当设计线程安全的类时,良好的面向对象技术、不可修改性,以及明晰的不变性规范都能起到一定的帮助作用。
在某些情况下,良好的面向对象设计技术与实际情况的需求并不一致。这时候可能要牺牲一些良好的设计原则,以换取性能或者对遗留代码的向后兼容。有时候,面向对象中的抽象和封装会降低进程的性能(你可能会怀疑这句话),但在编写并发进程时一种正确的编程方法就是:首先使代码正确运行,然后再提高代码速度。即便如此,最好也只是当性能测试结果和应用需求告诉你必须提高性能,以及测量结果表明这种优化在实际环境中确实可以带来性能提升时,才进行优化。
在编写并发代码时,应该始终遵循这个原则。由于并发错误是非常难以重现以及调试的,因此如果只是在某段很少执行的代码路径上获得了性能的提升,那么很有可能被进程运行时存在的失败风险而抵消。
2.1什么是线程安全性
线程安全性的定义中,最核心的就是正确性。
正确性的含义是,某个类的行为与其规范完全一致。在良好的规范中通常会定义各种不变性条件来约束对象的状态,以及定义各种后验条件来描述对象操作的结果。在对正确性给出了一个较为清晰的定义后,就可以定义线程安全性:当多个线程访问某个类时,这个类始终都能表现出正确的行为,那么就称这个类是线程安全的。
3.对象的共享
4.对象的组合
我们并不希望对每次一的内存访问都进行分析以确保进程是线程安全的,而是希望将一些现有的线程安全组件组合为更大规模的组件或进程。这一章将介绍一些组合模式,这些模式能够使一个类更容易称为线程安全的,并且在维护这些类时不会无意中破坏类的安全保证。
4.1设计线程安全的类
在线程安全的进程中,虽然可以将进程的所有状态都保存在公有的静态域中,但与那些将状态封装起来的进程相比,这些进程的线程安全性更难以得到验证,并且在修改时也更难以确保其线程安全性。通过使用封装技术,可以使得在不对整个进程进行分析的情况下就可以判断一个类是否是线程安全的。 在设计线程安全类的过程中,需要包含以下三个基本要素:
-
找出构成对象状态的所有变量。
-
找出约束状态变量的不变性条件。
-
建立对象状态的并发访问管理策略。
要分析对象的状态,首先从对象的域开始。如果对象中的所有域都是基本类型的变量,那么这些域将构成对象的全部状态。进程4-1中的Counter只有一个域value,因此这个域就是Counter的全部状态。对于含有n个基本类型域的对象,其状态就是这些域构成的n元组。例如,二维点的状态就是它的坐标值(x,y)。如果在对象的域中引用了其他对象,那么该对象的状态将包含被引用对象的域。例如LinkedList的状态就包括该链表中所有节点对象的状态。
//进程4-1 使用Java监视器模式的线程安全计数器
@ThreadSafe
  public final class Counter {
  	@GuardedBy("this") private long value = 0;
    	public synchronized long getValue() {
        return value;
    	}
    	public synchronized long increment大专栏  Java Concurrency>() {
        if(value == Long.MAX_VALUE)
          throw new illegalStateException("counter overflow");
        return ++value;
    	}
  }
同步策略(synchronization Policy)定义了如何在不违背对象不变性条件或后验条件的情况下对其状态的访问操作进行协同。同步策略规定了如何将不可变性、线程封闭与加锁机制等结合起来以维护线程的安全性,并且还规定了哪些变量由哪些锁来保护。要确保开发人员可以对这个类进行分析与维护,就必须将同步策略写为正式文档。
4.1.1 收集同步需求
要确保类的线程安全性,就需要确保它的不可变性条件不会再并发访问的情况下被破坏,这就需要对其状态进行推断。对象和变量都有一个状态空间,即所有可能的取值。状态空间越小,就越容易判断线程的状态。final类型的域使用的越多,就越能简化对象可能状态的分析过程。(极端情况下,不可变对象只有唯一的状态)
在许多类中都定义了一些不可变条件,用于判断状态是否有效。Counter中的value域是long类型的变量,其状态空间从Long.MIN_VALUE到Long.MAX_VALUE,但value在取值范围上存在着一个限制,即不能为负值。
同样,在操作中还会包含一些后验条件来判断状态迁移是否是有效的。如果Counter的当前状态是17,那么下一个有效状态只能是18。当下一个状态需要依赖当前状态时,这个操作就必须是一个复合操作。并非所有的操作都会在状态转换上施加限制,例如,当更新一个保存当前温度的变量时,该变量之前的状态并不会影响计算结果。
由于不变性以及后验条件在状态及状态转换上施加了各种约束,因此就需要额外的同步与封装。如果某些状态是无效的,那么必须对底层的状态变量进行封装,否则客户代码可能会使对象处于无效状态。如果在某个操作中存在无效的状态转换。那么该操作必须是原子的。另外,如果在类中没有施加这种约束,那么就可以放宽封装性或序列化等需求,以便获得更高的灵活性或性能。
在类中也可以包含同时约束多个状态变量的不变性条件,在一个表示数值范围的类中可以包含两个状态的变量,分别表示范围的上下界。这些变量必须遵守的约束是:下界值应小于或等于上届值。类似于这种包含多个变量的不变性条件将带来原子性的需求:这些相关变量必须在单个原子操作中进行读取或更新。不能先更新一个变量,然后释放锁并再次获得锁,然后在更新其他变量。因为释放锁后,可能会使对象处于无效状态。如果在一个不变性条件中包含多个变量,那么在执行任何访问相关变量的操作时,都必须保护这些变量的锁。
如果不了解对象的不变性条件与后验条件,那么就不能确保线程安全性。要满足在状态变量的有效值或状态转换上的各种约束条件,就需要借助于原子性与封装性。
4.1.2依赖状态的操作
类的不变性条件与后验条件约束了在对象上有哪些状态和状态转换是有效的。在某些对象的方法中还包含一些基于状态的先验条件。例如,不能从空队列中移除一个元素,再删除元素前,队列必须处于非空状态。如果在某个操作中包含基于状态的先验条件,那么这个操作就称为依赖状态的操作。
在单线程进程中,如果某个操作无法满足先验条件,那么就只能失败。但在并发进程中,先验条件可能会由于其他线程执行的操作而变成真。在并发进程中要一直等到先验条件为真,然后在执行该操作。
在Java中,等待某个条件为真的各种内置机制(包括的等待和通知机制)都与内置加锁机制紧密关联,要想正确地使用它们并不容易。要想实现某个等待验证先验条件为真时才执行的条件,一种更简单的方法是通过现有库中的类(例如阻塞队列[Blocking Queue]或信号量[Semaphore])来实现依赖状态的行为。这些会在后续进行介绍。
4.1.3状态的所有权
4.1节中曾指出,如果以某个对象为根节点构造一张对象图,那么该对象的状态将是对象图中所有对象包含的域的一个子集。为什么是“子集”?在从对象可以达到的所有域中,需要满足哪些条件才不属于对象状态的一部分?
在定义哪些变量将构成对象的状态时,只考虑对象拥有的数据。所有权(Ownership)在Java中并没有得到充分的体现,而是属于类设计中的一个要素。如果分配并填充了一个HashMap对象,那么就相当于创建了多个对象:HashMap对象,在HashMap对象中包含的多个对象,以及在Map.Entry中可能包含的内部对象。HashMap对象的逻辑状态包括所有的Map.Entry对象以及内部对象,即使这些对象都是一些独立的对象。
无论如何,垃圾回收机制使我们避免了如何处理所有权的问题。在C++中,当把一个对象传递给某个方法时,必须认真考虑这种操作是否传递对象的所有权,是短期还是长期的所有权。在Java中同样存在这些所有权模型,只不过垃圾回收器为我们减少了许多在引用共享方面常见的错误,因此降低了在所有权处理上的开销。
许多情况下,所有权和封装性总是相互关联的:对象封装它拥有的状态,反之也成立,即对它封装的状态拥有所有权。状态变量的所有者将决定采用何种加锁协议来维持变量状态的完整性。所有权意味着控制权。然而,如果发布了某个可变状态的引用,那么就不再拥有独占的控制权,最多是“共享控制权”。对于从构造函数或者从方法中传递进来的对象,类通常并不拥有这些对象,除非这些方法是被专门设计为转移传递进来的对象的所有权(例如,同步容器封装器的工厂方法)。
容器类通常表现出一种“所有权分离”的形式,其中容器类拥有器自身的状态,而客户代码则拥有容器中各个对象的状态。Servlet框架中的ServletContext就是其中一个示例。ServletContext为Servlet提供了类似于Map形式的对象容器服务,在ServletContext中可以通过名称来注册(setAttribute)或获取(getAttribute)应用进程对象。由Servlet容器实现的ServletContext必须是线程安全的,因为它肯定会被多个线程同时访问。当调用setAttribute和getAttribute时,Servlet不需要使用同步,但当使用保存在ServletContext中的对象时,则可能需要同步。这些对象由应用进程拥有,Servlet容器只是替应用进程报关它们。与所有共享对象一样,它们鼻血被安全地共享。为了防止多个线程在并发访问同一个对象时产生的相互干扰,这些对象应该要么是线程安全的对象,要么是事实不可变的对象,或者由锁来保护的对象。
4.2实例封闭
如果某对象不是线程安全的,那么可以通过多种技术使其在多线程进程中安全地使用。你可以确保该对象只能由单个线程访问(线程封闭),或者通过一个锁来保护对该对象的所有访问。
封装简化了线程安全类的实现过程,它提供了一种实例封闭机制(Instance Confinement,简称封闭),当一个对象被封装到另一个对象中时,能够访问被封装对象的所有代码路径都是已知的。与对象可以由整个进程访问的情况相比,更易于对代码进行分析。通过将封闭机制与合适的加锁策略结合起来,可以确保以线程安全的方式来使用非线程安全的对象。
最后的最后,老婆我爱你。

JAVA concurrency -- AQS 源码详解
概述
AQS全称AbstractQueuedSynchronizer是jdk中一个非常重要的方法,这是一个jdk的同步器的实现,JUC中的很多类例如ReentrantLock等的实现都依赖于AQS。
CAS
AQS的同步实现方式依赖于CAS,那么CAS究竟是什么呢?
CAS全称Compare And Swap,比较然后交换。JAVA中CAS的实现位于Unsafe类下。CAS本质上属于乐观锁,它的实现原理如下:当你想要修改位于某个内存地址R的值的时候,会带入两个值,一个是在地址上的旧值A,一个是想要修改的新值B。比较内存地址上的值与A,如果相同则将B的值更新入内存地址R中。
CAS有优点也有缺点,但是在本文中不详细阐述了,大家可以自行了解。在这里只是介绍下CAS是什么,为我们理解AQS的实现做好准备。
AQS
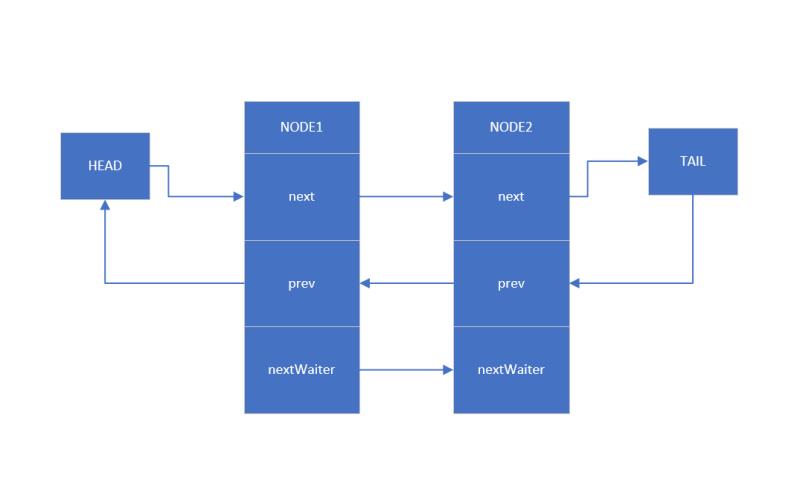
这个是AQS内部维护的FIFO链表的示意图,我们可以看出每个节点会维护一个prev和一个next指针来维护双向链表。除此之外addWaiter额外维护了一个单向链表用于Condition的操作。每个Node节点内部会封装一个线程,当线程争抢锁失败后会封装成Node加入到ASQ队列中去。
FIFO队列节点插入
AQS内部维护了一个双向链表,链表的节点定义如下:
    static final class Node {
        // 共享模式
        static final Node SHARED = new Node();
        // 独占模式
        static final Node EXCLUSIVE = null;

        // 节点的状态值定义
        static final int CANCELLED =  1;
        static final int SIGNAL    = -1;
        static final int CONDITION = -2;
        static final int PROPAGATE = -3;

        // 节点状态,取值为以上定义的CANCELLED/SIGNAL/CONDITION/PROPAGATE以及0
        volatile int waitStatus;

        // 先驱节点
        volatile Node prev;

        // 后继节点
        volatile Node next;

        // 节点线程
        volatile Thread thread;

        Node nextWaiter;

        final boolean isShared() {
            return nextWaiter == SHARED;
        }

        final Node predecessor() throws NullPointerException {
            Node p = prev;
            if (p == null)
                throw new NullPointerException();
            else
                return p;
        }

        Node() {    // Used to establish initial head or SHARED marker
        }

        Node(Thread thread, Node mode) {     // Used by addWaiter
            this.nextWaiter = mode;
            this.thread = thread;
        }

        Node(Thread thread, int waitStatus) { // Used by Condition
            this.waitStatus = waitStatus;
            this.thread = thread;
        }
    }
链表插入的代码如下
    private Node addWaiter(Node mode) {
        // 根据传入的模式(共享或者独占)以及当前线程创建新的节点
        Node node = new Node(Thread.currentThread(), mode);
        // 获取等待队列的尾节点
        Node pred = tail;
        // 如果尾节点不为空,即等待队列不为空,那么新加入的节点就直接加在尾部
        if (pred != null) {
            node.prev = pred;
            if (compareAndSetTail(pred, node)) {
                pred.next = node;
                return node;
            }
        }
        // 如果等待队列空了,或者是CAS直接把新结点加在尾部失败,那么调用enq来加入节点
        enq(node);
        return node;
    }

    private Node enq(final Node node) {
        for (;;) {
            // 首先申明临时变量赋值为尾巴节点
            Node t = tail;
            // 判断尾巴节点是否为空
            if (t == null) { // Must initialize
                // 如果为空,经过CAS,新创建一个节点为头节点,把头节点赋值给尾巴节点
                if (compareAndSetHead(new Node()))
                    tail = head;
            } else {
                // 如果不为空,把当前节点的先驱节点赋值为尾巴节点
                node.prev = t;
                // CAS操作,将当前节点赋值给尾巴系欸但,将前尾巴节点的后继节点赋值为当前节点,至此,当前节点成为最新的尾巴节点
                if (compareAndSetTail(t, node)) {
                    t.next = node;
                    return t;
                }
            }
        }
    }
这里有几个需要注意的地方:
- 注意上述的代码
enq内部是一个无限循环,是为了要保证CAS操作一定要成功,如果不成功就反复尝试直到成功为止。 - 我们可以看到
addWaiter方法中会有一次尝试直接把新节点放到尾部,这是一次尝试提高效率的操作。如果失败,再使用通用的enq方法来加入节点。 - 当发现为节点为空的时候,不是用当前节点来初始化首尾,而是用一个空节点来作为虚拟头节点的存在。
- 此外上述插入新节点的代码里就利用到的CAS在内部进行了一次封装,具体的代码如下:
AQS内部将CAS的代码再次进行了一层封装,使得它可以轻松调用于内部方法。private static final Unsafe unsafe = Unsafe.getUnsafe(); private static final long stateOffset; private static final long headOffset; private static final long tailOffset; private static final long waitStatusOffset; private static final long nextOffset; static { try { stateOffset = unsafe.objectFieldOffset (AbstractQueuedSynchronizer.class.getDeclaredField("state")); headOffset = unsafe.objectFieldOffset (AbstractQueuedSynchronizer.class.getDeclaredField("head")); tailOffset = unsafe.objectFieldOffset (AbstractQueuedSynchronizer.class.getDeclaredField("tail")); waitStatusOffset = unsafe.objectFieldOffset (Node.class.getDeclaredField("waitStatus")); nextOffset = unsafe.objectFieldOffset (Node.class.getDeclaredField("next")); } catch (Exception ex) { throw new Error(ex); } } private final boolean compareAndSetHead(Node update) { return unsafe.compareAndSwapObject(this, headOffset, null, update); } private final boolean compareAndSetTail(Node expect, Node update) { return unsafe.compareAndSwapObject(this, tailOffset, expect, update); } private static final boolean compareAndSetWaitStatus(Node node, int expect, int update) { return unsafe.compareAndSwapInt(node, waitStatusOffset, expect, update); } private static final boolean compareAndSetNext(Node node, Node expect, Node update) { return unsafe.compareAndSwapObject(node, nextOffset, expect, update); }
AQS的共享模式与独占模式
独占模式
所谓独占模式,指的是同时只能有一个线程获取到同步器。例如可重入锁ReentrantLock就是一个AQS的独占模式的典型实现。
AQS的独占模式有两个核心方法:
- 获取同步器
acquire:
获取同步器的方法比较简单,调用public final void acquire(int arg) { if (!tryAcquire(arg) && acquireQueued(addWaiter(Node.EXCLUSIVE), arg)) selfInterrupt(); }tryAcquire来判断是否可以获取同步器,然后调用acquireQueued来将新加入的节点放入队列。然后我们来看下这两个方法的具体实现,首先是tryAcquire:
我们可以看到protected boolean tryAcquire(int arg) { throw new UnsupportedOperationException(); }tryAcquire并没有在AQS内部实现,而是由AQS的具体实现类根据自己的需求自行实现的。那么再来看acquireQueued:final boolean acquireQueued(final Node node, int arg) { boolean failed = true; try { boolean interrupted = false; for (;;) { // 获取node的先驱节点 final Node p = node.predecessor(); // 如果是头节点那就去尝试着获取同步器 if (p == head && tryAcquire(arg)) { // 如果获取同步器成功那就重新设置头节点并且返回 setHead(node); p.next = null; // help GC failed = false; return interrupted; } // 检查获取同步器失败后的节点是否需要阻塞住(park) if (shouldParkAfterFailedAcquire(p, node) && parkAndCheckInterrupt()) interrupted = true; } } finally { if (failed) cancelAcquire(node); } } // 检查获取同步器失败后的节点是否需要阻塞住 private static boolean shouldParkAfterFailedAcquire(Node pred, Node node) { int ws = pred.waitStatus; if (ws == Node.SIGNAL) // 如果节点状态为SIGNAL,那就需要把节点park住 return true; if (ws > 0) { // 如果ws大于0,意味着节点状态为CANCEL,那就不断循环向前,把所有的取消节点全部删除掉 do { node.prev = pred = pred.prev; } while (pred.waitStatus > 0); pred.next = node; } else { // 走到这一步,那就只有几种情况: // 1. 状态为0,那他就是一个新加入的节点 // 2. 状态为PROPAGATE,那他就是一个共享模式的状态 // 无论是以上的那种情况走到这里,都需要尝试将节点状态设置为SIGNAL compareAndSetWaitStatus(pred, ws, Node.SIGNAL); } return false; } - 释放同步器
release:
释放同步器的方法主要是这样的:首先调用public final boolean release(int arg) { if (tryRelease(arg)) { Node h = head; if (h != null && h.waitStatus != 0) unparkSuccessor(h); return true; } return false; }tryRelease来看看是否满足释放同步器的条件,如果满足条件,那么需要在释放前先将后继节点唤醒(如果有后继节点,并且后继节点状态不为0)。来看下具体代码:
可以看到和获取同步器一样protected boolean tryRelease(int arg) { throw new UnsupportedOperationException(); } private void unparkSuccessor(Node node) { int ws = node.waitStatus; // 将当前节点的状态设置为0,允许失败 if (ws < 0) compareAndSetWaitStatus(node, ws, 0); // 获取当前节点的后继节点 Node s = node.next; if (s == null || s.waitStatus > 0) { // 如果后继节点为空或者是状态大于0,即状态为CANCEL, // 则从尾部开始向前遍历,找到状态不为CANCEL的节点,设置为需要唤醒的节点 s = null; for (Node t = tail; t != null && t != node; t = t.prev) if (t.waitStatus <= 0) s = t; } if (s != null) LockSupport.unpark(s.thread); }tryRelease也是需要AQS实现类自己实现的。在唤醒后继节点时有这么一个问题,为什么需要从尾部开始遍历而不是从前面开始遍历?这里我们可以去看一下插入节点的代码,即enq,里面插入节点是在尾部插入的,代码是这样的:
在CAS设置了尾节点的值之后,在node.prev = t; if (compareAndSetTail(t, node)) { t.next = node; return t; }t.next指向node之前,如果是从前开始遍历,遍历到这里就会发现节点为null,这个时候就会漏掉部分节点。反之如果从后往前遍历则没有这些问题。
共享模式
所谓的共享模式,是指多个线程可以共享同一个同步器。
共享模式的两个核心方法:
-
获取同步器
acquireShared:public final void acquireShared(int arg) { if (tryAcquireShared(arg) < 0) doAcquireShared(arg); }和独占模式一样
tryAcquireShared同样需要子类自己实现。// 不同于其他的方法,共享模式的tryAcquire方法返回的不是一个布尔值, // 而是一个int,根据代码中的注释我们可以得知,这个int值如果是小于0, // 说明获取失败,如果等于0说明获取成功,但是没有剩下的余量,如果大于0,则说明获取成功并且有余量 protected int tryAcquireShared(int arg) { throw new UnsupportedOperationException(); }然后我们来看
doAcquireShared:private void doAcquireShared(int arg) { // 将node插入fifo队列中 final Node node = addWaiter(Node.SHARED); boolean failed = true; try { boolean interrupted = false; for (;;) { // 获取node的先驱节点 final Node p = node.predecessor(); if (p == head) { // 如果该节点为头节点,那么尝试获取共享同步器 int r = tryAcquireShared(arg); if (r >= 0) { // 如果获取成功并且留有余量,那么就设置为头节点 setHeadAndPropagate(node, r); p.next = null; // help GC if (interrupted) selfInterrupt(); failed = false; return; } } // 以下是和独占模式相同的实现 if (shouldParkAfterFailedAcquire(p, node) && parkAndCheckInterrupt()) interrupted = true; } } finally { if (failed) cancelAcquire(node); } }我们可以看到同步模式中和独占模式最大的不同是
setHeadAndPropagate,我们看下具体实现:private void setHeadAndPropagate(Node node, int propagate) { // 记录下旧的头节点 Node h = head; setHead(node); if (propagate > 0 || h == null || h.waitStatus < 0 || (h = head) == null || h.waitStatus < 0) { Node s = node.next; if (s == null || s.isShared()) doReleaseShared(); } }我们可以看到
setHeadAndPropagate中依然是调用了setHead方法,不同之处在于他会在设置完头节点后会根据条件释放后继节点。造成这点不同的原因就是因为在独占模式中,同时只能有一个线程占有同步器,所以在获取同步器的过程中不会出现需要唤醒其他线程的情况,但是在共享模式中,则可以有多个线程持有同步器。因此判断条件如下:propagate > 0: 当还剩有余量的时候h == null || h.waitStatus < 0: 当旧的头节点为空或者是状态为SIGNAL或者PROPAGATE的时候(h = head) == null || h.waitStatus < 0: 当新的头节点为空或者是状态为SIGNAL或者PROPAGATE的时候
在这几种情况下,我们需要尝试着唤醒后面的节点来尝试获取同步器。至于唤醒方法,会在
releaseShared部分解析。 -
释放同步器
releaseShared:public final boolean releaseShared(int arg) { if (tryReleaseShared(arg)) { doReleaseShared(); return true; } return false; } protected boolean tryReleaseShared(int arg) { throw new UnsupportedOperationException(); }接下来看一下
acquire和release里面都有调用了的doReleaseShared:private void doReleaseShared() { for (;;) { Node h = head; if (h != null && h != tail) { int ws = h.waitStatus; if (ws == Node.SIGNAL) { if (!compareAndSetWaitStatus(h, Node.SIGNAL, 0)) continue; // loop to recheck cases unparkSuccessor(h); } else if (ws == 0 && !compareAndSetWaitStatus(h, 0, Node.PROPAGATE)) continue; // loop on failed CAS } if (h == head) // loop if head changed break; }其实这个方法不是很容易理解,这里进行下分解。首先我们观察可以注意到这是一个无限自旋的方法,唯一的一个跳出条件就是
if (h == head),也就是说,只有当h为头节点的时候才会跳出这个循环。然后我们来看下h的值是什么,我们可以看到h在循环的开始就被赋值为了头节点Node h = head;这是怎么回事呢?这是因为在共享模式下不止一个线程可以获取到同步器,因此一个线程进行释放后续节点的操作时,其他节点可能也在进行这步操作,也就是说,在这个过程中头节点可能会进行变动。因此我们需要保证在每个线程内部如果头结点的值和自己预期不同就一直循环下去。 然后我们来看这段代码:if (ws == Node.SIGNAL) { if (!compareAndSetWaitStatus(h, Node.SIGNAL, 0)) continue; // loop to recheck cases unparkSuccessor(h); }这段代码相对比较容易理解,如果一个节点的状态为
SIGNAL那么将它的值通过CAS,变为0,并且不断的失败重试直到成功为止。然后释放它的后继节点。 比较令人费解的是下面这段代码:else if (ws == 0 && !compareAndSetWaitStatus(h, 0, Node.PROPAGATE)) continue; // loop on failed CAS这段代码究竟是干什么的呢?我们来一步一步分析。首先ws什么时候会是0,那只有一种情况,那就是这个节点是新加入的节点,也就是说队列的最后的节点成为了队列的头节点。那么什么时候这个CAS会失败呢?只有当ws不为0的时候,也就是说只有在前一刻判断ws为0,下一刻ws被其他的线程修改导致不为0的时候才会走到这步
continue;之中。至于为什么会有这一步操作呢?回想一下当ws为0的时候什么操作会改变ws的值。没错就是当有新的节点加入的时候,会调用到的shouldParkAfterFailedAcquire,里面这段代码:if (ws > 0) { do { node.prev = pred = pred.prev; } while (pred.waitStatus > 0); pred.next = node; } else { compareAndSetWaitStatus(pred, ws, Node.SIGNAL); }在这种情况下确实是需要继续进行下一轮循环,然后唤醒后续的节点。确实是有道理,但是似乎优化的太细致了,不知道是不是我的理解不到位。
Condition
condition是jdk中定义的一个条件协作的接口,常用于阻塞队列等情况下。AQS内部有一个对其的实现。
代码实现
在AQS中定义了一个类ConditionObject实现了condition接口。
    public class ConditionObject implements Condition, java.io.Serializable {
        private static final long serialVersionUID = 1173984872572414699L;
        private transient Node firstWaiter;
        private transient Node lastWaiter;

        public ConditionObject() { }

        private Node addConditionWaiter() {
            Node t = lastWaiter;

            if (t != null && t.waitStatus != Node.CONDITION) {
                unlinkCancelledWaiters();
                t = lastWaiter;
            }
            Node node = new Node(Thread.currentThread(), Node.CONDITION);
            if (t == null)
                firstWaiter = node;
            else
                t.nextWaiter = node;
            lastWaiter = node;
            return node;
        }
    }
在类中定义了两个Node,一个是condition队列的头节点,一个是尾节点。还有一个比较重要的内部方法也放到这里讲:addConditionWaiter。这个方法和之前的队列中的addWaiter有点像,但是区别在于他插入并不是依赖Node中的prev和next,而是nextWaiter,并且在代码中我们可以发现和之前的双向队列不同,condition的队列是一个单向队列。
condition中的主要方法有两个:
-
await:public final void await() throws InterruptedException { if (Thread.interrupted()) throw new InterruptedException(); // 将节点添加到Condition的队列里面 Node node = addConditionWaiter(); // 将节点持有的同步器释放掉 int savedState = fullyRelease(node); int interruptMode = 0; // 判断该节点是否已经在同步器的队列之中, // 如果在队列之中,那么就阻塞节点,等待signal或者signalAll来唤醒 // 当然如果在循环中发现interruptMode不为0,也跳出循环 while (!isOnSyncQueue(node)) { LockSupport.park(this); if ((interruptMode = checkInterruptWhileWaiting(node)) != 0) break; } // 首先获取同步器,如果获取成功,并且中断的模式非THROW_IE,则将interruptMode设置为REINTERRUPT if (acquireQueued(node, savedState) && interruptMode != THROW_IE) interruptMode = REINTERRUPT; // 清除取消的节点 if (node.nextWaiter != null) // clean up if cancelled unlinkCancelledWaiters(); // 中断处理 if (interruptMode != 0) reportInterruptAfterWait(interruptMode); }上面的代码加了一些注释,但是可能还是有点不清晰,所以逐步来进行讲解。首先这个
interruptMode是什么东西呢?我们来看代码中的定义:private static final int REINTERRUPT = 1; private static final int THROW_IE = -1;THROW_IE表示该中断需要抛出异常,REINTERRUPT则不同。那么再来看代码查询节点是否在队列中出现过是怎么实现的呢:final boolean isOnSyncQueue(Node node) { // 如果这个节点状态是CONDITION或者他先驱节点为空,则说明他不在队列内 if (node.waitStatus == Node.CONDITION || node.prev == null) return false; // 如果一个节点有后继节点,则说明他在队列内 if (node.next != null) return true; return findNodeFromTail(node); } // 从尾部开始循环查找节点是否在队列内 private boolean findNodeFromTail(Node node) { Node t = tail; for (;;) { if (t == node) return true; if (t == null) return false; t = t.prev; } }然后我们来看下
(interruptMode = checkInterruptWhileWaiting(node)) != 0这个条件在什么情况下成立,我们看下checkInterruptWhileWaiting的实现:private int checkInterruptWhileWaiting(Node node) { return Thread.interrupted() ? (transferAfterCancelledWait(node) ? THROW_IE : REINTERRUPT) : 0; }这个方法实现很明了,如果一个线程被中断了,那么就根据
transferAfterCancelledWait方法的结果来判断中断的类型,否则返回0。那么循环跳出的条件就很明了了,要么是节点已经在同步器队列内了,要么是线程被中断了(当然前提是有signal方法唤醒了阻塞的线程) -
signal:public final void signal() { if (!isHeldExclusively()) throw new IllegalMonitorStateException(); Node first = firstWaiter; if (first != null) doSignal(first); }这里涉及到了两个方法:一个是
isHeldExclusively,这个方法是由子类实现的,判断当前是否是在独占资源,另一个是doSignal也就是signal实现的核心方法,代码如下:// 节点传递直到找到非取消节点或者null private void doSignal(Node first) { do { if ( (firstWaiter = first.nextWaiter) == null) lastWaiter = null; first.nextWaiter = null; } while (!transferForSignal(first) && (first = firstWaiter) != null); } final boolean transferForSignal(Node node) { // CAS修改node的值,如果修改失败返回false if (!compareAndSetWaitStatus(node, Node.CONDITION, 0)) return false; // node的值成功修改成为0,将节点放入同步队列内 Node p = enq(node); int ws = p.waitStatus; // 如果节点已经取消了或者是将状态修改为SINGNAL失败,则唤醒这个节点的线程 if (ws > 0 || !compareAndSetWaitStatus(p, ws, Node.SIGNAL)) LockSupport.unpark(node.thread); return true; }
当然Condition内部除了这两个核心方法之外还有诸如signalAll,awaitNanos等方法,实现大致相同,大家可以自行学习一下。
总结
java锁的基础实现靠的是AQS,AQS的基础使用的是CAS。AQS内部的实现依赖于FIFO双向队列,Condition的实现依靠的是一个单向链表。在AQS内部使用了大量的自旋操作,因而会对性能有一定的挑战,因此设计者在内部进行了大量的优化。在本文中未能将这些优化尽数到来,大家可以自己找一份源码细细品味。

JAVA concurrency -- CyclicBarrier 与 CountDownLatch 源码详解
概述
CountDownLatch和CyclicBarrier有着相似之处,并且也常常有人将他们拿出来进行比较,这次,笔者试着从源码的角度分别解析这两个类,并且从源码的角度出发,看看两个类的不同之处。
CountDownLatch
CountDownLatch从字面上来看是一个计数工具类,实际上这个类是用来进行多线程计数的JAVA方法。
CountDownLatch内部的实现主要是依靠AQS的共享模式。当一个线程把CountDownLatch初始化了一个count之后,其他的线程调用await就会阻塞住,直到其他的线程一个一个调用countDown方法进行release操作,把count的值减到0,即把同步锁释放掉,await才会进行下去。
Sync
内部主要还是实现了一个继承自AQS的同步器Sync。Sync源码如下:
    private static final class Sync extends AbstractQueuedSynchronizer {
        private static final long serialVersionUID = 4982264981922014374L;

        // 构造方法,参数是count的数值
        Sync(int count) {
            // 内部使用state来存储count
            setState(count);
        }

        // 获取count的值
        int getCount() {
            return getState();
        }

        // 尝试获取分享模式同步器
        protected int tryAcquireShared(int acquires) {
            // 判断state的值,如果为0则获取成功,否则获取失败
            // 继承自AQS,根据AQS中的注释我们可以知道如果返回结果
            // 大于0则说明获取成功,如果小于0则说明获取失败
            // 此处不会返回0,因为没有意义
            return (getState() == 0) ? 1 : -1;
        }

        // 释放同步器
        protected boolean tryReleaseShared(int releases) {
            // 自选操作
            for (;;) {
                // 获取state
                int c = getState();
                // 如果state为0,直接返回false
                if (c == 0)
                    return false;
                // 计算state-1的结果
                int nextc = c-1;
                // CAS操作将这个值同步到state上
                if (compareAndSetState(c, nextc))
                    // 如果同步成功,则判断是否此时state为0
                    return nextc == 0;
            }
        }
    }
Sync是继承自AQS的同步器,这段代码中值得拿出来讨论的有以下几点:
-
为什么用state来存储count的数值?
因为state和count其实上是一个概念,当state为0的时候说明资源是空闲的,当count为0时,说明所有的
CountDownLatch线程都已经完成,所以两者虽然说不是同样的意义,但是在代码实现层面的表现是完全一致的,因此可以将count记录在state中。 -
为什么
tryAcquireShared不会返回0?首先需要解释下
tryAcquireShared在AQS中可能的返回值:负数说明是不可以获取共享锁,0说明是可以获取共享锁,但是当前线程获取后已经把所有的共享锁资源占完了,接下来的线程将不会再有多余资源可以获取了,正数则说明了你可以获取共享锁,并且之后还有余量可以给其他线程提供共享锁。然后我们回过来看CountDownLatch内部的tryAcquireShared,我们在实现上完全不关注后续线程,后续的资源占用状况,我只要当前状态,那么这个0的返回值实际上是没有必要的。 -
为什么
tryReleaseShared中的参数不被使用到?根据这个类的实现方式,我们可以知道
tryReleaseShared的参数一定是1,因为线程的完成一定是一个一个倒数完成的。实际上我们去看countDown方法内部调用到了sync.releaseShared方法的时候可以发现他写死了参数为1,所以实际上tryReleaseShared中的参数不被使用到的原因是因为参数值固定为1.
构造函数和方法
    // 构造方法
    public CountDownLatch(int count) {
        // count必须大于0
        if (count < 0) throw new IllegalArgumentException("count < 0");
        // 初始化Sync
        this.sync = new Sync(count);
    }


    // 等待获取锁(可被打断)
    public void await() throws InterruptedException {
        sync.acquireSharedInterruptibly(1);
    }

    // 等待获取锁(延迟)
    public boolean await(long timeout, TimeUnit unit)
        throws InterruptedException {
        return sync.tryAcquireSharedNanos(1, unit.toNanos(timeout));
    }

    // 计数器降低(释放同步器)
    // 每次调用减少1
    public void countDown() {
        sync.releaseShared(1);
    }

    // 获取count
    public long getCount() {
        return sync.getCount();
    }

    // toString
    public String toString() {
        return super.toString() + "[Count = " + sync.getCount() + "]";
    }
CyclicBarrier
CyclicBarrier从字面上看是循环栅栏,在JAVA中的作用是让所有的线程完成后进行等待,直到所有的线程全部完成,再进行接下来的操作。
CyclicBarrier并没有直接继承AQS实现同步,而是借助了可重入锁ReentrantLock以及Condition来完成自己的内部逻辑。
成员变量
    // 锁
    private final ReentrantLock lock = new ReentrantLock();

    // 条件
    private final Condition trip = lock.newCondition();

    // 线程数
    private final int parties;

    // 执行完所有线程后执行的Runnable方法,可以为空
    private final Runnable barrierCommand;

    // 分组
    private Generation generation = new Generation();

    // 未完成的线程数
    private int count;

    private static class Generation {
        boolean broken = false;
    }
我们可以看到成员变量中有一个很陌生的类Generation,这个是CyclicBarrier内部声明的一个static类,作用是帮助区分线程的分组分代,使得CyclicBarrier可以被复用,如果这个简单的解释不能够让你很好地理解的话可以看接下来的源码解析,通过实现来理解它的用途。
构造函数
    public CyclicBarrier(int parties, Runnable barrierAction) {
        if (parties <= 0) throw new IllegalArgumentException();
        this.parties = parties;
        this.count = parties;
        this.barrierCommand = barrierAction;


    public CyclicBarrier(int parties) {
        this(parties, null);
    }
很常规的构造函数,只是简单的初始化成员变量,没有特别的地方。
核心方法
    public int await() throws InterruptedException, BrokenBarrierException {
        try {
            return dowait(false, 0L);
        } catch (TimeoutException toe) {
            throw new Error(toe);
        }
    }

    public int await(long timeout, TimeUnit unit)
        throws InterruptedException,
               BrokenBarrierException,
               TimeoutException {
        return dowait(true, unit.toNanos(timeout));
    }
await是CyclicBarrier的核心方法,就是靠着这个方法来实现线程的统一规划的,其中调用的是内部实现的doWait,我们来看下代码:
    private int dowait(boolean timed, long nanos)
        throws InterruptedException, BrokenBarrierException,
               TimeoutException {
        // 常规的加锁操作,至于为什么要用本地变量操作,
        // 可以去看下我写的另一篇ArrayBlockingQueue的相关文章
        final ReentrantLock lock = this.lock;
        lock.lock();
        try {
            // 获取Generation类
            final Generation g = generation;

            // 查看generation是否是broken,如果是broken的,
            // 那说明之前可能因为某些线程中断或者是一些意外状态导致没有办法
            // 完成所有线程到达终点(tripped)的目标而只能报错
            if (g.broken)
                throw new BrokenBarrierException();

            // 如果线程被外部中断需要报错,并且在内部需要将
            // generation的broken置为true来让其他线程能够感知到中断
            if (Thread.interrupted()) {
                breakBarrier();
                throw new InterruptedException();
            }

            // 将线程未完成数减1
            int index = --count;
            // 如果此时剩余线程数为0,则说明所有的线程均已完成,即到达tripped状态
            if (index == 0) {
                boolean ranAction = false;
                try {
                    // 如果有预设完成后执行的方法,则执行
                    final Runnable command = barrierCommand;
                    if (command != null)
                        command.run();
                    ranAction = true;
                    // 此时由于这一个轮回的线程已经全部完成,
                    // 所以调用nextGeneration方法开启一个新的轮回
                    nextGeneration();
                    return 0;
                } finally {
                    if (!ranAction)
                        breakBarrier();
                }
            }

            // 如果此时还有其他的线程未完成,则当前线程开启自旋模式
            for (;;) {
                try {
                    if (!timed)
                        // 如果timed为false,trip则阻塞住直到被唤醒
                        trip.await();
                    else if (nanos > 0L)
                        // 如果timed为true,则调用awaitNanos设定时间
                        nanos = trip.awaitNanos(nanos);
                } catch (InterruptedException ie) {
                    if (g == generation && ! g.broken) {
                        breakBarrier();
                        throw ie;
                    } else {
                        Thread.currentThread().interrupt();
                    }
                }

                // 查看generation是否是broken,如果是broken的抛出异常
                if (g.broken)
                    throw new BrokenBarrierException();

                // 如果g != generation意味着generation
                // 已经被赋予了一个新的对象,这说明要么是所有线程已经完成任务开启下一个轮回,
                // 要么是已经失败了,然后开启的下一个轮回,无论是哪一种情况,都return
                if (g != generation)
                    return index;

                // 如果已经超时,则强制打断
                if (timed && nanos <= 0L) {
                    breakBarrier();
                    throw new TimeoutException();
                }
            }
        } finally {
            lock.unlock();
        }
    }
看完这段核心代码之后我们回头再来反思Generation的意义,我们已经可以大致的给出使用Generation的理由了:
不同于CountDownLatch的实现,CyclicBarrier采取了更加复杂的方式,原因便是因为内部涉及到了多线程之间的干预与通信,CountDownLatch不关心线程的实现与进程,他只是一个计数器,而CyclicBarrier则需要知道线程是否正常的完结,是否被中断,如果用其他的方式代价会比较高,因此,CyclicBarrier的作者通过静态内部类的方式将整个分代的状态共享于多个线程之间,保证每个线程能够获取到栅栏的状态以及能够将自身的状态更好的反馈回去。同时,这种方式便于重置,也使得CyclicBarrier可以高效的重用。至于为什么broken没有用volatile修饰,因为类的方法内部全部都上了锁,所以不会出现数据不同步的问题。
总结
CountDownLatch和CyclicBarrier从使用上来说可能会有一些相似之处,但是在我们看完源码之后我们会发现两者可以说是天差地别,实现原理,实现方式,应用场景均不相同,总结下来有以下几点:
CountDownLatch实现直接依托于AQS;CyclicBarrier则是借助了ReentrantLock以及ConditionCountDownLatch是作为计数器存在的,因此采取了讨巧的设计,源码结构清晰并且简单,同样功能也较为简单;CyclicBarrier则为了实现多线程的掌控,采用了比较复杂的设计,在代码实现上也显得比较弯弯绕绕。- 由于
CyclicBarrier采用的实现方式,相比一次性的CountDownLatch,CyclicBarrier可以多次重复使用 - 计数方式的不同:
CountDownLatch采用累加计数,CyclicBarrier则使用倒数计数
关于java concurrency in practice - 札记2和java concurrency in practice中文的介绍已经告一段落,感谢您的耐心阅读,如果想了解更多关于Java 8 Concurrency Tutorial--转、Java Concurrency、JAVA concurrency -- AQS 源码详解、JAVA concurrency -- CyclicBarrier 与 CountDownLatch 源码详解的相关信息,请在本站寻找。
本文标签:


![[转帖]Ubuntu 安装 Wine方法(ubuntu如何安装wine)](https://www.gvkun.com/zb_users/cache/thumbs/4c83df0e2303284d68480d1b1378581d-180-120-1.jpg)

