关于【Vue.js】900-Vue3.0进阶之VNode探秘和vue的vnode的问题就给大家分享到这里,感谢你花时间阅读本站内容,更多关于【Vue.js】873-Vue3.0进阶之指令探秘、【Vue
关于【Vue.js】900- Vue 3.0 进阶之 VNode 探秘和vue的vnode的问题就给大家分享到这里,感谢你花时间阅读本站内容,更多关于【Vue.js】873- Vue 3.0 进阶之指令探秘、【Vue.js】875- Vue 3.0 进阶之自定义事件探秘、【Vue.js】880- Vue 3.0 进阶之双向绑定探秘、【Vue.js】890- Vue 3.0 进阶之 VNode 探秘等相关知识的信息别忘了在本站进行查找喔。
本文目录一览:- 【Vue.js】900- Vue 3.0 进阶之 VNode 探秘(vue的vnode)
- 【Vue.js】873- Vue 3.0 进阶之指令探秘
- 【Vue.js】875- Vue 3.0 进阶之自定义事件探秘
- 【Vue.js】880- Vue 3.0 进阶之双向绑定探秘
- 【Vue.js】890- Vue 3.0 进阶之 VNode 探秘
")
【Vue.js】900- Vue 3.0 进阶之 VNode 探秘(vue的vnode)
本文是 Vue 3.0 进阶系列 的第五篇文章,在这篇文章中,阿宝哥将介绍 Vue 3 中的核心对象 —— VNode,该对象用于描述节点的信息,它的全称是虚拟节点(virtual node)。与 “虚拟节点” 相关联的另一个概念是 “虚拟 DOM”,它是我们对由 Vue 组件树建立起来的整个 VNode 树的称呼。通常一个 Vue 应用会以一棵嵌套的组件树的形式来组织:

(图片来源:https://v3.cn.vuejs.org/)
所以 “虚拟 DOM” 对 Vue 应用来说,是至关重要的。而 “虚拟 DOM” 又是由 VNode 组成的,它是 Vue 底层的核心基石。接下来,阿宝哥将带大家一起来探索 Vue 3 中与 VNode 相关的一些知识。
一、VNode 长什么样?
// packages/runtime-core/src/vnode.ts
export interface VNode<
  HostNode = RendererNode,
  HostElement = RendererElement,
  ExtraProps = { [key: string]: any }
> {
 // 省略内部的属性
}
在 runtime-core/src/vnode.ts 文件中,我们找到了 VNode 的类型定义。通过 VNode 的类型定义可知,VNode 本质是一个对象,该对象中按照属性的作用,分为 5 大类。这里阿宝哥只详细介绍其中常见的两大类型属性 —— 内部属性 和 DOM 属性:
1.1 内部属性
__v_isVNode: true // 标识是否为VNode
[ReactiveFlags.SKIP]: true // 标识VNode不是observable
type: VNodeTypes // VNode 类型
props: (VNodeProps & ExtraProps) | null // 属性信息
key: string | number | null // 特殊 attribute 主要用在 Vue 的虚拟 DOM 算法
ref: VNodeNormalizedRef | null // 被用来给元素或子组件注册引用信息。
scopeId: string | null // SFC only
children: VNodeNormalizedChildren // 保存子节点
component: ComponentInternalInstance | null // 指向VNode对应的组件实例
dirs: DirectiveBinding[] | null // 保存应用在VNode的指令信息
transition: TransitionHooks<HostElement> | null // 存储过渡效果信息
1.2 DOM 属性
el: HostNode | null // element
anchor: HostNode | null // fragment anchor
target: HostElement | null // teleport target
targetAnchor: HostNode | null // teleport target anchor
staticCount: number // number of elements contained in a static vnode
1.3 suspense 属性
suspense: SuspenseBoundary | null
ssContent: VNode | null
ssFallback: VNode | null
1.4 optimization 属性
shapeFlag: number
patchFlag: number
dynamicProps: string[] | null
dynamicChildren: VNode[] | null
1.5 应用上下文属性
appContext: AppContext | null
二、如何创建 VNode?
要创建 VNode 对象的话,我们可以使用 Vue 提供的 h 函数。也许可以更准确地将其命名为 createVNode(),但由于频繁使用和简洁,它被称为 h() 。该函数接受三个参数:
// packages/runtime-core/src/h.ts
export function h(type: any, propsOrChildren?: any, children?: any): VNode {
  const l = arguments.length
  if (l === 2) {
    if (isObject(propsOrChildren) && !isArray(propsOrChildren)) {
      // single vnode without props
      if (isVNode(propsOrChildren)) {
        return createVNode(type, null, [propsOrChildren])
      }
      // 只包含属性不含有子元素
      return createVNode(type, propsOrChildren) // h(''div'', { id: ''foo'' })
    } else {
      // 忽略属性
      return createVNode(type, null, propsOrChildren) // h(''div'', [''foo''])
    }
  } else {
    if (l > 3) {
      children = Array.prototype.slice.call(arguments, 2)
    } else if (l === 3 && isVNode(children)) {
      children = [children]
    }
    return createVNode(type, propsOrChildren, children)
  }
}
观察以上代码可知, h 函数内部的主要处理逻辑就是根据参数个数和参数类型,执行相应处理操作,但最终都是通过调用 createVNode 函数来创建 VNode 对象。在开始介绍 createVNode 函数前,阿宝哥先举一些实际开发中的示例:
const app = createApp({ // 示例一
  render: () => h(''div'', ''我是阿宝哥'')
})

const Comp = () => h("p", "我是阿宝哥"); // 示例二

app.component(''component-a'', { // 示例三
  template: "<p>我是阿宝哥</p>"
})
示例一和示例二很明显都使用了 h 函数,而示例三并未看到 h 或 createVNode 函数的身影。为了一探究竟,我们需要借助 Vue 3 Template Explorer 这个在线工具来编译一下 "<p>我是阿宝哥</p>" 模板,该模板编译后的结果如下(函数模式):
// https://vue-next-template-explorer.netlify.app/
const _Vue = Vue
return function render(_ctx, _cache, $props, $setup, $data, $options) {
  with (_ctx) {
    const { createVNode: _createVNode, openBlock: _openBlock,
      createBlock: _createBlock } = _Vue
    return (_openBlock(), _createBlock("p", null, "我是阿宝哥"))
  }
}
由以上编译结果可知, "<p>我是阿宝哥</p>" 模板被编译生成了一个 render 函数,调用该函数后会返回 createBlock 函数的调用结果。其中 createBlock 函数的实现如下所示:
// packages/runtime-core/src/vnode.ts
export function createBlock(
  type: VNodeTypes | ClassComponent,
  props?: Record<string, any> | null,
  children?: any,
  patchFlag?: number,
  dynamicProps?: string[]
): VNode {
  const vnode = createVNode(
    type,
    props,
    children,
    patchFlag,
    dynamicProps,
    true /* isBlock: prevent a block from tracking itself */
  )
  // 省略部分代码
  return vnode
}
在 createBlock 函数内部,我们终于看到了 createVNode 函数的身影。顾名思义,该函数的作用就是用于创建 VNode,接下来我们来分析一下它。
三、createVNode 函数内部做了啥?
下面我们将从参数说明和逻辑说明两方面来介绍 createVNode 函数:
3.1 参数说明
createVNode 被定义在 runtime-core/src/vnode.ts 文件中:
// packages/runtime-core/src/vnode.ts
export const createVNode = (__DEV__
  ? createVNodeWithArgsTransform
  : _createVNode) as typeof _createVNode

function _createVNode(
  type: VNodeTypes | ClassComponent | typeof NULL_DYNAMIC_COMPONENT,
  props: (Data & VNodeProps) | null = null,
  children: unknown = null,
  patchFlag: number = 0,
  dynamicProps: string[] | null = null,
  isBlockNode = false
): VNode {
  //
  return vnode
}
在分析该函数的具体代码前,我们先来看一下它的参数。该函数可以接收 6 个参数,这里阿宝哥用思维导图来重点介绍前面 2 个参数:
type 参数
// packages/runtime-core/src/vnode.ts
function _createVNode(
  type: VNodeTypes | ClassComponent | typeof NULL_DYNAMIC_COMPONENT,
  // 省略其他参数
): VNode { ... }
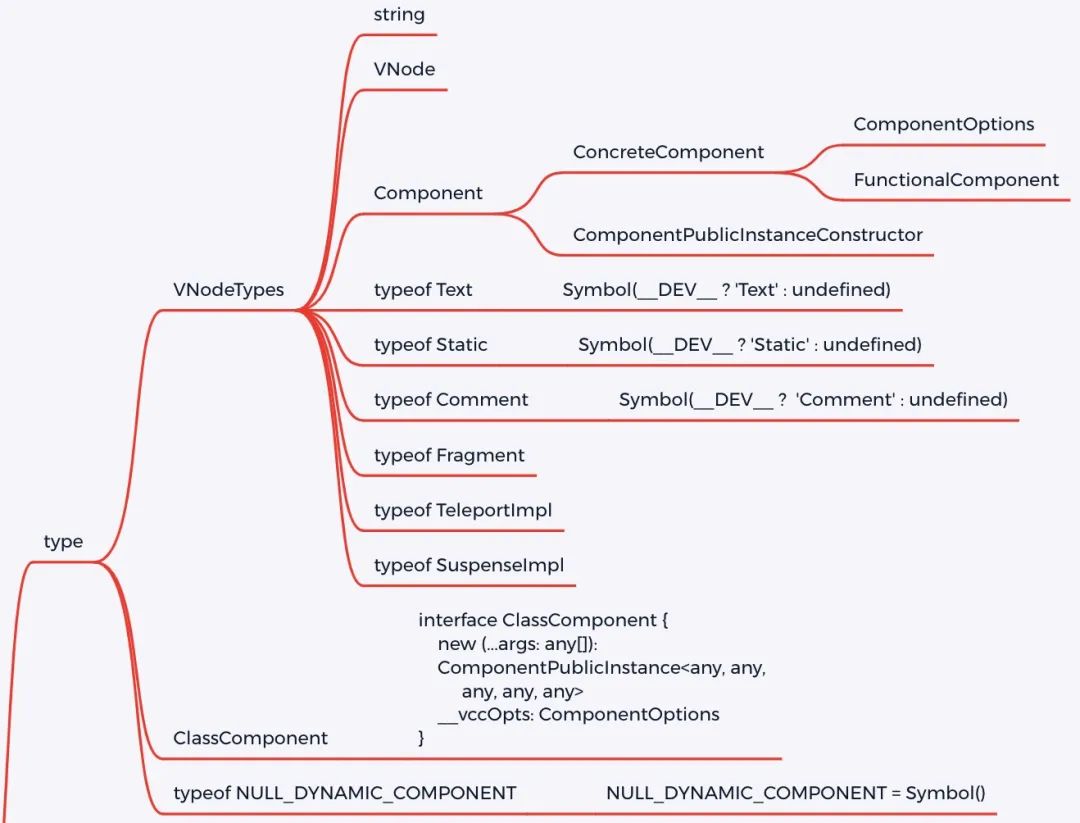
由上图可知,type 参数支持很多类型,比如常用的 string、VNode 和 Component 等。此外,也有一些陌生的面孔,比如 Text、Comment 、Static 和 Fragment 等类型,它们的定义如下:
// packages/runtime-core/src/vnode.ts
export const Text = Symbol(__DEV__ ? ''Text'' : undefined)
export const Comment = Symbol(__DEV__ ? ''Comment'' : undefined)
export const Static = Symbol(__DEV__ ? ''Static'' : undefined)

export const Fragment = (Symbol(__DEV__ ? ''Fragment'' : undefined) as any) as {
  __isFragment: true
  new (): {
    $props: VNodeProps
  }
}
那么定义那么多的类型有什么意义呢?这是因为在 patch 阶段,会根据不同的 VNode 类型来执行不同的操作:
// packages/runtime-core/src/renderer.ts
function baseCreateRenderer(
  options: RendererOptions,
  createHydrationFns?: typeof createHydrationFunctions
): any {
  const patch: PatchFn = (
    n1, n2, container, anchor = null, parentComponent = null, parentSuspense = null,
    isSVG = false, optimized = false
  ) => {
    // 省略部分代码
    const { type, ref, shapeFlag } = n2
    switch (type) {
      case Text: // 处理文本节点
        processText(n1, n2, container, anchor)
        break
      case Comment: // 处理注释节点
        processCommentNode(n1, n2, container, anchor)
        break
      case Static: // 处理静态节点
        if (n1 == null) {
          mountStaticNode(n2, container, anchor, isSVG)
        } else if (__DEV__) {
          patchStaticNode(n1, n2, container, isSVG)
        }
        break
      case Fragment: // 处理Fragment节点
        processFragment(...)
        break
      default:
        if (shapeFlag & ShapeFlags.ELEMENT) { // 元素类型
          processElement(...)
        } else if (shapeFlag & ShapeFlags.COMPONENT) { // 组件类型
          processComponent(...)
        } else if (shapeFlag & ShapeFlags.TELEPORT) { // teleport内置组件
          ;(type as typeof TeleportImpl).process(...)
        } else if (__FEATURE_SUSPENSE__ && shapeFlag & ShapeFlags.SUSPENSE) {
          ;(type as typeof SuspenseImpl).process(...)
        }
    }
  }
}
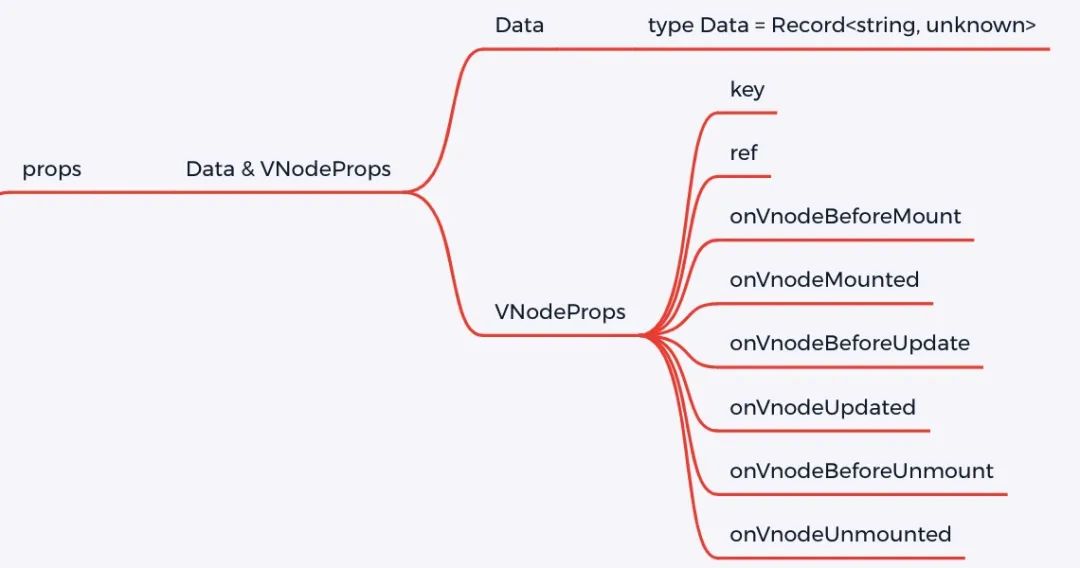
介绍完 type 参数后,接下来我们来看 props 参数,具体如下图所示:
props 参数
function _createVNode(
  type: VNodeTypes | ClassComponent | typeof NULL_DYNAMIC_COMPONENT,
  props: (Data & VNodeProps) | null = null,
): VNode { ... }
props 参数的类型是联合类型,这里我们来分析 Data & VNodeProps 交叉类型:

其中 Data 类型是通过 TypeScript 内置的工具类型 Record 来定义的:
export type Data = Record<string, unknown>
type Record<K extends keyof any, T> = {
  [P in K]: T;
};
而 VNodeProps 类型是通过类型别名来定义的,除了含有 key 和 ref 属性之外,其他的属性主要是定义了与生命周期有关的钩子:
// packages/runtime-core/src/vnode.ts
export type VNodeProps = {
  key?: string | number
  ref?: VNodeRef

  // vnode hooks
  onVnodeBeforeMount?: VNodeMountHook | VNodeMountHook[]
  onVnodeMounted?: VNodeMountHook | VNodeMountHook[]
  onVnodeBeforeUpdate?: VNodeUpdateHook | VNodeUpdateHook[]
  onVnodeUpdated?: VNodeUpdateHook | VNodeUpdateHook[]
  onVnodeBeforeUnmount?: VNodeMountHook | VNodeMountHook[]
  onVnodeUnmounted?: VNodeMountHook | VNodeMountHook[]
}
3.2 逻辑说明
createVNode 函数内部涉及较多的处理逻辑,这里我们只分析主要的逻辑:
// packages/runtime-core/src/vnode.ts
function _createVNode(
  type: VNodeTypes | ClassComponent | typeof NULL_DYNAMIC_COMPONENT,
  props: (Data & VNodeProps) | null = null,
  children: unknown = null,
  patchFlag: number = 0,
  dynamicProps: string[] | null = null,
  isBlockNode = false
): VNode {
  // 处理VNode类型,比如处理动态组件的场景:<component :is="vnode"/>
  if (isVNode(type)) {
    const cloned = cloneVNode(type, props, true /* mergeRef: true */)
    if (children) {
      normalizeChildren(cloned, children)
    }
    return cloned
  }

  // 类组件规范化处理
  if (isClassComponent(type)) {
    type = type.__vccOpts
  }

  // 类和样式规范化处理
  if (props) {
    // 省略相关代码
  }

  // 把vnode的类型信息转换为位图
  const shapeFlag = isString(type)
    ? ShapeFlags.ELEMENT // ELEMENT = 1
    : __FEATURE_SUSPENSE__ && isSuspense(type)
      ? ShapeFlags.SUSPENSE // SUSPENSE = 1 << 7,
      : isTeleport(type)
        ? ShapeFlags.TELEPORT // TELEPORT = 1 << 6,
        : isObject(type)
          ? ShapeFlags.STATEFUL_COMPONENT // STATEFUL_COMPONENT = 1 << 2,
          : isFunction(type)
            ? ShapeFlags.FUNCTIONAL_COMPONENT // FUNCTIONAL_COMPONENT = 1 << 1,
            : 0

  // 创建VNode对象
  const vnode: VNode = {
    __v_isVNode: true,
    [ReactiveFlags.SKIP]: true,
    type,
    props,
    // ...
  }

  // 子元素规范化处理
  normalizeChildren(vnode, children)
  return vnode
}
介绍完 createVNode 函数之后,阿宝哥再来介绍另一个比较重要的函数 —— normalizeVNode。
四、如何创建规范的 VNode 对象?
normalizeVNode 函数的作用,用于将传入的 child 参数转换为规范的 VNode 对象。
// packages/runtime-core/src/vnode.ts
export function normalizeVNode(child: VNodeChild): VNode {
  if (child == null || typeof child === ''boolean'') { // null/undefined/boolean -> Comment
    return createVNode(Comment)
  } else if (isArray(child)) { // array -> Fragment
    return createVNode(Fragment, null, child)
  } else if (typeof child === ''object'') { // VNode -> VNode or mounted VNode -> cloned VNode
    return child.el === null ? child : cloneVNode(child)
  } else { // primitive types:''foo'' or 1
    return createVNode(Text, null, String(child))
  }
}
由以上代码可知,normalizeVNode 函数内部会根据 child 参数的类型进行不同的处理:
4.1 null / undefined -> Comment
expect(normalizeVNode(null)).toMatchObject({ type: Comment })
expect(normalizeVNode(undefined)).toMatchObject({ type: Comment })
4.2 boolean -> Comment
expect(normalizeVNode(true)).toMatchObject({ type: Comment })
expect(normalizeVNode(false)).toMatchObject({ type: Comment })
4.3 array -> Fragment
expect(normalizeVNode([''foo''])).toMatchObject({ type: Fragment })
4.4 VNode -> VNode
const vnode = createVNode(''div'')
expect(normalizeVNode(vnode)).toBe(vnode)
4.5 mounted VNode -> cloned VNode
const mounted = createVNode(''div'')
mounted.el = {}
const normalized = normalizeVNode(mounted)
expect(normalized).not.toBe(mounted)
expect(normalized).toEqual(mounted)
4.6 primitive types
expect(normalizeVNode(''foo'')).toMatchObject({ type: Text, children: `foo` })
expect(normalizeVNode(1)).toMatchObject({ type: Text, children: `1` })
五、阿宝哥有话说
5.1 如何判断是否为 VNode 对象?
// packages/runtime-core/src/vnode.ts
export function isVNode(value: any): value is VNode {
  return value ? value.__v_isVNode === true : false
}
在 VNode 对象中含有一个 __v_isVNode 内部属性,利用该属性可以用来判断当前对象是否为 VNode 对象。
5.2 如何判断两个 VNode 对象的类型是否相同?
// packages/runtime-core/src/vnode.ts
export function isSameVNodeType(n1: VNode, n2: VNode): boolean {
  // 省略__DEV__环境的处理逻辑
  return n1.type === n2.type && n1.key === n2.key
}
在 Vue 3 中,是通过比较 VNode 对象的 type 和 key 属性,来判断两个 VNode 对象的类型是否相同。
5.3 如何快速创建某些类型的 VNode 对象?
在 Vue 3 内部提供了 createTextVNode 、createCommentVNode 和 createStaticVNode 函数来快速的创建文本节点、注释节点和静态节点:
createTextVNode
export function createTextVNode(text: string = '' '', flag: number = 0): VNode {
  return createVNode(Text, null, text, flag)
}
createCommentVNode
export function createCommentVNode(
  text: string = '''',
  asBlock: boolean = false
): VNode {
  return asBlock
    ? (openBlock(), createBlock(Comment, null, text))
    : createVNode(Comment, null, text)
}
createStaticVNode
export function createStaticVNode(
  content: string,
  numberOfNodes: number
): VNode {
  const vnode = createVNode(Static, null, content)
  vnode.staticCount = numberOfNodes
  return vnode
}
本文阿宝哥主要介绍了 VNode 对象是什么、如何创建 VNode 对象及如何创建规范的 VNode 对象。为了让大家能够更深入地理解 h 和 createVNode 函数的相关知识,阿宝哥还从源码的角度分析了 createVNode 函数 。
在后续的文章中,阿宝哥将会介绍 VNode 在 Vue 3 内部是如何被使用的,感兴趣的小伙伴不要错过哟。
六、参考资源
-
Vue 3 官网 - 渲染函数
本文分享自微信公众号 - 前端自习课(FE-study)。
如有侵权,请联系 support@oschina.cn 删除。
本文参与“OSC源创计划”,欢迎正在阅读的你也加入,一起分享。

【Vue.js】873- Vue 3.0 进阶之指令探秘
在 Vue 的项目中,我们经常会遇到 v-if、v-show、v-for 或 v-model 这些内置指令,它们为我们提供了不同的功能。除了使用这些内置指令之外,Vue 也允许注册自定义指令。
接下来,阿宝哥将使用 Vue 3 官方文档 自定义指令 章节中使用的示例,来一步步揭开自定义指令背后的秘密。
提示:在阅读本文前,建议您先阅读 Vue 3 官方文档 自定义指令 章节的内容。
一、自定义指令
1、注册全局自定义指令
const app = Vue.createApp({})

// 注册一个全局自定义指令 v-focus
app.directive(''focus'', {
  // 当被绑定的元素挂载到 DOM 中时被调用
  mounted(el) {
    // 聚焦元素
    el.focus()
  }
})
2、使用全局自定义指令
<div id="app">
   <input v-focus />
</div>
3、完整的使用示例
<div id="app">
   <input v-focus />
</div>
<script>
   const { createApp } = Vue

   const app = Vue.createApp({}) // ①
   app.directive(''focus'', { // ②
     // 当被绑定的元素挂载到 DOM 中时被调用
     mounted(el) {
       el.focus() // 聚焦元素
     }
   })
   app.mount(''#app'') // ③
</script>
当页面加载完成后,页面中的输入框元素将自动获得焦点。该示例的代码比较简单,主要包含 3 个步骤:创建 App 对象、注册全局自定义指令和应用挂载。其中创建 App 对象的细节,阿宝哥会在后续的文章中单独介绍,下面我们将重点分析其他 2 个步骤。首先我们先来分析注册全局自定义指令的过程。
二、注册全局自定义指令的过程
在以上示例中,我们使用 app 对象的 directive 方法来注册全局自定义指令:
app.directive(''focus'', {
  // 当被绑定的元素挂载到 DOM 中时被调用
  mounted(el) {
    el.focus() // 聚焦元素
  }
})
当然,除了注册全局自定义指令外,我们也可以注册局部指令,因为组件中也接受一个 directives 的选项:
directives: {
  focus: {
    mounted(el) {
      el.focus()
    }
  }
}
对于以上示例来说,我们使用的 app.directive 方法被定义在 runtime-core/src/apiCreateApp.ts 文件中:
// packages/runtime-core/src/apiCreateApp.ts
export function createAppAPI<HostElement>(
  render: RootRenderFunction,
  hydrate?: RootHydrateFunction
): CreateAppFunction<HostElement> {
  return function createApp(rootComponent, rootProps = null) {
    const context = createAppContext()
    let isMounted = false

    const app: App = (context.app = {
      // 省略部分代码
      _context: context,

      // 用于注册或检索全局指令。
      directive(name: string, directive?: Directive) {
        if (__DEV__) {
          validateDirectiveName(name)
        }
        if (!directive) {
          return context.directives[name] as any
        }
        if (__DEV__ && context.directives[name]) {
          warn(`Directive "${name}" has already been registered in target app.`)
        }
        context.directives[name] = directive
        return app
      },

    return app
  }
}
通过观察以上代码,我们可以知道 directive 方法支持以下两个参数:
-
name:表示指令的名称; -
directive(可选):表示指令的定义。
name 参数比较简单,所以我们重点分析 directive 参数,该参数的类型是 Directive 类型:
// packages/runtime-core/src/directives.ts
export type Directive<T = any, V = any> =
  | ObjectDirective<T, V>
  | FunctionDirective<T, V>
由上可知 Directive 类型属于联合类型,所以我们需要继续分析 ObjectDirective 和 FunctionDirective 类型。这里我们先来看一下 ObjectDirective 类型的定义:
// packages/runtime-core/src/directives.ts
export interface ObjectDirective<T = any, V = any> {
  created?: DirectiveHook<T, null, V>
  beforeMount?: DirectiveHook<T, null, V>
  mounted?: DirectiveHook<T, null, V>
  beforeUpdate?: DirectiveHook<T, VNode<any, T>, V>
  updated?: DirectiveHook<T, VNode<any, T>, V>
  beforeUnmount?: DirectiveHook<T, null, V>
  unmounted?: DirectiveHook<T, null, V>
  getSSRProps?: SSRDirectiveHook
}
该类型定义了对象类型的指令,对象上的每个属性表示指令生命周期上的钩子。而 FunctionDirective 类型则表示函数类型的指令:
// packages/runtime-core/src/directives.ts
export type FunctionDirective<T = any, V = any> = DirectiveHook<T, any, V>

export type DirectiveHook<T = any, Prev = VNode<any, T> | null, V = any> = (
  el: T,
  binding: DirectiveBinding<V>,
  vnode: VNode<any, T>,
  prevVNode: Prev
) => void
介绍完 Directive 类型,我们再回顾一下前面的示例,相信你就会清晰很多:
app.directive(''focus'', {
  // 当被绑定的元素挂载到 DOM 中时触发
  mounted(el) {
    el.focus() // 聚焦元素
  }
})
对于以上示例,当我们调用 app.directive 方法注册自定义 focus 指令时,就会执行以下逻辑:
directive(name: string, directive?: Directive) {
  if (__DEV__) { // 避免自定义指令名称,与已有的内置指令名称冲突
    validateDirectiveName(name)
  }
  if (!directive) { // 获取name对应的指令对象
    return context.directives[name] as any
  }
  if (__DEV__ && context.directives[name]) {
    warn(`Directive "${name}" has already been registered in target app.`)
  }
  context.directives[name] = directive // 注册全局指令
  return app
}
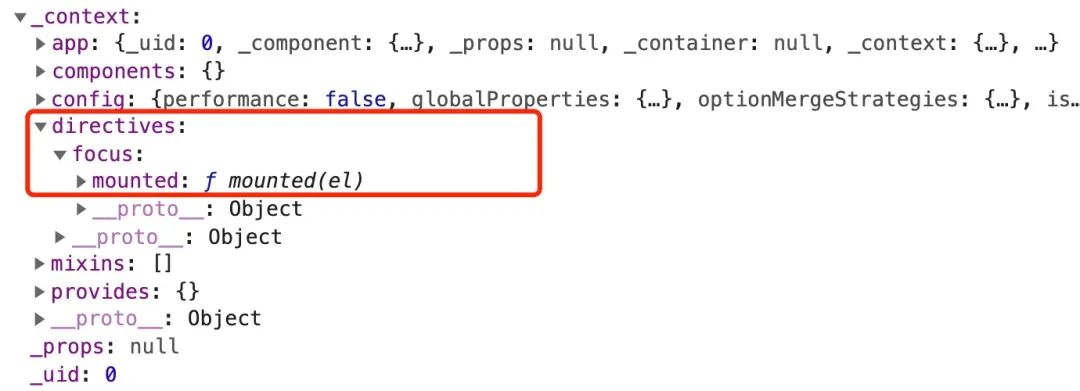
当 focus 指令注册成功之后,该指令会被保存在 context 对象的 directives 属性中,具体如下图所示:
顾名思义 context 是表示应用的上下文对象,那么该对象是如何创建的呢?其实,该对象是通过 createAppContext 函数来创建的:
const context = createAppContext()
而 createAppContext 函数被定义在 runtime-core/src/apiCreateApp.ts 文件中:
// packages/runtime-core/src/apiCreateApp.ts
export function createAppContext(): AppContext {
  return {
    app: null as any,
    config: {
      isNativeTag: NO,
      performance: false,
      globalProperties: {},
      optionMergeStrategies: {},
      isCustomElement: NO,
      errorHandler: undefined,
      warnHandler: undefined
    },
    mixins: [],
    components: {},
    directives: {},
    provides: Object.create(null)
  }
}
看到这里,是不是觉得注册全局自定义指令的内部处理逻辑其实挺简单的。那么对于已注册的 focus 指令,何时会被调用呢?要回答这个问题,我们就需要分析另一个步骤 —— 应用挂载。
三、应用挂载的过程
为了更加直观地了解应用挂载的过程,阿宝哥利用 Chrome 开发者工具,记录了应用挂载的主要过程:
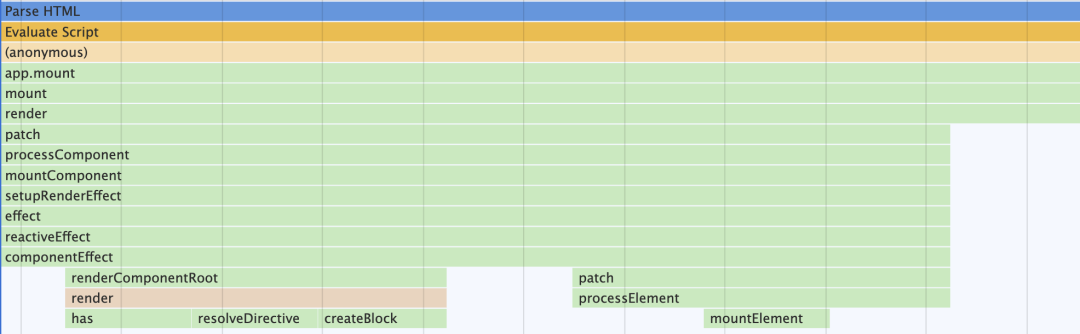
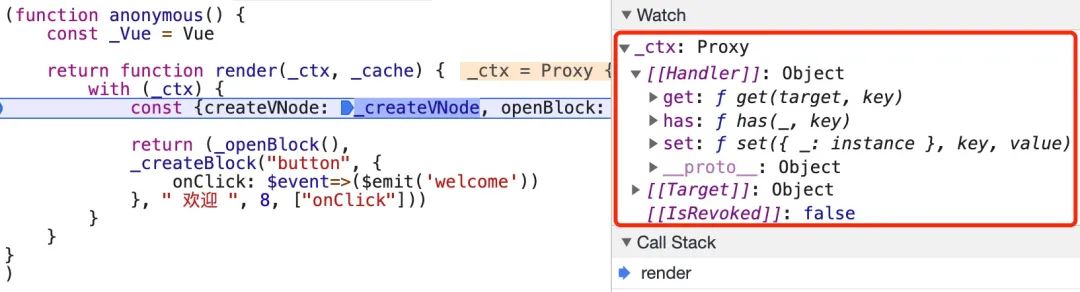
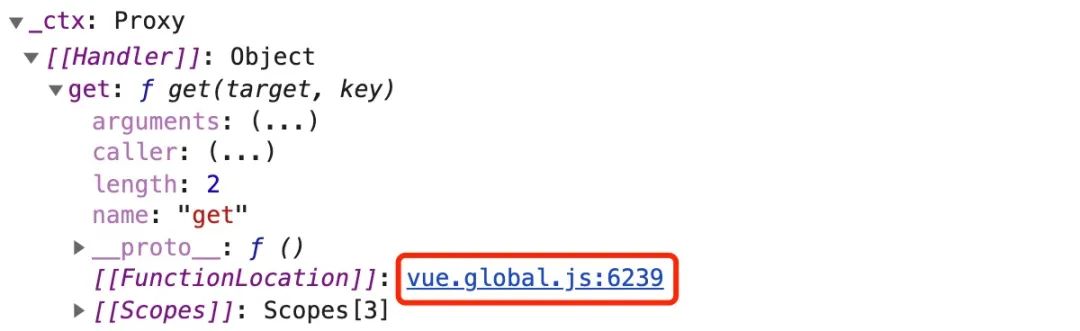
通过上图,我们就可以知道应用挂载期间所经历的主要过程。此外,从图中我们也发现了一个与指令相关的函数 resolveDirective。很明显,该函数用于解析指令,且该函数在 render 方法中会被调用。在源码中,我们找到了该函数的定义:
// packages/runtime-core/src/helpers/resolveAssets.ts
export function resolveDirective(name: string): Directive | undefined {
  return resolveAsset(DIRECTIVES, name)
}
在 resolveDirective 函数内部,会继续调用 resolveAsset 函数来执行具体的解析操作。在分析 resolveAsset 函数的具体实现之前,我们在 resolveDirective 函数内部加个断点,来一睹 render 方法的 “芳容”:
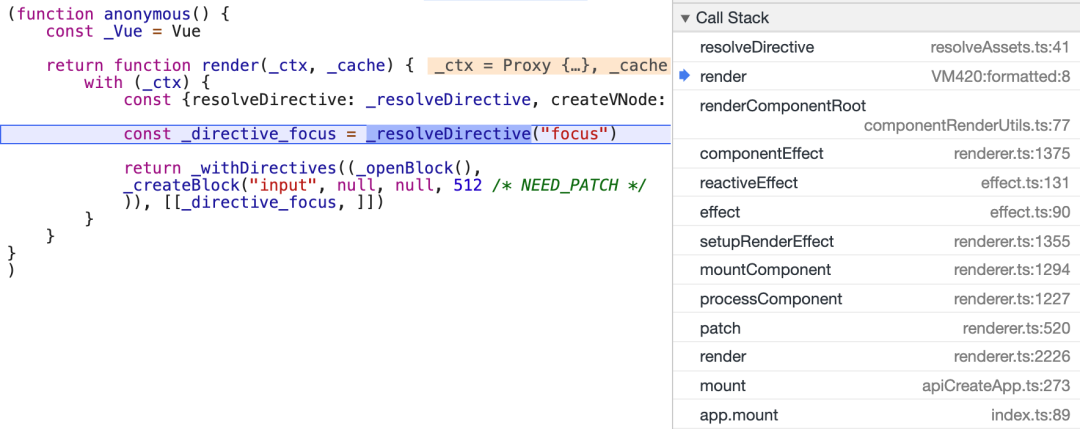
在上图中,我们看到了与 focus 指令相关的 _resolveDirective("focus") 函数调用。前面我们已经知道在 resolveDirective 函数内部会继续调用 resolveAsset 函数,该函数的具体实现如下:
// packages/runtime-core/src/helpers/resolveAssets.ts
function resolveAsset(
  type: typeof COMPONENTS | typeof DIRECTIVES,
  name: string,
  warnMissing = true
) {
  const instance = currentRenderingInstance || currentInstance
  if (instance) {
    const Component = instance.type
    // 省略解析组件的处理逻辑
    const res =
      // 局部注册
      resolve(instance[type] || (Component as ComponentOptions)[type], name) ||
      // 全局注册
      resolve(instance.appContext[type], name)
    return res
  } else if (__DEV__) {
    warn(
      `resolve${capitalize(type.slice(0, -1))} ` +
        `can only be used in render() or setup().`
    )
  }
}
因为注册 focus 指令时,使用的是全局注册的方式,所以解析的过程会执行 resolve(instance.appContext[type], name) 该语句,其中 resolve 方法的定义如下:
function resolve(registry: Record<string, any> | undefined, name: string) {
  return (
    registry &&
    (registry[name] ||
      registry[camelize(name)] ||
      registry[capitalize(camelize(name))])
  )
}
分析完以上的处理流程,我们可以知道在解析全局注册的指令时,会通过 resolve 函数从应用的上下文对象中获取已注册的指令对象。在获取到 _directive_focus 指令对象后,render 方法内部会继续调用 _withDirectives 函数,用于把指令添加到 VNode 对象上,该函数被定义在 runtime-core/src/directives.ts 文件中:
// packages/runtime-core/src/directives.ts
export function withDirectives<T extends VNode>(
  vnode: T,
  directives: DirectiveArguments
): T {
  const internalInstance = currentRenderingInstance // 获取当前渲染的实例
  const instance = internalInstance.proxy
  const bindings: DirectiveBinding[] = vnode.dirs || (vnode.dirs = [])
  for (let i = 0; i < directives.length; i++) {
    let [dir, value, arg, modifiers = EMPTY_OBJ] = directives[i]
    // 在 mounted 和 updated 时,触发相同行为,而不关系其他的钩子函数
    if (isFunction(dir)) { // 处理函数类型指令
      dir = {
        mounted: dir,
        updated: dir
      } as ObjectDirective
    }
    bindings.push({
      dir,
      instance,
      value,
      oldValue: void 0,
      arg,
      modifiers
    })
  }
  return vnode
}
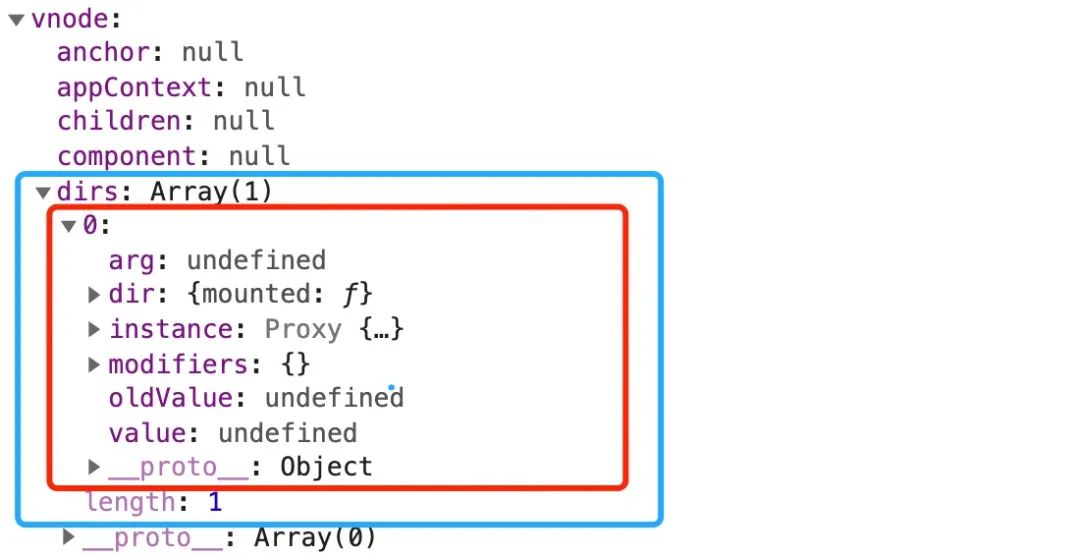
因为一个节点上可能会应用多个指令,所以 withDirectives 函数在 VNode 对象上定义了一个 dirs 属性且该属性值为数组。对于前面的示例来说,在调用 withDirectives 函数之后,VNode 对象上就会新增一个 dirs 属性,具体如下图所示:
通过上面的分析,我们已经知道在组件的 render 方法中,我们会通过 withDirectives 函数把指令注册对应的 VNode 对象上。那么 focus 指令上定义的钩子什么时候会被调用呢?在继续分析之前,我们先来介绍一下指令对象所支持的钩子函数。
一个指令定义对象可以提供如下几个钩子函数 (均为可选):
-
created:在绑定元素的属性或事件监听器被应用之前调用。 -
beforeMount:当指令第一次绑定到元素并且在挂载父组件之前调用。 -
mounted:在绑定元素的父组件被挂载后调用。 -
beforeUpdate:在更新包含组件的 VNode 之前调用。 -
updated:在包含组件的 VNode 及其子组件的 VNode 更新后调用。 -
beforeUnmount:在卸载绑定元素的父组件之前调用。 -
unmounted:当指令与元素解除绑定且父组件已卸载时,只调用一次。
介绍完这些钩子函数之后,我们再来回顾一下前面介绍的 ObjectDirective 类型:
// packages/runtime-core/src/directives.ts
export interface ObjectDirective<T = any, V = any> {
  created?: DirectiveHook<T, null, V>
  beforeMount?: DirectiveHook<T, null, V>
  mounted?: DirectiveHook<T, null, V>
  beforeUpdate?: DirectiveHook<T, VNode<any, T>, V>
  updated?: DirectiveHook<T, VNode<any, T>, V>
  beforeUnmount?: DirectiveHook<T, null, V>
  unmounted?: DirectiveHook<T, null, V>
  getSSRProps?: SSRDirectiveHook
}
好的,接下来我们来分析一下 focus 指令上定义的钩子什么时候被调用。同样,阿宝哥在 focus 指令的 mounted 方法中加个断点:
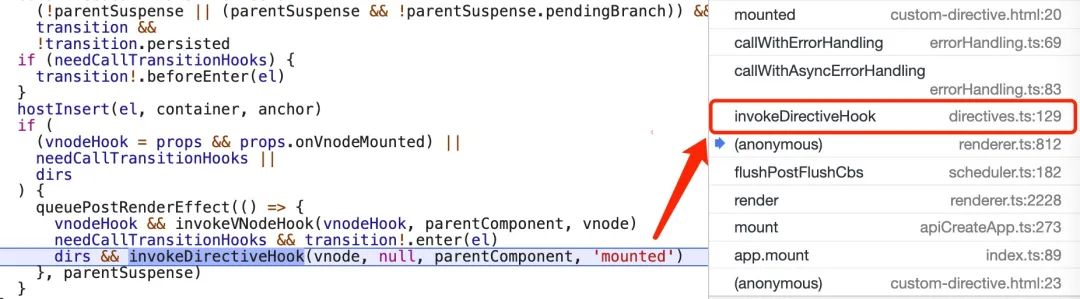
在图中右侧的调用栈中,我们看到了 invokeDirectiveHook 函数,很明显该函数的作用就是调用指令上已注册的钩子。出于篇幅考虑,具体的细节阿宝哥就不继续介绍了,感兴趣的小伙伴可以自行断点调试一下。
四、阿宝哥有话说
4.1 Vue 3 有哪些内置指令?
在介绍注册全局自定义指令的过程中,我们看到了一个 validateDirectiveName 函数,该函数用于验证自定义指令的名称,从而避免自定义指令名称,与已有的内置指令名称冲突。
// packages/runtime-core/src/directives.ts
export function validateDirectiveName(name: string) {
  if (isBuiltInDirective(name)) {
    warn(''Do not use built-in directive ids as custom directive id: '' + name)
  }
}
在 validateDirectiveName 函数内部,会通过 isBuiltInDirective(name) 语句来判断是否为内置指令:
const isBuiltInDirective = /*#__PURE__*/ makeMap(
  ''bind,cloak,else-if,else,for,html,if,model,on,once,pre,show,slot,text''
)
以上代码中的 makeMap 函数,用于生成一个 map 对象(Object.create(null))并返回一个函数,用于检测某个 key 是否存在 map 对象中。另外,通过以上代码,我们就可以很清楚地了解 Vue 3 中为我们提供了哪些内置指令。
4.2 指令有几种类型?
在 Vue 3 中指令分为 ObjectDirective 和 FunctionDirective 两种类型:
// packages/runtime-core/src/directives.ts
export type Directive<T = any, V = any> =
  | ObjectDirective<T, V>
  | FunctionDirective<T, V>
ObjectDirective
export interface ObjectDirective<T = any, V = any> {
  created?: DirectiveHook<T, null, V>
  beforeMount?: DirectiveHook<T, null, V>
  mounted?: DirectiveHook<T, null, V>
  beforeUpdate?: DirectiveHook<T, VNode<any, T>, V>
  updated?: DirectiveHook<T, VNode<any, T>, V>
  beforeUnmount?: DirectiveHook<T, null, V>
  unmounted?: DirectiveHook<T, null, V>
  getSSRProps?: SSRDirectiveHook
}
FunctionDirective
export type FunctionDirective<T = any, V = any> = DirectiveHook<T, any, V>

export type DirectiveHook<T = any, Prev = VNode<any, T> | null, V = any> = (
  el: T,
  binding: DirectiveBinding<V>,
  vnode: VNode<any, T>,
  prevVNode: Prev
) => void
如果你想在 mounted 和 updated 时触发相同行为,而不关心其他的钩子函数。那么你可以通过将回调函数传递给指令来实现:
app.directive(''pin'', (el, binding) => {
  el.style.position = ''fixed''
  const s = binding.arg || ''top''
  el.style[s] = binding.value + ''px''
})
4.3 注册全局指令与局部指令有什么区别?
注册全局指令
app.directive(''focus'', {
  // 当被绑定的元素挂载到 DOM 中时被调用
  mounted(el) {
    el.focus() // 聚焦元素
  }
});
注册局部指令
const Component = defineComponent({
  directives: {
    focus: {
      mounted(el) {
        el.focus()
      }
    }
  },
  render() {
    const { directives } = this.$options;
    return [withDirectives(h(''input''), [[directives.focus, ]])]
  }
});
解析全局注册和局部注册的指令
// packages/runtime-core/src/helpers/resolveAssets.ts
function resolveAsset(
  type: typeof COMPONENTS | typeof DIRECTIVES,
  name: string,
  warnMissing = true
) {
  const instance = currentRenderingInstance || currentInstance
  if (instance) {
    const Component = instance.type
    // 省略解析组件的处理逻辑
    const res =
      // 局部注册
      resolve(instance[type] || (Component as ComponentOptions)[type], name) ||
      // 全局注册
      resolve(instance.appContext[type], name)
    return res
  }
}
4.4 内置指令和自定义指令生成的渲染函数有什么区别?
要了解内置指令和自定义指令生成的渲染函数的区别,阿宝哥以 v-if 、v-show 内置指令和 v-focus 自定义指令为例,然后使用 Vue 3 Template Explorer 这个在线工具来编译生成渲染函数:
v-if 内置指令
<input v-if="isShow" />

const _Vue = Vue
return function render(_ctx, _cache, $props, $setup, $data, $options) {
  with (_ctx) {
    const { createVNode: _createVNode, openBlock: _openBlock,
      createBlock: _createBlock, createCommentVNode: _createCommentVNode } = _Vue

    return isShow
      ? (_openBlock(), _createBlock("input", { key: 0 }))
      : _createCommentVNode("v-if", true)
  }
}
对于 v-if 指令来说,在编译后会通过 ?: 三目运算符来实现动态创建节点的功能。
v-show 内置指令
<input v-show="isShow" />

const _Vue = Vue
return function render(_ctx, _cache, $props, $setup, $data, $options) {
  with (_ctx) {
    const { vShow: _vShow, createVNode: _createVNode, withDirectives: _withDirectives,
      openBlock: _openBlock, createBlock: _createBlock } = _Vue

    return _withDirectives((_openBlock(), _createBlock("input", null, null, 512 /* NEED_PATCH */)), [
      [_vShow, isShow]
    ])
  }
}
以上示例中的 vShow 指令被定义在 packages/runtime-dom/src/directives/vShow.ts 文件中,该指令属于 ObjectDirective 类型的指令,该指令内部定义了 beforeMount、mounted、updated 和 beforeUnmount 四个钩子。
v-focus 自定义指令
<input v-focus />

const _Vue = Vue
return function render(_ctx, _cache, $props, $setup, $data, $options) {
  with (_ctx) {
    const { resolveDirective: _resolveDirective, createVNode: _createVNode,
      withDirectives: _withDirectives, openBlock: _openBlock, createBlock: _createBlock } = _Vue

    const _directive_focus = _resolveDirective("focus")
    return _withDirectives((_openBlock(), _createBlock("input", null, null, 512 /* NEED_PATCH */)), [
      [_directive_focus]
    ])
  }
}
通过对比 v-focus 与 v-show 指令生成的渲染函数,我们可知 v-focus 自定义指令与 v-show 内置指令都会通过 withDirectives 函数,把指令注册到 VNode 对象上。而自定义指令相比内置指令来说,会多一个指令解析的过程。
此外,如果在 input 元素上,同时应用了 v-show 和 v-focus 指令,则在调用 _withDirectives 函数时,将使用二维数组:
<input v-show="isShow" v-focus />

const _Vue = Vue
return function render(_ctx, _cache, $props, $setup, $data, $options) {
  with (_ctx) {
    const { vShow: _vShow, resolveDirective: _resolveDirective, createVNode: _createVNode,
      withDirectives: _withDirectives, openBlock: _openBlock, createBlock: _createBlock } = _Vue

    const _directive_focus = _resolveDirective("focus")
    return _withDirectives((_openBlock(), _createBlock("input", null, null, 512 /* NEED_PATCH */)), [
      [_vShow, isShow],
      [_directive_focus]
    ])
  }
}
4.5 如何在渲染函数中应用指令?
除了在模板中应用指令之外,利用前面介绍的 withDirectives 函数,我们可以很方便地在渲染函数中应用指定的指令:
<div id="app"></div>
<script>
   const { createApp, h, vShow, defineComponent, withDirectives } = Vue
   const Component = defineComponent({
     data() {
       return { value: true }
     },
     render() {
       return [withDirectives(h(''div'', ''我是阿宝哥''), [[vShow, this.value]])]
     }
   });
   const app = Vue.createApp(Component)
   app.mount(''#app'')
</script>
本文阿宝哥主要介绍了在 Vue 3 中如何自定义指令、如何注册全局和局部指令。为了让大家能够更深入地掌握自定义指令的相关知识,阿宝哥从源码的角度分析了指令的注册和应用过程。
在后续的文章中,阿宝哥将会介绍一些特殊的指令,当然也会重点分析一下双向绑定的原理,感兴趣的小伙伴不要错过哟。
五、参考资源
-
Vue 3 官网 - 自定义指令 -
Vue 3 官网 - 应用 API


![[转帖]Ubuntu 安装 Wine方法(ubuntu如何安装wine)](https://www.gvkun.com/zb_users/cache/thumbs/4c83df0e2303284d68480d1b1378581d-180-120-1.jpg)

