如果您想了解Node.js介绍、优势、用途的相关知识,那么本文是一篇不可错过的文章,我们将对node.js优点进行全面详尽的解释,并且为您提供关于06-Nodejs介绍、104.jenkins介绍、安
如果您想了解Node.js介绍、优势、用途的相关知识,那么本文是一篇不可错过的文章,我们将对node.js优点进行全面详尽的解释,并且为您提供关于06-Nodejs介绍、104.jenkins介绍、安装、了解、Amazon Rekognition 综合指南:功能、优势、用例和替代方案、API接口的概念、优势、设计、实现和使用的有价值的信息。
本文目录一览:- Node.js介绍、优势、用途(node.js优点)
- 06-Nodejs介绍
- 104.jenkins介绍、安装、了解
- Amazon Rekognition 综合指南:功能、优势、用例和替代方案
- API接口的概念、优势、设计、实现和使用
")
Node.js介绍、优势、用途(node.js优点)
一、Node.js介绍
Node.js是一个javascript运行环境。它让javascript可以开发后端程序,实现几乎其他后端语言实现的所有功能,可以与PHP、Java、Python、.NET、Ruby等后端语言平起平坐。
Nodejs是基于V8引擎,V8是Google发布的开源JavaScript引擎,本身就是用于Chrome浏览器的js解释部分,但是Ryan Dahl 这哥们,鬼才般的,把这个V8搬到了服务器上,用于做服务器的软件。
二、node.js的优势
1、Nodejs语法完全是js语法,只要你懂js基础就可以学会Nodejs后端开发
Node打破了过去JavaScript只能在浏览器中运行的局面。前后端编程环境统一,可以大大降低开发成本。
2、NodeJs超强的高并发能力
NodeJs的首要目标是提供一种简单的、用于创建高性能服务器及可在该服务器中运行的各种应用程序的开发工具。
首先让我们来看一下现在的服务器端语言中存在着什么问题。在Java、PHP或者.NET等服务器语言中,会为每一个客户端连接创建一个新的线程。而每个线程需要耗费大约2MB内存。也就是说,理论上,一个8GB内存的服务器可以同时连接的最大用户数为4000个左右。要让web应用程序支持更多的用户,就需要增加服务器的数量,而web应用程序的硬件成本当然就上升了。
NodeJs不为每个客户连接创建一个新的线程,而仅仅使用一个线程。当有用户连接了,就触发一个内部事件,通过非阻塞I/O、事件驱动机制,让Node.js程序宏观上也是并行的。使用Node.js,一个8GB内存的服务器,可以同时处理超过4万用户的连接。
3、实现高性能服务器
严格地说,Node.js是一个用于开发各种web服务器的开发工具。在Node.js服务器中,运行的是高性能V8 JavaScript脚本语言,该语言是一种可以运行在服务器端的脚本语言。
那么,什么是V8 JavaScript脚本语言呢?该语言是一种被V8 JavaScript引擎所解析并执行的脚本语言。V8 JavaScript引擎是由Google公司使用C++语言开发的一种高性能JavaScript引擎,该引擎并不局限于在浏览器中运行。Node.js将其转用在了服务器中,并且为其提供了许多附加的具有各种不同用途的API。例如,在一个服务器中,经常需要处理各种二进制数据。在JavaScript脚本语言中,只具有非常有限的对二进制数据的处理能力,而Node.js所提供的Buffer类则提供了丰富的对二进制数据的处理能力。
另外,在V8 JavaScript引擎内部使用一种全新的编译技术。这意味着开发者编写的高端的 JavaScript 脚本代码与开发者编写的低端的C语言具有非常相近的执行效率,这也是Node.js服务器可以提供的一个重要特性。
4、开发周期短、开发成本低、学习成本低
Node.js自身哲学,是话最小的硬件成本,追求更高的并发,更高的处理性能。
三、Node.js能干什么
看图:
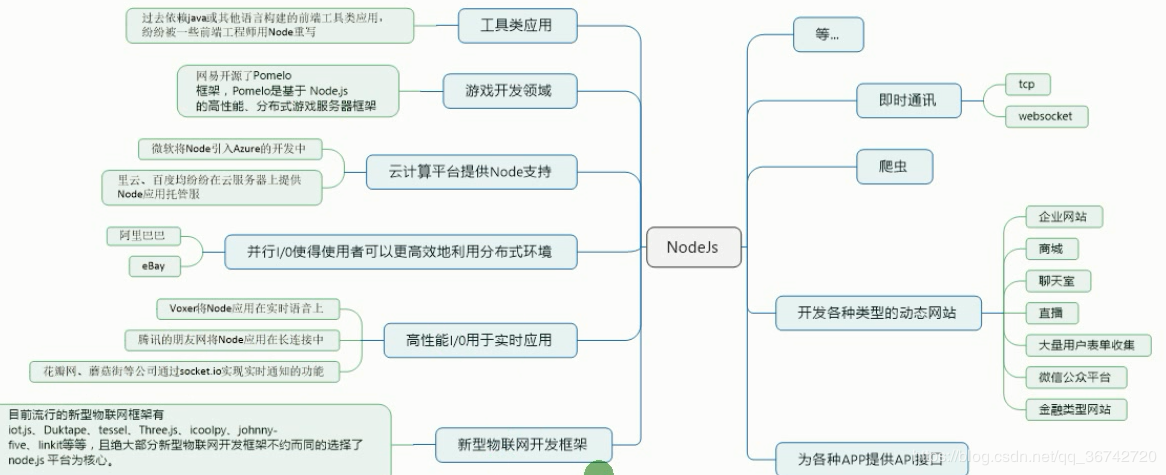

06-Nodejs介绍
打开Nodejs英文网:https://nodejs.org/en/
中文网:http://nodejs.cn/
我们会发现这样一句话:

翻译成中文如下:
Node.js 是一个基于 Chrome V8 引擎的 JavaScript 运行环境。
Node.js 使用了一个事件驱动、非阻塞式 I/O 的模型,使其轻量又高效。
Node.js 的包管理器 npm,是全球最大的开源库生态系统。
好的。那么在介绍nodejs之前,大家是否对JavaScript有定义呢?
1.1 什么是JavaScript?
接触过前端的同学都知道,javascript是一门运行在浏览器端的脚本语言,用来做客户端页面的交互。
1.2 JavaScript的运行环境呢?
1.3 浏览器中的javascript可以做什么
(1)操作dom(也就是对dom的增删改,注册事件之类的事情)
(2)发送AJAX请求/跨域
(3)BOM交互如给我们提供页面跳转,历史记录,控制台打印日志
(4)ecmascript(js的核心语言,如用来定义变量,函数等)
1.4、浏览器端的javasscript不可以做什么?
通过之前的了解,貌似javascrip对我们日常的交互都可以完成,貌似什么都可以做,但是他也有不能做的事。如:(1)涉及到端对端的应用程序,我们需要操作文件,浏览器中的javascript是不能进行文件操作的,虽然h5里面提供了关于文件相关的API,但是这些API大多数只限于只读的层面 ,不能像传统的语言如java,通过传一个路径,然后将对应的文件读出来,说白了就是不能进行文件和文件夹的CURD.
(2),浏览器端的javascript也没有办法去操作操作系统,如获取操作系统的版本之类的。
1.5、了解了客户端的js所能做的事,我们必须还要明确一个概念,那就是javascrip只能运行在浏览器端吗?
前端开发人员都知道,javascrip是有ecmascrip语言,BOM,DOM组成的,在语言层面,她只是给我们提供一些操作语法,如定义变量,函数,类型,流程控制等的操作。而BOM,DOM是浏览器提供的,并非es提供的。因此我们常提及的js其实就是es,js的大部分功能(DOm,BOM(浏览器开放出来的API)等的操作)都是由 浏览器的执行引擎决定的 ,这也衍生出一个观点,任何一门编程语言 ,他的能力不是由语言本身决定的,而是由他的执行环境决定的。比如说java,他即是一门语言也是一个平台,对于javascript来说语言就是es,平台是浏览器。那么js只能运行在浏览器中吗?非也!对于大多数语言,都是运行 在一个平台上的,比如java只运行在虚拟机上,但是也有运行在多个平台的语言, java在一定层面上来讲是没有必要运行在多个平台上的,因为虚拟机是跨平台(也就是跨操作系统如window,linux等)的。js同样是可以运行在多个平台的,浏览器之所以能过运行js,是因为他由js的执行引擎。js同样,只要由支持他的平台就可以执行。因此说要想语言有很强大的功能,只需要提供强大的平台,node就是这样一个平台,能够执行js,那么node到底是什么东西?接下来简述node是个什么鬼什么是node?
根据官方文档可以知道,node就是一个给予谷歌v8引擎的一个javascript的运行时,可以理解为运行js的一个虚拟机。他使用的是一个 事件驱动,非阻塞I/O模型 ,他是将js的运行环境搬到了服务器端,和客户端没有一点关系。是一个纯服务端的东西,node只是为js提供了一个平台。node里面其实还分了两块,一是封装了v8引擎,目的是为了执行es(如定义变量,定义函数等),另外一个提供了大量的工具库,是帮助node实现各种功能的,提供了一些以前js的环境办不到的事情,比如文件操作,网络操作,操作系统的操作。既然node是一个平台(所谓的平台就是用来运行特定语言的),也就意味着node是用来运行语言的,那么java也是语言,node能运行java吗?据nodejs创始人Ryan Dahl回忆,他最初是选择了Ruby这门语言,但是Ruby这门语言的虚拟机效率不怎么样最终放弃了,按照这种思路,貌似node将java的虚拟机集成进来应该可以运行java,但node作者最终选择了javascript。这样js就实现了在服务端运行的可能,js运行在node平台上(分为v8部分,用来执行es,和大量的工具库组件(API)称之为libuv,提供了以前js的环境办不到的事,如文件操作,网络操作等等)。
知道了什么是node,应该还要清楚node在web中有什么用途?
(1)node可以接受客户端用户的所有请求,并且能够快速的给出响应,因此node可以用来做网站。
(2)node可以作为一个中间层来来分发调用数据接口,比如有一个网站数据是有java提供的,我们可以让node作为一个中间曾,来接受用户的请求,然后通过node来调用java数据接口,获取到数据后直接在node层面做html的瓶装,然后将渲染好的页面直接给用户。为什么要这样做,直接请求java接口不行吗,这是因为node被称之为高性能的web服务器,在并发和抗压方面都比传统的平台要好很多,因此这样一包装可以极大的减轻服务器的开发。
通过上面的两点,可以总结出,node在web中要么从前端页面到后端服务全包了,一个是只做其中的一点。
一言以蔽之,node就是一个javascript的运行环境(平台),他不是一门语言,也不是javascript的框架。可以用来开发服务端应用程序,web系统。其特点是体积小,快速,高性能。

104.jenkins介绍、安装、了解
26.1 jenkins介绍
26.2 jenkins安装
26.3 了解jenkins
26.1 jenkins介绍
产品设计成型 -> 开发人员开发代码 -> 测试人员测试功能 -> 运维人员发布上线
持续集成 (Continuous integration,简称CI)
#每个人负责不同的模块,最后汇总到一起。这个过程叫集成。集成的频率可能会很多,比如今天集成一次,明天集成两次,这回设计到工作量。可能单独的模块测试没有问题,那集成到一起呢,也是需要测试。而持续集成就是我们不停的持续的去做集成
持续交付(Continuous delivery)
#1.我们把这些代码(集成的模块)交给测试人员,让他们去测试。持续交付就是不停的集成不停的去交付
#2.我们把成型的产品交付给需要人员(用户)
持续部署(continuous deployment)
#运维人员需要把成型的代码部署到线上去,让他提供服务
所以可以理解为先交付在部署,也可以理解为先部署在交付。因为交付有两层含义,一个交付给测试,一个交付给用户
!!!因为以上我们要把它搞成自动化,因为太频繁了(持续的),很容易出错。我们就可以让他在后台不断的去集成、不断地去交付、不断的去部署,而Jenkins就是一个持续集成、交付、部署的工具
参考 http://www.ruanyifeng.com/blog/2015/09/continuous-integration.html
1.官网 https://jenkins.io
#作为领先的开源自动化服务器,Jenkins提供数百个插件来支持构建,部署和自动化任何项目(php、java都可以)。 官网用很简单的一句话解释了jenkins
2.Jenkins是一个开源的、可扩展的持续集成、交付、部署(软件/代码的编译、打包、部署)基于web界面的平台。
3.Jenkins是一个工具集,提供了各种各样的插件
比如获取git上最新的代码
比如可以帮你编译源代码
比如可以调用自定义的shell脚本远程执行命令
官方文档 https://jenkins.io/doc/
~~~~~~~~~~~~~~~~~~~~~~~~~~~~~~~~~~~~~~~~~~~~~~~~~~~~~~~~~~~~~~~~~~~~~~~~~~~~~~~~~~~~~~~~~~
26.2 jenkins安装
最低配置: 不少于256M内存,不低于1G磁盘,jdk版本>=8
1.安装jdk1.8
yum install -y java-1.8.0-openjdk
#java开发。图省事也可以yum一个openjdk。当然也可以根据之前学的去安装一个jdk
2.wget -O /etc/yum.repos.d/jenkins.repo https://pkg.jenkins.io/redhat/jenkins.repo
# -O 在这里是定义输出文件名字。 如果不加这参数是直接把结果打印到屏幕上的。
3.rpm --import https://pkg.jenkins.io/redhat/jenkins.io.key
#安装jenkins的一个key
4.yum install -y jenkins
#到这,就会安装一个最新的稳定版
5.systemctl start jenkins
6.less /var/log/jenkins/jenkins.log //查询admin密码
访问 http://ip:8080/ 进行安装
注意:
也可以用docker拉一个jenkins,用容器去启动它
如果使用的是ubuntu就要去jenkins官方去看怎么安装。
实例:
[root@axinlinux-01 ~]# yum install -y java-1.8.0-openjdk
[root@axinlinux-01 ~]# wget -O /etc/yum.repos.d/jenkins.repo https://pkg.jenkins.io/redhat/jenkins.repo
[root@axinlinux-01 ~]# cat /etc/yum.repos.d/jenkins.repo #可以cat一下我们指定输出的文件。也就是说上一步的wget就是生成了这个文件(在我们-O指定的目录里)。不wget的话也可以直接编辑这个文件
[jenkins]
name=Jenkins
baseurl=http://pkg.jenkins.io/redhat
gpgcheck=1
[root@axinlinux-01 ~]# rpm --import https://pkg.jenkins.io/redhat/jenkins.io.key #因为上面的配置文件gpgcheck=1,需要安装jenkins的key
[root@axinlinux-01 ~]# systemctl start jenkins
[root@axinlinux-01 ~]# less /var/log/jenkins/jenkins.log #找到初始化的密码
Jenkins initial setup is required. An admin user has been created and a password generated.
Please use the following password to proceed to installation:
800986e8a1ec424fa62d9468ab46ad88
This may also be found at: /var/lib/jenkins/secrets/initialAdminPassword #也可以到这去找
http://192.168.208.128:8080 #可以直接在浏览器访问了
以上用360浏览器不成功。使用谷歌浏览器
接下来,他会按照自己的推荐去安装插件。之后的过程看下张
~~~~~~~~~~~~~~~~~~~~~~~~~~~~~~~~~~~~~~~~~~~~~~~~~~~~~~~~~~~~~~~~~~~~~~~~~~~~~~~~~~~~~~~~~~
26.3 了解jenkins
安装完插件就会创建用户
然后再回到linux服务器上
[root@axinlinux-01 ~]# vim /etc/sysconfig/jenkins #jenkins配置文件。以下简单讲解一下
JENKINS_HOME="/var/lib/jenkins" #home,就是jenkins程序放到了哪
JENKINS_JAVA_CMD="" #cmd,保持默认
JENKINS_USER="jenkins" #那个用户启动的
[root@axinlinux-01 ~]# cd /var/lib/jenkins/ #jenkins程序主目录
[root@axinlinux-01 jenkins]# ls
config.xml jenkins.install.InstallUtil.lastExecVersion logs secret.key.not-so-secret workflow-libs
hudson.model.UpdateCenter.xml jenkins.install.UpgradeWizard.state nodeMonitors.xml secrets
hudson.plugins.git.GitTool.xml jenkins.model.JenkinsLocationConfiguration.xml nodes updates
identity.key.enc jenkins.telemetry.Correlator.xml plugins userContent
jenkins.CLI.xml jobs secret.key users
[root@axinlinux-01 jenkins]# ls jobs/ #jobs目录就是浏览器上创建的任务。比如创建一个任务叫axin,在这个jobs目录下就会有一个axin的目录 常关注的!!
[root@axinlinux-01 jenkins]# ls logs/ #logs是日志相关
tasks
[root@axinlinux-01 jenkins]# ls nodes/ #多节点的时候用到的
[root@axinlinux-01 jenkins]# ls plugins/ #插件所在的目录。也是非常重要的目录。比如你先加一个插件,这个插件就存在这个目录里 常关注的!!
[root@axinlinux-01 jenkins]# ls secrets/ #密码密钥相关的
[root@axinlinux-01 jenkins]# ls updates/ #升级相关的
[root@axinlinux-01 jenkins]# ls users/ #用户相关的,比如我创建了一个admin,就会存在这个目录下
admin_625763853940219016 users.xml
如果,我们想要备份jenkins。就可以直接把jenkins目录(/var/lib/jenkins)全部考走,到新的机器上就可以了。jenkins不需要借助数据库存储数据。他的配置全部存在了.xml这样的文件里

Amazon Rekognition 综合指南:功能、优势、用例和替代方案

本指南将深入探讨 Amazon Rekognition 的核心功能,探索其提供的众多优势,并重点介绍不同行业的实际用例。此外,我们还将 Rekognition 与 Luxand.cloud 等替代方案进行比较,深入了解企业为何选择其中一种方案。无论您是希望将人脸识别集成到应用程序中的开发人员,还是寻求增强安全性和客户体验的企业,本综合指南都将为您提供有关利用视觉识别技术做出明智决策的知识。
在此处了解更多信息:Amazon Rekognition 综合指南:功能、优势、用例和替代方案
以上就是Amazon Rekognition 综合指南:功能、优势、用例和替代方案的详细内容,更多请关注php中文网其它相关文章!

API接口的概念、优势、设计、实现和使用
随着互联网的发展和不同系统之间的交互越来越频繁,API接口的使用已经成为软件开发和集成中不可或缺的一部分。API接口的使用原理是通过预定义的接口规范,软件系统可以调用或提供API接口的服务,来实现不同系统之间的数据传输和功能调用。本文将详细介绍API接口的使用原理,包括API接口的概念、优势、设计、实现和使用。
一、概念
API接口,全称应用程序编程接口,是一种定义了应用程序如何进行相互通信的标准技术。它允许应用程序通过互联网或者内部网络进行数据交换,从而实现应用程序之间的互操作性和数据共享。API接口的目的是简化开发过程,降低开发成本,并提高应用程序之间的可交互性。
二、优势
API接口具有以下优势:
- 互操作性:API接口定义了一种通用的数据格式和协议,使得不同平台和语言的应用程序可以相互通信。
- 灵活性:API接口提供了一种标准化的数据格式和协议,使得应用程序可以根据需要进行定制和扩展。
- 安全性:API接口可以提供安全的数据传输和认证机制,确保数据的安全性和完整性。
- 可靠性:API接口提供了一种可靠的数据传输机制,可以确保数据的稳定性和可靠性。
三、设计
API接口的设计应该遵循以下原则:
- 简单易用:API接口应该简单易用,易于理解和使用。
- 灵活可扩展:API接口应该具有灵活性和可扩展性,以便支持未来的需求变化。
- 安全性优先:API接口应该优先考虑安全性,确保数据的安全性和完整性。
- 可靠性优先:API接口应该优先考虑可靠性,确保数据的稳定性和可靠性。
四、实现
API接口的实现应该采用以下技术:
- RESTful API:RESTful API是一种基于HTTP协议的API设计风格,它使用HTTP方法(GET、POST、PUT、DELETE等)来表示对资源的操作。RESTful API具有简单易用、灵活可扩展和安全性高等优点。
- SOAP API:SOAP API是一种基于XML协议的API设计风格,它使用SOAP消息来表示对资源的操作。SOAP API具有复杂度高、灵活性强和安全性高等优点。
- JSON-RPC API:JSON-RPC API是一种基于JSON协议的API设计风格,它使用JSON格式来表示对资源的操作。JSON-RPC API具有简单易用、灵活可扩展和安全性高等优点。
五、使用
API接口的使用应该遵循以下步骤:
- 定义API接口:根据需求分析,定义API接口的输入和输出参数以及返回值。
- 实现API接口:根据定义好的API接口,编写相应的代码实现。
- 测试API接口:对实现好的API接口进行测试,确保其功能正确性和稳定性。
- 使用API接口:将实现好的API接口集成到应用程序中,实现应用程序之间的互操作性和数据共享。
六、总结
通过使用API接口,可以简化开发过程,降低开发成本,并提高应用程序之间的可交互性。在实际开发过程中,应该根据需求选择适合的API设计风格和技术实现。
我们今天的关于Node.js介绍、优势、用途和node.js优点的分享就到这里,谢谢您的阅读,如果想了解更多关于06-Nodejs介绍、104.jenkins介绍、安装、了解、Amazon Rekognition 综合指南:功能、优势、用例和替代方案、API接口的概念、优势、设计、实现和使用的相关信息,可以在本站进行搜索。
对于如何调试Node.js应用程序? - How do I debug Node.js applications?感兴趣的读者,本文将提供您所需要的所有信息,我们将详细讲解怎样调试node.js程序,并且为您提供关于How to Deploy Node Applications: Heroku vs Now.sh、iphone – 通过构建阶段脚本将iOS应用程序从XCode部署到/ Applications (越狱)、javascript – 为什么在Intellij IDEA 11中无法调试nodejs应用程序?、node-inspector,is a debugger interface for Node.js applications的宝贵知识。
本文目录一览:- 如何调试Node.js应用程序? - How do I debug Node.js applications?(怎样调试node.js程序)
- How to Deploy Node Applications: Heroku vs Now.sh
- iphone – 通过构建阶段脚本将iOS应用程序从XCode部署到/ Applications (越狱)
- javascript – 为什么在Intellij IDEA 11中无法调试nodejs应用程序?
- node-inspector,is a debugger interface for Node.js applications
")
如何调试Node.js应用程序? - How do I debug Node.js applications?(怎样调试node.js程序)
问题:
How do I debug a Node.js server application? 如何调试Node.js服务器应用程序?
Right now I''m mostly using alert debugging with print statements like this: 现在,我主要使用带有以下打印语句的警报调试 :
sys.puts(sys.inspect(someVariable));
There must be a better way to debug. 必须有更好的调试方法。 I know that Google Chrome has a command-line debugger. 我知道Google Chrome浏览器有一个命令行调试器。 Is this debugger available for Node.js as well? 该调试器也可用于Node.js吗?
解决方案:
参考一: https://stackoom.com/question/818p/如何调试Node-js应用程序参考二: https://oldbug.net/q/818p/How-do-I-debug-Node-js-applications

How to Deploy Node Applications: Heroku vs Now.sh
As Node.js continues to gain in popularity, new tutorials pop up teaching you to write server-side JavaScript apps and APIs. Once you’ve built your shiny new Node app, though, what then?
In this article, I’m going to take a look at a couple of options for deploying your Node applications. We’ll take a look at Now.sh and Heroku.
I’ll explain how to deploy your code to each platform and we’ll end the article with a short summary of the pros and cons. I’ll pay attention to options for monitoring, ease of use, offered functionality and what the free hosting plan includes.
Deployment with Heroku
To be able to deploy apps to Heroku, you will have to sign up at Heroku and install the Heroku CLI for your machine. I prefer working from my terminal!
Before we can start, we need to add some code to the Procfile. Heroku makes use of this file to determine how to execute the uploaded code.
The following code needs to be added to the file so Heroku knows what command should be executed to start the app:
web: node app.js
Once this is done, try to log in from the terminal by typing heroku login. Heroku will ask you to enter your login credentials.
Next, navigate to the root of your project and enter the command: heroku create. This creates an app on Heroku which is ready to receive the source code of your project. The name of the app on Heroku is randomly created.
To deploy our code to Heroku, simply use git push heroku master. We can visit the app with the command heroku open which will open the generated URL.
Pushing changes to Heroku
Changes can be pushed by following the normal Github flow:
git add .
git commit -m "Changes made to app"
git push heroku master
heroku open
Useful Heroku Commands
-
To make sure that at least one instance of the app is running:
heroku ps:scale web=1
Because we are using the free platform, it is not possible to upscale your application. However, it is possible to downscale so no instances of the application are running:heroku ps:scale web=0 -
View the latest logs (stream) in chronological order generated by Heroku:
heroku logs --tail
It’s also possible to show the app logs only. App logs are the output ofconsole.log()statements in your code and can be viewed withheroku logs --source app-name -
Heroku provides the possibility to run your app locally at http://localhost:5000:
heroku local web -
List all Heroku apps:
heroku apps -
Remove a deployment:
heroku apps:destroy --app app-name -
Add owner (account) to access the app:
heroku access:add me@email.com, same for removingheroku access:remove me@email.com
Heroku Environment Variables
If you are working with a .env file locally, you might want to use other environment variables for your Heroku deployment. It is possible to set these with heroku config:set PORT=3001. These values overwrite the variables set in you .env file.
To see all defined Heroku environment variables, just use heroku config. If you want to remove an environment variable for e.g. PORT, use heroku config:unset PORT.
Free Plan
- Allows up to five Heroku apps
- 512 MB RAM
- No upscaling available, only one instance of app can be running at the same time
- Sleeps after 30 minutes of inactivity
- Randomly generated app names
- Metrics about memory usage, response time and throughput available but not possible to add custom metrics
Deployment with now.sh
Now.sh focuses on the developer experience (DX), which is kind of unique. They try to offer tools which are flexible and are incredibly easy to use. Now.sh is part of Zeit.co which have developed several tools.
To keep it simple, we will only install the Now.sh CLI through npm:
npm install now -gNext, we need to sign up so we can use our credentials in the console. Both login and sign up happen at the login page. Every time you sign in, you will have to confirm your login attempt by verifying through email. After confirming, you will be redirected to your dashboard where you can view your logs and deployments.
To start using now, just type now in your console. The console will prompt your email. Fill in the correct email and verify this again by clicking on the verification email.
Now we are logged in, let’s take a look at the start script in our package.json. Now.sh uses this to start the application. This is what the scripts field looks like:
"scripts": {
  "start": "node app"
},
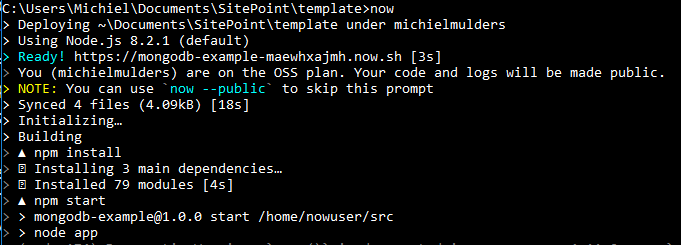
Let us start with deploying our code to now.sh. Make sure you are in the root of the code example. To start the deployment process, just hit now. I think you can see the developer experience there. Everything can be executed with just one keyword! If you make changes to the application and you want to redeploy it, just hit now in your console and you are good to go.
The URL of the app can be found in the console logs. More general logs about deployment or other now commands can be found at your dashboard.
Customization and defining environment variables
One way to customize your Now.sh deployment is by using a now.json file. However, since we are already using a package.json file, we can add the required customization under a the now key. This configuration allows you to customize the app name and alias, set environment variables, specify the deployment type and define the engine.
"now": {
  "name": "my-first-app",
  "alias": "app1",
  "type": "npm",
  "engines": {
    "node": "4.7.2"
  },
  "env": {
    "NODE_ENV": "production",
    "PORT": "3001"
  }
}
It’s also possible to set the environment variables through the CLI: now -e NODE_ENV="production" -e PORT="3001".
If you want to provide a dotenv file, you can set the option now --dotenv, but maybe you want to use .env.production instead of .env? This can be solved with --dotenv=.env.production. Lastly, you can also add the production dotenv file to your package.json.
"now": {
  "name": "my-first-app",
  "alias": "app1",
  "type": "npm",
  "engines": {
    "node": "4.7.2"
  },
  "dotenv": ".env.production"
}
Useful Now.sh Commands
-
The possibility to add an alias to your deployment:
now alias deploy-url aliasname -
List all deployments with their unique code:
now ls -
Remove a deployment:
now rm unique-code -
Force a new build (in case of issues):
now -f -
Scale your web app (free plan max 3):
now scale deployment-url 3. Sometimes, it is not easy to predict the amount of traffic. Now.sh enables you to set auto scaling with aminandmaxvalue:now scale deployment-url min max.
Monitoring Logs
Log output can be retrieved with: now logs [deployment-url | deployment-id]. More advanced logging is also possible:
-
now logs -a -q "GET" -n 10 deployment-url: Shows the 10 latest logs containing the wordGET. -
now logs --since=20171028: Shows all the logs from the 28th of October 2017 (ISO 8601 format)
It is also possible to access your logs by clicking on an app in your Now.sh dashboard.
OSS plan Now.sh
The OSS plan is free to use and offers the following:
- Bandwidth: 1GB
- Log storage up to 100MB
- Infinite amount of deployments possible
- Concurrent instances is limited to 3
- No support for custom domains
- Max file size: 1MB
- No auto-scaling support
The Bottom Line
Both Heroku and Now.sh offer great functionality. Now.sh focuses more on the developer experience by offering an easy to use CLI. On the other side, Heroku pays more attention to visual logging and especially monitoring with metrics.
Personally, I prefer the simplicity Now.sh offers by just using one keyword now for (re)deployment. For Node apps, I like the addition of the now property to the package.json file to customize your Now.sh deployment. No need to add extra files like the Procfile Heroku requires.
It’s hard to choose between both platforms. It just depends on your preferences and needs. Make sure to take a look at all the plans on offer. Good luck!
")
iphone – 通过构建阶段脚本将iOS应用程序从XCode部署到/ Applications (越狱)
>升级为狮子会
>转移到Xcode 4
>在我的iPad上更新到4.3.5,在iPhone上更新到5.0
从我所做的研究中,我得出结论,我的旧设置有一些“不寻常”.我发现配置的应用程序放在“沙盒目录”/ private / var / mobile / Applications中,并且可以读取整个文件系统的系统应用程序进入/ Applications.我想从使用更新的工具和Lion,我打破了给予我系统范围读取权限的任何东西.因此,我需要有关如何让Xcode直接部署到非沙盒系统目录的信息.
但有一些警告.我不想使用安装程序,我希望Xcode在构建和运行后自动执行.我还希望能够连接调试器,以便查看控制台.
任何有这方面经验的人都可以教我如何使用构建阶段脚本来做必要的魔术来获取签名的二进制文件并在每次构建后自动部署它吗?我认为这确实是可行的,因为控制台输出是一个非常有价值的工具,开发像Cydia本身这样的应用程序会非常困难.
谢谢您的帮助!
解决方法
构建阶段是使用/ bin / sh“运行脚本”,我添加了“${PROJECT_DIR} /MyApp/install.sh”
脚本(非常基本 – 没有错误处理)在下面(替换为适当的值):
(LatestBuild是构建目录的链接)
(ldid与iosopendev项目一起安装)
cd $HOME/Projects/iPhone/MyProject/MyApp
cp -r ../LatestBuild/MyApp.app com.test.MyApp/Applications/
ldid -S com.test.MyApp/Applications/MyApp.app/MyApp
rm com.test.MyApp.deb 2>&1
/opt/local/bin/dpkg-deb -b com.test.MyApp
scp com.test.MyApp.deb root@192.168.0.10:/var/root
ssh root@192.168.0.10 "dpkg -r com.test.MyApp"
ssh root@192.168.0.10 "dpkg -i com.test.MyApp.deb"
ssh root@192.168.0.10 "killall -9 MyApp"
#ssh root@192.168.0.10 "killall -HUP SpringBoard"
cd -
它可以改进很多 – 但它只是满足我的需求

javascript – 为什么在Intellij IDEA 11中无法调试nodejs应用程序?
所以,我放置一个初始断点并运行.调试器在断点处停止,但是它拒绝执行以下任何操作:
>进入
>去另一个断点
>暂停执行
当我进入时,似乎只是运行,而不必通过代码.一旦运行,它会忽略任何后续的断点,当我按下暂停按钮时不会中断.
这个问题让我疯狂.
有什么想法我该如何解决问题?
编辑
更多信息.在IDEA在第一个断点(唯一的成功时间)上断开之后,我尝试检查变量,看不到任何变量. IDEA被卡在“收集数据…”上,监视窗口也不起作用.
EDIT2
Justed发布了一个问题到他们的错误跟踪系统 – http://youtrack.jetbrains.com/issue/IDEA-112925
解决方法
我要hafta尝试寻找另一个工具..
UPDATE 2014-01-13:我一直在使用IntelliJ的调试器一段时间(发现没有其他好的工具).它似乎有一些问题是节点或v8本身的问题.我所遇到的大多数问题实际上都是通过较新版本的IntelliJ解决的,或者通过使用此解决方法:
1.创建一个名为proxyDebug.js的文件
2.将以下内容放在其中:
需要( ‘路径/要/的/脚本/你/想/到/ debug.js’)
3.将调试器指向该文件
显然,在entrypoint脚本中,node.js的调试钩子变得越来越麻烦,所以通过创建我们不在乎的代理入口点,在你关心的脚本中不会有任何奇怪的错误.修复的这个解决方法的错误是错过了断点,调试器无法访问的预定义变量(导出,模块,进程等),还有一个或两个我不记得的事情.

node-inspector,is a debugger interface for Node.js applications
https://github.com/node-inspector/node-inspector
我们今天的关于如何调试Node.js应用程序? - How do I debug Node.js applications?和怎样调试node.js程序的分享就到这里,谢谢您的阅读,如果想了解更多关于How to Deploy Node Applications: Heroku vs Now.sh、iphone – 通过构建阶段脚本将iOS应用程序从XCode部署到/ Applications (越狱)、javascript – 为什么在Intellij IDEA 11中无法调试nodejs应用程序?、node-inspector,is a debugger interface for Node.js applications的相关信息,可以在本站进行搜索。
本文标签: