对于Android_Jetpack:Room与LiveData、ViewModel的结合使用感兴趣的读者,本文将会是一篇不错的选择,我们将详细介绍androidroomlivedata,并为您提供关于
对于Android_Jetpack:Room与LiveData、ViewModel的结合使用感兴趣的读者,本文将会是一篇不错的选择,我们将详细介绍android room livedata,并为您提供关于Android Jetpack -- ViewModel篇(一)、Android jetpack 之 LiveData、Android Jetpack 全面学习 | LiveData 事件传送、Android Jetpack 狠活Lifecycles与LiveData使用详解的有用信息。
本文目录一览:- Android_Jetpack:Room与LiveData、ViewModel的结合使用(android room livedata)
- Android Jetpack -- ViewModel篇(一)
- Android jetpack 之 LiveData
- Android Jetpack 全面学习 | LiveData 事件传送
- Android Jetpack 狠活Lifecycles与LiveData使用详解
")
Android_Jetpack:Room与LiveData、ViewModel的结合使用(android room livedata)
如果不使用LiveData自动获取数据的变化,那么当每次数据库中的数据发生变化时,我们都要开启一个工作线程去重新获取数据库中的数据。
比如说,在进入页面时,要获取数据库中全部学生信息列表,一般我们会这么写:
thread{
    studentList = studentDao.getStudentList() as MutableList<Student>
    runOnUiThread {
        arrayAdapter = ArrayAdapter(this,android.R.layout.simple_list_item_1,studentList)
        listView.adapter = arrayAdapter
    }
}
首先开个工作线程去获取数据库中存储的学生列表,然后再回到UI线程中进行界面更新。这样既不方便又有可能因为忘记开线程而造成的程序出错,但是,结合LiveData及viewmodel,就可以在数据发生变化时,通过LiveData组件通知View层,实现数据的自动更新。
要想实现这个功能,我们需要对程序做如下改动:
①修改学生表Dao文件。
这里我们希望当学生列表数据发生变化时,能够收到实时通知,因此,我们将getStudentList()方法的返回对象用LiveData包装起来。
package com.example.jetpacktest.room

import androidx.lifecycle.LiveData
import androidx.room.*

@Dao
interface StudentDao {
    @Insert
    fun insertStudent(student:Student)
    @Delete
    fun deleteStudent(student: Student)
    @Update
    fun updateStudent(student: Student)
    @Query("SELECT * FROM student")
    fun getStudentList():LiveData<List<Student>>
    @Query("SELECT * FROM student WHERE id = :id")
    fun getStudentById(id:Long):Student
}
②创建Studentviewmodel类。
在Studentviewmodel类中调用StudentDao里的getStudentList()方法。
package com.example.jetpacktest.room

import androidx.lifecycle.viewmodel

class Studentviewmodel(studentDao: StudentDao) : viewmodel() {
    var studentLiveData = studentDao.getStudentList()
}
③创建StudentviewmodelFactory类。
因为我们在Studentviewmodel类中传递了StudentDao参数,因此我们需要有这么个类实现viewmodelProvider.Factory接口,以便于将StudentDao在实例化时传入。
以下写法为模板化写法,根据实际需求参数不同,做微调即可。
package com.example.jetpacktest.room

import androidx.lifecycle.viewmodel
import androidx.lifecycle.viewmodelProvider

class StudentviewmodelFactory(private val studentDao: StudentDao): viewmodelProvider.Factory {
    override fun <T : viewmodel?> create(modelClass: Class<T>): T {
        return Studentviewmodel(studentDao) as T
    }
}
④在Activity中实例化Studentviewmodel,并监听LiveData的变化。
package com.example.jetpacktest.room

import androidx.appcompat.app.AppCompatActivity
import android.os.Bundle
import android.view.View
import android.widget.AdapterView
import android.widget.ArrayAdapter
import android.widget.Toast
import androidx.appcompat.app.AlertDialog
import androidx.lifecycle.Observer
import androidx.lifecycle.viewmodelProvider
import com.example.jetpacktest.AppDatabase
import com.example.jetpacktest.R
import kotlinx.android.synthetic.main.activity_room_test_main.*
import kotlin.concurrent.thread

class RoomTestMainActivity : AppCompatActivity() {
    private var studentList:MutableList<Student> = arraylistof()
    private lateinit var arrayAdapter:ArrayAdapter<Student>
    lateinit var studentDao: StudentDao
    lateinit var viewmodel: Studentviewmodel
    override fun onCreate(savedInstanceState: Bundle?) {
        super.onCreate(savedInstanceState)
        setContentView(R.layout.activity_room_test_main)
        studentDao = AppDatabase.getDatabase(this).studentDao()
//        thread{
//            studentList = studentDao.getStudentList() as MutableList<Student>
//            runOnUiThread {
//                arrayAdapter = ArrayAdapter(this,android.R.layout.simple_list_item_1,studentList)
//                listView.adapter = arrayAdapter
//            }
//        }

		//Room与LiveData、viewmodel的结合使用,代替上面注释掉的部分
        arrayAdapter = ArrayAdapter(this,android.R.layout.simple_list_item_1,studentList)
        listView.adapter = arrayAdapter
        viewmodel = viewmodelProvider(this,StudentviewmodelFactory(studentDao)).get(Studentviewmodel::class.java)
        viewmodel.studentLiveData.observe(this, Observer { stList->
            studentList.clear()
            studentList.addAll(stList)
            arrayAdapter.notifyDataSetChanged()
        })
        ......
    }
}
运行程序,onChanged()方法会被自动调用,之后其他增删改操作都会在该方法内通知Adapter刷新数据,其他什么都不用做。
如:
fun addClick(view: View){
    if (nameEdt.text.toString() == "" || ageEdt.text.toString() == ""){
        Toast.makeText(this,"姓名或年龄不能为空",Toast.LENGTH_SHORT).show()
        return
    }
    val student = Student(nameEdt.text.toString(),ageEdt.text.toString().toInt())
    thread{
        studentDao.insertStudent(student)
    }
}
页面自动刷新。


")
Android Jetpack -- ViewModel篇(一)
ViewModel的出现主要为了解决两个问题:
1.当Actvitiy销毁重建过程中的数据恢复问题,虽然原来可以使用onSaveInstanceState()来完成,但是只支持能被序列化的数据而且是小量数据,对于大量数据则显得有点无力。
2.UI控制器的工作繁忙,UI控制器主要用于处理显示,交互,其他的额外操作可以委托给其他类完成,将不应该分配给UI的任务分离出来是必要的,这也就是上面所说的分离关注点原则。
下面是示意图
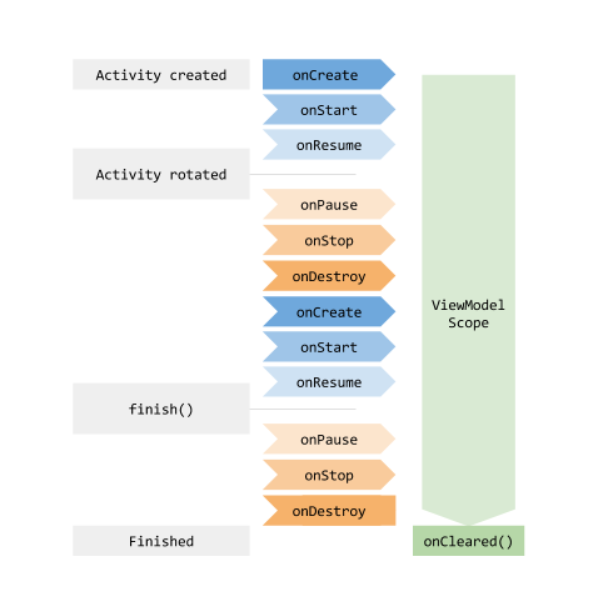
ViewModel实例
ViewModel在配置更改期间能自动保留其对象,以便它们所持有的数据可立即用于下一个 Activity 或片段 Fragment
具体的实例我在以前的一篇博客中讲过了,想要了解请点击 Android学习进度二 进行查看。
回到最上面的那个图,图说明了ViewModel的作用域涉及到整个生命周期,当获取ViewModel时,ViewModel的生命周期限定为传入ViewModelProvider的对象的生命周期。也就是对于以下场景(引用官方示例)
public class SharedViewModel extends ViewModel {
         private final MutableLiveData<Item> selected = new MutableLiveData<Item>();

         public void select(Item item) {
             selected.setValue(item);
         }

         public LiveData<Item> getSelected() {
             return selected;
         }
     }

     public class MasterFragment extends Fragment {
         private SharedViewModel model;
         public void onCreate(Bundle savedInstanceState) {
             super.onCreate(savedInstanceState);
             model = ViewModelProviders.of(getActivity()).get(SharedViewModel.class);
             itemSelector.setOnClickListener(item -> {
                 model.select(item);
             });
         }
     }

     public class DetailFragment extends Fragment {
         public void onCreate(Bundle savedInstanceState) {
             super.onCreate(savedInstanceState);
             SharedViewModel model = ViewModelProviders.of(getActivity()).get(SharedViewModel.class);
             model.getSelected().observe(this, { item ->
                // Update the UI.
             });
         }
     }
由于传入的是Activity,所以其作用域为整个Activity,不同的Fragment可以通过ViewModelProviders获取到同一个ViewModel,这样有以下的好处:
- Activity无须参与Fragment之间的交互。Activity与Fragment无关
- Fragment之间也无需互相建立联系,Fragment与Fragment无关
- 每个Fragment都有自己的生命周期,即使被替换也不会有任何影响
ViewModel加强,支持异常生命周期
有些时候在Activity被意外杀死,如清理后台等会直接跳过onDestory()而是回调onSaveInstanceState()异常杀死下的生命周期,这个时候ViewModel也会被杀死,再次恢复的时候便会被重建,这样,原来的数据也就丢失了,因此我们需要改进一下ViewModel以支持异常退出情况下的重建。
首先很容易是想到通过onSaveInstanceState() 来保存,然后通过SaveInstanceState 来恢复,虽然也是一种可行的方法,但是跟ViewModel没什么关联,ViewModel也提供了类似SavedInstanceState的方法。
SavedStateHandle :用于保存状态的数据类型,是一个key-value的map,类似于Bundle。
具体用法
public class ViewModelWithData extends ViewModel {

     private MutableLiveData<Integer> number;
     private SavedStateHandle handle;

     private static final String KEY_NUMBER = "number";

     public ViewModelWithData(SavedStateHandle handle) {
         this.handle = handle;
         number = new MutableLiveData<>();
         number.setValue(0);
     }

     public MutableLiveData<Integer> getNumber() {
         if (!handle.contains(KEY_NUMBER)) {
             handle.set(KEY_NUMBER, 0);
         }
         return handle.getLiveData(KEY_NUMBER);
     }

     public void addNumber(int n) {
         getNumber().setValue(getNumber().getValue() + n);
     }
 }
public class LiveDataActivity extends AppCompatActivity {
private ViewModelWithData viewModelWithData;
ActivityLiveDataBinding binding;
@Override
protected void onCreate(Bundle savedInstanceState) {
super.onCreate(savedInstanceState);
binding = DataBindingUtil.setContentView(this, R.layout.activity_live_data);
viewModelWithData = ViewModelProviders.of(this, new SavedStateVMFactory(this)).get(ViewModelWithData.class);
binding.setData(viewModelWithData);
binding.setLifecycleOwner(this);
}
}
Android jetpack 之 LiveData
首先,LiveData是什么
LiveData是一种可以被观察的数据存储器类,它可以感知其他组件(比如Activity,Fragment)的生命周期,并只更新处于活跃状态的组件. 当我们的应用组件处于 STARTED 或 RESUMED 状态,LiveData则会认为该组件处于活跃状态
开始使用LiveData,LiveData一般搭配viewmodel一起使用
首先我们会创建一个viewmodel,在viewmodel里面在创建LiveData,并提供getter方法进行访问.
class Nameviewmodel : viewmodel() {
    //LiveData是一个抽象类,一般使用它的 mutablelivedata 实现
    val currentName: mutablelivedata<String> by lazy {
        mutablelivedata<String>()
    }
}
接着在Activity的onCreate()方法中获取我们的Numviewmodel (在依赖了Android KTX 中的 Fragment KTX模块后, 可以直接使用viewmodels和activityviewmodels属性委托绑定到viewmodel),接着为LiveDta注册观察者
override fun onCreate(savedInstanceState: Bundle?) {
    super.onCreate(savedInstanceState)
    setContentView(R.layout.activity_main)
    //获取viewmodel对象
    val model = viewmodelProvider(this,
        viewmodelProvider.NewInstanceFactory()).get(Nameviewmodel::class.java)
    //创建观察者对象
    val nameObserver = Observer<String> { name ->
        //更新UI
    }
    //通过observe()来注册观察者
    model.currentName.observe(this, nameObserver)
}
在注册观察者之后系统会立即调用onChange()方法,来提供currentName中的最新值,如果LiveData对象尚未在currentName中设置值,则onChange()方法不会被调用.
现在已经创建了LiveData对象并且设置了观察者.我们只需要更新LiveData对象就可以完成对onChange()方法的调用.LiveData提了 setValue(T) 和 postValue(T) 两个方法来更新值,第一个用来在主线程上使用,第二个用来在工作线程上使用.
button.setonClickListener {
    model.currentName.setValue("乌鸡哥")
}
LiveData 是怎么工作的
首先我们看下LiveData是如何注册一个观察者的
@MainThread
public void observe(@NonNull LifecycleOwner owner, @NonNull Observer<? super T> observer) {
    //该方法一定要在主线程上调用
    assertMainThread("observe");
    if (owner.getLifecycle().getCurrentState() == DESTROYED) {
        // ignore
        return;
    }
    LifecycleBoundobserver wrapper = new LifecycleBoundobserver(owner, observer);
    ObserverWrapper existing = mObservers.putIfAbsent(observer, wrapper);
    if (existing != null && !existing.isAttachedTo(owner)) {
        throw new IllegalArgumentException("Cannot add the same observer"
            + " with different lifecycles");
    }
    if (existing != null) {
        return;
    }
    owner.getLifecycle().addobserver(wrapper);
}observe()方法的第一个参数是一个接口,提供了一个获取Lifecycle的方法,该对象可以对我们应用组件(如Activity,Fragment)的生命周期进行监听.LiveData能感知组件生命周期的能力就它带来的. 第二个参数就是我们的观察者对象.
从上面的代码可以看出.如果该观察者所在的组件已经销毁,则什么也不会做.
紧接着,把我们传入的owner 和 observer 做了一个包装. 这个包装类实现了GenericLifecycleObserver这个接口.
然后把我们的观察者都存储到mObservers这个SafeIterableMap里.在这里做了一个判断,即一个观察者只能观察一个LiveData对象.
最后把我们的包装类和Lifecycle做了关联,这时我们的LiveData就获得了应用组件的生命周期感知能力.
那这个包装类是什么
class LifecycleBoundobserver extends ObserverWrapper implements GenericLifecycleObserver {
    @NonNull
    final LifecycleOwner mOwner;

    LifecycleBoundobserver(@NonNull LifecycleOwner owner, Observer<? super T> observer) {
        super(observer);
        mOwner = owner;
    }

    //判断该组件是否是活跃状态,大于等于STARTED时返回true
    @Override
    boolean shouldBeActive() {
        return mOwner.getLifecycle().getCurrentState().isAtLeast(STARTED);
    }

    //当组件的生命周期发生改变时调用
    @Override
    public void onStateChanged(LifecycleOwner source, Lifecycle.Event event) {
        if (mOwner.getLifecycle().getCurrentState() == DESTROYED) {
            removeObserver(mObserver);
            return;
        }
        activeStateChanged(shouldBeActive());
    }

    @Override
    boolean isAttachedTo(LifecycleOwner owner) {
        return mOwner == owner;
    }

    @Override
    void detachObserver() {
        mOwner.getLifecycle().removeObserver(this);
    }
}
.当观察者所在的组件生命周期发生改变后,会回调onStartChange,在里面会首先检查组件是不是已经销毁,销毁的话需要移除LiveData的观察者,还要移除包装类和Lifecycle的关联.
@MainThread
public void removeObserver(@NonNull final Observer<? super T> observer) {
    assertMainThread("removeObserver");
    ObserverWrapper removed = mObservers.remove(observer);
    if (removed == null) {
        return;
    }
    removed.detachObserver();
    removed.activeStateChanged(false);
}
在里面首先会从mObservers这个SafeIterableMap里面移除LiveData的观察者. 接着调用detachObserver移除包装类和Lifecycle的关联.最后调用activeStateChanged(false)
如果组件没有销毁,则会直接调用activeStateChanged(shouldBeActive())
void activeStateChanged(boolean newActive) {
    //如果状态没改变,什么也不做
    if (newActive == mActive) {
        return;
    }
    // immediately set active state, so we'd never dispatch anything to inactive
    // owner
    //更新状态
    mActive = newActive;
    //当前LiveData没有任何活跃的观察者时为true
    boolean wasInactive = LiveData.this.mActiveCount == 0;
    LiveData.this.mActiveCount += mActive ? 1 : -1;
    if (wasInactive && mActive) {
        onActive();
    }
    if (LiveData.this.mActiveCount == 0 && !mActive) {
        onInactive();
    }
    if (mActive) {
        dispatchingValue(this);
    }
}
在里面就是判断了一下LiveData里面是否还有活跃的观察者.,从上面的代码看到,只有LiveData里面的活跃观察者从0变成1的时候才会调用onActive,并且只有活跃的观察者变成0的时候才会调用onInactive.最后判断了一个这个观察者是否是活跃的,如果是活跃的会调用dispatchingValue来向这一个观察者发送事件.
使用setValue来通知观察者更新数据
@MainThread
protected void setValue(T value) {
    assertMainThread("setValue");
    mVersion++;
    mData = value;
    dispatchingValue(null);
}
void dispatchingValue(@Nullable ObserverWrapper initiator) {
    //首先会判断是不是在分发事件,如果正在分发事件,则什么也不做
    if (mdispatchingValue) {
        mdispatchInvalidated = true;
        return;
    }
    mdispatchingValue = true;
    do {
        mdispatchInvalidated = false;
        if (initiator != null) {
            considerNotify(initiator);
            initiator = null;
        } else {
            //通知所有的观察者
            for (Iterator<Map.Entry<Observer<? super T>, ObserverWrapper>> iterator =
                    mObservers.iteratorWithAdditions(); iterator.hasNext(); ) {
                considerNotify(iterator.next().getValue());
                if (mdispatchInvalidated) {
                    break;
                }
            }
        }
    } while (mdispatchInvalidated);
    mdispatchingValue = false;
}
private void considerNotify(ObserverWrapper observer) {
//观察者不是活跃的,什么也不做
if (!observer.mActive) {
return;
}
...
if (!observer.shouldBeActive()) {
observer.activeStateChanged(false);
return;
}
if (observer.mLastVersion >= mVersion) {
return;
}
observer.mLastVersion = mVersion;
//noinspection unchecked
observer.mObserver.onChanged((T) mData);
}在观察者调用onChanged方法之前,仍会有很多的判断.比如检查观察者是不是活跃的.是不是已经通知过了. 我们的LiveData里又一个mVersion.这个mVersion在每次的setValue操作后都会自增. 而我们的ObserverWapper 也会有一个mLastVersion.比较这两个值就可以确定我们的观察者是否已经回调了onChanged.
LiveData还有一个observeForever方法.只需传递一个观察者对象就好.使用这个方法来注册观察者会是LiveData失去生命周期感知能力.我们需要自己在合适的生命周期回调方法中移除观察者
扩展LiveData
我们可以扩展一个LiveData来监听一些服务
class MoneyLiveData : LiveData<BigDecimal>(){
    //金钱的管理类
    private val manager = MoneyManager()
    private val listener = { money: BigDecimal ->
        value = money
    }
    override fun onActive() {
        super.onActive()
        manager.registerListener(listener)
    }
    override fun onInactive() {
        super.onInactive()
        manager.removeListener(listener)
    }
}
这里包含一些重要的方法,onActive() 会在有活跃的观察者时调用, onInactive() 会在没有任何活跃的观察者时调用. setValue(T)会更新LiveData实例的值并将结果告知所有活跃的观察者,可以在Activity的onCreate()方法中使用
override fun onCreate(savedInstanceState: Bundle?) {
    super.onCreate(savedInstanceState)
    setContentView(R.layout.activity_main)
    val moneyLiveData: MoneyLiveData = ...
    moneyLiveData.observe(this, Observer<BigDecimal> { money ->
        //更新UI
    })
}
转换LiveData
有时候我们会希望将LiveData对象分派给观察者之前改变里面存储的值,map(),又或者转换成别的LiveData对象,switchMap()
val oldLiveData: LiveData<String> = OldLiveData()
//使用 Transformations 的map() 来在对前一个LiveData的值进行修改
val newLiveData: LiveData<String> = Transformations.map(oldLiveData) {
    oldString -> "newString"
}
newLiveData.observe(this, Observer { Log.d("TAG", it)})

val oldLiveData: LiveData<String> = mutablelivedata<String>()
val newLiveData: LiveData<String> = mutablelivedata<String>()
//使用 Transformations 的switchMap()来对前一个LiveData转换为一个新的LiveData
val liveData = Transformations.switchMap(oldLiveData) { newLiveData}
liveData.observe(this, Observer { Log.d("TAG", it)})

Android Jetpack 全面学习 | LiveData 事件传送
ViewModel 如何将事件和数据传送到 Activity 中?我们可以使用 MutableLiveData<T>。
一,准备数据类型
新建类 MutableDemoVM。
public class MutableDemoVM {
    public int countPoint = 0;

    public ObservableField<String> title = new ObservableField<>("使用MutableLiveData");
    public ObservableField<String> timeStr = new ObservableField<>();
    public ObservableField<Integer> count = new ObservableField<>(0);

    public MutableLiveData<Void> liveDataOnBack = new MutableLiveData<>();
    public MutableLiveData<Integer> countLiveData = new MutableLiveData<>();

    public void onClickBack(View view) {
        liveDataOnBack.setValue(null);
    }

    public void onClickAdd(View view) {
        countPoint++;
        count.set(countPoint);
        countLiveData.setValue(countPoint);
    }
}
监听到点击事件后,执行一些操作,然后把数据发送出去。
发送事件需要调用 setValue 方法或者 postValue 方法。
它们之间一个显著区别在于,setValue 方法必须要在主线程中执行,postValue 方法可以在任意线程执行。postValue 方法会把数据切换到主线程去发送。
如果在子线程中调用 setValue,会报 IllegalStateException:Cannot invoke setValue on a background thread。 setValue 方法进行了 assertMainThread 检查。
另一个区别是,setValue 方法是立即将数据传送给监听器(观察者)。postValue 方法会把数据依次发送。
如果在主线程中调用 postValue 后又立即调用 setValue,那么监听器会先拿到 setValue 的数据,然后拿到 postValue 的数据。
连续多次调用 postValue 来发送数据,如果主线程没有来得及执行发送任务,监听器会接收到最后一次发送的数据。
二,layout
准备 layout 文件。设置监听与各个感兴趣的属性。
<?xml version="1.0" encoding="utf-8"?>
<layout xmlns:android="http://schemas.android.com/apk/res/android">

    <data>
        <variable
            name="vm"
            type="com.rustfisher.tutorial2020.databinding.data.MutableDemoVM" />
    </data>

    <LinearLayout
        android:layout_width="match_parent"
        android:layout_height="match_parent"
        android:orientation="vertical">

        <LinearLayout
            android:layout_width="match_parent"
            android:layout_height="50dp"
            android:orientation="horizontal">

            <ImageView
                android:layout_width="50dp"
                android:layout_height="50dp"
                android:onClick="@{vm.onClickBack}"
                android:padding="10dp"
                android:src="@drawable/ic_arrow_back_black_24dp" />

            <TextView
                android:layout_width="wrap_content"
                android:layout_height="match_parent"
                android:gravity="center_vertical"
                android:text="@{vm.title}"
                android:textColor="#000000"
                android:textSize="18sp" />

        </LinearLayout>

        <LinearLayout
            android:layout_width="match_parent"
            android:layout_height="match_parent"
            android:orientation="vertical">

            <TextView
                android:layout_width="wrap_content"
                android:layout_height="wrap_content"
                android:layout_gravity="center_horizontal"
                android:text=''@{"count: "+String.valueOf(vm.count)}''
                android:textSize="16sp" />

            <Button
                android:layout_width="100dp"
                android:layout_height="50dp"
                android:layout_gravity="center_horizontal"
                android:layout_marginTop="20dp"
                android:onClick="@{vm::onClickAdd}"
                android:text="+" />
        </LinearLayout>
    </LinearLayout>
</layout>
三,Activity 设置
需要使用 androidx.appcompat.app.AppCompatActivity,它支持了 LifeCycle。
public class MutableDemo1 extends AppCompatActivity {

    private ActMutableDemo1Binding binding;
    private MutableDemoVM mVM = new MutableDemoVM();

    @Override
    protected void onCreate(Bundle savedInstanceState) {
        super.onCreate(savedInstanceState);
        binding = DataBindingUtil.setContentView(this, R.layout.act_mutable_demo1);
        binding.setVm(mVM);

        // 设置观察者
        mVM.liveDataOnBack.observe(this, new Observer<Void>() {
            @Override
            public void onChanged(Void aVoid) {
                onBackPressed();
            }
        });
        mVM.countLiveData.observe(this, new Observer<Integer>() {
            @Override
            public void onChanged(Integer count) {
                Toast.makeText(getApplicationContext(), "count: " + count, Toast.LENGTH_SHORT).show();
            }
        });
    }
}
在 activity 中设置观察者。设置方法是 observe(@NonNull LifecycleOwner owner, @NonNull Observer<? super T> observer)。
这个方法必须在主线程中执行。
Android 开发中高级进阶:JetPack Compse 开发应用实战

Android Jetpack 狠活Lifecycles与LiveData使用详解
前言
今天在工作时,测试突然提了一个Bug给我,要求我将APP中某活动页面的UI界面要根据用户在由此页面跳转的下个页面操作,在返回时要实时更新。

在检查代码时,发现我已经对界面可变数据用LiveData去观测,但由于页面变化后并没有重新初始化UI,所以我放在初始化UI的请求根本没有起效,如上图所示例子,在进入下一个页面如若关闭开关,返回时无法及时更新,于是我便想到了安卓科技与狠活Lifecycles,去监听onResume,在resume时用livedata去post数据。
正篇
说了这么多但我们并没有看到代码,也即是LiveData是如何用的,所以下面我们先从代码示例看起:
class MainViewModel(countReserved: Int) : ViewModel() {
    val counter : LiveData<Int>
        get() = _counter
    private var _counter = MutableLiveData<Int>()
    init {
        _counter.value = countReserved
    }
    fun plusOne() {
        var count = _counter.value ?: 0
        _counter.value = count + 1
    }
    fun clear() {
        _counter.value = 0
    }
}
上面代码用到了我们之前说的ViewModel,与之前不同的是,我们为它的成员变量添加了LiveData,而且通过_counter设置私有变量的形式对外部不可见,使LiveData就不可变了,这样就能在非ViewModel中只能观察LiveData数据变化,而不能给LiveData设置数据。
为什么要这样做呢?这就不得不提一下上节我们的ViewModel生命周期问题,它是长与Activity的,这就可能导致Activity的实例传给ViewModel,而Activity无法释放造成内存泄漏,我们是绝对不能那样写的。
而LiveData可以包含任何类型数据,还能在数据变化时候通知给观察者,这样就能在数据变化时主动去通知Activity。
接下来我们再来看看上篇文章中写成的计数器的Activity是如何变化的:
override fun onCreate(savedInstanceState: Bundle?) {
    super.onCreate(savedInstanceState)
    setContentView(R.layout.activity_main)
    ...
    ...
    var infoText : TextView = findViewById(R.id.infoText)
    plusOneBtn.setOnClickListener {
        viewModel.plusOne()
    }
    clearBtn.setOnClickListener {
        viewModel.clear()
    }
    viewModel.counter.observe(this, Observer { count ->
        infoText.text = count.toString()
    })
}
override fun onPause() {
    super.onPause()
    sp.edit {
        putInt("count_reserved",viewModel.counter.value ?: 0)
    }
}
我们通过对LiveData的counter实例observe观察从而改变了计数器,效果如下:

我们可以看到,该计数器效果没有变化,但是实际上我们已经将ui数据的改变通过ViewModel去实现,这样的代码更科学也更合理,而且不用担心ViewModel内部会不会开启线程执行耗时逻辑。
但切记:如果在子线程给LiveData设置数据,一定得调用postValue()方法,而不能使用setValue()方法,否则会导致异常崩溃。
结语
LiveData应付正常的情况足够了,但工作还是出现了Bug,毕竟需要我们手动去获取value,所以本篇LiveData知识部分准备完成,下一篇我们将带大家去看看Leftcycles是如何亡羊补牢,力挽狂澜。
以上就是Android Jetpack 狠活Lifecycles与LiveData使用详解的详细内容,更多关于Jetpack Lifecycles LiveData的资料请关注其它相关文章!
- Android开发中用Kotlin编写LiveData组件教程
- Android liveData与viewBinding使用教程
- Android Jetpack组件库LiveData源码深入探究
- Android Jetpack组件支持库DataBinding与ViewModel与LiveData及Room详解
- Android开发Jetpack组件ViewModel与LiveData使用讲解
- Android 自定义Livedata使用示例解析
关于Android_Jetpack:Room与LiveData、ViewModel的结合使用和android room livedata的介绍已经告一段落,感谢您的耐心阅读,如果想了解更多关于Android Jetpack -- ViewModel篇(一)、Android jetpack 之 LiveData、Android Jetpack 全面学习 | LiveData 事件传送、Android Jetpack 狠活Lifecycles与LiveData使用详解的相关信息,请在本站寻找。
本文标签:


![[转帖]Ubuntu 安装 Wine方法(ubuntu如何安装wine)](https://www.gvkun.com/zb_users/cache/thumbs/4c83df0e2303284d68480d1b1378581d-180-120-1.jpg)

