对于想了解java-无法在SettingsActivity中解析“AppCompatPreferenceActivity”的读者,本文将提供新的信息,我们将详细介绍java无法应用到给定类型,并且为您
对于想了解java-无法在SettingsActivity中解析“ AppCompatPreferenceActivity”的读者,本文将提供新的信息,我们将详细介绍java无法应用到给定类型,并且为您提供关于Activiti6 应用安装 activiti-admin,activiti-app,activiti-rest、Activity、AppCompatActivity、FragmentActivity 和 ActionBarActivity:什么时候使用?、Activity、FragmentActivity和AppCompatActivity的区别、Activity与AppCompatActivity全屏实现方法的有价值信息。
本文目录一览:- java-无法在SettingsActivity中解析“ AppCompatPreferenceActivity”(java无法应用到给定类型)
- Activiti6 应用安装 activiti-admin,activiti-app,activiti-rest
- Activity、AppCompatActivity、FragmentActivity 和 ActionBarActivity:什么时候使用?
- Activity、FragmentActivity和AppCompatActivity的区别
- Activity与AppCompatActivity全屏实现方法
")
java-无法在SettingsActivity中解析“ AppCompatPreferenceActivity”(java无法应用到给定类型)
我有一个AppCompatPreferenceActivity.java.但这显示了一个错误
公共类SettingsActivity扩展了AppCompatPreferenceActivity
它说它无法解析’AppCompatPreferenceActivity’.

看来我是唯一遇到此问题的人.任何想法?
错误:(21、39)错误:找不到符号类AppCompatPreferenceActivity
解决方法:
Google支持库中不存在AppCompatPreferenceActivity,
您应该使用相同的名称创建一个类并使用此源:
public abstract class AppCompatPreferenceActivity extends PreferenceActivity {

private AppCompatDelegate mDelegate;

@Override
protected void onCreate(Bundle savedInstanceState) {
    getDelegate().installViewFactory();
    getDelegate().onCreate(savedInstanceState);
    super.onCreate(savedInstanceState);
}

@Override
protected void onPostCreate(Bundle savedInstanceState) {
    super.onPostCreate(savedInstanceState);
    getDelegate().onPostCreate(savedInstanceState);
}

public ActionBar getSupportActionBar() {
    return getDelegate().getSupportActionBar();
}

public void setSupportActionBar(@Nullable Toolbar toolbar) {
    getDelegate().setSupportActionBar(toolbar);
}

@Override
public MenuInflater getMenuInflater() {
    return getDelegate().getMenuInflater();
}

@Override
public void setContentView(@LayoutRes int layoutResID) {
    getDelegate().setContentView(layoutResID);
}

@Override
public void setContentView(View view) {
    getDelegate().setContentView(view);
}

@Override
public void setContentView(View view, ViewGroup.LayoutParams params) {
    getDelegate().setContentView(view, params);
}

@Override
public void addContentView(View view, ViewGroup.LayoutParams params) {
    getDelegate().addContentView(view, params);
}

@Override
protected void onPostResume() {
    super.onPostResume();
    getDelegate().onPostResume();
}

@Override
protected void onTitleChanged(CharSequence title, int color) {
    super.onTitleChanged(title, color);
    getDelegate().setTitle(title);
}

@Override
public void onConfigurationChanged(Configuration newConfig) {
    super.onConfigurationChanged(newConfig);
    getDelegate().onConfigurationChanged(newConfig);
}

@Override
protected void onStop() {
    super.onStop();
    getDelegate().onStop();
}

@Override
protected void onDestroy() {
    super.onDestroy();
    getDelegate().onDestroy();
}

public void invalidateOptionsMenu() {
    getDelegate().invalidateOptionsMenu();
}

private AppCompatDelegate getDelegate() {
    if (mDelegate == null) {
        mDelegate = AppCompatDelegate.create(this, null);
    }
    return mDelegate;
}

}

Activiti6 应用安装 activiti-admin,activiti-app,activiti-rest
activiti6安装包中
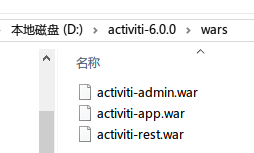
1/直接将三个war包放入tomcat中,即可运行,使用H2内存数据库
2/使用mysql数据库运行
2.1/activiti-admin
# security configuration (this key should be unique for your application, and kept secret)
security.rememberme.key=activitis3cr3tk3y


# H2 example (default)

#datasource.driver=org.h2.Driver
#datasource.url=jdbc:h2:tcp://localhost/activitiadmin

# MySQL example

datasource.driver=com.mysql.jdbc.Driver
datasource.url=jdbc:mysql://127.0.0.1:3306/test-wf-admin?characterEncoding=UTF-8&useSSL=false

#datasource.driver=org.postgresql.Driver
#datasource.url=jdbc:postgresql://localhost:5432/activitiadmin

#datasource.driver=com.microsoft.sqlserver.jdbc.SQLServerDriver
#datasource.url=jdbc:sqlserver://localhost:1433;databaseName=activitiadmin

#datasource.driver=oracle.jdbc.driver.OracleDriver
#datasource.url=jdbc:oracle:thin:@localhost:1521:ACTIVITIADMIN

#datasource.driver=com.ibm.db2.jcc.DB2Driver
#datasource.url=jdbc:db2://localhost:50000/activitiadmin

datasource.username=root
datasource.password=root

# JNDI CONFIG

# If uncommented, the datasource will be looked up using the configured JNDI name.
# This will have preference over any datasource configuration done below that doesn''t use JNDI
#
# Eg for JBoss: java:jboss/datasources/activitiDS
#
#datasource.jndi.name=jdbc/activitiDS

# Set whether the lookup occurs in a J2EE container, i.e. if the prefix "java:comp/env/" needs to be added if the JNDI
# name doesn''t already contain it. Default is "true".
#datasource.jndi.resourceRef=true

#hibernate.dialect=org.hibernate.dialect.H2Dialect
#hibernate.dialect=org.hibernate.dialect.MySQLDialect
#hibernate.dialect=org.hibernate.dialect.Oracle10gDialect
#hibernate.dialect=org.hibernate.dialect.SQLServerDialect
#hibernate.dialect=org.hibernate.dialect.DB2Dialect
#hibernate.dialect=org.hibernate.dialect.PostgreSQLDialect
#hibernate.show_sql=false
#hibernate.generate_statistics=false

#
# Connection pool (see http://www.mchange.com/projects/c3p0/#configuration)
#

datasource.min-pool-size=2
datasource.max-pool-size=10
datasource.acquire-increment=2
# test query for H2, MySQL, PostgreSQL and Microsoft SQL Server
#datasource.preferred-test-query=select 1
# test query for Oracle
#datasource.preferred-test-query=SELECT 1 FROM DUAL
# test query for DB2
#datasource.preferred-test-query=SELECT current date FROM sysibm.sysdummy1
#datasource.test-connection-on-checkin=true
#datasource.test-connection-on-checkout=true
#datasource.max-idle-time=1800
#datasource.max-idle-time-excess-connections=1800

#
# Cluster settings
#

# This a period of time, expressed in milliseconds, that indicates
# when a node is deemed to be inactive and is removed from the list
# of nodes of a cluster (nor will it appear in the ''monitoring'' section of the application).
#
# When a node is properly shut down, it will send out an event indicating
# it is shut down. From that point on, the data will be kept in memory for the amount
# of time indicated here.
# When a node is not properly shut down (eg hardware failure), this is the period of time
# before removal, since the time the last event is received.
#
# Make sure the value here is higher than the sending interval of the nodes, to avoid
# that nodes incorrectly removed.
#
# By default 10 minutes
cluster.monitoring.max.inactive.time=600000

# A cron expression that configures when the check for inactive nodes is made.
# When executed, this will mark any node that hasn''t been active for ''cluster.monitoring.max.inactive.time''
# seconds, as an inactive node. Default: every 5 minutes.
cluster.monitoring.inactive.check.cronexpression=0 0/5 * * * ?

# REST endpoint config
rest.app.name=Activiti app
rest.app.description=Activiti app Rest config
rest.app.host=http://localhost
rest.app.port=8080
rest.app.contextroot=activiti-app
rest.app.restroot=api
rest.app.user=admin
rest.app.password=test

# Passwords for rest endpoints and master configs are stored encrypted in the database using AES/CBC/PKCS5PADDING
# It needs a 128-bit initialization vector (http://en.wikipedia.org/wiki/Initialization_vector)
# and a 128-bit secret key represented as 16 ascii characters below
#
# Do note that if these properties are changed after passwords have been saved, all existing passwords
# will not be able to be decrypted and the password would need to be reset in the UI.
security.encryption.credentialsIVSpec=j8kdO2hejA9lKmm6
security.encryption.credentialsSecretSpec=9FGl73ngxcOoJvmL

# BPMN 2.0 Modeler config

modeler.url=https://activiti.alfresco.com/activiti-app/api/

# Enable multi tenant support, disabled by default
#multi-tenant.enabled=true
2.2 activiti-app
#
# SECURITY
#
security.rememberme.key=testkey

#
# DATABASE
#

#datasource.driver=org.h2.Driver
#datasource.url=jdbc:h2:mem:activiti;DB_CLOSE_DELAY=-1

datasource.driver=com.mysql.jdbc.Driver
datasource.url=jdbc:mysql://127.0.0.1:3306/test-wf-app?characterEncoding=UTF-8&useSSL=false

datasource.username=root
datasource.password=root

#hibernate.dialect=org.hibernate.dialect.H2Dialect
#hibernate.dialect=org.hibernate.dialect.MySQLDialect
#hibernate.dialect=org.hibernate.dialect.Oracle10gDialect
#hibernate.dialect=org.hibernate.dialect.SQLServerDialect
#hibernate.dialect=org.hibernate.dialect.DB2Dialect
#hibernate.dialect=org.hibernate.dialect.PostgreSQLDialect

#
# EMAIL
#

#email.enabled=true
#email.host=localhost
#email.port=1025
#email.useCredentials=false
#email.username=
#email.password=

# The base url that will be used to create urls in emails.
#email.base.url=http://localhost:9999/activiti-app

#email.from.default=no-reply@activiti.alfresco.com
#email.from.default.name=Activiti
#email.feedback.default=activiti@alfresco.com

#
# ACTIVITI
#

activiti.process-definitions.cache.max=500

#
# DEFAULT ADMINISTRATOR ACCOUNT
#

admin.email=admin
admin.password=test
admin.lastname=Administrator

admin.group=Superusers

# The maximum file upload limit. Set to -1 to set to ''no limit''. Expressed in bytes
file.upload.max.size=104857600

# For development purposes, data folder is created inside the sources ./data folder
contentstorage.fs.rootFolder=data/
contentstorage.fs.createRoot=true
contentstorage.fs.depth=4
contentstorage.fs.blockSize=1024
2.3/ activit-rest
#db=h2
#jdbc.driver=org.h2.Driver
#jdbc.url=jdbc:h2:mem:activiti;DB_CLOSE_DELAY=-1
#jdbc.username=sa
#jdbc.password=

db=mysql
jdbc.driver=com.mysql.jdbc.Driver
jdbc.url=jdbc:mysql://127.0.0.1:3306/test-wf-rest?characterEncoding=UTF-8&useSSL=false
jdbc.username=root
jdbc.password=root

Activity、AppCompatActivity、FragmentActivity 和 ActionBarActivity:什么时候使用?
我来自 iOS,这很容易,您只需使用 UIViewController。然而,在 Android 中,事情似乎要复杂得多,某些 UIComponents
用于特定的 API 级别。我正在阅读适用于 Android 的 BigNerdRanch(这本书大约有 2
年的历史),他们建议我用它Activity来托管我的FragmentActivities. 但是,我认为Activity已弃用。
那么对于 API 级别 22(至少支持 API 级别 15 或
16),我究竟应该使用什么来托管组件和组件本身?所有这些都有用吗,还是我应该几乎只使用一两个?

Activity、FragmentActivity和AppCompatActivity的区别
Activity
Activity是最基础的一个,是其它类的直接或间接父类。
Activity中只能使用系统自带的host Fragment(API Level 11中加入),对应getFragmentManager方法来控制Activity和Fragment之间的交互。
FragmentActivity
在v4包中引入FragmentActivity,FragmentActivity间接继承自Activity,并提供了对v4包中support Fragment的支持。
在FragmentActivity中必须使用getSupportFragmentManager方法来处理support Fragment的交互。也可以处理support Fragment的嵌套使用。
Known limitations:

*  When using the `<fragment>` tag, this implementation can not use the parent view''s ID as the new fragment''s ID.
You must explicitly specify an ID (or tag) in the `<fragment>`.
AppCompatActivity
AppCompatActivity继承自FragmentActivity,同时取代了ActionBarActivity。
AppCompatActivity支持ActionBar功能,同时更推荐使用ToolBar。AppCompatActivity为支持Material Design风格控件提供了便利。
使用场景
参考stack overflow中一个回答。
Activity is the baseline. Every activity inherits from Activity, directly or indirectly.
FragmentActivity is for use with the backport of fragments found in the support-v4 and support-v13 libraries. The native implementation of fragments was added in API Level 11, which is lower than your proposed minSdkVersion values. The only reason why you would need to consider FragmentActivity specifically is if you want to use nested fragments (a fragment holding another fragment), as that was not supported in native fragments until API Level 17.
AppCompatActivity is from the appcompat-v7 library. Principally, this offers a backport of the action bar. Since the native action bar was added in API Level 11, you do not need AppCompatActivity for that. However, current versions of appcompat-v7 also add a limited backport of the Material Design aesthetic, in terms of the action bar and various widgets. There are pros and cons of using appcompat-v7, well beyond the scope of this specific Stack Overflow answer.
ActionBarActivity is the old name of the base activity from appcompat-v7. For various reasons, they wanted to change the name. Unless some third-party library you are using insists upon an ActionBarActivity, you should prefer AppCompatActivity over ActionBarActivity.
So, given your minSdkVersion in the 15-16 range:
-
If you want the backported Material Design look, use AppCompatActivity
-
If not, but you want nested fragments, use FragmentActivity
-
If not, use Activity
Just adding from comment as note: AppCompatActivity extends FragmentActivity, so anyone who needs to use features of FragmentActivity can use AppCompatActivity.
AppCompatActivity中AppCompat系列组件的构造及替换
AppCompatActivity中通过AppCompatDelegate来扩展Activity。AppCompatDelegate可以在任一Activity中使用,需要与合适的生命周期方法挂钩。具体可参考官方文档https://developer.android.com/reference/android/support/v7/app/AppCompatDelegate或者AppCompatDelegate的源码注释。
在AppCompatActivity的onCreate方法中,调用AppCompatDelegate(基类)的create方法创建实例,并调用delegate.installViewFactory()设置factory。
@Override
    protected void onCreate(@Nullable Bundle savedInstanceState) { final AppCompatDelegate delegate = getDelegate(); delegate.installViewFactory(); delegate.onCreate(savedInstanceState); ...... super.onCreate(savedInstanceState); }
创建AppCompatDelegate子类实例的代码如下,根据手机的安卓版本来创建不同的子类实例
private static AppCompatDelegate create(Context context, Window window,
            AppCompatCallback callback) {
        if (Build.VERSION.SDK_INT >= 24) {
            return new AppCompatDelegateImplN(context, window, callback); } else if (Build.VERSION.SDK_INT >= 23) { return new AppCompatDelegateImplV23(context, window, callback); } else if (Build.VERSION.SDK_INT >= 14) { return new AppCompatDelegateImplV14(context, window, callback); } else if (Build.VERSION.SDK_INT >= 11) { return new AppCompatDelegateImplV11(context, window, callback); } else { return new AppCompatDelegateImplV9(context, window, callback); } }
以android 6.0(API 23)为例,来跟踪AppCompatDelegate实例对象的创建。AppCompatDelegateImplV23间接继承AppCompatDelegateImplV9,并实现了LayoutInflater.Factory2接口。
AppCompatDelegateImplV9的installViewFactory调用了 LayoutInflaterCompat.setFactory2,设置了自身的Factory2实现。
    @Override
    public void installViewFactory() { LayoutInflater layoutInflater = LayoutInflater.from(mContext); if (layoutInflater.getFactory() == null) { LayoutInflaterCompat.setFactory2(layoutInflater, this); } else { if (!(layoutInflater.getFactory2() instanceof AppCompatDelegateImplV9)) { Log.i(TAG, "The Activity''s LayoutInflater already has a Factory installed" + " so we can not install AppCompat''s"); } } }
AppCompatActivity创建view时,通过PhoneWindow->LayoutInflater(createViewFromTag)进入了其实现Factory2的onCreateView方法。可参考LayoutInflater setFactory进阶中setContentView调用流程分析
    /**
     * From {@link LayoutInflater.Factory2}.
     */
    @Override
    public final View onCreateView(View parent, String name, Context context, AttributeSet attrs) { // First let the Activity''s Factory try and inflate the view final View view = callActivityOnCreateView(parent, name, context, attrs); if (view != null) { return view; } // If the Factory didn''t handle it, let our createView() method try return createView(parent, name, context, attrs); }
如果AppCompatActivity并没有设置Factory,就会调用Delegate实例的createView方法创建view。
@Override
    public View createView(View parent, final String name, @NonNull Context context, @NonNull AttributeSet attrs) { if (mAppCompatViewInflater == null) { mAppCompatViewInflater = new AppCompatViewInflater(); } boolean inheritContext = false; if (IS_PRE_LOLLIPOP) { inheritContext = (attrs instanceof XmlPullParser) // If we have a XmlPullParser, we can detect where we are in the layout ? ((XmlPullParser) attrs).getDepth() > 1 // Otherwise we have to use the old heuristic : shouldInheritContext((ViewParent) parent); } return mAppCompatViewInflater.createView(parent, name, context, attrs, inheritContext, IS_PRE_LOLLIPOP, /* Only read android:theme pre-L (L+ handles this anyway) */ true, /* Read read app:theme as a fallback at all times for legacy reasons */ VectorEnabledTintResources.shouldBeUsed() /* Only tint wrap the context if enabled */ ); }
根据上述代码可知,Delegate实例调用了AppCompatViewInflater的createView来完成具体view的绘制。
public final View createView(View parent, final String name, @NonNull Context context, @NonNull AttributeSet attrs, boolean inheritContext, boolean readAndroidTheme, boolean readAppTheme, boolean wrapContext) { final Context originalContext = context; // We can emulate Lollipop''s android:theme attribute propagating down the view hierarchy // by using the parent''s context if (inheritContext && parent != null) { context = parent.getContext(); } if (readAndroidTheme || readAppTheme) { // We then apply the theme on the context, if specified context = themifyContext(context, attrs, readAndroidTheme, readAppTheme); } if (wrapContext) { context = TintContextWrapper.wrap(context); } View view = null; // We need to ''inject'' our tint aware Views in place of the standard framework versions switch (name) { case "TextView": view = new AppCompatTextView(context, attrs); break; case "ImageView": view = new AppCompatImageView(context, attrs); break; case "Button": view = new AppCompatButton(context, attrs); break; case "EditText": view = new AppCompatEditText(context, attrs); break; case "Spinner": view = new AppCompatSpinner(context, attrs); break; case "ImageButton": view = new AppCompatImageButton(context, attrs); break; case "CheckBox": view = new AppCompatCheckBox(context, attrs); break; case "RadioButton": view = new AppCompatRadioButton(context, attrs); break; case "CheckedTextView": view = new AppCompatCheckedTextView(context, attrs); break; case "AutoCompleteTextView": view = new AppCompatAutoCompleteTextView(context, attrs); break; case "MultiAutoCompleteTextView": view = new AppCompatMultiAutoCompleteTextView(context, attrs); break; case "RatingBar": view = new AppCompatRatingBar(context, attrs); break; case "SeekBar": view = new AppCompatSeekBar(context, attrs); break; } if (view == null && originalContext != context) { // If the original context does not equal our themed context, then we need to manually // inflate it using the name so that android:theme takes effect. view = createViewFromTag(context, name, attrs); } if (view != null) { // If we have created a view, check its android:onClick checkOnClickListener(view, attrs); } return view; } 在上述代码中可看到,AppCompatActivity中TextView等组件,被替代为AppCompatTextView等,从而可以利用AppCompat系列组件的特性。但是书写自定义view时,需要手动使用AppCompat组件。
参考AppCompatTextView的提示
This will automatically be used when you use TextView in your layouts and the top-level activity / dialog is provided by appcompat. You should only need to manually use this class when writing custom views.
参考文档:
https://stackoverflow.com/questions/31297246/activity-appcompatactivity-fragmentactivity-and-actionbaractivity-when-to-us
作者:zizi192
链接:https://www.jianshu.com/p/9d590c478828
来源:简书
简书著作权归作者所有,任何形式的转载都请联系作者获得授权并注明出处。

Activity与AppCompatActivity全屏实现方法
Activity与AppCompatActivity全屏实现方法
两种Activity全屏的实现方法是不同的,下面分别讲述。
一、实现Activity全屏

在项目清单文件里设置:

但是这个方法对于与AppCompatActivity是无效的,运行要报错。
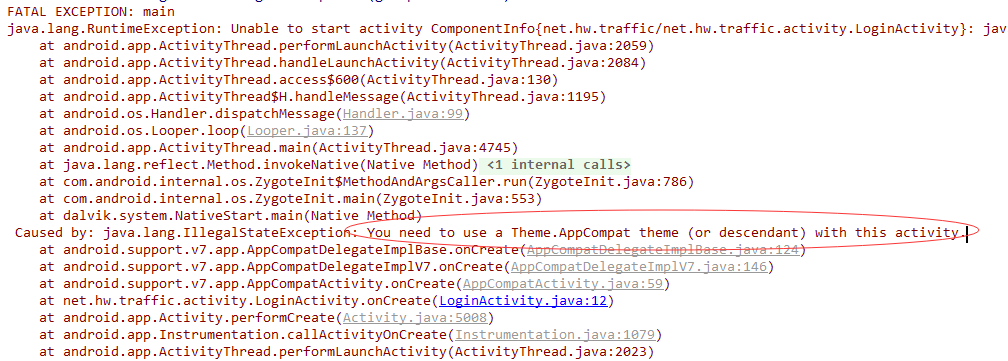
要求AppCompatActivity使用Theme.AppCompat....的主题。
二、实现AppCompatActivity全屏
1、仅仅去掉ActionBar,保留状态栏

2、实现真正的全屏
(1)在styles.xml里自定义样式

(2)AppCompatActivity采用自定义样式


如果自定义样式MyFullScreen,继承的父类是Theme.AppCompat.NoActionBar

那么全屏的底色就是灰黑色,而不是灰白色:
本文分享 CSDN - howard2005。
如有侵权,请联系 support@oschina.cn 删除。
本文参与“OSC源创计划”,欢迎正在阅读的你也加入,一起分享。
今天关于java-无法在SettingsActivity中解析“ AppCompatPreferenceActivity”和java无法应用到给定类型的介绍到此结束,谢谢您的阅读,有关Activiti6 应用安装 activiti-admin,activiti-app,activiti-rest、Activity、AppCompatActivity、FragmentActivity 和 ActionBarActivity:什么时候使用?、Activity、FragmentActivity和AppCompatActivity的区别、Activity与AppCompatActivity全屏实现方法等更多相关知识的信息可以在本站进行查询。
本文标签:


![[转帖]Ubuntu 安装 Wine方法(ubuntu如何安装wine)](https://www.gvkun.com/zb_users/cache/thumbs/4c83df0e2303284d68480d1b1378581d-180-120-1.jpg)

