在这篇文章中,我们将带领您了解asp.net-mvc-3–无法使用EnityFramework4.0设置MiniProfiler(不是代码优先)的全貌,包括无法使用service:jmx:rmi://
在这篇文章中,我们将带领您了解asp.net-mvc-3 – 无法使用Enity Framework 4.0设置MiniProfiler(不是代码优先)的全貌,包括无法使用service:jmx:rmi:///jndi的相关情况。同时,我们还将为您介绍有关ASP.NET Core在WebApi项目中使用MiniProfiler分析Entity Framework Core、ASP.NET MVC - Entity Framework、ASP.NET MVC 项目中 EntityFramework"代码优先方法" 的使用步骤、ASP.NET MVC5使用MiniProfiler监控MVC性能的知识,以帮助您更好地理解这个主题。
本文目录一览:- asp.net-mvc-3 – 无法使用Enity Framework 4.0设置MiniProfiler(不是代码优先)(无法使用service:jmx:rmi:///jndi)
- ASP.NET Core在WebApi项目中使用MiniProfiler分析Entity Framework Core
- ASP.NET MVC - Entity Framework
- ASP.NET MVC 项目中 EntityFramework"代码优先方法" 的使用步骤
- ASP.NET MVC5使用MiniProfiler监控MVC性能
(无法使用service:jmx:rmi:///jndi)")
asp.net-mvc-3 – 无法使用Enity Framework 4.0设置MiniProfiler(不是代码优先)(无法使用service:jmx:rmi:///jndi)
在使用MiniProfiler之前,我会在我的模型库中使用它来打开一个连接:
public class NotificationRepository
    {
       private CBNotificationModel.CB_NotificationEntities db;

       public NotificationRepository()
       {
          db = new CB_NotificationEntities();
       }

       public NotificationContact GetNotificationContacts()
       {
          return db.NotificationContacts.ToList();
       }
    }
要使用我创建的迷你探查器:
public static class ConnectionHelper
    {
        public static CB_NotificationEntities GetEntityConnection()
        {
            var conn = new StackExchange.Profiling.Data.EFProfiledDbConnection(GetConnection(),MiniProfiler.Current);

            return ObjectContextUtils.CreateObjectContext<CB_NotificationEntities>(conn); // resides in the MiniProfiler.EF nuget pack
        }

        public static EntityConnection GetConnection()
        {
            return new EntityConnection(ConfigurationManager.ConnectionStrings["CB_NotificationEntities"].ConnectionString);
        }
    }
模型库现在使用
db = ConnectionHelper.GetEntityConnection();
但是这会给出错误:
mscorlib.dll中发生了未处理的“System.StackOverflowException”类型异常
我错过了一步吗?我尝试在Application_start()中添加MiniProfilerEF.Initialize()和MiniProfilerEF.Initialize_EF42(),但这只会更改给定的错误.
设置实体框架项目以使用miniprofiler似乎没有太多信息,除非它是代码优先的.
解决方法
public static class ConnectionHelper
    {
            public static CB_NotificationEntities GetEntityConnection()
            {

                var connectionString = ConfigurationManager.ConnectionStrings["CB_NotificationEntities"].ConnectionString;
                var ecsb = new EntityConnectionStringBuilder(connectionString);
                var sqlConn = new sqlConnection(ecsb.ProviderConnectionString);
                var pConn = new StackExchange.Profiling.Data.EFProfiledDbConnection(sqlConn,MiniProfiler.Current);

                var context = ObjectContextUtils.CreateObjectContext<CB_NotificationEntities>(pConn);
                return context;

          }
     }

ASP.NET Core在WebApi项目中使用MiniProfiler分析Entity Framework Core
安装配置MiniProfiler
在现有的ASP.NET Core MVC WebApi 项目里,通过Nuget安装MiniProfiler:
Install-Package MiniProfiler.AspNetCore.Mvc MiniProfiler.EntityFrameworkCore
当然也可以通过Nuget Package Manager可视化工具安装

接下来就是如何配置和使用 MiniProfiler 了,总共分三步:
第一步,来到Startup.cs的ConfigureServices方法里,添加services.AddMiniProfiler();
    // This method gets called by the runtime. Use this method to add services to the container.
    public void ConfigureServices(IServiceCollection services)
    {
        services.AddDbContext<DataContext>(options => options.UseSqlServer(Configuration.GetConnectionString("DataContext")));

        services.AddMvc().SetCompatibilityVersion(CompatibilityVersion.Version_2_2);

        // 首先添加一个配置选项,用于访问分析结果:
        services.AddMiniProfiler(options =>
        {
            // 设定弹出窗口的位置是左下角
            options.PopupRenderPosition = RenderPosition.BottomLeft;
            // 设定在弹出的明细窗口里会显式Time With Children这列
            options.PopupShowTimeWithChildren = true;
            // 设定访问分析结果URL的路由基地址
            options.RouteBasePath = "/profiler";
        })
        // 然后在之前的配置后边加上AddEntityFramework():
        .AddEntityFramework();
}第二步,来到来到Startup.cs的Configure方法里,添加app.UseMiniProfiler();
    // This method gets called by the runtime. Use this method to configure the HTTP request pipeline.
    public void Configure(IApplicationBuilder app, IHostingEnvironment env)
    {
        ...

        // 最重要的一点是就是配置中间件在管道中的位置,一定要把它放在UseMvc()方法之前。
        app.UseMiniProfiler();

        app.UseMvc();
    }
第三步、运行程序,一共有3个可查看分析结果相关的URL地址:
1./profiler/results-index
- 先看results-index页面:

它表示每次调用API的记录结果。可以看到本次调用API的总时间为1578.4毫秒。
2./profiler/results
- 从result-index页面点击链接进入这次API调用的详细结果页面,也就是result页面:

它表示每次调用API的过程分析结果,具体到每一条SQL语句的内容和执行时间。
3./profiler/results-list
- 再看result-list页面:

它其实就表示每个API的所有调用记录结果的集合。
案例源码:
MiniProfilerCoreWebApiDemo
到此这篇关于ASP.NET Core在WebApi项目中使用MiniProfiler分析Entity Framework Core的文章就介绍到这了。希望对大家的学习有所帮助,也希望大家多多支持。
- Entity Framework Core使用控制台程序生成数据库表
- Entity Framework Core延迟加载(懒加载)用法
- Entity Framework Core实现Like查询详解
- Entity Framework Core中执行SQL语句和存储过程的方法介绍
- Entity Framework Core批处理SQL语句
- Entity Framework Core实现软删除与查询过滤器
- Entity Framework Core生成列并跟踪列记录
- Entity Framework Core工具使用命令行
- Entity Framework Core关联删除
- 详解如何在ASP.NET Core中应用Entity Framework
- Entity Framework Core对Web项目生成数据库表

ASP.NET MVC - Entity Framework
ASP.NET MVC - Entity Framework
实体关系
关系是某个实体(表)的一条记录对应于另一个实体(表)的一条或多条记录。
一对多关系
单方面的包含关系称为一对多,而一对多和一对一其实是一回事,只是站在不同的角度去看就会有不同的结果,比如有员工表和性向表,站在员工角度去看,一个员工对应了一种性向,而站在性向角度去看,一种性向对应于多名员工。
单向一对一
employee引用了sexual

双向一对一
employee引用了sexual,sexual也引用了employee

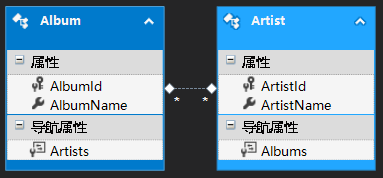
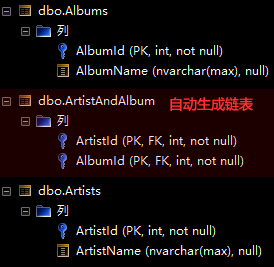
多对多
双方面的包含关系,称为多对多。一个艺术家对应于多张专辑,一张专辑对应于多个艺术家。通过链表存储对两张表的引用就可以实现多对多关系。

EF设计器
创建一个CUI项目,右击项目创建ADO实体数据模型
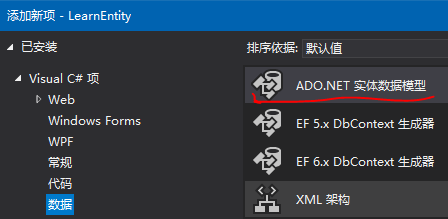
这会在项目中生成一个edmx文件,双击该文件可以打开实体设计器。
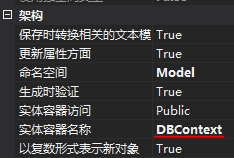
创建EF上下文对象
右击实体设计器- 属性,可以配置EF上下文对象
创建实体
右击实体设计器- 新增,可以增加实体

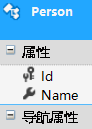
创建属性
右击创建好的实体,可以创建以下类型的属性

以下创建了一个实体,并添加了两个属性
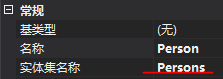
设置实体集的名称
实体就是一条记录,实体集就是多条记录,实体集对应于数据库的表,在.Net项目中,通过EF上下文对象调用实体集可执行Linq查询。单击实体,可以设置实体集的名称,下面将实体集的名称改为了复数。
根据实体生成数据库
右击设计器 - 根据模型生成数据库
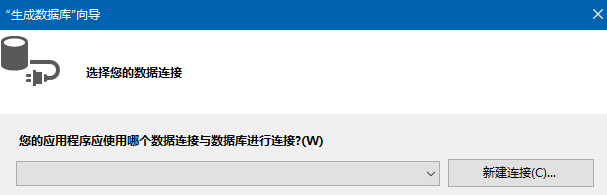
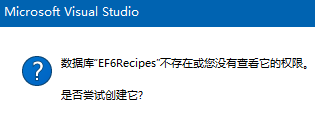
选择新建连接
输入数据库名称 - 确定,这会根据数据库连接自动生成数据库。完成后,数据库就自动建好了。
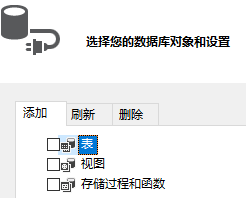
根据数据库生成实体
右击实体设计器 - 从数据库更新模型,这会自动根据数据库创建实体模型。
操作实体
对实体的操作,增删改查都是通过DBContext上下文对象来实现的,它提供了获取实体集(表)的属性。
{
DBContext EFContext = new DBContext( );
//新增
List<Person> list = new List<Person>
{
new Person{ Name="sam" },
new Person{ Name="leo" }
};
EFContext.Persons.AddRange( list ); //or Add
EFContext.SaveChanges( );
//查询记录
var result = EFContext.Persons;
//删除
//需要先查询
EFContext.Persons.RemoveRange( result ); //or Remove
EFContext.SaveChanges( );
}
实体关系
实体关系在EF中以导航属性的形式存在
一对多关系
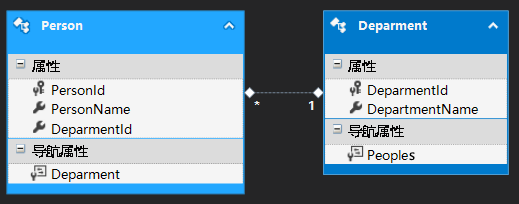
一个部门下有多名员工,以下创建两个实体。

右击主键实体 - 新增 - 关联,可以创建一对多关系。一个部门对应多个员工,Person实体出现了一个导航属性Department和一个标量属性DepartmentId,Department实体出现了一个导航属性Peoples,DepartmentId会变成数据库表字段,而导航属性不会变成表字段,导航属性只在你的项目代码中使用,用以表示实体关系。Person作为外键表引用了Department主键表,所以它有一个DepartmentId指向一个部门的Id。
EFContext.Persons.Single( ).Deparment; //一个员工隶属于一个部门
多对多关系
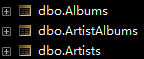
一张专辑有多个艺术家,一个艺术家有多张专辑,双方面的包含关系,称为多对多。
以下创建两种多对多关系,第一种是两个实体相互引用,第二种是两个实体对链表的引用。它们在数据库中生成的表没有什么区别,但在EF设计器中的实体会有一些变化。
第一种多对多关系
EFContext.Artists.Add( new Artist
{
ArtistName = "pink floyd",
Albums = new List<Album> {
new Album{ AlbumName="The Division Bell" },
new Album{ AlbumName="Ummagumma" }
}
} );
EFContext.SaveChanges( );
第二种多对多关系
以一个链表实体存储对双方的引用。
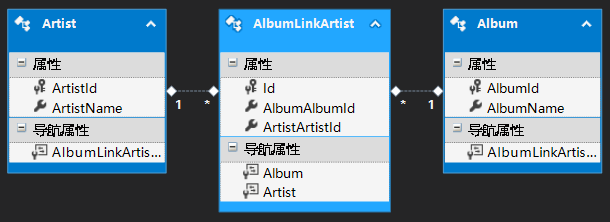
ICollection<AlbumLinkArtist> list= EFContext.Artists.Single( ).AlbumLinkArtists; //一个艺术家对应多张专辑,专辑id存储在AlbumLinkArtist表中
ICollection<AlbumLinkArtist> list2 = EFContext.Albums.Single( ).AlbumLinkArtists; //一个专辑对于多个艺术家,艺术家id存储在AlbumLinkArtist表中
var artist = new Artist { ArtistName = "Pink Floyd" };
//为同一个艺术家增加两张专辑
AlbumLinkArtist albumLinkArtist1 = new AlbumLinkArtist
{
Artist = artist,//同一个艺术家
Album = new Album { AlbumName = "The Division Bell" }
};
AlbumLinkArtist albumLinkArtist2 = new AlbumLinkArtist
{
Artist = artist,//同一个艺术家
Album = new Album { AlbumName = "Ummagumma" }
};
EFContext.AlbumLinkArtists.AddRange( new List<AlbumLinkArtist> {
albumLinkArtist1,
albumLinkArtist2
} );
EFContext.SaveChanges( );
//查
foreach (var artist in EFContext.Artists)
{
Console.WriteLine( artist.ArtistName );
foreach(var AlbumLinkArtist in artist.AlbumLinkArtist)
{
Console.WriteLine( AlbumLinkArtist.Album.AlbumName );
}
}
如果是从数据库生成实体,那么多对多关系的数据库表在生成实体时会有以上两种情况,如果链表只存储了双方的主键id,则生成第一种多对多,如果链表存储了额外的字段,比如Description,则生成第二种多对多实体,也即会多出一个链表实体。无论是哪种多对多实体,表达的都是一个概念,没有区别,只是我们在使用实体时需要加以区分。
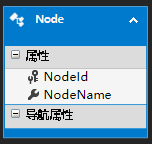
自引用关系
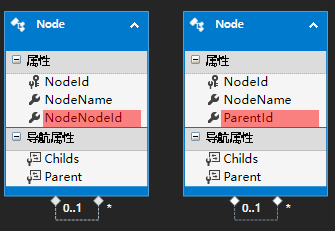
在一些表示分类的具有层级关系的表中,表可能会引用自身来表示父节点和子节点,在设计器中可以先创建节点实体,只指定其主键和名称,先不要增加父节点id,如下:
接着创建自引用关系,右击实体 - 关联,如下设置:
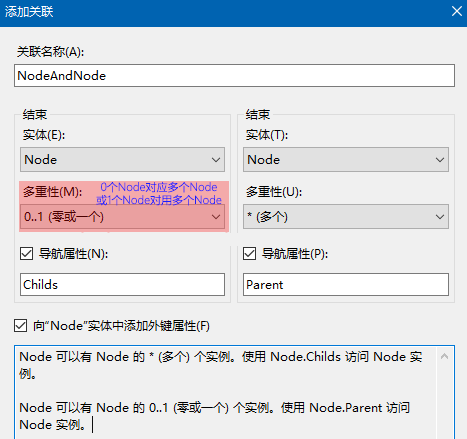
将自动生成的引用Id改为ParentId以便于理解,然后将ParentId设为可为null,因为顶级节点没有父节点。
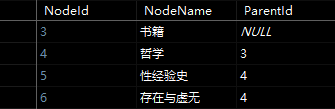
手动插入记录时注意,不需要指定节点的ParentId,由于实体是面向对象的,所以,节点通过其Childs导航属性的Add方法就可以将其它节点作为子节点添加到自身了。
Node father = new Node { NodeName = "书籍" };
Node child1 = new Node { NodeName = "哲学" };
Node child1HasChild1 = new Node { NodeName = "性经验史" };
Node child1HasChild2 = new Node { NodeName = "存在与虚无" };
//书籍
// 哲学
// 性经验史
// 存在与虚无
child1.Childs.Add( child1HasChild1 );
child1.Childs.Add( child1HasChild2 );
father.Childs.Add( child1 );
EFContext.Nodes.Add( father );
EFContext.SaveChanges( );
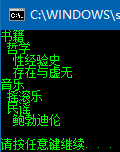
深度查询
var roots=EFContext.Nodes.Where( node => node.ParentId == null );
StringBuilder builder = new StringBuilder( );
foreach (var node in roots)
{
ShowNode( node, 0, builder );
}
Console.WriteLine( builder.ToString( ) );
}
public static StringBuilder ShowNode( Node fatherNode, int deep, StringBuilder builder )
{
builder.Append( new string('' '',deep)+ fatherNode.NodeName+"\n" );
foreach (var node in fatherNode.Childs)
{
ShowNode( node, deep+1, builder );
deep = fatherNode.Childs.Last( ) == node ? 0 : deep;
}
return builder;
}
Code First模式
新建一个类库项目,命名为MyEF,添加Entity framework的引用,在项目中创建Model目录用来存放领域模型,右击Model目录添加类。
{
public class Person
{
public int PersonId { get; set; }
public string PersonName { get; set; }
}
}
创建一个自定义的EF上下文,从DBContext派生
using MyEF.Model;
namespace MyEF
{
public class EFContext : DbContext //自定义EF上下文
{
public DbSet<Person> Persons { get; set; } //实体模型必须在此处注册,这就是一张表,记录的集合
public EFContext() : base("name=MyEF") //实例构造函数接收数据库连接字符或数据库名称,如果是连接字符,则是config中的ConnectionString=MyEF
{
}
static EFContext() //静态构造函数可用于指定数据库的创建模式
{
//无论怎样,删除同名数据库,再重新创建:
Database.SetInitializer(new DropCreateDatabaseAlways<EFContext>());
//默认,参数可为null,当数据库不存在时,自动创建数据库:
//Database.SetInitializer ( new CreateDatabaseIfNotExists<EFContext> ( ) );
//如果实体模型发生改变,则先删除同名数据库,再重新创建:
//Database.SetInitializer ( new DropCreateDatabaseIfModelChanges<EFContext> ( ) );
// 使数据库保持现状,如果你是后来为已经存在的数据库增加表或表的字段,那么可应用此配置,null表示不做任何改动,但你必须手动Code First增加实体或者为实体增加相应的字段:
//Database.SetInitializer<EFContext>(null); 或 Database.SetInitializer<EFContext>(new NullDatabaseInitializer<EFContext> );
}
}
}
在code first中定义导航属性,导航属性都是类类型且必须修饰为virtual,用以表示实体之间的引用关系。
{
public class Department
{
public int DepartmentId { get; set; }
public string DepartmentName { get; set; }
public virtual List<Person> Persons { get; set; } //一个部门对应多个员工
}
public class Person
{
public int PersonId { get; set; }
public string PersonName { get; set; }
//此处没有显示创建标量的外键DepartmentId,这样,EF会根据导航属性Department在数据库Person表中自动创建一个外键字段
public virtual Department Department { get; set; } //一个员工对应一个部门
}
}
再创建一个控制台引用程序,设置app.config,增加一个数据库连接字符串
<connectionStrings>
<add name="MyEFConn" connectionString="Data Source=.; Initial Catalog=MyEFDB; Integrated Security=True; MultipleActiveResultSets=True; AttachDbFilename=|DataDirectory|MusicStoreD.mdf"
providerName="System.Data.SqlClient" />
</connectionStrings>
</configuration>
{
//向数据库插入数据时会自动创建表
EFContext EFContext = new EFContext();
Department department = new Department
{
DepartmentName = "xxx",
Persons = new List<Person>
{
new Person{ PersonName="sam" },
new Person{ PersonName="leo" }
}
};
EFContext.Departments.Add(department);
EFContext.SaveChanges();
}
Code First模式创建实体关系映射
实体间的引用关系是指实体的导航属性与另一个实体关联,下面的方法就是根据导航属性来设置实体间的引用关系。
实体关系的设置分三个步骤
1.创建一个从EntityTypeConfiguration<T>(System.Data.Entity.ModelConfiguration)派生的类型,比如EmployeeConfig.cs文件,然后在这个类型的构造函数中设置实体关系。设置实体关系需要用到以下几个方法,
HasMany(lambda)
//根据实体间一对多的引用关系为另一方生成可null的外键
HasRequired(lambda)
//根据实体间一对一的引用关系为当前方生成不可null的外键
HasOptional(lambda)
//根据实体间一对一的引用关系为当前方生成可null的外键
由于一对一在多数情况下可以当做一对多,比如一个名员工对应一个部门,但是一个部门也可以对应多个员工,所以一对一和一对多没有区别。
但也有可能出现这种情况:一个员工对应一个住址,但一个住址通常都不会对应多个员工
WithMany([lambda])
//无参版:根据实体间一对多的引用关系为双方都生成可null的外键(如果只有单方面的引用则只生成单方面的外键)
WithOptional([lambda])
//无参版:根据实体间一对一的引用关系为另一方生成可null的外键,如果在此方法后调用了HasForeignKey方法,则表示手动指定另一方的外键(假如你没有指定外键表的哪个键作为外键,那么EF会自动根据主键表的主键为外键表增加一个外键字段)
WithRequired([lambda])
//无参版:根据实体间一对一的引用关系为另一方生成不可null的外键,如果在此方法后调用了HasForeignKey方法,则表示手动指定另一方的外键(假如你没有指定外键表的哪个键作为外键,那么EF会自动根据主键表的主键为外键表增加一个外键字段)
2.在EF上下文的派生上下文中重写基类的OnModelCreating方法,将从EntityTypeConfiguration<T>派生的类型注册到配置集合中
{
modelBuilder.Configurations.Add(new EmployeeConfig()).Add(/*……*/); //链式操作注册关系配置
}
一对一的code first
如果实体A引用了实体B,但实体B并不引用实体A,这就是单向的一对一。如果实体A引用了实体B,实体B也引用了实体A,这就是双向的一对一。
单向引用:在实体没有外键的情况下由EF自动创建数据库表的外键
{
public int EmployeeId { get; set; }
public string EmployeeName { get; set; }
public virtual Address Address { get; set; }
}
public class Address
{
public int AddressId { get; set; }
public string AddressName { get; set; }
}
public class EmployeeConfig : EntityTypeConfiguration<Employee>
{
public EmployeeConfig()
{
HasKey(employee => employee.EmployeeId);
//等同于 :
HasOptional(employee => employee.Address).WithMany();
}
}
单向引用:在实体有外键的情况下由你自己手动指定数据库表的外键
{
public int EmployeeId { get; set; }
public string EmployeeName { get; set; }
public int? AddressId { get; set; } //外键可null时,注意必须设为int?,否则抛错
public virtual Address Address { get; set; }
}
public class Address
{
public int AddressId { get; set; }
public string AddressName { get; set; }
}
public class EmployeeConfig : EntityTypeConfiguration<Employee>
{
public EmployeeConfig()
{
HasKey(employee => employee.EmployeeId);
HasOptional(employee => employee.Address).WithMany().HasForeignKey(employee=>employee.AddressId);
}
}
最后,将配置类注册到配置集合中就OK了。
{
public DbSet<Employee> Employees { get; set; }
public DbSet<Address> Addresss { get; set; }
//……
protected override void OnModelCreating(DbModelBuilder modelBuilder)
{
modelBuilder.Configurations.Add(new EmployeeConfig()).Add(new AddressConfig());
}
}
双向引用:在实体没有外键的情况下由EF自动创建数据库表的外键
{
public int EmployeeId { get; set; }
public string EmployeeName { get; set; }
public virtual Address Address { get; set; } //双向引用,则双方实体都必须有导航属性
}
public class Address
{
public int AddressId { get; set; }
public string AddressName { get; set; }
public virtual Employee Employee { get; set; } //双向引用,则双方实体都必须有导航属性
}
public class EmployeeConfig : EntityTypeConfiguration<Employee>
{
public EmployeeConfig()
{
HasKey(employee => employee.EmployeeId);
//双向引用,双方的外键不可能都是不可null的,如果都是不可null,那么向任何一方插入数据时都必定会抛错
//所以只可能创建双方外键都可null
HasOptional(employee => employee.Address).WithMany();
}
}
双向引用:在实体有外键的情况下由你自己手动指定数据库表的外键
{
public int EmployeeId { get; set; }
public string EmployeeName { get; set; }
public int? AddressId { get; set; } //外键可null时,注意必须设为int?,否则抛错
public virtual Address Address { get; set; } //双向引用,则双方实体都必须有导航属性
}
public class Address
{
public int AddressId { get; set; }
public string AddressName { get; set; }
public int? EmployeeId { get; set; } //外键可null时,注意必须设为int?,否则抛错
public virtual Employee Employee { get; set; } //双向引用,则双方实体都必须有导航属性
}
public class EmployeeConfig : EntityTypeConfiguration<Employee>
{
public EmployeeConfig()
{
HasKey(employee => employee.EmployeeId);
//手动指定数据库表的外键,这需要在双方的配置类中都显示指定外键才可以
HasOptional(employee => employee.Address).WithMany().HasForeignKey(employee=>employee.AddressId);
}
}
public class AddressConfig : EntityTypeConfiguration<Address>
{
public AddressConfig()
{
HasKey(address => address.AddressId);
//手动指定数据库表的外键,这需要在双方的配置类中都显示指定外键才可以
HasOptional(address => address.Employee).WithMany().HasForeignKey(address => address.EmployeeId);
}
}
一对多的code first
在实体没有外键的情况下由EF自动创建数据库表的外键
{
public int DepartmentId { get; set; }
public string DepartmentName { get; set; }
public virtual List<Employee> Employees { get; set; }
public Department()
{
Employees = new List<Employee>();
}
}
public class Employee
{
public int EmployeeId { get; set; }
public string EmployeeName { get; set; }
}
public class DepartmentConfig : EntityTypeConfiguration<Department>
{
public DepartmentConfig()
{
HasKey(department => department.DepartmentId);
HasMany(department => department.Employees);
//等同于
HasMany(department => department.Employees).WithOptional();
}
}
在实体有外键的情况下由你自己手动指定数据库表的外键
{
public int DepartmentId { get; set; }
public string DepartmentName { get; set; }
public virtual List<Employee> Employees { get; set; }
public Department()
{
Employees = new List<Employee>();
}
}
public class Employee
{
public int EmployeeId { get; set; }
public string EmployeeName { get; set; }
public int? DepartmentId { get; set; }
}
public class DepartmentConfig : EntityTypeConfiguration<Department>
{
public DepartmentConfig()
{
HasKey(department => department.DepartmentId);
HasMany(department => department.Employees).WithOptional().HasForeignKey(employee=>employee.DepartmentId);
}
}
多对多的code first
{
public int ArtistId { get; set; }
public string ArtistName { get; set; }
public virtual List<Album> Albums { get; set; }
public Artist()
{
Albums = new List<Album>();
}
}
public class Album
{
public int AlbumId { get; set; }
public string AlbumName { get; set; }
public virtual List<Artist> Artists { get; set; }
public Album()
{
Artists = new List<Artist>();
}
}
public class ArtistConfig : EntityTypeConfiguration<Artist>
{
public ArtistConfig()
{
HasKey(artist => artist.ArtistId);
//数据库将自动生成一张链表,EF自动创建对两张表的引用外键
HasMany(artist => artist.Albums).WithMany(album => album.Artists);
}
}

public class ArtistConfig : EntityTypeConfiguration<Artist>
{
public ArtistConfig()
{
HasKey(artist => artist.ArtistId);
HasMany(artist => artist.Albums).WithMany(album => album.Artists).Map(m => {
m.ToTable("ArtistAndAlbum");
m.MapLeftKey("ArtistId");
m.MapRightKey("AlbumId");
});
}
}
自引用的code first
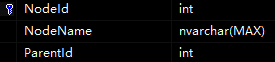
{
public int NodeId { get; set; }
public string NodeName { get; set; }
public int? ParentId { get; set; }
public virtual Node Parent { get; set; }
public virtual List<Node> Childs { get; set; }
}
{
public NodeConfig()
{
HasKey(node => node.NodeId);
//Node有多个Node
//当前Node表使用Childs外键引用Node表,外键可null,EF会自动创建一个自动命名的外键
HasMany(node => node.Childs);
//手动指定外键
HasMany(node => node.Childs).WithOptional(node => node.Parent).HasForeignKey(node => node.ParentId);
}
}
数据库的code first
和先code再生成数据库没有区别,只不过是先有数据库和表,再使用向导完成实体和EF上下文的、映射类的生成。其实数据库的code first应该更灵活,因为你可以随时在数据库更改表字段或增删字段,然后手动更新实体类型的字段即可。如果是使用来自已经创建好的数据库的code first,而数据库表并未定义任何外键关系,那么也可以按照以上方式建立实体在程序中的映射关系,也即如果表没有外键,表与表之间也可以自动关联在一起。如果后来增加了数据库表,那么也只需要在项目中填写一个新的实体即可。
配置实体属性
有两种方式可为属性增加配置,Data Annotations和Fluent API,前者配置方便,后者提供更强大的清洁配置。(如果不喜欢到处贴标签)
1.Data Annotations配置(System.ComponentModel.DataAnnotations)
//将类映射为Animal表
[Key]
//主键,且种子增量每次+1,即自动增长,增量为1
[Key, DatabaseGenerated(System.ComponentModel.DataAnnotations.Schema.DatabaseGeneratedOption.Identity)]
//如果主键类型是Guid,则必须配置此特性,否则不会自动生成唯一标识
[System.ComponentModel.DataAnnotations.Schema.ForeignKey]
//设置为外键
[Required]
//不允许空值
[MaxLength(255)]
//最大长度
[MinLength(10)]
//最小长度
[Timestamp]
//并发时间戳,为开放式并发环境配置时间戳。一个实体只能有一个byte [ ] 类型的属性可设置此特性,Sql Server称其为TimeStamp(时间戳),其他数据库称其为RowVersion(行版本)
[ConcurrencyCheck]
//并发非时间戳,当并发冲突发生时,这将为并发提供检查确保不会发生异常。对应的字段类似:public int SocialSecurityNumber { get; set; }
2.Fluent API配置 (System.Data.Entity.ModelConfiguration和System.Data.Entity)
//设置映射为数据库的表名
HasKey(lambda )
//主键,且种子增量每次+1,即自动增长,增量为1
HasPrecision(n1 , n2 )
//为decimal类型的属性保留有效位数和小数位数,n1为有效位数,n2为小数位数
Property(lambda ).HasDatabaseGeneratedOption(System.ComponentModel.DataAnnotations.Schema.DatabaseGeneratedOption.Identity )
//如果主键类型是Guid,则必须配置此项,否则不会自动生成唯一标识
Property(lambda ).IsRequired()
//不允许空
Property(lambda ).HasMaxLength()
//字符长度,与数据库表字段的字符长度一样,设为100则生成nvarchar(100)
Property(lambda ).HasColumnType(DBTableColumnType )
//设置字段在数据库表中的列的数据类型,C#有int string datetime类型,但没有数据库表字段的image、text类型,这两个类型可以使用HasColumnType
Property(lambda ).IsRowVersion()
//并发时间戳,为开放式并发环境配置时间戳。一个实体只能有一个byte [ ] 类型的属性可设置此特性,Sql Server称其为TimeStamp(时间戳),其他数据库称其为RowVersion(行版本)
Property(lambda ).IsConcurrencyToken(annotationName , val )
//添加约束
//示例:为多个 字段添加同一个唯一性约束
using System.Data.Entity.Infrastructure.Annotations;
using System.ComponentModel.DataAnnotations.Schema;
Property(lambda ).HasColumnAnnotation(IndexAnnotation.AnnotationName , new IndexAnnotation( new IndexAttribute( "Un_sameRecords" , 1 ) { IsUnique = true } ) );
Property(d => d.TbRightId ).HasColumnAnnotation(IndexAnnotation.AnnotationName , new IndexAnnotation( new IndexAttribute( "Un_sameRecords" , 2 ) { IsUnique = true } ) );
拆分实体到多个表
一个实体拆分成两张表

{
public int EmployeeId { get; set; }
public string EmployeeName { get; set; }
public string EmployeeAddress { get; set; }
}
{
public EmployeeConfig()
{
HasKey(employee => employee.EmployeeId);
Map(m => {
m.Properties( property => new { property.EmployeeId, property.EmployeeName });
m.ToTable("Employees");
})
.Map(m => {
m.Properties( property => new { property.EmployeeId, property.EmployeeAddress });
m.ToTable("EmployeeInfos"); });
}
}
待续……
参考资料
EF里一对一、一对多、多对多关系的配置和级联删除
Entity Framework Code First (五)Fluent API - 配置关系
《Entity Framework 6 Recipes》中文翻译系列
//双向引用

ASP.NET MVC 项目中 EntityFramework"代码优先方法" 的使用步骤
EF 提供了三种方式来实现项目,分别是:
(1)代码优先方法:
(2)模型优先方法:
(3)数据库优先方法:
本篇主要记录在 Vs2010 环境下使用代码优先的方式实现数据库和后端代码数据交互,语言为 C#,数据库为 sqlserver 2008。
1. 在 sqlserver 中创建数据库 "StudentDB", 注意只需要创建库名即可,不用建表;
2. 打开 VS2010,工具 -> 连接到数据库,选择服务器名、验证方式等,获取连接字符串,注意连接字符串的 name 属性,需要在后边做对应。如下:

3. 使用 Nuget 或者引用 dll,安装 EntityFramework。
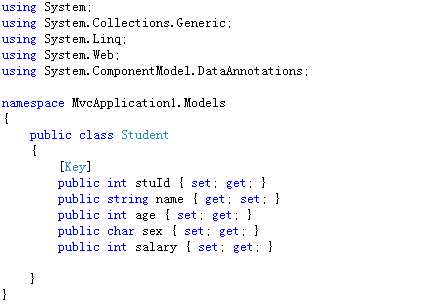
4. 在 mvc 项目的 model 文件夹中创建简单的.NET 类,并在该 model 下引用:using System.ComponentModel.DataAnnotations 命名空间,为主键标 [Key].
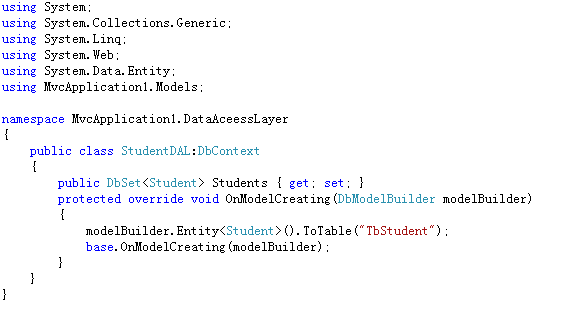
5. 在根目录下新建 Data Aceess Layer 文件夹,新建类 StudenDAL, 该类名务必与 web.config 中连接字符串 name=“StudentDAL” 一致,在该数据处理类中添加引用 using System.Data.Entity, 并继承 DbContext 类:
在 StudentDAL 类中重写 OnModelCreating () 方法代码,并引用 model 类 using WebApplicaion.Models, 然后添加 public DbSet<Student> Students {set;get;}{}, 代码如下:
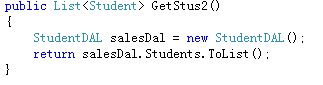
6. 在获取数据类或者 controller 中引用该数据处理类 using WebApplication1.DataAccessLayer ; 然后编写获取数据方法:
7. 在 controller 中使用该方法获取数据,并将数据返回至 view 上:


ASP.NET MVC5使用MiniProfiler监控MVC性能
MiniProfiler ,一个简单而有效的迷你剖析器,可以有效的实时监控页面。通过直接引用、Ajax、Iframe形式访问的其它页面进行监控,监控内容包括数据库内容,并可以显示数据库访问的SQL。
1.安装
首先新建一个 asp.net mvc 项目
右键项目,管理NuGet程序包。 安装 MiniProfiler.Mvc4和MiniProfiler
ps:MiniProfiler.MVC4的NuGet包(该MVC4包支持MVC5)

或者也可以打开程序包管理控制台 输入命令进行安装
Install-Package MiniProfiler -Version 3.2.0.157
Install-Package MiniProfiler.Mvc4 -Version 3.0.11
2.将以下内容添加到Application_Start()Global.asax中
protected void Application_Start()
{
 ...
 GlobalFilters.Filters.Add(new ProfilingActionFilter());

 var copy = ViewEngines.Engines.ToList();
 ViewEngines.Engines.Clear();
 foreach (var item in copy)
 {
  ViewEngines.Engines.Add(new ProfilingViewEngine(item));
 }
}
3.将以下内容添加到“Application_BeginRequest()”和“Application_EndRequest()”,也在Global.asax中
protected void Application_BeginRequest()
{
 if (Request.IsLocal)
 {
  MiniProfiler.Start();
 }
}

protected void Application_EndRequest()
{
 MiniProfiler.Stop();
}
4.将以下内容添加到_Layout.cshtml(就在</body>标签之前):
 @StackExchange.Profiling.MiniProfiler.RenderIncludes()
</body>
</html>
5.将以下内容添加到<handlers>Web.config 的部分中:
<system.webServer>
 ...
 <handlers>
  ...
  <add name="MiniProfiler" path="mini-profiler-resources/*" verb="*"
    type="System.Web.Routing.UrlRoutingModule" resourceType="Unspecified"
    preCondition="integratedMode" />
  ...
 </handlers>
</system.webServer>
如果你在项目中使用了Entity Framework ,那么你可以安装MiniProfiler.EF6软件包,在Application_Start()在Global.asax 结尾添加了以下内容: MiniProfilerEF6.Initialize();
一个简单的对MVC性能的监控就这样了,其实他还有很多功能,比如说能够通过不同的参数检测并突出显示执行相同查询的区域。这样您就可以快速找到可能批量的查询。
还可以记录所有的ajax的调用,查看最近100个分析请求的分析信息等。
结果展示:

以上就是本文的全部内容,希望对大家的学习有所帮助,也希望大家多多支持。
- .NET Core跨平台资源监控工具CZGL.SystemInfo用法
- .NET程序性能监控系统Elastic AMP的使用方法
- .Net中异步任务的取消和监控的具体实现
- 使用 HttpReports 监控 .NET Core 应用程序的方法
- 使用NLog给Asp.Net Core做请求监控的方法
- Asp.Net 5分钟实现网页实时监控
- CZGL.ProcessMetrics监控.NET应用
今天关于asp.net-mvc-3 – 无法使用Enity Framework 4.0设置MiniProfiler(不是代码优先)和无法使用service:jmx:rmi:///jndi的分享就到这里,希望大家有所收获,若想了解更多关于ASP.NET Core在WebApi项目中使用MiniProfiler分析Entity Framework Core、ASP.NET MVC - Entity Framework、ASP.NET MVC 项目中 EntityFramework"代码优先方法" 的使用步骤、ASP.NET MVC5使用MiniProfiler监控MVC性能等相关知识,可以在本站进行查询。
本文标签:


![[转帖]Ubuntu 安装 Wine方法(ubuntu如何安装wine)](https://www.gvkun.com/zb_users/cache/thumbs/4c83df0e2303284d68480d1b1378581d-180-120-1.jpg)

