如果您对wordpress在nginx下权限设置和安全总结感兴趣,那么本文将是一篇不错的选择,我们将为您详在本文中,您将会了解到关于wordpress在nginx下权限设置和安全总结的详细内容,我们还
如果您对wordpress在nginx下权限设置和安全总结感兴趣,那么本文将是一篇不错的选择,我们将为您详在本文中,您将会了解到关于wordpress在nginx下权限设置和安全总结的详细内容,我们还将为您解答wordpress nginx的相关问题,并且为您提供关于Linux Nginx下SSL证书安装及WordPress CDN怎么配置、Nginx WordPress 配置、nginx 上安装 wordpress 的问题、nginx下wordpress 固定链接问题的有价值信息。
本文目录一览:- wordpress在nginx下权限设置和安全总结(wordpress nginx)
- Linux Nginx下SSL证书安装及WordPress CDN怎么配置
- Nginx WordPress 配置
- nginx 上安装 wordpress 的问题
- nginx下wordpress 固定链接问题
")
wordpress在nginx下权限设置和安全总结(wordpress nginx)
1、wordpress 权限对安装和使用效果的影响很大:权限错误将影响theme的安装:不能安装theme或者修改theme或删除theme。
相关设置:
chmod 755 wordpress
find wordpress -type d -exec chmod 755 {} \;
find wordpress -iname “*.PHP” -exec chmod 644 {} \;
chown -R Nginx:Nginx wordpress
方法见: http://my.oschina.net/kjpioo/blog/162697
2、 uploads目录 安全:
问题描述:linux 下 最新版 wordpress ,上传theme,theme安装成功后,在 wordpress/wp-content/uploads/ 目录下有 2013/09/theme_name.zip 文件存在。 虽然 2013/09/ 目录都是禁止list的,但是如何禁止 theme_name.zip 文件被客户端窥探到(防止被下载)
解决方案:
方案1:每次上传和安装好theme 后,手动删除 uploads的 .zip文件
方案2:在uploads目录下用 .htaccess的 Rewrite 规则,可以对http://SITE_URL/uploads/2013/09/theme_name.zip 的访问 进行屏蔽。
在apache上.htaccess转向,只要apache编译的时候指明支持rewrite模块即可。
但是换到Nginx上方法会有不同,有人说把.htaccess转向规则写到Nginx的配置文件里面,官方提供的方法之一,肯定可行的。
不过,此方法有个问题:不方便,下次要更改一个伪静态转向规则的时候还得去Nginx的配置文件或者Nginx的虚拟网站的配置文件里面去改,相比apache直接在目录下放置.htaccess文件,Nginx的这个办法显然很原始。
解决方法:
在Nginx的配置文件中include .htacces文件就可以实现相同的功能了。
举个例子,要把www.jbxue.com的.htaccess迁移到Nginx上,几个步骤:
第一步:修改.htaccess文件,因为apache的rewrite转向规则跟Nginx的转向规则还是有一些不一样的,典型的不一样有Nginx的根目录需要写在每行转向的地址前,每行规则必须以分号(;)结束,301或者404等跳转使用不同的格式。
apache上htaccess转换到Nginx上:
RewriteBase /
RewriteRule ^show-([0-9]+)-([0-9]+)\.html$ index.PHP?action=show&id=$1&page=$2
RewriteRule ^category-([0-9]+)-([0-9]+)\.html$ index.PHP?action=index&cid=$1&page=$2
RewriteRule ^archives-([0-9]+)-([0-9]+)\.html$ index.PHP?action=index&setdate=$1&page=$2
RewriteRule ^(archives|search|reg|login|index|links)\.html$ index.PHP?action=$1
RewriteRule ^(comments|tagslist|trackbacks|index)-([0-9]+)\.html$ index.PHP?action=$1&page=$2
rewriteCond %{http_host} ^jbxue.com [NC]
rewriteRule ^(.*)$ http://www.jbxue.com/$1 [R=301,L]
ErrorDocument 404 http://www.jbxue.com/
转换成Nginx的规则
rewrite ^/category-([0-9]+)-([0-9]+)\.html$ /index.PHP?action=index&cid=$1&page=$2;
rewrite ^/archives-([0-9]+)-([0-9]+)\.html$ /index.PHP?action=index&setdate=$1&page=$2;
rewrite ^/(archives|search|reg|login|index|links)\.html$ /index.PHP?action=$1;
rewrite ^/(comments|tagslist|trackbacks|index)-([0-9]+)\.html$ /index.PHP?action=$1&page=$2;
if ($host != 'www.jbxue.com' ) {
rewrite ^/(.*)$ http://www.jbxue.com/$1 permanent;
}
error_page 404 http://www.jbxue.com/;
第二步:修改Nginx的配置文件,增加include该.htaccess文件
vi /etc/Nginx/sites-available/www.jbxue.com
增加一行:
修改为相应的地址。
第三步:测试并重启
重启生效:
/etc/init.d/Nginx restart

Linux Nginx下SSL证书安装及WordPress CDN怎么配置
一、
需要两个配置文件
(温馨提示:安装证书前请先备份您需要修改的服务器配置文件)
1_root_bundle.crt;
2_domainname.com.key。
注:这三个证书文件都在文件夹for nginx.zip中,例:1_root_bundle.crt是根证书链(公钥),2_ domainname.com.key为私钥。
(其中:证书公钥、私钥文件一般以您的域名命名;证书后缀名crt和cer的性质是一样的)。
二、nginx证书代码修改
1.打开nginx安装目录下conf目录中的nginx.conf文件,阿里云服务器在/alidata/server/nginx/conf/nginx.conf。
找到:
# https server
 #
 #server {
 #  listen    443;
 #  server_name localhost;
 #  ssl      on;
 #  ssl_certificate   cert.pem;
 #  ssl_certificate_key cert.key;
 #  ssl_session_timeout 5m;
 #  ssl_protocols sslv2 sslv3 tlsv1;
 #  ssl_ciphers all:!adh:!export56:rc4+rsa:+high:+medium:+low:+sslv2:+exp;
 #  ssl_prefer_server_ciphers  on;
 #  location / {
 #    root  html;
 #    index index.html index.htm;
 #  }
#}将其修改为 :
server {
    listen    443;
    server_name localhost;
    ssl         on;
    ssl_certificate   1_root_bundle.crt;   (证书公钥)
    ssl_certificate_key   2_ domainname.com.key;   (证书私钥)
    ssl_session_timeout 5m;
    ssl_protocols tlsv1 tlsv1.1 tlsv1.2;
    ssl_ciphers aesgcm:all:!dh:!export:!rc4:+high:!medium:!low:!anull:!enull;
    ssl_prefer_server_ciphers  on;
    location / {
      root  html;
      index index.html index.htm;
}注:配置完成后的网站路径及默认页等配置请与80端口保持一致。
2.本地测试访问。
如果本地测试,请做本地解析访问:打开 系统盘:\windows\system32\drivers\etc\hosts 文件,用文本编辑器修改,把证书绑定的域名解析到本地ip。

3.完成配置后的效果。
启动nginx,访问https://+证书绑定的域名

注:部署完毕后若网站无法通过https正常访问,可确认服务器443端口是否开启或被网站卫士等加速工具拦截。
(1)开启方法:防火墙设置-例外端口-添加443端口(tcp)。
(2)若被安全或加速工具拦截,可以在拦截记录中将443添加至信任列表。
重启后,重新通过https访问。
三、wordpress配置(2种方式:七牛和阿里oss)
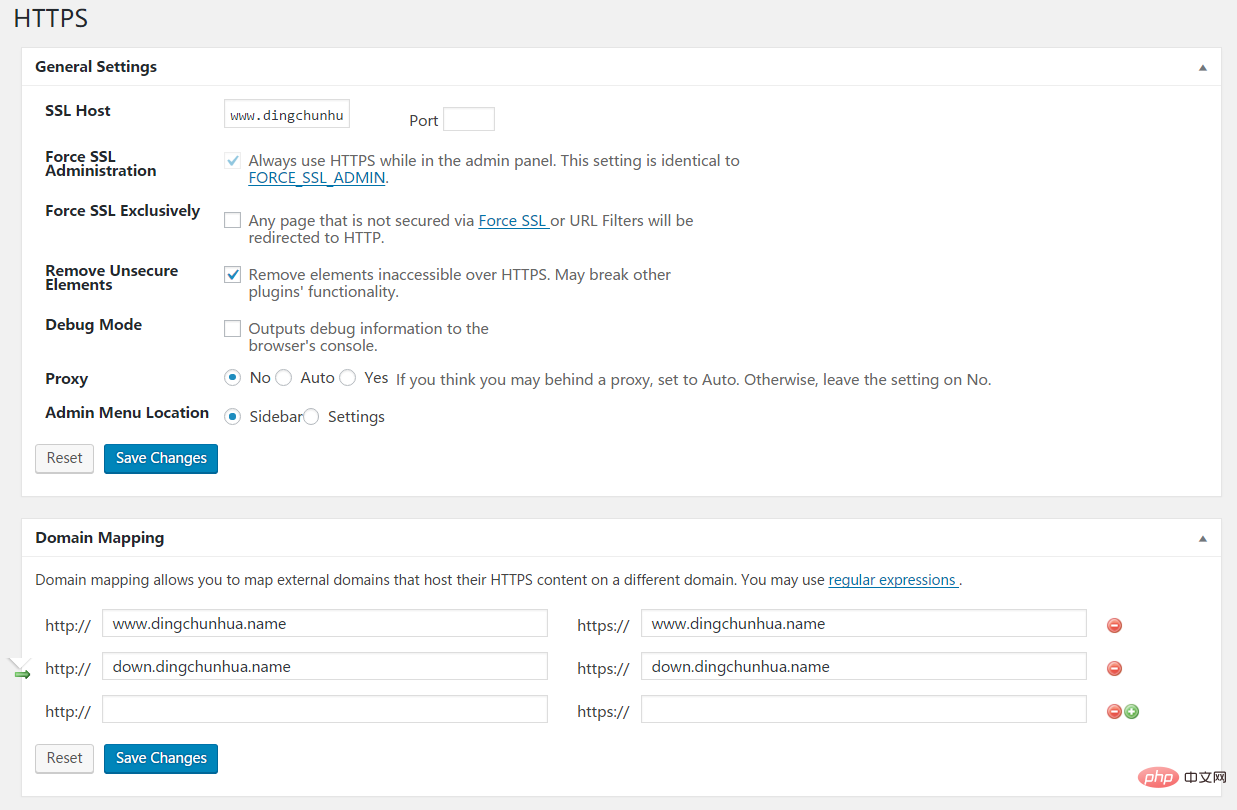
第一种:下载https插件和七牛云存储插件,各项插件配置如下图。
https插件:
七牛云存储插件:(我的图片都保存在七牛对象存储里面)
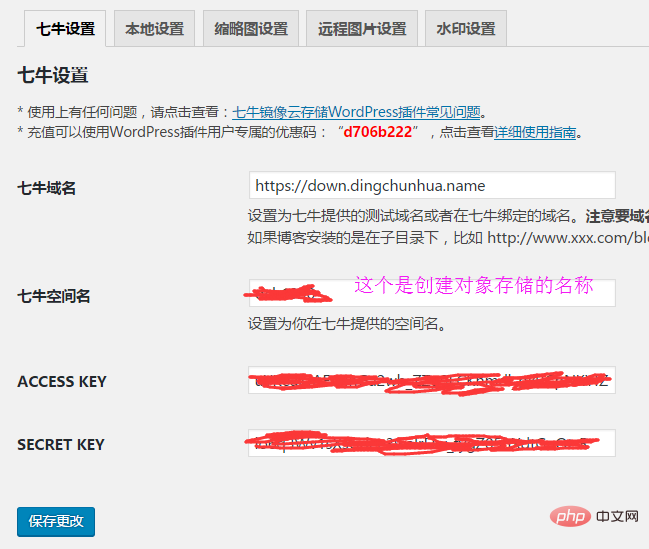
图1
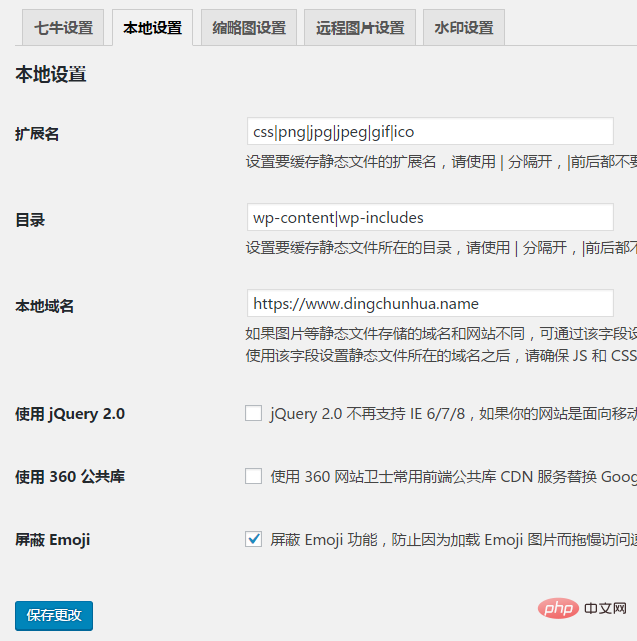
图2
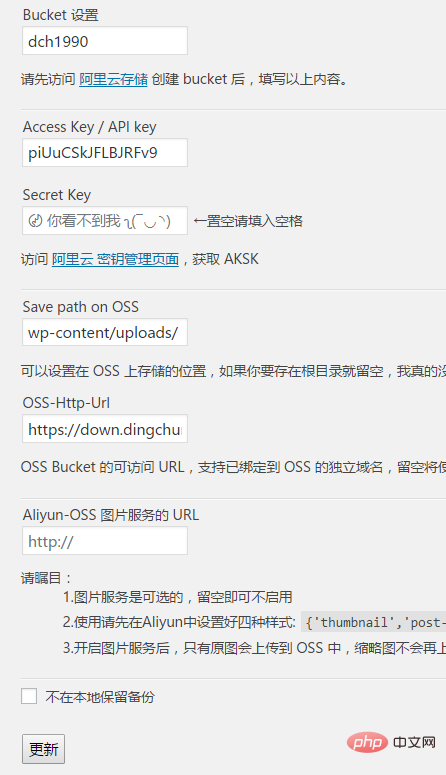
第二种:oss配置如下
2、修改外部链接,即为不安全因素链接,我的博客网站主要有以下几个需要修改。
a、百度统计修改(已支持);b、百度分享修改(不支持,需要本地化百度分享);c、主题图片修改(一个一个改);d、内容里面的图片修改;e、新浪关注按钮本地化(有谁知道的可以分享给博主)
四、cdn配置
www的域名直接上传证书和密钥在阿里云,回源选择443即可,如果不能留言取消js加载。
最后你应该能够完整的配置出ssl了。
以上就是Linux Nginx下SSL证书安装及WordPress CDN怎么配置的详细内容,更多请关注php中文网其它相关文章!

Nginx WordPress 配置
# For more information on configuration, see:
#   * Official English Documentation: http://nginx.org/en/docs/
#   * Official Russian Documentation: http://nginx.org/ru/docs/

user nginx;
worker_processes auto;
error_log /var/log/nginx/error.log;
pid /run/nginx.pid;

# Load dynamic modules. See /usr/share/nginx/README.dynamic.
include /usr/share/nginx/modules/*.conf;

events {
    worker_connections 1024;
}

http {
    log_format  main  ''$remote_addr - $remote_user [$time_local] "$request" ''
                      ''$status $body_bytes_sent "$http_referer" ''
                      ''"$http_user_agent" "$http_x_forwarded_for"'';

    access_log  /var/log/nginx/access.log  main;

    sendfile            on;
    tcp_nopush          on;
    tcp_nodelay         on;
    keepalive_timeout   65;
    types_hash_max_size 2048;

    include             /etc/nginx/mime.types;
    default_type        application/octet-stream;

    # Load modular configuration files from the /etc/nginx/conf.d directory.
    # See http://nginx.org/en/docs/ngx_core_module.html#include
    # for more information.
    include /etc/nginx/conf.d/*.conf;

    server {
        listen       80 default_server;
        listen       [::]:80 default_server;
        server_name   www.tokenmi.cn;
        root         /usr/share/nginx/wordpress/;

        # Load configuration files for the default server block.
        include /etc/nginx/default.d/*.conf;

        location / {
            root         /usr/share/nginx/wordpress/;
	    index	 index.html index.htm index.php;
	    try_files $uri $uri/ /index.php?$args;
        }

		rewrite /wp-admin$ $scheme://$host$uri/ permanent;

        error_page 404 /404.html;
            location = /40x.html {
        }

        error_page 500 502 503 504 /50x.html;
            location = /50x.html {
        }

        location ~ \.php$ {
            root         /usr/share/nginx/wordpress/;
            fastcgi_pass   127.0.0.1:9000;
            fastcgi_index  index.php;
            fastcgi_param  SCRIPT_FILENAME  $document_root$fastcgi_script_name;
            include        fastcgi_params;
        }

    }

# Settings for a TLS enabled server.
#
#    server {
#        listen       443 ssl http2 default_server;
#        listen       [::]:443 ssl http2 default_server;
#        server_name  _;
#        root         /usr/share/nginx/html;
#
#        ssl_certificate "/etc/pki/nginx/server.crt";
#        ssl_certificate_key "/etc/pki/nginx/private/server.key";
#        ssl_session_cache shared:SSL:1m;
#        ssl_session_timeout  10m;
#        ssl_ciphers HIGH:!aNULL:!MD5;
#        ssl_prefer_server_ciphers on;
#
#        # Load configuration files for the default server block.
#        include /etc/nginx/default.d/*.conf;
#
#        location / {
#        }
#
#        error_page 404 /404.html;
#            location = /40x.html {
#        }
#
#        error_page 500 502 503 504 /50x.html;
#            location = /50x.html {
#        }
#    }

}

nginx 上安装 wordpress 的问题
本人新手,最近在 nginx 上安装 wordpress,运行 install.php 时,总是出现 PHP is not running 的错误
网上也没有找到相应的解决办法
但我机器上 php-fpm 已经启动了,进程列表如下:
systemd-+-bash
|-mysqld_safe---mysqld---20*[{mysqld}]
|-nginx---nginx
|-php-fpm---2*[php-fpm]
|-sshd---sshd---bash---tmux
|-systemd-journal
|-systemd-udevd
`-tmux-+-bash---vim
|-bash---pstree
`-bash
nginx.conf 配置如下:
server {
listen 8080;
server_name uudiin;
index index.php index.html;
try_files $uri $uri/ /index.php;
location ~ \.php$ {
root html;
fastcgi_pass 127.0.0.1:9000;
fastcgi_index index.php;
fastcgi_param SCRIPT_FILENAME /scripts$fastcgi_script_name;
include fastcgi_params;
}
}
等大牛解答,先行谢过

nginx下wordpress 固定链接问题
情况是这样的,
我的wordpress并不是放在网站的根目录的,而是放在/blog目录下的,然后在wordpress中设置固定链接的时候,每次都出错,用了网上几个方法都不行,后来在http://codex.wordpress.org/Nginx 找到一个解决办法。
我正好安装了wp super cache的插件,那么在nginx.conf中添加如下:

代码如下:
set $cache_uri $request_uri;
location /blog {
try_files /blog/wp-content/cache/supercache/$http_host/$cache_uri/index.html $uri $uri/ /blog/index.php?$args ;
}
我们今天的关于wordpress在nginx下权限设置和安全总结和wordpress nginx的分享就到这里,谢谢您的阅读,如果想了解更多关于Linux Nginx下SSL证书安装及WordPress CDN怎么配置、Nginx WordPress 配置、nginx 上安装 wordpress 的问题、nginx下wordpress 固定链接问题的相关信息,可以在本站进行搜索。
本文标签:


![[转帖]Ubuntu 安装 Wine方法(ubuntu如何安装wine)](https://www.gvkun.com/zb_users/cache/thumbs/4c83df0e2303284d68480d1b1378581d-180-120-1.jpg)

