在本文中,您将会了解到关于在Spring中添加管理部分的新资讯,同时我们还将为您解释spring怎么管理对象的相关在本文中,我们将带你探索在Spring中添加管理部分的奥秘,分析spring怎么管理对
在本文中,您将会了解到关于在Spring中添加管理部分的新资讯,同时我们还将为您解释spring怎么管理对象的相关在本文中,我们将带你探索在Spring中添加管理部分的奥秘,分析spring怎么管理对象的特点,并给出一些关于5分钟快速在SpringCloud中添加Swagger、java – 在Spring中如何管理对象池?、java – 在Spring中添加Jaxb2消息转换器打破了Jackson2 json映射、spring 如何在spring中使用多个@RequestMapping注解?的实用技巧。
本文目录一览:- 在Spring中添加管理部分(spring怎么管理对象)
- 5分钟快速在SpringCloud中添加Swagger
- java – 在Spring中如何管理对象池?
- java – 在Spring中添加Jaxb2消息转换器打破了Jackson2 json映射
- spring 如何在spring中使用多个@RequestMapping注解?
")
在Spring中添加管理部分(spring怎么管理对象)
我有一个Spring Web项目,需要一个管理部分。我以为这部分会很简单,并且会遇到安全性问题,但是我什至无法指向/ admin /部分。
我的dispatcher-servelet.xml中包含以下内容,用于将JSP文件映射到控制器:
<context:component-scan base-package="controller"/><context:component-scan base-package="controller.admin"/><bean id="viewResolver"p:prefix="/WEB-INF/jsp/" p:suffix=".jsp" />/ WEB-INF / jsp /中现在有一个标记为“ admin”的文件夹,并且我有adminindex.jsp。我在web.xml中也有以下内容
<?xml version="1.0" encoding="UTF-8"?><web-app version="2.5" xmlns="http://java.sun.com/xml/ns/javaee" xmlns:xsi="http://www.w3.org/2001/XMLSchema-instance" xsi:schemaLocation="http://java.sun.com/xml/ns/javaee http://java.sun.com/xml/ns/javaee/web-app_2_5.xsd"> <context-param> <param-name>contextConfigLocation</param-name> <param-value>/WEB-INF/applicationContext.xml</param-value> </context-param> <listener> <listener-class>org.springframework.web.context.ContextLoaderListener</listener-class> </listener> <servlet> <servlet-name>dispatcher</servlet-name> <servlet-class>org.springframework.web.servlet.DispatcherServlet</servlet-class> <load-on-startup>2</load-on-startup> </servlet> <servlet-mapping> <servlet-name>dispatcher</servlet-name> <url-pattern>*.htm</url-pattern> </servlet-mapping> <session-config> <session-timeout> 30 </session-timeout> </session-config> <welcome-file-list> <welcome-file>redirect.jsp</welcome-file> </welcome-file-list> <security-constraint> <display-name>Constraint1</display-name> </security-constraint> <security-constraint> <display-name>admin pages</display-name> <web-resource-collection> <web-resource-name>Administration Pages</web-resource-name> <description/> <url-pattern>/admin/*</url-pattern> </web-resource-collection> <auth-constraint> <description/> <role-name>eCommerceAdmin</role-name> </auth-constraint> <!-- <user-data-constraint> <description/> <transport-guarantee>CONFIDENTIAL</transport-guarantee> </user-data-constraint>--> </security-constraint></web-app>当我尝试访问
本地主机:8080 / NewWebsite / admin / adminindex.htm
,我得到
拒绝访问请求的资源
INFO:ContextListener:attributeAdded(’org.apache.jasper.compiler.TldLocationsCache’,’org.apache.jasper.compiler.TldLocationsCache@44d1bd08’)
我可以轻松访问
localhost:8080 / NewWebsite / index.htm,我也想对admin文件夹进行自动重定向,就像使用根文件夹一样。IE浏览器
本地主机:8080 / NewWebsite /指向index.htm。
任何帮助都会很棒。
答案1
小编典典首先需要验证用户吗?否则,您的应用程序将如何识别ADMIN正在尝试访问的用户或普通USER?
在执行此操作之前,请security-constraint从 web.xml中 删除,以便
在应用程序中添加spring身份验证。
首先创建一个pojo类,以获取GrantedAuthority应该实现的列表org.springframework.security.core.userdetails.UserDetails。下面是一个示例:
public class YourPojo implements UserDetails{ /** The authorities. */ //This collection will have eCommerceAdmin public Collection<GrantedAuthority> authorities; /** The username. */ public String username; /** The account non expired. */ public boolean accountNonExpired; /** The credentials non expired. */ public boolean credentialsNonExpired; /** The enabled. */ public boolean enabled; /** The Constant serialVersionUID. */ private static final long serialVersionUID = -2342376103893073629L; /* (non-Javadoc) * @see org.springframework.security.core.userdetails.UserDetails#getAuthorities() */ @Override public Collection<GrantedAuthority> getAuthorities() { return authorities; } /* (non-Javadoc) * @see org.springframework.security.core.userdetails.UserDetails#getPassword() */ @Override public String getPassword() { return null; } /* (non-Javadoc) * @see org.springframework.security.core.userdetails.UserDetails#getUsername() */ @Override public String getUsername() { return username; } /* (non-Javadoc) * @see org.springframework.security.core.userdetails.UserDetails#isAccountNonExpired() */ @Override public boolean isAccountNonExpired() { return accountNonExpired; } /* (non-Javadoc) * @see org.springframework.security.core.userdetails.UserDetails#isAccountNonLocked() */ @Override public boolean isAccountNonLocked() { return accountNonLocked; } /* (non-Javadoc) * @see org.springframework.security.core.userdetails.UserDetails#isCredentialsNonExpired() */ @Override public boolean isCredentialsNonExpired() { return credentialsNonExpired; } /* (non-Javadoc) * @see org.springframework.security.core.userdetails.UserDetails#isEnabled() */ @Override public boolean isEnabled() { return enabled; } /** * Sets the authorities. * * @param authorities the new authorities */ public void setAuthorities(Collection<GrantedAuthority> authorities) { this.authorities = authorities; } /** * Sets the username. * * @param username the new username */ public void setUsername(String username) { this.username = username; } /** * Sets the account non expired. * * @param accountNonExpired the new account non expired */ public void setAccountNonExpired(boolean accountNonExpired) { this.accountNonExpired = accountNonExpired; } /** * Sets the account non locked. * * @param accountNonLocked the new account non locked */ public void setAccountNonLocked(boolean accountNonLocked) { this.accountNonLocked = accountNonLocked; } /** * Sets the credentials non expired. * * @param credentialsNonExpired the new credentials non expired */ public void setCredentialsNonExpired(boolean credentialsNonExpired) { this.credentialsNonExpired = credentialsNonExpired; } /** * Sets the enabled. * * @param enabled the new enabled */ public void setEnabled(boolean enabled) { this.enabled = enabled; }}以下是您需要的HTTP标签。
<!-- to use Spring security tags --> <bean/><http pattern="/login*" security="none"/><http pattern="/static/**" security="none"/> <http auto-config="false"> <intercept-url pattern="/admin/**" access="eCommerceAdmin" /> <form-login login-page="/login" default-target-url="/welcome" authentication-failure-url="/loginfailed" /> <logout logout-success-url="/logout" /> <session-management> <concurrency-control max-sessions="1" error-if-maximum-exceeded="true" /> </session-management> </http>现在定义您的身份验证提供程序。
<bean id="customeAuthProvider"> </bean> <authentication-manager > <authentication-provider ref="customeAuthProvider" ></authentication-provider> </authentication-manager>这customeAuthProvider应该实现org.springframework.security.authentication.AuthenticationProvider。
@Override public Authentication authenticate(Authentication authentication) throws AuthenticationException { UsernamePasswordAuthenticationToken userToken = (UsernamePasswordAuthenticationToken)authentication; String username = userToken.getName(); String password = (String) authentication.getCredentials(); //Do whatevr you want with the credentials //Then populate the authorities for this credential YourPojo user=new YourPojo (); user.setUserName("add username"); //set other details List<GrantedAuthority> grantedAuthorityList = new ArrayList<GrantedAuthority>(); //if user is admin add the below line GrantedAuthorityImpl grantedAuthorityImpl = new GrantedAuthorityImpl("eCommerceAdmin"); //Add other authorities as applicable like ''user'' etc. user.setAuthorities(grantedAuthorityList); return new UsernamePasswordAuthenticationToken(username, password, user.getAuthorities());可以在以下方式在web.xml中引用安全性xml文件。此外,您的web.xml还应具有spring安全性过滤器。
<context-param> <param-name>contextConfigLocation</param-name> <param-value> /WEB-INF/your-applicationContext.xml /WEB-INF/your-spring-security.xml </param-value></context-param><listener> <listener-class>org.springframework.web.context.ContextLoaderListener</listener-class></listener><filter> <filter-name>springSecurityFilterChain</filter-name> <filter-class>org.springframework.web.filter.DelegatingFilterProxy</filter-class></filter><filter-mapping> <filter-name>springSecurityFilterChain</filter-name> <url-pattern>/*</url-pattern></filter-mapping>您还需要spring安全性依赖项。.如果您在项目中使用Maven,请添加以下依赖项,否则您可以手动下载这些jar并继续。
<!-- Spring Security --><dependency> <groupId>org.springframework.security</groupId> <artifactId>spring-security-core</artifactId> <version>${spring.version}</version></dependency><dependency> <groupId>org.springframework.security</groupId> <artifactId>spring-security-web</artifactId> <version>${spring.version}</version></dependency><dependency> <groupId>org.springframework.security</groupId> <artifactId>spring-security-config</artifactId> <version>${spring.version}</version></dependency>现在您可以开始了。FYR经历了这个

5分钟快速在SpringCloud中添加Swagger
##目录:
文章目录
##一.基本介绍
官方介绍:Swagger是一个规范且完整的框架,提供描述、生产、消费和可视化RESTful Web Service。
专业角度:Swagger是由庞大工具集合支撑的形式化规范。这个集合涵盖了从终端用户接口、底层代码库到商业API管理的方方面面。
##二.如何使用
##开发环境
- maven 3.5
- jdk 8+
- spring-boot 1.5.3
- spring-cloud Dalston.SR1
- fastjson 1.2.41
##添加依赖
 <!-- Swagger核心包 start -->
 <dependency>
   <groupId>io.springfox</groupId>
   <artifactId>springfox-swagger2</artifactId>
   <version>2.6.1</version>
 </dependency>
 <dependency>
    <groupId>io.springfox</groupId>
    <artifactId>springfox-swagger-ui</artifactId>
    <version>2.6.1</version>
 </dependency>
<!-- Swagger核心包 end -->- 1
- 2
- 3
- 4
- 5
- 6
- 7
- 8
- 9
- 10
- 11
- 12
##application.yml中添加
#配置eureka获取服务地址
eureka:
  client:
    serviceUrl:
      defaultZone: http://localhost:1001/eureka/
  #配置Swagger相关信息
  instance:
      prefer-ip-address: true
      instanceId: ${spring.cloud.client.ipAddress}:${server.port}
      status-page-url:
	  http://${spring.cloud.client.ipAddress}:${server.port}/swagger-ui.html
# ${server.port}为该服务的端口号- 1
- 2
- 3
- 4
- 5
- 6
- 7
- 8
- 9
- 10
- 11
- 12
##添加配置
import org.springframework.context.annotation.Bean;
import org.springframework.context.annotation.Configuration;
import springfox.documentation.builders.ApiInfoBuilder;
import springfox.documentation.builders.PathSelectors;
import springfox.documentation.builders.RequestHandlerSelectors;
import springfox.documentation.service.ApiInfo;
import springfox.documentation.spi.DocumentationType;
import springfox.documentation.spring.web.plugins.Docket;
import springfox.documentation.swagger2.annotations.EnableSwagger2;

@Configuration
@EnableSwagger2
public class SwaggerConfig {
    @Bean
    public Docket userApi() {
        Docket docket = new Docket(DocumentationType.SWAGGER_2)
                .apiInfo(apiInfo())
                .select()
                .apis(RequestHandlerSelectors.basePackage("cn.zhangbox.eureka.provider.controller"))//过滤的接口
                .paths(PathSelectors.any())
                .build();
        return docket;
    }


    private ApiInfo apiInfo() {
        return new ApiInfoBuilder().title("eureka服务端提供者接口平台").description("服务相关数据接口")
                .termsOfServiceUrl("http://www.zhang.box.cn/").contact("技术开发部")
                .license("Licence Version 1.0").licenseUrl("#").version("1.0").build();
    }

}- 1
- 2
- 3
- 4
- 5
- 6
- 7
- 8
- 9
- 10
- 11
- 12
- 13
- 14
- 15
- 16
- 17
- 18
- 19
- 20
- 21
- 22
- 23
- 24
- 25
- 26
- 27
- 28
- 29
- 30
- 31
- 32
配置详情解释:
通过@Configuration注解,让Spring-boot来加载该类配置。再通过@EnableSwagger2注解来启用Swagger2Configuration。再通过userApi函数创建Docket的Bean之后,apiInfo()用来创建该Api的基本信息(这些基本信息会展现在文档页面中)。
select() 函数返回一个 ApiSelectorBuilder 实例用来控制哪些接口暴露给Swagger2来展现。
一般采用指定扫描的包路径来定义。Swagger会扫描该包下所有Controller定义的API,并产生文档内容(除了被@ApiIgnore指定的请求)。
| 注解 | 作用 |
|---|---|
| @Api | 用在类上,说明该类的作用 |
| @ApiOperation | 用在方法上,说明方法的作用,标注在具体请求上,value和notes的作用差不多,都是对请求进行说明;tags则是对请求进行分类的,比如你有好几个controller,分别属于不同的功能模块,那这里我们就可以使用tags来区分了,看上去很有条理 |
| @ApiImplicitParams | 用在方法上包含一组参数说明 |
| @ApiImplicitParam | 用在@ApiImplicitParams注解中,指定一个请求参数的各个方面 |
| @ApiResponses | 用于表示一组响应 |
| @ApiResponse | 用在@ApiResponses中,一般用于表达一个错误的响应信息 |
| @ApiModel | 描述一个Model的信息(这种一般用在post创建的时候,使用@RequestBody这样的场景,请求参数无法使用@ApiImplicitParam注解进行描述的时候)表明这是一个被swagger框架管理的model,用于class上 |
| @ApiModelProperty | 这里顾名思义,描述一个model的属性,就是标注在被标注了@ApiModel的class的属性上,这里的value是对字段的描述,example是取值例子,注意这里的example很有用,对于前后端开发工程师理解文档起到了关键的作用,因为会在api文档页面上显示出这些取值来;这个注解还有一些字段取值,可以自己研究,举例说一个:position,表明字段在model中的顺序 |
##配置需要解析的接口方法
import cn.zhangbox.eureka.provider.service.StudentService;
import cn.zhangbox.eureka.provider.entity.Student;
import com.alibaba.fastjson.JSON;
import io.swagger.annotations.Api;
import io.swagger.annotations.ApiParam;
import org.slf4j.Logger;
import org.slf4j.LoggerFactory;
import org.springframework.beans.factory.annotation.Autowired;
import org.springframework.stereotype.Controller;
import org.springframework.ui.ModelMap;
import org.springframework.web.bind.annotation.GetMapping;
import org.springframework.web.bind.annotation.RequestMapping;
import org.springframework.web.bind.annotation.RequestParam;
import org.springframework.web.bind.annotation.ResponseBody;

import java.util.List;

/**
 * Created by zhangyuan on 2018/07/06
 */
@Controller
@RequestMapping("/student")
@Api(value = "eureka-provider", description = "学生查询接口")
public class StudentConteroller {
    private static final Logger LOGGER = LoggerFactory.getLogger(StudentConteroller.class);

    @Autowired
    protected StudentService studentService;

    /**
     * 查询所有的学生信息
     *
     * @param sname
     * @param age
     * @param modelMap
     * @return
     */
    @ResponseBody
    @GetMapping("/list")
    public String list(
                    @ApiParam(value = "姓名") @RequestParam(required = false) String sname,
                    @ApiParam(value = "年龄") @RequestParam(required = false) Integer age,
                       ModelMap modelMap) {
        String json = null;
        try {
            List<Student> studentList = studentService.getStudentList(sname, age);
            modelMap.put("ren_code", "0");
            modelMap.put("ren_msg", "查询成功");
            modelMap.put("studentList", studentList);
            json = JSON.toJSONString(modelMap);
        } catch (Exception e) {
            e.printStackTrace();
            modelMap.put("ren_code", "0");
            modelMap.put("ren_msg", "查询失败===>" + e);
            LOGGER.error("查询失败===>" + e);
            json = JSON.toJSONString(modelMap);
        }
        return json;
    }
}- 1
- 2
- 3
- 4
- 5
- 6
- 7
- 8
- 9
- 10
- 11
- 12
- 13
- 14
- 15
- 16
- 17
- 18
- 19
- 20
- 21
- 22
- 23
- 24
- 25
- 26
- 27
- 28
- 29
- 30
- 31
- 32
- 33
- 34
- 35
- 36
- 37
- 38
- 39
- 40
- 41
- 42
- 43
- 44
- 45
- 46
- 47
- 48
- 49
- 50
- 51
- 52
- 53
- 54
- 55
- 56
- 57
- 58
- 59
- 60
##启动项目,在浏览器访问
http://localhost:8080/swagger-ui.html
显示如图,整合成功!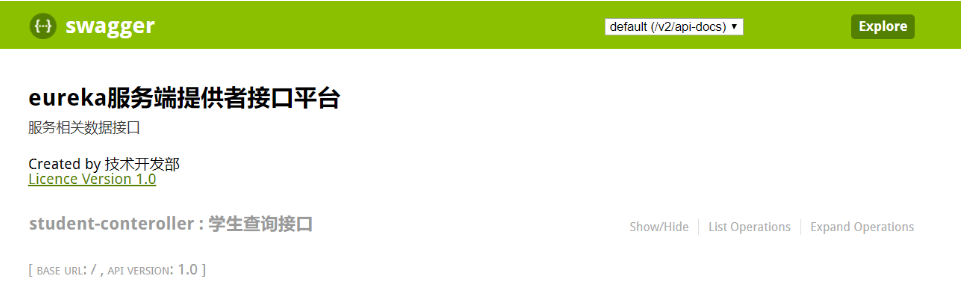

java – 在Spring中如何管理对象池?
但是如果我想要池对象呢?说设置范围从1分钟到最多10个实例?这是否可能使用Spring?
解决方法
有关详细信息,请参阅here.

java – 在Spring中添加Jaxb2消息转换器打破了Jackson2 json映射
我正在尝试这样做,所以我的Spring rest应用程序可以处理xml和json响应,但似乎添加Jaxb消息转换器已经破坏了我的json映射.
@Bean
public MappingJackson2HttpMessageConverter jsonConverter() {
    MappingJackson2HttpMessageConverter converter = new MappingJackson2HttpMessageConverter();
    SimpleModule simpleModule = new SimpleModule();
    simpleModule.addSerializer(String.class, new StringSerializer());
    ObjectMapper mapper = new ObjectMapper()
        .registerModule(simpleModule);
    converter.setobjectMapper(mapper);
    return converter;
}

@Bean
public Jaxb2RootElementHttpMessageConverter jaxbConverter() {
    return new Jaxb2RootElementHttpMessageConverter();
}

@Override
public void configureMessageConverters(List<HttpMessageConverter<?>> converters) {
    converters.add(jsonConverter());
    converters.add(jaxbConverter());
}
如果我在那里注释掉第二种和第三种方法,那么一切都会重新开始工作(当然除了xml映射!).但是,有了这些,我搞砸了一些东西,比如序列化List< String>结果在[APPLEORANGEBANANA]中,苹果,橙子和香蕉在列表中是单独的字符串.
如果我直接使用jackson对象映射器映射到json,它没有那个问题,但是使用@ResponseBody注释自动序列化为json我有这个问题.
有人有主意吗?
解决方法:
这就是我做到的.
@RequestMapping(method = RequestMethod.GET, value = "/accounts/{accountId}", produces = {APPLICATION_XML_VALUE, APPLICATION_JSON_VALUE})
@ResponseBody
@ResponseStatus(value = HttpStatus.OK)
public Account getAccount(@PathVariable String accountId) {
    return new Account(); // populate Account VO and send
}
并在XML文件中
<mvc:annotation-driven content-negotiation-manager="contentNegotiationManager" >
    <mvc:message-converters register-defaults="false">
       <ref bean="xmlConverter"/>
       <ref bean="jsonConverter"/>
    </mvc:message-converters>
</mvc:annotation-driven>

 <!-- XML MessageConverter -->
 <bean id="xmlConverter">
  <constructor-arg ref="jaxbMarshaller"/>
  <property name="supportedMediaTypes" value="application/xml" />
 </bean>

<!-- JSON MessageConverter -->
 <bean id="jsonConverter">
 </bean>

<!-- JAXB Classes to be marshalled -->
<bean id="jaxbMarshaller">
    <property name="packagesToScan">
   <list>
    <value>com.test.*</value>
    <value>com.*.test</value>
  </list>
  </property>
</bean>

spring 如何在spring中使用多个@RequestMapping注解?
是否可以在一个方法上使用多个@RequestMapping注释?
像 :
@RequestMapping("/")@RequestMapping("")@RequestMapping("/welcome")public String welcomeHandler(){ return "welcome";}答案1
小编典典@RequestMapping有一个String[]值参数,所以你应该能够像这样指定多个值:
@RequestMapping(value={"", "/", "welcome"})今天关于在Spring中添加管理部分和spring怎么管理对象的分享就到这里,希望大家有所收获,若想了解更多关于5分钟快速在SpringCloud中添加Swagger、java – 在Spring中如何管理对象池?、java – 在Spring中添加Jaxb2消息转换器打破了Jackson2 json映射、spring 如何在spring中使用多个@RequestMapping注解?等相关知识,可以在本站进行查询。
本文标签:


![[转帖]Ubuntu 安装 Wine方法(ubuntu如何安装wine)](https://www.gvkun.com/zb_users/cache/thumbs/4c83df0e2303284d68480d1b1378581d-180-120-1.jpg)

