如果您对一手遮天Android-view和布局类:通过inflate动态加载布局文件感兴趣,那么这篇文章一定是您不可错过的。我们将详细讲解一手遮天Android-view的各种细节,并对布局类:通过i
如果您对一手遮天 Android - view和布局类: 通过 inflate 动态加载布局文件感兴趣,那么这篇文章一定是您不可错过的。我们将详细讲解一手遮天 Android - view的各种细节,并对布局类: 通过 inflate 动态加载布局文件进行深入的分析,此外还有关于Android LayoutInflater 使用详解 View.inflate 的加载原理、Android LayoutInflater加载布局详解及实例代码、android 动态加载布局、android 动态加载布局文件三种方法的实用技巧。
本文目录一览:- 一手遮天 Android - view(布局类): 通过 inflate 动态加载布局文件
- Android LayoutInflater 使用详解 View.inflate 的加载原理
- Android LayoutInflater加载布局详解及实例代码
- android 动态加载布局
- android 动态加载布局文件三种方法
: 通过 inflate 动态加载布局文件")
一手遮天 Android - view(布局类): 通过 inflate 动态加载布局文件
项目地址 https://github.com/webabcd/AndroidDemo
作者 webabcd
一手遮天 Android - view(布局类): 通过 inflate 动态加载布局文件
示例如下:
/view/layout/InflateDemo1.java
/**
 * 演示如何通过 inflate 动态加载布局文件
 *
 * 有 3 种方式
 * 1、View view = View.inflate(context, int resource, ViewGroup root);
 *    相当于 LayoutInflater.from(context).inflate(int resource, ViewGroup root, true);
 * 2、View view = LayoutInflater.from(context).inflate(int resource, ViewGroup root);
 *    相当于 LayoutInflater.from(context).inflate(int resource, ViewGroup root, true);
 * 3、View view = LayoutInflater.from(context).inflate(int resource, ViewGroup root, boolean attachToRoot);
 *
 * 也就是说只要明白下面这个方法就行了
 * View view = LayoutInflater.from(context).inflate(int resource, ViewGroup root, boolean attachToRoot);
 *     resource - 需要加载的布局文件的资源 id
 *     root - 父容器(指定父容器后,才能计算出动态加载的布局文件的根布局中的 width, height 之类的属性)
 *     attachToRoot - 是否将获取到的 view 添加到父容器中(如果指定的父容器是 null,则此值无论你传的是什么,都视为 false)
 *     返回值就是获取到的 view
 */

package com.webabcd.androiddemo.view.layout;

import androidx.appcompat.app.AppCompatActivity;

import android.os.Bundle;
import android.view.LayoutInflater;
import android.view.View;
import android.view.ViewGroup;
import android.widget.Button;
import android.widget.LinearLayout;

import com.webabcd.androiddemo.R;

public class InflateDemo1 extends AppCompatActivity {

    private LinearLayout _container;
    private Button _button1;
    private Button _button2;
    private Button _button3;

    @Override
    protected void onCreate(Bundle savedInstanceState) {
        super.onCreate(savedInstanceState);
        setContentView(R.layout.activity_view_layout_inflatedemo1);

        _container = findViewById(R.id.container);
        _button1 = findViewById(R.id.button1);
        _button2 = findViewById(R.id.button2);
        _button3 = findViewById(R.id.button3);

        // 获取当前 activity 的根布局的父容器
        ViewGroup parent =  getwindow().getDecorView().findViewById(android.R.id.content);
        // 获取当前 activity 的根布局(以本例为例,其获取到的结果和 _container 是一样的)
        LinearLayout root = (LinearLayout)parent.getChildAt(0);

        sample();
    }

    private void sample() {
        _button1.setonClickListener(new View.OnClickListener() {
            @Override
            public void onClick(View view) {
                // 动态加载指定的布局文件,并指定其父容器,并自动添加到此父容器中(下面 3 句代码是一样的)

                // View layoutView = View.inflate(ViewDemo4.this,  R.layout.view_view_layout_inflatedemo1, _root);
                // View layoutView = LayoutInflater.from(ViewDemo4.this).inflate(R.layout.view_view_layout_inflatedemo1, _root);
                View layoutView = LayoutInflater.from(InflateDemo1.this).inflate(R.layout.view_view_layout_inflatedemo1, _container, true);
            }
        });

        _button2.setonClickListener(new View.OnClickListener() {
            @Override
            public void onClick(View view) {
                // 动态加载指定的布局文件,并指定其父容器,但是不自动添加到此父容器中
                View layoutView = LayoutInflater.from(InflateDemo1.this).inflate(R.layout.view_view_layout_inflatedemo1, _container, false);
                // 手动将获取到的 view 添加到指定的父容器中
                _container.addView(layoutView);
            }
        });

        _button3.setonClickListener(new View.OnClickListener() {
            @Override
            public void onClick(View view) {
                // 动态加载指定的布局文件,但是不指定其父容器
                View layoutView = LayoutInflater.from(InflateDemo1.this).inflate(R.layout.view_view_layout_inflatedemo1, null);
                // 手动将获取到的 view 添加到指定的父容器中
                // 请运行本例看实际效果,由于 inflate 的时候未指定父容器,所以加载的 view 的高度计算是有问题的
                _container.addView(layoutView);
            }
        });
    }
}
/layout/activity_view_layout_inflatedemo1.xml
<?xml version="1.0" encoding="utf-8"?>
<LinearLayout xmlns:android="http://schemas.android.com/apk/res/android"
    android:layout_width="match_parent"
    android:layout_height="match_parent"
    android:orientation="vertical"
    android:id="@+id/container">

    <Button
        android:id="@+id/button1"
        android:layout_width="wrap_content"
        android:layout_height="wrap_content"
        android:textAllCaps="false"
        android:text="inflate 说明 1"/>

    <Button
        android:id="@+id/button2"
        android:layout_width="wrap_content"
        android:layout_height="wrap_content"
        android:textAllCaps="false"
        android:text="inflate 说明 2"/>

    <Button
        android:id="@+id/button3"
        android:layout_width="wrap_content"
        android:layout_height="wrap_content"
        android:textAllCaps="false"
        android:text="inflate 说明 3"/>


</LinearLayout>
/layout/view_view_layout_inflatedemo1.xml
<?xml version="1.0" encoding="utf-8"?>
<LinearLayout xmlns:android="http://schemas.android.com/apk/res/android"
    android:layout_width="match_parent"
    android:layout_height="100dp"
    android:background="@color/blue">

    <TextView
        android:layout_width="match_parent"
        android:layout_height="match_parent"
        android:text="layout"
        android:textColor="@color/white"/>

</LinearLayout>
项目地址 https://github.com/webabcd/AndroidDemo
作者 webabcd

Android LayoutInflater 使用详解 View.inflate 的加载原理
志在巅峰的攀登者,不会陶醉在沿途的某个脚印之中,在码农的世界里,优美的应用体验,来源于程序员对细节的处理以及自我要求的境界,年轻人也是忙忙碌碌的码农中一员,每天、每周,都会留下一些脚印,就是这些创作的内容,有一种执着,就是不知为什么,如果你迷茫,不妨来瞅瞅码农的轨迹。
如果你有兴趣 你可以关注一下公众号 biglead 来获取最新的学习资料。
-
Flutter 从入门 到精通系列文章在这里
-
系列学习教程在这里
LayoutInflater 是用来将 layout.xml 布局文件添加到指定 View 中,或者是将 layout.xml 布局文件转化为对应的 View 对象。
1 LayoutInflater 的获取方式
第一种方式: 从给定的上 Context 下文中获取 LayoutInflater:
LayoutInflater inflater = LayoutInflater.from(context);
或者是
LayoutInflater inflater = context.getSystemService(Context.LAYOUT_INFLATER_SERVICE);
第二种方式:在 Activity 中直接获取 LayoutInflater:
LayoutInflater inflater = getLayoutInflater();
从源码分析的角度,无论哪种方式,最终都是使用的 context.getSystemService 这种方式。
2 获取 View
2.1 View.inflate
我们通常会将 layout 布局文件加载成 View , 会这样来写
 /**
  * 将 Layout 文件 加载 View
  * 参数一 上下文对象
  * 参数二 布局文件 ID
  * 参数三 不为null 时自动将这个布局文件 加载到这个 root 中去  null 代表不添加
  */
View inflate = View.inflate(mContext, R.layout.activity_list1_item, null);
它调用的源码如下
    /**
     * Inflate a view from an XML resource.  This convenience method wraps the {@link
     * LayoutInflater} class, which provides a full range of options for view inflation.
     *
     * @param context The Context object for your activity or application.
     * @param resource The resource ID to inflate
     * @param root A view group that will be the parent.  Used to properly inflate the
     * layout_* parameters.
     * @see LayoutInflater
     */
    public static View inflate(Context context, @LayoutRes int resource, ViewGroup root) {
        LayoutInflater factory = LayoutInflater.from(context);
        return factory.inflate(resource, root);
    }
所以它实际上还是调用的 LayoutInflater.inflate 方法实现的加载。
2.2 LayoutInflater.inflate
/**
   *  参数一 上下文对象
   */
  LayoutInflater layoutInflater = LayoutInflater.from(mContext);
  /**
   * 将 Layout 文件 加载 View
   * 参数一 布局文件 ID
   * 参数二 不为null 时 会测量这个 parent 的大小来 作为 inflate 的父组件大小参考
   * 参数三 true 将加载的 layout 布局文件 自动添加到 parent 中去
   */
  View inflate = layoutInflater.inflate(R.layout.activity_list1_item, parent,false);
本文同步分享在 博客 “早起的年轻人”(CSDN)。
如有侵权,请联系 support@oschina.cn 删除。
本文参与 “OSC 源创计划”,欢迎正在阅读的你也加入,一起分享。

Android LayoutInflater加载布局详解及实例代码
Android LayoutInflater加载布局详解
对于有一定Android开发经验的同学来说,一定使用过LayoutInflater.inflater()来加载布局文件,但并不一定去深究过它的原理,比如
1.LayoutInflater为什么可以加载layout文件?
2.加载layout文件之后,又是怎么变成供我们使用的View的?
3.我们定义View的时候,如果需要在布局中使用,则必须实现带AttributeSet参数的构造方法,这又是为什么呢?
既然在这篇文章提出来,那说明这三个问题都是跟LayoutInflater脱不了干系的。在我们的分析过程中,会对这些问题一一进行解答。
我们一步一步来,首先当我们需要从layout中加载View的时候,会调用这个方法
LayoutInflater.from(context).inflater(R.layout.main_activity,null);
1.如何创建LayoutInflater?
这有什么值得说的?如果你打开了LayoutInflater.Java你自然就明白了,LayoutInflater是一个抽象类,而抽象类是不能直接被实例化的,也就是说我们创建的对象肯定是LayoutInflater的某一个实现类。
我们进入LayoutInflater.from方法中可以看到
public static LayoutInflater from(Context context) {
    LayoutInflater LayoutInflater =
        (LayoutInflater) context.getSystemService(Context.LAYOUT_INFLATER_SERVICE);
    if (LayoutInflater == null) {
      throw new AssertionError("LayoutInflater not found.");
    }
    return LayoutInflater;
  }
好吧,是获取的系统服务!是从context中获取,没吃过猪肉还没见过猪跑么,一说到context对象十有八九是说得ContextImpl对象,于是我们直接去到ContextImpl.java中,找到getSystemService方法
@Override
  public Object getSystemService(String name) {
    return SystemServiceRegistry.getSystemService(this,name);
  }
额。。。又要去SystemServiceRegistry.java文件中
  /**
   * Gets a system service from a given context.
   */
  public static Object getSystemService(ContextImpl ctx,String name) {
    ServiceFetcher<?> fetcher = SYstem_SERVICE_FETCHERS.get(name);
    return fetcher != null ? fetcher.getService(ctx) : null;
  }
由代码可知,我们的Service是从SYstem_SERVICE_FETCHERS这个HashMap中获得的,而稍微看一下代码就会发现,这个HashMap是在static模块中赋值的,这里注册了很多的系统服务,什么ActivityService,什么AlarmService等等都是在这个HashMap中。从LayoutInflater.from方法中可以知道,我们找到是Context.LAYOUT_INFLATER_SERVICE对应的Service
registerService(Context.LAYOUT_INFLATER_SERVICE,LayoutInflater.class,new CachedServiceFetcher<LayoutInflater>() {
      @Override
      public LayoutInflater createService(ContextImpl ctx) {
        return new PhoneLayoutInflater(ctx.getouterContext());
      }});
好啦,主角终于登场了――PhoneLayoutInflater,我们获取的LayoutInflater就是这个类的对象。
那么,这一部分的成果就是我们找到了PhoneLayoutInflater,具体有什么作用,后面再说。
2.inflater方法分析
这个才是最重要的方法,因为就是这个方法把我们的layout转换成了View对象。这个方法直接就在LayoutInflater抽象类中定义
public View inflate(@LayoutRes int resource,@Nullable ViewGroup root) {
    return inflate(resource,root,root != null);
  }
传入的参数一个是layout的id,一个是是否指定ParentView,而真正的实现我们还得往下看
public View inflate(@LayoutRes int resource,@Nullable ViewGroup root,boolean attachToRoot) {
    final Resources res = getContext().getResources();
    if (DEBUG) {
      Log.d(TAG,"INFLATING from resource: \"" + res.getResourceName(resource) + "\" ("
          + Integer.toHexString(resource) + ")");
    }

    final XmlResourceParser parser = res.getLayout(resource);
    try {
      return inflate(parser,attachToRoot);
    } finally {
      parser.close();
    }
  }
我们先从context中获取了Resources对象,然后通过res.getLayout(resource)方法获取一个xml文件解析器XmlResourceParser(关于在Android中的xml文件解析器这里就不详细讲了,免得扯得太远,不了解的同学可以在网上查找相关资料阅读),而这其实是把我们定义layout的xml文件给加载进来了。
然后,继续调用了另一个inflate方法
public View inflate(XmlPullParser parser,boolean attachToRoot) {
    synchronized (mConstructorArgs) {
      final Context inflaterContext = mContext;
      //快看,View的构造函数中的attrs就是这个!!!
      final AttributeSet attrs = Xml.asAttributeSet(parser);

      //这个数组很重要,从名字就可以看出来,这是构造函数要用到的参数
      mConstructorArgs[0] = inflaterContext;
      View result = root;

      try {
        // 找到根节点,找到第一个START_TAG就跳出while循环,
        // 比如<TextView>是START_TAG,而</TextView>是END_TAG
        int type;
        while ((type = parser.next()) != XmlPullParser.START_TAG &&
            type != XmlPullParser.END_DOCUMENT) {
          // Empty
        }

        if (type != XmlPullParser.START_TAG) {
          throw new InflateException(parser.getPositionDescription()
              + ": No start tag found!");
        }
        //获取根节点的名称
        final String name = parser.getName();

        //判断是否用了merge标签
        if (TAG_MERGE.equals(name)) {
          if (root == null || !attachToRoot) {
            throw new InflateException("<merge /> can be used only with a valid "
                + "ViewGroup root and attachToRoot=true");
          }
          //解析
          rInflate(parser,inflaterContext,attrs,false);
        } else {
          // 这里需要调用到PhoneLayoutInflater中的方法,获取到根节点对应的View
          final View temp = createViewFromTag(root,name,attrs);

          ViewGroup.LayoutParams params = null;
          //如果指定了parentView(root),则生成layoutParams,
          //并且在后面会将temp添加到root中
          if (root != null) {
            params = root.generateLayoutParams(attrs);
            if (!attachToRoot) {
              temp.setLayoutParams(params);
            }
          }

          // 上面解析了根节点,这里解析根节点下面的子节点
          rInflateChildren(parser,temp,true);

          if (root != null && attachToRoot) {
            root.addView(temp,params);
          }

          if (root == null || !attachToRoot) {
            result = temp;
          }
        }

      } catch (Exception e) {

      } finally {
        // Don't retain static reference on context.
        mConstructorArgs[0] = lastContext;
        mConstructorArgs[1] = null;
      }

      return result;
    }
  }
这个就稍微有点长了,我稍微去除了一些跟逻辑无关的代码,并且添加了注释,如果有耐心看的话应该是能看懂了。这里主要讲两个部分,首先是rInflateChildren这个方法,其实就是一层一层的把所有节点取出来,然后通过createViewFromTag方法将其转换成View对象。所以重点是在如何转换成View对象的。
3.createViewFromTag
我们一层层跟进代码,最后会到这里
View createViewFromTag(View parent,String name,Context context,AttributeSet attrs,boolean ignoreThemeAttr) {
      ......
      ......
    try {
      ......

      if (view == null) {
        final Object lastContext = mConstructorArgs[0];
        mConstructorArgs[0] = context;
        try {
          //不含“.” 说明是系统自带的控件
          if (-1 == name.indexOf('.')) {
            view = onCreateView(parent,attrs);
          } else {
            view = createView(name,null,attrs);
          }
        } finally {
          mConstructorArgs[0] = lastContext;
        }
      }

      return view;
    } catch (InflateException e) {
      throw e;
      ......
    }
  }
为了方便理解,将无关的代码去掉了,我们看到其实就是调用的createView方法来从xml节点转换成View的。如果name中不包含'.' 就调用onCreateView方法,否则直接调用createView方法。
在上面的PhoneLayoutInflater中就复写了onCreateView方法,而且不管是否重写,该方法最后都会调用createView。唯一的区别应该是系统的View的完整类名由onCreateView来提供,而如果是自定义控件在布局文件中本来就是用的完整类名。
4. createView方法
public final View createView(String name,String prefix,AttributeSet attrs)
      throws ClassNotFoundException,InflateException {
    //1.通过传入的类名,获取该类的构造器

    Constructor<? extends View> constructor = sConstructorMap.get(name);
    Class<? extends View> clazz = null;

    try {
      if (constructor == null) {

        clazz = mContext.getClassLoader().loadClass(
            prefix != null ? (prefix + name) : name).asSubclass(View.class);

        if (mFilter != null && clazz != null) {
          boolean allowed = mFilter.onLoadClass(clazz);
          if (!allowed) {
            failNotAllowed(name,prefix,attrs);
          }
        }
        constructor = clazz.getConstructor(mConstructorSignature);
        constructor.setAccessible(true);
        sConstructorMap.put(name,constructor);
      } else {

        if (mFilter != null) {
          Boolean allowedState = mFilterMap.get(name);
          if (allowedState == null) {
            clazz = mContext.getClassLoader().loadClass(
                prefix != null ? (prefix + name) : name).asSubclass(View.class);
            boolean allowed = clazz != null && mFilter.onLoadClass(clazz);
            mFilterMap.put(name,allowed);
            if (!allowed) {
              failNotAllowed(name,attrs);
            }
          } else if (allowedState.equals(Boolean.FALSE)) {
            failNotAllowed(name,attrs);
          }
        }
      }

      //2.通过获得的构造器,创建View实例
      Object[] args = mConstructorArgs;
      args[1] = attrs;

      final View view = constructor.newInstance(args);
      if (view instanceof ViewStub) {
        final ViewStub viewStub = (ViewStub) view;
        viewStub.setLayoutInflater(cloneInContext((Context) args[0]));
      }
      return view;

    } catch (NoSuchMethodException e) {
     ......
    }
  }
这段代码主要做了两件事情
第一,根据ClassName将类加载到内存,然后获取指定的构造器constructor。构造器是通过传入参数类型和数量来指定,这里传入的是mConstructorSignature
static final Class<?>[] mConstructorSignature = new Class[] {
      Context.class,AttributeSet.class};
即传入参数是Context和AttributeSet,是不是猛然醒悟了!!!这就是为什么我们在自定义view的时候,必须要重写View(Context context,AttributeSet attrs)则个构造方法,才能在layout中使用我们的View。
第二,使用获得的构造器constructor来创建一个View实例。
5.回答问题
还记得上面我们提到的三个问题吗?现在我们来一一解答:
1.LayoutInflater为什么可以加载layout文件?
因为LayoutInflater其实是通过xml解析器来加载xml文件,而layout文件的格式就是xml,所以可以读取。
2.加载layout文件之后,又是怎么变成供我们使用的View的?
LayoutInflater加载到xml文件中内容之后,通过反射将每一个标签的名字取出来,并生成对应的类名,然后通过反射获得该类的构造器函数,参数为Context和AttributeSet。然后通过构造器创建View对象。
3.我们定义View的时候,如果需要在布局中使用,则必须实现带AttributeSet参数的构造方法,这又是为什么呢?
因为LayoutInflater在解析xml文件的时候,会将xml中的内容转换成一个AttributeSet对象,该对象中包含了在xml文件设定的属性值。需要在构造函数中将这些属性值取出来,赋给该实例的属性。
感谢阅读,希望能帮助到大家,谢谢大家对本站的支持!

android 动态加载布局
Android 开发 代码动态加载布局
动态加载布局分为导入xml控件和新建控件两种,添加至原布局中,适用于动态变化的界面和不适合用xml固定布局的情况
1、自己新建xml布局并与原来的activity所显示的布局相关联
LayoutInflatermInflater=LayoutInflater.from(MyActivity.this);//初始化LayoutInflater  MyActivity即当前所在Activity
View view=mInflater.inflate(R.layout.myview);//新建view 并从xml布局文件中初始化布局(自定义效果的布局文件)
TextViewtextView=(TextView)view.findViewById(R.id.text);初始化textView(需要的布局控件)
textView.setText("自定义");
LinearLayout layout=(LinearLayout)findViewById(R.id.linearlayout);//布局中初始化linearLayout控件
layout.setOrientation(LinearLayout.HORIZONTAL);
layout.addView(view);//添加到布局
2、新建view控件添加到原来的布局中
LinearLayout layout=(LinearLayout)findViewById(R.id.linearlayout);//布局中初始化linearLayout控件
layout.setOrientation(LinearLayout.HORIZONTAL);设置线性布局为横向还是纵向
ImageView img=new ImageView(MyActivity.this);//新建ImageView控件
LayoutParams mParams= newLayoutParams(width,height );//创建参数对象,with,height为控件的宽高,参数为整型
img.setLayoutParams(mParams);//利用参数对象设置控件的参数
layout.addView(img);//将新建的ImageView对象添加到已有控件中
android 动态加载布局文件三种方法
三种动态加载的方式。
界面很简单。一个MainActivity 界面只放一个按钮。点击该按钮弹出一个自定义对话框。加载的布局文件显示在自定义对话框上。加载的布局文件上只放了一个TextView 显示一行文字. 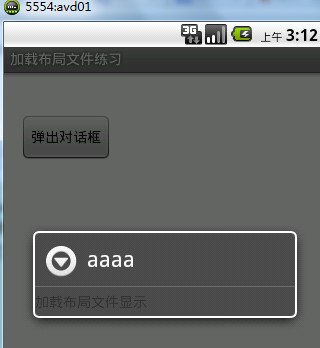
只看监听器里面即可:
<!-- lang: java -->
protected void onCreate(Bundle savedInstanceState) {
super.onCreate(savedInstanceState);
setContentView(R.layout.activity_main);
btn = (Button) findViewById(R.id.button1);
btn.setOnClickListener(new OnClickListener() { @Override public void onClick(View v) {
/* 布局文件加载一: */
// View views =
// LayoutInflater.from(MainActivity.this).inflate(
// R.layout.dialog, null);

/* 布局文件加载二: */
// LayoutInflater inflater = (LayoutInflater) MainActivity.this
// .getSystemService(Context.LAYOUT_INFLATER_SERVICE);
// View views = inflater.inflate(R.layout.dialog, null);

/*
 * 布局文件加载三: 如果是线性布局就用LinearLayout,如果是相对布局就用RelativeLayout.
 */

LinearLayout views = (LinearLayout) getLayoutInflater()
  .inflate(R.layout.dialog, null);

/* 弹出对话框 */
new AlertDialog.Builder(MainActivity.this).setTitle("aaaa")
  .setView(views).show();
} }); }
关于一手遮天 Android - view和布局类: 通过 inflate 动态加载布局文件的介绍现已完结,谢谢您的耐心阅读,如果想了解更多关于Android LayoutInflater 使用详解 View.inflate 的加载原理、Android LayoutInflater加载布局详解及实例代码、android 动态加载布局、android 动态加载布局文件三种方法的相关知识,请在本站寻找。
本文标签:


![[转帖]Ubuntu 安装 Wine方法(ubuntu如何安装wine)](https://www.gvkun.com/zb_users/cache/thumbs/4c83df0e2303284d68480d1b1378581d-180-120-1.jpg)

