想了解springboot整合mybatis的新动态吗?本文将为您提供详细的信息,我们还将为您解答关于springboot整合mybatisplus增删改查的相关问题,此外,我们还将为您介绍关于3.S
想了解springboot整合mybatis的新动态吗?本文将为您提供详细的信息,我们还将为您解答关于springboot整合mybatisplus增删改查的相关问题,此外,我们还将为您介绍关于3.SpringBoot整合Mybatis(一对多)、SpringBoot整合MyBatis(注解版)、springboot整合mybatis,redis,代码(五)、springboot整合mybatis-plus的新知识。
本文目录一览:- springboot整合mybatis(springboot整合mybatisplus增删改查)
- 3.SpringBoot整合Mybatis(一对多)
- SpringBoot整合MyBatis(注解版)
- springboot整合mybatis,redis,代码(五)
- springboot整合mybatis-plus
")
springboot整合mybatis(springboot整合mybatisplus增删改查)

导入依赖:
<dependencies>
        <dependency>
            <groupId>org.springframework.boot</groupId>
            <artifactId>spring-boot-starter-web</artifactId>
        </dependency>

        <dependency>
            <groupId>org.springframework.boot</groupId>
            <artifactId>spring-boot-starter-test</artifactId>
            <scope>test</scope>
            <exclusions>
                <exclusion>
                    <groupId>org.junit.vintage</groupId>
                    <artifactId>junit-vintage-engine</artifactId>
                </exclusion>
            </exclusions>
        </dependency>

        <!--整合  druid数据源 mybatis MysqL junit-↑ jdbc-->
        <dependency>
            <groupId>org.springframework.boot</groupId>
            <artifactId>spring-boot-starter-jdbc</artifactId>
        </dependency>

        <dependency>
            <groupId>org.mybatis.spring.boot</groupId>
            <artifactId>mybatis-spring-boot-starter</artifactId>
            <version>2.1.3</version>
        </dependency>

        <dependency>
            <groupId>MysqL</groupId>
            <artifactId>mysql-connector-java</artifactId>
        </dependency>

        <dependency>
            <groupId>org.mybatis</groupId>
            <artifactId>mybatis</artifactId>
            <version>3.4.6</version>
        </dependency>

        <dependency>
            <groupId>com.alibaba</groupId>
            <artifactId>druid</artifactId>
            <version>1.2.1</version>
        </dependency>

        <dependency>
            <groupId>log4j</groupId>
            <artifactId>log4j</artifactId>
            <version>1.2.12</version>
        </dependency>


        <!--引入thymeleaf依赖-->
        <dependency>
            <groupId>org.springframework.boot</groupId>
            <artifactId>spring-boot-starter-thymeleaf</artifactId>
        </dependency>
    </dependencies>

    <build>
        <plugins>
            <plugin>
                <groupId>org.springframework.boot</groupId>
                <artifactId>spring-boot-maven-plugin</artifactId>
            </plugin>
        </plugins>

        <resources>
            <resource>
                <directory>src/main/java</directory>
                <includes>
                    <include>**/*.properties</include>
                    <include>**/*.xml</include>
                </includes>
                <filtering>false</filtering>
            </resource>
            <resource>
                <directory>src/main/resources</directory>
                <includes>
                    <include>**/*.properties</include>
                    <include>**/*.xml</include>
                </includes>
                <filtering>false</filtering>
            </resource>
        </resources>
    </build>
写一下UserMapper.interface
/*
* 从mybatis3.4.0开始加入了@Mapper注解,目的就是为了不再写mapper映射文件(那个xml写的是真的蛋疼。。。)。
* @Mapper 是mybatis的注解  @Repository让spring容器帮我们自动装配bean
* */
@Mapper
@Repository
public interface UserMapper {
    //查询
    public List<User> queryAll();
    //添加数据
    public int addUser(User user);
    //根据用户名模糊查询
    public List<User> queryByLikeName(String username);
}
写一下UserMapper.xml
<mapper namespace="com.example.demo.mapper.UserMapper">

    <select id="queryAll" resultType="com.example.demo.pojo.User">
        select * from user
    </select>

    <insert id="addUser" parameterType="com.example.demo.pojo.User">
        insert into user (username,userid)
        values (#{username},${userid});
    </insert>

    <select id="queryByLikeName" parameterType="String" resultType="com.example.demo.pojo.User">
        select * from user where username like #{arg0}
    </select>

</mapper>
在主启动类头上写mapper扫描注解
//去扫描mapper
@MapperScan("com.example.demo.mapper")
@SpringBootApplication
public class DemoApplication {

    public static void main(String[] args) {
        SpringApplication.run(DemoApplication.class, args);
    }
}
测试一下
@SpringBoottest
class DemoApplicationTests {

    @Autowired
    DataSource dataSource;

    @Autowired
    UserMapper userMapper;

    @Test
    void contextLoads() {
        System.out.println(dataSource.getClass()); //查看现在所使用的数据源
        final List<User> users = userMapper.queryAll();
        for (User user : users) {
            System.out.println(user);
        }
    }

    @Test
    void contextLoads2() {
        final List<User> users = userMapper.queryByLikeName("%用%");
        for (User user : users) {
            System.out.println(user);
        }
    }

}
")
3.SpringBoot整合Mybatis(一对多)
前言:
Mybatis一对多的处理关系:
一个人有好多本书,每本书的主人只有一个人。当我们查询某个人拥有的所有书籍时,就涉及到了一对多的映射关系。
一、添加数据表:
1 CREATE TABLE `book` (
2   `id` int(6) NOT NULL,
3   `name` varchar(50) DEFAULT NULL,
4   `uid` int(6) DEFAULT NULL,
5   `price` double DEFAULT NULL,
6   PRIMARY KEY (`id`),
7   KEY `bu_id` (`uid`),
8   CONSTRAINT `bu_id` FOREIGN KEY (`uid`) REFERENCES `user` (`id`)
9 ) ENGINE=InnoDB DEFAULT CHARSET=utf8;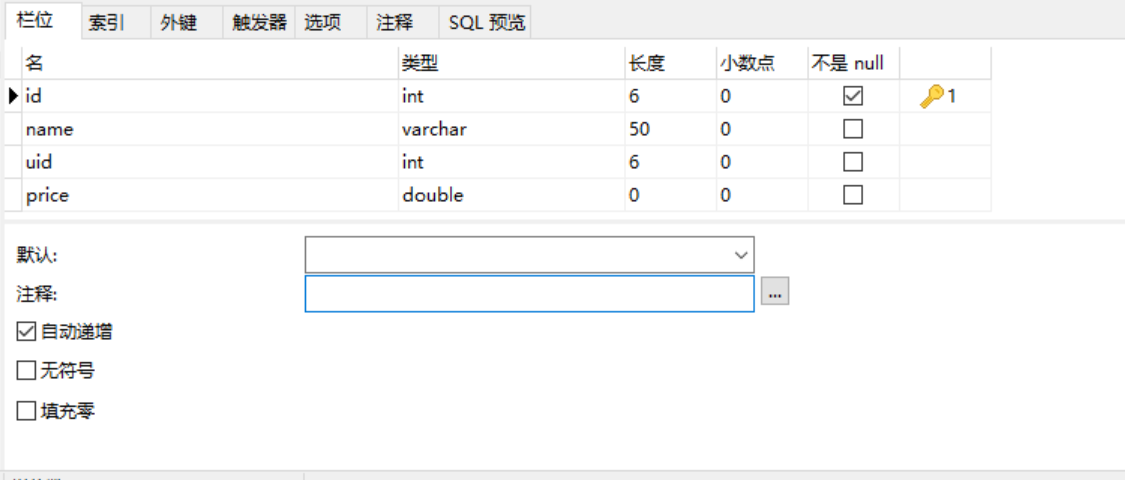
二、代码实现:
1.添加Book实体:


 1 package com.beilin.entity;
 2 /*
 3    * 书的实体
 4    * @author 北林
 5    *
 6    */
 7
 8 public class Book {
 9
10     private int id;
11     private int uid;
12     private String name;
13     private double price;
14
15     public int getId() {
16         return id;
17     }
18
19     public void setId(int id) {
20         this.id = id;
21     }
22
23     public int getUid() {
24         return uid;
25     }
26
27     public void setUid(int uid) {
28         this.uid = uid;
29     }
30
31     public String getName() {
32         return name;
33     }
34
35     public void setName(String name) {
36         this.name = name;
37     }
38
39     public double getPrice() {
40         return price;
41     }
42
43     public void setPrice(double price) {
44         this.price = price;
45     }
46 }2.在User实体中添加book集合:


 1 public class User {
 2     /**
 3      *  name:学生实体
 4      */
 5
 6     //主键id
 7     private int id;
 8     //姓名
 9     private String name;
10     //年龄
11     private int age;
12     //添加book集合
13     private List<Book> books;
14
15     // Get和 Set方法
16     public int getId() {
17         return id;
18     }
19
20     public void setId(int id) {
21         this.id = id;
22     }
23
24     public String getName() {
25         return name;
26     }
27
28     public void setName(String name) {
29         this.name = name;
30     }
31
32     public int getAge() {
33         return age;
34     }
35
36     public void setAge(int age) {
37         this.age = age;
38     }
39
40     public List<Book> getBooks() {
41         return books;
42     }
43
44     public void setBooks(List<Book> books) {
45         this.books = books;
46     }
47 }3.在UserMapper接口中定义查询方法:


 1 package com.beilin.mapper;
 2
 3 import com.beilin.entity.User;
 4
 5 import java.util.List;
 6
 7 public interface UserMapper {
 8
 9      //插入
10     public void insert(User user);
11
12     //根据id删除
13     public void delete(Integer id);
14
15      //根据user的id修改
16     public void update(User user);
17
18     //根据id查询
19     public User getById(Integer id);
20
21     //查询全部
22     public List<User> list();
23
24     /**
25           * 根据id查询所有的书
26            * @param id
27           */
28     public User selectBookById(Integer id);
29
30
31 }4.在mapper映射关系中,添加一对多的select和resaultMap:
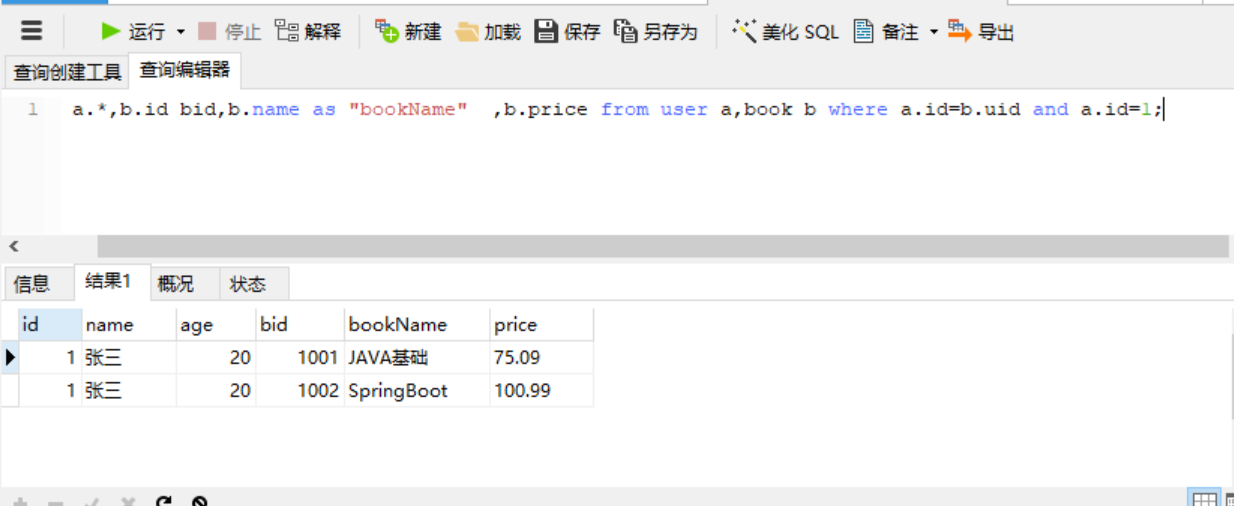
注意:当多个表的字段名一样的时候,查询需要用别名


 1 <?xml version="1.0" encoding="UTF-8"?>
 2         <!DOCTYPE mapper PUBLIC "-//mybatis.org//DTD Mapper 3.0//EN" "http://mybatis.org/dtd/mybatis-3-mapper.dtd">
 3 <mapper namespace="com.beilin.mapper.UserMapper">
 4
 5 <!-- 插入一个user -->
 6 <insert id="insert" parameterType="user" useGeneratedKeys="true" keyProperty="id">
 7         insert into user(name,age) values(#{name},#{age})
 8     </insert>
 9
10 <!-- 根据id删除user -->
11 <delete id="delete" parameterType="int">
12         delete  from user where id=#{id}
13     </delete>
14
15 <!-- 根据id修改user信息 -->
16 <update id="update" parameterType="user">
17         update user set name=#{name},age=#{age} where id=#{id}
18     </update>
19
20 <!-- 根据id查询 -->
21 <select id="getById" parameterType="int" resultType="user">
22         select * from user where id=#{id}
23     </select>
24
25 <!-- 查询所有 -->
26 <select id="list" parameterType="int" resultType="user">
27         select * from user
28     </select>
29
30
31 <resultMap id="bookMap" type="user">
32     <id property="id" column="id"/>
33     <result property="name" column="name"/>
34     <result property="age" column="age"/>
35     <collection property="books" ofType="book">
36         <id property="id" column="bid"/>
37         <result property="name" column="bookName"/>
38         <result property="price" column="price"/>
39     </collection>
40 </resultMap>
41
42 <!--根据id查询所有的书  -->
43 <select id="selectBookById" parameterType="int" resultMap="bookMap">
44         select a.*,b.id bid,b.name as "bookName"  ,b.price from user a,book b where a.id=b.uid and a.id=#{id};
45     </select>
46
47 </mapper>5.在UserController中实现查询:


1 package com.beilin.controller;
2
3 import com.beilin.entity.Book;
4 import com.beilin.entity.User;
5 import com.beilin.mapper.UserMapper;
6 import org.springframework.beans.factory.annotation.Autowired;
7 import org.springframework.web.bind.annotation.*;
8
9 import java.util.List;
10
11 @RestController
12 public class UserController {
13
14 @Autowired
15 private UserMapper userMapper;
16
17 //插入user
18 @RequestMapping("/user")
19 public void insert( User user) {
20 userMapper.insert(user);
21 }
22
23 //根据id删除
24 @RequestMapping("/user1/{id}")
25 public void delete(@PathVariable("id") Integer id) {
26 userMapper.delete(id);
27 }
28 //修改
29 @RequestMapping("/user2/{id}")
30 public void update(User user,@PathVariable("id") Integer id) {
31 userMapper.update(user);
32 }
33
34 //根据id查询user
35 @RequestMapping("/user3/{id}")
36 public User getById(@PathVariable("id") Integer id) {
37 User user = userMapper.getById(id);
38 return user;
39 }
40
41 //查询全部
42 @RequestMapping("/users")
43 public List<User> list(){
44 List<User> users = userMapper.list();
45 return users;
46 }
47
48 /**
49 * 根据id查询所有的书
50 */
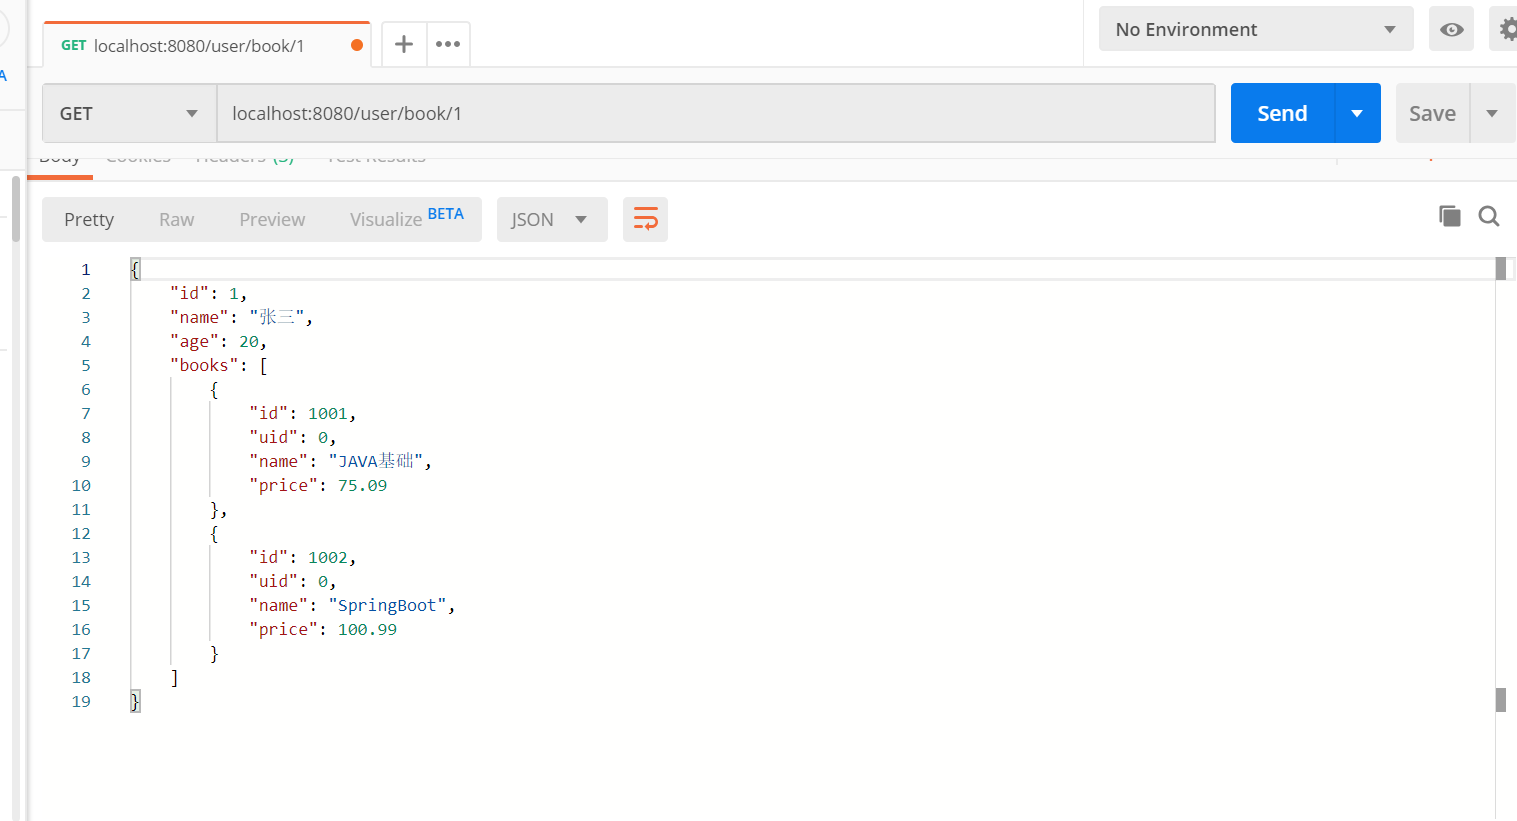
51 @GetMapping("/user/book/{id}")
52 public User getBooks(@PathVariable("id") Integer id){
53 User user = userMapper.selectBookById(id);
54 return user;
55 }
56 }
三、测试结果:
1.数据库查询结果:
2.postman访问结果:
")
SpringBoot整合MyBatis(注解版)
详情可以参考Mybatis官方文档 http://www.mybatis.org/spring-boot-starter/mybatis-spring-boot-autoconfigure/
(1)、引入Mybatis针对SpringBoot制作的Starter依赖
1         <dependency>
2             <groupId>org.mybatis.spring.boot</groupId>
3             <artifactId>mybatis-spring-boot-starter</artifactId>
4             <version>2.0.0</version>
5         </dependency>
(2)、配置Mybatis设置
 1 package cn.coreqi.config;
 2
 3 import org.mybatis.spring.boot.autoconfigure.ConfigurationCustomizer;
 4 import org.springframework.context.annotation.Bean;
 5 import org.springframework.context.annotation.Configuration;
 6
 7 @Configuration
 8 public class MybatisConfig {
 9     @Bean
10     public ConfigurationCustomizer configurationCustomizer(){
11         return new ConfigurationCustomizer() {
12             @Override
13             public void customize(org.apache.ibatis.session.Configuration configuration) {
14                 configuration.setMapUnderscoreToCamelCase(true);    //开启驼峰命名
15             }
16         };
17     }
18 }
(3)、编写Mapper接口
 1 package cn.coreqi.mapper;
 2
 3 import cn.coreqi.entities.User;
 4 import org.apache.ibatis.annotations.*;
 5
 6 //@Mapper   告诉SpringBoot这是一个操作数据库的mapper
 7 @Mapper
 8 public interface UserMapper {
 9     @Select("select * from users where Id = #{id}")
10     public User getUserById(Integer id);
11
12     @Insert("insert into users(UserName,PassWord,Enabled) values(#{UserName},#{PassWord},#{Enabled})")
13     @Options(useGeneratedKeys = true,keyProperty = "Id")    //使用自增主键,并指定主键的列名称
14     public int addUser(User user);
15
16     @Update("update users set UserName = #{UserName},PassWord = #{PassWord},Enabled = #{Enabled} where Id = #{Id}")
17     public int modifyUser(User user);
18
19     @Delete("delete from users where Id = #{id}")
20     public int delUserById(Integer id);
21
22 }
(4)、扫描所有的Mapper接口
 1 package cn.coreqi;
 2
 3 import org.mybatis.spring.annotation.MapperScan;
 4 import org.springframework.boot.SpringApplication;
 5 import org.springframework.boot.autoconfigure.SpringBootApplication;
 6
 7 @SpringBootApplication
 8 @MapperScan(value = "cn.coreqi.mapper")     //扫描指定路径下所有的Mapper接口
 9 public class SpringbootjdbcApplication {
10
11     public static void main(String[] args) {
12         SpringApplication.run(SpringbootjdbcApplication.class, args);
13     }
14
15 }
")
springboot整合mybatis,redis,代码(五)
redis注解开发过程中包含许多注解
1.@Cacheable 可以标记在方法上,也可以标记在类上。当标记在方法上时表示该方法是支持缓存的,当标记在类上时则表示该类所有的方法都是支持缓存的。应用到读取数据的方法上,将先从缓存中读取该方法的返回值,如果没
有再从DB获取数据,然后把数据添加到缓存中
缓存是以键值对进行的,值就是方法的返回结果,至于键的话,Spring又支持两种策略,默认策略和自定义策略,需要注意的是当一个支持缓存的方法在对象内部被调用时是不会触发缓存功能的。
2.@CacheEvcit 应用到删除数据的方法上,调用方法时会从缓存中删除对应key的数据
3.@CachePut 应用到写数据的方法上,如新增/修改方法,调用方法时会自动把相应的数据放入缓存,
具体步骤如下:Spring在每次执行前都会检查Cache中是否存在相同key的缓存元素,如果存在就不再执行该方法,而是直接从缓存中获取结果进行返回,否则才会执行并将返回结果存入指定的缓存中。
与@Cacheable的区别:执行前不会去检查缓存中是否存在之前执行过的结果,而是每次都会执行该方法,并将执行结果以键值对的形式存入指定的缓存中
4. @CacheConfig 属于类级别的注解,当方法上的注解未注明value时,以@CacheConfig的value属性为准,当方法上注明value时,以方法上的注解value属性为准
5. @Caching 可能组合多个Cache注解使用;比如用户新增成功后,我们要添加id–>user;username—>user;email—>user的缓存;此时就需要@Caching组合多个注解标签了
ex:可以使用如下方式使用:
@Caching(put = {
@CachePut(value = "person", key = "#person.id"),
@CachePut(value = "person", key = "#person.age"),
@CachePut(value = "person", key = "#person.address")
})
或者如代码开发里面一样


springboot整合mybatis-plus
springboot整合mybatis-plus
1.参考网址
自己在gitee上发布了两个四个springboot整合mybatis的
mysql:
springboot+mybaits
springboot+mybaits-plus
oracle:
springboot+mybaits
springboot+mybaits-plus
参考网址:
https://gitee.com/shao_ming314/note/tree/master/%E8%84%9A%E6%89%8B%E6%9E%B6-%E7%9B%B4%E6%8E%A5%E7%94%A8
2.说明事项
oracle数据的主键自增测试实例
原因:因为oracle主键自增和mysql主键自增的策略不一样
oracle主键自增需要序列和触发器
3.测试oracle主键自增的测试
3.1准备测试的表和sql脚本
- 参考网址:
我的博客欢迎光临:www.shaoming.club
1.怎么建一个主键自增的表格
2.怎么删除序列和除法器
http://www.shaoming.club/post/51
- 建表语句
-- 创建部门表
create table dept(
    id number, -- 部门编号
    name varchar2(20) ,-- 部门名称
    inserttime date,
    updatetime date
);
/* 创建序列 说明: 命名规则 表名_seq */
create sequence dept_seq
increment by 1  -- 每次加几个
start with 1    -- 从1开始计数
nomaxvalue      -- 不设置最大值
nocycle         -- 一直累加,不循环
cache 10        --缓存数量


-- 创建触发器
create trigger dept_tri before insert on dept
for each row
begin
    select dept_seq.nextval into :new.id from  dual;
end;
-- 往部门表中插入记录
insert into dept values(null, ''财务部'',null,null);
insert into dept values(null, ''人事部'',null,null);
insert into dept values(null, ''科技部'',null,null);
insert into dept values(null, ''销售部'',null,null);- 删除表并重置主键自增
-- 删除表数据
delete from dept
-- 删除序列
drop sequence dept_seq
-- 删除触发器
drop trigger dept_tri
-- 重新建一个序列
create sequence dept_seq
increment by 1  -- 每次加几个
start with 1    -- 从1开始计数
nomaxvalue      -- 不设置最大值
nocycle         -- 一直累加,不循环
cache 10        --缓存数量
-- 重新建一个触发器
create trigger dept_tri before insert on dept
for each row
begin
    select dept_seq.nextval into :new.id from  dual;
end;
3.2构建对应的实体类和dao层
- 实体类
说明:这是使用mybatis-plus逆向生成的模板
@Data
@EqualsAndHashCode(callSuper = false)
@Accessors(chain = true)
@TableName("DEPT")
@ApiModel(value = "Dept对象", description = "")
public class Dept extends Model<Dept> {


	private static final long serialVersionUID = 1L;

	@TableId(value = "ID", type = IdType.AUTO)
	private String id;

	@TableField("NAME")
	private String name;

	@TableField("INSERTTIME")
	private Date inserttime;

	@TableField("UPDATETIME")
	private Date updatetime;

	@Override
	protected Serializable pkVal() {

		return null;
	}

}- dao层
@Mapper
public interface DeptDao extends BaseMapper<Dept> {


}
3.3 进行测试
package com.fct.test;

import java.time.LocalDate;
import java.util.Date;
import java.util.List;

import org.junit.jupiter.api.Test;
import org.springframework.beans.factory.annotation.Autowired;
import org.springframework.boot.test.context.SpringBootTest;
import org.springframework.test.annotation.Rollback;
import org.springframework.transaction.annotation.Transactional;

import com.fct.dao.DeptDao;
import com.fct.pojo.entity.Dept;

/** * 用户测试主键自增 * * @author Admin * */
@SpringBootTest
@Transactional//支持增删改回滚
public class DaoTestAuto {

@Autowired
private DeptDao deptDao;

/** * 测试查询所有 */
@Test
public void testSelectAll() {

	List<Dept> deptList = deptDao.selectList(null);
	deptList.forEach(d->System.out.println(d));
}
/** * 测试插入 */
@Test
@Rollback(value=false)//这个表示让事务不会滚,这个注解配置为了测试
public void testInserIntoOne() {

	Dept dept = new Dept();
	dept.setId(null).setName("测试的name").setInserttime(new Date()).setUpdatetime(new Date());
	int row = deptDao.insert(dept);
	System.out.println("影响行数 :"+ row);
}
}
说明:
@TableId(value = “ID”, type = IdType.AUTO)
private String id;主键自增主要看这个,value=“这里是主键的名称‘
type = IdType.AUTO这个表示主键生成策略是主键自增
4.测试方法
说明:
测试方法,在对应的项目里面有,而且注释写的很详细
/** * 要求:查询id=1的数据 */
	@Test
	public void testFindOne() {


		//方法一
		User user = userMapper.selectById(1);
		System.out.println(user);

		//方法二
		QueryWrapper<User> queryWrapper =
						new QueryWrapper<>();
		queryWrapper.eq("id", 1);
		User user2 = userMapper.selectOne(queryWrapper);
		System.out.println(user2);
	}

	/** * 要求:查询age>1 and age<150 的数据 * 参数说明: > gt < lt = eq * >=ge <= le */
	@Test
	public void testFindByAge() {

		//方法二
		QueryWrapper<User> queryWrapper =
								new QueryWrapper<>();
		queryWrapper.gt("age", 1)
					.lt("age",150);
		List<User> userList = userMapper.selectList(queryWrapper);
		System.out.println(userList);

		QueryWrapper<User> queryWrapper2 =
								new QueryWrapper<>();
		queryWrapper2.between("age", 1, 150);
		List<User> userList2 = userMapper.selectList(queryWrapper2);
		System.out.println(userList);
	}

	/** * 3. 模糊查询 like %xxxx% * 查询名称 %精% */
	@Test
	public void testFindByLike() {

		QueryWrapper<User> queryWrapper = new QueryWrapper<User>();
		queryWrapper.like("name", "精");
		List<User> userList = userMapper.selectList(queryWrapper);
		System.out.println(userList);
	}

	/** * 4. 查询age=18岁 或者 女神仙 age>=300 sex=女 * */
	@Test
	public void testFindByWhere() {

		QueryWrapper<User> queryWrapper = new QueryWrapper<User>();
		queryWrapper.eq("age", 18)
					.or()
					.ge("age", 300)
					.eq("sex", "女");


		List<User> userList = userMapper.selectList(queryWrapper);
		System.out.println(userList);
	}

	@Test
	public void insert() {

		User user = new User();
		user.setId(null)
			.setName("苍老师")
			.setAge(30)
			.setSex("女");
		userMapper.insert(user);
	}

	/** * 1.将苍老师名称改为林志玲 * 2.年龄改为18 * sql:update user set name=xxx,age=xxx * where name=苍老师 * * 修改参数说明: * 1.entity 代表需要修改后的数据 * 2.updateWrapper 修改的条件构造器 */
	@Test
	public void update() {

		User user = new User();
		user.setName("林志玲")
			.setAge(18);
		UpdateWrapper<User> updateWrapper =
				new UpdateWrapper<>();
		updateWrapper.eq("name", "苍老师");
		userMapper.update(user, updateWrapper);

	}
主要就是
UpdateWrapper和QueryWrapper这两个条件构造器的使用
遇到时候自行参考和百度
5.关于分页的问题
我比较习惯pagehelp插件
mybatis-plus分页插件配置如下
- 引入依赖
<dependency>
			<groupId>com.github.pagehelper</groupId>
			<artifactId>pagehelper</artifactId>
			<version>4.1.4</version>
</dependency>- 配置类
package com.fct.config;

import java.util.Properties;

import org.mybatis.spring.annotation.MapperScan;
import org.springframework.context.annotation.Bean;
import org.springframework.context.annotation.Configuration;

import com.baomidou.mybatisplus.extension.plugins.PaginationInterceptor;
import com.github.pagehelper.PageHelper;

import lombok.extern.slf4j.Slf4j;


@Configuration//这个注解是springboot配置类的注解
@MapperScan("com.fct.dao")//配置mapper接口扫描的注解
@Slf4j
public class MyBatisPlusConfig {

	   /** * mybatis-plus分页插件<br> * 文档:http://mp.baomidou.com<br> */
// @Bean//可以设置使用的数据库类型
// public PaginationInterceptor paginationInterceptor() {

// PaginationInterceptor paginationInterceptor = new PaginationInterceptor();
 paginationInterceptor.setDialectType("mysql");
// paginationInterceptor.setDialectType("oracle");
// return paginationInterceptor;
// }
    /** * 注册MyBatis分页插件PageHelper * 原因: * 因为mybatis-plus分页的插件只是支持单表的分页,而pagehelper更加灵活 * @return */
    @Bean
    public PageHelper pageHelper() {

    	log.info("MyBatisConfiguration.pageHelper()");
        PageHelper pageHelper = new PageHelper();
        Properties p = new Properties();
        p.setProperty("offsetAsPageNum", "true");
        p.setProperty("rowBoundsWithCount", "true");
        p.setProperty("reasonable", "true");
        pageHelper.setProperties(p);
        return pageHelper;
    }

}今天关于springboot整合mybatis和springboot整合mybatisplus增删改查的分享就到这里,希望大家有所收获,若想了解更多关于3.SpringBoot整合Mybatis(一对多)、SpringBoot整合MyBatis(注解版)、springboot整合mybatis,redis,代码(五)、springboot整合mybatis-plus等相关知识,可以在本站进行查询。
本文标签:


![[转帖]Ubuntu 安装 Wine方法(ubuntu如何安装wine)](https://www.gvkun.com/zb_users/cache/thumbs/4c83df0e2303284d68480d1b1378581d-180-120-1.jpg)

