关于MySQLInstaller5.5.15GA发布的问题就给大家分享到这里,感谢你花时间阅读本站内容,更多关于64位Windows7安装MySQL社区版(community)5.7.23(mysql
关于MySQL Installer 5.5.15 GA 发布的问题就给大家分享到这里,感谢你花时间阅读本站内容,更多关于64位Windows7安装MySQL社区版(community)5.7.23(mysql-installer-community-5.7.23.0.msi)、centos7 设置 mysql 自启动的配置文件中 [Service] User=mysql Group=mysql,user 和 group 这边的 mysql 是指的什么?centos 的登录用户名?、CREATING AN INSTALLER FOR JITSI、installer – Inno Setup中的函数指针等相关知识的信息别忘了在本站进行查找喔。
本文目录一览:- MySQL Installer 5.5.15 GA 发布
- 64位Windows7安装MySQL社区版(community)5.7.23(mysql-installer-community-5.7.23.0.msi)
- centos7 设置 mysql 自启动的配置文件中 [Service] User=mysql Group=mysql,user 和 group 这边的 mysql 是指的什么?centos 的登录用户名?
- CREATING AN INSTALLER FOR JITSI
- installer – Inno Setup中的函数指针

MySQL Installer 5.5.15 GA 发布
MySQL Installer 提供了简单易用、向导式的 MySQL 软件的安装体验过程(目前只支持 Windows),包含的产品有:
- MySQL Server
- 所有的 connectors
- Workbench 和示例模型
- 示例数据库
- 文档
该版本绑定了 MySQl 5.5.15 GA 版本。
下载地址:http://dev.mysql.com/downloads/installer/5.5.html
5.7.23(mysql-installer-community-5.7.23.0.msi)")
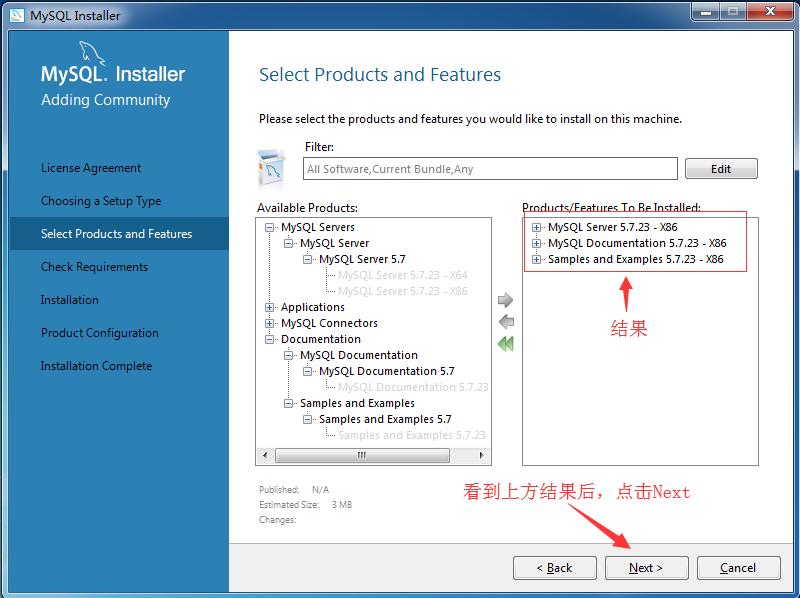
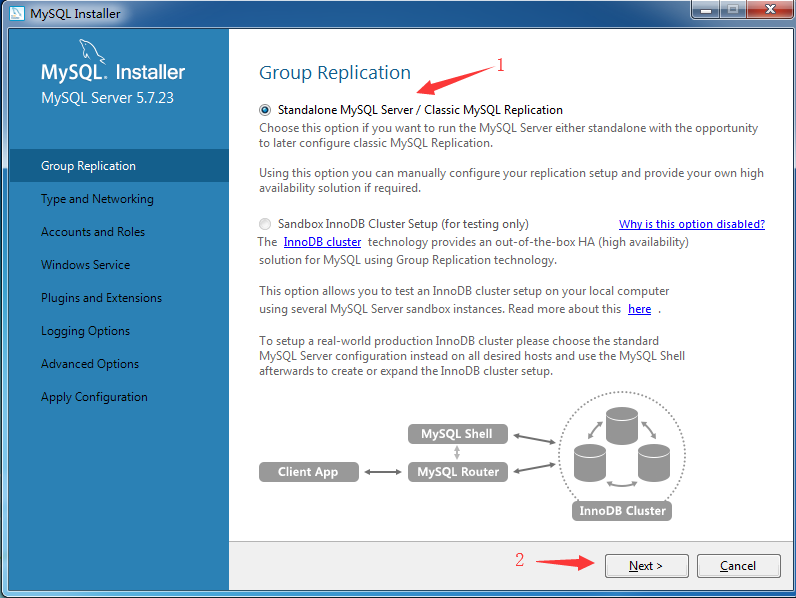
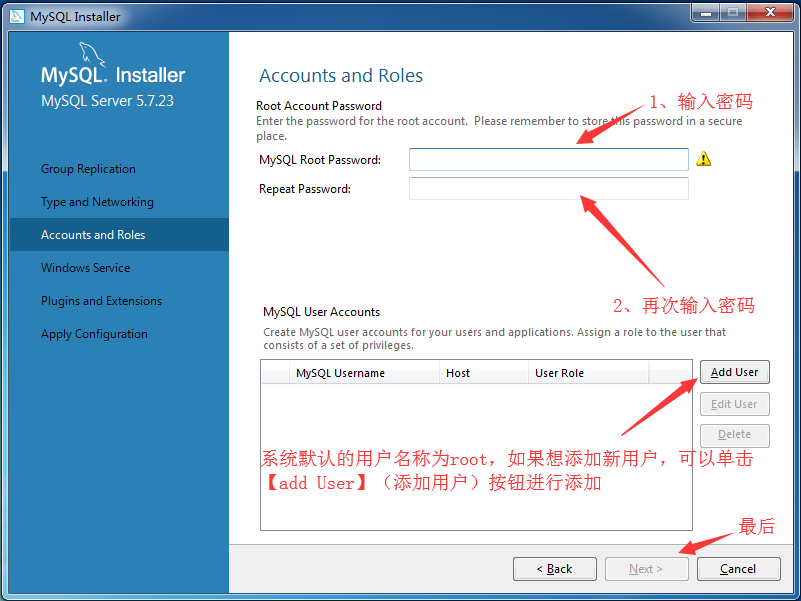
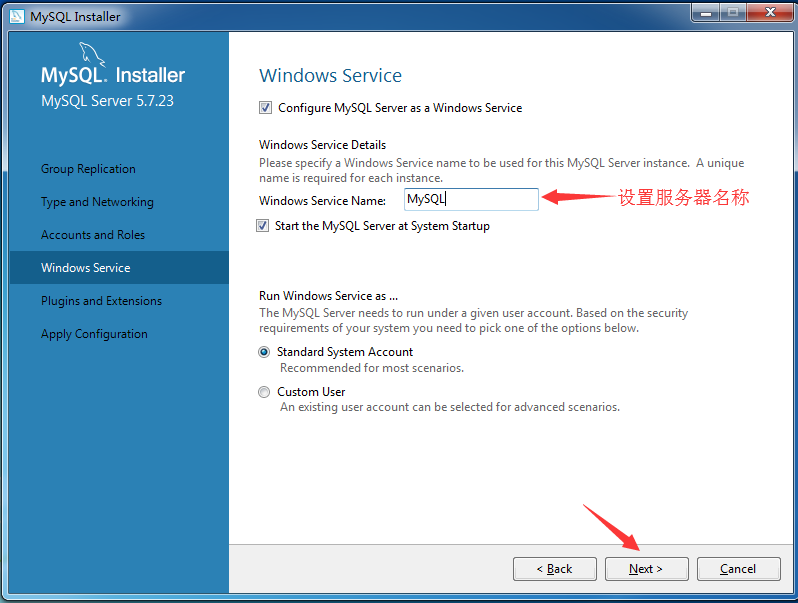
64位Windows7安装MySQL社区版(community)5.7.23(mysql-installer-community-5.7.23.0.msi)
系统环境:
操作系统:Windows7 旗舰版 64位
MySQL安装包(版本):mysql-installer-community-5.7.23.0.msi (32bit)
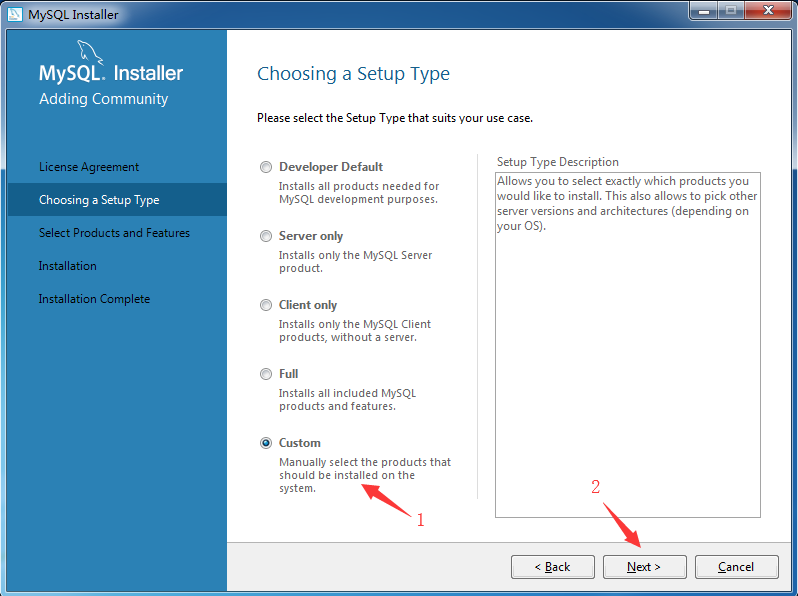
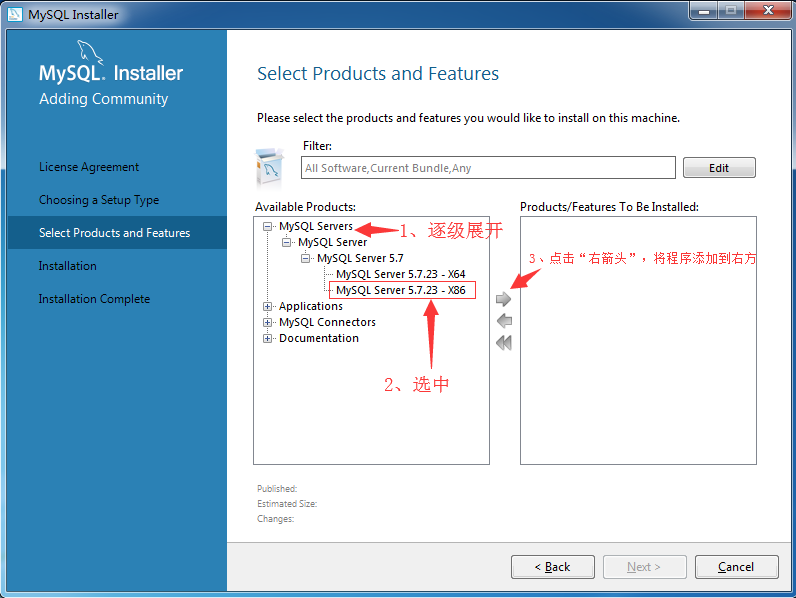
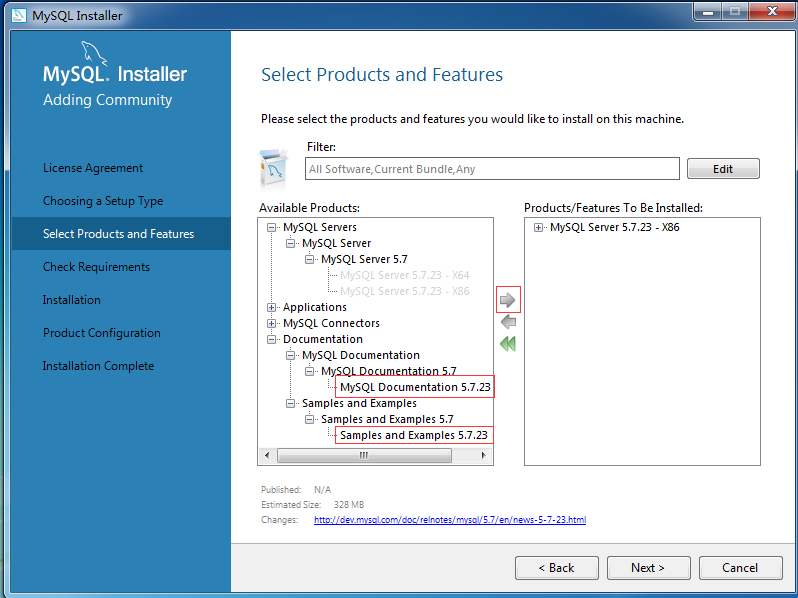
MySQL选择的安装类型:自定义安装类型(Custom)
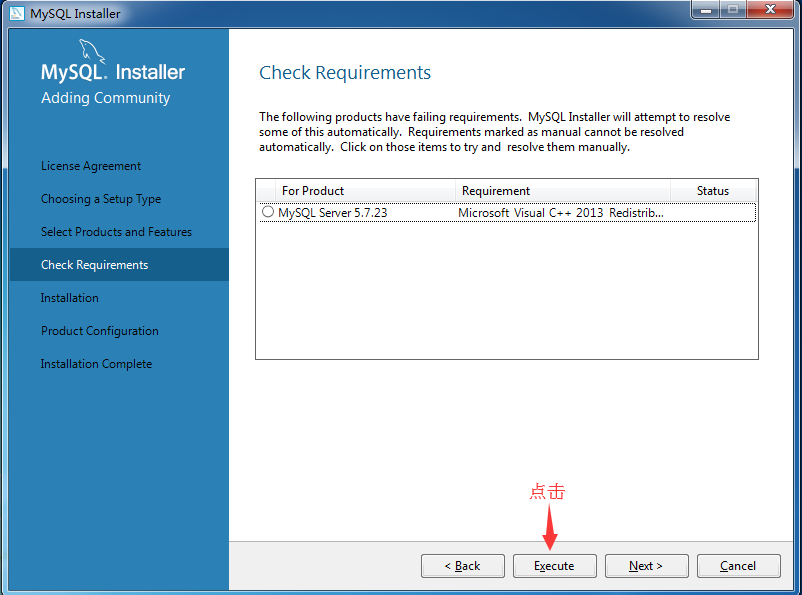
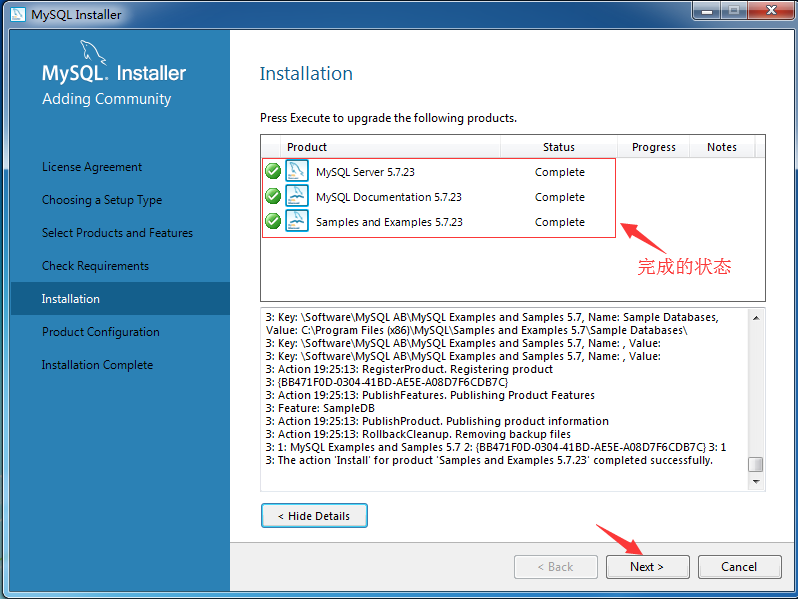
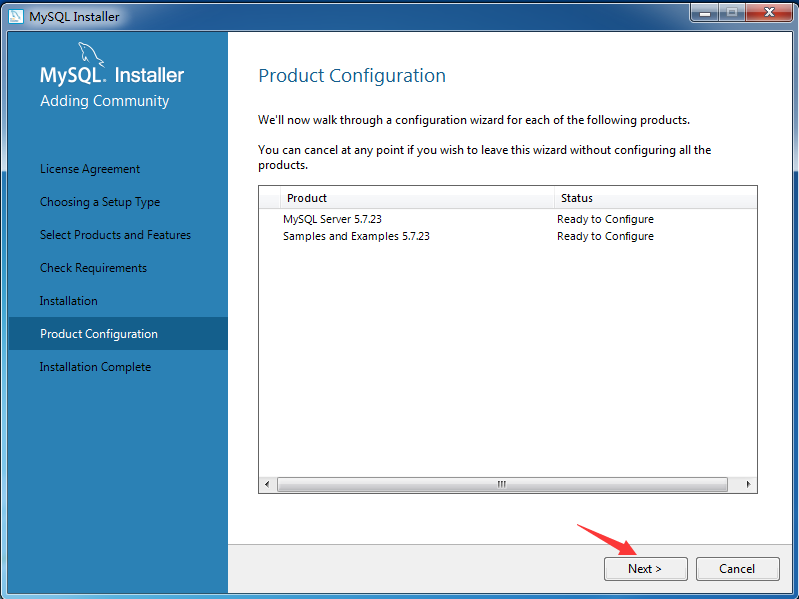
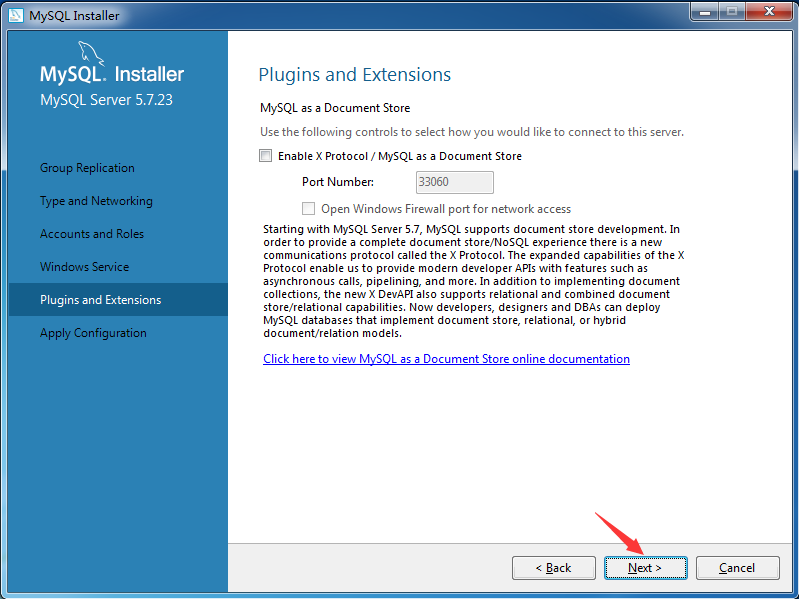
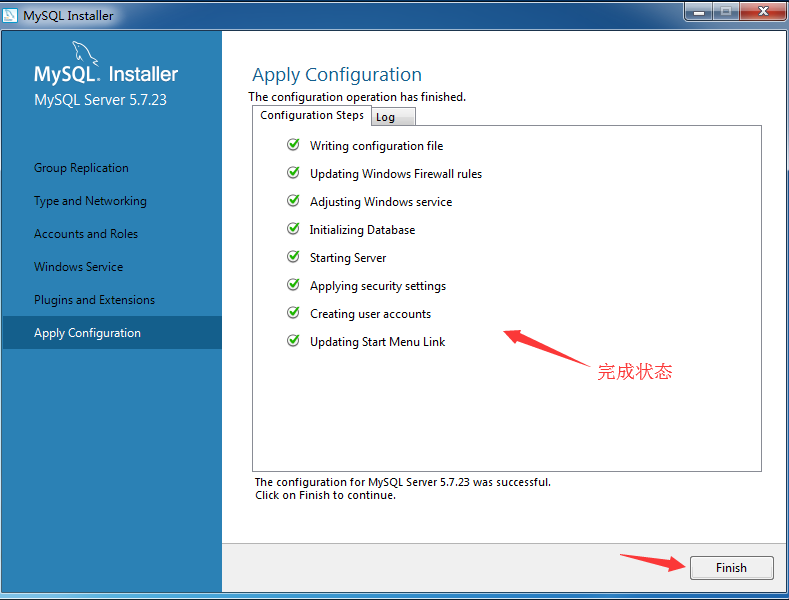
接下来开始安装:
1、安装MySQL所需框架.NET Framework 4.5.2(64位。步骤略);
2、双击安装包mysql-installer-community-5.7.23.0.msi,弹出安装界面;

然后程序就开始安装了......
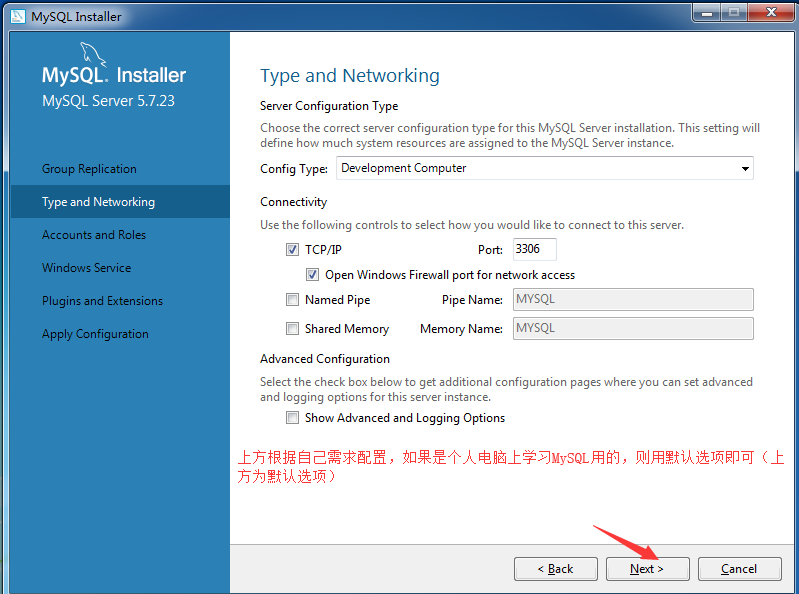
如果此时3306端口被占用,可参考 CMD中查看【端口】与【相关进程】
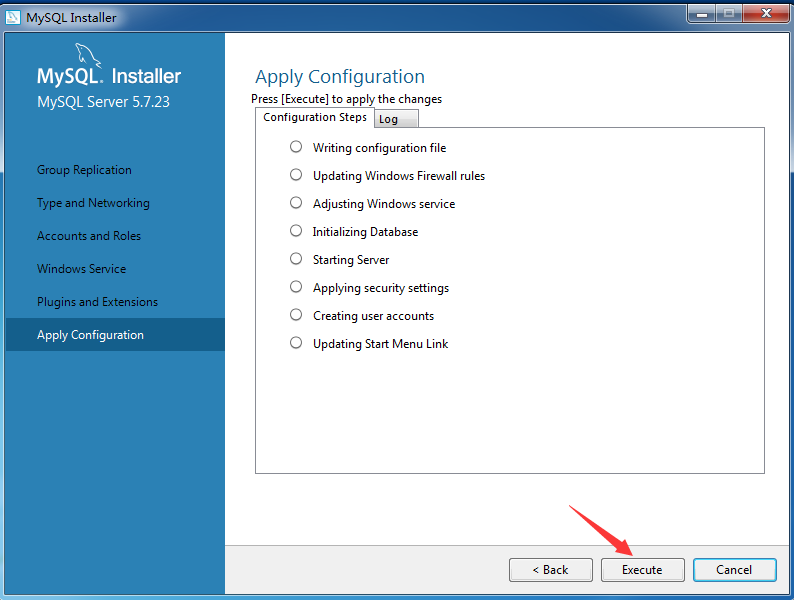
等待......
如果我们在windows10系统中安装mysql后,没有配置环境变量的话,在使用命令行(CMD)进行mysql操作时就必须要进入mysql安装目录中的bin目录才行。这样操作起来感觉会非常麻烦。这该怎么办呢?请参考:win10系统中配置mysql环境变量的方法
![centos7 设置 mysql 自启动的配置文件中 [Service] User=mysql Group=mysql,user 和 group 这边的 mysql 是指的什么?centos 的登录用户名?](http://www.gvkun.com/zb_users/upload/2025/04/aa0766fe-3fb4-4bca-b02e-4ecbf1cabf4a1745040305067.jpg "centos7 设置 mysql 自启动的配置文件中 [Service] User=mysql Group=mysql,user 和 group 这边的 mysql 是指的什么?centos 的登录用户名?")
centos7 设置 mysql 自启动的配置文件中 [Service] User=mysql Group=mysql,user 和 group 这边的 mysql 是指的什么?centos 的登录用户名?
centos7 设置 mysql 自启动的配置文件中
[Unit]
Description=MySQL Server
Documentation=man:mysqld(8)
Documentation=http://dev.mysql.com/doc/refman/en/using-systemd.html
After=network.target
After=syslog.target

[Install]
WantedBy=multi-user.target

[Service]
User=mysql
Group=mysql
ExecStart=/usr/local/mysql/bin/mysqld --defaults-file=/etc/my.cnf
LimitNOFILE = 5000
#Restart=on-failure
#RestartPreventExitStatus=1
#PrivateTmp=false
这里的
[Service]
User=mysql
Group=mysql,
user 和 group 这边的 mysql 是指的什么?centos 的登录用户名?还是其他呢?

CREATING AN INSTALLER FOR JITSI
CREATING AN INSTALLER FOR JITSI
Creating an OS specific installer for Jitsi (or any other Java application for that matter) consists in packaging all necessary binaries in a single installation package, which could be an archive, an executable, or both. The task also includes defining a set of steps (often in a script) that would need to be executed on a host machine when the application is installed so that it is properly configured for its first launch. These steps generally include things like setting the classpath, choosing a Java virtual machine or making sure that the executable is in the OS $PATH variable.
This tutorial goes over details that one would need to know in order to build an installation package for Jitsi by only using its sources. It tells you how you should be executing it, which libs and bundles you should be including in your distribution package and indicates those that you should not.
The tutorial assumes that before trying to build the installer, the user would have succeeded to build that application (by executing “ant build” in the project directory).
1. FILES YOU SHOULD INCLUDE (AND FILES YOU SHOULD NOT)
We’ve tried to keep the task of determining the necessary file set relatively simple, so that package maintainers don’t have to update there installer generator scripts all too often.
Basically there are three types of files that you have to get. Bundles (these are the Jitsi modules), library jars, and native libs. The first two (bundles and library jars), although containin java code only, may in some cases be suitable for a single operating system.
Let’s see this in more detail:
-
First of all. you’d need to get all jars located inside sip-communicator/sc-bundles (except the *-slick.jar files as they only contain unit tests) and place them in a directory their own inside your destination install dir (if this directory is not named sc-bundles, you’d have to modify “felix.client.run.properties” and update their corresponding bundle locations).
Retrieve all bundles located in sip-communicator/sc-bundles/os-specific/osname, where osname is the name of the operating system that your installer is targeting. Bundles that get built in these directories are meant to only run on the corresponding operating system.
All jars located in sip-communicator/lib correspond to libraries that should ship with the installer and that should be added to the classpath when the application is being run.
All jars in sip-communicator/lib/os-specific/osname represent libs that should ship with installers for the corresponding operating system. ATTN!! be careful not to include jars located in sip-communicator/lib/os-specific/osname/installer-exclude since they are most probably included in the bundles that use them
All files under sip-communicator/lib/native/osname represent native libs for a particular operating system. You should include in your installer those that correspond to your target OS and make sure that they are in the right location when the application is being launched (e.g. on Linux, the directory that contains them has to be added to the LD_LIBRARY_PATH variable, on Windows - the PATH variable, and on MAC - DYLD_LIBRARY_PATH)
2. EXECUTING
A somehow unusual thing about Jitsi, is the fact that it doesn’t have its own main() method. In order to run it, one needs to launch the Felix OSGi implementation and tell it to load all Jitsi modules.
One of the ways to run Felix itself is by calling the main() method of org.apache.felix.main.Main. This gives you:
#java org.apache.felix.main.MainThat alone would only run Felix but it would do nothing to start Jitsi. For that you need to set a Java system property and make it point to our felix.client.run.properties file that you can find in the lib directory of the sip-communicator project. The file, among other things, contains the list of all OSGi bundles that Felix needs to load in order to start Jitsi. Here’s how you tell Felix where to look for this file:
 #java -Dfelix.config.properties=file:/usr/share/sip-communicator/lib/felix.client.run.properties \
       org.apache.felix.main.Main
The above line assumes, of course, that felix.client.run.properties is located under the /usr/share/sip-communicator/lib directory at the time you are launching the application.
One other property that you would have to pass to the virtual machine upon launch is the logging configuration. Like felix.client.run.properties, our log config file is also in the lib directory of the sip-communicator project and its name is logging.properties. This means you’d need to add the following to your launch command:
 #java -Dfelix.config.properties=file:/usr/share/sip-communicator/lib/felix.client.run.properties \
       -Djava.util.logging.config.file=/usr/share/sip-communicator/lib/logging.properties \
       org.apache.felix.main.Main
You should also add to the classpath all library jars that Jitsi needs and does not include in the OSGi bundles. We mentioned these jars in the previous section. You would have to enumerate all of them in the classpath property of your run command:
#java -Dfelix.config.properties=file:/usr/share/sip-communicator/lib/felix.client.run.properties \ -Djava.util.logging.config.file=/usr/share/sip-communicator/lib/logging.properties \ -classpath "/usr/share/lib/jdic_stub.jar:/usr/.../util.jar" org.apache.felix.main.Main
Note that the exact location of the libraries depends on the location where your installer would place them.
You may of course have to add other properties (e.g. java.library.path) in order to tune the installation package and make it work on the destination operating system, but these depend on the cases and are outside the scope of this tutorial (and besides it’s getting late here and I want to go to bed).
6. JAVA VM DEPENDENCIES
In order to run Jitsi, users would need a locally installed Java Runtime Environment, and it is the responsibility of the installer to make sure that a compatible JRE exists on the user machine. There are three approaches you may choose when dealing with this issue:
-
Dependency - If the packaging system that you are using allows it (e.g. like Debian’s dpkg and apt-get do), then this is probably the best option, as it only consists in indicating that installing your package requires installation of the package containing SUN’s JRE.
Include the JRE in the Jitsi installation package. This is what we do in the Windows and generic Linux installers. The solution is quite clumsy since it implies adding a hefty amount of binaries to your installer but it is far better than simply dropping our application and risking lack of any JRE on the host machine.
Try to detect an installed JRE and point the user to a download URL in case detection fails. This should be a last resort since requiring a user to install a JRE on their own would be quite an obstacle for quite many people.
7. REFERENCES
Hope the tutorial has been clear enough to at least get you started with your installer. In case you could find a lot of examples in the existing installers and the project build.xml:
build.xml
Debian installer generator scripts (used by the ant “deb” target ).
Mac OS X DMG generator scripts (used by the ant “macosx” target)
IzPack installers

installer – Inno Setup中的函数指针
解决方法
type
  TStrProc =  procedure (const AStr: String);

procedure Call(const AProc: TStrProc; const AStr: String);
begin
  AProc(AStr);
end;

procedure ShowStr(const AStr: String);
begin
  MsgBox(AStr,mbinformation,MB_OK);
end;

function InitializeSetup(): Boolean;
begin
  Call(@ShowStr,'Hello World!');
end;
BTW:Inno Setup使用the Pascal Script engine from RemObjects.也许你可以在那里找到更多信息.
今天关于MySQL Installer 5.5.15 GA 发布的讲解已经结束,谢谢您的阅读,如果想了解更多关于64位Windows7安装MySQL社区版(community)5.7.23(mysql-installer-community-5.7.23.0.msi)、centos7 设置 mysql 自启动的配置文件中 [Service] User=mysql Group=mysql,user 和 group 这边的 mysql 是指的什么?centos 的登录用户名?、CREATING AN INSTALLER FOR JITSI、installer – Inno Setup中的函数指针的相关知识,请在本站搜索。
本文标签:


![[转帖]Ubuntu 安装 Wine方法(ubuntu如何安装wine)](https://www.gvkun.com/zb_users/cache/thumbs/4c83df0e2303284d68480d1b1378581d-180-120-1.jpg)

