最近很多小伙伴都在问mysql表与表之间数据的转移和mysql表与表之间怎么关联这两个问题,那么本篇文章就来给大家详细解答一下,同时本文还将给你拓展8.使用Elequent建立表与表之间的关系、egg
最近很多小伙伴都在问mysql表与表之间数据的转移和mysql表与表之间怎么关联这两个问题,那么本篇文章就来给大家详细解答一下,同时本文还将给你拓展8. 使用Elequent建立表与表之间的关系、egg学习笔记第二十天:关系型数据库表与表之间的几种关系、hive中子查询 表与表之间的连接、laravel入门教程之表与表之间的关系等相关知识,下面开始了哦!
本文目录一览:- mysql表与表之间数据的转移(mysql表与表之间怎么关联)
- 8. 使用Elequent建立表与表之间的关系
- egg学习笔记第二十天:关系型数据库表与表之间的几种关系
- hive中子查询 表与表之间的连接
- laravel入门教程之表与表之间的关系
")
mysql表与表之间数据的转移(mysql表与表之间怎么关联)
1.相同表结构
INSERT INTO table1 SELECT * FROM table2;
2.不同表结构
INSERT INTO table1(filed1,...,filedn) SELECT table2.filed1,table2.filedn FROM table2;
3.如果是不同数据库之间,参考以下:
INSERT into db_ds_edu.t_exam_student(stu_id,stu_number,stu_name,school_id,campus_id,grade_id,class_id,xuebu_id) SELECT stu.id ,stu.student_num ,person.name ,stu.school_id ,stu.campus_id ,stu.grade_id ,stu.clas_id ,stu.xuebu_id FROM db_ds.t_stu_info AS stu ,db_ds.t_p_person_info as person WHERE stu.person_id = person.id --------------------- 作者:清无时空 来源:CSDN 原文:https://blog.csdn.net/sinat_34439107/article/details/70214335 版权声明:本文为博主原创文章,转载请附上博文链接!

8. 使用Elequent建立表与表之间的关系
从零开始学Laravel目录
Eloquent提供了一个易于阅读且很形象化的表和表之间的关系对应和调用,比如说,一条评论是属于一个帖子的,一个帖子拥有很多的评论,一篇帖子和一个视频页同时拥有很多标签,下面我们来看看如何创建这些关系。
我们就以一篇帖子有很多的评论来举列,帖子和评论是一对多的关系,我们上一节已经建立了帖子的表posts, 下面我们来建立评论表comments和评论的ModelComment, 在上一节我们是通过下面两条命令来建立migration文件和Model的
// 建立帖子的migration文件
php artisan make:migration create_posts_table --create=posts

// 建立帖子Model
php artisan make:model Post我们在建立评论表和模型的时候,用另一种方法,我们在建立Model的时候,只要加上-m参数,就能在建立Model的时候,同时生成migration文件了。(执行php artisan命令都是需要进入到项目的根目录下执行的,以后我就不说这点了)
➜ php artisan make:model Comment -m
Model created successfully.
Created Migration: 2016_11_14_125930_create_comments_table
从上面我们可以看出,我们创建模型的时候,laravel也帮我们生成了表名为模型名复数的migration文件,我们打开这个migration文件,并更改up()函数如下:
    public function up()
    {
        Schema::create(''comments'', function (Blueprint $table) {
            $table->increments(''id'');
            $table->integer(''post_id'')->unsigned()->index();
            $table->text(''content'');
            $table->timestamps();
        });
}上面的post_id是posts表的外键,在正式开发的时候,我们需要做到外键约束,同时做到删除的及联操作,这里我们先不添加了。我们将这个表执行到数据库中
➜ php artisan migrate
Migrated: 2016_11_14_125930_create_comments_table现在在我们的app目录下,我们已经有了Post.php和Comment.php两个模型,下面我们打开tinker
➜ php artisan tinker
Psy Shell v0.7.2 (PHP 7.0.12 — cli) by Justin Hileman
>>> 以下的代码都在tinker中执行生成,我们先来获取第一条帖子数据:
>>> $post = App\Post::first();
=> App\Post {#636
     id: "1",
     title: "My New Post Title",
     content: "new post content",
     created_at: "2016-11-14 07:22:32",
     updated_at: "2016-11-14 07:22:32",
   }
我们再来创建属于帖子1的一条评论,我们这次创建先手动的来维护外键(post_id):
>>> $comment = new App\Comment;
=> App\Comment {#625}

>>> $comment->content = ''Some comment for the post'';
=> "Some comment for the post"

>>> $comment->post_id = 1;
=> 1

>>> $comment->save();
=> true

>>> App\Comment::all();
=> Illuminate\Database\Eloquent\Collection {#640
     all: [
       App\Comment {#641
         id: "1",
         post_id: "1",
         content: "Some comment for the post",
         created_at: "2016-11-15 01:07:53",
         updated_at: "2016-11-15 01:07:53",
       },
     ],
   }
>>> 下面我们来通过Eloquent在各模型间建立表与表之间的对应关系,首先我们先理一下,一个帖子会有很多评论,A post has many comments, 一个评论属于一个帖子:a comment that belongs to a post,我们打开Post.php,编写一个comments()函数,意思是一个帖子有很多评论,所以注意这个comments()一定要写成复数形式,写代码单词的单复数对于易读性来说非常的重要。
<?php

namespace App;

use Illuminate\Database\Eloquent\Model;

class Post extends Model
{
    public function comments()
    {
        return $this->hasMany(''App\Comment'');
    }
}好的,我们再进入到tinker中来测试下:
我们先拿到第一个帖子:
>>> $post = App\Post::first();
=> App\Post {#636
     id: "1",
     title: "My New Post Title",
     content: "new post content",
     created_at: "2016-11-14 07:22:32",
     updated_at: "2016-11-14 07:22:32",
}我们拿取这个帖子的所有评论,我们可以这么写$post->comments()->get(),也可以这么写$post->comments;, 后面这种写法,laravel文档叫它动态属性。
>>> $post->comments;
=> Illuminate\Database\Eloquent\Collection {#633
     all: [
       App\Comment {#637
         id: "1",
         post_id: "1",
         content: "Some comment for the post",
         created_at: "2016-11-15 01:07:53",
         updated_at: "2016-11-15 01:07:53",
       },
     ],
   }
用上面的方法拿出的数据其实是Comment对象的一个集合(Collection),我们可以像操作数组一样的操作这个集合,如:
>>> $post->comments[0];
=> App\Comment {#637
     id: "1",
     post_id: "1",
     content: "Some comment for the post",
     created_at: "2016-11-15 01:07:53",
     updated_at: "2016-11-15 01:07:53",
   }
当然,开发的时候很少像上面这么做,因为Laravel给我们提供了很多关于操作这个集合的方法,比如说,取集合中的第一个对象:
>>> $post->comments->first();
=> App\Comment {#637
     id: "1",
     post_id: "1",
     content: "Some comment for the post",
     created_at: "2016-11-15 01:07:53",
     updated_at: "2016-11-15 01:07:53",
    }
这里有一个非常重要的地方,我们来尝试下面这条语句:
>>> $post->comments()->first();
=> App\Comment {#651
     id: "1",
     post_id: "1",
     content: "Some comment for the post",
     created_at: "2016-11-15 01:07:53",
     updated_at: "2016-11-15 01:07:53",
}我们看到$post->comments->first();和$post->comments()->first();这两条语句输出的结果是一样的,但是具体的操作却不同,我们假设帖子1有500条评论,那么$post->comments->first();会先通过$post->comments从数据库拿到这500条评论的数据放进集合,然后再从集合中获取第一条数据。而$post->comments()->first();呢,当执行到$post->comments()时,它并没有拿出这500条数据,这里还处于一个查询的阶段,等到执行first()时,从数据库只拿出一条数据,我们应该使用哪种写法,大家应该就很明白了。曾有人说不要用ORM,太慢,但是很多慢的原因不在于ORM, 而是不了解它,没用好而已。
我们再看看这两条语句执行的原生SQL语句,我们在tinker中让每次执行语句的时候都打印出原生的SQL,可以这么做:
➜ php artisan tinker
Psy Shell v0.7.2 (PHP 7.0.12 — cli) by Justin Hileman
>>> DB::listen(function ($query) { var_dump($query->sql); });
=> null
我们再来拿第一个帖子:
>>> $post = App\Post::first();
string(29) "select * from "posts" limit 1"
=> App\Post {#637
     id: "1",
     title: "My New Post Title",
     content: "new post content",
     created_at: "2016-11-14 07:22:32",
     updated_at: "2016-11-14 07:22:32",
   }
>>>
拿帖子的所有评论,自己看下sql语句:
>>> $post->comments;
string(92) "select * from "comments" where "comments"."post_id" = ? and "comments"."post_id" is not null"
=> Illuminate\Database\Eloquent\Collection {#623
     all: [
       App\Comment {#638
         id: "1",
         post_id: "1",
         content: "Some comment for the post",
         created_at: "2016-11-15 01:07:53",
         updated_at: "2016-11-15 01:07:53",
},我们再来执行一次$post->comments;
>>> $post->comments;
=> Illuminate\Database\Eloquent\Collection {#623
     all: [
       App\Comment {#638
         id: "1",
         post_id: "1",
         content: "Some comment for the post",
         created_at: "2016-11-15 01:07:53",
         updated_at: "2016-11-15 01:07:53",
       },
     ],
}我们发现这次没有出现SQL语句,那是因为laravel已经缓存了这次查询的结果,我们再来看下$post的结果,它也被缓存了,并且我们查询的$post->comments的内容也被插入到这个对象中。
>>> $post
=> App\Post {#637
     id: "1",
     title: "My New Post Title",
     content: "new post content",
     created_at: "2016-11-14 07:22:32",
     updated_at: "2016-11-14 07:22:32",
     comments: Illuminate\Database\Eloquent\Collection {#623
       all: [
         App\Comment {#638
           id: "1",
           post_id: "1",
           content: "Some comment for the post",
           created_at: "2016-11-15 01:07:53",
           updated_at: "2016-11-15 01:07:53",
         },
       ],
     },
}如果我们刷新获取下$post,在打印$post, 大家在看下结果:
>>> $post = $post->fresh();
string(44) "select * from "posts" where "id" = ? limit 1"
=> App\Post {#643
     id: "1",
     title: "My New Post Title",
     content: "new post content",
     created_at: "2016-11-14 07:22:32",
     updated_at: "2016-11-14 07:22:32",
   }

>>> $post
=> App\Post {#643
     id: "1",
     title: "My New Post Title",
     content: "new post content",
     created_at: "2016-11-14 07:22:32",
     updated_at: "2016-11-14 07:22:32",
}因为laravel会缓存查询,所以大家在测试的时候一定要加上fresh()才能准确,我们来看$post->comments->first(),执行的时候要加上fresh(),这非常的重要,千万不要做了错误的测试误导了你。
>>> $post->fresh()->comments->first();
string(44) "select * from "posts" where "id" = ? limit 1"
string(92) "select * from "comments" where "comments"."post_id" = ? and "comments"."post_id" is not null"
=> App\Comment {#630
     id: "1",
     post_id: "1",
     content: "Some comment for the post",
     created_at: "2016-11-15 01:07:53",
     updated_at: "2016-11-15 01:07:53",
   }
看上面的第二条SQL语句,它是查询出数据库的所有的评论。
我们在来看$post->comments()->first()这条语句:
>>> $post->fresh()->comments()->first();
string(44) "select * from "posts" where "id" = ? limit 1"
string(100) "select * from "comments" where "comments"."post_id" = ? and "comments"."post_id" is not null limit 1"
=> App\Comment {#644
     id: "1",
     post_id: "1",
     content: "Some comment for the post",
     created_at: "2016-11-15 01:07:53",
     updated_at: "2016-11-15 01:07:53",
   }
我们看第2条SQL语句,用这种写法,只会从数据库拿出1条记录,这里我说这么多,是因为我看见很多人在滥用动态属性,所以我们一定要注意这点。
好了,我们现在看看在Comment模型中如何写对应的关系呢?拿出之前我们写的英文句子:a comment that belongs to a post, 我们打开Comment.php,
<?php

namespace App;

use Illuminate\Database\Eloquent\Model;

class Comment extends Model
{
    // 注意这里post应该是单数形式
    public function post()
    {
       return $this->belongsTo(''App\Post'');

        // 如果你使用的是PhpStrom编辑器,你也可以按下面这么写,这样点击可以跳转到对应的类文件中
        // return $this->belongsTo(Post::class);
    }
}我们重新打开tinker, 当你修改了代码后,要重新打开tinker再测试,否则tinker执行的还是修改前的代码:
>>> $comment = App\Comment::first();
=> App\Comment {#636
     id: "1",
     post_id: "1",
     content: "Some comment for the post",
     created_at: "2016-11-15 01:07:53",
     updated_at: "2016-11-15 01:07:53",
   }
>>> $comment->post;
=> App\Post {#637
     id: "1",
     title: "My New Post Title",
     content: "new post content",
     created_at: "2016-11-14 07:22:32",
     updated_at: "2016-11-14 07:22:32",
   }
>>>
下面我们来看下,我们创建一条评论的时候,如何让Eloquent的关联关系给我们自动维护外键:
我们先创建一个$comment对象,设置它的内容:
>>> $comment = new App\Comment;
=> App\Comment {#622}
>>> $comment->content = ''Here is another comment.'';
=> "Here is another comment."
>>> 现在我们不用手动去设置post_id,我们直接找到评论需要属于的post,比如,还是打算让这条评论属于第一个帖子:
>>> $post = App\Post::first();
=> App\Post {#639
     id: "1",
     title: "My New Post Title",
     content: "new post content",
     created_at: "2016-11-14 07:22:32",
     updated_at: "2016-11-14 07:22:32",
}下面我们只需要通过Post的Comments()关联去存储属于它的评论即可,会自动设置$post对象的ID到对应的评论的post_id
>>> $post->comments()->save($comment);
=> App\Comment {#622
     content: "Here is another comment.",
     post_id: 1,
     updated_at: "2016-11-15 02:38:01",
     created_at: "2016-11-15 02:38:01",
     id: 2,
}现在通过$post->comments;查看下,发现已经存在两条评论了。
好了,上面的代码都是在tinker中测试的,我们现在进入了PostsController中,修改下show()函数:
    public function show(Post $post)
    {
        return view(''posts.show'', compact(''post''));
    }
然后建立show.blade.php视图层,输入以下代码:
@extends(''layout'')

@section(''content'')
    <h1>{{ $post->title }}</h1>
    <ul>
        @foreach ($post->comments as $comment)
            <li>{{ $comment->content }}</li>
        @endforeach
    </ul>
@stop
好,我们访问下: http://localhost:8000/posts/1

我们刚才是用save()方法来存储一条评论,现在我们来试试使用create()方法来创建呢! 还是打开tinker

嗯, 出现了匹配异常错位,这是Laravel对使用create()和update()这两个函数做的保护机制,我们知道create()和update()可以批量的设置表字段,如果不做一些保护错位的话,可能会被人通过设置某些字段的值来串改你的数据,所以在Laravel中,你允许批量创建和修改的字段,你都要自己在模型中明确指定,我们打开Comment.php, 为Comment模型添加$fillbale属性:
<?php

namespace App;

use Illuminate\Database\Eloquent\Model;

class Comment extends Model
{
    // 允许使用create()和update()批量创建和更新的字段

    protected $fillable = [''content''];

    public function post()
    {
        return $this->belongsTo(Post::class);
    }
}下面重新启动tinker,在执行一次,就能成功创建了
Psy Shell v0.7.2 (PHP 7.0.12 — cli) by Justin Hileman
>>> $post = App\Post::first();
=> App\Post {#636
     id: "1",
     title: "My New Post Title",
     content: "new post content",
     created_at: "2016-11-14 07:22:32",
     updated_at: "2016-11-14 07:22:32",
   }
>>> $post->comments()->create([''content'' => ''Yet another comment about this post'']);
=> App\Comment {#640
     content: "Yet another comment about this post",
     post_id: 1,
     updated_at: "2016-11-15 03:08:25",
     created_at: "2016-11-15 03:08:25",
     id: 3,
   }
>>> 我们在进入到posts/index.balde.php中,我们给帖子都加上链接:
@extends(''layout'')

@section(''content'')
    <h1>所有的帖子</h1>

    @foreach ($posts as $post)
        <h2><a href="posts/{{ $post->id }}">{{ $post->title }}</a></h2>
        <p>{{ $post->content }}</p>
    @endforeach
@stop加链接有很多方法,也有人会写成一个函数,如<a href="{{ $post->path() }}">, 然后在Post模型层写一个path()函数
public function path()
{
    return ''/posts/'' . $this->id;
}
不过把这个写成函数我认为也没多大必要。好了,本节到这里结束。
Eloquent关联模型的用法大家应该知道了,但是除了一对多关系,还有一对一,多对多,多态一对多等,要用的时候,可以去查这篇文档

egg学习笔记第二十天:关系型数据库表与表之间的几种关系
一、简述关系数据库中表与表的3种关系
1、一对一的关系
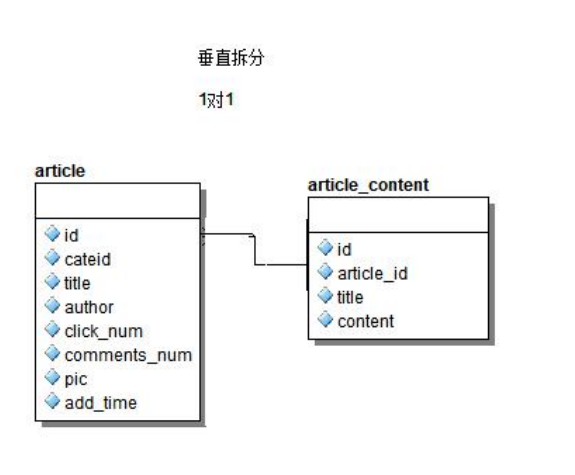
例如:一个人对应一个唯一的身份证号,即为一对一的关系。(文章表和文章详情表)
一个文章对应一个详情,一个详情只属于一个文章,所以是一对一的关系。
2、一对多的关系
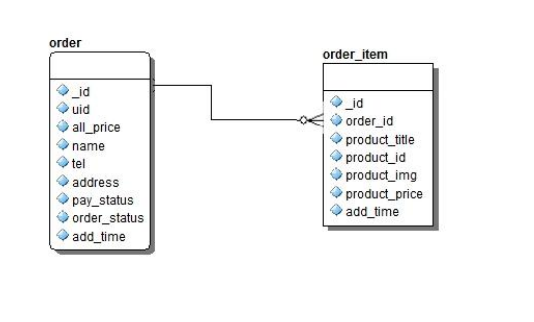
例如:一个班级对应多名学生,即为一对多关系。
订单表和商品表,可能是一对多的关系,一个订单里面可能有多个商品。
3、多对多关系
例如:一个学生可以选多门课程,而同一门课程可以被多个学生选修,彼此的对应关系即是多对多关系。
一个商品可以被多个用户关注,一个用户可以关注多个商品。一般保存信息需要一个中间表。

碎。

hive中子查询 表与表之间的连接
hive的子查询介绍 以及表与表之间的连接 用的比较多的是多表连接
还有能讲下join all

laravel入门教程之表与表之间的关系
首先关于表与表之间的关系
1.一对一
2.一对多
3.多对一
4.多对多
区分父表与子表
1.”一”的是父表
2.”多”的一方是子表
如何处理一对多关系
在子表中建一个字段(外键)指向父表
如何处理多对多关系
建立一张中间表,将”多对多”关系转化为”一对多”
案例分析
表一: 用户表(it_user)
表二: 用户详情表(it_user_info)
表三: 文章表(it_article)
表四: 国家表(it_country)
表五: 用户角色表(it_role)
① 一对一
用户表(表一)与详情表(表二)就是一对一的关系
②一对多
用户表(表一)与文章表(表三)就是一对多的关系
③多对一
用户表(表一)与国家表(表四)就是多对一的关系
④多对多
用户表(表一)与角色表(表五)就是多对多的关系
用户表建表及测试数据
DROP TABLE IF EXISTS `it_user`;
CREATE TABLE `it_user` (
  `id` int(10) unsigned NOT NULL AUTO_INCREMENT COMMENT '主键',
  `name` varchar(64) DEFAULT NULL COMMENT '用户名',
  `password` char(32) DEFAULT NULL COMMENT '密码(不使用md5)',
  `country_id` int(11) DEFAULT NULL,
  PRIMARY KEY (`id`),
  KEY `国家id` (`country_id`)
) ENGINE=MyISAM AUTO_INCREMENT=6 DEFAULT CHARSET=utf8;
-- ----------------------------
-- Records of it_user
-- ----------------------------
INSERT INTO `it_user` VALUES ('1', 'xiaoming', '123456', '1');
INSERT INTO `it_user` VALUES ('2', 'xiaomei', '123456', '1');
INSERT INTO `it_user` VALUES ('3', 'xiaoli-new', '123', '1');
用户详情表建表及测试数据
-- ----------------------------
-- Table structure for it_user_info
-- ----------------------------
DROP TABLE IF EXISTS `it_user_info`;
CREATE TABLE `it_user_info` (
  `user_id` int(11) NOT NULL AUTO_INCREMENT,
  `tel` char(11) DEFAULT NULL,
  `email` varchar(128) DEFAULT NULL,
  `addr` varchar(255) DEFAULT NULL,
  PRIMARY KEY (`user_id`)
) ENGINE=MyISAM AUTO_INCREMENT=4 DEFAULT CHARSET=utf8;
-- ----------------------------
-- Records of it_user_info
-- ----------------------------
INSERT INTO `it_user_info` VALUES ('1', '13012345678', 'xiaoming@163.com', '北京');
INSERT INTO `it_user_info` VALUES ('2', '15923456789', 'xiaomei@163.com', '上海');
INSERT INTO `it_user_info` VALUES ('3', '18973245670', 'xiaoli@163.com', '武汉');
文章表建表及测试数据
-- ----------------------------
-- Table structure for it_article
-- ----------------------------
DROP TABLE IF EXISTS `it_article`;
CREATE TABLE `it_article` (
  `id` int(11) NOT NULL AUTO_INCREMENT,
  `title` varchar(255) DEFAULT NULL,
  `content` text,
  `user_id` int(11) DEFAULT NULL,
  PRIMARY KEY (`id`),
  KEY `user_id` (`user_id`)
) ENGINE=MyISAM AUTO_INCREMENT=4 DEFAULT CHARSET=utf8;
-- ----------------------------
-- Records of it_article
-- ----------------------------
INSERT INTO `it_article` VALUES ('1', '世界那么大,我想去看看', '钱包那么小,总是不够', '1');
INSERT INTO `it_article` VALUES ('2', '我想撞角遇到爱', '却是碰到鬼', '2');
INSERT INTO `it_article` VALUES ('3', '哈哈哈哈', '嘻嘻嘻嘻', '1');
国家表建表及测试数据
-- ----------------------------
-- Table structure for it_country
-- ----------------------------
DROP TABLE IF EXISTS `it_country`;
CREATE TABLE `it_country` (
  `id` int(11) NOT NULL AUTO_INCREMENT,
  `name` varchar(255) DEFAULT NULL,
  PRIMARY KEY (`id`)
) ENGINE=MyISAM AUTO_INCREMENT=3 DEFAULT CHARSET=utf8;
-- ----------------------------
-- Records of it_country
-- ----------------------------
INSERT INTO `it_country` VALUES ('1', '中国');
INSERT INTO `it_country` VALUES ('2', '美国');
用户角色表建表及测试数据
-- ----------------------------
-- Table structure for it_role
-- ----------------------------
DROP TABLE IF EXISTS `it_role`;
CREATE TABLE `it_role` (
  `id` int(11) NOT NULL AUTO_INCREMENT,
  `name` varchar(255) DEFAULT NULL,
  PRIMARY KEY (`id`)
) ENGINE=MyISAM AUTO_INCREMENT=5 DEFAULT CHARSET=utf8;
-- ----------------------------
-- Records of it_role
-- ----------------------------
INSERT INTO `it_role` VALUES ('1', '开发');
INSERT INTO `it_role` VALUES ('2', '测试');
INSERT INTO `it_role` VALUES ('3', '管理');
用户和角色中间表表建表及测试数据
-- ----------------------------
-- Table structure for it_user_role
-- ----------------------------
DROP TABLE IF EXISTS `it_user_role`;
CREATE TABLE `it_user_role` (
  `user_id` int(11) DEFAULT NULL,
  `role_id` int(11) DEFAULT NULL,
  KEY `role_id` (`role_id`),
  KEY `user_id` (`user_id`)
) ENGINE=MyISAM DEFAULT CHARSET=utf8;
-- ----------------------------
-- Records of it_user_role
-- ----------------------------
INSERT INTO `it_user_role` VALUES ('1', '1');
INSERT INTO `it_user_role` VALUES ('1', '2');
INSERT INTO `it_user_role` VALUES ('1', '3');
INSERT INTO `it_user_role` VALUES ('2', '1');
INSERT INTO `it_user_role` VALUES ('3', '2');
准备工作
1、规划路由
在routes/web.php下写如下路由:
//ORM的关联关系
Route::get('/orm/relation/{mode}','ORM\UserController@relation');2、在App/Http/Controllers/ORM/UserController.php编写relation方法
    public function relation($mode)
    {
        switch ($mode){
            case '1_1':
            {
                //一对一
            }
            break;
            case '1_n':
            {
                //一对多
            }
                break;
            case 'n_1':
            {
                //多对一
            }
                break;
            case 'n_n':
            {
                //多对多
            }
                break;
            default;
        }
}3、安装debug调试工具
3.1使用composer命令安装
composer require barryvdh/laravel-debugbar
3.2、修改config/app.php文件,加载debugbar到
Barryvdh\Debugbar\ServiceProvider::class,
除了安装debugbar调试工具外,也可以使用查询监听:编providers/AppServiceProvider.php的boot方法中加入如下代码
\DB::listen(function ($query) {
var_dump($query->sql);
var_dump($query->bindings);
echo '<br>';
});也可以打印出执行的sql语句。
一对一
1、创建Userinfo模型对象
进入cmd命令行进入laravel项目所在目录执行以下命令
php artisan make:model Userinfo
会在App目录下生成Userinfo.php
2、编辑Userinfo模型文件
<?php
namespace App;
use Illuminate\Database\Eloquent\Model;
class Userinfo extends Model
{
protected $table = 'user_info';
protected $primaryKey = 'user_id';
protected $fillable = ['user_id','tel','email','addr'];
public $timestamps = false;
}3、编写UserModel, 加入一对一方法
<?php
namespace App;
use Illuminate\Database\Eloquent\Model;
class UserModel extends Model
{
protected $table = 'user';//真是表名
protected $primaryKey = 'id';//主键字段,默认为id
protected $fillable = ['name','password'];//可以操作的字段
public $timestamps = false;//如果数据表中没有created_at和updated_id字段,则$timestamps则可以不设置,
默认为true
public function Userinfo()
{
/*
* @param [string] [name] [需要关联的模型类名]
* @param [string] [foreign] [参数一指定数据表中的字段]
* */
return $this->hasOne('App\Userinfo','user_id');
}4、编写UserController, 调用一对一方法
    public function relation($mode)
    {
        switch ($mode){
            case '1_1':
            {
                //一对一
                $data = UserModel::find(1)->Userinfo()->get();
                dd($data);
            }
            break;
            default;
        }
}一对多
1、创建article模型对象
执行命令
php artisan make:model Article
在app下生成Article.php文件
2、编写article模型文件
<?php
namespace App;
use Illuminate\Database\Eloquent\Model;
class Article extends Model
{
protected $table = 'article';
protected $primaryKey = 'id';
protected $fillable = ['id','title','content','user_id'];
public $timestamps = false;
}3、编写UserModel, 加入一对多方法
public function Artice()
    {
        return $this->hasMany('App\Article','User_id');
}4、编写UserController,调用一对多方法
    public function relation($mode)
    {
        switch ($mode){
            case '1_1':
            {
                //一对一
                $data = UserModel::find(1)->Userinfo()->get();
                dd($data);
            }
            break;
            case '1_n':
            {
                //一对多
                $data = UserModel::find(1)->Artice()->get();
                dd($data);
            }
                break;
            default;
        }
    }
}多对一
1、创建country模型对象
执行命令
php artisan make:model Country
2、编写country模型文件
<?php
namespace App;
use Illuminate\Database\Eloquent\Model;
class Country extends Model
{
protected $table = 'country'; //真实表名
protected $primaryKey = "id"; //主键id
protected $fillable = ['id','name']; //允许操作的字段
public $timestamps = false; //如果数据表中没有created_at和updated_id字段,则$timestamps则可以不设置,
默认为true
}3、编写UserModel, 加入多对一方法
public function Country()
{
    return $this->belongsTo('App\Country','country_id');
}4、编写UserController, 调用方法
public function relation($mode)
    {
        switch ($mode){
            case '1_1':
            {
                //一对一
                $data = UserModel::find(1)->Userinfo()->get();
                dd($data);
            }
            break;
            case '1_n':
            {
                //一对多
                $data = UserModel::find(1)->Artice()->get();
                dd($data);
            }
                break;
            case 'n_1':
            {
                //多对一
                $data = UserModel::find(1)->Country()->get();
                dd($data);
            }
                break;
            default;
        }
    }
}多对多
1、创建role模型对象
执行命令
php artisan make:model Role
执行命令
php artisan make:model User_role
2、编写Role模型
<?php
namespace App;
use Illuminate\Database\Eloquent\Model;
class Role extends Model
{
protected $table = 'role';
protected $primaryKey = "id";
protected $fillable = ['name'];
public $timestamps =false;
}编写User_role模型
因为表中没有主键字段,所以需要两个字段即可
<?php
namespace App;
use Illuminate\Database\Eloquent\Model;
class User_role extends Model
{
protected $table = 'user_role';
public $timestamps =false;
}3、编写UserModel, 加入多对多方法
    public function Role(){
        /*
         * 第一个参数:要关联的表对应的类
         * 第二个参数:中间表的表名
         * 第三个参数:当前表跟中间表对应的外键
         * 第四个参数:要关联的表跟中间表对应的外键
         * */
        return $this->belongsToMany('App\Role','user_role','user_id','role_id');
}4、编写UserController, 调用多对多方法
public function relation($mode)
{
    switch ($mode){
        case '1_1':
        {
            //一对一
            $data = UserModel::find(1)->Userinfo()->get();
            dd($data);
        }
        break;
        case '1_n':
        {
            //一对多
            $data = UserModel::find(1)->Artice()->get();
            dd($data);
        }
            break;
        case 'n_1':
        {
            //多对一
            $data = UserModel::find(1)->Country()->get();
            dd($data);
        }
            break;
        case 'n_n':
        {
            //多对多
           $data = UserModel::find(2)->Role()->get();
           dd($data);
        }
            break;
        default;
    }
}总结:
1、一对一使用方法:hasOne()
2、一对多使用方法:hasMany()
3、多对一使用方法:belongsTo()
4、多对多使用方法:belongsToMany()
PHP中文网,大量的免费laravel入门教程,欢迎在线学习!
本文转自:https://blog.csdn.net/weixin_38112233/article/details/79220535
以上就是
今天的关于mysql表与表之间数据的转移和mysql表与表之间怎么关联的分享已经结束,谢谢您的关注,如果想了解更多关于8. 使用Elequent建立表与表之间的关系、egg学习笔记第二十天:关系型数据库表与表之间的几种关系、hive中子查询 表与表之间的连接、laravel入门教程之表与表之间的关系的相关知识,请在本站进行查询。
本文标签:


![[转帖]Ubuntu 安装 Wine方法(ubuntu如何安装wine)](https://www.gvkun.com/zb_users/cache/thumbs/4c83df0e2303284d68480d1b1378581d-180-120-1.jpg)

