如果您想了解SQL数据库增删改查基本语句和sql数据库增删改查基本语句的知识,那么本篇文章将是您的不二之选。我们将深入剖析SQL数据库增删改查基本语句的各个方面,并为您解答sql数据库增删改查基本语句
如果您想了解SQL 数据库增删改查基本语句和sql数据库增删改查基本语句的知识,那么本篇文章将是您的不二之选。我们将深入剖析SQL 数据库增删改查基本语句的各个方面,并为您解答sql数据库增删改查基本语句的疑在这篇文章中,我们将为您介绍SQL 数据库增删改查基本语句的相关知识,同时也会详细的解释sql数据库增删改查基本语句的运用方法,并给出实际的案例分析,希望能帮助到您!
本文目录一览:- SQL 数据库增删改查基本语句(sql数据库增删改查基本语句)
- Flask对mysql数据库增删改查
- ios Sqlite 数据库增删改查基本操作
- ios Sqlite数据库增删改查基本操作
- jsp 操作 mysql 数据库增删改查
")
SQL 数据库增删改查基本语句(sql数据库增删改查基本语句)
adoquery1.Fielddefs[1].Name; 字段名
dbgrid1.columns[0].width:=10; dbgrid的字段宽度
adoquery1.Fields[i].DataType=ftString 字段类型
update jb_spzl set kp_item_name=upper(kp_item_name) 修改数据库表中某一列为大写
select * from master.dbo.sysobjects ,jm_barcode.dbo.users 多库查询
adotable1.sort:='字段名称 ASC' adotable排序
SQL常用语句一览
sp_password null,'新密码','sa' 修改数据库密码
(1)数据记录筛选:
sql="select * from 数据表 where 字段名=字段值 orderby 字段名 [desc] "
sql="select * from 数据表 where 字段名 like '%字段值%' orderby 字段名 [desc]"
sql="select top10 * from 数据表 where 字段名 orderby 字段名[desc]"
sql="select * from 数据表 where 字段名 in('值1','值2','值3')"
sql="select * from 数据表 where 字段名 between 值1 and 值 2"
(2)更新数据记录:
sql="update 数据表 set 字段名=字段值 where 条件表达式"
sql="update 数据表 set 字段1=值1,字段2=值2……字段n=值n where 条件表达式"
(3)删除数据记录:
sql="delete from 数据表 where 条件表达式"
sql="delete from 数据表 "(将数据表所有记录删除)
(4)添加数据记录:
sql="insert into 数据表(字段1,字段2,字段3…) values(值1,值2,值3…)"
sql="insert into 目标数据表 select * from 源数据表"(把源数据表的记录添加到目标数据表)
(5)数据记录统计函数:
AVG(字段名)得出一个表格栏平均值
COUNT(*|字段名)对数据行数的统计或对某一栏有值的数据行数统计
MAX(字段名)取得一个表格栏*大的值
MIN(字段名)取得一个表格栏*小的值
SUM(字段名)把数据栏的值相加
引用以上函数的方法:
sql="selectsum(字段名)as别名from数据表where条件表达式"
setrs=conn.excute(sql)
用rs("别名")获取统的计值,其它函数运用同上。
(5)数据表的建立和删除:
CREATETABLE数据表名称(字段1类型1(长度),字段2类型2(长度)……)
例:CREATETABLEtab01 (namevarchar (50), datetimedefaultnow ())
DROPTABLE数据表名称(**性删除一个数据表)
4.记录集对象的方法:
rs.movenext将记录指针从当前的位置向下移一行
rs.moveprevious将记录指针从当前的位置向上移一行
rs.movefirst将记录指针移到数据表*行
rs.movelast将记录指针移到数据表*后一行
rs.absoluteposition=N将记录指针移到数据表第N行
rs.absolutepage=N将记录指针移到第N页的*行
rs.pagesize=N设置每页为N条记录
rs.pagecount根据pagesize的设置返回总页数
rs.recordcount返回记录总数
rs.bof返回记录指针是否超出数据表首端,true表示是,false为否
rs.eof返回记录指针是否超出数据表末端,true表示是,false为否
rs.delete删除当前记录,但记录指针不会向下移动
rs.addnew添加记录到数据表末端
rs.update更新数据表记录
SQL语句的添加、删除、修改虽然有如下很多种方法,但在使用过程中还是不够用,不知是否有高手把更多灵活的使用方法贡献出来?
添加、删除、修改使用db.Execute(Sql)命令执行操作
ㄘ------------------------ㄛ
☆ 数据记录筛选 ☆
ㄞ------------------------ㄡ
注意:单双引号的用法可能有误(没有测式)
Sql = "Select Distinct 字段名 From 数据表"
Distinct函数,查询数据库存表内不重复的记录
Sql = "Select Count(*) From 数据表 where 字段名1>#18:0:0# and 字段名1< #19:00# "
count函数,查询数库表内有多少条记录,“字段名1”是指同一字段
例:
set rs=conn.execute("select count(id) as idnum from news")
response.write rs("idnum")
sql="select * from 数据表 where 字段名 between 值1 and 值2"
Sql="select * from 数据表 where 字段名 between #2003-8-10# and #2003-8-12#"
在日期类数值为2003-8-10 19:55:08 的字段里查找2003-8-10至2003-8-12的所有记录,而不管是几点几分。
select * from tb_name where datetime between #2003-8-10# and #2003-8-12#
字段里面的数据格式为:2003-8-10 19:55:08,通过sql查出2003-8-10至2003-8-12的所有纪录,而不管是几点几分。
Sql="select * from 数据表 where 字段名=字段值 order by 字段名 [desc]"
Sql="select * from 数据表 where 字段名 like '%字段值%' order by 字段名 [desc]"
模糊查询
Sql="select top 10 * from 数据表 where 字段名 order by 字段名 [desc]"
查找数据库中前10记录
Sql="select top n * form 数据表 order by newid()"
随机取出数据库中的若干条记录的方法
top n,n就是要取出的记录数
Sql="select * from 数据表 where 字段名 in ('值1','值2','值3')"
ㄘ----------------ㄛ
☆ 添加数据记录 ☆
ㄞ----------------ㄡ
sql="insert into 数据表 (字段1,字段2,字段3 …) valuess (值1,值2,值3 …)"
sql="insert into 数据表 valuess (值1,值2,值3 …)"
不指定具体字段名表示将按照数据表中字段的顺序,依次添加
sql="insert into 目标数据表 select * from 源数据表"
把源数据表的记录添加到目标数据表
ㄘ----------------ㄛ
☆ 更新数据记录 ☆
ㄞ----------------ㄡ
Sql="update 数据表 set 字段名=字段值 where 条件表达式"
Sql="update 数据表 set 字段1=值1,字段2=值2 …… 字段n=值n where 条件表达式"
Sql="update 数据表 set 字段1=值1,字段2=值2 …… 字段n=值n "
没有条件则更新整个数据表中的指定字段值
ㄘ----------------ㄛ
☆ 删除数据记录 ☆
ㄞ----------------ㄡ
Sql="delete from 数据表 where 条件表达式"
Sql="delete from 数据表"
没有条件将删除数据表中所有记录)
ㄘ--------------------ㄛ
☆ 数据记录统计函数 ☆
ㄞ--------------------ㄡ
AVG(字段名) 得出一个表格栏平均值
COUNT(*|字段名) 对数据行数的统计或对某一栏有值的数据行数统计
MAX(字段名) 取得一个表格栏*大的值
MIN(字段名) 取得一个表格栏*小的值
SUM(字段名) 把数据栏的值相加
引用以上函数的方法:
sql="select sum(字段名) as 别名 from 数据表 where 条件表达式"
set rs=conn.excute(sql)
用 rs("别名") 获取统的计值,其它函数运用同上。
ㄘ----------------------ㄛ
☆ 数据表的建立和删除 ☆
ㄞ----------------------ㄡ
CREATE TABLE 数据表名称(字段1 类型1(长度),字段2 类型2(长度) …… )
例:CREATE TABLE tab01(name varchar(50),datetime default now())
DROP TABLE 数据表名称 (**性删除一个数据表)
ㄘ--------------------ㄛ
☆ 记录集对象的方法 ☆
ㄞ--------------------ㄡ
rs.movenext 将记录指针从当前的位置向下移一行
rs.moveprevious 将记录指针从当前的位置向上移一行
rs.movefirst 将记录指针移到数据表*行
rs.movelast 将记录指针移到数据表*后一行
rs.absoluteposition=N 将记录指针移到数据表第N行
rs.absolutepage=N 将记录指针移到第N页的*行
rs.pagesize=N 设置每页为N条记录
rs.pagecount 根据 pagesize 的设置返回总页数
rs.recordcount 返回记录总数
rs.bof 返回记录指针是否超出数据表首端,true表示是,false为否
rs.eof 返回记录指针是否超出数据表末端,true表示是,false为否
rs.delete 删除当前记录,但记录指针不会向下移动
rs.addnew 添加记录到数据表末端
rs.update 更新数据表记录
%:代表任意长的一段字符 _ :代表一个字符 [a,b,c,d]:a、b、c、d中的任意一个 [^a,b,c,d]:不在a、b、c、d中的任意一个
本文章网址:http://www.ppssdd.com/code/1672.html。转载请保留出处,谢谢合作!
Flask对mysql数据库增删改查
from flask_sqlalchemy import SQLAlchemy
db = SQLAlchemy()
增加
1、创建模型对象并赋值
user = User()
user.username = ''zhangsan''
user.password = ''123456''
2、将对象提交到会话 注:这里的会话不是 Flask 的会话,而是 Flask-SQLAlchemy 的会话。它本质上是一个 数据库事务的加强版本。
db.session.add(user)
3、提交会话
db.session.commit()
删除
与增加类似,将add()替换为commit()
db.session.delete(me)
db.session.commit()
修改
根据主键或其他条件找到对应的用户
user = User.query.get(id)
修改数据并提交即可
user.username = ''xxx''
db.session.commit()
查询
1.User.query.all() 返回所有

2.User.query.get(id) 主键查询,返回一个

3.filter_by 只可以查询等值数据
    User.query.filter_by(username=''peter'').all() 返回对象列表
    User.query.filter_by(username=''peter'').first()    返回查询到的第一个
    sql类似语句: select * from User where username=''peter''

4.filter 可以根据多种条件查询
    User.query.filter(User.username.endswith(''s'')).all() 查询s结尾的数据
    sql类似语句: select * from User where username like ''%s''

    User.username.  后边可以.各种封装好的方法,大家可以多尝试一下
    例:startswith(''参数'') 开头   contains(''参数'') 包含   like(''%参数%'') 模糊查询

    多个条件联合查询 and 和 or
        add_() 表示和的关系,括号内跟条件
        User.query.filter(add_(User.username.endswith(''s''), User.username.endswith(''n''))).all()
        sql类似语句: select * from User where username like ''%s'' and username like ''%n''

        or_() 表示或的关系,括号内跟条件
        User.query.filter(or_(User.username.endswith(''s''), User.username.endswith(''n''))).all()
        sql类似语句: select * from User where username like ''%s'' or username like ''%n''

    not_() 非的条件 类似!=
        User.query.filter(not_(User.username.endswith(''s''))).all() 取不是以s结尾的数据

    in_() 找多个数据
        User.query.filter(User.username.in_([''zhangshan'',''lisi''])).all()

    如果要检索的数据为整形或者日期类型
        User.age.__lt__(18)        小于
        User.age.__gt__(18)        大于
        User.age.__le__(18)        小于等于
        User.age.__ge__(18)        大于等于
        User.age.between(15,20)        范围取值

    排序
        User.query.order_by(User.username).all()
    根据条件排序
        User.query.filter(User.username.contains(''s'')).order_by(User.username).all()
    降序
        User.query.order_by(-User.username).all()

    限制 limit + offset
        User.query.limit(2).all() 从开始位置取前两条数据
        User.query.offset(2).limit(2).all()  offset可以理解为偏移量,从开始位置跳过前两条,再取两条
ios Sqlite 数据库增删改查基本操作
研究了几天的数据库,终于把它给搞出来了。Sqlite 是 ios 上最常用的数据库之一,大家还是有必要了解一下的。这是仿照网上的一个例子做的,有些部分写的不好,我稍作了修改,以讲解为主,主要让大家能够明白如何修改,明白原理,达到举一反三的目的。
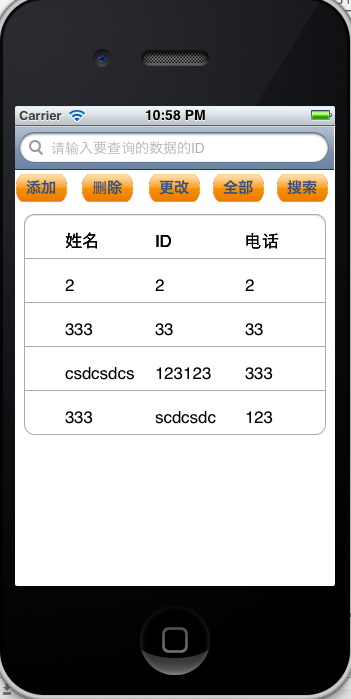
先来看看效果图
先来看看数据库方法类,将各个操作都封装在一个类里面,达到代码重用的目的,这是程序员都应该努力去实现的目标,这样在下一次用到同样的方法和类的时候,就可以直接使用封装好的类,可以节约大量的时间。
先来看看.h 文件

#import <Foundation/Foundation.h>
#import <sqlite3.h>
#define kFilename  @"testdb.db"
@class sqlTestList;
@interface sqlService : NSObject {
    sqlite3 *_database;

}

@property (nonatomic) sqlite3 *_database;-(BOOL) createTestList:(sqlite3 *)db;//创建数据库
-(BOOL) insertTestList:(sqlTestList *)insertList;//插入数据                                     -(BOOL) updateTestList:(sqlTestList *)updateList;//更新数据
-(NSMutableArray*)getTestList;//获取全部数据
- (BOOL) deleteTestList:(sqlTestList *)deletList;//删除数据:
- (NSMutableArray*)searchTestList:(NSString*)searchString;//查询数据库,searchID为要查询数据的ID,返回数据为查询到的数据
@end
@interface sqlTestList : NSObject//重新定义了一个类,专门用于存储数据
{
    int sqlID;
    NSString *sqlText;
    NSString *sqlname;
}

@property (nonatomic) int sqlID;
@property (nonatomic, retain) NSString *sqlText;
@property (nonatomic, retain) NSString *sqlname;@end
再来看看.m 文件
//
//  sqlService.m
//  SQLite3Test
//
//  Created by fengxiao on 11-11-28.
//  Copyright 2011 __MyCompanyName__. All rights reserved.
//

#import "sqlService.h"


@implementation sqlService

@synthesize _database;

- (id)init
{
    return self;
}

- (void)dealloc
{
    [super dealloc];
}

//获取document目录并返回数据库目录
- (NSString *)dataFilePath{

    NSArray *paths = NSSearchPathForDirectoriesInDomains(NSDocumentDirectory, NSUserDomainMask, YES);
    NSString *documentsDirectory = [paths objectAtIndex:0];
    NSLog(@"=======%@",documentsDirectory);
    return [documentsDirectory stringByAppendingPathComponent:@"data.db"];//这里很神奇,可以定义成任何类型的文件,也可以不定义成.db文件,任何格式都行,定义成.sb文件都行,达到了很好的数据隐秘性

}

//创建,打开数据库
- (BOOL)openDB {

    //获取数据库路径
    NSString *path = [self dataFilePath];
    //文件管理器
    NSFileManager *fileManager = [NSFileManager defaultManager];
    //判断数据库是否存在
    BOOL find = [fileManager fileExistsAtPath:path];

    //如果数据库存在,则用sqlite3_open直接打开(不要担心,如果数据库不存在sqlite3_open会自动创建)
    if (find) {

        NSLog(@"Database file have already existed.");

        //打开数据库,这里的[path UTF8String]是将NSString转换为C字符串,因为SQLite3是采用可移植的C(而不是
        //Objective-C)编写的,它不知道什么是NSString.
        if(sqlite3_open([path UTF8String], &_database) != SQLITE_OK) {

            //如果打开数据库失败则关闭数据库
            sqlite3_close(self._database);
            NSLog(@"Error: open database file.");
            return NO;
        }

        //创建一个新表
        [self createTestList:self._database];

        return YES;
    }
    //如果发现数据库不存在则利用sqlite3_open创建数据库(上面已经提到过),与上面相同,路径要转换为C字符串
    if(sqlite3_open([path UTF8String], &_database) == SQLITE_OK) {

        //创建一个新表
        [self createTestList:self._database];
        return YES;
    } else {
        //如果创建并打开数据库失败则关闭数据库
        sqlite3_close(self._database);
        NSLog(@"Error: open database file.");
        return NO;
    }
    return NO;
}

//创建表
- (BOOL) createTestList:(sqlite3*)db {

    //这句是大家熟悉的SQL语句
    char *sql = "create table if not exists testTable(ID INTEGER PRIMARY KEY AUTOINCREMENT, testID int,testValue text,testName text)";// testID是列名,int 是数据类型,testValue是列名,text是数据类型,是字符串类型

    sqlite3_stmt *statement;
    //sqlite3_prepare_v2 接口把一条SQL语句解析到statement结构里去. 使用该接口访问数据库是当前比较好的的一种方法
    NSInteger sqlReturn = sqlite3_prepare_v2(_database, sql, -1, &statement, nil);
    //第一个参数跟前面一样,是个sqlite3 * 类型变量,
    //第二个参数是一个 sql 语句。
    //第三个参数我写的是-1,这个参数含义是前面 sql 语句的长度。如果小于0,sqlite会自动计算它的长度(把sql语句当成以\0结尾的字符串)。
    //第四个参数是sqlite3_stmt 的指针的指针。解析以后的sql语句就放在这个结构里。
    //第五个参数是错误信息提示,一般不用,为nil就可以了。
    //如果这个函数执行成功(返回值是 SQLITE_OK 且 statement 不为NULL ),那么下面就可以开始插入二进制数据。


    //如果SQL语句解析出错的话程序返回
    if(sqlReturn != SQLITE_OK) {
        NSLog(@"Error: failed to prepare statement:create test table");
        return NO;
    }

    //执行SQL语句
    int success = sqlite3_step(statement);
    //释放sqlite3_stmt
    sqlite3_finalize(statement);

    //执行SQL语句失败
    if ( success != SQLITE_DONE) {
        NSLog(@"Error: failed to dehydrate:create table test");
        return NO;
    }
    NSLog(@"Create table ''testTable'' successed.");
    return YES;
}

//插入数据
-(BOOL) insertTestList:(sqlTestList *)insertList {

    //先判断数据库是否打开
    if ([self openDB]) {

        sqlite3_stmt *statement;

        //这个 sql 语句特别之处在于 values 里面有个? 号。在sqlite3_prepare函数里,?号表示一个未定的值,它的值等下才插入。
        static char *sql = "INSERT INTO testTable(testID, testValue,testName) VALUES(?, ?, ?)";

        int success2 = sqlite3_prepare_v2(_database, sql, -1, &statement, NULL);
        if (success2 != SQLITE_OK) {
            NSLog(@"Error: failed to insert:testTable");
            sqlite3_close(_database);
            return NO;
        }

        //这里的数字1,2,3代表上面的第几个问号,这里将三个值绑定到三个绑定变量
        sqlite3_bind_int(statement, 1, insertList.sqlID);
        sqlite3_bind_text(statement, 2, [insertList.sqlText UTF8String], -1, SQLITE_TRANSIENT);
        sqlite3_bind_text(statement, 3, [insertList.sqlname UTF8String], -1, SQLITE_TRANSIENT);

        //执行插入语句
        success2 = sqlite3_step(statement);
        //释放statement
        sqlite3_finalize(statement);

        //如果插入失败
        if (success2 == SQLITE_ERROR) {
            NSLog(@"Error: failed to insert into the database with message.");
            //关闭数据库
            sqlite3_close(_database);
            return NO;
        }
        //关闭数据库
        sqlite3_close(_database);
        return YES;
    }
    return NO;
}

//获取数据
- (NSMutableArray*)getTestList{

    NSMutableArray *array = [NSMutableArray arrayWithCapacity:10];
    //判断数据库是否打开
    if ([self openDB]) {

        sqlite3_stmt *statement = nil;
        //sql语句
        char *sql = "SELECT testID, testValue ,testName FROM testTable";//从testTable这个表中获取 testID, testValue ,testName,若获取全部的话可以用*代替testID, testValue ,testName。

        if (sqlite3_prepare_v2(_database, sql, -1, &statement, NULL) != SQLITE_OK) {
            NSLog(@"Error: failed to prepare statement with message:get testValue.");
            return NO;
        }
        else {
            //查询结果集中一条一条的遍历所有的记录,这里的数字对应的是列值,注意这里的列值,跟上面sqlite3_bind_text绑定的列值不一样!一定要分开,不然会crash,只有这一处的列号不同,注意!
            while (sqlite3_step(statement) == SQLITE_ROW) {
                sqlTestList* sqlList = [[sqlTestList alloc] init] ;
                sqlList.sqlID    = sqlite3_column_int(statement,0);
                char* strText   = (char*)sqlite3_column_text(statement, 1);
                sqlList.sqlText = [NSString stringWithUTF8String:strText];
                char *strName = (char*)sqlite3_column_text(statement, 2);
                sqlList.sqlname = [NSString stringWithUTF8String:strName];
                [array addObject:sqlList];
                [sqlList release];
            }
        }
        sqlite3_finalize(statement);
        sqlite3_close(_database);
    }

    return [array retain];//定义了自动释放的NSArray,这样不是个好办法,会造成内存泄露,建议大家定义局部的数组,再赋给属性变量。
}

//更新数据
-(BOOL) updateTestList:(sqlTestList *)updateList{

    if ([self openDB]) {
        sqlite3_stmt *statement;//这相当一个容器,放转化OK的sql语句
        //组织SQL语句
        char *sql = "update testTable set testValue = ? and testName = ? WHERE testID = ?";

        //将SQL语句放入sqlite3_stmt中
        int success = sqlite3_prepare_v2(_database, sql, -1, &statement, NULL);
        if (success != SQLITE_OK) {
            NSLog(@"Error: failed to update:testTable");
            sqlite3_close(_database);
            return NO;
        }

        //这里的数字1,2,3代表第几个问号。这里只有1个问号,这是一个相对比较简单的数据库操作,真正的项目中会远远比这个复杂
        //绑定text类型的数据库数据
        sqlite3_bind_text(statement, 3, [updateList.sqlname UTF8String], -1, SQLITE_TRANSIENT);
        sqlite3_bind_text(statement, 2, [updateList.sqlText UTF8String], -1, SQLITE_TRANSIENT);
        sqlite3_bind_int(statement, 1, updateList.sqlID);

        //执行SQL语句。这里是更新数据库
        success = sqlite3_step(statement);
        //释放statement
        sqlite3_finalize(statement);

        //如果执行失败
        if (success == SQLITE_ERROR) {
            NSLog(@"Error: failed to update the database with message.");
            //关闭数据库
            sqlite3_close(_database);
            return NO;
        }
        //执行成功后依然要关闭数据库
        sqlite3_close(_database);
        return YES;
    }
    return NO;
}
//删除数据
- (BOOL) deleteTestList:(sqlTestList *)deletList{
    if ([self openDB]) {

        sqlite3_stmt *statement;
        //组织SQL语句
        static char *sql = "delete from testTable  where testID = ? and testValue = ? and testName = ?";
        //将SQL语句放入sqlite3_stmt中
        int success = sqlite3_prepare_v2(_database, sql, -1, &statement, NULL);
        if (success != SQLITE_OK) {
            NSLog(@"Error: failed to delete:testTable");
            sqlite3_close(_database);
            return NO;
        }

        //这里的数字1,2,3代表第几个问号。这里只有1个问号,这是一个相对比较简单的数据库操作,真正的项目中会远远比这个复杂
        sqlite3_bind_int(statement, 1, deletList.sqlID);
        sqlite3_bind_text(statement, 2, [deletList.sqlText UTF8String], -1, SQLITE_TRANSIENT);
        sqlite3_bind_text(statement, 3, [deletList.sqlname UTF8String], -1, SQLITE_TRANSIENT);
        //执行SQL语句。这里是更新数据库
        success = sqlite3_step(statement);
        //释放statement
        sqlite3_finalize(statement);

        //如果执行失败
        if (success == SQLITE_ERROR) {
            NSLog(@"Error: failed to delete the database with message.");
            //关闭数据库
            sqlite3_close(_database);
            return NO;
        }
        //执行成功后依然要关闭数据库
        sqlite3_close(_database);
        return YES;
    }
    return NO;

}
//查询数据
- (NSMutableArray*)searchTestList:(NSString*)searchString{

    NSMutableArray *array = [NSMutableArray arrayWithCapacity:10];
    //判断数据库是否打开
    if ([self openDB]) {

        sqlite3_stmt *statement = nil;
        //sql语句
        NSString *querySQL = [NSString stringWithFormat:@"SELECT * from testTable where testName like \"%@\"",searchString];
        const char *sql = [querySQL UTF8String];
//        char *sql = "SELECT * FROM testTable WHERE testName like ?";//这里用like代替=可以执行模糊查找,原来是"SELECT * FROM testTable WHERE testName = ?"
        if (sqlite3_prepare_v2(_database, sql, -1, &statement, NULL) != SQLITE_OK) {
            NSLog(@"Error: failed to prepare statement with message:search testValue.");
            return NO;
        } else {
            sqlTestList *searchList = [[sqlTestList alloc]init];
//            sqlite3_bind_int(statement, 1, searchID);
            sqlite3_bind_text(statement, 3, [searchString UTF8String], -1, SQLITE_TRANSIENT);
            //查询结果集中一条一条的遍历所有的记录,这里的数字对应的是列值。
            while (sqlite3_step(statement) == SQLITE_ROW) {
                sqlTestList* sqlList = [[sqlTestList alloc] init] ;
                sqlList.sqlID   = sqlite3_column_int(statement,1);
                char* strText   = (char*)sqlite3_column_text(statement, 2);
                sqlList.sqlText = [NSString stringWithUTF8String:strText];
                char *strName = (char*)sqlite3_column_text(statement, 3);
                sqlList.sqlname = [NSString stringWithUTF8String:strName];
                [array addObject:sqlList];
                [sqlList release];
            }
            [searchList release];
        }
        sqlite3_finalize(statement);
        sqlite3_close(_database);
    }

    return [array retain];
}

@end


@implementation sqlTestList//刚才.h文件里定义的类在这实现

@synthesize sqlID;
@synthesize sqlText;
@synthesize sqlname;
-(id) init
{
    sqlID = 0;
    sqlText = @"";
    sqlname = @"";
    return self;
};
-(void) dealloc
{
    if ((sqlText != nil) && (sqlname != nil)) {
        [sqlText release];
        [sqlname release];
    }

    [super dealloc];
}

@end
这就是封装好的类,可以重用哦!
下面是添加数据页面
这也是一个类,来看.h 文件
#import <UIKit/UIKit.h>
#import "sqlService.h"
@interface operateSqlViewController : UIViewController {

    UITextField *idValue;
    UITextField *textValue;
    UITextField *textName;    int oprateType;//区分数据插入与更新
    sqlTestList *sqlValue;
}

@property (nonatomic, retain) IBOutlet UITextField *idValue;
@property (nonatomic, retain) IBOutlet UITextField *textValue;
@property (nonatomic, retain) IBOutlet UITextField *textName;
@property (nonatomic, retain) sqlTestList *sqlValue;
@property (nonatomic) int oprateType;@end
再来看看.m 文件
#import "operateSqlViewController.h"@implementation operateSqlViewController@synthesize idValue;@synthesize textValue;@synthesize oprateType;@synthesize sqlValue;@synthesize textName;- (void)didReceiveMemoryWarning {    // Releases the view if it doesn''t have a superview.    [super didReceiveMemoryWarning];
    // Release any cached data, images, etc. that aren''t in use.}- (void)viewDidLoad{

    UIBarButtonItem *backButton = [[UIBarButtonItem alloc]
                                   initWithTitle:@"返回"
                                   style:UIBarButtonItemStyleBordered
                                   target:self
                                   action:@selector(dismiss:)];

    UIBarButtonItem *saveButton = [[UIBarButtonItem alloc]
                                   initWithTitle:@"保存"
                                   style:UIBarButtonItemStyleBordered
                                   target:self
                                   action:@selector(saveValue:)];
    [[self navigationItem] setLeftBarButtonItem:backButton];
    [[self navigationItem] setRightBarButtonItem:saveButton];

    [backButton release];
    [saveButton release];
    if (oprateType == 0) {
        [self.navigationItem setTitle:@"数据插入"];
    }    else if(oprateType == 1){
        [self.navigationItem setTitle:@"数据更新"];
        idValue.text = [NSString stringWithFormat:@"%d", sqlValue.sqlID];
        textValue.text = sqlValue.sqlText;
        textName.text = sqlValue.sqlname;
    }
}
- (void)viewDidUnload {
    idValue = nil;
    textValue = nil;
    textName = nil;
    sqlValue = nil;
    [super viewDidUnload];    // Release any retained subviews of the main view.    // e.g. self.myOutlet = nil;}- (void)dealloc {
    [idValue release];
    [textValue release];
    [sqlValue release];
    [textName release];
    [super dealloc];
}
- (void)dismiss:(id)sender{
    [[self parentViewController] dismissModalViewControllerAnimated:YES];
}
- (void)saveValue:(id)sender{

    if (idValue.text.length == 0) {
            UIAlertView *alert = [[UIAlertView alloc] initWithTitle:@"提示"
                                                            message:@"请输入ID"
                                                           delegate:self
                                                  cancelButtonTitle:@"好"
                                                  otherButtonTitles:nil];
            [alert show];
            [alert release];        return;
    }    if (textValue.text.length == 0) {
        UIAlertView *alert = [[UIAlertView alloc] initWithTitle:@"提示"
                                                        message:@"请输入电话"
                                                       delegate:self
                                              cancelButtonTitle:@"好"
                                              otherButtonTitles:nil];
        [alert show];
        [alert release];        return;
    }    if (textName.text.length == 0) {
        UIAlertView *alert = [[UIAlertView alloc] initWithTitle:@"提示"
                                                        message:@"请输入姓名"
                                                       delegate:self
                                              cancelButtonTitle:@"好"
                                              otherButtonTitles:nil];
        [alert show];
        [alert release];        return;
    }

    //初始化数据库
    sqlService *sqlSer = [[sqlService alloc] init];
    //数据库插入
    if (oprateType == 0) {

        sqlTestList *sqlInsert = [[sqlTestList alloc]init];
        sqlInsert.sqlID = [idValue.text intValue];
        sqlInsert.sqlText = textValue.text;
        sqlInsert.sqlname = textName.text;
        //调用封装好的数据库插入函数
        if ([sqlSer insertTestList:sqlInsert]) {
            UIAlertView *alert = [[UIAlertView alloc] initWithTitle:@"提示"
                                                            message:@"插入数据成功"
                                                           delegate:self
                                                  cancelButtonTitle:@"好"
                                                  otherButtonTitles:nil];
            [alert show];
            [alert release];
        }        else {
            UIAlertView *alert = [[UIAlertView alloc] initWithTitle:@"提示"
                                                            message:@"插入数据失败"
                                                           delegate:self
                                                  cancelButtonTitle:@"好"
                                                  otherButtonTitles:nil];
            [alert show];
            [alert release];

        }
        [sqlInsert release];

    }    //数据库更新
    if(oprateType == 1){

        sqlTestList *newValue = [[sqlTestList alloc]init];
        newValue.sqlID = [idValue.text intValue];
        newValue.sqlText = textValue.text;
        newValue.sqlname = textName.text;
        //调用封装好的更新数据库函数
        if ([sqlSer updateTestList:newValue]) {
            UIAlertView *alert = [[UIAlertView alloc] initWithTitle:@"提示"
                                                            message:@"更新数据成功"
                                                           delegate:self
                                                  cancelButtonTitle:@"好"
                                                  otherButtonTitles:nil];
            [alert show];
            [alert release];
        }        else {
            UIAlertView *alert = [[UIAlertView alloc] initWithTitle:@"提示"
                                                            message:@"更新数据失败"
                                                           delegate:self
                                                  cancelButtonTitle:@"好"
                                                  otherButtonTitles:nil];
            [alert show];
            [alert release];

        }

        [newValue release];
    }

}@end
代码写的有些啰嗦,不过不难容易看懂,不多解释了,要在 xib 文件中添加 3 个 UITextField 和 ULabel,要记得连线。
在主界面的.h 文件
#import <UIKit/UIKit.h>
#import "sqlService.h"
@interface SQLite3TestViewController : UIViewController<UITableViewDelegate,UITableViewDataSource> {

    UITableView *utableView;
    NSArray *listData;
    UISearchBar *searchBar;//搜索栏

}

@property (nonatomic, retain) IBOutlet UITableView *utableView;
@property (nonatomic, retain) IBOutlet UISearchBar *searchBar;
@property (nonatomic, retain) NSArray *listData;
- (IBAction)insertValue;
- (IBAction)updateValue;
- (IBAction)getAllValue;
- (IBAction)deleteValue;
- (IBAction)searchValue;
@end
.m 文件
//
//  SQLite3TestViewController.m
//  SQLite3Test
//
//  Created by fengxiao on 11-11-28.
//  Copyright 2011 __MyCompanyName__. All rights reserved.
//

#import "SQLite3TestViewController.h"
#import "operateSqlViewController.h"

@implementation SQLite3TestViewController
@synthesize utableView;
@synthesize listData;
@synthesize searchBar;


- (void)viewDidLoad{
    sqlService *sqlSer = [[sqlService alloc] init];
    listData = [sqlSer getTestList];//先初始化那个专门用于存数据的类,才调用类获取数据的方法
}

- (void)viewDidAppear:(BOOL)animated{//在这里写是为了等待时间缩短一点,数据如果很多的,在这里写可以让数据提前加载
    sqlService *sqlSer = [[sqlService alloc] init];
    listData = [sqlSer getTestList];
    [sqlSer release];
    [utableView reloadData];
}

- (void)didReceiveMemoryWarning {
    // Releases the view if it doesn''t have a superview.
    [super didReceiveMemoryWarning];

    // Release any cached data, images, etc that aren''t in use.
}

- (void)viewDidUnload {
    utableView = nil;
    listData = nil;
    searchBar = nil;
    [super viewDidUnload];
    // Release any retained subviews of the main view.
    // e.g. self.myOutlet = nil;
}


- (void)dealloc {
    [utableView release];
    [listData release];
    [searchBar release];
    [super dealloc];
}


- (IBAction)insertValue{

    [searchBar resignFirstResponder];//触发这个insertValue方法时隐藏键盘
    operateSqlViewController *operateController = [[operateSqlViewController alloc] init ];
    UINavigationController *theNavController = [[UINavigationController alloc]
                                                initWithRootViewController:operateController];//这里如果不初始化一个UINavigationController类的对象来存放operateSqlViewController类的UIViewController,就不会有最上面的导航栏了。
    operateController.oprateType = 0;//optrateType为0时为数据插入
    [operateController release];
    theNavController.navigationBar.tintColor = [UIColor blackColor];
    [self presentModalViewController:theNavController animated:YES];
    [theNavController release];
}

- (IBAction)updateValue{

    [searchBar resignFirstResponder];
    NSIndexPath *indexPath = [utableView  indexPathForSelectedRow];
    if (indexPath == nil) {
        UIAlertView *alert = [[UIAlertView alloc] initWithTitle:@"提示"
                                                        message:@"请选择要更新的项"
                                                       delegate:self
                                              cancelButtonTitle:@"好"
                                              otherButtonTitles:nil];
        [alert show];
        [alert release];
        return;
    }

    NSUInteger row = [indexPath row];
    sqlTestList *sqlList = [[sqlTestList alloc]init];
    sqlList = [listData objectAtIndex:(row - 1)];//在这里面获取点击的行,因为table的第一行没显示数据,所以这里要减1。

    operateSqlViewController *operateController = [[operateSqlViewController alloc] init ];
    UINavigationController *theNavController = [[UINavigationController alloc]
                                                initWithRootViewController:operateController];
    operateController.oprateType = 1;//optrateType为1时为数据更新
    operateController.sqlValue = sqlList;
    theNavController.navigationBar.tintColor = [UIColor blackColor];
    [self presentModalViewController:theNavController animated:YES];
    [sqlList release];
    [operateController release];
    [theNavController release];
}

- (IBAction)getAllValue{

    [searchBar resignFirstResponder];

    sqlService *sqlSer = [[sqlService alloc] init];
    listData = [sqlSer getTestList];
    [utableView reloadData];
    [sqlSer release];

}
- (IBAction)deleteValue{

    [searchBar resignFirstResponder];

    NSIndexPath *indexPath = [utableView  indexPathForSelectedRow];

    if (indexPath == nil) {
        UIAlertView *alert = [[UIAlertView alloc] initWithTitle:@"提示"
                                                        message:@"请选择要删除的项"
                                                       delegate:self
                                              cancelButtonTitle:@"好"
                                              otherButtonTitles:nil];
        [alert show];
        [alert release];
        return;
    }

    NSUInteger row = [indexPath row];
    sqlTestList *sqlList = [[sqlTestList alloc]init];
    sqlList = [listData objectAtIndex:(row - 1)];

    sqlService *sqlSer = [[sqlService alloc] init];

     if ([sqlSer deleteTestList:sqlList]) {
         UIAlertView *alert = [[UIAlertView alloc] initWithTitle:@"提示"
                                                         message:@"删除数据成功"
                                                        delegate:self
                                               cancelButtonTitle:@"好"
                                               otherButtonTitles:nil];
         [alert show];
         [alert release];

         //删除成功后重新获取数据更新列表
         listData = [sqlSer getTestList];
         [utableView reloadData];

     }
    else {
        UIAlertView *alert = [[UIAlertView alloc] initWithTitle:@"提示"
                                                        message:@"删除数据失败"
                                                       delegate:self
                                              cancelButtonTitle:@"好"
                                              otherButtonTitles:nil];
        [alert show];
        [alert release];
        return;
    }

    [sqlList release];
    [sqlSer release];
}
- (IBAction)searchValue{

    if ([searchBar.text isEqualToString:@""]) {
        UIAlertView *alert = [[UIAlertView alloc] initWithTitle:@"提示"
                                                        message:@"请输入要查询数据的ID"
                                                       delegate:self
                                              cancelButtonTitle:@"好"
                                              otherButtonTitles:nil];
        [alert show];
        [alert release];
        return;
    }
    else {
//        int idNum = [searchBar.text intValue];
        NSString *str = searchBar.text;
        sqlService *sqlSer = [[sqlService alloc] init];
        listData = [sqlSer searchTestList:str];

        if ([listData  count] == 0) {
            UIAlertView *alert = [[UIAlertView alloc] initWithTitle:@"提示"
                                                            message:@"sorry,未查询到数据,请查看name是否有误"
                                                           delegate:self
                                                  cancelButtonTitle:@"好"
                                                  otherButtonTitles:nil];
            [alert show];
            [alert release];
            return;
        }
        [searchBar resignFirstResponder];
        [utableView reloadData];
        [sqlSer release];

    }
}

#pragma mark -
#pragma mark Table View Data Source Methods
- (NSInteger)tableView:(UITableView *)tableView numberOfRowsInSection:(NSInteger)section
{
    // Return the number of rows in the section.
    return [listData count] + 1;//从第二行开始,第一行不显示数据
}

- (UITableViewCell *)tableView:(UITableView *)tableView cellForRowAtIndexPath:(NSIndexPath *)indexPath
{

    NSString *CustomIdentifier =  [NSString stringWithFormat:@"cell%d",indexPath.row];
    //cell不重用
    UITableViewCell *cell = [tableView dequeueReusableCellWithIdentifier:CustomIdentifier];
    if (indexPath.row == 0)
    cell.selectionStyle = UITableViewCellSelectionStyleNone;
    if ( cell == nil ) {
        cell = [[[UITableViewCell alloc] initWithStyle:UITableViewCellStyleValue1
                                         reuseIdentifier:CustomIdentifier] autorelease];
        cell.backgroundColor = [UIColor clearColor];
            }
    if (indexPath.row > 0)
    {
        NSUInteger row = [indexPath row];
        sqlTestList *sqlList = [[sqlTestList alloc] init] ;

        if (listData != nil)
        sqlList = [listData objectAtIndex: (row - 1)];//读取数据的时候也要减一行,从第二行开始

        UILabel *nameLabel = [[UILabel alloc]initWithFrame:CGRectMake(0+40, 10, 70, 30)];
        UILabel *IDLabel = [[UILabel alloc]initWithFrame:CGRectMake(90+40, 10, 70, 30)];
        UILabel *valueLabel = [[UILabel alloc]initWithFrame:CGRectMake(180+40, 10, 70, 30)];
        nameLabel.text = sqlList.sqlname;
        IDLabel.text = sqlList.sqlText;
        valueLabel.text = [NSString stringWithFormat:@"%d",sqlList.sqlID];
        [cell.contentView addSubview:nameLabel];
        [cell.contentView addSubview:IDLabel];
        [cell.contentView addSubview:valueLabel];
        [nameLabel release];
        [IDLabel release];
        [valueLabel release];
    }
    else
        {
        for (int i = 0; i < 3; i ++) {
            UILabel *label = [[UILabel alloc]initWithFrame:CGRectMake(90 * i + 40, 10, 70 , 30)];
            NSArray *array = [NSArray arrayWithObjects:@"姓名",@"ID",@"电话", nil];
            label.text = [array objectAtIndex:i];
            label.backgroundColor = [UIColor clearColor];
            [cell.contentView addSubview:label];
            [label release];
        }
    }
    return cell;
}

- (NSIndexPath*)tableView:(UITableView *)tableView willSelectRowAtIndexPath:(NSIndexPath *)indexPath
{
    [searchBar resignFirstResponder];
    if (indexPath.row == 0) {
        return nil;//让第一行不能点击
    }
    else
        return indexPath;
}

@end
好了,这就是全部了,希望大家尽量封装自己写的类,现在写得多,以后会很轻松。

ios Sqlite数据库增删改查基本操作
转: http://www.cnblogs.com/xiaobaizhu/archive/2012/12/07/2808170.html
研究了几天的数据库,终于把它给搞出来了。Sqlite是ios上最常用的数据库之一,大家还是有必要了解一下的。这是仿照网上的一个例子做的,有些部分写的不好,我稍作了修改,以讲解为主,主要让大家能够明白如何修改,明白原理,达到举一反三的目的。
先来看看效果图
先来看看数据库方法类,将各个操作都封装在一个类里面,达到代码重用的目的,这是程序员都应该努力去实现的目标,这样在下一次用到同样的方法和类的时候,就可以直接使用封装好的类,可以节约大量的时间。
先来看看.h文件
复制代码
#import <Foundation/Foundation.h>
#import <sqlite3.h>
#define kFilename @"testdb.db"
@class sqlTestList;
@interface sqlService : NSObject {
sqlite3 *_database;
}
@property (nonatomic) sqlite3 *_database;
-(BOOL) createTestList:(sqlite3 *)db;//创建数据库
-(BOOL) insertTestList:(sqlTestList *)insertList;//插入数据
-(BOOL) updateTestList:(sqlTestList *)updateList;//更新数据
-(NSMutableArray*)getTestList;//获取全部数据
- (BOOL) deleteTestList:(sqlTestList *)deletList;//删除数据:
- (NSMutableArray*)searchTestList:(NSString*)searchString;//查询数据库,searchID为要查询数据的ID,返回数据为查询到的数据
@end
@interface sqlTestList : NSObject//重新定义了一个类,专门用于存储数据
{
int sqlID;
NSString *sqlText;
NSString *sqlname;
}
@property (nonatomic) int sqlID;
@property (nonatomic, retain) NSString *sqlText;
@property (nonatomic, retain) NSString *sqlname;
@end
复制代码
再来看看.m文件
复制代码
//
// sqlService.m
// SQLite3Test
//
// Created by fengxiao on 11-11-28.
// Copyright 2011 __MyCompanyName__. All rights reserved.
//
#import "sqlService.h"
@implementation sqlService
@synthesize _database;
- (id)init
{
return self;
}
- (void)dealloc
{
[super dealloc];
}
//获取document目录并返回数据库目录
- (NSString *)dataFilePath{
NSArray *paths = NSSearchPathForDirectoriesInDomains(NSDocumentDirectory, NSUserDomainMask, YES);
NSString *documentsDirectory = [paths objectAtIndex:0];
NSLog(@"=======%@",documentsDirectory);
return [documentsDirectory stringByAppendingPathComponent:@"data.db"];//这里很神奇,可以定义成任何类型的文件,也可以不定义成.db文件,任何格式都行,定义成.sb文件都行,达到了很好的数据隐秘性
}
//创建,打开数据库
- (BOOL)openDB {
//获取数据库路径
NSString *path = [self dataFilePath];
//文件管理器
NSFileManager *fileManager = [NSFileManager defaultManager];
//判断数据库是否存在
BOOL find = [fileManager fileExistsAtPath:path];
//如果数据库存在,则用sqlite3_open直接打开(不要担心,如果数据库不存在sqlite3_open会自动创建)
if (find) {
NSLog(@"Database file have already existed.");
//打开数据库,这里的[path UTF8String]是将NSString转换为C字符串,因为SQLite3是采用可移植的C(而不是
//Objective-C)编写的,它不知道什么是NSString.
if(sqlite3_open([path UTF8String], &_database) != SQLITE_OK) {
//如果打开数据库失败则关闭数据库
sqlite3_close(self._database);
NSLog(@"Error: open database file.");
return NO;
}
//创建一个新表
[self createTestList:self._database];
return YES;
}
//如果发现数据库不存在则利用sqlite3_open创建数据库(上面已经提到过),与上面相同,路径要转换为C字符串
if(sqlite3_open([path UTF8String], &_database) == SQLITE_OK) {
//创建一个新表
[self createTestList:self._database];
return YES;
} else {
//如果创建并打开数据库失败则关闭数据库
sqlite3_close(self._database);
NSLog(@"Error: open database file.");
return NO;
}
return NO;
}
//创建表
- (BOOL) createTestList:(sqlite3*)db {
//这句是大家熟悉的SQL语句
char *sql = "create table if not exists testTable(ID INTEGER PRIMARY KEY AUTOINCREMENT, testID int,testValue text,testName text)";// testID是列名,int 是数据类型,testValue是列名,text是数据类型,是字符串类型
sqlite3_stmt *statement;
//sqlite3_prepare_v2 接口把一条SQL语句解析到statement结构里去. 使用该接口访问数据库是当前比较好的的一种方法
NSInteger sqlReturn = sqlite3_prepare_v2(_database, sql, -1, &statement, nil);
//第一个参数跟前面一样,是个sqlite3 * 类型变量,
//第二个参数是一个 sql 语句。
//第三个参数我写的是-1,这个参数含义是前面 sql 语句的长度。如果小于0,sqlite会自动计算它的长度(把sql语句当成以\0结尾的字符串)。
//第四个参数是sqlite3_stmt 的指针的指针。解析以后的sql语句就放在这个结构里。
//第五个参数是错误信息提示,一般不用,为nil就可以了。
//如果这个函数执行成功(返回值是 SQLITE_OK 且 statement 不为NULL ),那么下面就可以开始插入二进制数据。
//如果SQL语句解析出错的话程序返回
if(sqlReturn != SQLITE_OK) {
NSLog(@"Error: failed to prepare statement:create test table");
return NO;
}
//执行SQL语句
int success = sqlite3_step(statement);
//释放sqlite3_stmt
sqlite3_finalize(statement);
//执行SQL语句失败
if ( success != SQLITE_DONE) {
NSLog(@"Error: failed to dehydrate:create table test");
return NO;
}
NSLog(@"Create table ''testTable'' successed.");
return YES;
}
//插入数据
-(BOOL) insertTestList:(sqlTestList *)insertList {
//先判断数据库是否打开
if ([self openDB]) {
sqlite3_stmt *statement;
//这个 sql 语句特别之处在于 values 里面有个? 号。在sqlite3_prepare函数里,?号表示一个未定的值,它的值等下才插入。
static char *sql = "INSERT INTO testTable(testID, testValue,testName) VALUES(?, ?, ?)";
int success2 = sqlite3_prepare_v2(_database, sql, -1, &statement, NULL);
if (success2 != SQLITE_OK) {
NSLog(@"Error: failed to insert:testTable");
sqlite3_close(_database);
return NO;
}
//这里的数字1,2,3代表上面的第几个问号,这里将三个值绑定到三个绑定变量
sqlite3_bind_int(statement, 1, insertList.sqlID);
sqlite3_bind_text(statement, 2, [insertList.sqlText UTF8String], -1, SQLITE_TRANSIENT);
sqlite3_bind_text(statement, 3, [insertList.sqlname UTF8String], -1, SQLITE_TRANSIENT);
//执行插入语句
success2 = sqlite3_step(statement);
//释放statement
sqlite3_finalize(statement);
//如果插入失败
if (success2 == SQLITE_ERROR) {
NSLog(@"Error: failed to insert into the database with message.");
//关闭数据库
sqlite3_close(_database);
return NO;
}
//关闭数据库
sqlite3_close(_database);
return YES;
}
return NO;
}
//获取数据
- (NSMutableArray*)getTestList{
NSMutableArray *array = [NSMutableArray arrayWithCapacity:10];
//判断数据库是否打开
if ([self openDB]) {
sqlite3_stmt *statement = nil;
//sql语句
char *sql = "SELECT testID, testValue ,testName FROM testTable";//从testTable这个表中获取 testID, testValue ,testName,若获取全部的话可以用*代替testID, testValue ,testName。
if (sqlite3_prepare_v2(_database, sql, -1, &statement, NULL) != SQLITE_OK) {
NSLog(@"Error: failed to prepare statement with message:get testValue.");
return NO;
}
else {
//查询结果集中一条一条的遍历所有的记录,这里的数字对应的是列值,注意这里的列值,跟上面sqlite3_bind_text绑定的列值不一样!一定要分开,不然会crash,只有这一处的列号不同,注意!
while (sqlite3_step(statement) == SQLITE_ROW) {
sqlTestList* sqlList = [[sqlTestList alloc] init] ;
sqlList.sqlID = sqlite3_column_int(statement,0);
char* strText = (char*)sqlite3_column_text(statement, 1);
sqlList.sqlText = [NSString stringWithUTF8String:strText];
char *strName = (char*)sqlite3_column_text(statement, 2);
sqlList.sqlname = [NSString stringWithUTF8String:strName];
[array addObject:sqlList];
[sqlList release];
}
}
sqlite3_finalize(statement);
sqlite3_close(_database);
}
return [array retain];//定义了自动释放的NSArray,这样不是个好办法,会造成内存泄露,建议大家定义局部的数组,再赋给属性变量。
}
//更新数据
-(BOOL) updateTestList:(sqlTestList *)updateList{
if ([self openDB]) {
sqlite3_stmt *statement;//这相当一个容器,放转化OK的sql语句
//组织SQL语句
char *sql = "update testTable set testValue = ? and testName = ? WHERE testID = ?";
//将SQL语句放入sqlite3_stmt中
int success = sqlite3_prepare_v2(_database, sql, -1, &statement, NULL);
if (success != SQLITE_OK) {
NSLog(@"Error: failed to update:testTable");
sqlite3_close(_database);
return NO;
}
//这里的数字1,2,3代表第几个问号。这里只有1个问号,这是一个相对比较简单的数据库操作,真正的项目中会远远比这个复杂
//绑定text类型的数据库数据
sqlite3_bind_text(statement, 3, [updateList.sqlname UTF8String], -1, SQLITE_TRANSIENT);
sqlite3_bind_text(statement, 2, [updateList.sqlText UTF8String], -1, SQLITE_TRANSIENT);
sqlite3_bind_int(statement, 1, updateList.sqlID);
//执行SQL语句。这里是更新数据库
success = sqlite3_step(statement);
//释放statement
sqlite3_finalize(statement);
//如果执行失败
if (success == SQLITE_ERROR) {
NSLog(@"Error: failed to update the database with message.");
//关闭数据库
sqlite3_close(_database);
return NO;
}
//执行成功后依然要关闭数据库
sqlite3_close(_database);
return YES;
}
return NO;
}
//删除数据
- (BOOL) deleteTestList:(sqlTestList *)deletList{
if ([self openDB]) {
sqlite3_stmt *statement;
//组织SQL语句
static char *sql = "delete from testTable where testID = ? and testValue = ? and testName = ?";
//将SQL语句放入sqlite3_stmt中
int success = sqlite3_prepare_v2(_database, sql, -1, &statement, NULL);
if (success != SQLITE_OK) {
NSLog(@"Error: failed to delete:testTable");
sqlite3_close(_database);
return NO;
}
//这里的数字1,2,3代表第几个问号。这里只有1个问号,这是一个相对比较简单的数据库操作,真正的项目中会远远比这个复杂
sqlite3_bind_int(statement, 1, deletList.sqlID);
sqlite3_bind_text(statement, 2, [deletList.sqlText UTF8String], -1, SQLITE_TRANSIENT);
sqlite3_bind_text(statement, 3, [deletList.sqlname UTF8String], -1, SQLITE_TRANSIENT);
//执行SQL语句。这里是更新数据库
success = sqlite3_step(statement);
//释放statement
sqlite3_finalize(statement);
//如果执行失败
if (success == SQLITE_ERROR) {
NSLog(@"Error: failed to delete the database with message.");
//关闭数据库
sqlite3_close(_database);
return NO;
}
//执行成功后依然要关闭数据库
sqlite3_close(_database);
return YES;
}
return NO;
}
//查询数据
- (NSMutableArray*)searchTestList:(NSString*)searchString{
NSMutableArray *array = [NSMutableArray arrayWithCapacity:10];
//判断数据库是否打开
if ([self openDB]) {
sqlite3_stmt *statement = nil;
//sql语句
NSString *querySQL = [NSString stringWithFormat:@"SELECT * from testTable where testName like \"%@\"",searchString];
const char *sql = [querySQL UTF8String];
// char *sql = "SELECT * FROM testTable WHERE testName like ?";//这里用like代替=可以执行模糊查找,原来是"SELECT * FROM testTable WHERE testName = ?"
if (sqlite3_prepare_v2(_database, sql, -1, &statement, NULL) != SQLITE_OK) {
NSLog(@"Error: failed to prepare statement with message:search testValue.");
return NO;
} else {
sqlTestList *searchList = [[sqlTestList alloc]init];
// sqlite3_bind_int(statement, 1, searchID);
sqlite3_bind_text(statement, 3, [searchString UTF8String], -1, SQLITE_TRANSIENT);
//查询结果集中一条一条的遍历所有的记录,这里的数字对应的是列值。
while (sqlite3_step(statement) == SQLITE_ROW) {
sqlTestList* sqlList = [[sqlTestList alloc] init] ;
sqlList.sqlID = sqlite3_column_int(statement,1);
char* strText = (char*)sqlite3_column_text(statement, 2);
sqlList.sqlText = [NSString stringWithUTF8String:strText];
char *strName = (char*)sqlite3_column_text(statement, 3);
sqlList.sqlname = [NSString stringWithUTF8String:strName];
[array addObject:sqlList];
[sqlList release];
}
[searchList release];
}
sqlite3_finalize(statement);
sqlite3_close(_database);
}
return [array retain];
}
@end
@implementation sqlTestList//刚才.h文件里定义的类在这实现
@synthesize sqlID;
@synthesize sqlText;
@synthesize sqlname;
-(id) init
{
sqlID = 0;
sqlText = @"";
sqlname = @"";
return self;
};
-(void) dealloc
{
if ((sqlText != nil) && (sqlname != nil)) {
[sqlText release];
[sqlname release];
}
[super dealloc];
}
@end
复制代码
这就是封装好的类,可以重用哦!
下面是添加数据页面
这也是一个类,来看.h文件
复制代码
#import <UIKit/UIKit.h>
#import "sqlService.h"
@interface operateSqlViewController : UIViewController {
UITextField *idValue;
UITextField *textValue;
UITextField *textName;
int oprateType;//区分数据插入与更新
sqlTestList *sqlValue;
}
@property (nonatomic, retain) IBOutlet UITextField *idValue;
@property (nonatomic, retain) IBOutlet UITextField *textValue;
@property (nonatomic, retain) IBOutlet UITextField *textName;
@property (nonatomic, retain) sqlTestList *sqlValue;
@property (nonatomic) int oprateType;
@end
复制代码
再来看看.m文件
复制代码
#import "operateSqlViewController.h"
@implementation operateSqlViewController
@synthesize idValue;
@synthesize textValue;
@synthesize oprateType;
@synthesize sqlValue;
@synthesize textName;
- (void)didReceiveMemoryWarning {
// Releases the view if it doesn''t have a superview.
[super didReceiveMemoryWarning];
// Release any cached data, images, etc. that aren''t in use.
}
- (void)viewDidLoad{
UIBarButtonItem *backButton = [[UIBarButtonItem alloc]
initWithTitle:@"返回"
style:UIBarButtonItemStyleBordered
target:self
action:@selector(dismiss:)];
UIBarButtonItem *saveButton = [[UIBarButtonItem alloc]
initWithTitle:@"保存"
style:UIBarButtonItemStyleBordered
target:self
action:@selector(saveValue:)];
[[self navigationItem] setLeftBarButtonItem:backButton];
[[self navigationItem] setRightBarButtonItem:saveButton];
[backButton release];
[saveButton release];
if (oprateType == 0) {
[self.navigationItem setTitle:@"数据插入"];
}
else if(oprateType == 1){
[self.navigationItem setTitle:@"数据更新"];
idValue.text = [NSString stringWithFormat:@"%d", sqlValue.sqlID];
textValue.text = sqlValue.sqlText;
textName.text = sqlValue.sqlname;
}
}
- (void)viewDidUnload {
idValue = nil;
textValue = nil;
textName = nil;
sqlValue = nil;
[super viewDidUnload];
// Release any retained subviews of the main view.
// e.g. self.myOutlet = nil;
}
- (void)dealloc {
[idValue release];
[textValue release];
[sqlValue release];
[textName release];
[super dealloc];
}
- (void)dismiss:(id)sender{
[[self parentViewController] dismissModalViewControllerAnimated:YES];
}
- (void)saveValue:(id)sender{
if (idValue.text.length == 0) {
UIAlertView *alert = [[UIAlertView alloc] initWithTitle:@"提示"
message:@"请输入ID"
delegate:self
cancelButtonTitle:@"好"
otherButtonTitles:nil];
[alert show];
[alert release];
return;
}
if (textValue.text.length == 0) {
UIAlertView *alert = [[UIAlertView alloc] initWithTitle:@"提示"
message:@"请输入电话"
delegate:self
cancelButtonTitle:@"好"
otherButtonTitles:nil];
[alert show];
[alert release];
return;
}
if (textName.text.length == 0) {
UIAlertView *alert = [[UIAlertView alloc] initWithTitle:@"提示"
message:@"请输入姓名"
delegate:self
cancelButtonTitle:@"好"
otherButtonTitles:nil];
[alert show];
[alert release];
return;
}
//初始化数据库
sqlService *sqlSer = [[sqlService alloc] init];
//数据库插入
if (oprateType == 0) {
sqlTestList *sqlInsert = [[sqlTestList alloc]init];
sqlInsert.sqlID = [idValue.text intValue];
sqlInsert.sqlText = textValue.text;
sqlInsert.sqlname = textName.text;
//调用封装好的数据库插入函数
if ([sqlSer insertTestList:sqlInsert]) {
UIAlertView *alert = [[UIAlertView alloc] initWithTitle:@"提示"
message:@"插入数据成功"
delegate:self
cancelButtonTitle:@"好"
otherButtonTitles:nil];
[alert show];
[alert release];
}
else {
UIAlertView *alert = [[UIAlertView alloc] initWithTitle:@"提示"
message:@"插入数据失败"
delegate:self
cancelButtonTitle:@"好"
otherButtonTitles:nil];
[alert show];
[alert release];
}
[sqlInsert release];
}
//数据库更新
if(oprateType == 1){
sqlTestList *newValue = [[sqlTestList alloc]init];
newValue.sqlID = [idValue.text intValue];
newValue.sqlText = textValue.text;
newValue.sqlname = textName.text;
//调用封装好的更新数据库函数
if ([sqlSer updateTestList:newValue]) {
UIAlertView *alert = [[UIAlertView alloc] initWithTitle:@"提示"
message:@"更新数据成功"
delegate:self
cancelButtonTitle:@"好"
otherButtonTitles:nil];
[alert show];
[alert release];
}
else {
UIAlertView *alert = [[UIAlertView alloc] initWithTitle:@"提示"
message:@"更新数据失败"
delegate:self
cancelButtonTitle:@"好"
otherButtonTitles:nil];
[alert show];
[alert release];
}
[newValue release];
}
}
@end
复制代码
代码写的有些啰嗦,不过不难容易看懂,不多解释了,要在xib文件中添加3个UITextField和ULabel,要记得连线。
在主界面的.h文件
复制代码
#import <UIKit/UIKit.h>
#import "sqlService.h"
@interface SQLite3TestViewController : UIViewController<UITableViewDelegate,UITableViewDataSource> {
UITableView *utableView;
NSArray *listData;
UISearchBar *searchBar;//搜索栏
}
@property (nonatomic, retain) IBOutlet UITableView *utableView;
@property (nonatomic, retain) IBOutlet UISearchBar *searchBar;
@property (nonatomic, retain) NSArray *listData;
- (IBAction)insertValue;
- (IBAction)updateValue;
- (IBAction)getAllValue;
- (IBAction)deleteValue;
- (IBAction)searchValue;
@end
复制代码
.m文件
复制代码
//
// SQLite3TestViewController.m
// SQLite3Test
//
// Created by fengxiao on 11-11-28.
// Copyright 2011 __MyCompanyName__. All rights reserved.
//
#import "SQLite3TestViewController.h"
#import "operateSqlViewController.h"
@implementation SQLite3TestViewController
@synthesize utableView;
@synthesize listData;
@synthesize searchBar;
- (void)viewDidLoad{
sqlService *sqlSer = [[sqlService alloc] init];
listData = [sqlSer getTestList];//先初始化那个专门用于存数据的类,才调用类获取数据的方法
}
- (void)viewDidAppear:(BOOL)animated{//在这里写是为了等待时间缩短一点,数据如果很多的,在这里写可以让数据提前加载
sqlService *sqlSer = [[sqlService alloc] init];
listData = [sqlSer getTestList];
[sqlSer release];
[utableView reloadData];
}
- (void)didReceiveMemoryWarning {
// Releases the view if it doesn''t have a superview.
[super didReceiveMemoryWarning];
// Release any cached data, images, etc that aren''t in use.
}
- (void)viewDidUnload {
utableView = nil;
listData = nil;
searchBar = nil;
[super viewDidUnload];
// Release any retained subviews of the main view.
// e.g. self.myOutlet = nil;
}
- (void)dealloc {
[utableView release];
[listData release];
[searchBar release];
[super dealloc];
}
- (IBAction)insertValue{
[searchBar resignFirstResponder];//触发这个insertValue方法时隐藏键盘
operateSqlViewController *operateController = [[operateSqlViewController alloc] init ];
UINavigationController *theNavController = [[UINavigationController alloc]
initWithRootViewController:operateController];//这里如果不初始化一个UINavigationController类的对象来存放operateSqlViewController类的UIViewController,就不会有最上面的导航栏了。
operateController.oprateType = 0;//optrateType为0时为数据插入
[operateController release];
theNavController.navigationBar.tintColor = [UIColor blackColor];
[self presentModalViewController:theNavController animated:YES];
[theNavController release];
}
- (IBAction)updateValue{
[searchBar resignFirstResponder];
NSIndexPath *indexPath = [utableView indexPathForSelectedRow];
if (indexPath == nil) {
UIAlertView *alert = [[UIAlertView alloc] initWithTitle:@"提示"
message:@"请选择要更新的项"
delegate:self
cancelButtonTitle:@"好"
otherButtonTitles:nil];
[alert show];
[alert release];
return;
}
NSUInteger row = [indexPath row];
sqlTestList *sqlList = [[sqlTestList alloc]init];
sqlList = [listData objectAtIndex:(row - 1)];//在这里面获取点击的行,因为table的第一行没显示数据,所以这里要减1。
operateSqlViewController *operateController = [[operateSqlViewController alloc] init ];
UINavigationController *theNavController = [[UINavigationController alloc]
initWithRootViewController:operateController];
operateController.oprateType = 1;//optrateType为1时为数据更新
operateController.sqlValue = sqlList;
theNavController.navigationBar.tintColor = [UIColor blackColor];
[self presentModalViewController:theNavController animated:YES];
[sqlList release];
[operateController release];
[theNavController release];
}
- (IBAction)getAllValue{
[searchBar resignFirstResponder];
sqlService *sqlSer = [[sqlService alloc] init];
listData = [sqlSer getTestList];
[utableView reloadData];
[sqlSer release];
}
- (IBAction)deleteValue{
[searchBar resignFirstResponder];
NSIndexPath *indexPath = [utableView indexPathForSelectedRow];
if (indexPath == nil) {
UIAlertView *alert = [[UIAlertView alloc] initWithTitle:@"提示"
message:@"请选择要删除的项"
delegate:self
cancelButtonTitle:@"好"
otherButtonTitles:nil];
[alert show];
[alert release];
return;
}
NSUInteger row = [indexPath row];
sqlTestList *sqlList = [[sqlTestList alloc]init];
sqlList = [listData objectAtIndex:(row - 1)];
sqlService *sqlSer = [[sqlService alloc] init];
if ([sqlSer deleteTestList:sqlList]) {
UIAlertView *alert = [[UIAlertView alloc] initWithTitle:@"提示"
message:@"删除数据成功"
delegate:self
cancelButtonTitle:@"好"
otherButtonTitles:nil];
[alert show];
[alert release];
//删除成功后重新获取数据更新列表
listData = [sqlSer getTestList];
[utableView reloadData];
}
else {
UIAlertView *alert = [[UIAlertView alloc] initWithTitle:@"提示"
message:@"删除数据失败"
delegate:self
cancelButtonTitle:@"好"
otherButtonTitles:nil];
[alert show];
[alert release];
return;
}
[sqlList release];
[sqlSer release];
}
- (IBAction)searchValue{
if ([searchBar.text isEqualToString:@""]) {
UIAlertView *alert = [[UIAlertView alloc] initWithTitle:@"提示"
message:@"请输入要查询数据的ID"
delegate:self
cancelButtonTitle:@"好"
otherButtonTitles:nil];
[alert show];
[alert release];
return;
}
else {
// int idNum = [searchBar.text intValue];
NSString *str = searchBar.text;
sqlService *sqlSer = [[sqlService alloc] init];
listData = [sqlSer searchTestList:str];
if ([listData count] == 0) {
UIAlertView *alert = [[UIAlertView alloc] initWithTitle:@"提示"
message:@"sorry,未查询到数据,请查看name是否有误"
delegate:self
cancelButtonTitle:@"好"
otherButtonTitles:nil];
[alert show];
[alert release];
return;
}
[searchBar resignFirstResponder];
[utableView reloadData];
[sqlSer release];
}
}
#pragma mark -
#pragma mark Table View Data Source Methods
- (NSInteger)tableView:(UITableView *)tableView numberOfRowsInSection:(NSInteger)section
{
// Return the number of rows in the section.
return [listData count] + 1;//从第二行开始,第一行不显示数据
}
- (UITableViewCell *)tableView:(UITableView *)tableView cellForRowAtIndexPath:(NSIndexPath *)indexPath
{
NSString *CustomIdentifier = [NSString stringWithFormat:@"cell%d",indexPath.row];
//cell不重用
UITableViewCell *cell = [tableView dequeueReusableCellWithIdentifier:CustomIdentifier];
if (indexPath.row == 0)
cell.selectionStyle = UITableViewCellSelectionStyleNone;
if ( cell == nil ) {
cell = [[[UITableViewCell alloc] initWithStyle:UITableViewCellStyleValue1
reuseIdentifier:CustomIdentifier] autorelease];
cell.backgroundColor = [UIColor clearColor];
}
if (indexPath.row > 0)
{
NSUInteger row = [indexPath row];
sqlTestList *sqlList = [[sqlTestList alloc] init] ;
if (listData != nil)
sqlList = [listData objectAtIndex: (row - 1)];//读取数据的时候也要减一行,从第二行开始
UILabel *nameLabel = [[UILabel alloc]initWithFrame:CGRectMake(0+40, 10, 70, 30)];
UILabel *IDLabel = [[UILabel alloc]initWithFrame:CGRectMake(90+40, 10, 70, 30)];
UILabel *valueLabel = [[UILabel alloc]initWithFrame:CGRectMake(180+40, 10, 70, 30)];
nameLabel.text = sqlList.sqlname;
IDLabel.text = sqlList.sqlText;
valueLabel.text = [NSString stringWithFormat:@"%d",sqlList.sqlID];
[cell.contentView addSubview:nameLabel];
[cell.contentView addSubview:IDLabel];
[cell.contentView addSubview:valueLabel];
[nameLabel release];
[IDLabel release];
[valueLabel release];
}
else
{
for (int i = 0; i < 3; i ++) {
UILabel *label = [[UILabel alloc]initWithFrame:CGRectMake(90 * i + 40, 10, 70 , 30)];
NSArray *array = [NSArray arrayWithObjects:@"姓名",@"ID",@"电话", nil];
label.text = [array objectAtIndex:i];
label.backgroundColor = [UIColor clearColor];
[cell.contentView addSubview:label];
[label release];
}
}
return cell;
}
- (NSIndexPath*)tableView:(UITableView *)tableView willSelectRowAtIndexPath:(NSIndexPath *)indexPath
{
[searchBar resignFirstResponder];
if (indexPath.row == 0) {
return nil;//让第一行不能点击
}
else
return indexPath;
}
@end

jsp 操作 mysql 数据库增删改查
jsp 连接 mysql 需要引入一个 jar 包,下载地址:http://dev.mysql.com/downloads/connector/j/
解压后把 mysql-connector-java-5.1.39-bin.jar 导入到 eclipse 中

然后在拷贝一份到 tomcat 下的 bin 目录下

然后就可以测试增删改查了
<%@ page language="java" contentType="text/html; charset=utf-8"
    pageEncoding="utf-8"%>
<%@ page import="java.sql.*"  %>
<!DOCTYPE html PUBLIC "-//W3C//DTD HTML 4.01 Transitional//EN" "http://www.w3.org/TR/html4/loose.dtd">
<html>
<head>
<meta http-equiv="Content-Type" content="text/html; charset=ISO-8859-1">
<title>Insert title here</title>
</head>
<body>

<table border="1">
<tr><th>id</th><th>用户名</th><th>密码</th></tr>
<%
Class.forName("com.mysql.jdbc.Driver");
String host = "jdbc:mysql://localhost:3306/demo?useUnicode=true&characterEncoding=utf-8" ;
String user = "root";
String pwd="";

Connection conn = DriverManager.getConnection(host, user, pwd);
Statement stmt = conn.createStatement();
int res = stmt.executeUpdate("INSERT INTO users(username,password)values(''zhangsan'',''123456'')");
out.println(res);

res = stmt.executeUpdate("UPDATE users set username=''张三'' where username=''zhangsan''");
out.println(res);

res = stmt.executeUpdate("DELETE FROM users WHERE id=1");
out.println(res);

ResultSet rs = stmt.executeQuery("SELECT * FROM users");
while(rs.next()){
	out.println("<tr><td>"+rs.getString("id")+"</td><td>"+rs.getString("username")+"</td><td>"+rs.getString("password")+"</td></tr>");
}

conn.close();
%>
</table>
</body>
</html>
今天关于SQL 数据库增删改查基本语句和sql数据库增删改查基本语句的介绍到此结束,谢谢您的阅读,有关Flask对mysql数据库增删改查、ios Sqlite 数据库增删改查基本操作、ios Sqlite数据库增删改查基本操作、jsp 操作 mysql 数据库增删改查等更多相关知识的信息可以在本站进行查询。
本文标签:


![[转帖]Ubuntu 安装 Wine方法(ubuntu如何安装wine)](https://www.gvkun.com/zb_users/cache/thumbs/4c83df0e2303284d68480d1b1378581d-180-120-1.jpg)

