对于想了解ORACLE11GRACASM磁盘的三种冗余模式的读者,本文将是一篇不可错过的文章,我们将详细介绍oraclerac磁盘最佳规划,并且为您提供关于AIX+oracle+rac+asm、Con
对于想了解ORACLE 11G RAC ASM 磁盘的三种冗余模式的读者,本文将是一篇不可错过的文章,我们将详细介绍oracle rac 磁盘 最佳 规划,并且为您提供关于AIX+oracle+rac+asm、Configuring Oracle 18c RAC Using NFS With ASM、Installation of SAP on RAC with Oracle ASM(转)、Linux redhat5.5安装Oracle 11g RAC + ASM + RAW 准备工作的有价值信息。
本文目录一览:- ORACLE 11G RAC ASM 磁盘的三种冗余模式(oracle rac 磁盘 最佳 规划)
- AIX+oracle+rac+asm
- Configuring Oracle 18c RAC Using NFS With ASM
- Installation of SAP on RAC with Oracle ASM(转)
- Linux redhat5.5安装Oracle 11g RAC + ASM + RAW 准备工作
")
ORACLE 11G RAC ASM 磁盘的三种冗余模式(oracle rac 磁盘 最佳 规划)
在安装 ASM 磁盘时采用了 high、normal、extenrnal 的三种冗余模式。
三种冗余模式
EXTERNAL 模式
External redundancy(1OCR and no copies)
An external redundancy disk group requires a minimum of one disk device.
The effective disk space in an external redundancy disk group is the sum of the disk space in all of its devices.
Because Automatic Storage Management does not mirror data in an external
redundancy disk group, Oracle recommends that you use external redundancy with storage devices such as RAID, or other
similar devices that provide their own data protection mechanisms.
NORMAL 模式
Normal redundancy(1 OCR and 2 copies )
In a normal redundancy disk group, to increase performance and reliability,
Automatic Storage Management by default uses two-way mirroring. A normal
redundancy disk group requires a minimum of two disk devices (or two
failure groups). The effective disk space in a normal redundancy disk group is
half the sum of the disk space in all of its devices.
For Oracle Clusterware files, Normal redundancy disk groups provide 3
voting disk files, 1 OCR and 2 copies (one primary and one secondary mirror).
With normal redundancy, the cluster can survive the loss of one failure group.
For most installations, Oracle recommends that you select normal redundancy.
HIGH 模式
High redundancy(1 OCR and 3 copies )
In a high redundancy disk group, Automatic Storage Management uses
three-way mirroring to increase performance and provide the highest level of
reliability. A high redundancy disk group requires a minimum of three disk
devices (or three failure groups). The effective disk space in a high redundancy
disk group is one-third the sum of the disk space in all of its devices.
For Oracle Clusterware files, High redundancy disk groups provide 5 voting
disk files, 1 OCR and 3 copies (one primary and two secondary mirrors). With
high redundancy, the cluster can survive the loss of two failure groups.
While high redundancy disk groups do provide a high level of data protection,
you should consider the greater cost of additional storage devices before
deciding to select high redundancy disk groups.
METALINK 文档描述
[ID 428681.1]
题目:OCR / Vote disk Maintenance Operations: (ADD/REMOVE/REPLACE/MOVE)
11.2+:
From 11.2, votedisk can be stored on either ASM diskgroup or cluster file systems. The following commands can only be
executed when GI is running either in cluster mode or exclusive mode. As grid user:
1. To add a Voting Disk
a. When votedisk is on cluster file system:
$ crsctl add css votedisk <VOTEDISK_LOCATION/filename>
b. When votedisk is on ASM diskgroup, no add option available. The number of votedisk is determined by the diskgroup
redundancy. If more copy of votedisk is desired, one can move votedisk to a diskgroup with higher redundancy.
2. To delete a Voting Disk
a. When votedisk is on cluster file system:
$ crsctl delete css votedisk <VOTEDISK_LOCATION/filename>
b. When votedisk is on ASM, no delete option available, one can only replace the existing votedisk group with another ASM
diskgroup
3. To move a Voting Disk
a. When votedisk is on cluster file system:
$ crsctl add css votedisk <NEW VOTEDISK_LOCATION/filename>
$ crsctl delete css votedisk <OLD VOTEDISK_LOCATION/filename>
b. When votedisk is on ASM or moving votedisk between cluster file system and ASM diskgroup
$ crsctl replace votedisk <+diskgroup>|<vdisk>
eg:
move to cluster file system:
$ crsctl replace votedisk /shared/vote.dat
Now formatting voting disk: /shared/vote.dat.
CRS-4256: Updating the profile
Successful addition of voting disk 32ff90ab38a04f65bf0c428c8fea9721.
Successful deletion of voting disk 3d34623f09b64f9dbfa44fabf455513e.
Successful deletion of voting disk 7043c38000a24f1abf36473ca7e9cd9e.
Successful deletion of voting disk 18de241007df4f9cbf3fbb4193f0ecb4.
CRS-4256: Updating the profile
CRS-4266: Voting file(s) successfully replaced
more to ASM diskgroup:
$ crsctl replace votedisk +OCRVOTE
CRS-4256: Updating the profile
Successful addition of voting disk 3d34623f09b64f9dbfa44fabf455513e.
Successful addition of voting disk 7043c38000a24f1abf36473ca7e9cd9e.
Successful addition of voting disk 18de241007df4f9cbf3fbb4193f0ecb4.
Successful deletion of voting disk a32c9b158e644fabbfdcc239c76f22a0.
Successfully replaced voting disk group with +CRS.
CRS-4256: Updating the profile
CRS-4266: Voting file(s) successfully replaced
联机文档描述
One reason to drop a disk group is to change the redundancy level (normal, high, or external). Because you cannot change
the redundancy of a disk group, you must drop the disk group and then re-create it with the proper redundancy. In this
case, you must back up or move disk group data before you drop the disk group
小结
如果要想改变 asm 磁盘组的冗余方式,就必须删除并重建磁盘组。
移走 OCR 磁盘内容 2.1 备份 2.1.1 备份 OCR
ocrconfig –export /tmp/ocr.bak
或
ocrconfig –manualbackup
$ ocrconfig -showbackup
node2 2012/02/24 12:09:34 /u01/grid/cdata/PMSBIPD/backup00.ocr
node2 2012/02/24 08:03:21 /u01/grid/cdata/PMSBIPD/backup01.ocr
node2 2012/02/24 04:03:21 /u01/grid/cdata/PMSBIPD/backup02.ocr
node2 2012/02/22 19:38:28 /u01/grid/cdata/PMSBIPD/day.ocr
node2 2012/02/10 11:48:21 /u01/grid/cdata/PMSBIPD/week.ocr
PROT-25: Manual backups for the Oracle Cluster Registry are not available
备份 VOTEDISK
In Oracle Clusterware 11g release 2 (11.2), you no longer have to back up the voting disk. The voting disk data is
automatically backed up in OCR as part of any configuration change and is automatically restored to any voting disk added.
If all voting disks are corrupted, however, you can restore them as described in "Restoring Voting Disks".--- 联机文档说不需
要备份 votedisk,可以使用 dd 备份
查看 VOTEDISK 位置
$ crsctl query css votedisk
## STATE File Universal Id File Name Disk group
-- ----- ----------------- --------- ---------
1. ONLINE 077fcbf9dd704f03bf95d2b1490208f2 (/dev/rdisk/disk444) [OCR_ORCL]
Located 1 voting disk(s).
备份
备份 votedisk 盘:
[root@node1 bin]# dd if=/dev/raw/raw5 of=/home/oracle/voting_disk.bak
256977+0 records in
256977+0 records out
恢复
恢复 votedisk 盘(如果真需要恢复的话):
[root@node1 bin]# dd if=/home/oracle/voting_disk.bak of=/dev/raw/raw5
256977+0 records in
256977+0 records out
备份 ASM 参数文件
在 OCR 的磁盘组里,有 OCR、VOTEDISK、ASM 的 SPFILE 参数文件,但是这里 ASM 的参数文件是不需要备份的,因为我们一会在改 ASM 参数文件位置
的时候,会生产 PFILE 文件,那时就已经是备份了。
移动 OCR
备注:这里将 OCR 移动到 DATA_ORCL 这个磁盘组上,在一个节点操作即可。
当 OCR 只有一份时,如果移动则会报错
NODE1#[/u01/grid/bin]./ocrconfig -replace OCR_ORCL -replacement DATA_ORCL
PROT-28: Cannot delete or replace the only configured Oracle Cluster Registry location
添加一份 OCR
NODE1#[/u01/grid/bin]./ocrconfig -add +DATA_ORCL
检查 OCR 位置
NODE1#[/u01/grid/bin]./ocrcheck
Status of Oracle Cluster Registry is as follows :
Version : 3
Total space (kbytes) : 262120
Used space (kbytes) : 2852
Available space (kbytes) : 259268
ID : 941087888
Device/File Name : +OCR_ORCL
Device/File integrity check succeeded
Device/File Name : +DATA_ORCL
Device/File integrity check succeeded
Device/File not configured
Device/File not configured
Device/File not configured
Cluster registry integrity check succeeded
Logical corruption check succeeded
删除一份 OCR
NODE1#[/u01/grid/bin]./ocrconfig -delete +OCR_ORCL
NODE1#[/u01/grid/bin]./ocrcheck
Status of Oracle Cluster Registry is as follows :
Version : 3
Total space (kbytes) : 262120
Used space (kbytes) : 2852
Available space (kbytes) : 259268
ID : 941087888
Device/File Name : +DATA_ORCL
Device/File integrity check succeeded
Device/File not configured
Device/File not configured
Device/File not configured
Device/File not configured
Cluster registry integrity check succeeded
Logical corruption check succeeded
NODE1#[/u01/grid/bin]cat /var/opt/oracle/ocr.loc
#Device/file +OCR_ORCL getting replaced by device +DATA_ORCL
ocrconfig_loc=+DATA_ORCL
移动 VOTEDISK
NODE1#[/u01/grid/bin]./crsctl replace votedisk +DATA_ORCL
Successful addition of voting disk 21dffc4c1ef84feebfaf2340c61853ba.
Successful deletion of voting disk 077fcbf9dd704f03bf95d2b1490208f2.
Successfully replaced voting disk group with +DATA_ORCL.
CRS-4266: Voting file(s) successfully replaced
NODE1#[/u01/grid/bin]./crsctl query css votedisk
## STATE File Universal Id File Name Disk group
-- ----- ----------------- --------- ---------
1. ONLINE 21dffc4c1ef84feebfaf2340c61853ba (/dev/rdisk/disk447) [DATA_ORCL]
备注:在一个节点操作即可。
移动 ASM 参数文件
查看 ASM 位置
$sqlplus / as sysasm
SQL> show parameter spfile
NAME TYPE VALUE
------------------------------------ ----------- ------------------------------
spfile string +OCR_ORCL/pmsbipd/asmparameterfile/registry.253.760201253
创建 PFILE
SQL> create pfile=''/home/grid/asminit.ora'' from spfile=''+OCR_ORCL/pmsbipd/asmparameterfile/registry.253.760201253'';
File created.
查看 PFILE 内容
$ cat asminit.ora
+ASM2.asm_diskgroups=''DATA_ORCL'',''REDO_ORCL''#Manual Mount
+ASM1.asm_diskgroups=''DATA_ORCL'',''REDO_ORCL''#Manual Mount
*.asm_power_limit=1
*.diagnostic_dest=''/u01/oracle''
*.instance_type=''asm''
*.large_pool_size=12M
*.remote_login_passwordfile=''EXCLUSIVE''
关闭 ASM 实例
NODE2#[/u01/grid/bin]./srvctl stop asm -o abort -f
以 PFILE 启动 ASM 实例
$sqlplus / as sysasm
SQL> startup pfile=''/home/grid/asminit.ora'';
ASM instance started
Total System Global Area 283930624 bytes
Fixed Size 2169104 bytes
Variable Size 256595696 bytes
ASM Cache 25165824 bytes
ASM diskgroups mounted
SQL> show parameter spfile
NAME TYPE VALUE
------------------------------------ ----------- ------------------------------
spfile string
创建 SPFILE
SQL> create spfile=''+DATA_ORCL'' from pfile=''/home/grid/asminit.ora'';
File created.
以 SPFILE 启动 ASM 实例
NODE2#[/u01/grid/bin]./srvctl stop asm -o abort -f
$sqlplus / as sysasm
SQL> startup
ASM instance started
Total System Global Area 283930624 bytes
Fixed Size 2169104 bytes
Variable Size 256595696 bytes
ASM Cache 25165824 bytes
ASM diskgroups mounted
SQL> show parameter spfile
NAME TYPE VALUE
-------------- -----------------------------
spfile string +DATA_ORCL/pmsbipd/asmparameterfile/registry.253.776257911
节点二重启 CLUSTER
将另一个节点的 cluster 重启以保证 asm 的 spfile 是新的参数文件
此时最好是将 2 个节点的 cluster 都重启下,让所有的资源都正常。
删除 OCR 磁盘组
查看 OCR 磁盘组状态
节点一:
SQL> select name,state from v$asm_diskgroup;
NAME STATE
------------------------------ -----------
DATA_ORCL MOUNTED
REDO_ORCL MOUNTED
OCR_ORCL DISMOUNTED
节点二:
SQL> select name,state from v$asm_diskgroup;
NAME STATE
------------------------------ -----------
DATA_ORCL MOUNTED
REDO_ORCL MOUNTED
OCR_ORCL DISMOUNTED
查看 OCR 磁盘组包括的磁盘
SQL> select name,GROUP_NUMBER ,DISK_NUMBER,state,REDUNDANCY ,TOTAL_MB,FREE_MB,path from v$asm_disk where name like ''OCR%'';
NAME GROUP_NUMBER DISK_NUMBER STATE REDUNDA TOTAL_MB FREE_MB PATH
------------------------------ ------------ ----------- -------- ------- ---------- ----------
----------------------------------------
OCR_ORCL_0000 1 0 NORMAL UNKNOWN 1031 844 /dev/rdisk/disk444
OCR_ORCL_0001 1 1 NORMAL UNKNOWN 1031 908 /dev/rdisk/disk445
OCR_ORCL_0002 1 2 NORMAL UNKNOWN 1031 909 /dev/rdisk/disk446
节点 2 卸载 OCR 磁盘
备注:节点一不卸载
SQL> alter diskgroup OCR_ORCL dismount ;
Diskgroup altered.
SQL> select name,state from v$asm_diskgroup;
NAME STATE
------------------------------ -----------
DATA_ORCL MOUNTED
REDO_ORCL MOUNTED
OCR_ORCL DISMOUNTED
OCR 磁盘组删除
备注:在节点一操作
SQL> drop diskgroup OCR_ORCL including contents;
Diskgroup dropped.
3.5 两节点查看
SQL> select name,state from v$asm_diskgroup;
NAME STATE
------------------------------ -----------
DATA_ORCL MOUNTED
REDO_ORCL MOUNTED
SQL> select name,state from v$asm_diskgroup;
NAME STATE
------------------------------ -----------
DATA_ORCL MOUNTED
REDO_ORCL MOUNTED
ASMCA 重建 OCR 磁盘组
打开
创建注意选择 normal 冗余
完成
查看状态
SQL> select name,state from v$asm_diskgroup;
NAME STATE
------------------------------ -----------
DATA_ORCL MOUNTED
REDO_ORCL MOUNTED
OCR_ORCL MOUNTED
将信息移回 OCR 磁盘组
OCR 移回
查看 OCR 位置
NODE1#[/u01/grid/bin]./ocrcheck
Status of Oracle Cluster Registry is as follows :
Version : 3
Total space (kbytes) : 262120
Used space (kbytes) : 2852
Available space (kbytes) : 259268
ID : 941087888
Device/File Name : +DATA_ORCL
Device/File integrity check succeeded
Device/File not configured
Device/File not configured
Device/File not configured
Device/File not configured
Cluster registry integrity check succeeded
./ Logical corruption check succeeded
添加一份 OCR
NODE1#[/u01/grid/bin]./ocrconfig -add +OCR_ORCL
NODE1#[/u01/grid/bin]./ocrcheck
Status of Oracle Cluster Registry is as follows :
Version : 3
Total space (kbytes) : 262120
Used space (kbytes) : 2852
Available space (kbytes) : 259268
ID : 941087888
Device/File Name : +DATA_ORCL
Device/File integrity check succeeded
Device/File Name : +OCR_ORCL
Device/File integrity check succeeded
Device/File not configured
Device/File not configured
Device/File not configured
Cluster registry integrity check succeeded
Logical corruption check succeeded
删除一份 OCR
NODE1#[/u01/grid/bin]./ocrconfig -delete +DATA_ORCL
NODE2#[/u01/grid/bin]./ocrcheck
Status of Oracle Cluster Registry is as follows :
Version : 3
Total space (kbytes) : 262120
Used space (kbytes) : 2852
Available space (kbytes) : 259268
ID : 941087888
Device/File Name : +OCR_ORCL
Device/File integrity check succeeded
Device/File not configured
Device/File not configured
Device/File not configured
Device/File not configured
Cluster registry integrity check succeeded
Logical corruption check succeeded
VOTEDISK 移回
NODE1#[/u01/grid/bin]./crsctl query css votedisk
## STATE File Universal Id File Name Disk group
-- ----- ----------------- --------- ---------
1. ONLINE 21dffc4c1ef84feebfaf2340c61853ba (/dev/rdisk/disk447) [DATA_ORCL]
Located 1 voting disk(s).
NODE1#[/u01/grid/bin]./crsctl replace votedisk +OCR_ORCL
Successful addition of voting disk 57ebf38a74524fbebf146a38ef3e1088.
Successful addition of voting disk 376ef62cf1c14febbfd6635bd9786366.
Successful addition of voting disk 6658efafcb194f7cbff49fa4bb8b5408.
Successful deletion of voting disk 21dffc4c1ef84feebfaf2340c61853ba.
Successfully replaced voting disk group with +OCR_ORCL.
CRS-4266: Voting file(s) successfully replaced
NODE1#[/u01/grid/bin]./crsctl query css votedisk
## STATE File Universal Id File Name Disk group
-- ----- ----------------- --------- ---------
1. ONLINE 57ebf38a74524fbebf146a38ef3e1088 (/dev/rdisk/disk444) [OCR_ORCL]
2. ONLINE 376ef62cf1c14febbfd6635bd9786366 (/dev/rdisk/disk445) [OCR_ORCL]
3. ONLINE 6658efafcb194f7cbff49fa4bb8b5408 (/dev/rdisk/disk446) [OCR_ORCL]
Located 3 voting disk(s).
ASM 参数文件移回
创建 PFILE
$ sqlplus / as sysasm
SQL> show parameter spfile
NAME TYPE VALUE
------------- -----------------------
spfile string +DATA_ORCL/pmsbipd/asmparameterfile/registry.253.776257911
SQL> create pfile=''/home/grid/asmocrinit.ora'' from spfile=''+DATA_ORCL/pmsbipd/asmparameterfile/registry.253.776257911'';
File created.
关闭 ASM 实例
NODE1#[/u01/grid/bin]./srvctl stop asm -o abort -f
启动 ASM 实例
$ sqlplus / as sysasm
SQL> startup pfile=''/home/grid/asmocrinit.ora'';
ASM instance started
Total System Global Area 283930624 bytes
Fixed Size 2169104 bytes
Variable Size 256595696 bytes
ASM Cache 25165824 bytes
ASM diskgroups mounted
创建 SPFILE
SQL> create spfile=''+OCR_ORCL'' from pfile=''/home/grid/asmocrinit.ora'';
File created.
关闭 ASM 实例
NODE1#[/u01/grid/bin]./srvctl stop asm -o abort -f
节点一启动 CLUSTER
NODE1#[/u01/grid/bin]./crsctl start cluster -n node1
节点二启动 CLUSTER
NODE2#[/u01/grid/bin]./crsctl start cluster -n node2
查看 OCR、VOTEDISK、ASM 参数文件位置
查看 OCR 位置
NODE2#[/u01/grid/bin]./ocrcheck
Status of Oracle Cluster Registry is as follows :
Version : 3
Total space (kbytes) : 262120
Used space (kbytes) : 2852
Available space (kbytes) : 259268
ID : 941087888
Device/File Name : +OCR_ORCL
Device/File integrity check succeeded
Device/File not configured
Device/File not configured
Device/File not configured
Device/File not configured
Cluster registry integrity check succeeded
Logical corruption check succeeded
查看 VOTEDISK 位置
NODE2#[/u01/grid/bin]./crsctl query css votedisk
## STATE File Universal Id File Name Disk group
-- ----- ----------------- --------- ---------
1. ONLINE 57ebf38a74524fbebf146a38ef3e1088 (/dev/rdisk/disk444) [OCR_ORCL]
2. ONLINE 376ef62cf1c14febbfd6635bd9786366 (/dev/rdisk/disk445) [OCR_ORCL]
3. ONLINE 6658efafcb194f7cbff49fa4bb8b5408 (/dev/rdisk/disk446) [OCR_ORCL]
Located 3 voting disk(s).
查看 ASM 参数文件位置
$ sqlplus / as sysasm
SQL*Plus: Release 11.2.0.1.0 Production on Sun Feb 26 14:31:43 2012
Copyright (c) 1982, 2009, Oracle. All rights reserved.
Connected to:
Oracle Database 11g Enterprise Edition Release 11.2.0.1.0 - 64bit Production
With the Real Application Clusters and Automatic Storage Management options
SQL> show parameter spfile
NAME TYPE VALUE
原文地址 http://www.itpub.net/thread-1580669-1-1.html
本文同步分享在 博客 “xjsunjie”(51CTO)。
如有侵权,请联系 support@oschina.cn 删除。
本文参与 “OSC 源创计划”,欢迎正在阅读的你也加入,一起分享。

AIX+oracle+rac+asm
AIX6.1+Oracle 10g R2+RAC+ASM
环境简介
一.安装前准备
1.1 检查硬件是否满足需求
1.2 检查系统包和补丁是否满足需求
1.3 建立oracle 用户/组/目录
1.4 调试内核和系统参数
1.5 建立节点信任关系
1.6 配置NTP 时间同步
1.7 磁盘配置
1.8 用户环境变量配置
二.Oracle 安装
2.1 crs 安装
2.2 crs 升级
2.3 数据库软件安装
2.4 数据库软件升级
2.5 建立监听
2.6 建立ASM 实例和磁盘组
2.7 建立数据库
三.数据库安装后续设置
3.1 本地LISTENER 配置
3.2 RAC 下修改归档模式
1. 硬件环境
两台IBM POWER6 550 内存16G、DS5300(FC 450G *4 RAID 10)
2.网络环境
公共IP地址(en0)210.34.96.190210.34.96.191
虚拟IP地址(en0)210.34.96.192(210.34.96.139)210.34.96.193
私有IP地址(en2)10.0.0.110.0.0.2
服务器节点名db1db2
3.SAN 环境
4.ORACLE RAC数据库系统规划
节点1节点2
操作系统AIX6100-0700AIX6100-0700
服务器主机名db2
IP地址语言环境ENEN
时区ZHZH
内置硬盘300G*4300G*4
系统硬盘hdisk0、hdisk1hdisk0、hdisk1
系统分区Swap16G16G
/2G2G
/home4G4G
/tmp/usr10G10G
/opt/var4G
ORACLE软件分区/oralce30G30G
系统用户名密码root/rootroot
oracle/rootrootoracle/rootroot
数据库磁盘分区OCR (oracle集群注册表)/dev/rhdisk4 (1G)
/dev/rhdisk5 (1G)
表决磁盘(voting disk)/dev/rhdisk6 (1G)
/dev/rhdisk7 (1G)
/dev/rhdisk8 (1G)
归档/dev/rhdisk9(1T)
ASM/dev/rhdisk10(200G)
数据库版本Oracle db 10g Enterprise Edition Release 10.2.0.1(64位)
ORACLE_BASE目录/opt/oracle
ORACLE_HOME目录/opt/oracle/product/10.2.0/db_1
CRS_HOME目录/opt/oracle/product/10.2.0/crs
数据库名Rac
数据库服务名/SIDrac/rac1、rac2
归档模式打开,自动归档
数据库监听端口1521
数据库字符american_america.ZHS16GBK
数据库系统帐号与初始密码sys/rootroot
system/rootroot
数据库恢复区大小数据库实例建库方式ASM
数据库块大小8192 bytes
1.1 检查硬件
查看系统是否满足需求:
# uname
查看版本
# oslevel -r#两个节点版本号需完全一致
查看系统架构,ORALCE RAC要求64位操作系统
# bootinfo –K
查看硬盘大小
# lscfg -vp|grep hdisk#这个只能看本地盘大小,不能看到存储划过来的盘的大小
# bootinfo -s hdiskn#可以看到所有盘(包括存储盘)的大小
查看内存大小
# /usr/sbin/lsattr -El sys0 -a realmem 或# prtconf -m
查看交换分区
# /usr/sbin/lsps -a
修改交换分区 # smitty chps16G
修改系统分区大小
# chfs -a size=2G /
# chfs -a size=4G /tmp
# chfs -a size=4G /home
# chfs -a size=10G /usr
# chfs -a size=40G /opt
# chfs -a size=4G /var
创建oralce软件目录/opt/oracle
查看所有系统分区 # df -g
1.2 检查软件补丁包
系统文件包:
JDK 1.4.2 (64-bit)
# lslpp -l bos.adt.base bos.adt.lib bos.adt.libm bos.perf.perfstat bos.perf.libperfstat bos.perf.proctools xlC.rte xlC.aix61.rte rsct.basic.rte rsct.compat.clients.rte bos.cifs_fs.rte
如果有的包没安装,需要安装盘,将没安装的包重新安装上
查看 oracle 所需AIX 要打补丁集是否已经打上:
# /usr/sbin/instfix -ik "IZ10223 "
如果补丁没打,需打上
# lslpp -l OpenGL.OpenGL_X.adt.include OpenGL.OpenGL_X.adt.samples OpenGL.OpenGL_X.rte.base OpenGL.OpenGL_X.rte.soft bos.iconv.ucs.Zh_CN
1.3 建oracle 用户和组
需要建 的组:oinstall,dba
需要建的用户:oracle
# mkgroup -A "id=301" oinstall
# mkgroup -A "id=302" dba
建 ORACLE 用户
# useradd -u 301 -g oinstall -G dba -d '/opt/oracle' oracle
修改oracle 用户密码:
# passwd oracle
(注:确保两个节点的gid,uid 必须相同)
查看用户信息:
# id oracle
# id nobody
(注:如果nobody 不存在,必须创建)
确定 root 和oracle 用户拥有以下能力,如果没有需添加:
CAP_PROPAGATE,CAP_BYPASS_RAC_VMM,CAP_NUMA_ATTACH
查看:
# lsuser oracle
# lsuser root
为用户添加以下能力:
# /usr/bin/chuser capabilities=CAP_PROPAGATE,CAP_NUMA_ATTACH oracle
# mkdir -p /opt/oracle/product/10.2.0/db_1# ORACLE_HOME
# mkdir -p /opt/oracle/product/10.2.0/crs# CRS_HOME
# chown -R oracle:oinstall /opt/oracle# ORACLE_BASE
# chmod -R 755 /opt/oracle
1.4 内核参数调试
查看用户限制
# ulimit -a
# cat /etc/security/limits
修改用户限制:
# chuser fsize=-1 oracle
# chuser stack=-1 oracle
# chuser RSS=-1 oracle
# chuser core=-1 oracle
# chuser data=-1 oracle
# chuser nofiles=-1 oracle
# chuser fsize=-1 root
# chuser stack=-1 root (以下可不修改)
# chuser RSS=-1 root
# chuser core=-1 root
# chuser data=-1 root
# chuser nofiles=-1 root
修改系统配置参数:maxuproc
# chdev -l sys0 -a maxuproc='16384' 注:oracle 官方给出参考值为:2048
修改内核参数脚本(修改后需重启系统才能生效):
# vmo -p -o maxperm%=90
# vmo -p -o minperm%=3need nextboot
# vmo -p -o maxclient%=90
# vmo -p -o strict_maxperm=0
# vmo -p -o strict_maxclient=1
# vmo -p -o lru_file_repage=0# vmo -r -o page_steal_method=1(need to reboot to take into effect)
网络参数配置
# no -a|more 查看
查看系统是否运行在兼容模式下:
# /usr/sbin/lsattr -El sys0 -a pre520tune
pre520tune disable Pre-520 tuning compatibility mode True
如果系统运行在兼容模式下,使用下面命令修改:
# /usr/sbin/no -o parameter_name=value
For example:
# /usr/sbin/no -o udp_recvspace=655360
如果系统运行在非兼容模式下,使用下面命令修改:
# /usr/sbin/no -r -o ipqmaxlen=512
Other parameter:
# /usr/sbin/no -p -o parameter=value
参数修改脚本:
# /usr/sbin/no -p -o rfc1323=1
# /usr/sbin/no -p -o sb_max=1310720
# /usr/sbin/no -p -o tcp_sendspace=65536
# /usr/sbin/no -p -o tcp_recvspace=65536
# /usr/sbin/no -p -o udp_sendspace=65536
# /usr/sbin/no -p -o udp_recvspace=655360
检查网络设置
# cat /etc/netsvc.conf | grep hosts
查看主机名
# hostname
查看域名
# domainname
查看hosts 配置
# cat /etc/hosts
db1
210.34.96.191210.34.96.192db1-vip
210.34.96.193db2-vip
db1-priv
10.0.0.2db2-priv
1.5 配置节点信任关系
配置节点信任有两种方式,可以任选一种
一种用.rhosts
一种用ssh
Rhosts 配置:
在 root 和oracle 用户的主目录(# cat /etc/passwd 如root:!:0:0::/:/usr/bin/ksh主目录为/)下修改或者新建.rhosts 文件,内容如下:
root 用户:
root
db2db1-vipdb2-vipdb1-privdb2-privoracle 用户:
oracle
完成后使用 rlogin,rsh 进行测试
#rlogin db2
#rsh db2 date
…….
配置 SSH 等效(可选)
用 oracle 用户登录
$ mkdir ~/.ssh
$ chmod 700 ~/.ssh
$ /usr/bin/ssh-keygen -t rsa
$ /usr/bin/ssh-keygen -t dsa
$ touch ~/.ssh/authorized_keys
$ cd ~/.ssh
$ ls -al
$ cat ~/.ssh/id_rsa.pub >> authorized_keys
$ cat id_dsa.pub >>authorized_keys
$ cat id_rsa.pub >>authorized_keys
$ scp oracle@db2:/opt/oracle/.ssh/authorized_keys /opt/oracle/.ssh/authorized_keys2
$ scp oracle@db1:/opt/oracle/.ssh/authorized_keys /opt/oracle/.ssh/authorized_keys1 #节点2执行
$ cat authorized_keys1 >>authorized_keys
$ cat authorized_keys2 >>authorized_keys #节点2执行
$ chmod 600 ~/.ssh/authorized_keys
打开 ssh 等效性
$ exec /usr/bin/ssh-agent $SHELL
$ /usr/bin/ssh-add
设置 disPLAY
$ export disPLAY=hostname(ip):0.0
验证 ssh 等效性
$ ssh dbname1 date
$ ssh dbname2 date
1.6 配置ntp
------------------------------------------------------------------------------------
1. 构造一个NTP环境的基本步骤(假设NTP不是运行在SP上):
1.1 设置NTP 服务器 (MASTER),其它NTP客户服务器以此服务器的时间为准,与其进行时间同步.
1.1.1 编辑 /etc/ntp.conf 文件,内容如下:
#broadcastclient
server 127.127.1.0
driftfile /etc/ntp.drift
tracefile /etc/ntp.trace
请注意文件中的 server 127.127.1.0 这一行,此处的127.127.1.0 是一特殊的地址,表示NTP主服务器是与自身的系统时钟同步.
1.1.2 编辑好 /etc/ntp.conf后,启动xntpd守护进程
# startsrc -s xntpd
也可通过调用smitty,使 xntpd 在以后重启服务器时能自动启动.
# smitty xntpd
1.1.3xntpd 状态查询,使用 # l***c -ls xntpd
刚启动xntpd时,sys peer 为 'insane',表明xntpd还没有完成同步
# l***c -ls xntpd
Program name: --/usr/sbin/xntpd
Version: -------3
Leap indicator: 11 (Leap indicator is insane.)
Sys peer: ------no peer,system is insane
...
等待 6 - 10 分钟后,sys peer 就不再是 'insane' 了.
Leap indicator: 00 (No leap second today.)
Sys peer: ------127.127.1.0
1.2. NTP客户端的设置
1.2.1 编辑 NTP 客户端上的 /etc/ntp.conf文件,255);">server 210.34.96.190
其中的 server 210.34.96.190表明,此客户端与IP地址为 210.34.96.190的NTP服务器进行时间同步.
1.2.2 在NTP客户端启动xntpd守护进程
1.2.3 查询xntpd的状态
当 system peer 不为 'insane' 时,表明客户端已与服务器端成功地进行了同步.
Sys peer: ------210.34.96.190
1.3. NTP客户端查询NTP服务器
ntp客户端使用 ntpdate 命令来确认是否可用指定的 ntp 服务器进行时间同步。
命令的结果会显示客户端与服务器的时间偏移。
# ntpdate -d 210.34.96.190
18 Mar 10:52:54 ntpdate[23578]: step time server 9.185.43.189 offset 86323.06827 2 sec
若时间间隔大于1000秒,使用ntpdate 进行调整,如:
# date
Tue Mar 18 11:06:29 BEIST 2003
# ntpdate 210.34.96.190
19 Mar 11:06:51 ntpdate[23832]: step time server 9.185.43.189 offset 86403.40260 7 sec
# date
Wed Mar 19 11:06:54 BEIST 2003
完成上述操作后 ntp 客户端与 ntp 服务器系统时钟完成同步,ntp 客户端得到了新的系统时间。
1.7 配置磁盘
使用 ASM
需修改下列存储参数:
将 reserve_policy 值修改为no_reserve
(此处是修改磁盘在AIX系统的锁定)
# /usr/sbin/chdev -l hdisk4 -a reserve_policy=no_reserve #ocr 盘
# /usr/sbin/chdev -l hdisk5 -a reserve_policy=no_reserve# /usr/sbin/chdev -l hdisk6 -a reserve_policy=no_reserve#voting disk 盘
# /usr/sbin/chdev -l hdisk7 -a reserve_policy=no_reserve# /usr/sbin/chdev -l hdisk8 -a reserve_policy=no_reserve# /usr/sbin/chdev -l hdisk9 -a reserve_policy=no_reserve#arch盘
# /usr/sbin/chdev -l hdisk10 -a reserve_policy=no_reserve#asm盘
查看修改结果
# lsattr -El hdisk4 |grep reserve_policy
设置存储磁盘权限
# /usr/sbin/lsdev -Cc disk
使用祼盘做CRS 盘:
# chown oracle:oinstall /dev/rhdisk4 (ocr disk)
# chown oracle:oinstall /dev/rhdisk5# chown oracle:oinstall /dev/rhdisk6(voting disk)
# chown oracle:oinstall /dev/rhdisk7# chown oracle:oinstall /dev/rhdisk8# chown oracle:oinstall /dev/rhdisk9(arch)
# chown oracle:oinstall /dev/rhdisk10(asm)
# chmod 660 /dev/rhdisk4# chmod 660 /dev/rhdisk5# chmod 660 /dev/rhdisk6# chmod 660 /dev/rhdisk7# chmod 660 /dev/rhdisk8# chmod 660 /dev/rhdisk9# chmod 660 /dev/rhdisk10使用祼设备做 CRS 盘:
# ls -alF /dev/*hdiskn
注:(创建别名22 为磁盘路径的主号,4 为磁盘路径的从号,是通过命令ls -l /dev/*hdiskn查看得来的)查看磁盘号: #lscfg |grep hd
查看磁盘的主号和次号: ls -l /dev |grep hd
# ls -l /dev/*hdisk4
brw------- 1 root system 23,5 Mar 31 01:54 /dev/hdisk4
crw-rw---- 1 oracle oinstall 23,5 Mar 31 01:54 /dev/rhdisk4
# mknod /dev/ocr_disk c 23 5
# chown oracle:oinstall /dev/ocr_disk
# chmod 660 /dev/ocr_disk
# ls -l /dev/*hdisk9
#mknod /dev/Vote_disk c 23 9
# chown oracle:oinstall /dev/Vote_disk
# chmod 660 /dev/Vote_disk
(同理,完成*hdisk10-14)
1.8 用户环境变量设置:
$ cat .profile
PATH=/usr/bin:/etc:/usr/sbin:/usr/ucb:$HOME/bin:/usr/bin/X11:/sbin:.
export PATH
if [ -s "$MAIL" ] # This is at Shell startup. In normal
then echo "$MAILMSG" # operation,the Shell checks
fi # periodically.
export ORACLE_BASE=/opt/oracle
export ORACLE_HOME=$ORACLE_BASE/product/10.2.0/db_1
export CRS_HOME=$ORACLE_BASE/product/10.2.0/crs
export TEMP=/tmp
export TMP=/tmp
export TMPDIR=/tmp
export PATH=$PATH:$ORACLE_HOME/bin:$CRS_HOME/bin
export AIXTHREAD_ScopE=S
umask 022
export disPLAY=210.34.96.190:0.0
export LIBPATH=$ORACLE_HOME/lib:$CRS_HOME/install/prepatch10204/lib32/
$ cat .dtprofile
去掉最后一行前面的 #
DTSOURCEPROFILE=true
注:以上所有操作都必须在两个节点上执行(需修改一些参数)
二.ORACLE 安装
2.1CRS 安装
1.以root 用户在两个节点上运行rootpre.sh,在安装前必须运行这个脚本
注:补丁 p6718715 需在Metalink 上下载
$ su - root
# unzip p6718715_10203_AIX64-5L.zip
# chmod 755 *
# ./rootpre.sh
2.只要在一个节点上执行安装:(图形界面下)
登录到节点 1,切换到oracle 用户,安装之前运行下面命令检查系统当前是否满足数据库安装,也可手动一步一步查看:
# su – oracle
$ gunzip 10gr2_aix5l64_cluster.cpio.gz
$ cpio –idcmv < 10gr2_aix5l64_cluster.cpio
$ cd disk1/cluvfy
$ ./runcluvfy.sh stage -pre crsinst -n db1,db2 –verbose
3.切换到oracle 用户,如果上面命令运行成功(会报VIP 错误,实际没碰到),执行下面命令开始安装数据库:
进入安装目录:
$ ./runInstaller –ignoreSysPreReqs
在这里会提示你是否运行过rootpre.sh,如果已经运行选择Y,开始安装(如果没运行,请选N 退出后以root用户运行,然后再次安装)
点击Next
选择Oracle 目录清单存放目录,/oracle/oraInventory,点击Next
Name:CRS_HOME
选择CRS安装的目录oracle/product/10.2.0/crs,点击Next
到了安装前期的环境检查,这里需要把握的就是,凡是系统检查没有报告"Failed",那么就不用管,"warning"或者"not executed"都没有关系,只要我们在对应的小方框里面打勾就可以了,oracle进行系统参数检查无问题,点击Next
集群名rac
集群节点配置,这里默认只有节点1,第二个节点需点Add添加,格式按节点1 配置。指定网卡类型,这里系统把所有可用的网卡都扫描进来,我们需要把eth0设置为public方式,eth1设置为Private。点击Next
OCR文件的存放位置,选择normal Redundancy
Specify OCR Location: /dev/ocr_disk
Specify OCR Mirror Location: /dev/ocr_disk2
(若选择External Redundancy,则不冗余)
Voting disk文件的存放位置,选择External Redundancy
Voting disk Location: /dev/Voted_disk
(若选择normal Redundancy,则冗余,需要3块Voting disk)
执行安装至完成。
完成后安装提示用root用户分别在每个节点执行root.sh。
运行成功后,回到节点1 点下一步,然后弹出安装成功。
CRS配置完成。
2.2 将cluster 从10.2.0.1 升级到10.2.0.4
1.先将CRS 停掉:
在一个节点以 oracle 执行
先查看:
$ crs_stat –t
停止crs 资源:
$ crs_stop –all
然后在每个节点上以root 用户执行下列命令,停掉 crs 进程:
# /etc/init.crs stop
使用:crs_stat –t,ps –ef|grep crs 等命令确认crs 已经停掉
2.将升级补丁包上传到服务器,解压
$ unzip p6810189_10204_AIX5L.zip
将包解压到同一个目录下
3.在运行升级程序前需要以root 用户在每个节点执行下面命令:
#/usr/sbin/slibclean
4.然后切换到oracle 用户运行升级安装程序:
进入升级程序目录,然后运行:
./runInstaller –ignoreSysPreReqs
提示是否以root 用户运行过:/usr/sbin/slibclean 命令时,选择Y,开始升级安装
5.选择crs_home 目录,然后点下一步,开始升级安装
6.安装完结束前提示如下
To complete the installation of this patchset,you must perform the following tasks on each node:
Log in as the root user.
2.As the root user,perform the following tasks:
a.Shutdown the CRS daemons by issuing the following command:
/u01/crs/oracle/product/10.2/crs/bin/crsctl stop crs
b.Run the shell script located at:
/u01/crs/oracle/product/10.2/crs/install/root102.sh
This script will automatically start the CRS daemons on the
patched node upon completion.
3.After completing this procedure,proceed to the next node and repeat.
要以root 用户停止crs,然后运行root102.sh脚本在第一个节点和第二个节点依次执行下面步骤,第一个节点执行完了后再在第二个节点上执行,两个节点都执行完以后再回到第一个节点点退出。
以 root 用户登录,然后停止crs:
# su – root
# /oracle/product/10.2.0/crs/bin/crsctl stop crs
# /oracle/product/10.2.0/crs/install/root102.sh
7.在两个节点上脚本运行完成后,使用以下命令查看升级是否成功:
$ crsctl query crs softwareversion
查看结果显示,如果版本为10.2.0.4 则表示升级成功。
2.3 Oracle database 安装
1.将oracle database 安装包上传到服务器,解压
$ gunzip 10gr2_aix5l64_database.cpio.gz
$ cpio –idcmv <10gr2_aix5l64_database.cpio
执行安装
提示是否运行过rootpre.sh 时,之前已经运行过,这里输入y
选择企业版,点击Next
Name: ORACLE_HOME
Path: /oracle/product/10.2.0/db_1
点击“Select All”选择所有节点,点击Next
Oracle软件进行系统参数检查,检查通过后点击Next
选择Install Database Software only ,点击Next
点击Next完成安装。安装完成后按照提示分别在每个节点用root用户执行root.sh脚本。
2.4 Oracle database software 升级到10.2.0.4
进入升级包目录:
1.执行安装
$./runInstaller
2.选择oracle home 目录
3.选择下一步,然后选择install 开始升级安装
4.安装完成后退出,连上oracle 软件,看版本,如果为10.2.0.4,表示升级成功
2.5 建监听
1.切换到oracle 用户下,运行以下命令:
$ netca
选择Cluster Configuration,点击Next
点击“Select all nodes”选择所有节点,点击“Next”
选择Listener configuration,点击Next
选择Add,点击Next
配置监听器的名称,点击Next
选择TCP协议支持,点击Next
使用1521端口作为监听端口,点击Next
不进行其他配置,点击Next
完成监听器配置
安装完成后验证:
$ lsnrctl status
$crs_stat –t
2.6 建ASM 实例和磁盘组
1.这里需安装一个数据库补丁8350262.zip
$ unzip 8350262.zip
$ cd 8350262 $ ORACLE_HOME/OPatch/opatch apply
2.切换到oracle 用户下,运行以下命令:
$dbca
选择Oracle Real Application Clusters database,点击Next
选择Configure Austomatic Storage Management,点击Next
点击“select all”选择所有节点,点击“next”
给出ASM SYS的密码为keyan,选择使用Pfile作为ASM的参数文件,点击Next
点击OK
ASM 实例开始启动
出现ASM磁盘组的界面,点击Create New
出现选择磁盘新建磁盘组界面,点击Change disk discovery Path按钮
输入discovery Path为/dev/asm_disk,点击OK
选择/dev/rrac_data01磁盘,选择Redundancy为Extenal,给出disk Group Name为DATA01,点击OK
完成新建ASM工作
2.7 数据库建立
选择Create Database,点击Next
选择General purpose,点击Next
输入Global Database Name和SID prefix为rac,点击Next
去掉Configure the Database with Enterprose Manager,点击Next
输入SYS和SYstem的密码,点击Next
储存选择Automatic Storage Management (ASM) ,点击Next
选择第四步建立的DATA01作为存储,点击Next
出现Service配置界面,点击Add添加Service
Enter Service name 处填写rac,点击OK
TAF Policy 选择Basic,rac1和rac2都使用Perferred,点击Next
内存配置使用系统内存的65%,点击Sizing Tab页
更改Processes 为1024,选择Character Sets Tab页
选择Choose from the list of character sets中的ZHS16GBK,
Defatult Language为Simplified Chinese,Default Date Format为China,点击Next
点击Finish建立数据库。
验证RAC 集群和数据库配置
所有实例和服务的状态
$ srvctl status database -d rac
Instance rac1 is running on node db1
Instance rac2 is running on node db2
单个实例的状态
$ srvctl status instance -d rac -i rac1
$ srvctl status instance -d rac -i rac2
在数据库全局命名服务的状态
$ srvctl status service -d keyan
Service keyandb is running on instance(s) keyan2,keyan1
特定节点上节点应用程序的状态
$ srvctl status nodeapps -n db1
VIP is running on node: db1
GSD is running on node: db1
Listener is running on node: db1
ONS daemon is running on node: db1
$ srvctl status nodeapps -n db2
VIP is running on node: db2
GSD is running on node: db2
Listener is running on node: db2
ONS daemon is running on node: db2
ASM 实例的状态
$ srvctl status asm -n db1
ASM instance +ASM1 is running on node db1.
$ srvctl status asm -n db2
ASM instance +ASM2 is running on node db2.
列出配置的所有数据库
$ srvctl config database
rac
显示RAC 数据库的配置
$ srvctl config database -d rac
db1 rac1 /oracle/product/10.2.0/db_1
db2 rac2 /oracle/product/10.2.0/db_1
显示指定集群数据库
$ srvctl config service -d keyan
keyandb PREF: keyan2 keyan1 AVAIL:
显示节点应用程序的配置-(VIP、GSD、ONS、监听器)
$ srvctl config nodeapps -n db1 -a -g -s -l
VIP exists.: /db1-vip/210.34.96.199/255.255.255.0/en0
GSD exists.
ONS daemon exists.
Listener exists.
$ srvctl config nodeapps -n db2 -a -g -s -l
VIP exists.: /db2-vip/210.34.96.193/255.255.255.0/en0
显示ASM 实例的配置
$ srvctl config asm -n db1
+ASM1 /oracle/product/10.2.0/db_1
$ srvctl config asm -n db2
+ASM2 /oracle/product/10.2.0/db_1
集群中所有正在运行的实例
sql> select inst_id,instance_number inst_no,instance_name inst_name,parallel,status,database_status db_status,active_state state,host_name host FROM gv$instance ORDER BY inst_id;
INST_ID INST_NO INST_NAME PAR STATUS DB_STATUSSTATE HOST
---------------------------------------------------------------------------------------------------------------------------------
1 1 rac1 YES OPEN ACTIVEnorMAL db1
2 2 rac2 YES OPEN ACTIVE norMAL db2
位于磁盘组中的所有数据文件
sql> select name from v$datafile;
NAME
--------------------------------------------------------------------------------
+DATA01/rac/datafile/system.262.776302619
+DATA01/rac/datafile/undotbs1.263.776302627
+DATA01/rac/datafile/sysaux.264.776302633
+DATA01/rac/datafile/undotbs2.266.776302637
+DATA01/rac/datafile/users.267.776302641
sql> select member from v$logfile;
MEMBER
+DATA01/rac/onlinelog/group_1.258.776302615
+DATA01/rac/onlinelog/group_1.259.776302615
+DATA01/rac/onlinelog/group_2.260.776302617
+DATA01/rac/onlinelog/group_2.261.776302617
+DATA01/rac/onlinelog/group_3.268.776304139
+DATA01/rac/onlinelog/group_3.269.776304141
+DATA01/rac/onlinelog/group_4.270.776304141
+DATA01/rac/onlinelog/group_4.271.776304143
8 rows selected.
sql> select name from v$controlfile;
+DATA01/rac/controlfile/current.256.776302615
+DATA01/rac/controlfile/current.257.776302615
https://210.34.96.190:1158/em
若为英文环境,希望以中文显示,浏览器菜单->工具->Internet,语言

Configuring Oracle 18c RAC Using NFS With ASM
1、环境介绍
所用到的主机信息如图中所示:
@H_301_10@
2、NFS Server配置
[[email protected] ~]# vi /etc/exports
/u02    *(rw,sync,no_wdelay,insecure_locks,no_root_squash)
[[email protected] ~]# systemctl restart nfs
[[email protected] ~]# showmount -e
Export list for onas:
/u02 *
3、RAC节点挂载NFS共享
RAC节点分别编辑/etc/fstab文件,加入以下内容:
[[email protected] ~]# vi /etc/fstab
onas:/u02               /u02            nfs     rw,bg,hard,nointr,tcp,vers=3,timeo=600,rsize=32768,wsize=32768,actimeo=0  0 0
[[email protected] ~]# mount -a
[[email protected] ~]# vi /etc/fstab
onas:/u02               /u02            nfs     rw,actimeo=0  0 0
[[email protected] ~]# mount -a
4、安装Grid组件
4.1 初始安装
具体的安装过程不做过多描述,只截取几张ASM部分的截图。
这里使用第二个选项“Configure ASM on NFS”,使用了此选项后,系统会自动创建共享磁盘。
@H_301_10@
@H_301_10@

指定OCR的位置,下一步。待Grid组件安装并配置完成后,默认会创建一块30G大小的磁盘ocrvfdgdisk0,用于OCRVFDG磁盘组,如下:
[[email protected] ~]# la /u02/asmrac/
total 33G
drwxr-xr-x 2 grid oinstall   40 Sep  4 17:05 .
drwxr-xr-x 8 root root     4.0K Sep  4 15:09 ..
-rw-rw---- 1 grid asmadmin  28G Sep  5 09:52 ocrvfdgdisk0
通过asmca图形界面查看,如下图所示:
@H_301_10@
4.2 创建磁盘组
在共享目录下,创建了10块虚拟磁盘:asmdisk1~asmdisk10,分别演示使用asmca和命令行创建磁盘组。通过asmca图形界面创建data磁盘组,通过asmca命令创建fra磁盘组。
@H_301_10@
@H_301_10@

[[email protected] ~]$ asmca -silent -sysAsmPassword abcABC12 -asmsnmpPassword abcABC12 -creatediskGroup -diskString ‘/u02/asmrac‘ -diskGroupName fra -diskList /u02/asmrac/asmdisk6 -redundancy external -au_size 4
[INFO] [DBT-30001] disk groups created successfully. Check /u01/app/grid/cfgtoollogs/asmca/asmca-180905AM105833.log for details.
//添加磁盘
[[email protected] ~]$ asmca -silent -sysAsmPassword abcABC12 -asmsnmpPassword abcABC12 -adddisk -diskString ‘/u02/asmrac‘ -diskGroupName fra -diskList /u02/asmrac/asmdisk7,/u02/asmrac/asmdisk8,/u02/asmrac/asmdisk9
[[email protected] ~]$ asmcmd lsdsk -t -G fra
Create_Date  Mount_Date  Repair_Timer  Path
05-SEP-18    05-SEP-18   0             /u02/asmrac/asmdisk6
05-SEP-18    05-SEP-18   0             /u02/asmrac/asmdisk7
05-SEP-18    05-SEP-18   0             /u02/asmrac/asmdisk8
05-SEP-18    05-SEP-18   0             /u02/asmrac/asmdisk9
5、使用ASMLib配置
5.1 创建虚拟共享磁盘
[[email protected] asmdisks]# for i in  {1..10};do dd if=/dev/zero of=/u02/asmrac/asmdisk$i bs=1024k count=10000;done
[[email protected] ~]# ll /u02/asmrac/
total 102400000
-rw-r--r-- 1 root root 10485760000 Sep  4 11:41 asmdisk1
-rw-r--r-- 1 root root 10485760000 Sep  4 11:41 asmdisk2
-rw-r--r-- 1 root root 10485760000 Sep  4 11:41 asmdisk3
-rw-r--r-- 1 root root 10485760000 Sep  4 11:41 asmdisk4
-rw-r--r-- 1 root root 10485760000 Sep  4 11:41 asmdisk5
-rw-r--r-- 1 root root 10485760000 Sep  4 11:41 asmdisk6
-rw-r--r-- 1 root root 10485760000 Sep  4 11:41 asmdisk7
-rw-r--r-- 1 root root 10485760000 Sep  4 11:41 asmdisk8
-rw-r--r-- 1 root root 10485760000 Sep  4 11:41 asmdisk9
-rw-r--r-- 1 root root 10485760000 Sep  4 11:41 asmdisk10
5.2 配置ASMLib服务
在RAC各个节点分别配置asmlib服务,如下:
[email protected] ~]# oracleasm configure -i
Configuring the Oracle ASM library driver.

This will configure the on-boot properties of the Oracle ASM library
driver.  The following questions will determine whether the driver is
loaded on boot and what permissions it will have.  The current values
will be shown in brackets (‘[]‘).  Hitting <ENTER> without typing an
answer will keep that current value.  Ctrl-C will abort.

Default user to own the driver interface []: grid
Default group to own the driver interface []: dba
Start Oracle ASM library driver on boot (y/n) [n]: y
Scan for Oracle ASM disks on boot (y/n) [y]:
Writing Oracle ASM library driver configuration: done
[[email protected] ~]# oracleasm init
Creating /dev/oracleasm mount point: /dev/oracleasm
Loading module "oracleasm": oracleasm
Configuring "oracleasm" to use device physical block size
Mounting ASMlib driver filesystem: /dev/oracleasm
5.3 创建块设备
如果使用asmlib,必须使用losetup命令创建块设备,如下:
[[email protected] ~]# for i in {1..10};do losetup /dev/loop$i /u02/asmdisks/asmdisk$i;done
[[email protected] ~]# ll /dev/looP*
brw-rw---- 1 root disk  7,1 Sep  4 14:35 /dev/loop1
brw-rw---- 1 root disk  7,10 Sep  4 14:35 /dev/loop10
brw-rw---- 1 root disk  7,2 Sep  4 14:35 /dev/loop2
brw-rw---- 1 root disk  7,3 Sep  4 14:35 /dev/loop3
brw-rw---- 1 root disk  7,4 Sep  4 14:35 /dev/loop4
brw-rw---- 1 root disk  7,5 Sep  4 14:35 /dev/loop5
brw-rw---- 1 root disk  7,6 Sep  4 14:35 /dev/loop6
brw-rw---- 1 root disk  7,7 Sep  4 14:35 /dev/loop7
brw-rw---- 1 root disk  7,8 Sep  4 14:35 /dev/loop8
brw-rw---- 1 root disk  7,9 Sep  4 14:35 /dev/loop9
crw-rw---- 1 root disk 10,237 Sep  4 14:35 /dev/loop-control
[[email protected] ~]# for i in {1..10};do losetup /dev/loop$i /u02/asmdisks/asmdisk$i;done
[[email protected] ~]# ll /dev/looP*
5.4 创建ASM磁盘
[[email protected] ~]# for i in {1..10};do oracleasm createdisk vol$i /dev/loop$i;done
[[email protected] ~]# oracleasm scandisks
Reloading disk partitions: done
Cleaning any stale ASM disks...
Scanning system for ASM disks...
Instantiating disk "VOL1"
Instantiating disk "VOL2"
Instantiating disk "VOL3"
Instantiating disk "VOL4"
Instantiating disk "VOL5"
Instantiating disk "VOL6"
Instantiating disk "VOL7"
Instantiating disk "VOL8"
Instantiating disk "VOL9"
Instantiating disk "VOL10"
5.5 使用ASM磁盘
在安装Grid组件时,在配置“Storage Option”中选择第一个选项“Configure ASM using block devices”,如下图:
@H_301_10@
@H_301_10@

@H_301_10@

")
Installation of SAP on RAC with Oracle ASM(转)
https://blogs.sap.com/2016/03/17/installation-of-sap-on-rac-with-oracle-asm-part-3distributed-environment/
I am writing this blog , as i faced issue on installing SAP system on oracle RAC with ASM.
When i raised a message with SAP , SAP told me to install SAP on oracle and then migrate it to RAC with ASM.
So i want to add few points to make it easier for others. There are few importants points which we need to remember.
1. SWPM will give you four options to install SAP
i. Single Instance on Filesystem
ii. Single Instance on Oracle ASM
iii. RAC on Filesystem
iv. RAC on oracle ASM
2.Database RAC Parameter
3. We need to know about the scan listener name and port which it is using. By default it uses a port 1521.
4. Listener Configuration for each RAC Node.
I have to install the SAP on RAC with oracle ASM , in a distributed environment, so i installed the SCS first , which got completed successfully.
After this ,i started the installation with Database instance installation.
What option should we select in SWPM for RAC?
SWPM will give you four options for Database installation scenario.
i. Single Instance on Filesystem (normal)
ii. Single Instance on Oracle ASM(oracle is on ASM without RAC )
iii. RAC on Filesystem (RAC nodes without ASM )
iv. RAC on oracle ASM(RAC node will exists with ASM)
I have selected option RAC on oracle ASM as we are having RAC with ASM environment.
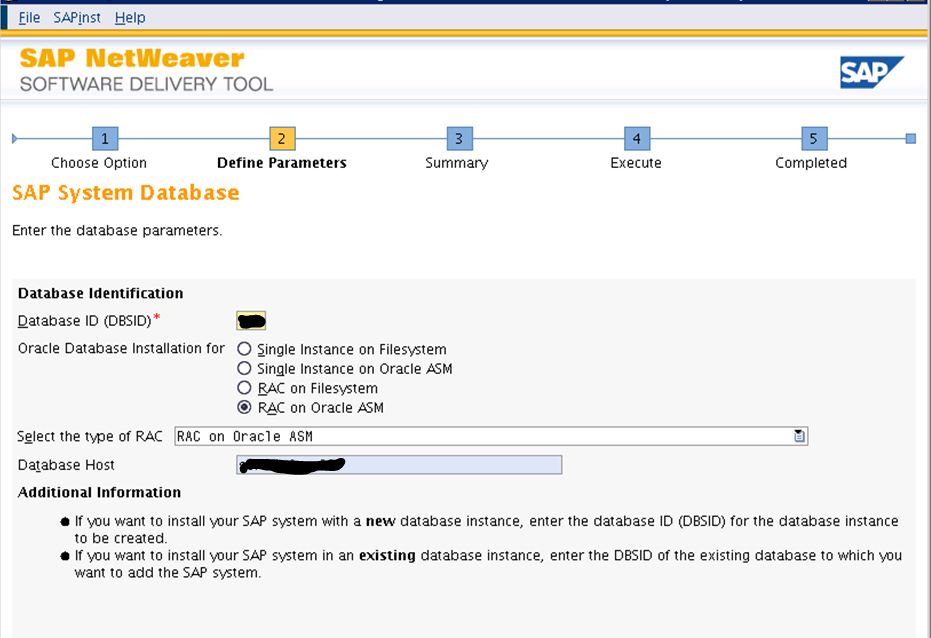
Database RAC Parameter
In the below diagram , where you need to provide the RAC Parameters
i. Database Name : You need to enter the Database name(DBSID) as per your requirement for example i have given DBSID as RAD.
ii. Number of instances : You need to specify the number of instances to be created which in turn depends on the number of RAC Node.
Suppose , we are having three RAC node RACN1 , RACN2 , RACN3 and i have mentioned DBSID as RAD.
Since we are using three RAC node so Number of Instances we need to mentioned 3 and it will create three instances of DB and assigned them to each RAC node.
RACN1—–>RACN2—–>RACN3
RAD1 RAD2 RAD3
iii. Length of Instance Number : i. One character
ii. Three character.
if we select the one character option , then DBSID(in our case which is RAD) followed by one character digit for each instance on RAC node.
For eample
RACN1—–>RACN2—–>RACN3
RAD<N> RAD<N+1> RAD<N+2> Where N stands for Length for Instance Number
Since we have selected the option one character so here value of N will start from 1.
RACN1—–>RACN2—–>RACN3
RAD1 RAD2 RAD3 where N=1
So it will be same for three character option where N starts from 001 and so the naming convention for the instances will be
RACN1——->RACN2——->RACN3
RAD001 RAD002 RAD003 where N=001

What we need to know about the SCAN Listener?
SWPM asked for scan listener name only but we need to input port number as well , which it didn’t asked for?
if you don’t specify the port number , it will give I/O network error and will not able to connect to Database.
When we setup the RAC environment , a Server control utility get installed on each RAC node by default which is used to start ,stop , manage configuration information and also used to add and remove the instances from RAC environment. By the help of Server control utility , we can get the scan listener name and its port number.
When we run below command on the primary RAC node , we will be get the scan listener name.
srvctl config scan
It will give us the scan listener name and ip information(Generally we keep three scan listener)
srvctl config scan_listener
The above command , will let us know which port is configured for the scan listener.
Here we need to enter the correct scan listener name which is configured on RAC environment as it will have it own scan listener.
SCAN stands for Single client Access Name.
Scan Listener* : Enter the scan listener name which will be used by the SAP to connect to Database and if , it is a Dual stack or only Java stack then JDBC string will be created using the scan listener name.

After firing the command ” srvctl config scan” and “srvctl config scan_listener” we will get the scan listener name and its port number
Suppose our scan listener name is scan1 and port number is 1521 (which is default) so in Label
Oracle RAC secure store connect* will be like this
jdbc:oracle:thin:@/scan1:1521/Service_name since the Service_name is the DBSID which is RAD.
So the final string , will be
jdbc:oracle:thin:@/scan1:1521/RAD (Here i have mentioned the port 1521 explicitly)

Listener Configuration for each RAC Node
You need to configure the local listener parameter for each RAC node and remote listener parameter will be scan listener which will be common for each RAC node.
In Spfile<SID>.ora , you need to add local listener for each RAC node with the port number which will be different from scan listener port number.
In Spfile<SID>.ora , you need to remove the parameter *.local_listener and in place of it you need to add three parameter for each RAC node and the corresponding instance. For example , we are having three instance distributed on each RAC node RACN1 , RACN2 , RACN3.
Local Listener parameter will be like this
RAD1.local_listener=’//RACN1:1527′ (for RAC node RACN1 having a instance RAD1)
RAD2.local_listener=’//RACN1:1527′ (for RAC node RACN2 having a instance RAD2)
RAD3.local_listener=’//RACN1:1527′ (for RAC node RACN3 having a instance RAD3)
But
There will be only remote listener which will have the scan listener name and its port number
*.remote_listener=’//scan1:1521′ (it will be common on all the RAC Node)
Now why we are configuring the local listener on each RAC node with a a different port number.
We are configuring the local listener so that we can take the backup for Database using a BR*TOOLS.
I will be writing a next blog on BRTOOLS in RAC environment.
Please follow the below SAP Notes and While Paper published from SAP
1. Note 581320 – FAQ: Oracle Real Application Cluster (RAC)
2. Note 527843 – Oracle RAC support in the SAP environment
3. http://scn.sap.com/docs/DOC-8835

Linux redhat5.5安装Oracle 11g RAC + ASM + RAW 准备工作
提示
linux 磁盘最好是用lvm的方式管理
内存 1.5G以上
交换空间 3G以上
/tmp 目录2GB以上
安装Grid Infrastracture所需空间:8GB
安装Oracle Database所需空间:4GB
注:本文只讲解安装前的配置,具体的图形化安装教程网上很多,如果linux未安装图形界面,可以使用xmanager安装
查看内存及Swap大小的命令如下。
[root@rac1 ~]# grep MemTotal /proc/meminfo
[root@rac1 ~]# grep SwapTotal /proc/meminfo
创建共享磁盘
D:\Program Files (x86)\VMware\VMware Workstation>vmware-vdiskmanager.exe -c -s 5
00Mb -a lsilogic -t 2 "G:\Virtual Machines\Share Disks"\sharedisk01.vmdk
D:\Program Files (x86)\VMware\VMware Workstation>vmware-vdiskmanager.exe -c -s 5
00Mb -a lsilogic -t 2 "G:\Virtual Machines\Share Disks"\sharedisk02.vmdk
D:\Program Files (x86)\VMware\VMware Workstation>vmware-vdiskmanager.exe -c -s 4
Gb -a lsilogic -t 2 "G:\Virtual Machines\Share Disks"\sharedisk03.vmdk
D:\Program Files (x86)\VMware\VMware Workstation>vmware-vdiskmanager.exe -c -s 4
Gb -a lsilogic -t 2 "G:\Virtual Machines\Share Disks"\sharedisk04.vmdk
附加共享磁盘到虚拟机
disk.locking = "false"
diskLib.dataCacheMaxSize = "0"
diskLib.dataCacheMaxReadAheadSize = "0"
diskLib.dataCacheMinReadAheadSize = "0"
diskLib.dataCachePageSize = "4096"
diskLib.maxUnsyncedWrites = "0"
scsi1.present = "TRUE"
scsi1.sharedBus = "virtual"
scsi1.virtualDev = "lsilogic"
scsi1:1.deviceType = "disk"
scsi1:1.fileName = "G:\Virtual Machines\Share Disks\sharedisk01.vmdk"
scsi1:1.mode = "independent-persistent"
scsi1:1.present = "TRUE"
scsi1:1.redo = ""
scsi1:2.deviceType = "disk"
scsi1:2.fileName = "G:\Virtual Machines\Share Disks\sharedisk02.vmdk"
scsi1:2.mode = "independent-persistent"
scsi1:2.present = "TRUE"
scsi1:2.redo = ""
scsi1:3.deviceType = "disk"
scsi1:3.fileName = "G:\Virtual Machines\Share Disks\sharedisk03.vmdk"
scsi1:3.mode = "independent-persistent"
scsi1:3.present = "TRUE"
scsi1:3.redo = ""
scsi1:4.deviceType = "disk"
scsi1:4.fileName = "G:\Virtual Machines\Share Disks\sharedisk04.vmdk"
scsi1:4.mode = "independent-persistent"
scsi1:4.present = "TRUE"
scsi1:4.redo = ""
给附加磁盘建立分区表 (n,p,1,回车,回车,w)
[root@rac1 ~]# fdisk /dev/sdb
[root@rac1 ~]# fdisk /dev/sdc
[root@rac1 ~]# fdisk /dev/sdd
[root@rac1 ~]# fdisk /dev/sde
格式化新建分区
[root@rac1 ~]# mkfs -t ext3 /dev/sdb1
[root@rac1 ~]# mkfs -t ext3 /dev/sdc1
[root@rac1 ~]# mkfs -t ext3 /dev/sdd1
[root@rac1 ~]# mkfs -t ext3 /dev/sde1
在每一个节点上添加安装Oracle Grid的用户、组和家目录,并设置权限。
[root@rac1 ~]# groupadd oinstall
[root@rac1 ~]# groupadd asmadmin
[root@rac1 ~]# groupadd asmdba
[root@rac1 ~]# groupadd asmoper
[root@rac1 ~]# groupadd dba
[root@rac1 ~]# groupadd oper
[root@rac1 ~]# useradd -g oinstall -G asmadmin,asmdba,asmoper,oper,dba grid
[root@rac1 ~]# useradd -g oinstall -G dba,asmdba,oper oracle
[root@rac1 ~]# mkdir -p /u01/app/11.2.0/grid
[root@rac1 ~]# mkdir -p /u01/app/grid
[root@rac1 ~]# chown -R grid:oinstall /u01/app
[root@rac1 ~]# mkdir /u01/app/oracle
[root@rac1 ~]# chown oracle:oinstall /u01/app/oracle
[root@rac1 ~]# chmod -R 775 /u01/app
[root@rac1 ~]# passwd grid
[root@rac1 ~]# passwd oracle
设置环境变量
[grid@rac1 ~]$ vi ~/.bash_profile
export ORACLE_BASE=/u01/app/grid
export ORACLE_HOME=/u01/app/11.2.0/grid
export ORACLE_SID=+ASM1 (rac2上为+ASM2)
export LD_LIBRARY_PATH=$ORACLE_HOME/lib
export PATH=$ORACLE_HOME/bin:$PATH
[grid@rac1 ~]$ source ~/.bash_profile
[oracle@rac1 ~]$ vi ~/.bash_profile
export ORACLE_BASE=/u01/app/oracle
export ORACLE_HOME=/u01/app/oracle/product/11.2.0/db_1
export ORACLE_SID=racdb1 (rac2上为racdb2)
export LD_LIBRARY_PATH=$ORACLE_HOME/lib
export PATH=$ORACLE_HOME/bin:$PATH
[oracle@rac2 ~]$ source ~/.bash_profile
修改/etc/sysctl.conf的内容
[root@rac1 ~]# vi /etc/sysctl.conf
fs.file-max = 6815744
fs.aio-max-nr = 1048576
net.ipv4.ip_forward = 0
net.ipv4.conf.default.rp_filter = 1
net.ipv4.conf.default.accept_source_route = 0
kernel.sysrq = 0
kernel.core_uses_pid = 1
net.ipv4.tcp_syncookies = 1
net.ipv4.ip_local_port_range = 9000 65500
net.core.rmem_default = 262144
net.core.rmem_max = 4194304
net.core.wmem_default = 262144
net.core.wmem_max = 1048576
kernel.msgmnb = 65536
kernel.msgmax = 65536
kernel.shmmax = 536870912
kernel.shmall = 2097152
kernel.shmmni = 4096
kernel.sem = 250 32000 100 128
[root@rac1 ~]# sysctl -p
修改/etc/hosts的内容
[root@rac1 ~]# vi /etc/hosts
192.168.244.131 rac1
192.168.244.132 rac2
192.168.244.231 rac1-vip
192.168.244.232 rac2-vip
192.168.93.121 rac1-priv
192.168.93.122 rac2-priv
192.168.244.31 rac-scan
192.168.244.32 rac-scan
192.168.244.33 rac-scan
使用yum源安装依赖包
[root@rac1 ~]# yum -y install binutils-*
[root@rac1 ~]# yum -y install compat-lib*
[root@rac1 ~]# yum -y install gcc-*
[root@rac1 ~]# yum -y install glibc-*
[root@rac1 ~]# yum -y install libgcc-*
[root@rac1 ~]# yum -y install libstdc++*
[root@rac1 ~]# yum -y install libaio-*
[root@rac1 ~]# yum -y install make-*
[root@rac1 ~]# yum -y install sysstat-*
[root@rac1 ~]# yum -y install unixODBC*
[root@rac1 ~]# yum -y install elfutils-*
关闭NTPOracle(建议使用Oracle Cluster Time Synchronization Service,因此关闭删除NTP)
[root@rac1 ~]# /sbin/service ntpd stop
[root@rac1 ~]# chkconfig ntpd off
[root@rac1 ~]# rm /etc/ntp.conf
[root@rac1 ~]# rm /var/run/ntpd.pid
设置oracle使用的文件数权限
[root@rac1 ~]# vi /etc/security/limits.conf
oracle soft nproc 2047
oracle hard nproc 16384
oracle soft nofile 1024
oracle hard nofile 65536
grid hard nproc 16384
grid hard nofile 65536
修改安全限制
[root@rac1 ~]# vi /etc/pam.d/login
session required /lib/security/pam_limits.so
配置裸设备
[root@rac1 ~]# vi /etc/udev/rules.d/60-raw.rules
ACTION=="add", KERNEL=="/dev/sdb1", RUN+="/bin/raw /dev/raw/raw1 %N"
ACTION=="add", ENV{MAJOR}=="8", ENV{MINOR}=="17", RUN+="/bin/raw /dev/raw/raw1 %M %m"
ACTION=="add", KERNEL=="/dev/sdc1", RUN+="/bin/raw /dev/raw/raw2 %N"
ACTION=="add", ENV{MAJOR}=="8", ENV{MINOR}=="33", RUN+="/bin/raw /dev/raw/raw2 %M %m"
ACTION=="add", KERNEL=="/dev/sdd1", RUN+="/bin/raw /dev/raw/raw3 %N"
ACTION=="add", ENV{MAJOR}=="8", ENV{MINOR}=="49", RUN+="/bin/raw /dev/raw/raw3 %M %m"
ACTION=="add", KERNEL=="/dev/sde1", RUN+="/bin/raw /dev/raw/raw4 %N"
ACTION=="add", ENV{MAJOR}=="8", ENV{MINOR}=="65", RUN+="/bin/raw /dev/raw/raw4 %M %m"
KERNEL=="raw[1-4]", OWNER="oracle", GROUP="oinstall", MODE="640"
[root@rac1 ~]# start_udev
配置SSH互信(grid和oracle都要配置)
[root@rac1 ~]# su - grid
[grid@rac1~]$ mkdir ~/.ssh
[grid@rac1~]$ chmod 700 ~/.ssh
[grid@rac1~]$ ssh-keygen -t rsa
[grid@rac1~]$ ssh-keygen -t dsa
[grid@rac2~]$ mkdir ~/.ssh
[grid@rac2~]$ chmod 700 ~/.ssh
[grid@rac2~]$ ssh-keygen -t rsa
[grid@rac2~]$ ssh-keygen -t dsa
[grid@rac1~]$ cat ~/.ssh/id_rsa.pub >> ~/.ssh/authorized_keys
[grid@rac1~]$ cat ~/.ssh/id_dsa.pub >> ~/.ssh/authorized_keys
[grid@rac1~]$ ssh rac2 cat ~/.ssh/id_rsa.pub >> ~/.ssh/authorized_keys
[grid@rac1~]$ ssh rac2 cat ~/.ssh/id_dsa.pub >> ~/.ssh/authorized_keys
[grid@rac1~]$ scp ~/.ssh/authorized_keys rac2:~/.ssh/authorized_keys
[grid@rac1~]$ ssh rac1 date
[grid@rac1~]$ ssh rac2 date
[grid@rac1~]$ ssh rac1-priv date
[grid@rac1~]$ ssh rac2-priv date
[grid@rac2~]$ ssh rac1 date
[grid@rac2~]$ ssh rac2 date
[grid@rac2~]$ ssh rac1-priv date
[grid@rac2~]$ ssh rac2-priv date
安装oracleasmlib程序包
oracleasm-support-2.1.8-1.el5.x86_64.rpm
oracleasm-2.6.18-194.el5-2.0.5-1.el5.x86_64.rpm
oracleasmlib-2.0.4-1.el5.x86_64.rpm
配置ASM
[root@rac1 ~]# /etc/init.d/oracleasm configure -i (grid asadmin y y)
[root@rac1 ~]# /etc/init.d/oracleasm createdisk DATA1 /dev/sdb1
[root@rac1 ~]# /etc/init.d/oracleasm createdisk DATA2 /dev/sdc1
[root@rac1 ~]# /etc/init.d/oracleasm createdisk DATA3 /dev/sdd1
[root@rac1 ~]# /etc/init.d/oracleasm createdisk DATA4 /dev/sde1
[root@rac1 ~]# /etc/init.d/oracleasm scandisks
[root@rac1 ~]# /etc/init.d/oracleasm listdisks
[root@rac2 ~]# /etc/init.d/oracleasm scandisks
[root@rac2 ~]# /etc/init.d/oracleasm listdisks
使用CVU检查各个节点的配置工作(grid为linux_11gR2_grid.zip解压后的目录)
[grid@rac1 grid]$ ./runcluvfy.sh stage -pre crsinst -n rac1,rac2 -fixup -verbose
关于ORACLE 11G RAC ASM 磁盘的三种冗余模式和oracle rac 磁盘 最佳 规划的问题就给大家分享到这里,感谢你花时间阅读本站内容,更多关于AIX+oracle+rac+asm、Configuring Oracle 18c RAC Using NFS With ASM、Installation of SAP on RAC with Oracle ASM(转)、Linux redhat5.5安装Oracle 11g RAC + ASM + RAW 准备工作等相关知识的信息别忘了在本站进行查找喔。
本文标签:


![[转帖]Ubuntu 安装 Wine方法(ubuntu如何安装wine)](https://www.gvkun.com/zb_users/cache/thumbs/4c83df0e2303284d68480d1b1378581d-180-120-1.jpg)

