在这篇文章中,我们将带领您了解BoostYourCareerwithHPE2-E71ExamCramQuestions的全貌,同时,我们还将为您介绍有关@CookieValue,@PathVariab
在这篇文章中,我们将带领您了解Boost Your Career with HPE2-E71 Exam Cram Questions的全貌,同时,我们还将为您介绍有关@CookieValue,@PathVariable,@RequestBody,@RequestHeader,@RequestParam、@Param @PathVariable @RequestParam @ResponseBody @RequestBody注解说明、Android Camera 原理之 camera service 与 camera provider session 会话与 capture request 轮转、Angular 4/2 Http get() Parameters + Headers + URLSearchParams + RequestOptions Exam的知识,以帮助您更好地理解这个主题。
本文目录一览:- Boost Your Career with HPE2-E71 Exam Cram Questions
- @CookieValue,@PathVariable,@RequestBody,@RequestHeader,@RequestParam
- @Param @PathVariable @RequestParam @ResponseBody @RequestBody注解说明
- Android Camera 原理之 camera service 与 camera provider session 会话与 capture request 轮转
- Angular 4/2 Http get() Parameters + Headers + URLSearchParams + RequestOptions Exam

Boost Your Career with HPE2-E71 Exam Cram Questions
Tired of doing the same job? Get your hands on HPE2-E71 exam
It is the nature of the human being that he/she will get tired of doing the same task over and over,same is the case of the HP Sales Certified professionals. If you are an individual who is seeking for the chances of getting a high ranked job,then you should get your hands on the HP HPE2-E71 certification exam. HPE2-E71 exam that has been released recently by the HP has not only caught the eyeballs of the recruiters but also the HP Sales Certified experts. In short,if we say then the HP HPE2-E71 exam pretty much to offer you,from career advancement to the skill set updating all in one package and that is by earning the Introduction to Selling HPE Products,Solutions and Service certification.
How to start the preparation of the HPE2-E71 new questions?
If we talk about the preparation process of the HPE2-E71 exam questions,then one has to follow some steps to achieve the milestone of Introduction to Selling HPE Products,Solutions and Service certification. The first thing that you should do if you are going to take the HP HPE2-E71 exam dumps do a research about the HPE2 E71 exam certification. KNowing the HPE2-E71 exam cram Could help you a lot in the HPE2-E71 final exam. Then you should go for the latest and accurate HPE2-E71 exam simulator. For your comfort,I’m recommending you a splendid platform for the preparation of the Introduction to Selling HPE Products,Solutions and Service questions and that is BrainDumpsPro.
HPE2 E71 exam dumps a highly trusted source for the preparation
HPE2-E71 exam cram offered by the BrainDumpsPro has been made up by keeping in view the schedule of the Introduction to Selling HPE Products,Solutions and Service new questions. These HPE2-E71 braindumps cover all topics of the HPE2 E71 exam and that too with the in-depth analysis of each and every HPE2-E71 exam questions. Beside this BrainDumpsPro is also famous for its valuable HPE2-E71 simulation questions. This HPE2-E71 exam simulator that has been considered as the backbone for the preparation comes with the updated HPE2-E71 questions with verified answers.

BrainDumpsPro | Free updates on HPE2-E71 exam simulator up-to 90 days
In addition to this BrainDumpsPro is also keeps on updating their HPE2-E71 pdf dumps. So if any updates come on the HPE2-E71 exam cram you Could also have the access to it that too for the span of 90 days for free. Moreover,you can also get a 100% money back guarantee with latest HP HPE2-E71 dumps if the HPE2 E71 braindumps fail to come up to your standards or you got Failed by studying from them but it’s a rare chance as the Introduction to Selling HPE Products,Solutions and Service exam simulator is prepared by the highly qualified staff.

@CookieValue,@PathVariable,@RequestBody,@RequestHeader,@RequestParam
原文链接:http://blog.sina.com.cn/s/blog_6d3c1ec601017q4l.html
下列参数一般都和@RequestMapping配合使用。
A、@CookieValue
org.springframework.web.bind.annotation.CookieValue
public @interface CookieValue
Annotation which indicates that a method parameter should be bound to an HTTP cookie. Supported for annotated handler methods in Servlet and Portlet environments.
这个注释表示一个方法参数绑定到一个HTTP cookie。支持Servlet和Portlet环境。
The method parameter may be declared as type Cookie or as cookie value type (String,int,etc).
这个方法的参数可声明为Cookie类型或String,int等。
A.1、@CookieValue的属性
String value
The name of the cookie to bind to.
绑定的cookie名称。
boolean required
Whether the header is required.
Default is true,leading to an exception being thrown in case the header is missing in the request. Switch this to false if you prefer a null in case of the missing header.
Head是否需要。默认是true,请求中头丢失将抛出一个异常。False,请求中头丢失将返回null。
Alternatively,provide a defaultValue,which implicitly sets this flag to false.
因此,提供一个defaultValue。
String defaultValue
The default value to use as a fallback. Supplying a default value implicitly sets required() to false.
当required为false,请求中头丢失将返回这个值。
B、@PathVariable
Annotation which indicates that a method parameter should be bound to a URI template variable. Supported for RequestMapping annotated handler methods in Servlet environments.
这个参数指出方法的一个参数绑定到一个URI template变量。在Servlet环境中的被@RequestMapping注释的处理器方法。
B.1、@PathVariable的属性
value
The URI template variable to bind to.
绑定URI template变量。
举例说明
@Controller
public class HelloWorldController { @RequestMapping("/helloWorld/{userId}")
public String helloWorld(ModelMap model,@PathVariable("userId") String userId) {
model.addAttribute("attributeName",userId);
return "helloWorld";
}
}
当URI template变量和方法的参数名称一样时,可以省略value的定义,@PathVariable达到同样的效果。
C、@RequestBody
Annotation which indicates that a method parameter should be bound to the web request body. Supported for annotated handler methods in Servlet environments.
这个注释它指示一个方法的参数绑定到一个web请求的body。它支持Servlet环境中的注释处理器方法。
class HelloWorldController {
"/hello.do")
public String helloWorld(Model model,100);font-size:10pt;">@RequestBody String reqBody) {
"message",reqBody);
}
}
这时这个参数reqBody的值是请求页面的form表单的所有值。
D、@ RequestHeader
Annotation which indicates that a method parameter should be bound to a web request header. Supported for annotated handler methods in Servlet and Portlet environments.
这个注释它指示一个方法的参数绑定到一个web请求的头信息。它支持Servlet和Portlet环境中的注释处理器方法。
D.1、@ RequestHeader的属性
String defaultValue
The default value to use as a fallback.
默认返回值。
Boolean required
Whether the header is required.
是否需要header。
String value
The name of the request header to bind to.
绑定的请求头名称。
@RequestHeader("Accept") String info) {
ottom:5px;border:0px;list-style:none;line-height:21px;color:rgb(70, info);
这时这个参数info将获得请求的Accept头信息。
E、@RequestParam
org.springframework.web.bind.annotation.RequestParam
Annotation which indicates that a method parameter should be bound to a web request parameter. Supported for annotated handler methods in Servlet and Portlet environments.
这个参数指出一个方法的参数应绑定到一个web请求的参数。支持Servlet和Portlet环境下注释处理器的方法。
E.1、@RequestParam的属性
E.1.1、value
The name of the request parameter to bind to.
绑定的请求参数的名称。
@RequestParam(value="abc")等同于@RequestParam("abc")
E.1.2、required
Whether the parameter is required.
是否需要参数。
Default is true,leading to an exception thrown in case of the parameter missing in the request. Switch this to false if you prefer a null in case of the parameter missing.
默认为true,若请求中没有参数会导致抛出一个异常。若设置为false,若请求中没有参数就会返回null。
Alternatively,which implicitly sets this flag to false.
在required=false时,最好设置一个defaultValue默认值。
@RequestParam(value = "abc",required=false)
E.1.3、defaultValue
The default value to use as a fallback. Supplying a default value implicitly sets required() to false.
当required=false时,设定默认值。
"/a")
"/b")
ottom:5px;border:0px;list-style:none;line-height:21px;color:rgb(70,@RequestParam("a") String abc) {
ottom:5px;border:0px;list-style:none;line-height:21px;color:rgb(70,abc);
F、@ResponseBody
Annotation which indicates that a method return value should be bound to the web response body. Supported for annotated handler methods in Servlet environments.
这个注释它指示一个方法的返回值应该绑定到一个web响应的body中。它支持Servlet环境中的注释处理器方法。
应用@ResponseBody将会跳过视图处理,而是调用合适HttpMessageConverter,将返回值写入输出流。
@ResponseBody
public String helloWorld() {
或者这样定义
"/a/b")
public @ResponseBody String helloWorld() {
这时访问/a/b时,不是返回一个view名为helloWorld的视图,而是作出一个响应,其内容为helloWorld。

@Param @PathVariable @RequestParam @ResponseBody @RequestBody注解说明
@Param主要是用来注解dao类中方法的参数,在不使用@Param注解的时候,函数的参数只能为一个,并且在查询语句取值时只能用#{},且其所属的类必须为Javabean,而使用@Param注解则可以使用多个参数,在查询语句中使用时可以使用#{}或者${}
@PathVariable用于将请求URL中的模板变量映射到功能处理方法的参数上,http://127.0.0.1:8040/findById/1-->>@GetMapping("/findById/{id}") 参数不能为空
@RequestParam注解主要有哪些参数:
value:参数名字,即入参的请求参数名字,如username表示请求的参数区中的名字为username的参数的值将传入;
required:是否必须,默认是true,表示请求中一定要有相应的参数,否则将报404错误码;
defaultValue:默认值,表示如果请求中没有同名参数时的默认值,例如:
public List<EasyUITreeNode> getItemTreeNode(@RequestParam(value="id",defaultValue="0")long parentId)
@ResponseBody将响应的结果转为json格式
@RequestBody将请求参数转为json格式

Android Camera 原理之 camera service 与 camera provider session 会话与 capture request 轮转
上层调用 CameraManager.openCamera 的时候,会触发底层的一系列反应,之前我们分享过 camera framework 到 camera service 之间的调用,但是光看这一块还不够深入,接下来我们讨论一下 camera service 与 camera provider 之间在 openCamera 调用的时候做了什么事情。
status_t Camera3Device::initialize(sp<CameraProviderManager> manager, const String8& monitorTags) {
    sp<ICameraDeviceSession> session;
    status_t res = manager->openSession(mId.string(), this,
            /*out*/ &session);
    //......
    res = manager->getCameraCharacteristics(mId.string(), &mDeviceInfo);
    //......
    std::shared_ptr<RequestMetadataQueue> queue;
    auto requestQueueRet = session->getCaptureRequestMetadataQueue(
        [&queue](const auto& descriptor) {
            queue = std::make_shared<RequestMetadataQueue>(descriptor);
            if (!queue->isValid() || queue->availableToWrite() <= 0) {
                ALOGE("HAL returns empty request metadata fmq, not use it");
                queue = nullptr;
                // don''t use the queue onwards.
            }
        });
    //......
    std::unique_ptr<ResultMetadataQueue>& resQueue = mResultMetadataQueue;
    auto resultQueueRet = session->getCaptureResultMetadataQueue(
        [&resQueue](const auto& descriptor) {
            resQueue = std::make_unique<ResultMetadataQueue>(descriptor);
            if (!resQueue->isValid() || resQueue->availableToWrite() <= 0) {
                ALOGE("HAL returns empty result metadata fmq, not use it");
                resQueue = nullptr;
                // Don''t use the resQueue onwards.
            }
        });
    //......

    mInterface = new HalInterface(session, queue);
    std::string providerType;
    mVendorTagId = manager->getProviderTagIdLocked(mId.string());
    mTagMonitor.initialize(mVendorTagId);
    if (!monitorTags.isEmpty()) {
        mTagMonitor.parseTagsToMonitor(String8(monitorTags));
    }

    return initializeCommonLocked();
}
上面 camera service 中执行 openCamera 中的核心步骤,可以看出,第一步执行的就是 manager->openSession (mId.string (), this, /out/ &session);
本文就是通过剖析 openSession 的执行流程来 还原 camera service 与 camera provider 的执行过程。
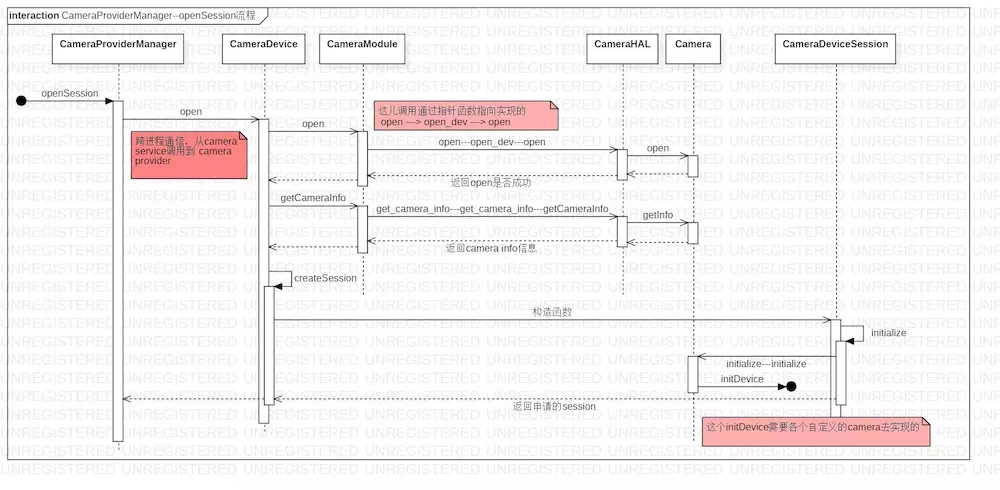
CameraProviderManager--openSession 流程.jpg
为了让大家看得更加清楚,列出各个文件的位置:
CameraProviderManager : frameworks/av/services/camera/libcameraservice/common/CameraServiceProvider.cpp
CameraDevice : hardware/interfaces/camera/device/3.2/default/CameraDevice.cpp
CameraModule : hardware/interfaces/camera/common/1.0/default/CameraModule.cpp
CameraHAL : hardware/libhardware/modules/camera/3_0/CameraHAL.cpp
Camera : hardware/libhardware/modules/camera/3_0/Camera.cpp
CameraDeviceSession : hardware/interfaces/camera/device/3.2/default/CameraDeviceSession.cpp
中间涉及到一些指针函数的映射,如果看不明白,可以参考:《Android Camera 原理之底层数据结构总结》,具体的调用流程就不说了,按照上面的时序图走,都能看明白的。
一些回调关系还是值得说下的。我们看下 CameraProviderManager::openSession 调用的地方:
status_t CameraProviderManager::openSession(const std::string &id,
        const sp<hardware::camera::device::V3_2::ICameraDeviceCallback>& callback,
        /*out*/
        sp<hardware::camera::device::V3_2::ICameraDeviceSession> *session) {

    std::lock_guard<std::mutex> lock(mInterfaceMutex);

    auto deviceInfo = findDeviceInfoLocked(id,
            /*minVersion*/ {3,0}, /*maxVersion*/ {4,0});
    if (deviceInfo == nullptr) return NAME_NOT_FOUND;

    auto *deviceInfo3 = static_cast<ProviderInfo::DeviceInfo3*>(deviceInfo);

    Status status;
    hardware::Return<void> ret;
    ret = deviceInfo3->mInterface->open(callback, [&status, &session]
            (Status s, const sp<device::V3_2::ICameraDeviceSession>& cameraSession) {
                status = s;
                if (status == Status::OK) {
                    *session = cameraSession;
                }
            });
    if (!ret.isOk()) {
        ALOGE("%s: Transaction error opening a session for camera device %s: %s",
                __FUNCTION__, id.c_str(), ret.description().c_str());
        return DEAD_OBJECT;
    }
    return mapToStatusT(status);
}
我们看下 IPC 调用的地方:
ret = deviceInfo3->mInterface->open(callback, [&status, &session]
            (Status s, const sp<device::V3_2::ICameraDeviceSession>& cameraSession) {
                status = s;
                if (status == Status::OK) {
                    *session = cameraSession;
                }
            });
传入两个参数,一个是 const sp<hardware::camera::device::V3_2::ICameraDeviceCallback>& callback, 另一个是 open_cb _hidl_cb
callback 提供了 camera HAL 层到 camera service 的回调。
open_cb _hidl_cb 是硬件抽象层提供了一种 IPC 间回传数据的方式。就本段代码而言,需要传回两个数据,一个 status:表示当前 openSession 是否成功;另一个是 session:表示 camera session 会话创建成功之后返回的 session 数据。
CameraDevice::open (...) 函数
{
        session = createSession(
                device, info.static_camera_characteristics, callback);
        if (session == nullptr) {
            ALOGE("%s: camera device session allocation failed", __FUNCTION__);
            mLock.unlock();
            _hidl_cb(Status::INTERNAL_ERROR, nullptr);
            return Void();
        }
        if (session->isInitFailed()) {
            ALOGE("%s: camera device session init failed", __FUNCTION__);
            session = nullptr;
            mLock.unlock();
            _hidl_cb(Status::INTERNAL_ERROR, nullptr);
            return Void();
        }
        mSession = session;

        IF_ALOGV() {
            session->getInterface()->interfaceChain([](
                ::android::hardware::hidl_vec<::android::hardware::hidl_string> interfaceChain) {
                    ALOGV("Session interface chain:");
                    for (auto iface : interfaceChain) {
                        ALOGV("  %s", iface.c_str());
                    }
                });
        }
        mLock.unlock();
}
_hidl_cb(status, session->getInterface());
最后执行的代码 _hidl_cb (status, session→getInterface ()); 当前 session 创建成功之后,回调到 camera service 中。
const sp<hardware::camera::device::V3_2::ICameraDeviceCallback>& callback 设置到什么地方?这个问题非常重要的,camera 上层很依赖底层的回调,所以我们要搞清楚底层的回调被设置到什么地方,然后在搞清楚在合适的时机触发这些回调。
执行 CameraDeviceSession 构造函数的时候,传入了这个 callback。
CameraDeviceSession::CameraDeviceSession(
    camera3_device_t* device,
    const camera_metadata_t* deviceInfo,
    const sp<ICameraDeviceCallback>& callback) :
        camera3_callback_ops({&sProcessCaptureResult, &sNotify}),
        mDevice(device),
        mDeviceVersion(device->common.version),
        mIsAELockAvailable(false),
        mDerivePostRawSensKey(false),
        mNumPartialResults(1),
        mResultBatcher(callback) {
    mDeviceInfo = deviceInfo;
    camera_metadata_entry partialResultsCount =
            mDeviceInfo.find(ANDROID_REQUEST_PARTIAL_RESULT_COUNT);
    if (partialResultsCount.count > 0) {
        mNumPartialResults = partialResultsCount.data.i32[0];
    }
    mResultBatcher.setNumPartialResults(mNumPartialResults);

    camera_metadata_entry aeLockAvailableEntry = mDeviceInfo.find(
            ANDROID_CONTROL_AE_LOCK_AVAILABLE);
    if (aeLockAvailableEntry.count > 0) {
        mIsAELockAvailable = (aeLockAvailableEntry.data.u8[0] ==
                ANDROID_CONTROL_AE_LOCK_AVAILABLE_TRUE);
    }

    // Determine whether we need to derive sensitivity boost values for older devices.
    // If post-RAW sensitivity boost range is listed, so should post-raw sensitivity control
    // be listed (as the default value 100)
    if (mDeviceInfo.exists(ANDROID_CONTROL_POST_RAW_SENSITIVITY_BOOST_RANGE)) {
        mDerivePostRawSensKey = true;
    }

    mInitFail = initialize();
}
CameraDeviceSession 中的 mResultBatcher 类构造中传入了这个 callback,现在由 CameraDeviceSession::ResultBatcher 来持有 callback 了。看下 ResultBatcher 全局代码,在 CameraDeviceSession.h 中。
那以后底层要回调到上层必定要经过 CameraDeviceSession::ResultBatcher 的 mCallback 来完成了。
class ResultBatcher {
public:
    ResultBatcher(const sp<ICameraDeviceCallback>& callback);
    void setNumPartialResults(uint32_t n);
    void setBatchedStreams(const std::vector<int>& streamsToBatch);
    void setResultMetadataQueue(std::shared_ptr<ResultMetadataQueue> q);

    void registerBatch(uint32_t frameNumber, uint32_t batchSize);
    void notify(NotifyMsg& msg);
    void processCaptureResult(CaptureResult& result);

protected:
    struct InflightBatch {
        // Protect access to entire struct. Acquire this lock before read/write any data or
        // calling any methods. processCaptureResult and notify will compete for this lock
        // HIDL IPCs might be issued while the lock is held
        Mutex mLock;

        bool allDelivered() const;

        uint32_t mFirstFrame;
        uint32_t mLastFrame;
        uint32_t mBatchSize;

        bool mShutterDelivered = false;
        std::vector<NotifyMsg> mShutterMsgs;

        struct BufferBatch {
            BufferBatch(uint32_t batchSize) {
                mBuffers.reserve(batchSize);
            }
            bool mDelivered = false;
            // This currently assumes every batched request will output to the batched stream
            // and since HAL must always send buffers in order, no frameNumber tracking is
            // needed
            std::vector<StreamBuffer> mBuffers;
        };
        // Stream ID -> VideoBatch
        std::unordered_map<int, BufferBatch> mBatchBufs;

        struct MetadataBatch {
            //                   (frameNumber, metadata)
            std::vector<std::pair<uint32_t, CameraMetadata>> mMds;
        };
        // Partial result IDs that has been delivered to framework
        uint32_t mNumPartialResults;
        uint32_t mPartialResultProgress = 0;
        // partialResult -> MetadataBatch
        std::map<uint32_t, MetadataBatch> mResultMds;

        // Set to true when batch is removed from mInflightBatches
        // processCaptureResult and notify must check this flag after acquiring mLock to make
        // sure this batch isn''t removed while waiting for mLock
        bool mRemoved = false;
    };


    // Get the batch index and pointer to InflightBatch (nullptrt if the frame is not batched)
    // Caller must acquire the InflightBatch::mLock before accessing the InflightBatch
    // It''s possible that the InflightBatch is removed from mInflightBatches before the
    // InflightBatch::mLock is acquired (most likely caused by an error notification), so
    // caller must check InflightBatch::mRemoved flag after the lock is acquried.
    // This method will hold ResultBatcher::mLock briefly
    std::pair<int, std::shared_ptr<InflightBatch>> getBatch(uint32_t frameNumber);

    static const int NOT_BATCHED = -1;

    // move/push function avoids "hidl_handle& operator=(hidl_handle&)", which clones native
    // handle
    void moveStreamBuffer(StreamBuffer&& src, StreamBuffer& dst);
    void pushStreamBuffer(StreamBuffer&& src, std::vector<StreamBuffer>& dst);

    void sendBatchMetadataLocked(
            std::shared_ptr<InflightBatch> batch, uint32_t lastPartialResultIdx);

    // Check if the first batch in mInflightBatches is ready to be removed, and remove it if so
    // This method will hold ResultBatcher::mLock briefly
    void checkAndRemoveFirstBatch();

    // The following sendXXXX methods must be called while the InflightBatch::mLock is locked
    // HIDL IPC methods will be called during these methods.
    void sendBatchShutterCbsLocked(std::shared_ptr<InflightBatch> batch);
    // send buffers for all batched streams
    void sendBatchBuffersLocked(std::shared_ptr<InflightBatch> batch);
    // send buffers for specified streams
    void sendBatchBuffersLocked(
            std::shared_ptr<InflightBatch> batch, const std::vector<int>& streams);
   // End of sendXXXX methods

    // helper methods
    void freeReleaseFences(hidl_vec<CaptureResult>&);
    void notifySingleMsg(NotifyMsg& msg);
    void processOneCaptureResult(CaptureResult& result);
    void invokeProcessCaptureResultCallback(hidl_vec<CaptureResult> &results, bool tryWriteFmq);

    // Protect access to mInflightBatches, mNumPartialResults and mStreamsToBatch
    // processCaptureRequest, processCaptureResult, notify will compete for this lock
    // Do NOT issue HIDL IPCs while holding this lock (except when HAL reports error)
    mutable Mutex mLock;
    std::deque<std::shared_ptr<InflightBatch>> mInflightBatches;
    uint32_t mNumPartialResults;
    std::vector<int> mStreamsToBatch;
    const sp<ICameraDeviceCallback> mCallback;
    std::shared_ptr<ResultMetadataQueue> mResultMetadataQueue;

    // Protect against invokeProcessCaptureResultCallback()
    Mutex mProcessCaptureResultLock;

} mResultBatcher;
到这里,openSession 工作就完成了,这个主要是设置了上层的回调到底层,并且底层返回可用的 camera session 到上层来,实现底层和上层的交互通信。
1. 获取的 session 是什么?为什么这个重要?
此 session 是 ICameraDeviceSession 对象,这个对象是指为了操作 camera device,camera provider 与 camera service 之间建立的一个会话机制,可以保证 camera service IPC 调用到 camera provider 进程中的代码。
1.1. 获取 session 当前请求原数组队列
auto requestQueueRet = session->getCaptureRequestMetadataQueue(
    [&queue](const auto& descriptor) {
        queue = std::make_shared<RequestMetadataQueue>(descriptor);
        if (!queue->isValid() || queue->availableToWrite() <= 0) {
            ALOGE("HAL returns empty request metadata fmq, not use it");
            queue = nullptr;
            // don''t use the queue onwards.
        }
    });
到 HAL 层的 CameraDeviceSession.cpp 中调用 getCaptureRequestMetadataQueue
Return<void> CameraDeviceSession::getCaptureRequestMetadataQueue(
    ICameraDeviceSession::getCaptureRequestMetadataQueue_cb _hidl_cb) {
    _hidl_cb(*mRequestMetadataQueue->getDesc());
    return Void();
}
这个 mRequestMetadataQueue 是在 CameraDeviceSession::initialize 执行的时候初始化的。
int32_t reqFMQSize = property_get_int32("ro.camera.req.fmq.size", /*default*/-1);
if (reqFMQSize < 0) {
    reqFMQSize = CAMERA_REQUEST_METADATA_QUEUE_SIZE;
} else {
    ALOGV("%s: request FMQ size overridden to %d", __FUNCTION__, reqFMQSize);
}

mRequestMetadataQueue = std::make_unique<RequestMetadataQueue>(
        static_cast<size_t>(reqFMQSize),
        false /* non blocking */);
if (!mRequestMetadataQueue->isValid()) {
    ALOGE("%s: invalid request fmq", __FUNCTION__);
    return true;
}
首先读取 ro.camera.req.fmq.size 属性,如果没有找到,则直接赋给一个 1M 大小的 请求原数组队列。这个队列很重要,后续的 camera capture 请求都是通过这个队列处理的。
1.2. 获取 session 当前结果原数组队列
这个和 请求原数组队列相似,不过结果原数组中保留的是 camera capture 的结果数据。大家可以看下源码,这儿就不贴源码了
2. 开始运转 capture request 线程
camera service 与 camera provider 建立 session 会话之后,开始运转 capture request 请求线程,之后发送的 capture request 都会到这个线程中执行,这就是熟知的 capture request 轮转。
在 Camera3Device::initializeCommonLocked 中执行了 capture request 轮转。
/** Start up request queue thread */
mRequestThread = new RequestThread(this, mStatusTracker, mInterface, sessionParamKeys);
res = mRequestThread->run(String8::format("C3Dev-%s-ReqQueue", mId.string()).string());
if (res != OK) {
    SET_ERR_L("Unable to start request queue thread: %s (%d)",
            strerror(-res), res);
    mInterface->close();
    mRequestThread.clear();
    return res;
}
开始启动当前的 capture request 队列,放在 RequestThread 线程中执行,这个线程会一直执行,当有新的 capture request 发过来,会将 capture request 放进当前会话的请求队列中,继续执行。这个轮转很重要,这是 camera 能正常工作的前提。
轮转的主要工作在 Camera3Device::RequestThread::threadLoop 函数中完成,这是 native 中定义的一个 线程执行函数块。
bool Camera3Device::RequestThread::threadLoop() {
    ATRACE_CALL();
    status_t res;

    // Handle paused state.
    if (waitIfPaused()) {
        return true;
    }

    // Wait for the next batch of requests.
    waitForNextRequestBatch();
    if (mNextRequests.size() == 0) {
        return true;
    }
    //......

    // Prepare a batch of HAL requests and output buffers.
    res = prepareHalRequests();
    if (res == TIMED_OUT) {
        // Not a fatal error if getting output buffers time out.
        cleanUpFailedRequests(/*sendRequestError*/ true);
        // Check if any stream is abandoned.
        checkAndStopRepeatingRequest();
        return true;
    } else if (res != OK) {
        cleanUpFailedRequests(/*sendRequestError*/ false);
        return false;
    }

    // Inform waitUntilRequestProcessed thread of a new request ID
    {
        Mutex::Autolock al(mLatestRequestMutex);

        mLatestRequestId = latestRequestId;
        mLatestRequestSignal.signal();
    }
    //......

    bool submitRequestSuccess = false;
    nsecs_t tRequestStart = systemTime(SYSTEM_TIME_MONOTONIC);
    if (mInterface->supportBatchRequest()) {
        submitRequestSuccess = sendRequestsBatch();
    } else {
        submitRequestSuccess = sendRequestsOneByOne();
    }
    //......

    return submitRequestSuccess;
}
waitForNextRequestBatch () 不断去轮训底层是否有 InputBuffer 数据,获取的 inputBuffer 数据放在 request 中,这些数据会在之后被消费。
这儿先列个调用过程:对照着代码看一下,camera 的 producer 与 consumer 模型之后还会详细讲解的。
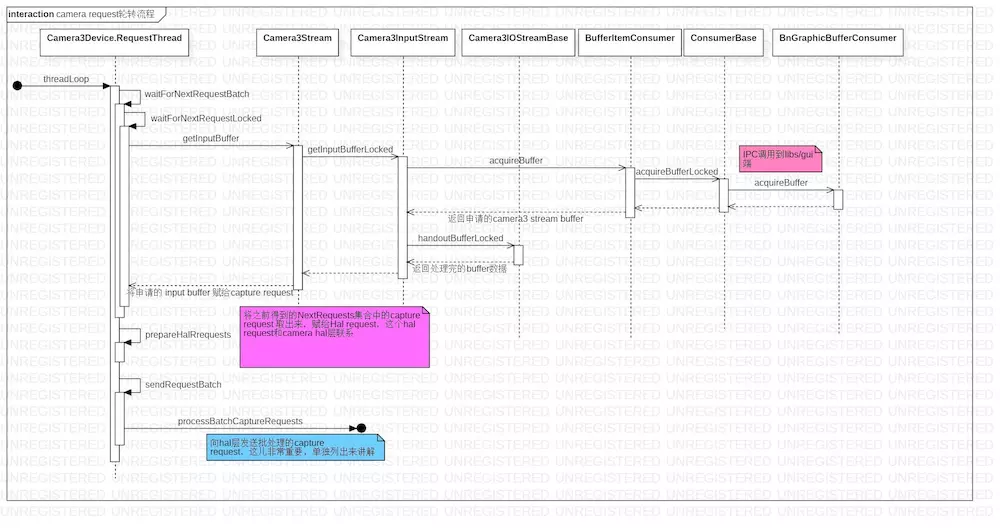
camera request 轮转流程.jpg
这儿也为了大家快速进入代码,也列出来代码的对应位置:
Camera3Device::RequestThread : frameworks/av/services/camera/libcameraservice/device3/Camera3Device.cpp 中有内部类 RequestThread,这是一个线程类。
Camera3Stream : frameworks/av/services/camera/libcameraservice/device3/Camera3Stream.cpp
Camera3InputStream : frameworks/av/services/camera/libcameraservice/device3/Camera3InputStream.cpp
Camera3IOStreamBase : frameworks/av/services/camera/libcameraservice/device3/Camera3IOStreamBase.cpp
BufferItemConsumer : frameworks/native/libs/gui/BufferItemConsumer.cpp
ConsumerBase : frameworks/native/libs/gui/ConsumerBase.cpp
BnGraphicBufferConsumer : frameworks/native/libs/gui/IGraphicBufferConsumer.cpp
上层发过来来的 capture request,手下到底层申请 Consumer buffer,这个 buffer 数据存储在 capture request 缓存中,后期这些 buffer 数据会被复用,不断地生产数据,也不断地被消费。
capture request 开启之后,camera hal 层也会受到 capture request 批处理请求,让 camera hal 做好准备,开始和 camera driver 层交互。hal 层的请求下一章讲解。
小礼物走一走,来简书关注我
 Parameters + Headers + URLSearchParams + RequestOptions Exam")
Angular 4/2 Http get() Parameters + Headers + URLSearchParams + RequestOptions Exam
https://www.concretepage.com/angular-2/angular-2-http-get-parameters-headers-urlsearchparams-requestoptions-example
Headers
class is used to create headers. Angular
URLSearchParams
class is used to create URL parameters. Angular
RequestOptions
instantiates itself using instances of
,
and other request options such as url,method,search,body,withCredentials,responseType. These classes are imported from
@angular/http
API. Finally
Http.get()
uses instance of
to interact with the server. Though
is optional to use with
arameters in the URL,we need to use them. On this page we will create an application that will use
to send headers and parameters using angular in-memory web API. Find the code snippet from our example.
getBookById(bookId: string): Observable<Book[]> {
let myHeaders = new Headers();
myHeaders.append('Content-Type', 'application/json');
let myParams URLSearchParams();
myParams'id' bookId);
let options RequestOptions({ headers: myHeaders params: myParams });
return this.http.get(this.url options)
.map.extractData.catch.handleError);
}
Using
set()
or
append()
method of
and
arameters and headers,too. Now we will walk through complete example step by step.
Contents
- Technologies Used
- Headers
- URLSearchParams
- RequestOptionsArgs and RequestOptions
- Http.get() with Multiple Headers and Multiple Parameters
- Angular In-Memory Web API
- Complete Example
- Run Application
- References
- Download Source Code
Technologies Used
Find the technologies being used in our example.
1. Angular 4.0.0
2. TypeScript 2.2.0
3. Node.js 6.10.1
4. Angular CLI 1.0.0
5. Angular Compiler CLI 4.0.0
6. angular-in-memory-web-api@0.3.2
Headers
is the angular class that is used to configure request headers. Find the sample
instantiation.
let myHeaders ();
We can also pass headers as an argument while instantiating
class. Find the code snippet.
({ : 'Cache-Control''no-cache' });
To fetch,add and delete headers,sans-serif; font-size:14px">class has following methods.
append(name: string,value: string)
: Appends a header to existing list of header values for a given header name. We use
as follows.
myHeaders'Accept''text/plain');
myHeaders' application/xhtml+xml ');
Now the
Accept
header will have the following values.
Accept: text/plain application/xhtml+xml
set(name: string,value: string|string[])
: Sets or overrides header value for given name. It is used as follows.
.set' application/xml 'header will have only the following value.
: application/xml
delete(name: string)
: Deletes all header values for the given name. We use it as follows.
.deleteget(name: string) : string
: Returns first header that matches given name. Find the code snippet.
let acceptHeader = myHeadersgetAll(name: string) : string[]
: Returns list of header values for a given name.
let acceptHeaders .getAll );
If we want to add multiple headers,we can achieve it by
method as follows.
);
myHeaders);
If we want to add multiple headers by
method,we can achieve it as follows.
);
URLSearchParams
creates the query string in the URL. It is a map-like representation of URL search parameters. Find its constructor Syntax.
constructor(rawParams?: string queryEncoder?: QueryEncoder)
Both arguments in the constructor are optional. Angular
queryEncoder
parameter is used to pass any custom
QueryEncoder
to encode key and value of the query string. By default
encodes keys and values of parameter using JavaScript
encodeURIComponent()
method.
Now we can instantiate
as given below.
let myParams Now we can fetch,add and delete parameters using following methods.
append(param: string,val: string) : void
: Appends parameter value to existing list of parameter values for a given parameter name. It is used to add values in multi-value fields or arrays in query string. If we write the code as given below.
myParams'names''John');
myParams'David'Then query parameter
names
will be an array. The query string will look like as given below.
?names[]=John&namesDavid
Server side code such as PHP will get
parameter value as an array.
set(param: string,val: string)
: Sets or overrides parameter value for given parameter name. We can use as follows.
'Bob'The query string will be as follows.
=Bob
delete(param: string) : void
: Deletes all parameter values for the given parameter name. Find the code snippet.
get(param: string) : string
: In case of multi-value fields,it returns the first value for given parameter name. Find the code snippet.
let nameParam = myParamsgetAll(param: string) : string[]
: Returns list of values for a given parameter name. Find the code snippet.
let namesParam .getAllIf we want to add multiple parameters,0)">'category' catg'writer' wtrIf we want to add multiple parameters by
);
RequestOptionsArgs and RequestOptions
RequestOptionsArgs
is an interface that is used to construct a
. The fields of
are url,params,headers,responseType.
is used to create request option. It is instantiated using
. It contains all the fields of the
interface. Now find the constructor of
class.
({method headers body url search
withCredentials responseType}?: RequestOptionsArgsIn our example we will use following fields.
headers
: Sets headers for HTTP request. It is of
class type.
params
: Sets query parameters in the URL. It is of
Now if we have instance of
();
myHeadersAnd instance of
();
myParamsThen
headers
params
can be passed to
let options });
Http.get() with Multiple Headers and Multiple Parameters
Angular
method performs a request with HTTP GET method. Find the arguments of
method.
get(url) : Response>
url
: This is the HTTP URL to hit the server using HTTP GET method.
RequestOptionsArgs
: This is optional in
method. This is used to create instance of
to send headers,parameters etc with
Now If we want to add multiple headers,we can do as follows.
();
myHeaders);
Find the code snippet for
with multiple headers and multiple URL parameters.
getBooksAfterFilter(catg{
let myHeaders ();
myHeaders);
myHeaders);
let myParams ();
myParams);
myParams);
let options });
return this}
Angular In-Memory Web API
Angular provides in-memory web API to process HTTP request in test environment. In case we don't have actual server URL,we can use angular in-memory web API for testing our angular
Http
methods. It provides a dummy URL which can be changed by actual URL later. It returns an
Observable
of HTTP
Response
object in the manner of a RESTy web api. In our example we are using in-memory web API to get and post data. To use it in our angular application we need to follow below steps.
Step-1
: Add
angular-in-memory-web-api
in
dependencies
block in
package.json
file as given below.
"angular-in-memory-web-api""~0.3.2"
Step-2
: Run
npm install
command to download
.
Step-3
: Create a class implementing
InMemoryDbService
interface. In our example we are creating an in-memory DB for books. Find our class for our in-memory DB.
book-data.ts
import { InMemoryDbService } from 'angular-in-memory-web-api';
export class BookData implements {
createDb() {
let books = [
{ id'1' name'Angular 2 by Krishna' category'Angular' writer'Krishna' },
'2''AngularJS by Krishna''3''Angular 2 by Vishnu''Vishnu'
'4''Core Java by Vishnu''Java''5''JSP & Servlet by Vishnu''6''JPA by Vishnu''7''Hibernate by Krishna''Hibernate'}
];
return {books};
}
To interact with DB,URL will be
api/books
Step-4
: Before using DB we need to configure our above class in application module using
imports
Metadata of
@NgModule
InMemoryWebApiModule.forRoot(BookDataFind the application module.
InMemoryWebApiModule ;
import BookData './book-data';
@NgModule({
---------
imports: [
browserModule
HttpModule)
]
---------
})
Find the
link
for more information on in-memory web API.
Complete Example
Find the complete example.
book.service.ts
Injectable '@angular/core'Http RequestOptions '@angular/http'Observable 'rxjs';
import Book './book'@Injectable()
export class BookService {
url = "api/books";
constructor(private http:{ }
getAllBooks(): {
return this)
);
}
getBookById{
let myHeaders ();
myHeaders);
let myParams ();
myParams);
let options });
return this)
}
getBooksAfterFilter);
let myParams );
myParams);
let options }
private extractData(res{
let body = res.json();
return body.data;
}
private handleError (errorResponse | any{
console.error.message || error);
return .throwbook.component.ts
ComponentOnInit NgForm '@angular/forms''./book.service'@Component({
selector'app-book'
templateUrl'./book.component.html'
styleUrls['./book.component.css'})
export class BookComponent implements {
allBooks[];
book;
filteredlistofBooks[];
errorMessageString;
dataAvailableById= true;
dataAvailableAfterFilter;
categories [
{name
}
];
writers [
'Krishna'
'Vishnu'}
];
constructor(private bookServiceBookService}
ngOnInit(): void {
this.getAllBooks();
}
getAllBooks.bookService()
.subscribe(
data => this.allBooks = data
error => this.errorMessage <any>error);
}
getBookById.dataAvailableById;
this.book = null;
this.getBookById)
=> {
if(data.length > 0{
this[];
} else {
this= false;
}
<any>error
);
}
getBooksAfterFilter(category.dataAvailableAfterFilter.filteredlistofBooks .getBooksAfterFilter)
{
if}
<any>error
);
}
bookById(bookByIdFormNgForm{
let bookId = bookByIdForm.controls'bookId'].value;
this);
}
filterBooks{
let catg ;
let wtr ;
thisbook.component.html
<h3>Book Details</h3>
<table>
<tr><th> Id</th> <th>Name</th><th>Category</th><th>Writer</th></tr>
<tr *ngFor="let bk of allBooks" >
<td>{{bk.id}}</td> <td>{{bk.name}}<td>{{bk.category}}<td>{{bk.writer}}</td>
</tr>
</table>
<h3>Get Book by ID <div>
<form #bookByIdForm= "ngForm" (ngSubmit)"bookById(bookByIdForm)">
<div>
Enter Book Id: <input name"bookId" ngModel required #bookId"ngModel"</div>
<div> <br/>
<button [disabled]"bookByIdForm.invalid">Submit</button>
</div>
</form>
</div>
<br/>
<div *ngIf"bookByIdForm.submitted""book; else loading">
<table>
</th></tr>
<tr>
<td>{{book.id}}<td>{{book.name}}<td>{{book.category}}<td>{{book.writer}}</td>
</tr>
</table>
</div>
<ng-template #loading"dataAvailableById; else notAvailable">
Loading data...
</div>
notAvailable> Data not Aavailable. </ng-template>
</ng-template>
</div>
<h3>Filter Books filterBookForm"filterBooks(filterBookForm)">
<div>
Category:
<select "category" ngModel>
<option value"" disabled>Select a Category</option>
<option *"let category of categories" [ngValue]"category.name">
{{ category.name }}
</option>
</select>
</div> <br/>
<div>
Writer:
"writer" >
>Select a Writer</option>
"let writer of writers" ["writer.name">
{{ writer.name }}
</div>
<div><br/>
<button>Submit</button>
"filterBookForm.submitted""filteredlistofBooks; else loading""let bk of filteredlistofBooks" >
</table>
"dataAvailableAfterFilter; else notAvailable"</div>
"errorMessage" [ngClass] "'error'"> {{errorMessage}} </div>
book.component.css
table {
border-collapse: collapse;
}
table th td : 1px solid black{
color: red;
font-size20pxbook.ts
export class {
id;
name;
category;
writer;
constructor{
}
app.component.ts
Component 'app-root'
template`
<app-book></app-book>
`
AppComponent {
app.module.ts
NgModule browserModule '@angular/platform-browser'FormsModule HttpModule } from './app.component'BookComponent './book.component'({
importsFormsModule],
declarations[
AppComponentBookComponent
providersBookService
bootstrapAppComponent
AppModule }
Run Application
To run the application,find following steps.
1.
Download source code using download link given on this page.
2.
In your angular CLI application,replace
src
folder.
3.
Add
"angular-in-memory-web-api": "~0.3.2"
file.
4.
Run
and then run
ng serve
5.
Now access the URL
http://localhost:4200
. Find the print screen.
Find the link for Angular 2
CRUD operation with Spring Boot.
Spring Boot REST + Angular 2 + JPA + Hibernate + MySQL CRUD Example
References
Http
Headers
URLSearchParams
RequestOptions
Angular 2 Http post() Example
Download Source Code
angular-2-http-get-parameters-headers-urlsearchparams-requestoptions-example.zip
总结
以上是小编为你收集整理的Angular 4/2 Http get() Parameters + Headers + URLSearchParams + RequestOptions Exam全部内容。
如果觉得小编网站内容还不错,欢迎将小编网站推荐给好友。
Angularjs相关文章
AngularJS进阶(四)ANGULAR.JS实现下拉菜单单选
ANGULAR.JS:NG-SELECTANDNG-OPTIONSPS:其实看英文文档比看中文文档更容易理解,前提是你的英语基础还可以。英文文档对于知识点讲述简明扼要,通俗易懂,而有些中文文档读起来特别费力,基础差、底子薄的有可能一会就会被绕晕了,最起码英文文档中的代码与中文文档中的代码是一致的,但知识点讲述实在是差距太大。Angular.jshasapowerfuldire
AngularJS进阶(四十一)AngularJS中使用Chart.js制折线图与饼图实例
AngularJS中使用Chart.js制折线图与饼图实例 Chart.js 是一个令人印象深刻的 JavaScript 图表库,建立在 HTML5 Canvas 基础上。目前,它支持6种图表类型(折线图,条形图,雷达图,饼图,柱状图和极地区域区)。而且,这是一个独立的包,不依赖第三方 JavaScript 库,小于 5KB。 其中用到的软件: Chart.js框架,版本1.0.2,一
AngularJS进阶(三十七)IE浏览器兼容性后续
IE浏览器兼容性后续前言 继续尝试解决IE浏览器兼容性问题,结局方案为更换jquery、angularjs、IE的版本。 1.首先尝试更换jquery版本为1.7.2 jquery-1.9.1.js-->jquery-1.7.2.js--> jquery2.1.4.js 无效 2.尝试更换IE版本IE8 IE11-
AngularJS进阶(五)Angular实现下拉菜单多选
Angular实现下拉菜单多选写这篇文章时,引用文章地址如下:http://ngmodules.org/modules/angularjs-dropdown-multiselecthttp://dotansimha.github.io/angularjs-dropdown-multiselect/#/AngularJSDropdownMultiselectThisdire
AngularJS进阶(十八)在AngularJS应用中集成科大讯飞语音输入功能
在AngularJS应用中集成科大讯飞语音输入功能前言 根据项目需求,需要在首页搜索框中添加语音输入功能,考虑到科大讯飞语音业务的强大能力,遂决定使用科大讯飞语音输入第三方服务。软件首页截图如下所示: 涉及的源代码如下所示: //语音识别$rootScope.startRecognize = function() {var speech;
AngularJS进阶(三十四)Angular数据更新不及时问题探讨
Angular数据更新不及时问题探讨前言 在修复控制角标正确变化过程中,发觉前端代码组织层次出现了严重问题。传递和共享数据时自己使用的是rootScope,为此造成了全局变量空间的污染。根据《AngularJs深度剖析与最佳实践》,如果两个控制器的协作存在大量的数据共享和交互可以利用Factory等服务的“单例”特性为它们注入一个共享对象来传递数据。而自己在使用rootScope
AngularJS进阶(三)HTML:让表单、文本框只读,不可编辑的方法
HTML:让表单、文本框只读,不可编辑的方法有时候,我们希望表单中的文本框是只读的,让用户不能修改其中的信息,如使中国">的内容,"中国"两个字不可以修改。实现的方式归纳一下,有如下几种。方法1:onfocus=this.blur()中国"onfocus=this.blur()>方法2:readonly中国"readonly>中国"readonly="tru
AngularJS进阶(十七)在AngularJS应用中实现微信认证授权遇到的坑
在AngularJS应用中实现微信认证授权遇到的坑前言 项目开发过程中,移动端新近增加了一个功能“微信授权登录”,由于自己不是负责移动端开发的,但最后他人负责的部分未达到预期效果。不能准确实现微信授权登录。最后还得靠自己做进一步的优化工作,谁让自己是负责人呢?原来负责人就是负责最后把所有的BUG解决掉。 首先,熟悉一下微信授权部分的源代码,如下所示:
- • AngularJS进阶(四)ANGULAR.JS实现下拉菜
- • AngularJS进阶(四十一)AngularJS中使用
- • AngularJS进阶(三十七)IE浏览器兼容性后
- • AngularJS进阶(五)Angular实现下拉菜单
- • AngularJS进阶(十八)在AngularJS应用中
- • AngularJS进阶(三十四)Angular数据更新
- • AngularJS进阶(三)HTML:让表单、文本框
- • AngularJS进阶(十七)在AngularJS应用中
- • AngularJS进阶(二十七)实现二维码信息的
- • AngularJS进阶(十五)Cookie ‘data‘ p
HTMLreactjsCSSNode.jsangulartypescriptvue.jsreact-natispringkotlinAPIseleniumtensorflowbashangularJSexpressxcodematplotlibflaskHibernatedictionaryrailscocoswebnpmreact-hookmongoosegoogle-appformswpfRestwebpackunit-testihttpclassfileNext.jsJsHTML5bootstrap-
今天关于Boost Your Career with HPE2-E71 Exam Cram Questions的介绍到此结束,谢谢您的阅读,有关@CookieValue,@PathVariable,@RequestBody,@RequestHeader,@RequestParam、@Param @PathVariable @RequestParam @ResponseBody @RequestBody注解说明、Android Camera 原理之 camera service 与 camera provider session 会话与 capture request 轮转、Angular 4/2 Http get() Parameters + Headers + URLSearchParams + RequestOptions Exam等更多相关知识的信息可以在本站进行查询。
本文标签:


![[转帖]Ubuntu 安装 Wine方法(ubuntu如何安装wine)](https://www.gvkun.com/zb_users/cache/thumbs/4c83df0e2303284d68480d1b1378581d-180-120-1.jpg)

