对于PHP实现MD5密码加盐处理感兴趣的读者,本文将会是一篇不错的选择,我们将详细介绍phpmd5加密解密,并为您提供关于ApachShiroMD5密码加密过程(明文生成密码过程)详细解析、BCryp
对于PHP实现MD5密码加盐处理感兴趣的读者,本文将会是一篇不错的选择,我们将详细介绍php md5加密解密,并为您提供关于Apach Shiro MD5密码加密过程(明文生成密码过程)详细解析、BCrypt和MD5密码加密介绍及实现、Django -MD5密码加密与登录、JAVA中使用MD5加密实现密码加密的有用信息。
本文目录一览:- PHP实现MD5密码加盐处理(php md5加密解密)
- Apach Shiro MD5密码加密过程(明文生成密码过程)详细解析
- BCrypt和MD5密码加密介绍及实现
- Django -MD5密码加密与登录
- JAVA中使用MD5加密实现密码加密
")
PHP实现MD5密码加盐处理(php md5加密解密)
为了系统安全,大多密码都使用MD5加密处理,md5方式相对安全,但相同的密码MD5值也是相同的,加盐处理后可以生成相同密码而MD5值不同。不多说,直接上图(参考PHPCMS密码加密处理)
数据库如下:

其中admin和xiaozhang的密码都是123456,但值不同,是因为加了一组生成随机数的"encrypt"加密字段。
代码如下:
/**
 * 对用户的密码进行加密
 * @param $password
 * @param $encrypt //传入加密串,在修改密码时做认证
 * @return array/password
 */
function password($password, $encrypt='''') {
	$pwd = array();
	$pwd[''encrypt''] =  $encrypt ? $encrypt : create_randomstr();
	$pwd[''password''] = md5(md5(trim($password)).$pwd[''encrypt'']);
	return $encrypt ? $pwd[''password''] : $pwd;
}

/**
 * 生成随机字符串
 * @param string $lenth 长度
 * @return string 字符串
 */
 function create_randomstr($length=6) {
        $chars = ''123456789abcdefghijklmnpqrstuvwxyzABCDEFGHIJKLMNPQRSTUVWXYZ'';
        $hash = '''';
        $max = strlen($chars) - 1;
        mt_srand();
        for($i = 0; $i < $length; $i++) {
            $hash .= $chars[mt_rand(0, $max)];
        }
        return $hash;
    }
注:方法
当调用password方法时,就可以返回密码和加密值(加盐值)。这样就能实现相对安全的登录密码了。
用户登录的时候只需查找username相同的数据,拿到数据库里的"encrypt"加密字段值+提交的密码反查,获取新的密码匹配数据库的密码,匹配相同即可正确登录。
详细解析")
Apach Shiro MD5密码加密过程(明文生成密码过程)详细解析
前言:
最近再项目当中使用的ApachShiro安全框架,对于权限和服务器资源的保护都有一个很好的管理。前期主要参考的文章有
项目中设计密码的加盐处理以及二次加密问题,跟着断点 一步步揭开Apach Shiro 的神秘面纱
数据库:

这里我们就用最简单的admin + 123456(加密前的密码) 来做测试
ShiroConfig 配置
/**
     * 凭证匹配器  告诉
     * @return
     */
    @Bean
    public HashedCredentialsMatcher hashedCredentialsMatcher() {
        HashedCredentialsMatcher hashedCredentialsMatcher = new HashedCredentialsMatcher();
        hashedCredentialsMatcher.setHashAlgorithmName("md5");// 散列算法:这里使用MD5算法;
        hashedCredentialsMatcher.setHashIterations(2);// 散列的次数,比如散列两次,相当于 md5(md5(""));
        return hashedCredentialsMatcher;
    }
这里我摘取了一段shiro 配置类当中的一个Bean注入对象,这里是告诉ApachShiro 我用的加密方式是MD5 散列次数是两次,后面你把传上来的用户名和密码交给Shiro校验的时候,它会按照你传入的凭证匹配器去校验用户名和密码是否正确
继承 AuthorizingRealm 重写 doGetAuthenticationInfo(校验)
@Override
    protected AuthenticationInfo doGetAuthenticationInfo(AuthenticationToken token) throws AuthenticationException {

        System.out.println("MyShiroRealm.doGetAuthenticationInfo()");
        // 获取用户的输入的账号.
        String username = (String) token.getPrincipal();
        System.out.println(token.getCredentials());
        // 通过username从数据库中查找 User对象,如果找到,没找到.
        // 实际项目中,这里可以根据实际情况做缓存,如果不做,Shiro自己也是有时间间隔机制,2分钟内不会重复执行该方法
        UserInfo userInfo = userInfoService.findByUsername(username);
        System.out.println("----->>userInfo=" + userInfo);
        if (userInfo == null) {
            return null;
        }
        SimpleAuthenticationInfo authenticationInfo = new SimpleAuthenticationInfo(userInfo, // 用户名
                userInfo.getPassword(), // 密码
                ByteSource.Util.bytes(userInfo.getCredentialsSalt()), // salt=username+salt
                getName() // realm name
        );
        return authenticationInfo;

    }
这个方法最后返回一个 AuthenticationInfo (身份验证信息)需要传入这样几个参数,principal(当前需要校验的用户)hashedCredentials (已经加密后密码) credentialsSalt(密码加盐)realmName(特定安全的 DAO名称)
public SimpleAuthenticationInfo(Object principal, Object hashedCredentials, ByteSource credentialsSalt, String realmName) {
        this.principals = new SimplePrincipalCollection(principal, realmName);
        this.credentials = hashedCredentials;
        this.credentialsSalt = credentialsSalt;
    }
构建校验对象
SimpleAuthenticationInfo authenticationInfo = new SimpleAuthenticationInfo(userInfo, // 用户名
userInfo.getPassword(), // 密码
ByteSource.Util.bytes(userInfo.getCredentialsSalt()), // salt=username+salt
getName() // realm name
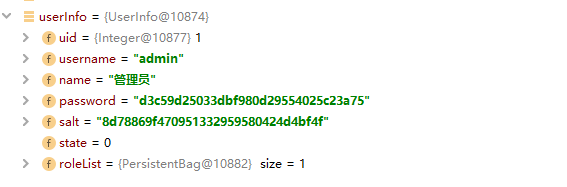
);我们在这里把从数据库查出来的userInfo对象传入,全局作为唯一
第二个参数依然是传入用户被MD5加盐加密后的密码 d3c59d25033dbf980d29554025c23a75
第三个参数传入盐值 (这里的盐值是用户名+盐值)再用 ByteSource进行一次编码 YWRtaW44ZDc4ODY5ZjQ3MDk1MTMzMjk1OTU4MDQyNGQ0YmY0Zg==
最后一个参数当然就是本次Realm的名字
断点跟进,进入一个getAuthenticationInfo核心方法
public final AuthenticationInfo getAuthenticationInfo(AuthenticationToken token) throws AuthenticationException {
        AuthenticationInfo info = this.getCachedAuthenticationInfo(token);
        if (info == null) {
       //从自定义的Realm中拿出一个包装好的对象 ,和token传过来的进行一个比较
            info = this.doGetAuthenticationInfo(token);
            log.debug("Looked up AuthenticationInfo [{}] from doGetAuthenticationInfo", info);
            if (token != null && info != null) {
                this.cacheAuthenticationInfoIfPossible(token, info);
            }
        } else {
            log.debug("Using cached authentication info [{}] to perform credentials matching.", info);
        }

        if (info != null) {
            this.assertCredentialsMatch(token, info);
        } else {
            log.debug("No AuthenticationInfo found for submitted AuthenticationToken [{}].  Returning null.", token);
        }

        return info;
    }
注意:
1.方法传入的AuthenticationToken token 保存了当前传入过来的用户名 密码
继续用断点进行跟进 进入这样一个方法 cacheAuthenticationInfoIfPossible()
private void cacheAuthenticationInfoIfPossible(AuthenticationToken token, AuthenticationInfo info) {

     //isAuthenticationCachingEnabled 首选检查是否启用缓存 我这里没有启用 返回的是false 直接跳出这个方法
if (!this.isAuthenticationCachingEnabled(token, info)) {
log.debug("AuthenticationInfo caching is disabled for info [{}]. Submitted token: [{}].", info, token);
} else {
Cache<Object, AuthenticationInfo> cache = this.getAvailableAuthenticationCache();
if (cache != null) {
Object key = this.getAuthenticationCacheKey(token);
cache.put(key, info);
log.trace("Cached AuthenticationInfo for continued authentication. key=[{}], value=[{}].", key, info);
}
}
}
跳出来回到上面的 getAuthenticationInfo 核心方法 ,这里才是身份验证的主要位置
if (info != null) {
        //凭证匹配器,提交的凭证和存储的凭证进行匹配比较
            this.assertCredentialsMatch(token, info);
        } else {
            log.debug("No AuthenticationInfo found for submitted AuthenticationToken [{}].  Returning null.", token);
        }
进入这个 assertCredentialsMatch(token,info)
protected void assertCredentialsMatch(AuthenticationToken token, AuthenticationInfo info) throws AuthenticationException {
     //取出我们配置的凭证管理器 这里当然是MD5
        CredentialsMatcher cm = this.getCredentialsMatcher();
        if (cm != null) {
            if (!cm.doCredentialsMatch(token, info)) {
                String msg = "Submitted credentials for token [" + token + "] did not match the expected credentials.";
                throw new IncorrectCredentialsException(msg);
            }
        } else {
            throw new AuthenticationException("A CredentialsMatcher must be configured in order to verify credentials during authentication.  If you do not wish for credentials to be examined, you can configure an " + AllowAllCredentialsMatcher.class.getName() + " instance.");
        }
    }
引用:
返回设定的凭证匹配器(匹配规则),包含了hashAlgorithmName(加密方式名如md5)、hashIterations(加密次数)、
storedCredentialsHexEncoded(密文进行16进制存储)、hashSalted(默认值false)、passwordRetryCache(密码重试缓存)5个属性。
凭证管理器 CredentialsMatcher
public interface CredentialsMatcher {
    boolean doCredentialsMatch(AuthenticationToken var1, AuthenticationInfo var2);
}
凭证管理器定义为一个接口,我们在注入凭证管理器的时候,我们选择的是 Hash加密方法
HashedCredentialsMatcher hashedCredentialsMatcher = new HashedCredentialsMatcher();
所以跳到 HashedCredentialsMatcher 类下面的校验方法
public boolean doCredentialsMatch(AuthenticationToken token, AuthenticationInfo info) {
     //把前台传过来的token明文密码进行加密
        Object tokenHashedCredentials = this.hashProvidedCredentials(token, info);
      //数据库查出来的已经加密过的密码
        Object accountCredentials = this.getCredentials(info);
      //进行比较
        return this.equals(tokenHashedCredentials, accountCredentials);
    }
继续断点跟进,这里是要给取出盐值的操作 判断info的类型是否是 SaltedAuthenticationInfo
protected Object hashProvidedCredentials(AuthenticationToken token, AuthenticationInfo info) {
        Object salt = null;
        if (info instanceof SaltedAuthenticationInfo) {
            salt = ((SaltedAuthenticationInfo)info).getCredentialsSalt();
        } else if (this.isHashSalted()) {
            salt = this.getSalt(token);
        }

        return this.hashProvidedCredentials(token.getCredentials(), salt, this.getHashIterations());
    }
拿到盐值后 传给hashProvidedCredentials方法 传入明文密码 盐值 以及 加密散列的次数
protected Hash hashProvidedCredentials(Object credentials, Object salt, int hashIterations) {
        String hashAlgorithmName = this.assertHashAlgorithmName();
        return new SimpleHash(hashAlgorithmName, credentials, salt, hashIterations);
    }
最后使用 SimpleHash构造器构造出加密后的对象
两个 SimpleHash 进行比较的方法
protected boolean equals(Object tokenCredentials, Object accountCredentials) {
        if (log.isDebugEnabled()) {
            log.debug("Performing credentials equality check for tokenCredentials of type [" + tokenCredentials.getClass().getName() + " and accountCredentials of type [" + accountCredentials.getClass().getName() + "]");
        }

        if (this.isByteSource(tokenCredentials) && this.isByteSource(accountCredentials)) {
            if (log.isDebugEnabled()) {
                log.debug("Both credentials arguments can be easily converted to byte arrays.  Performing array equals comparison");
            }

            byte[] tokenBytes = this.toBytes(tokenCredentials);
            byte[] accountBytes = this.toBytes(accountCredentials);
            return MessageDigest.isEqual(tokenBytes, accountBytes);
        } else {
            return accountCredentials.equals(tokenCredentials);
        }
    }
得知这些以后 ,我们自然而然的知道了密码加密的过程 ,我们在创建用户的时候 按照同样的方式,对密码进行一个加密 ,这样解密一点毛病也没有了
密码生成过程
    @Test
    public void contextLoads() {


        String password  = "123456";

        String salt = "admin8d78869f470951332959580424d4bf4f";


        int hashIterations = 2;

        SimpleHash simpleHash = new SimpleHash("md5",password, ByteSource.Util.bytes(salt),hashIterations);

        System.out.println(simpleHash.toHex());
    // 结果 : d3c59d25033dbf980d29554025c23a75

    }

比较数据库的密码 发现一致
参考博文:
https://www.iteye.com/blog/sunjy22-2398775
Apach Shiro 中文文档

BCrypt和MD5密码加密介绍及实现
需求
对于用户密码的保护,通常都会进行加密。我们通常对密码进行加密,然后存放在数据库中,在用户进行登录的时候,将其输入的密码与数据库中存放的密文进行比较,以验证用户密码是否正确。
BCrypt和MD5介绍
BCrypt加密: 一种加盐的单向Hash,不可逆的加密算法,同一种明文(plaintext),每次加密后的密文都不一样,而且不可反向破解生成明文,破解难度很大。
MD5加密: 是不加盐的单向Hash,不可逆的加密算法,同一个密码经过hash的时候生成的是同一个hash值,在大多数的情况下,有些经过md5加密的方法将会被破解。
Bcrypt生成的密文是60位的。而MD5的是32位的。
目前,MD5和BCrypt比较流行。相对来说,BCrypt比MD5更安全,但加密更慢。
虽然BCrpyt也是输入的字符串+盐,但是与MD5+盐的主要区别是:每次加的盐不同,导致每次生成的结果也不相同。无法比对!
BCrypt加密实现
第一种: 单独用BCrypt进行密码加密
1,添加依赖
|
1
2 3 4 5 |
<dependency>
<groupId>org.mindrot</groupId> <artifactId>jbcrypt</artifactId> <version>0.4</version> </dependency> |
2,代码
|
1
2 3 4 5 6 7 8 9 10 11 12 13 14 15 16 17 18 19 20 21 22 23 24 25 26 27 28 29 30 31 32 33 34 35 36 37 |
public static void main(String[] args) {
String password = "666666"; /** * 第一步:生成盐值salt * 调用BCrypt类的构造函数 * 有三个构造函数: * BCrypt.gensalt() * log_rounds为散列数因子,范围4-31,默认为10 * BCrypt.gensalt(int log_rounds) * random是随机数产生器,要使用的new SecureRandom()实例 * BCrypt.gensalt(int log_rounds, SecureRandom random) * */ String salt = BCrypt.gensalt(); /** * 第二步:生成加密字符串 * 调用BCrypt类的hashpw(String password, String salt)函数进行加密 * 其中password是明文密码,salt是第一步生成的盐值 */ String hashpw = BCrypt.hashpw(password, salt); System.out.println("明文:"+password); System.out.println("密文1:"+hashpw); /** * 第三步:验证密文是否正确 * 调用BCrypt类的checkpw(String plaintext, String hashed)函数 * plaintext 需要传入的明文 * hashed 为第二步加密后的密文 */ String plaintext = "666666"; boolean checkpw = BCrypt.checkpw(plaintext, hashpw); if (checkpw){ System.out.println("密码正确"); }else { System.out.println("密码错误"); } } |
第二种: 如果用到spring security安全框架,就直接用spring security 的依赖就可以
1,添加依赖
|
1
2 3 4 5 |
<!-- spring security 安全认证 -->
<dependency> <groupId>org.springframework.boot</groupId> <artifactId>spring-boot-starter-security</artifactId> </dependency> |
2,创建BCryptPasswordEncoder 类后调用其encode方法,BCryptPasswordEncoder类底层也是调用第一种方法。
|
1
2 3 4 5 6 7 8 9 10 11 12 |
public static void BCryptTest(){
String password = "666666"; BCryptPasswordEncoder passwordEncoder = new BCryptPasswordEncoder(); // encode() 密码加密 String encode = passwordEncoder.encode(password); //matches 密码验证 if (passwordEncoder.matches("666666",encode1)){ System.out.println("密码正确"); }else { System.out.println("密码错误"); } } |
|
1
2 3 4 5 |
for (int i = 1; i <10 ; i++){
BCryptPasswordEncoder passwordEncoder = new BCryptPasswordEncoder(); String encode = passwordEncoder.encode(password); System.out.println(encode); } |

MD5加密实现
1,添加依赖
|
1
2 3 4 |
<dependency>
<groupId>commons-codec</groupId> <artifactId>commons-codec</artifactId> </dependency> |
2, 代码
|
1
2 3 4 5 6 7 8 9 10 11 |
public static void md5Test(){
String password = "x987654321d"; //盐/秘钥 随机数 String salt = UUID.randomUUID().toString().toUpperCase(); //带盐加密 String md5pw = DigestUtils.md5Hex(password + salt); //不带盐加密 String md5pw1 = DigestUtils.md5Hex(password); System.out.println("带盐 "+md5pw); System.out.println("不带盐 "+md5pw1); } |
MD5验证
第一步:把盐值和加密后的密文都存入数据库
第二步:验证时用输入的密码和数据库中存入的盐值进行再次进行加密后得到的密文和已经存入数据库中的密文进行比较。(这也是md5加密的缺点,如果密码相同,加密后的密文就相同。)

Django -MD5密码加密与登录
直接贴代码
login_reg.py
from django.shortcuts import render, redirect
from web.forms.login_reg import RegForm
from web import models
import hashlib


def login(request):
    error_msg = ''''
    if request.method == ''POST'':
        try:
            username = request.POST.get(''username'')
            password = request.POST.get(''password'')
            # 实例化MD5加密方法
            md5 = hashlib.md5()
            # 进行加密,python2可以给字符串加密,python3只能给字节加密
            md5.update(password.encode())
            password_md5 = md5.hexdigest()
            user_obj = models.SysUser.objects.get(USERNAME=username, PASSWORD=password_md5)
            if user_obj:
                return redirect(''/web/user/list/'')
        except Exception as e:
            print(e)
            error_msg = ''用户名或密码错误''

    return render(request, ''login.html'', {"error_msg": error_msg})
models.py
from django.db import models
from django.utils.encoding import python_2_unicode_compatible


@python_2_unicode_compatible
class SysUser(models.Model):
    """
    系统用户表
    """
    USER_ID = models.AutoField(''用户ID'', max_length=100, blank=True, primary_key=True)
    USERNAME = models.CharField(''用户名'', max_length=255, unique=True, blank=True)
    PASSWORD = models.CharField(''密码'', max_length=255, blank=True)

JAVA中使用MD5加密实现密码加密
本篇文章主要介绍JAVA中使用MD5加密实现密码加密,很多地方都要存储用户密码,这里整理了详细的代码,有需要的小伙伴可以参考下
1.新建Md5.java
package com.loger.md5; import java.io.UnsupportedEncodingException; import java.security.MessageDigest; import java.security.NoSuchAlgorithmException; import sun.misc.BASE64Encoder; public class Md5 { /**利用MD5进行加密*/ public String EncoderByMd5(String str) throws NoSuchAlgorithmException, UnsupportedEncodingException{ //确定计算方法 MessageDigest md5=MessageDigest.getInstance("MD5"); BASE64Encoder base64en = new BASE64Encoder(); //加密后的字符串 String newstr=base64en.encode(md5.digest(str.getBytes("utf-8"))); return newstr; } /**判断用户密码是否正确 *newpasswd 用户输入的密码 *oldpasswd 正确密码*/ public boolean checkpassword(String newpasswd,String oldpasswd) throws NoSuchAlgorithmException, UnsupportedEncodingException{ if(EncoderByMd5(newpasswd).equals(oldpasswd)) return true; else return false; } }
2.新建测试类
package com.loger.md5; import java.io.UnsupportedEncodingException; import java.security.NoSuchAlgorithmException; public class MyTest { public static void main(String[] args) throws NoSuchAlgorithmException, UnsupportedEncodingException { Md5 md5 = new Md5(); String str = "apple"; try { String newString = md5.EncoderByMd5(str); System.out.println(newString); } catch (NoSuchAlgorithmException e) { // Todo Auto-generated catch block e.printstacktrace(); } catch (UnsupportedEncodingException e) { // Todo Auto-generated catch block e.printstacktrace(); } System.out.println(md5.EncoderByMd5("apple").equals("HzhwvidPbEmz4xoMZyiVfw==")); } }
运行结果:

说明:
可能会出现找不到 BASE64Encoder 这个类,在eclipse中按住 ctr+shift + T 即可查找到!
以上就是本文的全部内容,希望对大家的学习有所帮助,也希望大家多多支持小编。
关于PHP实现MD5密码加盐处理和php md5加密解密的介绍现已完结,谢谢您的耐心阅读,如果想了解更多关于Apach Shiro MD5密码加密过程(明文生成密码过程)详细解析、BCrypt和MD5密码加密介绍及实现、Django -MD5密码加密与登录、JAVA中使用MD5加密实现密码加密的相关知识,请在本站寻找。
本文标签:


![[转帖]Ubuntu 安装 Wine方法(ubuntu如何安装wine)](https://www.gvkun.com/zb_users/cache/thumbs/4c83df0e2303284d68480d1b1378581d-180-120-1.jpg)

