本篇文章给大家谈谈为什么我被迫在python中使用os.path.expanduser?,以及python中os.path.isdir的知识点,同时本文还将给你拓展HowtousePythonforx
本篇文章给大家谈谈为什么我被迫在python中使用os.path.expanduser?,以及python中os.path.isdir的知识点,同时本文还将给你拓展How to use Python for xpath, JsonPath, and bs4?、python – 为什么在字符串连接中使用os.path.join?、python – 为什么我的PanelND工厂抛出KeyError?、python 之 os.path.expanduser ()等相关知识,希望对各位有所帮助,不要忘了收藏本站喔。
本文目录一览:- 为什么我被迫在python中使用os.path.expanduser?(python中os.path.isdir)
- How to use Python for xpath, JsonPath, and bs4?
- python – 为什么在字符串连接中使用os.path.join?
- python – 为什么我的PanelND工厂抛出KeyError?
- python 之 os.path.expanduser ()
")
为什么我被迫在python中使用os.path.expanduser?(python中os.path.isdir)
我确定这是故意的,因此有人可以解释这种行为的原因:
Python 2.7.2 (default,Oct 13 2011,15:27:47)
[GCC 4.1.2 20080704 (Red Hat 4.1.2-44)] on linux2
Type "help","copyright","credits" or "license" for more information.
>>> from os.path import isdir,expanduser
>>> isdir("~amosa/pdb")
False
>>> isdir(expanduser("~amosa/pdb"))
True
>>>
>>> from os import chdir
>>> chdir("~amosa/pdb")
Traceback (most recent call last):
  File "<stdin>",line 1,in <module>
OSError: [Errno 2] No such file or directory: '~amosa/pdb'
>>> chdir(expanduser("~amosa/pdb"))
>>>
毕竟这确实很烦人,因为其中包含用户名的路径 可以
明确解析…我想编写可处理用户可能给我的任何输入的代码,但是这种行为要求我调用expanduser我的代码必须处理的所有路径。这也意味着,无论我在哪里打印出该路径以供用户查看,它的可读性都比他们给我的要清晰。
这似乎与“鸭子类型”的概念不一致,在该概念中,我概括地说,是指我期望python不会对我发牢骚,除非确实存在问题…

How to use Python for xpath, JsonPath, and bs4?
1.xpath
1.1 xpath使用
google提前安装xpath插件,按ctrl + shift + x 出现小黑框
安装lxml库 pip install lxml ‐i https://pypi.douban.com/simple
导入lxml.etreefrom lxml import etree
etree.parse() 解析本地文件html_tree = etree.parse(''XX.html'')
-
etree.HTML() 服务器响应文件html_tree = etree.HTML(response.read().decode(''utf‐8'')
立即学习“Python免费学习笔记(深入)”;
.html_tree.xpath(xpath路径)
1.2 xpath基本语法
1.路径查询
查找所有子孙节点,不考虑层级关系
找直接子节点
2.谓词查询
//div[@id]
//div[@id="maincontent"]
3.属性查询
//@class
4.模糊查询
//div[contains(@id, "he")]
//div[starts‐with(@id, "he")]
5.内容查询
//div/h2/text()
6.逻辑运算
//div[@id="head" and @]
//title | //price
1.3 示例
xpath.html
<!DOCTYPE html>
<html lang="en">
<head>
    <meta charset="UTF-8"/>
    <title>Title</title>
</head>
<body>
    <ul>
        <li id="l1">北京</li>
        <li id="l2">上海</li>
        <li id="d1">广州</li>
        <li>深圳</li>
    </ul>
</body>
</html>from lxml import etree # xpath解析 # 本地文件: etree.parse # 服务器相应的数据 response.read().decode('utf-8') etree.HTML() tree = etree.parse('xpath.html') # 查找url下边的li li_list = tree.xpath('//body/ul/li') print(len(li_list)) # 4 # 获取标签中的内容 li_list = tree.xpath('//body/ul/li/text()') print(li_list) # ['北京', '上海', '广州', '深圳'] # 获取带id属性的li li_list = tree.xpath('//ul/li[@id]') print(len(li_list)) # 3 # 获取id为l1的标签内容 li_list = tree.xpath('//ul/li[@id="l1"]/text()') print(li_list) # ['北京'] # 获取id为l1的class属性值 c1 = tree.xpath('//ul/li[@id="l1"]/@class') print(c1) # ['class1'] # 获取id中包含l的标签 li_list = tree.xpath('//ul/li[contains(@id, "l")]/text()') print(li_list) # ['北京', '上海'] # 获取id以d开头的标签 li_list = tree.xpath('//ul/li[starts-with(@id,"d")]/text()') print(li_list) # ['广州'] # 获取id为l2并且class为class2的标签 li_list = tree.xpath('//ul/li[@id="l2" and @]/text()') print(li_list) # ['上海'] # 获取id为l2或id为d1的标签 li_list = tree.xpath('//ul/li[@id="l2"]/text() | //ul/li[@id="d1"]/text()') print(li_list) # ['上海', '广州']
1.4 爬取百度搜索按钮的value
import urllib.request
from lxml import etree
url = 'http://www.baidu.com'
headers = {
    'User-Agent': 'Mozilla/5.0 (Windows NT 10.0; Win64; x64) AppleWebKit/537.36 (KHTML, like Gecko) Chrome/103.0.0.0 Safari/537.36'
}
request = urllib.request.Request(url=url, headers=headers)
response = urllib.request.urlopen(request)
content = response.read().decode('utf-8')
tree = etree.HTML(content)
value = tree.xpath('//input[@id="su"]/@value')
print(value)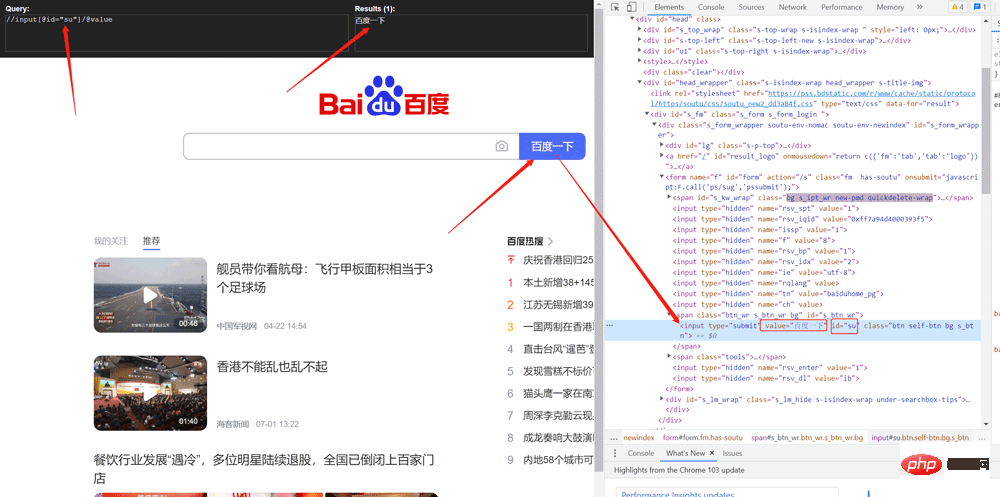
1.5 爬取站长素材的图片
# 需求 下载的前十页的图片
# https://sc.chinaz.com/tupian/qinglvtupian.html   1
# https://sc.chinaz.com/tupian/qinglvtupian_page.html
import urllib.request
from lxml import etree
def create_request(page):
    if (page == 1):
        url = 'https://sc.chinaz.com/tupian/qinglvtupian.html'
    else:
        url = 'https://sc.chinaz.com/tupian/qinglvtupian_' + str(page) + '.html'
    headers = {
        'User-Agent': 'Mozilla/5.0 (Windows NT 10.0; Win64; x64) AppleWebKit/537.36 (KHTML, like Gecko) Chrome/92.0.4515.159 Safari/537.36',
    }
    request = urllib.request.Request(url=url, headers=headers)
    return request
def get_content(request):
    response = urllib.request.urlopen(request)
    content = response.read().decode('utf-8')
    return content
def down_load(content):
    #     下载图片
    # urllib.request.urlretrieve('图片地址','文件的名字')
    tree = etree.HTML(content)
    name_list = tree.xpath('//div[@id="container"]//a/img/@alt')
    # 一般设计图片的网站都会进行懒加载
    src_list = tree.xpath('//div[@id="container"]//a/img/@src2')
    print(src_list)
    for i in range(len(name_list)):
        name = name_list[i]
        src = src_list[i]
        url = 'https:' + src
        urllib.request.urlretrieve(url=url, filename='./loveImg/' + name + '.jpg')
if __name__ == '__main__':
    start_page = int(input('请输入起始页码'))
    end_page = int(input('请输入结束页码'))

    for page in range(start_page, end_page + 1):
        # (1) 请求对象的定制
        request = create_request(page)
        # (2)获取网页的源码
        content = get_content(request)
        # (3)下载
down_load(content)2. JsonPath
2.1 pip安装
pip install jsonpath
2.2 jsonpath的使用
obj = json.load(open('json文件', 'r', encoding='utf‐8'))
ret = jsonpath.jsonpath(obj, 'jsonpath语法')
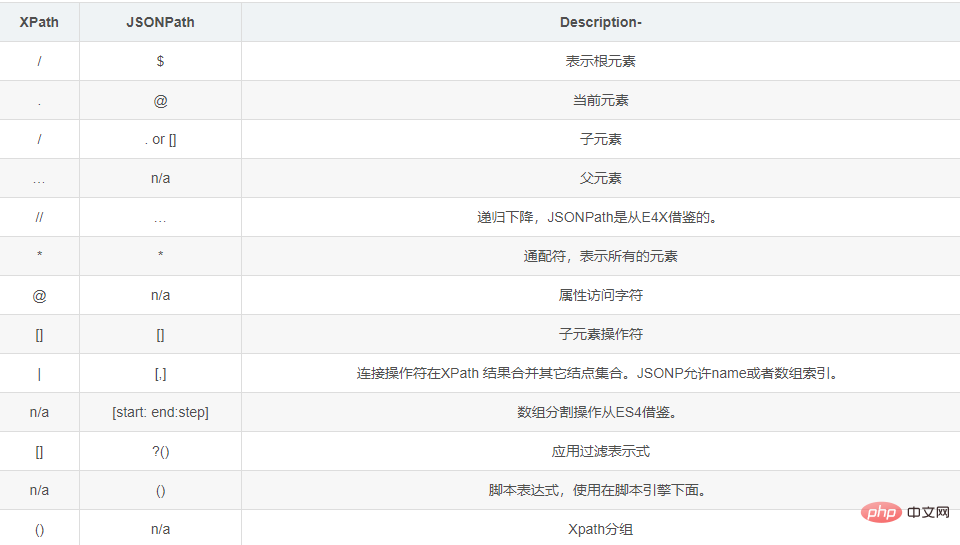
JSONPath语法元素和对应XPath元素的对比:
示例:
jsonpath.json
{ "store": {
    "book": [
      { "category": "修真",
        "author": "六道",
        "title": "坏蛋是怎样练成的",
        "price": 8.95
      },
      { "category": "修真",
        "author": "天蚕土豆",
        "title": "斗破苍穹",
        "price": 12.99
      },
      { "category": "修真",
        "author": "唐家三少",
        "title": "斗罗大陆",
        "isbn": "0-553-21311-3",
        "price": 8.99
      },
      { "category": "修真",
        "author": "南派三叔",
        "title": "星辰变",
        "isbn": "0-395-19395-8",
        "price": 22.99
      }
    ],
    "bicycle": {
      "author": "老马",
      "color": "黑色",
      "price": 19.95
    }
  }
}import json
import jsonpath
obj = json.load(open('jsonpath.json', 'r', encoding='utf-8'))
# 书店所有书的作者
author_list = jsonpath.jsonpath(obj, '$.store.book[*].author')
print(author_list) # ['六道', '天蚕土豆', '唐家三少', '南派三叔']
# 所有的作者
author_list = jsonpath.jsonpath(obj, '$..author')
print(author_list) # ['六道', '天蚕土豆', '唐家三少', '南派三叔', '老马']
# store下面的所有的元素
tag_list = jsonpath.jsonpath(obj, '$.store.*')
print(
tag_list) # [[{'category': '修真', 'author': '六道', 'title': '坏蛋是怎样练成的', 'price': 8.95}, {'category': '修真', 'author': '天蚕土豆', 'title': '斗破苍穹', 'price': 12.99}, {'category': '修真', 'author': '唐家三少', 'title': '斗罗大陆', 'isbn': '0-553-21311-3', 'price': 8.99}, {'category': '修真', 'author': '南派三叔', 'title': '星辰变', 'isbn': '0-395-19395-8', 'price': 22.99}], {'author': '老马', 'color': '黑色', 'price': 19.95}]
# store里面所有东西的price
price_list = jsonpath.jsonpath(obj, '$.store..price')
print(price_list) # [8.95, 12.99, 8.99, 22.99, 19.95]
# 第三个书
book = jsonpath.jsonpath(obj, '$..book[2]')
print(book) # [{'category': '修真', 'author': '唐家三少', 'title': '斗罗大陆', 'isbn': '0-553-21311-3', 'price': 8.99}]
# 最后一本书
book = jsonpath.jsonpath(obj, '$..book[(@.length-1)]')
print(book) # [{'category': '修真', 'author': '南派三叔', 'title': '星辰变', 'isbn': '0-395-19395-8', 'price': 22.99}]
# 前面的两本书
book_list = jsonpath.jsonpath(obj, '$..book[0,1]')
# book_list = jsonpath.jsonpath(obj,'$..book[:2]')
print(
book_list) # [{'category': '修真', 'author': '六道', 'title': '坏蛋是怎样练成的', 'price': 8.95}, {'category': '修真', 'author': '天蚕土豆', 'title': '斗破苍穹', 'price': 12.99}]
# 条件过滤需要在()的前面添加一个?
# 过滤出所有的包含isbn的书。
book_list = jsonpath.jsonpath(obj, '$..book[?(@.isbn)]')
print(
book_list) # [{'category': '修真', 'author': '唐家三少', 'title': '斗罗大陆', 'isbn': '0-553-21311-3', 'price': 8.99}, {'category': '修真', 'author': '南派三叔', 'title': '星辰变', 'isbn': '0-395-19395-8', 'price': 22.99}]
# 哪本书超过了10块钱
book_list = jsonpath.jsonpath(obj, '$..book[?(@.price>10)]')
print(
book_list) # [{'category': '修真', 'author': '天蚕土豆', 'title': '斗破苍穹', 'price': 12.99}, {'category': '修真', 'author': '南派三叔', 'title': '星辰变', 'isbn': '0-395-19395-8', 'price': 22.99}]3. BeautifulSoup
3.1 基本简介
1.安装
pip install bs4
2.导入
from bs4 import BeautifulSoup
3.创建对象
服务器响应的文件生成对象 soup = BeautifulSoup(response.read().decode(), ''lxml'')
本地文件生成对象 soup = BeautifulSoup(open(''1.html''), ''lxml'')
注意:默认打开文件的编码格式gbk所以需要指定打开编码格式utf-8
3.2 安装以及创建
1.根据标签名查找节点
	soup.a 【注】只能找到第一个a
		soup.a.name
		soup.a.attrs
2.函数
	(1).find(返回一个对象)
		find('a'):只找到第一个a标签
		find('a', title='名字')
		find('a', class_='名字')
	(2).find_all(返回一个列表)
		find_all('a') 查找到所有的a
		find_all(['a', 'span']) 返回所有的a和span
		find_all('a', limit=2) 只找前两个a
	(3).select(根据选择器得到节点对象)【推荐】
		1.element
			eg:p
		2..class
			eg:.firstname
		3.#id
			eg:#firstname
		4.属性选择器
			[attribute]
				eg:li = soup.select('li[class]')
			[attribute=value]
				eg:li = soup.select('li[]')
		5.层级选择器
			element element
				div p
			element>element
				div>p
			element,element
				div,p
					eg:soup = soup.select('a,span')
3.3 节点定位
1.根据标签名查找节点
	soup.a 【注】只能找到第一个a
		soup.a.name
		soup.a.attrs
2.函数
	(1).find(返回一个对象)
		find('a'):只找到第一个a标签
		find('a', title='名字')
		find('a', class_='名字')
	(2).find_all(返回一个列表)
		find_all('a') 查找到所有的a
		find_all(['a', 'span']) 返回所有的a和span
		find_all('a', limit=2) 只找前两个a
	(3).select(根据选择器得到节点对象)【推荐】
		1.element
			eg:p
		2..class
			eg:.firstname
		3.#id
			eg:#firstname
		4.属性选择器
			[attribute]
				eg:li = soup.select('li[class]')
			[attribute=value]
				eg:li = soup.select('li[]')
		5.层级选择器
			element element
				div p
			element>element
				div>p
			element,element
				div,p
					eg:soup = soup.select('a,span')
3.5 节点信息
(1).获取节点内容:适用于标签中嵌套标签的结构
	obj.string
	obj.get_text()【推荐】
(2).节点的属性
	tag.name 获取标签名
		eg:tag = find('li)
			print(tag.name)
	tag.attrs将属性值作为一个字典返回
(3).获取节点属性
	obj.attrs.get('title')【常用】
	obj.get('title')
	obj['title']
(1).获取节点内容:适用于标签中嵌套标签的结构
	obj.string
	obj.get_text()【推荐】
(2).节点的属性
	tag.name 获取标签名
		eg:tag = find('li)
			print(tag.name)
	tag.attrs将属性值作为一个字典返回
(3).获取节点属性
	obj.attrs.get('title')【常用】
	obj.get('title')
	obj['title']
3.6 使用示例
bs4.html
<!DOCTYPE html>
<html lang="en">
<head>
    <meta charset="UTF-8">
    <title>Title</title>
</head>
<body>

    <div>
        <ul>
            <li id="l1">张三</li>
            <li id="l2">李四</li>
            <li>王五</li>
            <a href="" id=" rel="external nofollow"  rel="external nofollow"  rel="external nofollow"  rel="external nofollow"  rel="external nofollow"  rel="external nofollow"  rel="external nofollow"  rel="external nofollow"  rel="external nofollow" ">google</a>
            <span>嘿嘿嘿</span>
        </ul>
    </div>


    <a href="" title=" rel="external nofollow"  rel="external nofollow"  rel="external nofollow"  rel="external nofollow"  rel="external nofollow"  rel="external nofollow" a2">百度</a>

    <div id="d1">
        <span>
            哈哈哈
        </span>
    </div>

    <p id="p1">呵呵呵</p>
</body>
</html>from bs4 import BeautifulSoup
# 通过解析本地文件 来将bs4的基础语法进行讲解
# 默认打开的文件的编码格式是gbk 所以在打开文件的时候需要指定编码
soup = BeautifulSoup(open('bs4.html', encoding='utf-8'), 'lxml')
# 根据标签名查找节点
# 找到的是第一个符合条件的数据
print(soup.a) # <ahref="" id=" rel="external nofollow" rel="external nofollow" rel="external nofollow" rel="external nofollow" rel="external nofollow" rel="external nofollow" rel="external nofollow" rel="external nofollow" rel="external nofollow" ">google</a>
# 获取标签的属性和属性值
print(soup.a.attrs) # {'href': '', 'id': '', 'class': ['a1']}
# bs4的一些函数
# (1)find
# 返回的是第一个符合条件的数据
print(soup.find('a')) # <ahref="" id=" rel="external nofollow" rel="external nofollow" rel="external nofollow" rel="external nofollow" rel="external nofollow" rel="external nofollow" rel="external nofollow" rel="external nofollow" rel="external nofollow" ">google</a>
# 根据title的值来找到对应的标签对象
print(soup.find('a', title="a2")) # <a href="" title=" rel="external nofollow" rel="external nofollow" rel="external nofollow" rel="external nofollow" rel="external nofollow" rel="external nofollow" a2">百度</a>
# 根据class的值来找到对应的标签对象 注意的是class需要添加下划线
print(soup.find('a', class_="a1")) # <ahref="" id=" rel="external nofollow" rel="external nofollow" rel="external nofollow" rel="external nofollow" rel="external nofollow" rel="external nofollow" rel="external nofollow" rel="external nofollow" rel="external nofollow" ">google</a>
# (2)find_all 返回的是一个列表 并且返回了所有的a标签
print(soup.find_all('a')) # [<ahref="" id=" rel="external nofollow" rel="external nofollow" rel="external nofollow" rel="external nofollow" rel="external nofollow" rel="external nofollow" rel="external nofollow" rel="external nofollow" rel="external nofollow" ">google</a>, <a href="" title=" rel="external nofollow" rel="external nofollow" rel="external nofollow" rel="external nofollow" rel="external nofollow" rel="external nofollow" a2">百度</a>]
# 如果想获取的是多个标签的数据 那么需要在find_all的参数中添加的是列表的数据
print(soup.find_all(['a','span'])) # [<ahref="" id=" rel="external nofollow" rel="external nofollow" rel="external nofollow" rel="external nofollow" rel="external nofollow" rel="external nofollow" rel="external nofollow" rel="external nofollow" rel="external nofollow" ">google</a>, <span>嘿嘿嘿</span>, <a href="" title=" rel="external nofollow" rel="external nofollow" rel="external nofollow" rel="external nofollow" rel="external nofollow" rel="external nofollow" a2">百</a><spa哈</span>]
# limit的作用是查找前几个数据
print(soup.find_all('li', limit=2)) # [<li id="l1">张三</li>, <li id="l2">李四</li>]
# (3)select(推荐)
# select方法返回的是一个列表 并且会返回多个数据
print(soup.select('a')) # [<ahref="" id=" rel="external nofollow" rel="external nofollow" rel="external nofollow" rel="external nofollow" rel="external nofollow" rel="external nofollow" rel="external nofollow" rel="external nofollow" rel="external nofollow" ">google</a>, <a href="" title=" rel="external nofollow" rel="external nofollow" rel="external nofollow" rel="external nofollow" rel="external nofollow" rel="external nofollow" a2">百度</a>]
# 可以通过.代表class 我们把这种操作叫做类选择器
print(soup.select('.a1')) # [<ahref="" id=" rel="external nofollow" rel="external nofollow" rel="external nofollow" rel="external nofollow" rel="external nofollow" rel="external nofollow" rel="external nofollow" rel="external nofollow" rel="external nofollow" ">google</a>]
print(soup.select('#l1')) # [<li id="l1">张三</li>]
# 属性选择器---通过属性来寻找对应的标签
# 查找到li标签中有id的标签
print(soup.select('li[id]')) # [<li id="l1">张三</li>, <li id="l2">李四</li>]
# 查找到li标签中id为l2的标签
print(soup.select('li[id="l2"]')) # [<li id="l2">李四</li>]
# 层级选择器
# 后代选择器
# 找到的是div下面的li
print(soup.select('div li')) # [<li id="l1">张三</li>, <li id="l2">李四</li>, <li>王五</li>]
# 子代选择器
# 某标签的第一级子标签
# 注意:很多的计算机编程语言中 如果不加空格不会输出内容 但是在bs4中 不会报错 会显示内容
print(soup.select('div > ul > li')) # [<li id="l1">张三</li>, <li id="l2">李四</li>, <li>王五</li>]
# 找到a标签和li标签的所有的对象
print(soup.select(
'a,li')) # [<li id="l1">张三</li>, <li id="l2">李四</li>, <li>王五</li>, <ahref="" id=" rel="external nofollow" rel="external nofollow" rel="external nofollow" rel="external nofollow" rel="external nofollow" rel="external nofollow" rel="external nofollow" rel="external nofollow" rel="external nofollow" ">google</a>, <a href="" title=" rel="external nofollow" rel="external nofollow" rel="external nofollow" rel="external nofollow" rel="external nofollow" rel="external nofollow" a2">百度</a>]
# 节点信息
# 获取节点内容
obj = soup.select('#d1')[0]
# 如果标签对象中 只有内容 那么string和get_text()都可以使用
# 如果标签对象中 除了内容还有标签 那么string就获取不到数据 而get_text()是可以获取数据
# 我们一般情况下 推荐使用get_text()
print(obj.string) # None
print(obj.get_text()) # 哈哈哈
# 节点的属性
obj = soup.select('#p1')[0]
# name是标签的名字
print(obj.name) # p
# 将属性值左右一个字典返回
print(obj.attrs) # {'id': 'p1', 'class': ['p1']}
# 获取节点的属性
obj = soup.select('#p1')[0]
#
print(obj.attrs.get('class')) # ['p1']
print(obj.get('class')) # ['p1']
print(obj['class']) # ['p1']3.7 解析星巴克产品名称
import urllib.request
url = 'https://www.starbucks.com.cn/menu/'
response = urllib.request.urlopen(url)
content = response.read().decode('utf-8')
from bs4 import BeautifulSoup
soup = BeautifulSoup(content,'lxml')
# //ul[@]//strong/text()
# 一般先用xpath方式通过google插件写好解析的表达式
name_list = soup.select('ul[] strong')
for name in name_list:
    print(name.get_text())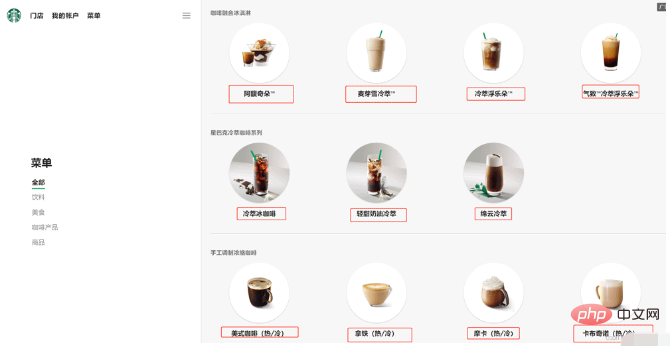
以上就是How to use Python for xpath, JsonPath, and bs4?的详细内容,更多请关注php中文网其它相关文章!

python – 为什么在字符串连接中使用os.path.join?
我主要使用VBScript,所以我不明白这个功能的意义.
解决方法
编写文件路径操作一次,它可以在许多不同的平台上免费使用.分隔字符被抽象化,使您的工作更轻松.
聪明
您不再需要担心该目录路径是否具有trailing slash or not. os.path.join将在需要时添加它.
明确
使用os.path.join可以让其他人阅读您正在使用文件路径的代码.人们可以快速扫描代码并发现它本质上是一个文件路径.如果您决定自己构建它,您可能会让读者不要发现代码的实际问题:“嗯,一些字符串concats,一个替换.这是一个文件路径还是什么?Gah!为什么他没有使用os.path .加入?”
总结
以上是小编为你收集整理的python – 为什么在字符串连接中使用os.path.join?全部内容。
如果觉得小编网站内容还不错,欢迎将小编网站推荐给好友。

python – 为什么我的PanelND工厂抛出KeyError?
我如何选择构建我的数据:
首先让我演示一下我对pandas.core.panelnd.creat_nd_panel_factory的使用.
Subject = panelnd.create_nd_panel_factory(
    klass_name='Subject',axis_orders=['setsize','location','vfield','channels','samples'],axis_slices={'labels': 'location','items': 'vfield','major_axis': 'major_axis','minor_axis': 'minor_axis'},slicer=pd.Panel4D,axis_aliases={'ss': 'setsize','loc': 'location','vf': 'vfield','major': 'major_axis','minor': 'minor_axis'}
    # stat_axis=2  # dafuq is this?
    )
从本质上讲,该组织如下:
> setsize:一个实验条件,可以是1或2
> location:一个实验条件,可以是“same”,“diff”或None
> vfield:一个实验条件,可以是“lvf”或“rvf”
最后两个轴对应于DataFrame的major_axis和minor_axis.为清楚起见,它们已重命名:
>频道:列,EEG频道(其中129个)
>样品:行,单个样品.样本可以作为时间轴.
我正在做的事情:
每个实验条件(主题x设置x位置x vfield)存储在它自己的制表符分隔文件中,我用pandas.read_table读取它,获取DataFrame对象.我想为每个主题创建一个5维面板(即主题),其将包含该主题的所有实验条件(即DataFrame).
首先,我正在为每个主题/主题构建一个嵌套字典:
# ... do some boring stuff to get the text files,etc...
for _,factors in df.iterrows():
    # `factors` is a 4-tuple containing
    #  (subject number,setsize,location,vfield,#  and path to the tab-delimited file).
    sn,ss,loc,vf,path = factors
    eeg = pd.read_table(path,sep='\t',names=range(1,129) + ['ref'],header=None)

    # build nested dict
    subjects.setdefault(sn,{}).setdefault(ss,{}).setdefault(loc,{})[vf] = eeg

# and Now attempt to build `Subject`
for sn,d in subjects.iteritems():
    subjects[sn] = Subject(d)
完整堆栈跟踪
---------------------------------------------------------------------------
KeyError                                  Traceback (most recent call last)
<ipython-input-2-831fa603ca8f> in <module>()
----> 1 import_data()

/home/louist/DropBox/Research/VSTM/scripts/vstmlib.py in import_data()
     64
     65     import ipdb; ipdb.set_trace()
---> 66     for sn,d in subjects.iteritems():
     67         subjects[sn] = Subject(d)
     68

/usr/local/lib/python2.7/dist-packages/pandas/core/panelnd.pyc in __init__(self,*args,**kwargs)
     65         if 'dtype' not in kwargs:
     66             kwargs['dtype'] = None
---> 67         self._init_data(*args,**kwargs)
     68     klass.__init__ = __init__
     69

/usr/local/lib/python2.7/dist-packages/pandas/core/panel.pyc in _init_data(self,data,copy,dtype,**kwargs)
    250             mgr = data
    251         elif isinstance(data,dict):
--> 252             mgr = self._init_dict(data,passed_axes,dtype=dtype)
    253             copy = False
    254             dtype = None

/usr/local/lib/python2.7/dist-packages/pandas/core/panel.pyc in _init_dict(self,axes,dtype)
    293         raxes = [self._extract_axis(self,axis=i)
    294                  if a is None else a for i,a in enumerate(axes)]
--> 295         raxes_sm = self._extract_axes_for_slice(self,raxes)
    296
    297         # shallow copy

/usr/local/lib/python2.7/dist-packages/pandas/core/panel.pyc in _extract_axes_for_slice(self,axes)
   1477         """ return the slice dictionary for these axes """
   1478         return dict([(self._AXIS_SLICEMAP[i],a) for i,a
-> 1479                      in zip(self._AXIS_ORDERS[self._AXIS_LEN - len(axes):],axes)])
   1480
   1481     @staticmethod

KeyError: 'location'
我知道panelnd是一个实验性功能,但我很确定我做错了什么.有人可以指点我正确的方向吗?如果它是一个bug,有什么可以做的吗?
像往常一样,非常感谢你!
解决方法
我会首先创建一个Panel4D,然后像下面一样创建你的主题.
如果你发现更多错误,请在github /这里发帖.这不是一个使用频繁的功能.
产量
<class 'pandas.core.panelnd.Subject'>
Dimensions: 3 (setsize) x 1 (location) x 1 (vfield) x 10 (channels) x 2 (samples)
Setsize axis: level0_0 to level0_2
Location axis: level1_0 to level1_0
Vfield axis: level2_0 to level2_0
Channels axis: level3_0 to level3_9
Samples axis: level4_1 to level4_2
码
import pandas as pd
import numpy as np
from pandas.core import panelnd

Subject = panelnd.create_nd_panel_factory(
    klass_name='Subject',axis_slices={'location' : 'labels','vfield' : 'items','channels' : 'major_axis','samples': 'minor_axis'},'loc': 'labels','vf': 'items','minor': 'minor_axis'})


subjects = dict()
for i in range(3):
    eeg = pd.DataFrame(np.random.randn(10,2),columns=['level4_1','level4_2'],index=[ "level3_%s" % x for x in range(10)])

    loc,vf = ('level1_0','level2_0')
    subjects["level0_%s" % i] = pd.Panel4D({ loc : { vf : eeg }})

print Subject(subjects)
")
python 之 os.path.expanduser ()
奇怪了,我的《python 基础教程第二版》里面写的是
sys.path.expanduser(''~/python'')
使用后会有如下报错
Traceback (most recent call last):
File "./info.py", line 6, in <module>
sys.path.expanduser(''~/desktop/'')
AttributeError: ''list'' object has no attribute ''expanduser''
后来查了一下,发现原来这不是正确的,应该使用下面这个
os.path.expanduser(''~/python/'')
python 版本是 2.7
今天关于为什么我被迫在python中使用os.path.expanduser?和python中os.path.isdir的讲解已经结束,谢谢您的阅读,如果想了解更多关于How to use Python for xpath, JsonPath, and bs4?、python – 为什么在字符串连接中使用os.path.join?、python – 为什么我的PanelND工厂抛出KeyError?、python 之 os.path.expanduser ()的相关知识,请在本站搜索。
本文标签:


![[转帖]Ubuntu 安装 Wine方法(ubuntu如何安装wine)](https://www.gvkun.com/zb_users/cache/thumbs/4c83df0e2303284d68480d1b1378581d-180-120-1.jpg)

