对于想了解C#中的CircularBufferIDictionary?的读者,本文将是一篇不可错过的文章,我们将详细介绍c#中的数据类型分为哪两大种,并且为您提供关于.netRedis分布式锁,Dic
对于想了解C#中的CircularBuffer IDictionary?的读者,本文将是一篇不可错过的文章,我们将详细介绍c#中的数据类型分为哪两大种,并且为您提供关于.net Redis分布式锁,Dictionary,ConcurrentDictionary 介绍、Android CircularFloatingActionMenu (1)、angular – 类型’SharedArrayBuffer’不能分配给’ArrayBuffer’类型、Are Java DirectByteBuffer wrappers garbage collect的有价值信息。
本文目录一览:- C#中的CircularBuffer IDictionary?(c#中的数据类型分为哪两大种)
- .net Redis分布式锁,Dictionary,ConcurrentDictionary 介绍
- Android CircularFloatingActionMenu (1)
- angular – 类型’SharedArrayBuffer’不能分配给’ArrayBuffer’类型
- Are Java DirectByteBuffer wrappers garbage collect
")
C#中的CircularBuffer IDictionary?(c#中的数据类型分为哪两大种)
所以IDictionary具有最大容量,比如说配置为100个项目,当添加项目101时,从字典中弹出/删除原始的第一个项目,从而确保项目计数永远不会超过100.
谢谢
解决方法
> O(1)入队(后退)
> O(n)插入违反添加顺序(因为你必须使数组保持最新);无论如何你可能永远都不需要这个
> O(1)出队(从前面)
> O(1)或O(log n)键控查找
使其成为通用的并实现IDictionary< T,K>和IDictionary,因为没有理由不这样做,你将获得性能优势.
一个主要考虑因素:你如何处理重复键?我假设你实际上不能保留重复,所以:
>抛出一个异常(如果没有重复的密钥,那么插入两次只是一个错误)
>向后移动:检查字典的计数,然后使用此[key]索引器插入密钥.如果大小增加,则检查列表是否已具有最大容量,从列表和字典中删除前项并将新项添加到后面.如果字典的大小没有增加,请将项目从列表中的现有位置移动到列表的后面.
>不移动覆盖:与上一个项目相同,但您不必弄乱列表.
最后,请注意内部列表保留键,而不是值.这是为了确保在超出列表容量时O(1)出列.

.net Redis分布式锁,Dictionary,ConcurrentDictionary 介绍
1、背景
在计算机世界里,对于锁大家并不陌生,在现代所有的语言中几乎都提供了语言级别锁的实现,为什么我们的程序有时候会这么依赖锁呢?这个问题还是要从计算机的发展说起,随着计算机硬件的不断升级,多核cpu,多线程,多通道等技术把计算机的计算速度大幅度提升,原来同一时间只能执行一条cpu指令的时代已经过去。随着多条cpu指令可以并行执行的原因,原来不曾出现的资源竞争随着出现,在程序中的体现就是随处可见的多线程环境。比如要更新数据库的一个信息,如果没有并发控制,多个线程同时操作的话,就会出现互相覆盖的现象发生。
锁要解决的就是资源竞争的问题,也就是要把执行的指令顺序化。
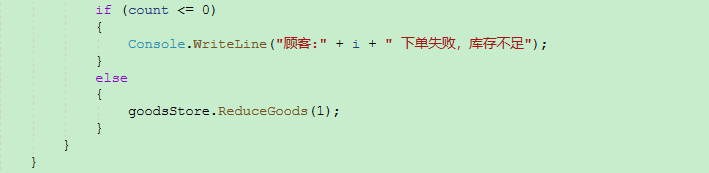
在互联网背景下,电商行业是普遍都是多线程执行,并发量大。比如下单秒杀抢购商品活动,属于高并发情况,库存的保证就尤其重要了,不能出现超卖现象。程序员所要做的事情就是需要单线程执行获取库存,再减库存操作,保证数据原子性。
在多台服务器中,锁就是重点。
2、应用
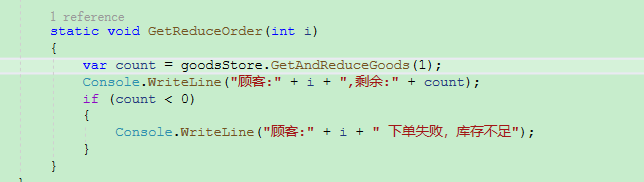
我们先来介绍下单线程下的情况,假设有个商品A,库存500件,假设每次购买1件,单价1元,这样就只有是500次下单时成功的,其他都不能下单。
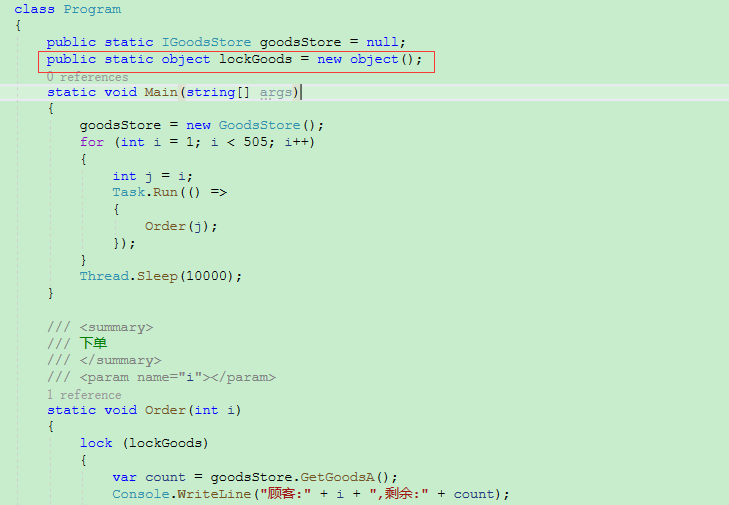
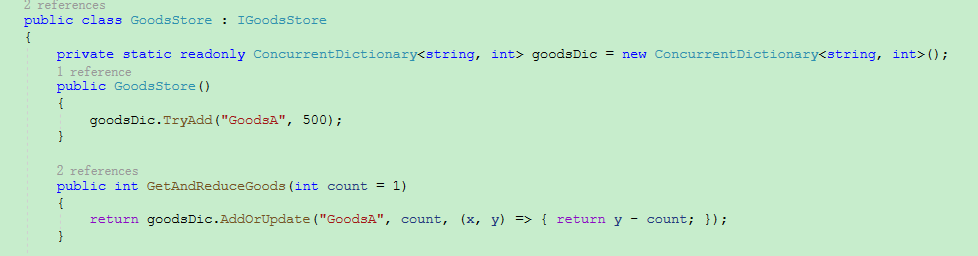
2.1 Store商品存储-Dictionary
数据库不存在的情况下,用Dictionary来代替
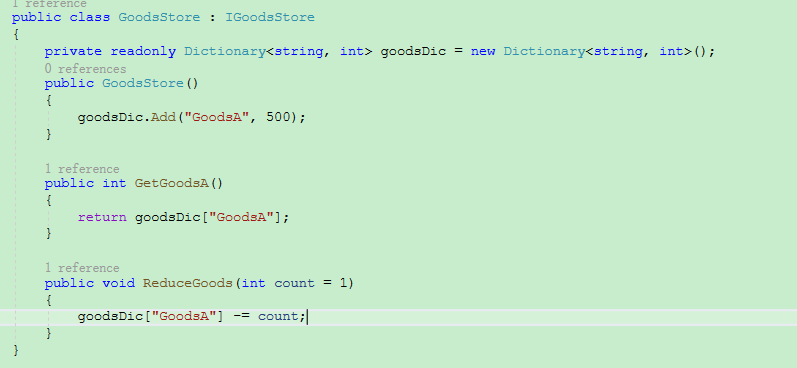
创建了Store后,主程序创建下单,单线程执行。
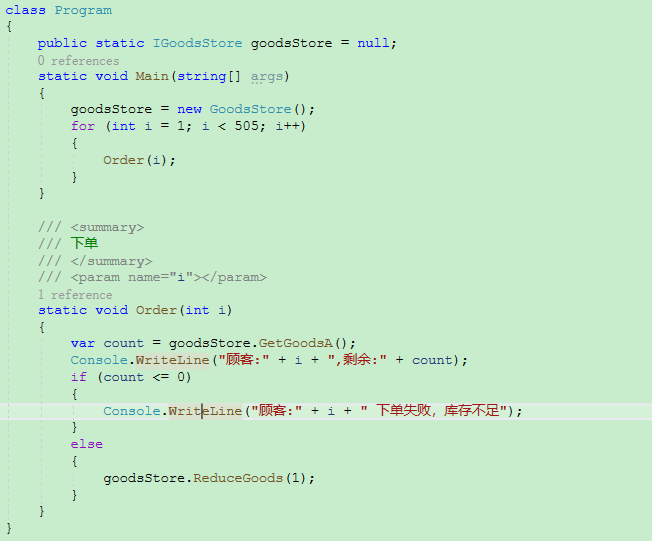
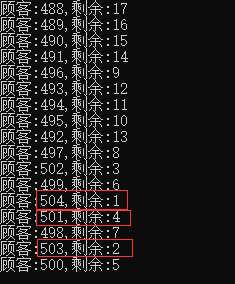
执行结果:
执行正常,4人不能下单。
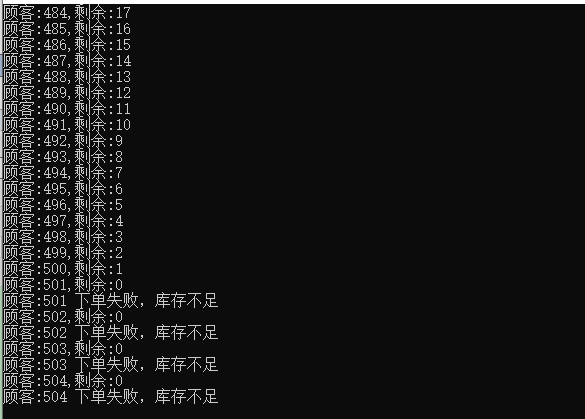
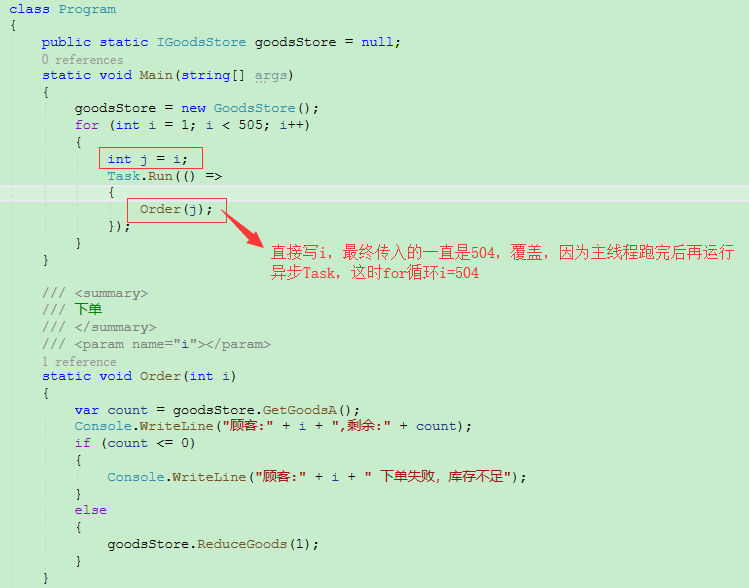
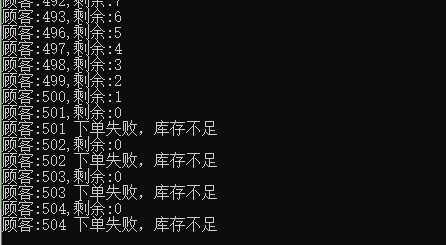
改成多线程执行,直接出现超卖现象,其中用Task.Run 模拟多线程,其中Order(int i) i变量注意,不能直接填写i,异步中上下文不存在,因为主线程以及跑完了,再运行异步Task线程,这时变量已是最后一个被覆盖。
解决方案是重复赋值变量替换
结果:
500多的人都买了。
解决方案:
2.1.1 lock 加锁
lock很明显影响性能。
执行结果:
正常。
2.1.2 使用ConcurrentDictionary
ConcurrentDictionary 本身是线程安全的,源代码就是加了lock
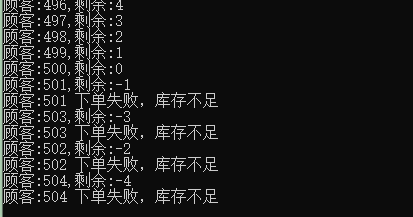
执行结果符合。
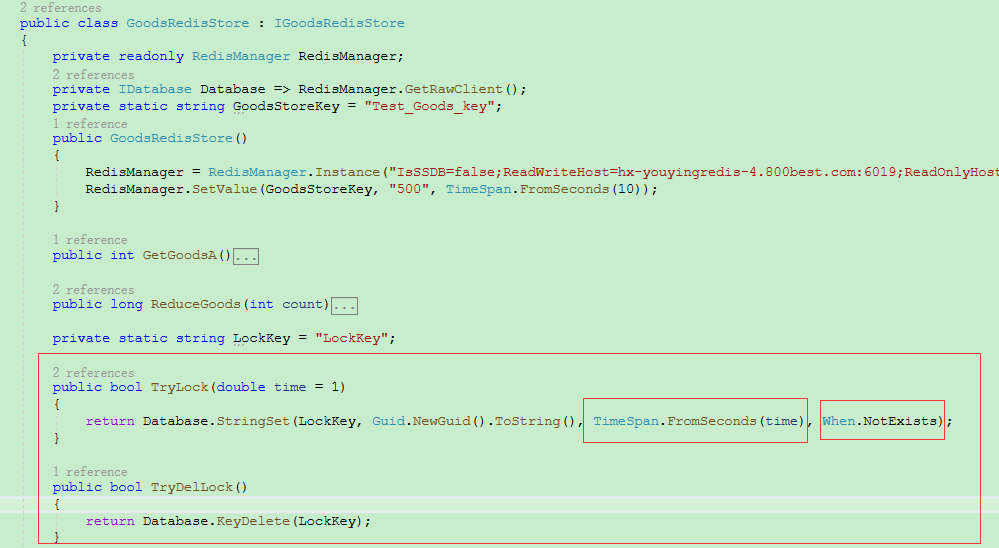
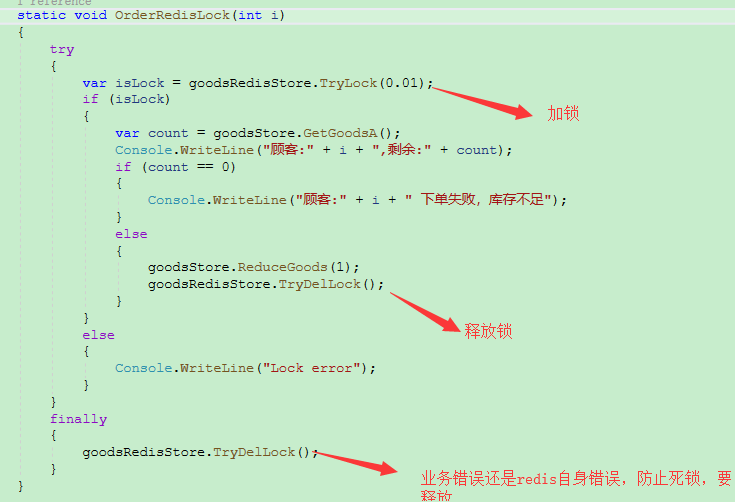
2.2 用Redis分布式锁
redis是单线程运行,所以适合。原理也很简单,运用redis以下指令
1、SETNX
SETNX key val:当且仅当key不存在时,set一个key为val的字符串,返回1;若key存在,则什么都不做,返回0。
2、expire
expire key timeout:为key设置一个超时时间,单位为second,超过这个时间锁会自动释放,避免死锁。
3、delete
delete key:删除key
在使用Redis实现分布式锁的时候,主要就会使用到这三个命令。
原理如下:
1、先获取redis锁,设置一个随机字符串
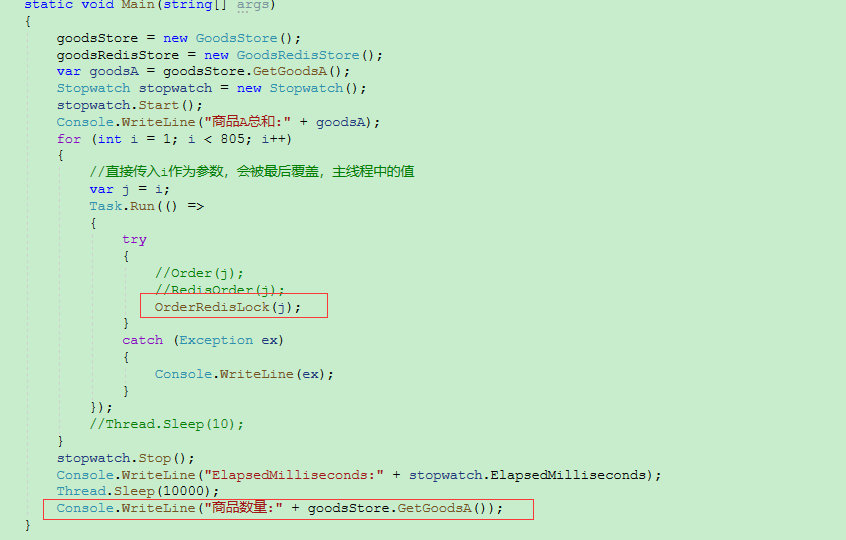
执行了805次,看下输出最后数量有没有小于0
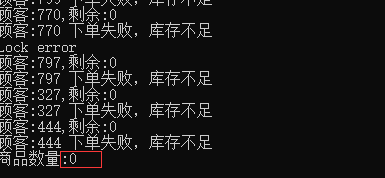
结果显示0,正确,没超卖
")
Android CircularFloatingActionMenu (1)
Android CircularFloatingActionMenu (1)
Android CircularFloatingActionMenu在github上项目主页地址:https://github.com/oguzbilgener/CircularFloatingActionMenu
Android CircularFloatingActionMenu要实现的效果如动态图所示:
Java代码:
import android.animation.ObjectAnimator;
import android.animation.PropertyValuesHolder;
import android.app.Activity;
import android.os.Bundle;
//import android.view.Menu;
//import android.view.MenuItem;
import android.view.View;
import android.widget.FrameLayout;
import android.widget.ImageView;

import com.oguzdev.circularfloatingactionmenu.library.FloatingActionButton;
import com.oguzdev.circularfloatingactionmenu.library.FloatingActionMenu;
import com.oguzdev.circularfloatingactionmenu.library.SubActionButton;

/**
 * 一个FloatingActionButton有一个FloatingActionMenu,FloatingActionMenu添加动画弹出的子菜单。
 * FloatingActionButton的按钮点击事件将触发、弹出FloatingActionMenu中包含的子菜单。
 * FloatingActionMenu使用attachTo方法附着在一个FloatingActionButton上。
 * FloatingActionMenu在attachTo到一个FloatingActionButton后,两者之间发生关联。
 * FloatingActionMenu在添加子菜单时候,首先需要一个SubActionButton.Builder,该SubActionButton.
 * Builder通过setContentView(ImageView
 * image).build()把一个ImageView创建生产一个SubActionButton ,
 * 然后通过FloatingActionMenu.Builder的add方法把前面生成的SubActionButton添加进去。
 *
 *
 * 按钮的旋转动画在onMenuOpened和onMenuClosed中做。
 *
 */

public class MenuWithFABActivity extends Activity {

	@Override
	protected void onCreate(Bundle savedInstanceState) {
		super.onCreate(savedInstanceState);

		// 添加 右下角的白色+号按钮
		final ImageView fabIconNew = new ImageView(this);
		fabIconNew.setImageDrawable(getResources().getDrawable(R.drawable.ic_action_new_light));
		final FloatingActionButton rightLowerButton = new FloatingActionButton.Builder(this).setContentView(fabIconNew)
				.build();

		SubActionButton.Builder rLSubBuilder = new SubActionButton.Builder(this);

		ImageView rlIcon1 = new ImageView(this);
		ImageView rlIcon2 = new ImageView(this);
		ImageView rlIcon3 = new ImageView(this);
		ImageView rlIcon4 = new ImageView(this);
		rlIcon1.setImageDrawable(getResources().getDrawable(R.drawable.ic_action_chat_light));
		rlIcon2.setImageDrawable(getResources().getDrawable(R.drawable.ic_action_camera_light));
		rlIcon3.setImageDrawable(getResources().getDrawable(R.drawable.ic_action_video_light));
		rlIcon4.setImageDrawable(getResources().getDrawable(R.drawable.ic_action_place_light));

		// Build the menu with default options: light theme, 90 degrees, 72dp
		// radius.
		// Set 4 default SubActionButtons
		// FloatingActionMenu通过attachTo(rightLowerButton)附着到FloatingActionButton
		final FloatingActionMenu rightLowerMenu = new FloatingActionMenu.Builder(this)
				.addSubActionView(rLSubBuilder.setContentView(rlIcon1).build())
				.addSubActionView(rLSubBuilder.setContentView(rlIcon2).build())
				.addSubActionView(rLSubBuilder.setContentView(rlIcon3).build())
				.addSubActionView(rLSubBuilder.setContentView(rlIcon4).build()).attachTo(rightLowerButton).build();

		// Listen menu open and close events to animate the button content view
		rightLowerMenu.setStateChangeListener(new FloatingActionMenu.MenuStateChangeListener() {
			@Override
			public void onMenuOpened(FloatingActionMenu menu) {
				// 增加按钮中的+号图标顺时针旋转45度
				// Rotate the icon of rightLowerButton 45 degrees clockwise
				fabIconNew.setRotation(0);
				PropertyValuesHolder pvhR = PropertyValuesHolder.ofFloat(View.ROTATION, 45);
				ObjectAnimator animation = ObjectAnimator.ofPropertyValuesHolder(fabIconNew, pvhR);
				animation.start();
			}

			@Override
			public void onMenuClosed(FloatingActionMenu menu) {
				// 增加按钮中的+号图标逆时针旋转45度
				// Rotate the icon of rightLowerButton 45 degrees
				// counter-clockwise
				fabIconNew.setRotation(45);
				PropertyValuesHolder pvhR = PropertyValuesHolder.ofFloat(View.ROTATION, 0);
				ObjectAnimator animation = ObjectAnimator.ofPropertyValuesHolder(fabIconNew, pvhR);
				animation.start();
			}
		});

		// 左边中间的红底白色星型按钮
		// Set up the large red button on the center right side
		// With custom button and content sizes and margins
		int redActionButtonSize = getResources().getDimensionPixelSize(R.dimen.red_action_button_size);
		int redActionButtonMargin = getResources().getDimensionPixelOffset(R.dimen.action_button_margin);
		int redActionButtonContentSize = getResources().getDimensionPixelSize(R.dimen.red_action_button_content_size);
		int redActionButtonContentMargin = getResources()
				.getDimensionPixelSize(R.dimen.red_action_button_content_margin);
		int redActionMenuRadius = getResources().getDimensionPixelSize(R.dimen.red_action_menu_radius);
		int blueSubActionButtonSize = getResources().getDimensionPixelSize(R.dimen.blue_sub_action_button_size);
		int blueSubActionButtonContentMargin = getResources()
				.getDimensionPixelSize(R.dimen.blue_sub_action_button_content_margin);

		ImageView fabIconStar = new ImageView(this);
		fabIconStar.setImageDrawable(getResources().getDrawable(R.drawable.ic_action_important));

		FloatingActionButton.LayoutParams starParams = new FloatingActionButton.LayoutParams(redActionButtonSize,
				redActionButtonSize);
		starParams.setMargins(redActionButtonMargin, redActionButtonMargin, redActionButtonMargin,
				redActionButtonMargin);
		fabIconStar.setLayoutParams(starParams);

		FloatingActionButton.LayoutParams fabIconStarParams = new FloatingActionButton.LayoutParams(
				redActionButtonContentSize, redActionButtonContentSize);
		fabIconStarParams.setMargins(redActionButtonContentMargin, redActionButtonContentMargin,
				redActionButtonContentMargin, redActionButtonContentMargin);

		final FloatingActionButton leftCenterButton = new FloatingActionButton.Builder(this)
				.setContentView(fabIconStar, fabIconStarParams)
				.setBackgroundDrawable(R.drawable.button_action_red_selector)// 红底白星按钮选中时候状态变化和背景颜色
				.setPosition(FloatingActionButton.POSITION_LEFT_CENTER)// 左边居中
				.setLayoutParams(starParams).build();

		// Set up customized SubActionButtons for the right center menu
		SubActionButton.Builder lCSubBuilder = new SubActionButton.Builder(this);
		lCSubBuilder.setBackgroundDrawable(getResources().getDrawable(R.drawable.button_action_blue_selector));

		FrameLayout.LayoutParams blueContentParams = new FrameLayout.LayoutParams(FrameLayout.LayoutParams.MATCH_PARENT,
				FrameLayout.LayoutParams.MATCH_PARENT);
		blueContentParams.setMargins(blueSubActionButtonContentMargin, blueSubActionButtonContentMargin,
				blueSubActionButtonContentMargin, blueSubActionButtonContentMargin);
		lCSubBuilder.setLayoutParams(blueContentParams);
		// Set custom layout params
		FrameLayout.LayoutParams blueParams = new FrameLayout.LayoutParams(blueSubActionButtonSize,
				blueSubActionButtonSize);
		lCSubBuilder.setLayoutParams(blueParams);

		ImageView lcIcon1 = new ImageView(this);
		ImageView lcIcon2 = new ImageView(this);
		ImageView lcIcon3 = new ImageView(this);
		ImageView lcIcon4 = new ImageView(this);
		ImageView lcIcon5 = new ImageView(this);

		lcIcon1.setImageDrawable(getResources().getDrawable(R.drawable.ic_action_camera));
		lcIcon2.setImageDrawable(getResources().getDrawable(R.drawable.ic_action_picture));
		lcIcon3.setImageDrawable(getResources().getDrawable(R.drawable.ic_action_video));
		lcIcon4.setImageDrawable(getResources().getDrawable(R.drawable.ic_action_location_found));
		lcIcon5.setImageDrawable(getResources().getDrawable(R.drawable.ic_action_headphones));

		// Build another menu with custom options
		final FloatingActionMenu leftCenterMenu = new FloatingActionMenu.Builder(this)
				.addSubActionView(lCSubBuilder.setContentView(lcIcon1, blueContentParams).build())
				.addSubActionView(lCSubBuilder.setContentView(lcIcon2, blueContentParams).build())
				.addSubActionView(lCSubBuilder.setContentView(lcIcon3, blueContentParams).build())
				.addSubActionView(lCSubBuilder.setContentView(lcIcon4, blueContentParams).build())
				.addSubActionView(lCSubBuilder.setContentView(lcIcon5, blueContentParams).build())
				.setRadius(redActionMenuRadius).setStartAngle(70).setEndAngle(-70).attachTo(leftCenterButton).build();

	}

	// @Override
	// public boolean onCreateOptionsMenu(Menu menu) {
	// // Inflate the menu; this adds items to the action bar if it is present.
	// getMenuInflater().inflate(R.menu.menu_with_fab, menu);
	// return true;
	// }
	//
	// @Override
	// public boolean onOptionsItemSelected(MenuItem item) {
	// // Handle action bar item clicks here. The action bar will
	// // automatically handle clicks on the Home/Up button, so long
	// // as you specify a parent activity in AndroidManifest.xml.
	// int id = item.getItemId();
	// if (id == R.id.action_settings) {
	// return true;
	// }
	// return super.onOptionsItemSelected(item);
	// }
}
其中用到的定义的尺寸在该项目的库文件及demo中代码文件中已经定义。
附录相关文章:
【1】《Android第三方开源FloatingActionButton(com.getbase.floatingactionbutton)【1】》链接地址:http://blog.csdn.net/zhangphil/article/details/50166715
【2】《Android第三方开源FloatingActionButton(com.getbase.floatingactionbutton)【2】》链接地址:http://blog.csdn.net/zhangphil/article/details/50166929
【3】《Android第三方开源FloatingActionButton(com.getbase.floatingactionbutton): FloatingActionsMenu【3】》链接地址:http://blog.csdn.net/zhangphil/article/details/50167609
【4】《Android FloatingActionButton: FloatingActionsMenu向下伸展弹出及删除包含的FloatingActionButton【4】》链接地址:http://blog.csdn.net/zhangphil/article/details/50182019
【5】《Android Material Design的FloatingActionButton,Snackbar和CoordinatorLayout》链接地址:http://blog.csdn.net/zhangphil/article/details/48861371
【6】《Android第三方FloatingActionButton:伴随ListView、RecyclerView、ScrollView滚动滑入滑出》链接地址:http://blog.csdn.net/zhangphil/article/details/50135707

angular – 类型’SharedArrayBuffer’不能分配给’ArrayBuffer’类型
error TS2322: Type 'ArrayBuffer | SharedArrayBuffer' is not assignable to type 'Arr
ayBuffer'.
  Type 'SharedArrayBuffer' is not assignable to type 'ArrayBuffer'.
    Types of property '[Symbol.toStringTag]' are incompatible.
      Type '"SharedArrayBuffer"' is not assignable to type '"ArrayBuffer"'.
码
serialize(): ArrayBuffer {
        let source: ArrayLike<number>[] = this.contents.map(o => new Uint8Array(o));
        let lengths = source.map(o => this.numToArr(o.length));
        if (!!this.value) {
            const bytes = utf8.toByteArray(JSON.stringify(this.value,null,null));
            const dataLength = this.numToArr(bytes.length);
            source = [bytes,...source];
            lengths = [dataLength,...lengths];
        }

        const totalLength = source.reduce((acc,o) => acc + o.length,0) + lengths.reduce((acc,0);

        const data = new Uint8Array(totalLength);
        let offset = 0;
        source.forEach((item,index) => {
            const prefix = lengths[index];
            data.set(prefix,offset);
            offset += prefix.length;
            data.set(item,offset);
            offset += item.length;
        });

        return data.buffer;
    }
解决方法
return data.buffer as ArrayBuffer;
或者定义一个可以接受ArrayBuffer或SharedArrayBuffer的变量,如下所示:
pdf: ArrayBuffer | SharedArrayBuffer;
...

...
this.pdf = data.buffer;
return this.pdf;
希望这可以帮助.

Are Java DirectByteBuffer wrappers garbage collect
I understand that when a directbytebuffer is allocated, its not subject to garbage collection, but what I''m wondering is if the wrapping object is garbage collected.
For example, if I allocated a new DirectByteBuffer dbb, and then duplicated(shallow copied) it using dbb.duplicate(), I''d have two wrappers around the same chunk of memory.
Are those wrappers subject to garbage collection? If I did
while(true){ DirectByteBuffer dbb2 = dbb.duplicate(); } Would I eventually OOM myself?
A:
In the Sun JDK, a java.nio.DirectByteBuffer—created by ByteBuffer#allocateDirect(int)—has a field of type sun.misc.Cleaner, which extends java.lang.ref.PhantomReference.
When this Cleaner (remember, a subtype of PhantomReference) gets collected and is about to move into the associated ReferenceQueue, the collection-related thread running through the nested type ReferenceHandler has a special case treatment of Cleaner instances: it downcasts and calls on Cleaner#clean(), which eventually makes its way back to calling on DirectByteBuffer$Deallocator#run(), which in turn calls on Unsafe#freeMemory(long). Wow.
It''s rather circuitous, and I was surprised to not see any use of Object#finalize() in play. The Sun developers must have had their reasons for tying this in even closer to the collection and reference management subsystem.
In short, you won''t run out of memory by virtue of abandoning references to DirectByteBufferinstances, so long as the garbage collector has a chance to notice the abandonment and its reference handling thread makes progress through the calls described above.
今天关于C#中的CircularBuffer IDictionary?和c#中的数据类型分为哪两大种的讲解已经结束,谢谢您的阅读,如果想了解更多关于.net Redis分布式锁,Dictionary,ConcurrentDictionary 介绍、Android CircularFloatingActionMenu (1)、angular – 类型’SharedArrayBuffer’不能分配给’ArrayBuffer’类型、Are Java DirectByteBuffer wrappers garbage collect的相关知识,请在本站搜索。
本文标签:


![[转帖]Ubuntu 安装 Wine方法(ubuntu如何安装wine)](https://www.gvkun.com/zb_users/cache/thumbs/4c83df0e2303284d68480d1b1378581d-180-120-1.jpg)

