对于asp.net-mvc–基于MVC角色的路由感兴趣的读者,本文将会是一篇不错的选择,我们将详细介绍asp.netmvc路由机制,并为您提供关于ASP.NETMVC基于角色的权限控制系统的示例教程、
对于asp.net-mvc – 基于MVC角色的路由感兴趣的读者,本文将会是一篇不错的选择,我们将详细介绍asp.net mvc路由机制,并为您提供关于ASP.NET MVC 基于角色的权限控制系统的示例教程、ASP.NET MVC教程五:ASP.NET MVC中的路由、asp.net mvc角色授权不起作用、asp.net-mvc – Asp.net MVC / Web Api路由:需要路由一点点不同的有用信息。
本文目录一览:- asp.net-mvc – 基于MVC角色的路由(asp.net mvc路由机制)
- ASP.NET MVC 基于角色的权限控制系统的示例教程
- ASP.NET MVC教程五:ASP.NET MVC中的路由
- asp.net mvc角色授权不起作用
- asp.net-mvc – Asp.net MVC / Web Api路由:需要路由一点点不同
")
asp.net-mvc – 基于MVC角色的路由(asp.net mvc路由机制)
Admin的默认路由为/ Admin / Home / Index,用户的默认路由为/ User / Home / Index。
是否可以实现路由以使其家乡网址看起来像/ Profile / Index,但是要显示/ Admin / Home / Index的用户管理员和/ User / Home / Index的内容?
UPD
最后找出如何做到这一点
context.MapRoute(
    "Admin","Profile/{action}",new { area = AreaName,controller = "Home",action = "Index" },new { RoleConstraint = new Core.RoleConstraint() },new[] { "MvcApplication1.Areas.Admin.Controllers" }
);
...
context.MapRoute(
    "User",new[] { "MvcApplication1.Areas.User.Controllers" }
);

public class RoleConstraint : IRouteConstraint
{
    public bool Match(HttpContextBase httpContext,Route route,string parameterName,RouteValueDictionary values,RouteDirection routeDirection)
    {
        string roleName = db.GetRoleByUserName(httpContext.User.Identity.Name);
        string areaName = route.Defaults["area"].ToString();
        return areaName == roleName;
    }
}
它的作品,但对我来说,这不是MVC的方式。有人知道怎么做吗?
解决方法

ASP.NET MVC 基于角色的权限控制系统的示例教程
上一次在 .NET MVC 用户权限管理示例教程中讲解了ASP.NET MVC 通过AuthorizeAttribute类的OnAuthorization方法讲解了粗粒度控制权限的方法,接下来讲解基于角色的权限控制方法。
基于角色的权限控制方法概述
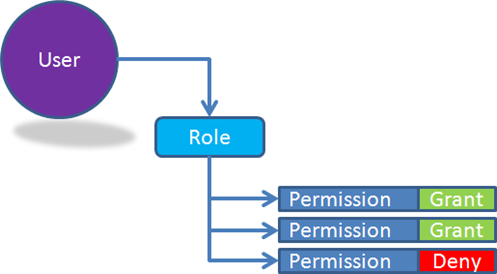
基于角色的权限控制系统RBAC(Role Based Access Control)是目前最流行,也是最通用的权限控制系统。所谓基于角色的权限控制,就是将各个操作权限分组,每一个组就是一个角色,举个例子:管理员拥有所有的权限,编辑就只拥有写文章和发布文章的权限,这里的“管理员”和“编辑”就是一个角色——一系列操作权限的集合。我们只需要将某个角色赋予某个用户那么这个用户就拥有这个角色下的权限集合。
现在我们要做的就是通过把Controller下的每一个Action可以看作是一个权限,然后可以通过方法将每一个权限进行自定义的分组,从而创建一个角色,然后将角色与用户对应起来。
基于角色的权限控制方法步骤
步骤一、新建一个RoleAuthorizeAttribute类
这个类可以拿到ControllerName和ActionName,这样可以根据ControllerName和ActionName判断是什么样的操作,如下面的代码
using System;
using System.Collections.Generic;
using System.Linq;
using System.Web;
using System.Web.Security;
using System.Web.Mvc;
using System.Web.Routing;

namespace SampleMVCWebsite
{
    public class RoleAuthorizeAttribute : AuthorizeAttribute
    {
        public override void OnAuthorization(AuthorizationContext filterContext)
        {
            var isAuth = false;
            if (!filterContext.RequestContext.HttpContext.Request.IsAuthenticated)
            {
                isAuth = false;
            }
            else
            {
                if (filterContext.RequestContext.HttpContext.User.Identity != null)
                {
                    var roleApi = new RoleApi();
                    var actionDescriptor = filterContext.ActionDescriptor;
                    var controllerDescriptor = actionDescriptor.ControllerDescriptor;
                    var controller = controllerDescriptor.ControllerName;
                    var action = actionDescriptor.ActionName;
                    var ticket = (filterContext.RequestContext.HttpContext.User.Identity as FormsIdentity).Ticket;
                    var role = roleApi.GetById(ticket.Version);
                    if (role != null)
                    {
                        isAuth = role.Permissions.Any(x => x.Permission.Controller.ToLower() == controller.ToLower() && x.Permission.Action.ToLower() == action.ToLower());
                    }
                }
            }
            if (!isAuth)
            {
                filterContext.Result = new RedirectToRouteResult(new RouteValueDictionary(new { controller = "account", action = "login", returnUrl = filterContext.HttpContext.Request.Url, returnMessage = "您无权查看." }));
                return;
            }
            else
            {
                base.OnAuthorization(filterContext);
            }
        }
    }
}
其中RoleApi是角色对象管理的API,这里需要自己设置角色管理。上面的代码中通过FilterContext的ActionDescriptor对象的ControllerDescriptor就可以获取到ControllerName和ActionName。获取到当前用户的角色后,通过查看用户的权限中是否包含了当前访问的Controller中的方法,就能实现权限验证。这里主要使用了ActionDescriptor和ControllerDescriptor,关于这两个类的介绍可以参考MSDN官网。
PS:这里用Ticket的Version存储RoleId。你也可以用其他方式。关于Ticket的知识可以参考微软MSDN官方文档,这里不再敖述。
步骤二、创建DescriptionAttribute类
这个类是继承Attribute,为的是给Action方法打上描述标签,如下面的代码
using System;
using System.Collections.Generic;
using System.Linq;
using System.Web;

namespace SampleMVCWebsite
{
    /// <summary>
    /// Description Attribute
    /// </summary>
    public class DescriptionAttribute:Attribute
    {
        public string Name
        {
            set;
            get;
        }
        public int No
        {
            set;
            get;
        }
    }
}
Name和NO和Permission类中是ControllerName、ActionName和ControllerNo、ActionNO是对应的。
步骤三、给Controllers打上DescriptionAttribute标签
使用步骤二创建的DescriptionAttribute标签给Controller标上,以便存储Permission的时候获取信息。如下面的代码:
using System;
using System.Collections.Generic;
using System.Linq;
using System.Web;
using System.Web.Mvc;

namespace SampleMVCWebsite.Controllers
{
[Description(No = 1, Name = "用户")]
    public class UserController : Controller
    {
        [RoleAuthorize]
        [Description(No = 1, Name = "用户首页")]
        public ActionResult Index()
        {
            return View();
        }
        [RoleAuthorize]
        [Description(No = 1, Name = "用户管理员")]
        public ActionResult Manage()
        {
            return View();
        }
        [RoleAuthorize]
        [Description(No = 1, Name = "用户详情")]
        public ActionResult Detail()
        {
            return View();
        }
    }
}
步骤四、生成权限控制列表
步骤一种有一个role.Permissions,这个Permissions就是当前用户所拥有的权限集合,在实际的项目开发中是把它存储在数据库关系表中的,我们可以将Permissions类如下面的代码这样定义
using System;
using System.Collections.Generic;
using System.Linq;
using System.Text;

namespace SampleMVCWebsite
{
    public class Permission
    {
        /// <summary>
        /// Permission Id
        /// </summary>
        public virtual int Id
        {
            set;
            get;
        }
        /// <summary>
        /// Permission Action No
        /// </summary>
        public virtual int ActionNo
        {
            set;
            get;
        }

        /// <summary>
        /// Controller No
        /// </summary>
        public virtual int ControllerNo
        {
            set;
            get;
        }

        /// <summary>
        /// Controller Name
        /// </summary>
        public virtual string ControllerName
        {
            set;
            get;
        }

        /// <summary>
        /// Permission Action Name
        /// </summary>
        public virtual string ActionName
        {
            set;
            get;
        }

        /// <summary>
        /// Controller
        /// </summary>
        public virtual string Controller
        {
            set;
            get;
        }

        /// <summary>
        /// Action
        /// </summary>
        public virtual string Action
        {
            set;
            get;
        }
    }
}
属性Controller和Action记录的是权限,ControllerName和ActionName用于显示UI,ControllerNo和ActionNo用于显示顺序控制。其余根据上面的代码注释应该很好理解,这里就不一一陈述了。
因此你需要将Action输入数据库中来实现RoleApi。手动输入如果方法少还好,但是多了就比较麻烦,这样我们可以使用.NET的反射机制来进行权限的创建。先看下面的代码:
using System;
using System.Collections.Generic;
using System.Linq;
using System.Web;
using System.Web.Mvc;
using SampleMVCWebsite.Controllers;

namespace SampleMVCWebsite
{
    public class InstallController
    {
        public class InstallController : Controller
        {
            public ActionResult Index()
            {
                return View();
            }

            [HttpPost]
            public ActionResult Index()
            {
                try
                {
                    var roleService = new RoleApi();
                    #region init permission
                    CreatePermission(new UserController());
                    #endregion

                    var allDefinedPermissions = roleService.GetDefinedPermissions();

                    #region 管理员角色初始化
                    var adminPermissions = new List<RolePermissionInfo>();
                    foreach (var d in allDefinedPermissions)
                    {
                        adminPermissions.Add(new RolePermissionInfo {Permission = d, });
                    }
                    int adminRoleId = roleService.AddRole(new RoleInfo
                    {
                        Name = "管理员",
                        Description = "",
                        Permissions = adminPermissions,
                        AddDate = DateTime.Now,
                    });
                    #endregion
                    return RedirectToAction("Admin", "Index");
                }
                catch (Exception ex)
                {
                    ModelState.AddModelError("", ex.Message);
                    return View();
                }
            }
            private void CreatePermission(Controller customController)
            {
                var roleApi = new RoleApi();

                var controllerName = "";
                var controller = ""; var controllerNo = 0;
                var actionName = ""; var action = ""; var actionNo = 0;
                var controllerDesc = new KeyValuePair<string, int>();

                var controllerType = customController.GetType();

                //remove controller posfix
                controller = controllerType.Name.Replace("Controller", "");
                controllerDesc = Getdesc(controllerType);
                if (!string.IsNullOrEmpty(controllerDesc.Key))
                {
                    controllerName = controllerDesc.Key;
                    controllerNo = controllerDesc.Value;
                    foreach (var m in controllerType.GetMethods())
                    {
                        var mDesc = GetPropertyDesc(m);
                        if (string.IsNullOrEmpty(mDesc.Key)) continue;
                        action = m.Name;
                        actionName = mDesc.Key;
                        actionNo = mDesc.Value;
                        roleApi.CreatePermissions(actionNo, controllerNo, actionName, controllerName, controller, action);
                    }
                }
            }
            private KeyValuePair<string, int> Getdesc(Type type)
            {
                var descriptionAttribute = (DescriptionAttribute)(type.GetCustomAttributes(false).FirstOrDefault(x => x is DescriptionAttribute));
                if (descriptionAttribute == null) return new KeyValuePair<string, int>();
                return new KeyValuePair<string, int>(descriptionAttribute.Name, descriptionAttribute.No);
            }
            private KeyValuePair<string, int> GetPropertyDesc(System.Reflection.MethodInfo type)
            {
                var descriptionAttribute = (DescriptionAttribute)(type.GetCustomAttributes(false).FirstOrDefault(x => x is DescriptionAttribute));
                if (descriptionAttribute == null) return new KeyValuePair<string, int>();
                return new KeyValuePair<string, int>(descriptionAttribute.Name, descriptionAttribute.No);
            }
        }
    }
}
上面的代码首先通过Getdesc来获取Controller的描述,GetPropertyDesc方法获取方法的描述,这里的方法就是一个独立的权限,然后通过roleApi的CreatePermissions方法将权限的数据写入到数据库中,将数据写入数据库的代码就需要根据自己的数据库读写方法去实现了,强烈建议使用Linq对数据库进行读写。然后再通过roleApi获取到所有的权限并且将所有的权限绑定到Admin角色,保存对应关系。这样我们就完成了权限控制列表生成并且初始化了管理员用户。
通过上面的示例就可以完成ASP.NET MVC 基于角色的权限控制系统,上面的代码中的roleApi需要自己写代码实现对数据库的操作,数据模型就是权限、角色、用户的数据表以及权限月角色以及角色与用户的关系表。

ASP.NET MVC教程五:ASP.NET MVC中的路由
一、概述
在ASP.NET MVC架构中,控制器在3大核心构件中处于中心地位,通过控制器支配模型和视图,然而从浏览器发出的请求到控制器还需要路由的协助,路由将特定的请求和控制器的动作对应起来。
在ASP.NET MVC程序中,路由主要有两方面的职责:
- 与入站的请求相匹配,将这些请求映射到控制器的动作中。
- 构造出站的URL,这些URL可以响应控制器的动作。
二、路由原理
1、注册路由
先看Global.asax中的代码:
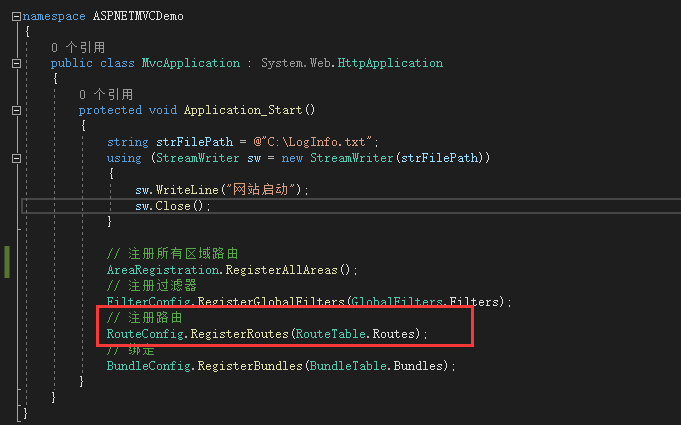
网站启动的时候执行Application_Start方法,通过RouteConfig.RegisterRoutes(RouteTable.Routes)这段代码进行路由的注册,在RegisterRoutes上面F12转到定义,可以查看该方法,其实就是App_Start文件夹下面的RouteConfig类,该类定义如下:
using System;
using System.Collections.Generic;
using System.Linq;
using System.Web;
using System.Web.Mvc;
using System.Web.Routing;

namespace ASPNETMVCDemo
{
    /// <summary>
    /// RouteCollection 所有路由的集合
    /// </summary>
    public class RouteConfig
    {
        public static void RegisterRoutes(RouteCollection routes)
        {
            // 表示忽略路由   只要URL满足这个正则规则,就不使用路由
            // .axd 是因为iis6给没有后缀的请求加个asd,然后支持MVC的请求
            routes.IgnoreRoute("{resource}.axd/{*pathInfo}");

            // 默认路由规则
            // 里面使用的是命名参数,顺序可以改变
            routes.MapRoute(
                // 路由名称   RouteCollection是个字典 每个路由都要有自己的名称,相同名称的路由会被覆盖
                name: "Default",
                // url的正则规则,去掉域名和端口后的地址进行匹配
                url: "{controller}/{action}/{id}",
                // 默认值
                defaults: new { controller = "Home", action = "Index", id = UrlParameter.Optional }
            );
        }
    }
}
注册路由其实就是把路由规则添加到RouteCollection路由集合中。
解释说明:
- RegisterRoutes方法是在应用程序启动时(Application_Start)被调用执行的。
- RegisterRoutes方法的作用:注册路由。它的参数是一个集合对象,这个集合对象就是用来保存多项路由数据的。一项路由数据实际上就是某种形式的URL路径和控制器及其Action的关系,根据这个关系,MVC才能执行到控制器。
- 那么怎么添加这种路由数据呢?即调用RegisterRoutes方法里面的routes.MapRoute方法。该方法的第一个参数是路由的名称,类似于Dictionary字典里面的key。第二个参数表示的是URL或者是地址。第三个参数是一个匿名类型,表示该路由相关的默认数据,可以看作一个字典。
- 我们注意到第二个参数其实就是占位符表示的URL,这个占位符是用大括号和里面的字符串表示的。可以看出里面不是某种硬编码的URL地址(这里的controller代表所有的控制器,而不是某一个具体的控制器。同理,action也是代表所有的方法,而不是某一个具体的action方法),这样就增加了灵活性,就是用“/”把URL分成三部分。还有我们注意到占位符表示的URL是没有域名的,这个是允许的,这种匹配是不考虑域名的。
- 在ASP.NET MVC中我们见得最多的是“{controller}/{action}/{id}”这种形式的URL,那么controller和action这两个单词是否有特殊的用途呢,能不能改变这两个单词的写法。答案是不能的。这时因为会把controller、action和id当做字典或集合的key值来存储对应的URL片段,这样框架在处理时,会读取键名为controller的数据,比如Home,然后得到要执行的控制器是HomeController。同样会从字典中读取键名为action的数据,比如Index,然后得到要执行的Action方法是Index。如果这两个单词写错了,就执行不到相应的controller和action方法了。所以一定要记住写成controller和action是一种约定,其他参数的定义就没有这种要求了。但是action和controller的位置可以修改。
启动程序,这时URL地址是:http://localhost:49730

其实该地址相当于在浏览器里面输入:http://localhost:49730/Home/Index,这时因为在路由规则里面设置了默认值,如果没有控制器和action方法,则默认是Home控制器下面的Index方法。
修改URL里面的controller和action,代码如下:
using System;
using System.Collections.Generic;
using System.Linq;
using System.Web;
using System.Web.Mvc;
using System.Web.Routing;

namespace ASPNETMVCDemo
{
    /// <summary>
    /// RouteCollection 所有路由的集合
    /// </summary>
    public class RouteConfig
    {
        public static void RegisterRoutes(RouteCollection routes)
        {
            // 表示忽略路由   只要URL满足这个正则规则,就不使用路由
            // .axd 是因为iis6给没有后缀的请求加个asd,然后支持MVC的请求
            routes.IgnoreRoute("{resource}.axd/{*pathInfo}");

            // 默认路由规则
            // 里面使用的是命名参数,顺序可以改变
            routes.MapRoute(
                // 路由名称   RouteCollection是个字典 每个路由都要有自己的名称,相同名称的路由会被覆盖
                name: "Default",
                // url的正则规则,去掉域名和端口后的地址进行匹配
                url: "{controller1}/{action1}/{id}",
                // 默认值
                defaults: new { controller = "Home", action = "Index", id = UrlParameter.Optional }
            );
        }
    }
}
然后运行程序查看结果:

这时程序运行出错,所以说controller和action千万不能写错。把controller和action改回正确的,然后颠倒controller和action的位置,代码如下:
using System;
using System.Collections.Generic;
using System.Linq;
using System.Web;
using System.Web.Mvc;
using System.Web.Routing;

namespace ASPNETMVCDemo
{
    /// <summary>
    /// RouteCollection 所有路由的集合
    /// </summary>
    public class RouteConfig
    {
        public static void RegisterRoutes(RouteCollection routes)
        {
            // 表示忽略路由   只要URL满足这个正则规则,就不使用路由
            // .axd 是因为iis6给没有后缀的请求加个asd,然后支持MVC的请求
            routes.IgnoreRoute("{resource}.axd/{*pathInfo}");

            // 默认路由规则
            // 里面使用的是命名参数,顺序可以改变
            routes.MapRoute(
                // 路由名称   RouteCollection是个字典 每个路由都要有自己的名称,相同名称的路由会被覆盖
                name: "Default",
                // url的正则规则,去掉域名和端口后的地址进行匹配
                url: "{action}/{controller}/{id}",
                // 默认值
                defaults: new { controller = "Home", action = "Index", id = UrlParameter.Optional }
            );
        }
    }
}
在运行程序查看结果:

这说明:controller和action的位置是可以颠倒的。这时如果想输入完整的URL地址就行访问就应该输入:http://localhost:49730/Index/Home。
2、路由匹配
2.1、匹配方式一
看下面的截图:

解释说明:
- {parameter}:花括弧加任意长度的字符串表示模糊匹配,字符串不能定义成controller和action。默认路由规则就是使用模糊匹配,没有指明具体是哪个控制器里面的哪个action方法。
- 字面量即一个常数字符串,这个字符串可以在大括弧与大括弧之间,也可以在最前面或最后面。
- 两个大括弧之间没有任何的字面量是不可以的。
看下面的示例:
首先修改Home控制器里面的Index方法,修改后的代码如下:
using System;
using System.Collections.Generic;
using System.Linq;
using System.Web;
using System.Web.Mvc;
namespace ASPNETMVCRoute.Controllers
{
public class HomeController : Controller
{
public ActionResult Index()
{
string paras = "";
// 遍历获取参数值
foreach(KeyValuePair<string,object> keyValue in RouteData.Values)
{
paras += string.Format($"{keyValue.Key}={keyValue.Value} ");
}
// 通过ViewData向页面传值
ViewData["msg"] = paras;
return View();
}
public ActionResult About()
{
ViewBag.Message = "Your application description page.";
return View();
}
public ActionResult Contact()
{
ViewBag.Message = "Your contact page.";
return View();
}
}
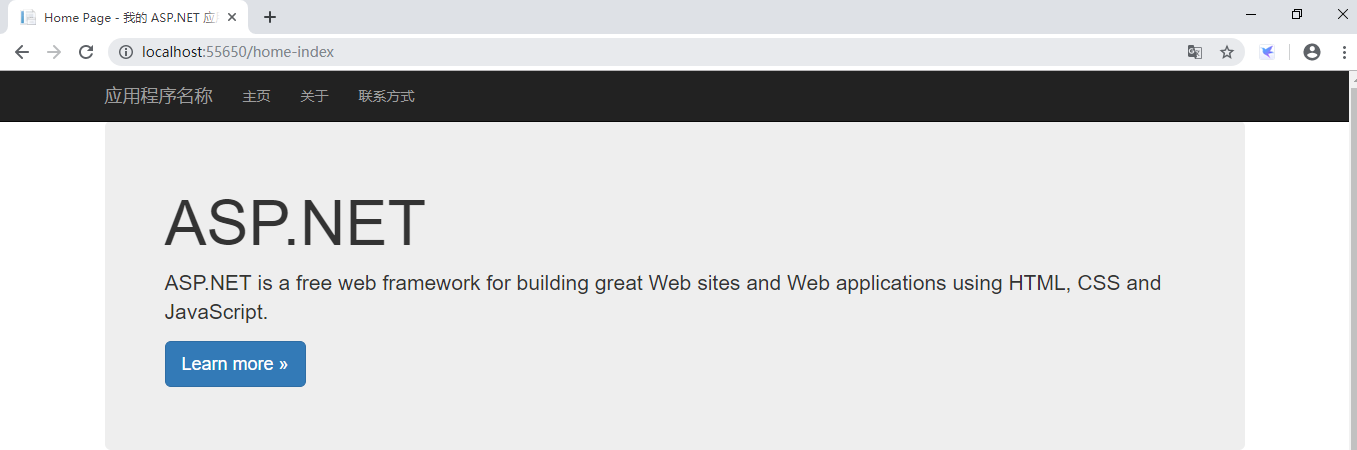
}修改对应的视图,在界面展示ViewData["msg"]的值:
@{
ViewBag.Title = "Home Page";
}
<div class="jumbotron">
<h1>ASP.NET</h1>
<p class="lead">ASP.NET is a free web framework for building great Web sites and Web applications using HTML, CSS and JavaScript.</p>
<p><a href="https://asp.net" class="btn btn-primary btn-lg">Learn more »</a></p>
<!--展示ViewData["msg"]的值-->
<p style="color:red;">@ViewData["msg"]</p>
</div>
<div class="row">
<div class="col-md-4">
<h2>Getting started</h2>
<p>
ASP.NET MVC gives you a powerful, patterns-based way to build dynamic websites that
enables a clean separation of concerns and gives you full control over markup
for enjoyable, agile development.
</p>
<p><a class="btn btn-default" href="https://go.microsoft.com/fwlink/?LinkId=301865">Learn more »</a></p>
</div>
<div class="col-md-4">
<h2>Get more libraries</h2>
<p>NuGet is a free Visual Studio extension that makes it easy to add, remove, and update libraries and tools in Visual Studio projects.</p>
<p><a class="btn btn-default" href="https://go.microsoft.com/fwlink/?LinkId=301866">Learn more »</a></p>
</div>
<div class="col-md-4">
<h2>Web Hosting</h2>
<p>You can easily find a web hosting company that offers the right mix of features and price for your applications.</p>
<p><a class="btn btn-default" href="https://go.microsoft.com/fwlink/?LinkId=301867">Learn more »</a></p>
</div>
</div>1、使用{parameter}做模糊匹配其实就是默认路由规则:
routes.MapRoute(
      name: "Default",
      url: "{controller}/{action}/{id}",
      defaults: new { controller = "Home", action = "Index", id = UrlParameter.Optional }
);
运行程序查看结果:

2、使用字面量做精确匹配
路由规则如下代码所示:
routes.MapRoute(
      name: "const",
      url: "admin/{controller}/{action}"
);
运行程序,在浏览器里面输入:http://localhost:64957/admin/home/index,运行结果如下:

3、不允许连续的URL参数
路由规则如下:
routes.MapRoute(
name: "blx",
// 错误的URL
// url: "{language}{country}/{controller}/{action}"
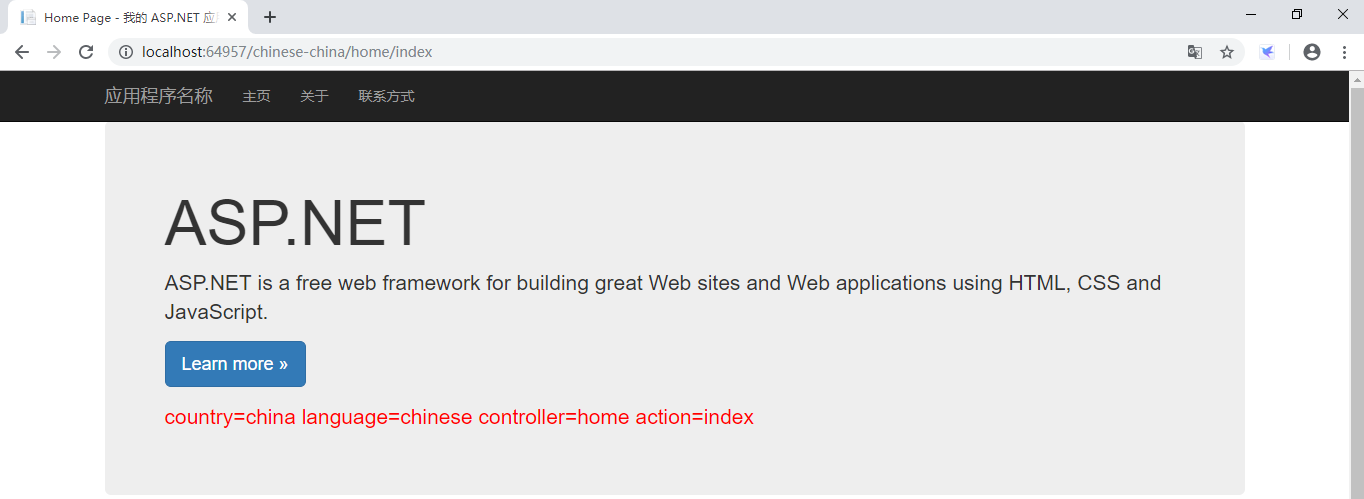
url: "{language}-{country}/{controller}/{action}"
);运行程序,URL里面输入:http://localhost:64957/chinese-china/home/index,运行结果如下:
2.2、匹配方式二
看下面截图:

解释说明:
- 使用“*”来匹配URL剩余的部分,如*plus放在一个表达式的尾部,最后尾部的URL会保存为plus为键名的字典值。
看下面的路由规则:
routes.MapRoute(
       name: "RouteRule",
       url: "{controller}/{action}/{query-name}/{*plus}"
);
运行程序,在URL里面输入:http://localhost:64957/home/index/123/wqer_1234,运行结果如下:

2.3、匹配方式三
看下面截图:

解释说明:
- 在URL表达式中有一种特殊的情况,就是URL表达式可能和实际的URL有多种匹配情况,这时候遵守贪婪匹配的原则(即从后往前进行匹配)。
路由规则1:
routes.MapRoute(
     name: "tlppone",
     url: "{controller}/{action}/{filename}.{ext}"
);
运行程序,在URL里面输入:http://localhost:64957/home/index/2342.234.234.aspx,运行结果如下:

路由规则2:
routes.MapRoute(
name: "tlpptwo",
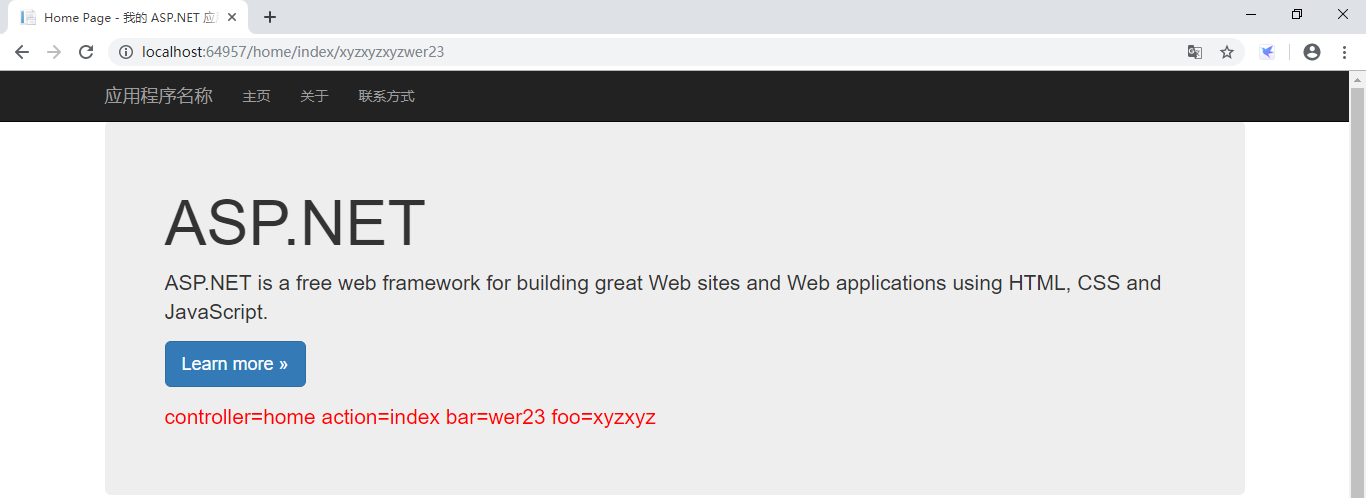
url: "{controller}/{action}/{foo}xyz{bar}"
);运行程序,在URL里面输入:http://localhost:64957/home/index/xyzxyzxyzwer23,运行结果如下:
完整路由规则代码如下:
using System;
using System.Collections.Generic;
using System.Linq;
using System.Web;
using System.Web.Mvc;
using System.Web.Routing;

namespace ASPNETMVCRoute
{
    public class RouteConfig
    {
        public static void RegisterRoutes(RouteCollection routes)
        {
            routes.IgnoreRoute("{resource}.axd/{*pathInfo}");

            // 使用字面量做精确匹配
            // http://localhost:64957/admin/home/index
            routes.MapRoute(
                name: "const",
                url: "admin/{controller}/{action}"
                );

            // 不允许连续的URL参数
            // http://localhost:64957/chinese-china/home/index
            routes.MapRoute(
                  name: "blx",
                  // 错误的URL
                  // url: "{language}{country}/{controller}/{action}"
                  url: "{language}-{country}/{controller}/{action}"
              );

            // 使用*号匹配URL剩余部分
            // http://localhost:64957/home/index/2342.234.234.aspx 与第一个和第二个路由规则都匹配,显示第一个,说明路由匹配的顺序是从上往下
            // http://localhost:64957/home/index/123/wqer_1234
            routes.MapRoute(
                name: "RouteRule",
                url: "{controller}/{action}/{query-name}/{*plus}"
            );


            // 贪婪匹配
            // http://localhost:64957/home/index/2342.234.234.aspx
            routes.MapRoute(
               name: "tlppone",
               url: "{controller}/{action}/{filename}.{ext}"
            );

            // 贪婪匹配2
            // http://localhost:64957/home/index/xyzxyzxyzwer23
            routes.MapRoute(
               name: "tlpptwo",
               url: "{controller}/{action}/{foo}xyz{bar}"
           );

            routes.MapRoute(
                name: "Default",
                url: "{controller}/{action}/{id}",
                defaults: new { controller = "Home", action = "Index", id = UrlParameter.Optional }
            );
        }
    }
}
3、URL参数默认值
3.1、参数默认值一
看下面的截图:
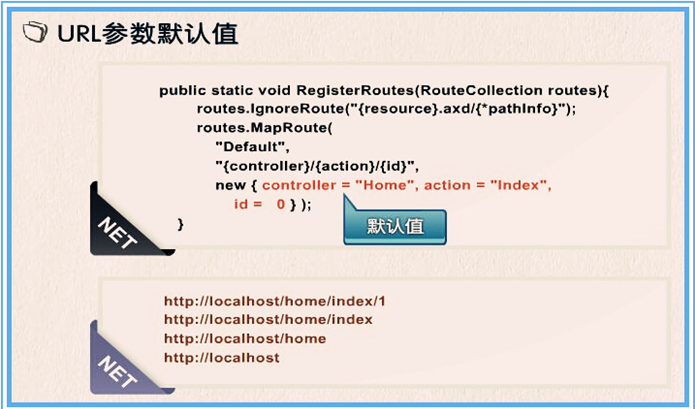
解释说明:
- 如上图所示,我们使用了参数的默认值,上图下方的URL都是匹配这个路由的,如果没有使用默认值,那么就只能使用http://localhost/home/index/1这种完整形式的URL地址了。
路由规则代码如下:
// 参数默认值一
routes.MapRoute(
     name: "Default",
     url: "{controller}/{action}/{id}",
     defaults: new { controller = "Home", action = "Index", id = UrlParameter.Optional }
);
3.2、参数默认值二
看下面截图:
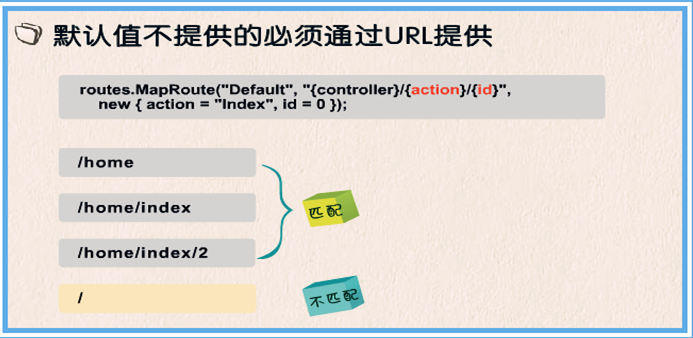
解释说明:
- 首先我们说的路由项只提供部分URL片段默认值的情况,一条规则就是如果在路由项中使用默认值,但是没有提供全部默认值,那么没有提供默认值的必须通过URL提供。在上面截图中,控制器必须在URL里面提供。
路由规则如下:
// 参数默认值二:默认值不提供的必须通过URL提供
routes.MapRoute(
       name: "Default",
       url: "{controller}/{action}/{id}",
       defaults: new { action = "Index", id = UrlParameter.Optional });
这时直接运行程序,因为没有提供controller,所以程序会报错:
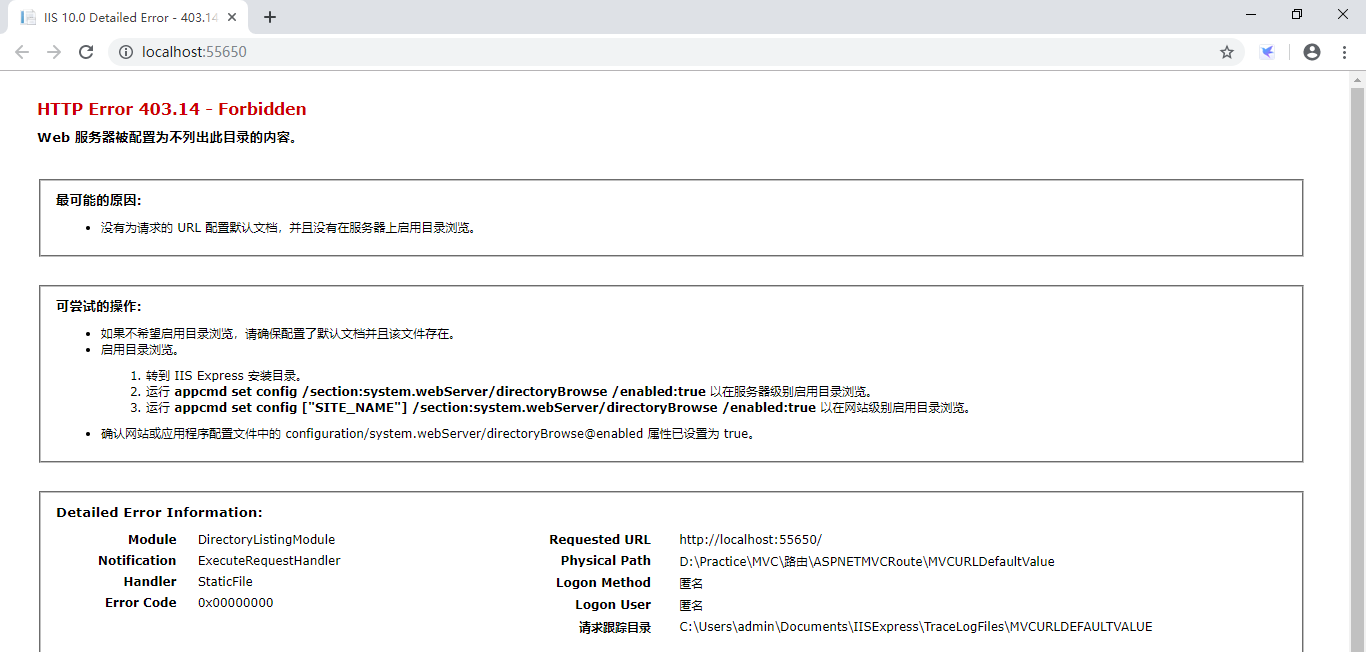
然后在URL里面输入:http://localhost:55650/Home,就可以正常访问了:

3.4、参数默认值三

解释说明:
- 如果只提供了部分参数,而且提供的部分参数是URL表达式中间的,如上图所示,这种情况下action是不起作用的,所以,这种定义默认值的方式是没有意义的!
路由规则如下:
// 参数默认值三:只提供中间参数的默认值是不起作用的
routes.MapRoute(
     name: "Default2",
     url: "{controller}/{action}/{id}",
     defaults: new { action = "Index" }
);
这时候需要在浏览器里面输入完整的URL才能访问。
3.4、参数默认值四
看下面截图:
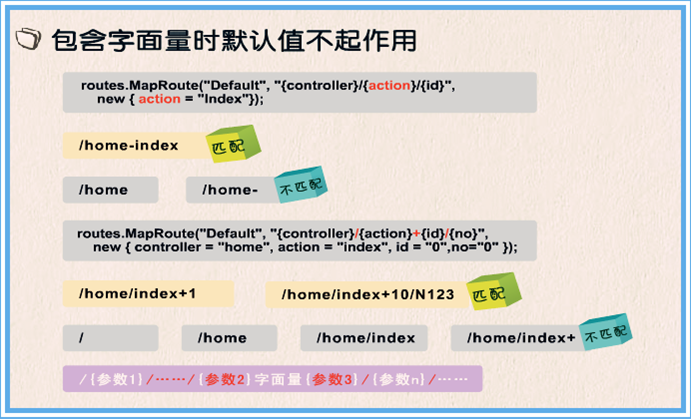
解释说明:
- 最后一种默认值的特殊情况,就是在URL表达式中使用字面量,注意这个字面量是除-之外的任意字符的组合,那么字面量相邻的URL参数的默认值是不起作用的。
-
规律:使用/把URL划分成若干个部分,如果各个部分包含了URL参数和字面量,那么给这些URL参数提供默认值是不起作用的。如图所示,给参数2和参数3是不起作用的!
路由规则如下:
// 参数默认值四:只提供中间参数的默认值是不起作用的
routes.MapRoute(
         name: "Default2",
         url: "{controller}-{action}",
         defaults: new { action = "Index" });
运行程序,如果浏览器里面只输入http://localhost:55650/home- 是报错的:

这时需要输入完整的URL地址:http://localhost:55650/home-index
4、参数值约束
假如我们想对URL后面的数字进行限制,比如四位数字或者两位数字,如下图所示,该如何限制呢?

1、使用正则表达式
如下图所示:
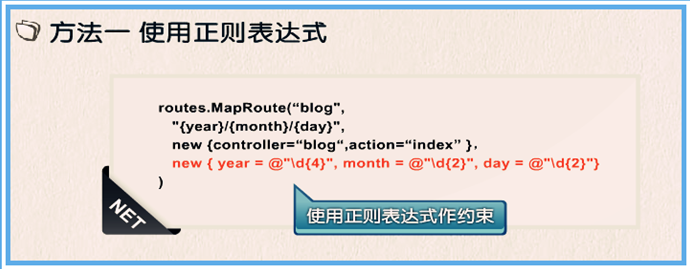
解释说明:
- 在MVC的路由中我们可以对URL的各个参数定义约束,有两种约束方法,第一种是使用正则表达式,如上图所示。
- MapRoute提供了一个重载方法,就是在默认值后面增加了一个约束的参数,这个参数可以使用匿名类型设置值,在匿名类里面可以设置各种参数对应的正则表达式,如上图所示。
路由规则如下:
using System;
using System.Collections.Generic;
using System.Linq;
using System.Web;
using System.Web.Mvc;
using System.Web.Routing;

namespace MVCURLParaConstraint
{
    public class RouteConfig
    {
        public static void RegisterRoutes(RouteCollection routes)
        {
            routes.IgnoreRoute("{resource}.axd/{*pathInfo}");

            // 1、使用正则表达式设置参数值的约束
            routes.MapRoute(
              name: "Default1",
              url: "{controller}/{action}/{id}/{year}/{month}/{day}",
              defaults: new { controller = "Home", action = "Index", id = UrlParameter.Optional },
              // year是4位整数 month和day是2位整数
              constraints:new { year = @"\d{4}",month=@"\d{2}",day=@"\d{2}"}
             );

            // 默认路由
            routes.MapRoute(
                name: "Default",
                url: "{controller}/{action}/{id}",
                defaults: new { controller = "Home", action = "Index", id = UrlParameter.Optional }
            );
        }
    }
}
运行程序,在浏览器里面输入:http://localhost:51244/Home/Index/1/2019/05/24,效果如下:

因为设置了约束month是2位整数,这时将month改为1位整数,然后输入:http://localhost:51244/Home/Index/1/2019/5/24,效果如下:

这时程序就报错了,说明设置的正则约束起作用了。
2、使用约束类
如下图所示:

解释说明:
- 在有些时候,如果约束规则很复杂或者正则表达式很难写,或者你根本就不擅长写正则表达式,那么可以考虑第二种约束方式:约束类。
- 如上图所示:定义约束类就是要实现IRouteConstraint接口的Match方法,这个方法就是用来判断接口是否匹配的。使用这个约束类的方法也很简单,就是在以前使用正则表达式的地方,换成用约束类的实例赋值,如上图所示。
路由规则如下:
using System;
using System.Collections.Generic;
using System.Linq;
using System.Web;
using System.Web.Mvc;
using System.Web.Routing;

namespace MVCURLParaConstraint
{
    public class RouteConfig
    {
        public static void RegisterRoutes(RouteCollection routes)
        {
            routes.IgnoreRoute("{resource}.axd/{*pathInfo}");

            // 2、使用约束类来约束参数值
            routes.MapRoute(
               name: "Default1",
               url: "{controller}/{action}/{id}/{year}/{month}/{day}",
               defaults: new { controller = "Home", action = "Index", id = UrlParameter.Optional },
               // 使用约束类的实例
               constraints: new { year = @"\d{4}", month =new MonthConstraint(), day = @"\d{2}" }
              );

            // 1、使用正则表达式设置参数值的约束
            //routes.MapRoute(
            //  name: "Default1",
            //  url: "{controller}/{action}/{id}/{year}/{month}/{day}",
            //  defaults: new { controller = "Home", action = "Index", id = UrlParameter.Optional },
            //  // year是4位整数 month和day是2位整数
            //  constraints:new { year = @"\d{4}",month=@"\d{2}",day=@"\d{2}"}
            // );

            // 默认路由
            routes.MapRoute(
                name: "Default",
                url: "{controller}/{action}/{id}",
                defaults: new { controller = "Home", action = "Index", id = UrlParameter.Optional }
            );
        }
    }

    /// <summary>
    /// 对月进行约束,实现IRouteConstraint接口
    /// 对年或者日进行约束同理
    /// </summary>
    public class MonthConstraint : IRouteConstraint
    {
        // 实现Match方法
        public bool Match(HttpContextBase httpContext, Route route, string parameterName, RouteValueDictionary values, RouteDirection routeDirection)
        {
            //  values["month"]表示根据键名或者值
            //  长度为2,并且在1到12之间表示匹配通过返回true,否则不通过返回false
            if (values["month"].ToString().Length==2 &&
                Convert.ToInt32(values["month"])>=1 &&
                Convert.ToInt32(values["month"]) <=12)
            {
                return true;
            }
            else
            {
                return false;
            }
        }
    }
}
运行程序,在浏览器里面输入:http://localhost:51244/Home/Index/2/2019/05/24 ,效果如下:

5、路由匹配顺序
如下图所示:

解释说明:
- 如图所示,上面的URL跟哪个路由规则匹配呢?答案是匹配Default1这个路由,为什么会是这样呢?其实如果只注册单独的一条路由,这两条路由规则都是匹配这个URL的,这里有一个原则:如果有多条路由都和这个URL匹配,那么就是排在最前面的优先匹配,排在后面的就不在进行匹配。
6、排除路由

解释说明:
-
我们注意到RigisterRoutes方法中默认的第一句代码是routes.IgnoreRoute方法,他的作用就是排除路由,比如上图下面的URL不会在路由表中匹配的,而是直接被忽略掉!
- 如果出了.axd以外的文件需要忽略,那么在IgnoreRoute方法里面添加需要忽略的路由即可。
5、由URL到控制器
先看下面的截图:

解释说明:
- 通过前面路由注册的代码会最终形成一个路由集合的数据,可以看作是一个路由表(RouteTable),那么请求是如何通过URL进入到相应的控制器及Action方法的呢?
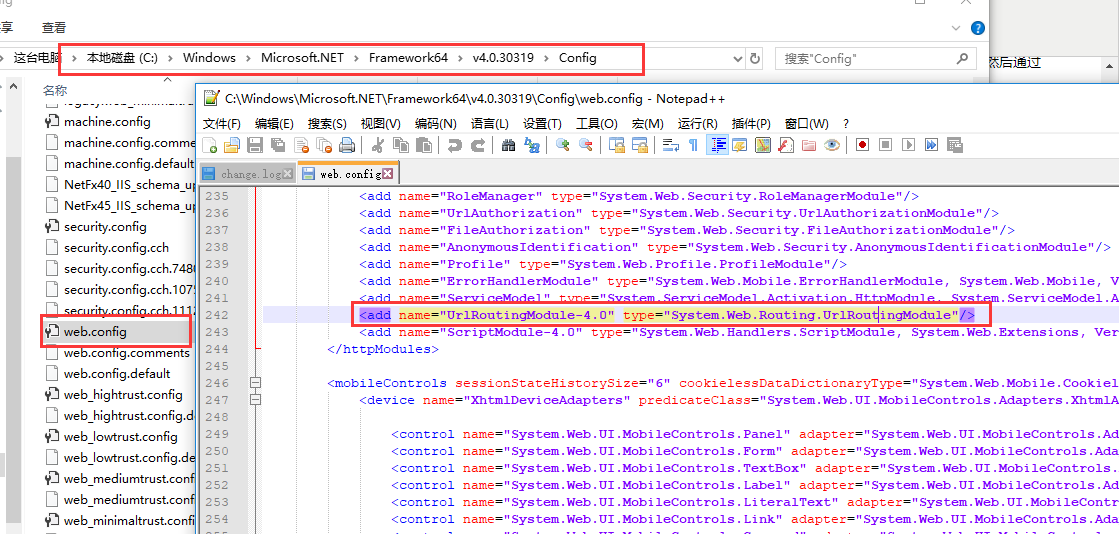
- 如上图所示,请求到达ASP.NET MVC应用程序后,首先会经过一个名为“UrlRoutingModule”的HttpModule,HttpModule可以过滤每一个请求,UrlRoutingModule的作用就是根据请求的URL从路由表中查找和URL匹配的路由,然后从匹配的路由中得到一个名为MvcHandler的HttpHandler,之后就执行它的ProcessRequest方法,在ProcessRequest方法的内部找到Controller,并继续往下执行。
- 说到这里可能有疑问:某项路由数据是怎样联系到一个HttpHandler的呢?如下图中的源码所示:MapRoute方法实际上包含这样一段代码,在new的时候会初始化一个MvcRouteHandler对象,然后通过MvcRouteHandler的GetHttpHandler方法可以得到真正的处理程序MvcHandler。

上面说的UrlRoutingModule在哪里呢?看下面截图:
6、从控制器中获取URL值的方式
从控制器中获取URL中的值共有三种方式:
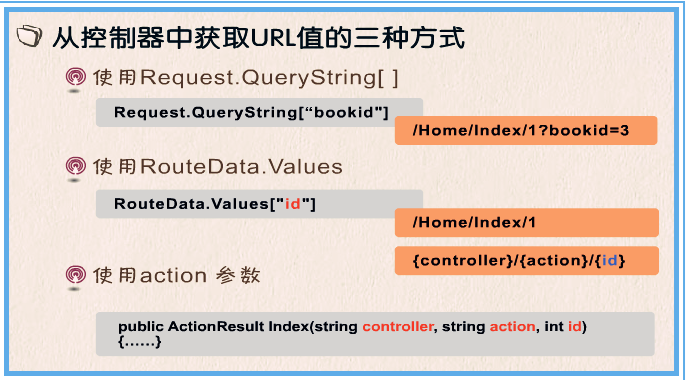
解释说明:
- Request.QueryString只能获取以?分隔的参数值!
-
RouteDate.Values[“id”]就是当前字典上的路由数据,通过访问键名的方式得到键值,比如URL模式匹配的字符串是id,这里必须是id。
-
Action方法的参数和路由字典的参数是对应的,MVC框架在执行action之前会首先为这些参数赋值。
6.1、Request.QueryString
控制器代码如下:
using System;
using System.Collections.Generic;
using System.Linq;
using System.Web;
using System.Web.Mvc;

namespace MVCURlValue.Controllers
{
    public class HomeController : Controller
    {
        /// <summary>
        ///  Request.QueryString
        /// </summary>
        /// <returns></returns>
        public ActionResult Index()
        {
            if(Request.QueryString["bookid"]!=null)
            {
                string value = Request.QueryString["bookid"];
                ViewData["msg"] = value;
            }

            return View();
        }

        public ActionResult About()
        {
            ViewBag.Message = "Your application description page.";

            return View();
        }

        public ActionResult Contact()
        {
            ViewBag.Message = "Your contact page.";

            return View();
        }
    }
}
视图也代码如下:
@{
ViewBag.Title = "Home Page";
}
<div class="jumbotron">
<h1>ASP.NET</h1>
<p class="lead">ASP.NET is a free web framework for building great Web sites and Web applications using HTML, CSS and JavaScript.</p>
<p><a href="https://asp.net" class="btn btn-primary btn-lg">Learn more »</a></p>
<p style="color:red;font-weight:bold;">@ViewData["msg"]</p>
</div>
<div class="row">
<div class="col-md-4">
<h2>Getting started</h2>
<p>
ASP.NET MVC gives you a powerful, patterns-based way to build dynamic websites that
enables a clean separation of concerns and gives you full control over markup
for enjoyable, agile development.
</p>
<p><a class="btn btn-default" href="https://go.microsoft.com/fwlink/?LinkId=301865">Learn more »</a></p>
</div>
<div class="col-md-4">
<h2>Get more libraries</h2>
<p>NuGet is a free Visual Studio extension that makes it easy to add, remove, and update libraries and tools in Visual Studio projects.</p>
<p><a class="btn btn-default" href="https://go.microsoft.com/fwlink/?LinkId=301866">Learn more »</a></p>
</div>
<div class="col-md-4">
<h2>Web Hosting</h2>
<p>You can easily find a web hosting company that offers the right mix of features and price for your applications.</p>
<p><a class="btn btn-default" href="https://go.microsoft.com/fwlink/?LinkId=301867">Learn more »</a></p>
</div>
</div>程序运行效果:

6.2、RouteData.Values
控制器代码如下:
using System;
using System.Collections.Generic;
using System.Linq;
using System.Web;
using System.Web.Mvc;
namespace MVCURlValue.Controllers
{
public class HomeController : Controller
{
/// <summary>
/// Request.QueryString
/// </summary>
/// <returns></returns>
//public ActionResult Index()
//{
// if(Request.QueryString["bookid"]!=null)
// {
// string value = Request.QueryString["bookid"];
// ViewData["msg"] = value;
// }
// return View();
//}
/// <summary>
/// RouteData.Values
/// </summary>
/// <returns></returns>
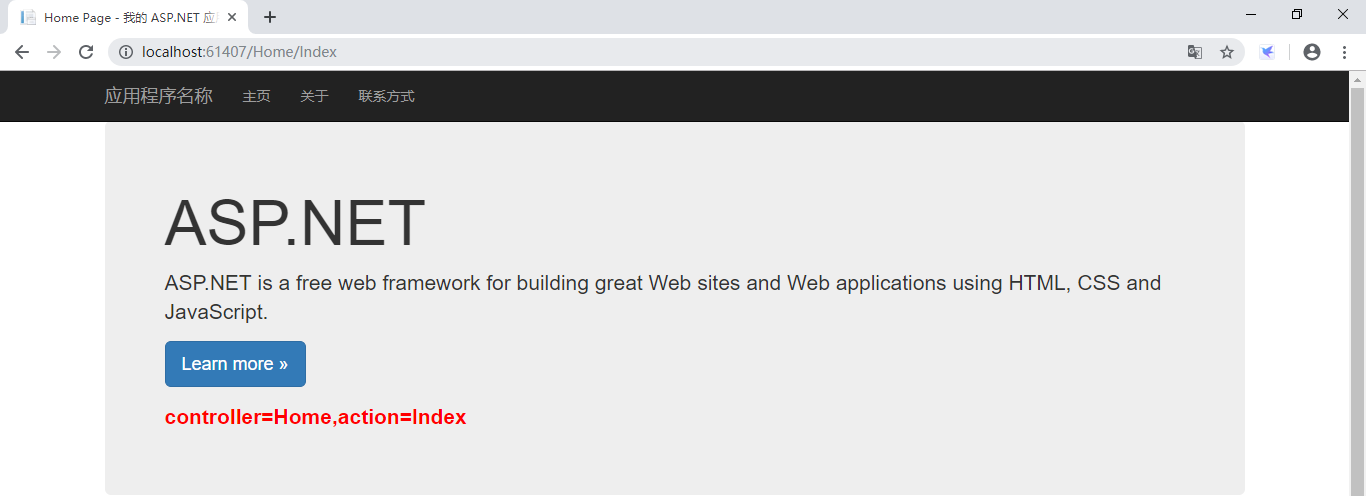
public ActionResult Index()
{
string value = $"controller={RouteData.Values["controller"]},action={RouteData.Values["action"]}";
ViewData["msg"] = value;
return View();
}
public ActionResult About()
{
ViewBag.Message = "Your application description page.";
return View();
}
public ActionResult Contact()
{
ViewBag.Message = "Your contact page.";
return View();
}
}
}运行效果:
这时会遇到一个问题,如果在URL里面还有其他参数呢?比如下面的情况
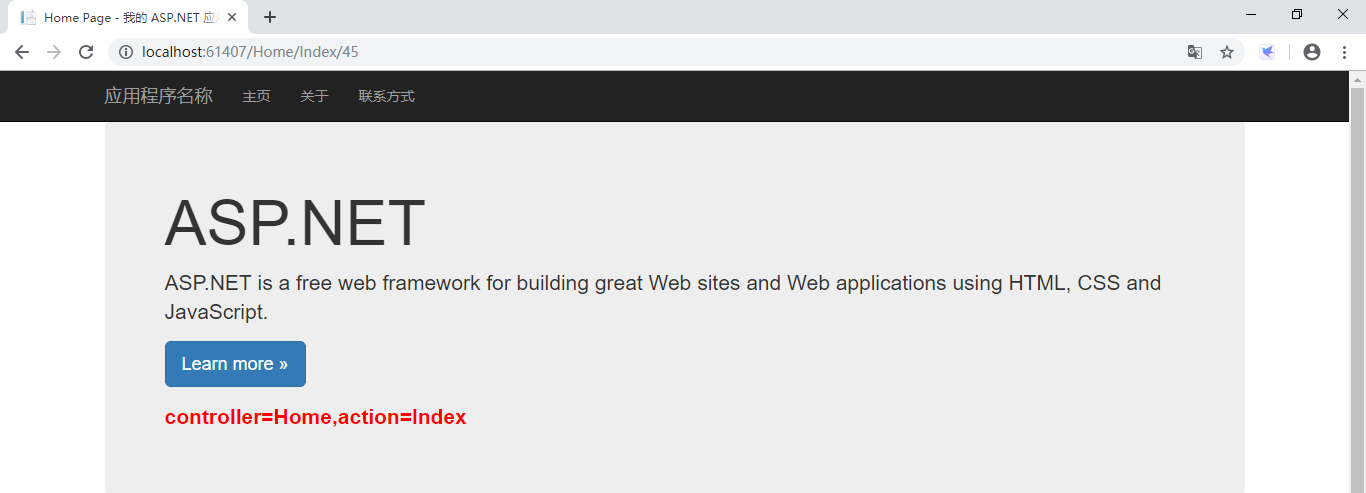
这时候如果要获取id的值就要修改代码,那么有没有其他简便的方式呢?看下面代码:
using System;
using System.Collections.Generic;
using System.Linq;
using System.Web;
using System.Web.Mvc;
namespace MVCURlValue.Controllers
{
public class HomeController : Controller
{
/// <summary>
/// Request.QueryString
/// </summary>
/// <returns></returns>
//public ActionResult Index()
//{
// if(Request.QueryString["bookid"]!=null)
// {
// string value = Request.QueryString["bookid"];
// ViewData["msg"] = value;
// }
// return View();
//}
/// <summary>
/// RouteData.Values
/// </summary>
/// <returns></returns>
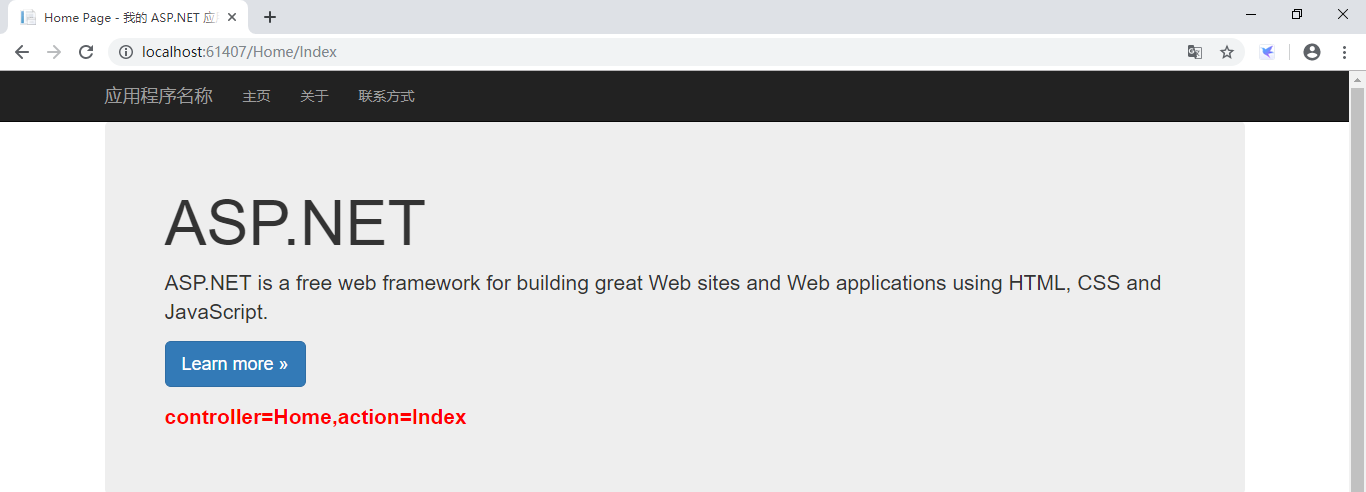
public ActionResult Index()
{
// 方式一
//string value = $"controller={RouteData.Values["controller"]},action={RouteData.Values["action"]}";
// 方式二
string value = "";
foreach(var item in RouteData.Values)
{
value += $"{item.Key}={item.Value} ";
}
ViewData["msg"] = value;
return View();
}
public ActionResult About()
{
ViewBag.Message = "Your application description page.";
return View();
}
public ActionResult Contact()
{
ViewBag.Message = "Your contact page.";
return View();
}
}
}运行效果:

因为RouteData.Values是一个字典集合,所以可以遍历RouteData.Values,这样无论URL里面有多少参数,都可以获取到对应的value值。
6.3、action参数
控制器代码:
using System;
using System.Collections.Generic;
using System.Linq;
using System.Web;
using System.Web.Mvc;

namespace MVCURlValue.Controllers
{
    public class HomeController : Controller
    {
        /// <summary>
        ///  Request.QueryString
        /// </summary>
        /// <returns></returns>
        //public ActionResult Index()
        //{
        //    if(Request.QueryString["bookid"]!=null)
        //    {
        //        string value = Request.QueryString["bookid"];
        //        ViewData["msg"] = value;
        //    }

        //    return View();
        //}


        /// <summary>
        ///  RouteData.Values
        /// </summary>
        /// <returns></returns>
        //public ActionResult Index()
        //{
        //    // 方式一
        //    //string value = $"controller={RouteData.Values["controller"]},action={RouteData.Values["action"]}";

        //    // 方式二
        //    string value = "";
        //    foreach(var item in RouteData.Values)
        //    {
        //        value += $"{item.Key}={item.Value}  ";
        //    }

        //    ViewData["msg"] = value;

        //    return View();
        //}


        /// <summary>
        ///  action参数
        ///  方法参数名称必须和URL里面参数名称保持一致
        /// </summary>
        /// <returns></returns>
        public ActionResult Index(string controller,string action)
        {
            string value = $"controller={controller},action={action}";
            ViewData["msg"] = value;

            return View();
        }

        public ActionResult About()
        {
            ViewBag.Message = "Your application description page.";

            return View();
        }

        public ActionResult Contact()
        {
            ViewBag.Message = "Your contact page.";

            return View();
        }
    }
}
运行效果:
7、由路由到URL
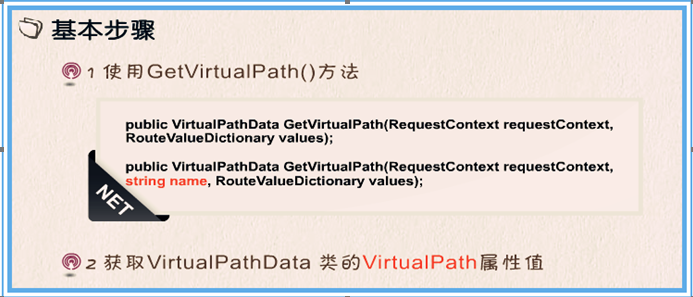
解释说明:
-
1.由路由生成URL其实就是简单的两句代码,第一步就是使用RouteCollection对象的GetVirtualPath方法,通过该方法可以返回一个VirtualPahData对象,该类型表示有关路由和虚拟路径的信息,包含了两个重载的方法,区别是第二个方法可以指定路由项的名称,就是添加路由时,设置的路由键名,参数Values表达生成URL时设置的参数值,是一个字典类型。
-
1.得到VirtualPahData实例后,就可以通过他的VirtualPath属性值得到URL地址,它是一个字符串类型,从路由的这个功能可以看出,他是有双向功能的,不同于URL重写!
看下面的案例:
修改RouteConfig代码如下:
using System;
using System.Collections.Generic;
using System.Linq;
using System.Web;
using System.Web.Mvc;
using System.Web.Routing;

namespace MVCRouteToUrl
{
    public class RouteConfig
    {
        public static void RegisterRoutes(RouteCollection routes)
        {
            routes.IgnoreRoute("{resource}.axd/{*pathInfo}");

            routes.MapRoute(
             name: "Default2",
             url: "{controller}/{action}/{id}",
             defaults: new { controller = "Home", id = UrlParameter.Optional }
            );

            // 默认路由匹配规则
            routes.MapRoute(
                name: "Default",
                url: "{controller}/{action}/{id}",
                defaults: new { controller = "Home", action = "Index", id = UrlParameter.Optional }
            );
        }
    }
}
控制器代码如下:
using System;
using System.Collections.Generic;
using System.Linq;
using System.Web;
using System.Web.Mvc;
using System.Web.Routing;
namespace MVCRouteToUrl.Controllers
{
public class HomeController : Controller
{
public ActionResult Index()
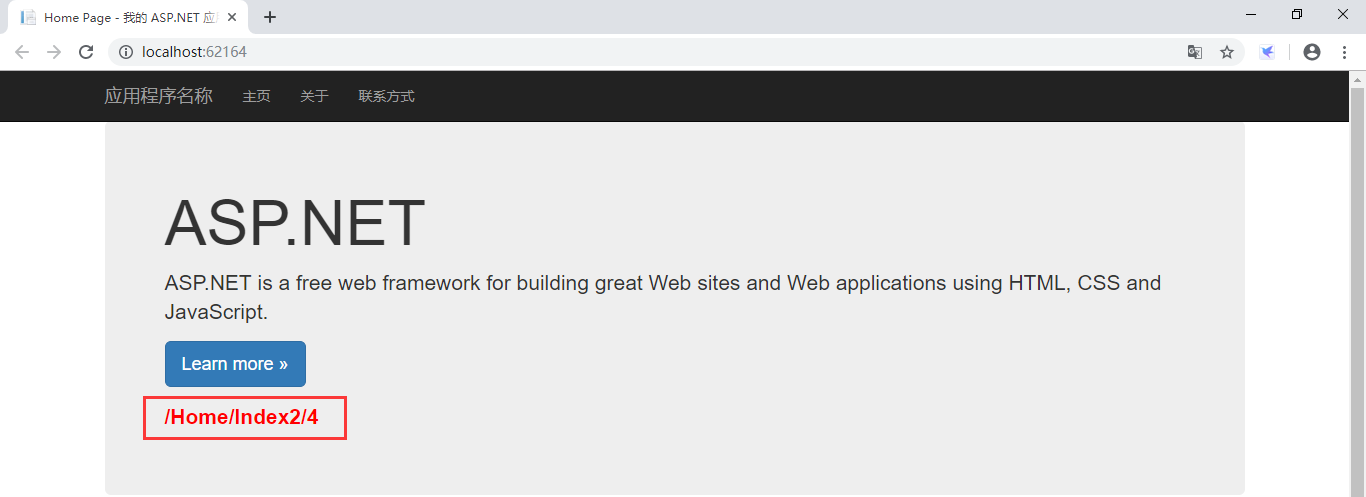
{
// 1.不使用路由名称的方式生成URL
VirtualPathData vp= RouteTable.Routes.GetVirtualPath(null, new RouteValueDictionary(new { controller = "Home", action = "Index2", id = 4 }));
string url = vp.VirtualPath;
ViewData["msg"] = url;
return View();
}
public ActionResult About()
{
ViewBag.Message = "Your application description page.";
return View();
}
public ActionResult Contact()
{
ViewBag.Message = "Your contact page.";
return View();
}
}
}界面运行效果:
在看下面一种方式:
控制器代码:
using System;
using System.Collections.Generic;
using System.Linq;
using System.Web;
using System.Web.Mvc;
using System.Web.Routing;
namespace MVCRouteToUrl.Controllers
{
public class HomeController : Controller
{
public ActionResult Index()
{
// 1.不使用路由名称的方式生成URL
//VirtualPathData vp= RouteTable.Routes.GetVirtualPath(null, new RouteValueDictionary(new { controller = "Home", action = "Index2", id = 4 }));
//string url = vp.VirtualPath;
//ViewData["msg"] = url;
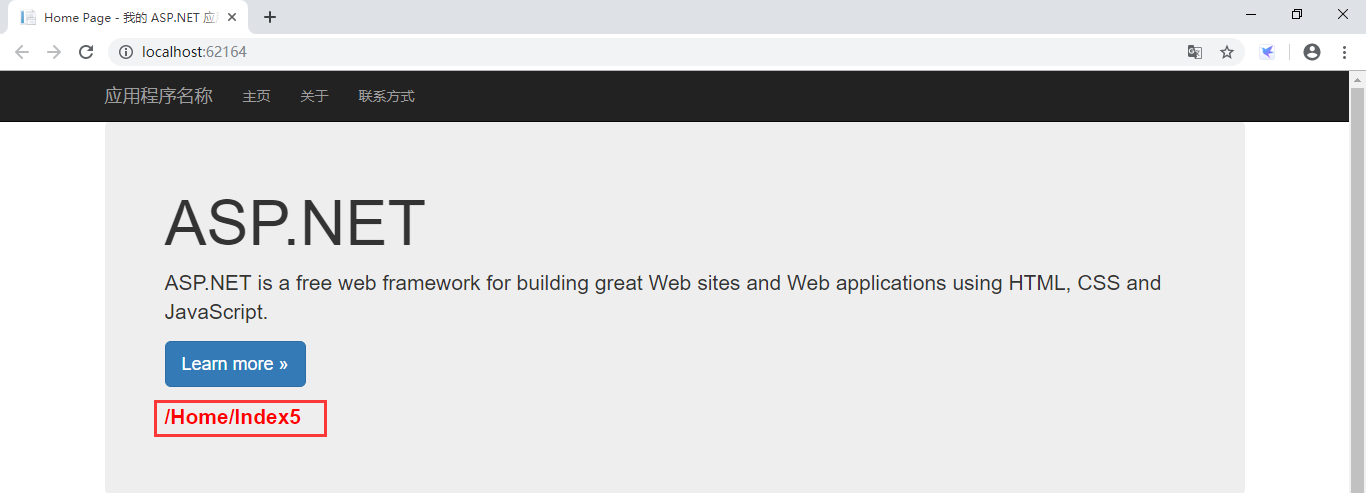
// 2.根据路由名称生成URL
// 因为controller和id有默认值,所以这里只指定action的值
VirtualPathData vp = RouteTable.Routes.GetVirtualPath(null, "Default2", new RouteValueDictionary(new { action = "Index5" }));
string url = vp.VirtualPath;
ViewData["msg"] = url;
return View();
}
public ActionResult About()
{
ViewBag.Message = "Your application description page.";
return View();
}
public ActionResult Contact()
{
ViewBag.Message = "Your contact page.";
return View();
}
}
}运行效果:

asp.net mvc角色授权不起作用
如何解决asp.net mvc角色授权不起作用?
在此遵循本教程: http://www.asp.net/mvc/tutorials/authenticating-users-with-windows-authentication-cs 我正在尝试实施Windows身份验证和授权。 将Localhost上的IIS配置为使用Windows身份验证。这是我的web.config中的相关元素: <authentication mode=\"Windows\">
</authentication>
<authorization>
<deny users=\"?\" />
</authorization>
    [Authorize(Roles = \"MY_DOMAIN\\\\SomeGroup\")]
    public ActionResult Index()
    {
        IList<CampusListviewmodel> campusList = _campusRepository.List(true);
        return View(\"Index\",campusList);
    }
@User.IsInRole(\"MY_DOMAIN\\\\GroupINoLongerBelongTo\")
解决方法

asp.net-mvc – Asp.net MVC / Web Api路由:需要路由一点点不同
routes.MapHttpRoute(
    name: "API Default",routeTemplate: "api/{controller}/{id}",defaults: new { id = RouteParameter.Optional }
);
所以一切都按照我想要的方式工作….我输入api / Products / 15它到达我的产品控制器,传入15作为id.
大.
我还有2个控制器,1个叫做UploadsController,1个叫做DownloadController.这些提供上传和下载(GET / PUT等)
现在我不希望他们被原规则接受(见上文)
但我想要的是使用这两个网址来访问它们
/ API /运输/上传/ 15
/ API /运输/下载/ 15
我已经通过了15作为身份证,可能不会发生在现实生活中…只是它有利于示范:-)
现在运输不存在所以我可以做以下事情
routes.MapHttpRoute(
    name: "API Default",routeTemplate: "api/Transports/{controller}/{id}",defaults: new { id = RouteParameter.Optional }
);
我认为有效…
但问题是,如果我这样做
/ api / Uploads / 15 – 这也会被我不想要的原始规则所捕获..
我希望通过虚假的“传输”访问上传和DOwnloads控制器,而不是没有传输
有人可以帮忙吗?
提前致谢
解决方法
// matches /api/transports/downloads/id or /api/transports/uploads/id only
// and no other possible controller
routes.MapHttpRoute(
    name: "API Transport",routeTemplate: "api/transports/{controller}/{id}",defaults: new { id = RouteParameter.Optional },constraints: new { controller = "uploads|downloads" }
);

// matches anything in the form /api/{controller}/id where {controller}
// Could be anythnig different than "downloads" or "uploads" because we don't
// want to allow the following urls: /api/downloads/id and /api/uploads/id
routes.MapHttpRoute(
    name: "API Default",constraints: new { controller = @"^((?!(downloads|uploads)).)*$" }
);
关于asp.net-mvc – 基于MVC角色的路由和asp.net mvc路由机制的介绍已经告一段落,感谢您的耐心阅读,如果想了解更多关于ASP.NET MVC 基于角色的权限控制系统的示例教程、ASP.NET MVC教程五:ASP.NET MVC中的路由、asp.net mvc角色授权不起作用、asp.net-mvc – Asp.net MVC / Web Api路由:需要路由一点点不同的相关信息,请在本站寻找。
本文标签:


![[转帖]Ubuntu 安装 Wine方法(ubuntu如何安装wine)](https://www.gvkun.com/zb_users/cache/thumbs/4c83df0e2303284d68480d1b1378581d-180-120-1.jpg)

