针对在Elasticsearch中将字符串的默认映射更改为“未分析”和elasticsearch映射类型这两个问题,本篇文章进行了详细的解答,同时本文还将给你拓展DebeziumPostgres和El
针对在Elasticsearch中将字符串的默认映射更改为“未分析”和elasticsearch映射类型这两个问题,本篇文章进行了详细的解答,同时本文还将给你拓展Debezium Postgres和ElasticSearch-在ElasticSearch中存储复杂对象、Elasticsearch-将字段从not_analyzed更改为分析、Elasticsearch中的默认索引分析器、ElasticSearch源码之——Netty在Elasticsearch中的应用等相关知识,希望可以帮助到你。
本文目录一览:- 在Elasticsearch中将字符串的默认映射更改为“未分析”(elasticsearch映射类型)
- Debezium Postgres和ElasticSearch-在ElasticSearch中存储复杂对象
- Elasticsearch-将字段从not_analyzed更改为分析
- Elasticsearch中的默认索引分析器
- ElasticSearch源码之——Netty在Elasticsearch中的应用
")
在Elasticsearch中将字符串的默认映射更改为“未分析”(elasticsearch映射类型)
在我的系统中,数据插入始终是通过logstash通过csv文件完成的。我从未预定义映射。但每当我输入它总是被一个字符串是analyzed,其结果就像一个条目helloI amSinha被分为hello,I,am,Sinha。无论如何,我是否可以更改elasticsearch的默认/动态映射,以便所有字符串(无论索引如何,无论类型如何)都被视为notanalyzed?还是有一种在.conf文件中设置它的方法?说我的conf档案看起来像
input { file { path => "/home/sagnik/work/logstash-1.4.2/bin/promosms_dec15.csv" type => "promosms_dec15" start_position => "beginning" sincedb_path => "/dev/null" }}filter { csv { columns => ["Comm_Plan","Queue_Booking","Order_Reference","Multi_Ordertype"] separator => "," } ruby { code => "event[''Generation_Date''] = Date.parse(event[''Generation_Date'']);" }}output { elasticsearch { action => "index" host => "localhost" index => "promosms-%{+dd.MM.YYYY}" workers => 1 }}我希望所有的字符串都是这样not analyzed,我也不介意将其作为所有将来的数据插入elasticsearch的默认设置
答案1
小编典典您可以查询.raw字段的版本。这是在Logstash
1.3.1中添加的:
我们提供的logstash索引模板会为您索引的每个字段添加一个“ .raw”字段。Logstash将这些“ .raw”字段设置为“
not_analyzed”,因此不会进行任何分析或标记化-我们的原始值保持不变!
因此,如果您的字段称为foo,则会查询foo.raw返回not_analyzed(未在定界符上拆分)版本。

Debezium Postgres和ElasticSearch-在ElasticSearch中存储复杂对象
您需要使用发件箱模式,请参见https://debezium.io/documentation/reference/1.2/configuration/outbox-event-router.html
或者您可以使用聚合对象,请参见 https://github.com/debezium/debezium-examples/tree/master/jpa-aggregations https://github.com/debezium/debezium-examples/tree/master/kstreams-fk-join

Elasticsearch-将字段从not_analyzed更改为分析
是否可以将现有字段的属性从修改not_analyzed为analyzed?
如果没有,我该怎么办才能将我所有的文件保存起来?
我无法删除映射(因为所有文档都将消失),并且需要该旧字段进行分析。
答案1
小编典典不能修改现有字段,但是,您可以创建其他字段或子字段添加到您的not_analyzed领域。
我要使用后一种解决方案。因此,首先,将一个新的子字段添加到您现有的字段中,如下所示:
curl -XPUT localhost:9200/index/_mapping/type -d ''{ "properties": { "your_field": { "type": "string", "index": "not_analyzed", "fields": { "sub": { "type": "string" } } } }}''上面,我们已经添加了子场称为your_field.sub(被分析)现有的your_field(这是not_analyzed)
接下来,我们需要填充该新子字段。如果您运行的是最新的ES 2.3,则可以使用功能强大的Reindex
API
curl -XPUT localhost:9200/_reindex -d ''{ "source": { "index": "index" }, "dest": { "index": "index" }, "script": { "inline": "ctx._source.your_field = ctx._source.your_field" }}''否则,您可以简单地使用以下Logstash配置,该配置将为您的数据重新索引以便填充新的子字段
input { elasticsearch { hosts => "localhost:9200" index => "index" docinfo => true }}filter { mutate { remove_field => [ "@version", "@timestamp" ] }}output { elasticsearch { hosts => ["localhost:9200"] manage_template => false index => "%{[@metadata][_index]}" document_type => "%{[@metadata][_type]}" document_id => "%{[@metadata][_id]}" }}
Elasticsearch中的默认索引分析器
我在Elasticsearch上遇到问题,我不希望对索引项进行分析。但是elasticsearch有一些默认设置,可以在空间上标记它。因此,我的方面查询未返回我想要的结果。
我读到"index" :
"not_analyzed"索引类型的属性应该工作。但是问题是我事先不知道我的文档结构。我会在不知道表结构的情况下将随机MySQL数据库索引到elasticsearch。
我如何设置elasticsearch,使其默认情况下会"index" : "not_analyzed"一直使用,除非另有要求。谢谢
PS:如果我可以直接使用任何API,我会使用Java。

ElasticSearch源码之——Netty在Elasticsearch中的应用
Elasticsearch作为分布式集群,客户端到服务端,节点与节点间通信有TCP和Http通信协议,底层实现为Netty框架。不了解Netty的同学先了解Netty基本原理及使用https://www.cnblogs.com/zhxdxf/articles/10340791.html。
1.关于启动
HTTP请求仅提供服务端响应,节点启动时启动HTTP服务端,TCP请求时ES的节点即作为服务端,又作为客户端,需要启动Transport的服务端、客户端服务。节点启动请参考ElasticSearch源码之启动类
injector.getInstance(HttpServerTransport.class).start();//提供HttpServerTransport服务的启动

最终调用Netty4HttpServerTransport中的doStart()方法
serverBootstrap = new ServerBootstrap();//即Netty的服务端启动方式serverBootstrap.childHandler(configureServerChannelHandler());//添加服务端接消息的处理类
this.requestHandler = new Netty4HttpRequestHandler(transport, detailedErrorsEnabled, threadContext);ch.pipeline().addLast("handler", requestHandler);

protected void doStart() {
        boolean success = false;
        try {
            this.serverOpenChannels = new Netty4OpenChannelsHandler(logger);

            serverBootstrap = new ServerBootstrap();
            if (blockingServer) {
                serverBootstrap.group(new OioEventLoopGroup(workerCount, daemonThreadFactory(settings,
                    HTTP_SERVER_WORKER_THREAD_NAME_PREFIX)));
                serverBootstrap.channel(OioServerSocketChannel.class);
            } else {
                serverBootstrap.group(new NioEventLoopGroup(workerCount, daemonThreadFactory(settings,
                    HTTP_SERVER_WORKER_THREAD_NAME_PREFIX)));
                serverBootstrap.channel(NioServerSocketChannel.class);
            }

            serverBootstrap.childHandler(configureServerChannelHandler());

            serverBootstrap.childOption(ChannelOption.TCP_NODELAY, SETTING_HTTP_TCP_NO_DELAY.get(settings));
            serverBootstrap.childOption(ChannelOption.SO_KEEPALIVE, SETTING_HTTP_TCP_KEEP_ALIVE.get(settings));

            final ByteSizeValue tcpSendBufferSize = SETTING_HTTP_TCP_SEND_BUFFER_SIZE.get(settings);
            if (tcpSendBufferSize.getBytes() > 0) {
                serverBootstrap.childOption(ChannelOption.SO_SNDBUF, Math.toIntExact(tcpSendBufferSize.getBytes()));
            }

            final ByteSizeValue tcpReceiveBufferSize = SETTING_HTTP_TCP_RECEIVE_BUFFER_SIZE.get(settings);
            if (tcpReceiveBufferSize.getBytes() > 0) {
                serverBootstrap.childOption(ChannelOption.SO_RCVBUF, Math.toIntExact(tcpReceiveBufferSize.getBytes()));
            }

            serverBootstrap.option(ChannelOption.RCVBUF_ALLOCATOR, recvByteBufAllocator);
            serverBootstrap.childOption(ChannelOption.RCVBUF_ALLOCATOR, recvByteBufAllocator);

            final boolean reuseAddress = SETTING_HTTP_TCP_REUSE_ADDRESS.get(settings);
            serverBootstrap.option(ChannelOption.SO_REUSEADDR, reuseAddress);
            serverBootstrap.childOption(ChannelOption.SO_REUSEADDR, reuseAddress);

            this.boundAddress = createBoundHttpAddress();
            if (logger.isInfoEnabled()) {
                logger.info("{}", boundAddress);
            }
            success = true;
        } finally {
            if (success == false) {
                doStop(); // otherwise we leak threads since we never moved to started
            }
        }
}TransportService transportService = injector.getInstance(TransportService.class);//提供Transport服务的启动transportService.start();
最终调用Netty4Transport中的doStart()方法
bootstrap = createBootstrap();//客户端启动
bootstrap.handler(getClientChannelInitializer());//添加客户端消息处理类ch.pipeline().addLast("dispatcher", new Netty4MessageChannelHandler(Netty4Transport.this, ".client"));createServerBootstrap(entry.getKey(), settings);//服务端启动
serverBootstrap.childHandler(getServerChannelInitializer(name, settings));//添加服务端消息处理类ch.pipeline().addLast("dispatcher", new Netty4MessageChannelHandler(Netty4Transport.this, name));

    @Override
    protected void doStart() {
        boolean success = false;
        try {
            bootstrap = createBootstrap();
            if (NetworkService.NETWORK_SERVER.get(settings)) {
                final Netty4OpenChannelsHandler openChannels = new Netty4OpenChannelsHandler(logger);
                this.serverOpenChannels = openChannels;
                // loop through all profiles and start them up, special handling for default one
                for (Map.Entry<String, Settings> entry : buildProfileSettings().entrySet()) {
                    // merge fallback settings with default settings with profile settings so we have complete settings with default values
                    final Settings settings = Settings.builder()
                        .put(createFallbackSettings())
                        .put(entry.getValue()).build();
                    createServerBootstrap(entry.getKey(), settings);
                    bindServer(entry.getKey(), settings);
                }
            }
            super.doStart();
            success = true;
        } finally {
            if (success == false) {
                doStop();
            }
        }
    }
当客户端发送消息时,建立连接。(调用过程见下一小节)


    @Override
    public void connectToNode(DiscoveryNode node, ConnectionProfile connectionProfile,
                              CheckedBiConsumer<Connection, ConnectionProfile, IOException> connectionValidator)
        throws ConnectTransportException {
        connectionProfile = resolveConnectionProfile(connectionProfile, defaultConnectionProfile);
        if (node == null) {
            throw new ConnectTransportException(null, "can''t connect to a null node");
        }
        globalLock.readLock().lock(); // ensure we don''t open connections while we are closing
        try {
            ensureOpen();
            try (Releasable ignored = connectionLock.acquire(node.getId())) {
                NodeChannels nodeChannels = connectedNodes.get(node);
                if (nodeChannels != null) {
                    return;
                }
                boolean success = false;
                try {
                    nodeChannels = openConnection(node, connectionProfile);
                    connectionValidator.accept(nodeChannels, connectionProfile);
                    // we acquire a connection lock, so no way there is an existing connection
                    connectedNodes.put(node, nodeChannels);
                    if (logger.isDebugEnabled()) {
                        logger.debug("connected to node [{}]", node);
                    }
                    transportServiceAdapter.onNodeConnected(node);
                    success = true;
                } catch (ConnectTransportException e) {
                    throw e;
                } catch (Exception e) {
                    throw new ConnectTransportException(node, "general node connection failure", e);
                } finally {
                    if (success == false) { // close the connection if there is a failure
                        logger.trace(
                            (Supplier<?>) () -> new ParameterizedMessage(
                                "failed to connect to [{}], cleaning dangling connections", node));
                        IOUtils.closeWhileHandlingException(nodeChannels);
                    }
                }
            }
        } finally {
            globalLock.readLock().unlock();
        }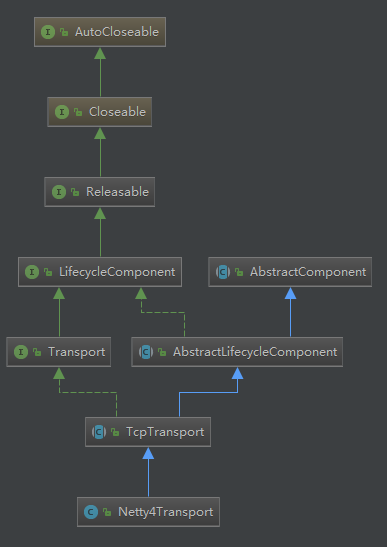
}Netty4HttpServerTransport类图 Netty4ServerTransport类图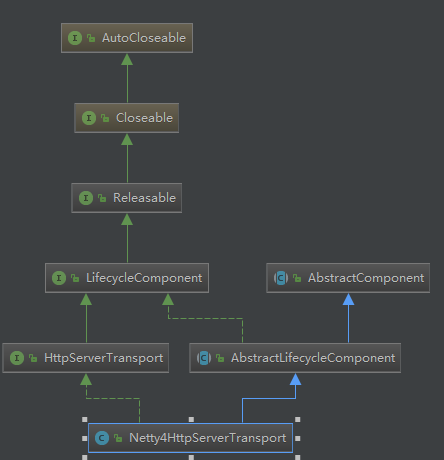
2.客户端发送请求
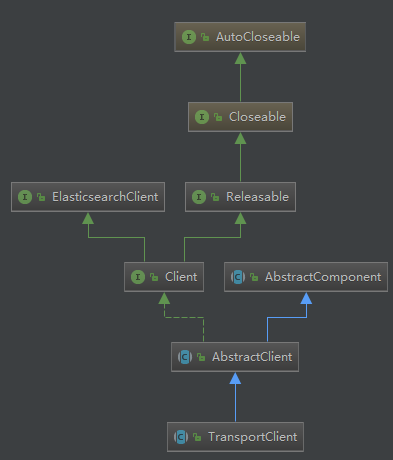
客户端类图
发送请求后,执行客户端的execute()方法到doExecute()方法
    @Override
    protected <Request extends ActionRequest, Response extends ActionResponse, RequestBuilder extends ActionRequestBuilder<Request, Response, RequestBuilder>> void doExecute(Action<Request, Response, RequestBuilder> action, Request request, ActionListener<Response> listener) {
        proxy.execute(action, request, listener);
    }
final TransportActionNodeProxy<Request, Response> proxy = proxies.get(action);//根据action类型不同,生产执行不同的execute方法
nodesService.execute((n, l) -> proxy.execute(n, request, l), listener);transportService.sendRequest(node, action.name(), request, transportOptions,
new ActionListenerResponseHandler<>(listener, action::newResponse));
}Transport.Connection connection = getConnection(node);//节点连接
sendRequest(connection, action, request, options, handler);//发送请求connection.sendRequest(requestId, action, request, options);通过channel发送请求
Channel channel = channel(options.type());
sendRequestToChannel(this.node, channel, requestId, action, request, options, getVersion(), (byte)0);最终执行Netty4Transport的sendMessage方法将请求发送至channel@Override
protected void sendMessage(Channel channel, BytesReference reference, Runnable sendListener) {
final ChannelFuture future = channel.writeAndFlush(Netty4Utils.toByteBuf(reference));
future.addListener(f -> sendListener.run());
}3.服务端处理请求
服务端通过Netty4HttpRequestHandler的channelRead得到客户端请求,通过MessageReceived接受并处理请求
transport.messageReceived(reference, ctx.channel(), profileName, remoteAddress, remainingMessageSize);final RequestHandlerRegistry reg = transportServiceAdapter.getRequestHandler(action);//根据action类型,生产具体的TransportRequest子类final TransportRequest request = reg.newRequest();threadPool.executor(reg.getExecutor()).execute(new RequestHandler(reg, request, transportChannel)); @Override
protected void doRun() throws Exception {
reg.processMessageReceived(request, transportChannel);//
}
handler.messageReceived(request, channel);//TransportRequestHandler中的messageReceived方法最终调用TransportHandler中的messageReceived方法
public final void messageReceived(final Request request, final TransportChannel channel, Task task) throws Exception {
// We already got the task created on the network layer - no need to create it again on the transport layer
execute(task, request, new ActionListener<Response>() {//执行具体的请求处理
@Override
public void onResponse(Response response) {
try {
channel.sendResponse(response);
} catch (Exception e) {
onFailure(e);
}
}
.......4.示例bulk请求API
transportClient.bulk(bulkRequest);
依次执行:
public ActionFuture<BulkResponse> bulk(final BulkRequest request) {
return execute(BulkAction.INSTANCE, request);
}final TransportActionNodeProxy<Request, Response> proxy = proxies.get(action);//proxy则根据不同的action,生成不同的TransportActionNodeProxynodesService.execute((n, l) -> proxy.execute(n, request, l), listener);//nodesService为TransportClientNodesService实例public <Response> void execute(NodeListenerCallback<Response> callback, ActionListener<Response> listener) {
// we first read nodes before checking the closed state; this
// is because otherwise we could be subject to a race where we
// read the state as not being closed, and then the client is
// closed and the nodes list is cleared, and then a
// NoNodeAvailableException is thrown
// it is important that the order of first setting the state of
// closed and then clearing the list of nodes is maintained in
// the close method
final List<DiscoveryNode> nodes = this.nodes;
if (closed) {
throw new IllegalStateException("transport client is closed");
}
ensureNodesAreAvailable(nodes);
int index = getNodeNumber();
RetryListener<Response> retryListener = new RetryListener<>(callback, listener, nodes, index, hostFailureListener);
DiscoveryNode node = retryListener.getNode(0);
try {
callback.doWithNode(node, retryListener);
} catch (Exception e) {
try {
//this exception can''t come from the TransportService as it doesn''t throw exception at all
listener.onFailure(e);
} finally {
retryListener.maybeNodeFailed(node, e);
}
}
}final DiscoveryNode getNode(int i) {
return nodes.get((index + i) % nodes.size());
}public void execute(final DiscoveryNode node, final Request request, final ActionListener<Response> listener) {
ActionRequestValidationException validationException = request.validate();
if (validationException != null) {
listener.onFailure(validationException);
return;
}
transportService.sendRequest(node, action.name(), request, transportOptions,
new ActionListenerResponseHandler<>(listener, action::newResponse));//根据请求类型调用sendRequest方法
}public final <T extends TransportResponse> void sendRequest(final DiscoveryNode node, final String action,
final TransportRequest request,
final TransportRequestOptions options,
TransportResponseHandler<T> handler) {
try {
Transport.Connection connection = getConnection(node);//连接节点
sendRequest(connection, action, request, options, handler);//处理请求
} catch (NodeNotConnectedException ex) {
// the caller might not handle this so we invoke the handler
handler.handleException(ex);
}
}
        @Override
        public void sendRequest(long requestId, String action, TransportRequest request, TransportRequestOptions options)
            throws IOException, TransportException {
            if (closed.get()) {
                throw new NodeNotConnectedException(node, "connection already closed");
            }
            Channel channel = channel(options.type());//根据不同的请求类型,添加不同的过滤器
            sendRequestToChannel(this.node, channel, requestId, action, request, options, getVersion(), (byte)0);
        }
    }
private boolean internalSendMessage(Channel targetChannel, BytesReference message, Runnable onRequestSent) throws IOException {
boolean success;
try {
sendMessage(targetChannel, message, onRequestSent);//终极调用Netty4Transport的sendMessage方法
success = true;
} catch (IOException ex) {
// passing exception handling to deal with this and raise disconnect events and decide the right logging level
onException(targetChannel, ex);
success = false;
}
return success;
} @Override
protected void sendMessage(Channel channel, BytesReference reference, Runnable sendListener) {
final ChannelFuture future = channel.writeAndFlush(Netty4Utils.toByteBuf(reference));//向服务端发送消息
future.addListener(f -> sendListener.run());
关于在Elasticsearch中将字符串的默认映射更改为“未分析”和elasticsearch映射类型的问题我们已经讲解完毕,感谢您的阅读,如果还想了解更多关于Debezium Postgres和ElasticSearch-在ElasticSearch中存储复杂对象、Elasticsearch-将字段从not_analyzed更改为分析、Elasticsearch中的默认索引分析器、ElasticSearch源码之——Netty在Elasticsearch中的应用等相关内容,可以在本站寻找。
本文标签:


![[转帖]Ubuntu 安装 Wine方法(ubuntu如何安装wine)](https://www.gvkun.com/zb_users/cache/thumbs/4c83df0e2303284d68480d1b1378581d-180-120-1.jpg)

