本文将分享如何使用NSNotificationCenter传递对象的详细内容,并且还将对intent传递对象进行详尽解释,此外,我们还将为大家带来关于AppDelegate中调用UNUserNotif
本文将分享如何使用NSNotificationCenter传递对象的详细内容,并且还将对intent 传递对象进行详尽解释,此外,我们还将为大家带来关于AppDelegate 中调用UNUserNotificationCenter *center = [UNUserNotificationCenter currentNotificationCe...、iOS NSNotificationCenter 使用姿势详解、iOS NSNotificationCenter通知中心使用小结、ios NSNotificationCenter通知的简单使用的相关知识,希望对你有所帮助。
本文目录一览:- 如何使用NSNotificationCenter传递对象(intent 传递对象)
- AppDelegate 中调用UNUserNotificationCenter *center = [UNUserNotificationCenter currentNotificationCe...
- iOS NSNotificationCenter 使用姿势详解
- iOS NSNotificationCenter通知中心使用小结
- ios NSNotificationCenter通知的简单使用
")
如何使用NSNotificationCenter传递对象(intent 传递对象)
我试图将对象从我的应用程序委托传递到另一个类的通知接收器。
我想传递整数messageTotal。现在我有:
在接收器中:
- (void) receiveTestNotification:(NSNotification *) notification{ if ([[notification name] isEqualToString:@"TestNotification"]) NSLog (@"Successfully received the test notification!");}- (void)viewDidLoad { [super viewDidLoad]; [[NSNotificationCenter defaultCenter] addObserver:self selector:@selector(dismissSheet) name:UIApplicationWillResignActiveNotification object:nil]; [[NSNotificationCenter defaultCenter] addObserver:self selector:@selector(receiveTestNotification:) name:@"eRXReceived" object:nil];在执行通知的类中:
[UIApplication sharedApplication].applicationIconBadgeNumber = messageTotal;[[NSNotificationCenter defaultCenter] postNotificationName:@"eRXReceived" object:self];但是我想将对象传递messageTotal给另一个类。
答案1
小编典典您必须使用“ userInfo”变体,并传递一个包含messageTotal整数的NSDictionary对象:
NSDictionary* userInfo = @{@"total": @(messageTotal)};NSNotificationCenter* nc = [NSNotificationCenter defaultCenter];[nc postNotificationName:@"eRXReceived" object:self userInfo:userInfo];在接收端,您可以按以下方式访问userInfo字典:
-(void) receiveTestNotification:(NSNotification*)notification{ if ([notification.name isEqualToString:@"TestNotification"]) { NSDictionary* userInfo = notification.userInfo; NSNumber* total = (NSNumber*)userInfo[@"total"]; NSLog (@"Successfully received test notification! %i", total.intValue); }}
AppDelegate 中调用UNUserNotificationCenter *center = [UNUserNotificationCenter currentNotificationCe...
2019年2月27日:
修复bug:

查找资料:
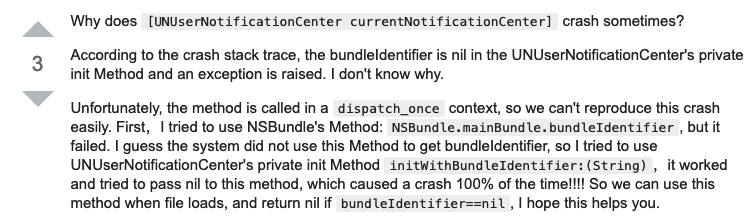
解决方式:添加分类,对系统方法替换,做非空校验
#import "UNUserNotificationCenter+Hack.h"
#import <objc/runtime.h>
@implementation UNUserNotificationCenter (Hack)
+ (void)load {
static dispatch_once_t _onceToken;
dispatch_once(&_onceToken, ^{
[self safeHook];
});
}
+ (void)safeHook {
/*hook UNUserNotificationCenter''s systemMethod - (id)initWithBundleProxy:(id)arg1;*/
NSString * orig_initWithBundleProxyName = @"initWithBundleProxy:";
SEL orig_initWithBundleSelector = NSSelectorFromString(orig_initWithBundleProxyName);
if (![self instancesRespondToSelector:orig_initWithBundleSelector]) {
return;
}
SEL alt_initWithBundleSelector = @selector(hk_initWithBundleProxy:);
Method origMethod = class_getInstanceMethod(self, orig_initWithBundleSelector);
Method altMethod = class_getInstanceMethod(self, @selector(hk_initWithBundleProxy:));
class_addMethod(self,
orig_initWithBundleSelector,
class_getMethodImplementation(self, orig_initWithBundleSelector),
method_getTypeEncoding(origMethod));
class_addMethod(self,
alt_initWithBundleSelector,
class_getMethodImplementation(self, alt_initWithBundleSelector),
method_getTypeEncoding(altMethod));
method_exchangeImplementations(origMethod, altMethod);
}
- (instancetype)hk_initWithBundleProxy:(id)arg1 {
if (nil==arg1||NSNull.null==arg1) return nil;
// return [self hk_initWithBundleProxy:nil]; //crash
return [self hk_initWithBundleProxy:arg1];
}
@end

iOS NSNotificationCenter 使用姿势详解
最近在做平板的过程中,发现了一些很不规范的代码。偶然修复支付bug的时候,看到其他项目代码,使用通知的地方没有移除,我以为我这个模块的支付闪退是因为他通知没有移除的缘故。而在debug和看了具体的代码的时候才发现和这里没有关系。在我印象中,曾经因为没有移除通知而遇到闪退的问题。所以让我很意外,于是写了个demo研究了下,同时来讲下NSNotificationCenter使用的正确姿势。
NSNotificationCenter
对于这个没必要多说,就是一个消息通知机制,类似广播。观察者只需要向消息中心注册感兴趣的东西,当有地方发出这个消息的时候,通知中心会发送给注册这个消息的对象。这样也起到了多个对象之间解耦的作用。苹果给我们封装了这个NSNotificationCenter,让我们可以很方便的进行通知的注册和移除。然而,有些人的姿势还是有点小问题的,下面就看看正确的姿势吧!
正确姿势之remove
只要往NSNotificationCenter注册了,就必须有remove的存在,这点是大家共识的。但是大家在使用的时候发现,在UIViewController 中addObserver后没有移除,好像也没有挂!我想很多人可能和我有一样的疑问,是不是因为使用了ARC?在你对象销毁的时候自动置为nil了呢?或者苹果在实现这个类的时候用了什么神奇的方式呢?下面我们就一步步来探究下。
首先,向NSNotificationCenter中addObserver后,并没有对这个对象进行引用计数加1操作,所以它只是保存了地址。为了验证这个操作,我们来做下代码的测试。
一个测试类,用来注册通知:
@implementation MRCObject
- (id)init
{
if (self = [super init]) {
[[NSNotificationCenter defaultCenter] addObserver:self selector:@selector(test) name:@"test" object:nil];
}
return self;
}
- (void)test
{
NSLog(@"=================");
}
- (void)dealloc
{
[super dealloc];
}
@end
这个类很简单,就是在初始化的时候,给他注册一个通知。但是在销毁的时候不进行remove操作。我们在VC中创建这个对象后,然后销毁,最后发送这个通知:
- (void)viewDidLoad {
[super viewDidLoad];
MRCObject *obj = [[MRCObject alloc] init];
[obj release];
[[NSNotificationCenter defaultCenter] postNotificationName:@"test" object:nil];
}
在进入这个vc后,我们发现挂了。。而打印出的信息是:
2015-01-19 22:49:06.655 测试[1158:286268] *** -[MRCObject test]: message sent to deallocated instance 0x17000e5b0
我们可以发现,向野指针对象发送了消息,所以挂掉了。从这点来看,苹果实现也基本差不多是这样的,只保存了个对象的地址,并没有在销毁的时候置为nil。
这点就可以证明,addObserver后,必须要有remove操作。
现在我们在UIViewController中注册通知,不移除,看看会不会挂掉。
- (void)viewDidLoad {
[super viewDidLoad];
[[NSNotificationCenter defaultCenter] addObserver:self selector:@selector(test) name:@"test" object:nil];
}
首先用navigationController进入到这个页面,然后pop出去。最后点击发送通知的按钮事件:
- (void)didButtonClicked:(id)sender
{
[[NSNotificationCenter defaultCenter] postNotificationName:@"test" object:nil];
}
无论你怎么点击这个按钮,他就是不挂!这下,是不是很郁闷了?我们可以找找看,你代码里面没有remove操作,但是NSNotificationCenter那边已经移除了,不然肯定会出现上面野指针的问题。看来看去,也只能说明是UIViewController自己销毁的时候帮我们暗地里移除了。
那我们如何证明呢?由于我们看不到源码,所以也不知道有没有调用。这个时候,我们可以从这个通知中心下手!!!怎么下手呢?我只要证明UIViewController在销毁的时候调用了remove方法,就可以证明我们的猜想是对的了!这个时候,就需要用到我们强大的类别这个特性了。我们为NSNotificationCenter添加个类别,重写他的- (void)removeObserver:(id)observer方法:
- (void)removeObserver:(id)observer
{
NSLog(@"====%@ remove===", [observer class]);
}
这样在我们VC中导入这个类别,然后pop出来,看看发生了什么!
怎么样?是不是可以证明系统的UIViewController在销毁的时候调用了这个方法。(不建议大家在开发的时候用类别的方式覆盖原有的方法,由于类别方法具有更高的优先权,所以有可能影响到其他地方。这里只是调试用)。
以上也提醒我们,在你不是销毁的时候,千万不要直接调用[[NSNotificationCenter defaultCenter] removeObserver:self]; 这个方法,因为你有可能移除了系统注册的通知。
正确姿势之注意重复addObserver
在我们开发中,我们经常可以看到这样的代码:
- (void)viewWillAppear:(BOOL)animated
{
[super viewWillAppear:animated];
[[NSNotificationCenter defaultCenter] addObserver:self selector:@selector(test) name:@"test" object:nil];
}
- (void)viewWillDisappear:(BOOL)animated
{
[super viewWillDisappear:animated];
[[NSNotificationCenter defaultCenter] removeObserver:self name:@"test" object:nil];
}
就是在页面出现的时候注册通知,页面消失时移除通知。你这边可要注意了,一定要成双成对出现,如果你只在viewWillAppear 中 addObserver没有在viewWillDisappear 中 removeObserver那么当消息发生的时候,你的方法会被调用多次,这点必须牢记在心。
正确姿势之多线程通知
首先看下苹果的官方说明:
Regular notification centers deliver notifications on the thread in which the notification was posted. Distributed notification centers deliver notifications on the main thread. At times, you may require notifications to be delivered on a particular thread that is determined by you instead of the notification center. For example, if an object running in a background thread is listening for notifications from the user interface, such as a window closing, you would like to receive the notifications in the background thread instead of the main thread. In these cases, you must capture the notifications as they are delivered on the default thread and redirect them to the appropriate thread.
意思很简单,NSNotificationCenter消息的接受线程是基于发送消息的线程的。也就是同步的,因此,有时候,你发送的消息可能不在主线程,而大家都知道操作UI必须在主线程,不然会出现不响应的情况。所以,在你收到消息通知的时候,注意选择你要执行的线程。下面看个示例代码
//接受消息通知的回调
- (void)test
{
if ([[NSThread currentThread] isMainThread]) {
NSLog(@"main");
} else {
NSLog(@"not main");
}
dispatch_async(dispatch_get_main_queue(), ^{
//do your UI
});
}
//发送消息的线程
- (void)sendNotification
{
dispatch_queue_t defaultQueue = dispatch_get_global_queue(DISPATCH_QUEUE_PRIORITY_DEFAULT, 0);
dispatch_async(defaultQueue, ^{
[[NSNotificationCenter defaultCenter] postNotificationName:@"test" object:nil];
});
}
总结
通知平常使用的知识点差不多就这么多。希望对大家有帮助。最后,代码一定要养成良好的习惯,该移除的还是要移除。

iOS NSNotificationCenter通知中心使用小结
前言
最近公司组织两个星期的新人培训,事情安排的满满的,周末都没有。说好的一个星期一更新的博客中断了,让大家久等了,现在培训结束,终于又可以安安静静的做一个程序员了,好开心。。。
一、NSNotification和Delegate的联系和区别
众所周知,IOS中经常会使用到NSNotification和delegate来进行一些类之间的消息传递。言归正传,这两种有什么区别呢?
NSNotification就是IOS提供的一个消息中心,由一个全局的defaultNotification管理应用中的消息机制。通过公开的API可以看出,这里面使用了是一个观察者,通过注册addObserver和解除注册removeObserver来实现消息传递。苹果文档特别提出,在类析构的时候,要记得把removeObserver,不然就会引发崩溃,所以NSNotifcation的使用是没有retain+1的,NSNotification是一对多的。
至于Delegate,很简单,就是通过增加一个指针,然后把需要调用的函数通过delegate传递到其他类中,来得很直截了当。不需要通过广播的形式去实现,但是,delegate的形式只能是一对一,不能实现一对多。
在什么情况下使用Delegate和NSNotifiation呢?
从效率上看Delegate是一个很轻量级的,相对delegate,NSNotification却是一个很重量级的,效率上delegate明显要比Noticication高。一般情况我们会这样使用。
场景一:
A拥有B,然后B中的一些操作需要回调到A中,这时候就简单的通过delegate回调到A。因为B是A创建的,B可以很直接的把delegate赋值A。
场景二:
A和B是两个不相干的关系,A不知道B,B也不知道A,那么这时候如果通过delegate就没办法做到,会相对复杂。所以可以通过NSNotifcation去做一些消息传递。
所以使用delegate的情况是两者有直接的关系,至于一方知道另一方的存在。而NSNotifcation一般是大家不知道对方的存在,一般是使用跨模块的时候使用。在使用的时候,使用delegate可能需要多写一些delegate去实现,代码量比较多。NSNotication只要定义相关的NotificationName就可以很方便的沟通。两者各有所长。
二、监听系统自带的NSNotification
系统里定义了许多的 XxxNotification 名称,其实只要 Cmd+Shift+O 打开 Open Quickly,输入 NSNotification 或者 UINotification 可以看到许多以 Notification 结尾的变量定义,由变量名称也能理解在什么时候会激发什么事件,一般都是向 [NSNotificationCenter defaultCenter] 通知的。

使用步骤
第一步:注册系统监听事件
 //在NSNotificationCenter中注册键盘弹出事件
  [[NSNotificationCenter defaultCenter] addObserver:self selector:@selector(keyboardUpEvent:) name:UIKeyboardDidShowNotification object:nil];
  //在NSNotificationCenter中注册键盘隐藏事件
  [[NSNotificationCenter defaultCenter] addObserver:self selector:@selector(keyboardDownEvent:) name:UIKeyboardDidHideNotification object:nil];
  //在NSNotificationCenter中注册程序从后台唤醒事件
  [[NSNotificationCenter defaultCenter] addObserver:self selector:@selector(becomeActive:) name:UIApplicationDidBecomeActiveNotification object:nil];
第二步:事件触发后的处理
/**
 * 弹出键盘事件触发处理
 *
 * @param notification
 */
-(void)keyboardUpEvent : (NSNotification *)notification{
  //NSLog(@"键盘弹出事件触发==%@",notification);
  NSLog(@"键盘弹出事件触发");
}

/**
 * 键盘隐藏事件触发处理
 *
 * @param notification
 */
-(void)keyboardDownEvent : (NSNotification *)notification{
  //NSLog(@"键盘隐藏事件触发==%@",notification);
  NSLog(@"键盘隐藏事件触发");
}

/**
 * 程序从后台唤醒触发处理
 *
 * @param notification
 */
-(void)becomeActive: (NSNotification *)notification{
  NSLog(@"程序从后台唤醒触发处理");
}
第三步、在dealloc中解除监听
/**
 *NSNotificationCenter 注意点:每一次在接受者对象中需要delleac把它销毁掉。
 */
-(void)dealloc{
  [[NSNotificationCenter defaultCenter] removeObserver:self];
}
三、自定义NSNotification
这里我使用的一个实例为:在ViewController中定义一个按钮,点击该按钮,同时改变两个自定义View中的内容。
使用步骤
第一步、在ViewController中生成一个按钮,两个自定义View
 UIButton *postMsgBtn = [[UIButton alloc] initWithFrame:CGRectMake(50, 200, 100, 40)];
  [postMsgBtn setTitle:@"发送消息" forState:UIControlStateNormal];
  postMsgBtn.backgroundColor = [UIColor grayColor];
  [postMsgBtn addTarget:self action:@selector(postMsg:) forControlEvents:UIControlEventTouchUpInside];
  [self.view addSubview:postMsgBtn];

  MyView *view = [[MyView alloc] initWithFrame:CGRectMake(50, 250, 100, 50)];
  [self.view addSubview:view];

  MyView *view2 = [[MyView alloc] initWithFrame:CGRectMake(50, 320, 100, 50)];
  [self.view addSubview:view2];
第二步、点击按钮,发送Notification
-(void)postMsg: (UIButton *)btn{
  [[NSNotificationCenter defaultCenter] postNotificationName:NOTIFICATION_MESSAGE_NAME object:nil userInfo:@{@"msg":@"jingming1"}];
}
第三步、在自定义View中注册监听事件
第四步、处理监听事件
-(void)acceptMsg : (NSNotification *)notification{
  NSLog(@"%@",notification);
  NSDictionary *userInfo = notification.userInfo;
  _label.text = [userInfo objectForKey:@"msg"];
}
第五步、在dealloc中解除监听
-(void)dealloc{
  [[NSNotificationCenter defaultCenter] removeObserver:self];
}
以上就是本文的全部内容,希望对大家的学习有所帮助,也希望大家多多支持。
- ios NSNotificationCenter通知的简单使用

ios NSNotificationCenter通知的简单使用
通知类本身比较简单,大概就分为注册通知监听器、发送通知,注销通知监听器三个方法;通知中心(NSNotificationCenter)采用单例的模式,整个系统只有一个通知中心,通过如下代码获取:
//获取通知中心
[NSNotificationCenter defaultCenter];
注册通知监听器方法:
//observer为监听器
//aSelector为接到收通知后的处理函数
//aName为监听的通知的名称
//object为接收通知的对象,需要与postNotification的object匹配,否则接收不到通知
- (void)addObserver:(id)observer selector:(SEL)aSelector name:(nullable NSNotificationName)aName object:(nullable id)anObject;
发送通知的方法:
//需要手动构造一个NSNotification对象
- (void)postNotification:(NSNotification *)notification;

//aName为注册的通知名称
//anObject为接受通知的对象,通知不传参时可使用该方法
- (void)postNotificationName:(NSNotificationName)aName object:(nullable id)anObject;

//aUserInfo为将要传递的参数,类型为字典类型
//通知需要传参数时使用下面这个方法,其他同上。
- (void)postNotificationName:(NSNotificationName)aName object:(nullable id)anObject userInfo:(nullable NSDictionary *)aUserInfo;
注销通知监听器方法:
//删除通知的监听器
- (void)removeObserver:(id)observer;
//删除通知的监听器,aName监听的通知的名称,anObject监听的通知的发送对象
- (void)removeObserver:(id)observer name:(nullable NSNotificationName)aName object:(nullable id)anObject;
//以block的方式注册通知监听器
- (id <NSObject>)addObserverForName:(nullable NSNotificationName)name object:(nullable id)obj queue:(nullable NSOperationQueue *)queue usingBlock:(void (^)(NSNotification *note))block API_AVAILABLE(macos(10.6), ios(4.0), watchos(2.0), tvos(9.0));
使用情况:
NSNotificationCenter类一般用于一个对象传递事件给另外一个对象,在另一个对象中触发某些方法,可以实现跨视图的交互。我在最近一个月内用到了两次NSNotificationCenter类。
①在对项目进行国际化时,在切换语言时采用通知的方式,使其他界面进行刷新(需要在主线程内)。
②使用SGPagingView时,需要实现pageContentView中的内容在多选状态时,pageTitleView禁止进行切换的功能。看了SGPagingView提供的方法是没有这个的,所以就采用了NSNotificationCenter。在进入多选状态时发一条通知,在退出多选状态时发一条通知(方法比较简陋,如果有更好的方法请不吝赐教)。
//注册通知监听器
  [NotifyUtil addNotify:NOTIFY_DISABLE_SWITCH Observer:self selector:@selector(disableSwitch) Object:nil];
  [NotifyUtil addNotify:NOTIFY_ALLOW_SWITCH Observer:self selector:@selector(allowSwitch) Object:nil];

//调用方法

//禁止pageTitleView进行切换
-(void)disableSwitch{
  self.pageTitleView.userInteractionEnabled = NO;
}
//允许pageTitleView进行切换
-(void)allowSwitch{
  self.pageTitleView.userInteractionEnabled = YES;
}

//注销通知监听器
- (void) dealloc{
  [NotifyUtil removeNotify:NOTIFY_DISABLE_SWITCH Observer:self];
  [NotifyUtil removeNotify:NOTIFY_ALLOW_SWITCH Observer:self];
}
注:用NotifyUtil对NSNotificationCenter类进行了一个简单的封装,参数基本都一致,就不贴NotifyUtil的代码了。
以上就是本文的全部内容,希望对大家的学习有所帮助,也希望大家多多支持。
- iOS NSNotificationCenter通知中心使用小结
今天关于如何使用NSNotificationCenter传递对象和intent 传递对象的介绍到此结束,谢谢您的阅读,有关AppDelegate 中调用UNUserNotificationCenter *center = [UNUserNotificationCenter currentNotificationCe...、iOS NSNotificationCenter 使用姿势详解、iOS NSNotificationCenter通知中心使用小结、ios NSNotificationCenter通知的简单使用等更多相关知识的信息可以在本站进行查询。
本文标签:


![[转帖]Ubuntu 安装 Wine方法(ubuntu如何安装wine)](https://www.gvkun.com/zb_users/cache/thumbs/4c83df0e2303284d68480d1b1378581d-180-120-1.jpg)

